JavaScript is required to for searching.
Skip Navigation Links
Exit Print View
Sun SPARC Enterprise T5140 and T5240 Servers Topic Set
search filter icon
search icon

Document Information

Preface

Related Documentation

Documentation, Support, and Training

Site Planning

Sun SPARC Enterprise T5140 and T5240 Servers Site Planning Guide

Physical Specifications

Minimum Clearance for Service Access

Environmental Specifications

Power Source Requirements

Acoustic Noise Emissions

Agency Compliance Specifications

Operating Environment Requirements

Installation

Preparing for Installation

Server Overview

Server Handling Precautions

Input Power Information and Precautions

Tools and Equipment Needed

Optional Component Installation

ESD Precautions

Installation Overview

Prepare for Installation

Install the Hardware

Configure the Service Processor

Configure the Host Software

Cabling Notes for Both Servers

Port, Connector, and LED Locations for Both Servers

Slide Rail Assembly Notes for Both Servers

Cable Management Notes for Both Servers

Installing the Sun SPARC Enterprise T5140 and T5240 Servers

Installing the Servers in a Rack

Install the Slide Rail Assemblies

Insert and Lock the Server in the Rack

Installing the Cable Management Arm for Both Servers

Install the Cable Management Arm

Verify the Operation of the Slide Rails and the CMA

Connecting the Server Cables for Both Servers

Connect the Service Processor Serial Management Port

Connect the Service Processor Network Management Port

Connect the Ethernet Network Cables

AC Power Cable Notes

Managing Cables With the CMA

Secure the Server Cables in the CMA

Dismounting the Servers

Powering On the System

Powering On the System for the First Time

Enable the Service Processor Network Management Port

Logging Into the Service Processor

Using the Service Processor for Common Operations

Booting the Solaris Operating System

Verifying System Functionality

Updating the Firmware

flashupdate command

Update the Firmware

Selecting a Boot Device

Boot Device Selection Overview

Select a Boot Device

Installing the Servers With the Express Rail Rackmounting Kit

Slide Rail Assembly Notes for the Express Rail Rackmounting Kit

Install the Slide Rail Assemblies

Insert and Lock the Server in the Rack

Dismounting the Server

Assembling and Installing DC Power Cables for the Sun SPARC Enterprise T5140 Server

Requirements for Servers With DC Input Power

DC Supply and Ground Conductor Requirements

Overcurrent Protection Requirements

Assembling and Installing the DC Input Power Cables

Assembling and Installing DC Power Cables for the Sun SPARC Enterprise T5240 Server

Requirements for Servers With DC Input Power

DC Supply and Ground Conductor Requirements

Overcurrent Protection Requirements

Assembling and Installing the DC Input Power Cables

Administration

Communicating With the System

ILOM Overview

Log In to ILOM

Log In to the System Console

Display the ok Prompt

Display the ILOM ->Prompt

Use a Local Graphics Monitor

Performing Common Tasks

Power On the System

Power Off the System

Reset the System

Update the Firmware

Managing Disks

Hardware RAID Support

Creating Hardware RAID Volumes

Delete a Hardware RAID Volume

Hot-Plug a Mirrored Disk

Hot-Plug a Nonmirrored Disk

Disk Slot Numbers

Managing Devices

Unconfigure a Device Manually

Reconfigure a Device Manually

Devices and Device Identifiers

Sun SPARC Enterprise T5x40 Device Tree

Multipathing Software

Handling Faults

Discovering Faults

Bypassing Minor Faults

Clear a Fault

Managing Logical Domains Software

Logical Domains Software

Logical Domain Configurations

OpenBoot Configuration Variables

OpenBoot Configuration Variables on the SCC

Remote Management (ILOM 3.0)

Understanding ILOM for the Sun SPARC Enterprise T5140 and T5240 Servers

ILOM Overview

Platform-Specific ILOM Features

ILOM Features Not Supported

Managing the Host

Reset the Host

Managing Host Boot Mode

Viewing and Configuring Host Control Information

Managing System User Interactions

Managing the Service Processor

Storing Customer Information

Display Console History (CLI)

Change Console Escape Characters (CLI)

Changing Configuration Policy Settings

Managing Network Access

Managing Devices

Specify Host Behavior With the Virtual Keyswitch

Specify Host Behavior With the Virtual Keyswitch (Web Interface)

Discover IPMI Sensors and Indicators

Sensors on Sun SPARC Enterprise T5140 and T5240 Servers

Indicators on the Sun SPARC Enterprise T5140 and T5240 Servers

Discover ALOM Compatibility Information

ALOM CMT Compatibility Shell

ALOM CMT Variable Comparison

Event Messages Available Through the ALOM Compatibility Shell

Service

Identifying Server Components

Infrastructure Boards in Sun SPARC Enterprise T5140 Servers

Infrastructure Boards in Sun SPARC Enterprise T5240 Servers

Internal System Cables for Sun SPARC Enterprise T5140 Servers

Internal System Cables for Sun SPARC Enterprise T5240 Servers

Front Panel Controls and Indicators on Sun SPARC Enterprise T5140 Servers

Rear Panel Components and Indicators on Sun SPARC Enterprise T5140 Servers

Front Panel Controls and Indicators on Sun SPARC Enterprise T5240 Servers

Rear Panel Components and Indicators on Sun SPARC Enterprise T5240 Servers

Status LEDs for Ethernet Ports and the Network Management Port

Detecting and Managing Faults

Diagnostic Tools Overview

Diagnostics Tools Quick Reference

LED Overview

Detecting Faults With ILOM

Detecting Faults With POST

Managing Faults Using the PSH Feature

Viewing Solaris OS Messages

Managing Components With Automatic System Recovery Commands

Detecting Faults Using SunVTS Software

Preparing to Service the System

General Safety Information

Essential Tools

Find the Chassis Serial Number

Removing Power From the System

Positioning the System for Servicing

Accessing Internal Components

Servicing Hard Drives

Hard Drive Servicing Overview

Hard Drive LEDs

Remove a Hard Drive

Install a Hard Drive

Four-Drive Capable Backplane Configuration Reference

Eight-Drive Capable Backplane Configuration Reference

Sixteen-Drive Capable Backplane Configuration Reference

Servicing Motherboard Components

Servicing FB-DIMMs

Servicing the Air Duct

Servicing PCIe/XAUI Risers

Servicing the Battery

Servicing the SCC Module

Servicing the Memory Mezzanine Assembly (Sun SPARC Enterprise T5240)

Servicing the Motherboard Assembly

Servicing Fan Modules

Fan Module Overview

Remove a Fan Module

Install a Fan Module

Servicing Power Supplies

Power Supplies Overview

Remove a Power Supply

Install a Power Supply

Power Supply Configuration Reference

Servicing Boards and Components

Important Safety Instructions

Servicing DVD/USB Modules

Servicing Fan Power Boards

Servicing the Hard Drive Cage

Servicing the Hard Drive Backplane

Servicing Front Control Panel Light Pipe Assemblies

Servicing Power Distribution Boards

Servicing Power Supply Backplanes (Sun SPARC Enterprise T5240 Servers)

Servicing Paddle Cards

Returning the Server to Operation

Install the Top Cover

Reinstall the Server in the Rack

Return the Server to the Normal Rack Position

Connect Power Cords to the Server

Power On the Server Using the poweron Command

Power On the Server Using the Front Panel Power Button

Identifying FRUs in Sun SPARC Enterprise T5140 Servers

Motherboard Components in Sun SPARC Enterprise T5140 Servers

I/O Components in Sun SPARC Enterprise T5140 Servers

Power Distribution/Fan Module Components in Sun SPARC Enterprise T5140 Servers

Internal Cables for Onboard SAS Controller Cards in Sun SPARC Enterprise T5140 Servers

HDD Data Cable Routing for SAS RAID Controller Cards in Four-Disk Capable Sun SPARC Enterprise T5140 Servers

HDD Data Cable Routing for SAS RAID Controller Cards in Eight-Disk Capable Sun SPARC Enterprise T5140 Servers

Identifying FRUs in Sun SPARC Enterprise T5240 Servers

Motherboard Components in Sun SPARC Enterprise T5240 Servers

Memory Mezzanine Components in Sun SPARC Enterprise T5240 Servers

I/O Components in Sun SPARC Enterprise T5240 Servers

Power Distribution/Fan Module Components in Sun SPARC Enterprise T5240 Servers

Internal Cables for Onboard SAS Controller Cards in Sun SPARC Enterprise T5240 Servers

HDD Data Cable Routing for SAS RAID Controller Cards in Sun SPARC Enterprise T5240 Servers

Index

Install the Slide Rail Assemblies

  1. Pull both mounting brackets completely out of their respective slide rails.
    1. Simultaneously press and hold the upper and lower lock buttons of the slide rail lock.

      Figure 11 Unlocking the Slide Rail Assembly (Either Server)
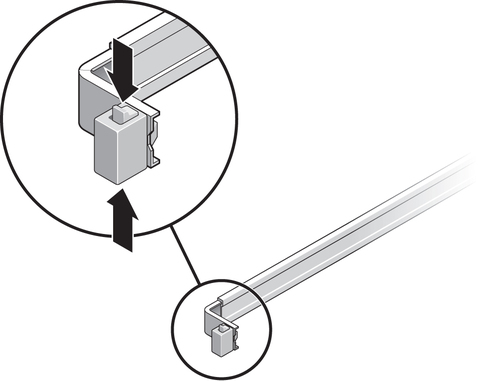
      Figure showing the slide rail lock located at the front of the mounting bracket
    2. Pull the mounting bracket out until it locks in the extended position.
    3. Slide the mounting bracket release button, then slide the mounting bracket out of the slide rail.

      Figure 12 Location of the Mounting Bracket Release Button (Either Server)
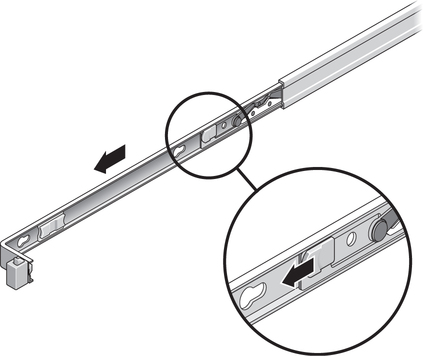
      Figure showing the plastic slide rail lock located in the middle of the mounting bracket
    4. Press the metal lever (labeled Push) on the middle section of the sliding rail, then push the middle section back into the rack.

      Figure 13 Unlocking the Slide Rail Middle Section (Either Server)
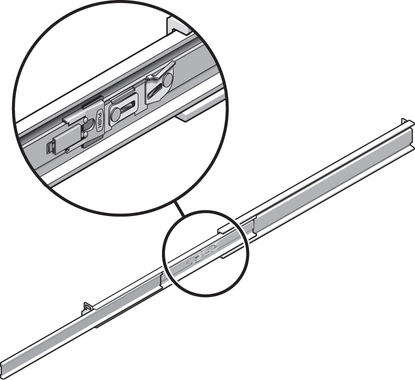
      Figure showing the metal lever is near the rear end of the mounting bracket
  2. Attach a mounting bracket to the right side of the chassis.
    1. Position the mounting bracket against the chassis. Ensure that the slide rail lock is at the front and the three keyed openings on the mounting bracket are aligned with the three locating pins on the side of the chassis.

      Figure 14 Attaching a Mounting Bracket to the Chassis (Either Server)
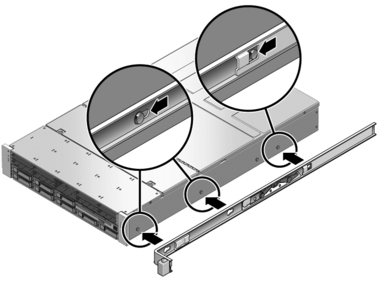
      Figure showing the mounting bracket attaching to the locating pins on the side of the chassis
    2. Ensure that the heads of the locating pins protrude though the keyed openings in the mounting bracket. Pull the mounting bracket toward the front of the chassis until the bracket locks into place with an audible click.
    3. Verify that all locating pins are trapped in the keyed openings and that the correct locating pin has engaged the mounting bracket lock.
  3. Attach the second mounting bracket to the left side of the chassis.
  4. Determine which rack hole numbers to use when attaching the slide rails to the rack posts.

    If the server is two rack units high (2U), the slide rails occupy the lower half of the 2U space.

  5. Determine which screws you will use to mount the slide rails.
    • If your rack has threaded mounting holes in the rack posts, determine whether the threads are metric or standard. Select the appropriate screws from the package included in the mounting kit.
    • If your rack does not have threaded mounting holes, the mounting screws are secured with a caged nut.
  6. Attach a slide rail to the right front rack post.
    1. Loosely attach the front of a slide rail to the right front rack post using two screws.

      Note - Do not tighten the screws yet.


      Figure 15 Mounting a Slide Rail (Either Server)
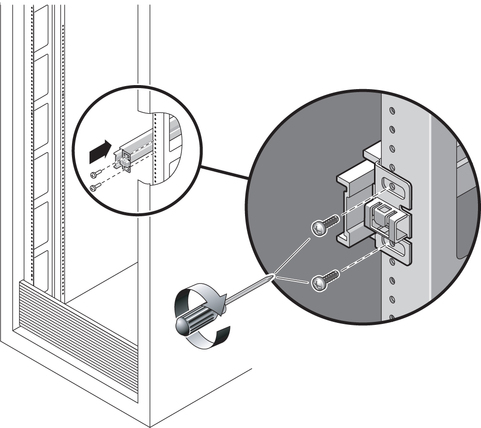
      Figure showing two screws attaching the front of a slide rail to the front of a rack post rail
    2. Adjust the length of the slide rail by sliding the rear mounting flange to reach the outside edge of the rear rack post.
    3. Loosely attach the rear of the slide rail to the rear rack post with two screws.
  7. Attach the second slide rail to the left rack posts in a similar manner.

    Do not tighten the screws.

  8. Use the slide rail spacing tool to adjust the distance between the slide rails.
    1. At the front of the rack, plug the left side of the tool into slots at the end of the left rail.

      Figure 16 Using the Slide Rail Spacing Tool to Adjust the Distance Between the Slide Rails (Either Server)
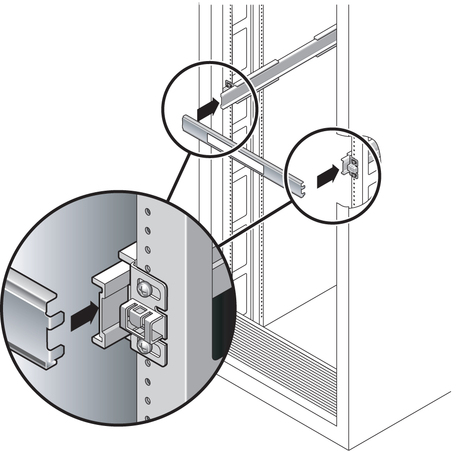
      Figure showing the slide rail spacing tool as it fits into slots at the ends of both slide rails
    2. Insert the right side of the tool into the front end of the right rail.
    3. Slide the end of the rail to the right or left as needed to allow the ends of the tool to enter the ends of both rails.

      The distance between the rails is now equal to the width of the server with mounting brackets.

    4. Tighten the screws to lock the ends of the rails in place.
    5. At the rear of the rack, repeat Step a through Step d for the rear ends of the rails.
Related Information