| Sun Blade T6320 G2 and Sun Blade T6320 Server Modules Product Notes |
| Sun Blade T6320 G2 and Sun Blade T6320 Server Modules Product Notes |
| C H A P T E R 3 |
 Information Not Covered in the Online Documentation
 |
This chapter provides the following information about Oracle server module documentation:
The Oracle Solaris 10 5/08 OS is the minimum suggested OS for installing from a USB DVD drive. If the USB DVD drive is connected through a USB hub to the front dongle, the Oracle Solaris 10 10/08 OS is the minimum requirement.
|
2. Identify the USB device path at the OpenBoot PROM level from output from the show-disks command:
{0} ok show-disks a) /pci@0/pci@0/pci@2/LSILogic,sas@0/disk b) /pci@0/pci@0/pci@1/pci@0/usb@1,2/storage@1/disk <======== q) NO SELECTION Enter Selection, q to quit: q {0} ok |
3. At the ok prompt, boot from the DVD drive to proceed with the Oracle Solaris OS installation:
At a minimum, the Oracle Solaris 10 10/08 OS and an 8-Gbyte USB drive are required for installing the OS on USB Flash devices. For installing Core System Support only, you can use a 2-Gbyte USB drive.
|
a. Install the USB drive with a front dongle.
b. Boot from a netinstall image or a DVD drive in single user mode.
2. After the USB drive is labeled, install the Oracle Solaris OS with a netinstall image or a USB DVD media.
For instructions on using these features, refer to the Sun Integrated Lights Out Manager (ILOM) 3.0 Supplement for the Sun Blade T6340 Server Module.
| Note - The ILOM Remote Console feature is only supported on the Sun Blade T6320 G2 server module. |
After initial system installation, you can install a local graphics monitor and configure it to access the system console. You cannot use a local graphics monitor to perform initial system installation, nor can you use a local graphics monitor to view power-on self-test (POST) messages.
To install a local graphics monitor, you must have the following items:
To view a list of supported screen resolutions type:
For more information about graphics support, refer to the Sun Blade T6320 Server Module Service Manual.
|
1. Attach the monitor video cable to the HD-15 video connector on the cable dongle.
Tighten the thumbscrews to secure the connection.
2. Connect the monitor power cord to an AC outlet.
3. Connect the USB keyboard cable to one USB connector on the cable dongle.
4. Connect the USB mouse cable to the other USB connector.
For more information, refer to the Sun Blade T6320 Server Installation and Configuration Guide.
6. Set the OpenBoot configuration variables.
From the existing system console, type:
7. To cause the changes to take effect, type:
The system stores the parameter changes, and boots automatically when the OpenBoot configuration variable auto-boot? is set to true (the default value).
| Note - To cause the parameter changes to take effect, you can also power cycle the system using the front panel Power button. |
You can now issue system commands and view system messages using your local graphics monitor. Continue with your installation or diagnostic procedure, as needed.For more information about graphics configurations, refer to the Sun Blade T6320 Server Module Service Manual.
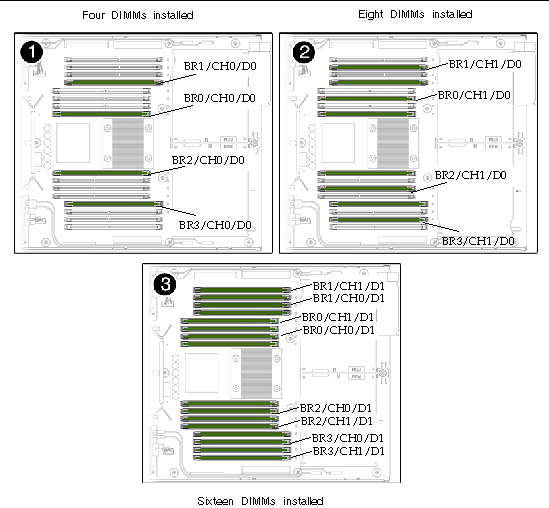
Oracle’s Sun Blade T6320 server module has 16 connectors (slots) that hold Sun approved, industry standard FB-DIMMs in the following capacities:
The Sun Blade T6320 server module performs best if all 16 connectors are populated with 16 identical FB-DIMMs. This configuration also enables the system to continue operating even when a FB-DIMM fails, or if an entire channel fails.
You must follow these guidelines when adding or replacing FB-DIMMs:
When adding memory to the server, ensure that you follow all of the guidelines. You might need to move some of the original FB-DIMMs to ensure that all FB-DIMMs in a branch have the same part number.
Within each branch, ensure that the replacement FB-DIMM has the same part number as the FB-DIMM you are removing. If you are unable to obtain an FB-DIMM with the same part number, you might need to replace all FB-DIMMs in the branch to ensure that they all have the same part number.
FIGURE 1 DIMM Population Rules
| Sun Blade T6320 G2 and Sun Blade T6320 Server Modules Product Notes | E37211-01 |
Copyright © 2012, Oracle and/or its affiliates. All rights reserved.
 To Install the OS From a USB DVD Drive