| Skip Navigation Links | |
| Exit Print View | |

|
Sun Fire X4170 M2 and X4270 M2 Servers Installation Guide |
1. Preparing to Install the Sun Fire X4170 M2 and X4270 M2 Servers
Server Installation Task Checklist
Sun Fire X4170 M2 Server Supported Components
Sun Fire X4270 M2 Server Supported Components
2. Installing the Server Into a Rack With Slide-Rails
Server Installation Process Overview
Disassemble Bolt-On Slide-Rails
Disassemble Tool-less Slide-Rails
Installing the Mounting Brackets Onto the Server
Attaching the Slide-Rail Assemblies to the Rack
Attach Bolt-On Slide-Rail Assemblies
Attach Tool-less Slide-Rail Assemblies
Installing the Server Into the Slide-Rail Assemblies
Install Server Into the Slide-Rail Assemblies
Installing the Cable Management Arm on the Sun Fire X4170 M2 Server
Installing the Cable Management Arm on the Sun Fire X4270 M2 Server
Verifying Operation of the Slide-Rails and CMA
Verify Operation of Slide-Rails and CMA
3. Attaching Cables and Power Cords
Attaching Cables to the Server
Connecting Power Cords to the Server
4. Connecting to Oracle ILOM and Applying Main Power to the Server
Log In to Oracle ILOM Using a Serial Connection
Log In to Oracle ILOM Using an Ethernet Connection
Test IPv4 or IPv6 Network Configuration
Applying Main Power to the Server
Apply Main Power to the Server
5. Installing or Configuring an Operating System
Installing an Operating System
Configuring a Preinstalled Operating System
6. Configuring the Preinstalled Solaris 10 Operating System
Configuring Server RAID Drives
Configuring the Preinstalled Oracle Solaris 10 Operating System
Configure Oracle Solaris 10 OS
Oracle Solaris 10 Operating System User Information
Oracle Solaris 10 User Documentation
Using the Oracle Solaris Installation Program
Reinstalling the Oracle Solaris Operating System
Download the Solaris Operating System
7. Configuring the Preinstalled Oracle VM Software
Oracle VM Server Configuration
Oracle VM Manager Configuration
Configuring the Preinstalled Oracle VM Software
This section shows the front and back of the Sun Fire X4170 M2 and X4270 M2 Servers.
Sun Fire X4170 M2 Server Front Panel shows the Sun Fire X4170 M2 Server front panel and describes its components.
Figure 1-2 Sun Fire X4170 M2 Server Front Panel

Figure Legend
1 Product Serial Number (PSN) label and Radio Frequency Identification (RFID) tag
2 Locator LED/Locator button: white
3 Service Action Required LED: amber
4 Power/OK LED: green
5 Power button
6 Hard disk drive 1 (optional)
7 Hard disk drive 0 (optional)
8 Hard disk drive 3 (optional)
9 Hard disk drive 2 (optional)
10 Hard disk drive 4 (optional)
11 Hard disk drive 5 (optional)
12 DVD drive (optional)
13 Hard disk drive 6 (optional)
14 Hard disk drive 7 (optional)
15 USB 2.0 ports (2)
16 Disk configuration label
17 Power Supply Service Action Required LED: amber
The Sun Fire X4270 M2 Server can optionally be configured with 12 or 24 storage drives. Sun Fire X4270 M2 Server Front Panel (With 12 Storage Drives) shows the 12 storage drive configuration. Sun Fire X4270 M2 Server Front Panel (With 24 Storage Drives) shows the 24 storage drive configuration.
Figure 1-3 Sun Fire X4270 M2 Server Front Panel (With 12 Storage Drives)

Figure Legend
1 Product Serial Number (PSN) label and Radio Frequency Identification (RFID) tag
2 Power button
3 Locator LED/Locator button: white
4 Service Action Required LED (System Level): amber
5 Power/OK LED: green
6 Hard disk drive 2 (optional)
7 Hard disk drive 1 (optional)
8 Hard disk drive 0 (optional)
9 Hard disk drive 3 (optional)
10 Hard disk drive 4 (optional)
11 Hard disk drive 5 (optional)
12 Hard disk drive 6 (optional)
13 Hard disk drive 7 (optional)
14 Hard disk drive 8 (optional)
15 Hard disk drive 9 (optional)
16 Hard disk drive 10 (optional)
17 Hard disk drive 11 (optional)
18 Fan Module Service Action Required LED: amber
19 Power Supply Service Action Required LED: amber
20 System Overtemperature LED: amber
21 USB 2.0 ports (2)
22 Disk configuration label
Note - In Sun Fire X4270 M2 Server Front Panel (With 24 Storage Drives), the storage drives are numbered 0 to 23 from left to right.
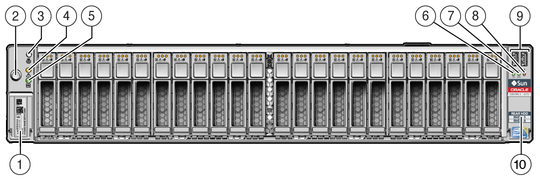
Figure 1-4 Sun Fire X4270 M2 Server Front Panel (With 24 Storage Drives)

Figure Legend
1 Product Serial Number (PSN) label and Radio Frequency Identification (RFID) tab
2 Power button
3 Locator LED/Locator button: white
4 Service Action Required LED (System Level): amber
5 Power/OK LED: green
6 Fan Module Service Action Required LED: amber
7 Power Supply Service Action Required LED: amber
8 System Overtemperature LED: amber
9 USB 2.0 ports (2)
10 Disk configuration label
Sun Fire X4170 M2 Server Back Panel shows the Sun Fire X4170 M2 Server back panel and describes its components.
Figure 1-5 Sun Fire X4170 M2 Server Back Panel

Figure Legend
1 Power supply unit 0 connector
2 Power supply unit 0 status indicator LEDs: Power Supply OK: green Power Supply Fail: amber AC OK: green
3 Power supply unit 1 connector
4 Power supply unit 1 status indicator LEDs: Power Supply OK: green Power Supply Fail: amber AC OK: green
5 System status LEDs: Power: green Attention: amber Locate: white
6 PCI Express Module slot (0)
7 PCI Express Module slot (1)
8 PCI Express Module slot (2)
9 Serial management (SER MGT)/RJ-45 serial port
10 Service processor (SP) network management (NET MGT) port
11 Gigabit Ethernet ports NET 0, 1, 2, 3
12 USB 2.0 ports (0, 1)
13 HD15 video connector (analog VGA)
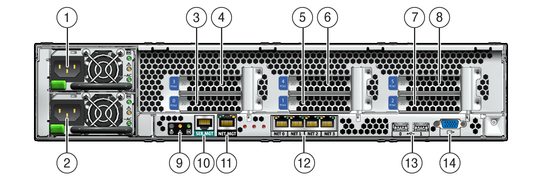
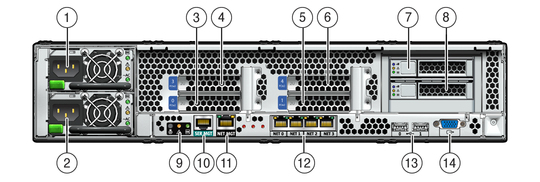
Sun Fire X4270 M2 Server Back Panel (Without Rear Boot Drives) shows the Sun Fire X4270 M2 Server back panel without rear mounted storage drives. Sun Fire X4270 M2 Server Back Panel (With Rear Boot Drives) shows the Sun Fire X4270 M2 Server back panel with rear mounted storage drives.
Figure 1-6 Sun Fire X4270 M2 Server Back Panel (Without Rear Boot Drives)

Figure Legend
1 Power supply unit 1 (PSU1)
2 Power supply unit 0 (PSU0)
3 PCI Express Module slot (0) (filler panel shown)
4 PCI Express Module slot (3) (filler panel shown)
5 PCI Express Module slot (1) (filler panel shown)
6 PCI Express Module slot (4) (filler panel shown)
7 PCI Express Module slot (2) (filler panel shown)
8 PCI Express Module slot (5) (filler panel shown)
9 System status LEDs: Power: green Attention: amber Locate: white
10 Serial management (SER MGT)/RJ-45 serial port
11 Service processor (SP) network management (NET MGT) port
12 Gigabit Ethernet ports NET 0, 1, 2, 3
13 USB 2.0 ports (0, 1)
14 HD15 video connector (analog VGA)
Figure 1-7 Sun Fire X4270 M2 Server Back Panel (With Rear Boot Drives)

Figure Legend
1 Power supply unit 1 (PSU1)
2 Power supply unit 0 (PSU0)
3 PCIe Slot 0 (filler panel shown)
4 PCIe Slot 3 (filler panel shown)
5 PCIe Slot 1 (filler panel shown)
6 PCIe Slot 4 (filler panel shown)
7 Boot disk drive 1
8 Boot disk drive 0
9 System status LEDs: Power: green Attention: amber Locate: white
10 Serial management (SER MGT)/RJ-45 serial port
11 Service processor (SP) network management (NET MGT) port
12 Gigabit Ethernet ports NET 0, 1, 2, 3
13 USB 2.0 ports (0, 1)
14 HD15 video connector (analog VGA)