Deploying Communities on Multiple Hosts Using a Single Database Instance
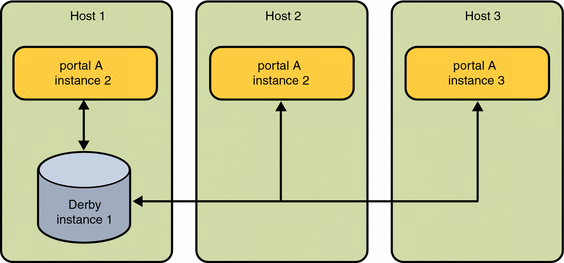
When multiple Portal instances are deployed to different hosts, each instance has different community data unless you configure the instances to use a common database instance. This section describes how to configure multiple Portal Server instances on different hosts to use a single, common Derby network server instance.

Deploying multiple instances of Portal Server on a single, common Derby instance can be accomplished in two ways.
-
You can use a Derby instance that is already installed on a Portal Server host and configure other Portal Server instances to point to the Derby instance. To Point All Portal Server Instances To The Common Derby Network Server Instance
-
You can create a derby instance on a dedicated Derby host and configure other Portal Server instances to point to the host running the dedicated Derby instance.
Deployment Requirements
The platform requirements for deploying multiple Portal Server communities on single Derby instances include the following:
Operating System
-
Solaris 9 U6 or Solaris 10 on SPARC
-
Solaris 9 or Solaris 10 on x86
-
RedHat Enterprise Linux 2.1, 3.0 Update 3 or 4.0 on x86.
For more detailed information please refer to the release notes.
These requirements are similar to those required for setting up any portal instance. The requirements for setting up a dedicated derby instance also require the use of java sdk which is normally packaged with the Java Enterprise System 5. The required version is 1.5.0_09 or later.
 To Set Up a Common Derby Network Server Instance (Solaris)
-
Install JDK from Java Enterprise System 5 distribution. This step is required if the required Java version is not present on the machine.
-
Install the Derby database packages on the dedicated host.
-
Transfer the Derby data files from the Portal Server install host to the dedicated Derby network server instance host. The data files are located in /var/opt/SUNWportal/derby.
The Derby data files are:
-
derby.properties
-
and the following directories
-
communitymc_portal1
-
surveydb_portal1
-
filesharingdb_portal1
-
wikidb_portal1
-
-
Archive the Derby data files using the tar command on the Portal Server install host.
cd /var/opt/SUNWportal/derby
tar -cvf derby-system.tar *
-
Create the Derby system home directory on the dedicated Derby network instance host.
mkdir -p /var/opt/SUNWportal/derby
-
Transfer the derby-system.tar file from the Portal Server install host to the system home directory on the dedicated Derby network instance host.
On the dedicated Derby network instance host, execute the following commands from the /var/opt/SUNWportal/derby directory.
ftp> portal install
ftp> cd /var/opt/SUNWportal/derby
ftp> get derby-system.tar
ftp> quit
-
Extract the derby-system.tar file using the tar command.
tar -xvf derby-system.tar
-
-
Modify the Derby properties file.
-
Change the derby.drda.host property to the fully qualified host name assigned to the interface on which the common Derby network server instance runs.
-
Delete the derby log file
rm derby.log
-
create empty log file.
touch derby.log
-
(Optional) Change the derby.drda.port property to run the server on a non default port. Port 1527 is the Derby default port. Changing the port property is optional.
-
-
Start the Derby network server instance. You can use the following sample script:
###start_derby.sh#### PATH=/usr/jdk/jdk1.5.0_09/bin:${PATH};export PATH derby_classpath=/opt/SUNWjavadb/lib/derby.jar:/opt/SUNWjavadb/lib/derbynet.jar; exportderby_classpath derby_home=/var/opt/SUNWportal/derby;export derby_home java -Dderby.system.home=${derby_home} -cp ${derby_classpath} org.apache.derby.drda.NetworkServerControl start & -
(Optional) Modify the Derby tuning properties in derby.properties or add JVM tuning parameters to the Java command used to start the Derby network server. For details, refer to the Apache Derby manuals, and java.sun.com.
 To Point All Portal Server Instances To The Common
Derby Network Server Instance
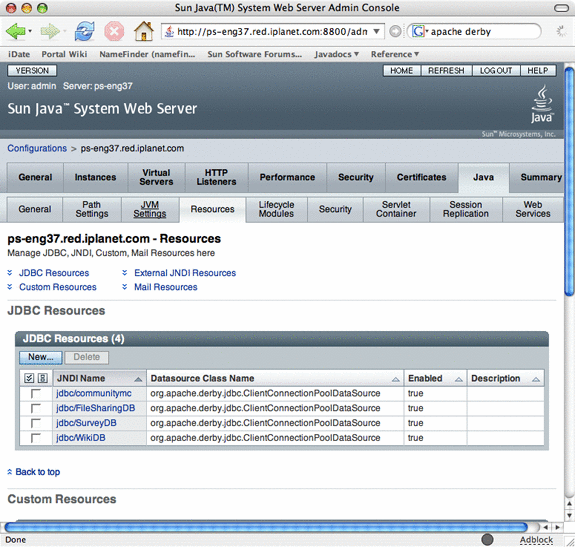
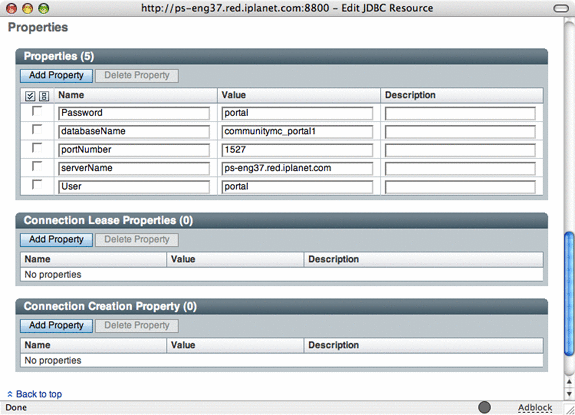
Portal clients of the Derby network server instance access it through a JDBC data source that is configured in the web container. Configuring a Portal instance to use a non-default Derby network server instance means reconfiguring these data sources to point to a different host. The method depends on the brand of web container. This procedure uses Sun Java Webserver 7.0 as an example.
Perform the following procedure for each Portal Server instance that you want to use a common Derby network server instance.
-
Access the Sun Java System Web Server.
For example, http://sesta.iplanet.com:8800
-
Under the Common Tasks Tab, click Edit Java Settings under Configuration Tasks.
-
Click the Resources tab.
A list of the JDBC resources in the web container is displayed.

-
Perform the following steps for each of the following resources:
-
jdbc/communitymc
-
jdbc/FileSharingDB
-
jdbc/SurveyDB
-
jdbc/WikiDB
-
-
Deploy the configuration by performing the following steps:
-
Restart the Web Container.
- © 2010, Oracle Corporation and/or its affiliates

