|
|
| Sun ONE Directory Server 5.2 Installation and Tuning Guide |
Chapter 2 Upgrading From Previous Versions
This chapter covers upgrading to Sun ONE Directory Server 5.2 from Netscape Directory Server 4.x, and from iPlanet Directory Server 5.x.
Note This chapter does not explain how to upgrade from Innosoft Distributed Directory Server 4.5.1.
This chapter focuses primarily on how to migrate directory data from old servers to new servers. Refer to the Sun ONE Directory Server Reference Manual for details about the configuration attributes migrated from the old server to the new.
Before You Upgrade
Before upgrading, familiarize yourself with the new features available in Sun ONE Directory Server 5.2 and described in the documentation under "Suggested Reading". Take the opportunity to review design decisions made during implementation of existing directory services.
When Upgrading a Single Server Instance
Upgrading a server instance involves installing the new server alongside the existing server in a different ServerRoot using a different serverID and different Administration Server and Directory Server port numbers, stopping the old server, migrating configuration and directory data, and then having clients make requests to the new server.
Sun ONE Directory Server 5.2 provides a script to help you migrate data for a server instance. The migration script performs the following tasks in sequence:
- Stops your existing server, and backs up the current configuration.
- Checks schema configuration files, notifying you of differences between the standard schema configuration files and those used by your existing server.
(4.x to 5.2 only) If an existing 4.x server uses custom schema not installed in the default location, under ServerRoot/slapd-serverID/config, you must adjust the configuration manually before migrating directory data.
- Creates a database for each suffix stored in the old server.
(4.x to 5.2 only) 4.x servers supported multiple suffixes per database. The migration script creates a database for each suffix on the new server.
- Migrates server and database configuration parameters.
4.x servers store such parameters in slapd.conf. 5.x servers store such parameters as entries in dse.ldif.
(4.x to 5.2 only) The migration script does not migrate all 4.x server parameters. In some cases, you must migrate 4.x attribute values manually. Refer to the current version of the Sun ONE Directory Server Reference Manual for details.
- Migrates user-defined schema objects.
- Migrates indexes.
- Migrates standard server plug-ins.
You must migrate custom plug-ins manually. At minimum, you must recompile all custom plug-ins. Refer to the Sun ONE Directory Server Plug-In API Programming Guide for a detailed list of plug-in API changes.
- (5.x to 5.2 only) Migrates replication agreements.
- Migrates the certificate database, and SSL parameters.
- (5.x to 5.2 only) Migrates database links.
- (5.x to 5.2 only) Migrates replication entries.
- Migrates the SNMP configuration.
After the migration script completes, clients may send requests to the new server.
When Upgrading Multiple Replicated Servers
Not surprisingly, upgrading multiple servers involves upgrading each server individually. The order in which you upgrade servers depends, however, on the software version of existing servers and on the replication topology.
For 5.x to 5.2 upgrades, the standard process is bottom up. First you migrate the consumers. Next you upgrade the hubs. Finally you upgrade the masters. Refer to "Example 5.x Upgrade Scenario" for how you might do this in a particular instance.
For 4.x to 5.2 upgrades, you start by upgrading the 4.x master, then proceed with each branch of consumers being replicated from the master, starting with the consumer closest to the master in terms of replication. Refer to "Example 4.x Upgrade Scenario" for how you might do this in a particular instance.
If the existing environment involves multiple, replicated servers, read all relevant sections of this chapter carefully before proceeding with the upgrade. You must plan your approach fully to avoid unnecessary downtime.
For Help With Upgrades
Sun Professional Services can help you upgrade critical directory services.
Refer to http://www.sun.com/service/sunps/sunone/ for contact information.
Upgrading a Single Server
This section describes the upgrade process from a single existing server to a single 5.2 server.
Note If the existing 4.x server uses custom schema, ensure the migration script can find the custom schema before migrating any data. Read "(4.x to 5.2) Handling Custom Schema" for details.
If the migration script does not recognize the custom schema, it does not migrate the schema, but instead applies standard schema files after migrating the data to the new server. Applying the standard schema to entries that conform to custom schema may render modifications impossible, thereby making the upgraded directory read-only.
Installing the New Server
Proceed according to the instructions in Chapter 1 "Installing Sun ONE Directory Server," to install the new server on the same host as the existing server.
Note Ensure you have a current backup of the existing server before installing the new server.
The new server must reside in a different ServerRoot location than the existing server. It must also be identified by a different serverID.
Although you may choose to reuse most of the configuration information supplied for the original installation, do not reuse the existing port number. Instead, you may change the port number of the new server after migrating existing data.
(4.x to 5.2) Handling Custom Schema
The script provided for migrating data recognizes only those custom schema either placed in the standard slapd.user_oc.conf and slapd.user_at.conf files, or placed in other files and included in slapd.conf using useroc and userat directives. If, for example, custom schema are included directly in slapd.at.conf or slapd.oc.conf, the migration script does not recognize them.
Perform the following steps before proceeding with the upgrade.
- Compare slapd.at.conf or slapd.oc.conf with the standard files provided under ServerRoot/bin/slapd/install/version4/ of the new server, transcribing custom schema elements to slapd.user_oc.conf and slapd.user_at.conf files.
If the custom object classes have inheritance relationships, ensure that superior object classes precede others in the schema configuration file.
- If custom attributes were added to standard object classes in slapd.oc.conf, create a new object class including the attributes in slapd.user_oc.conf, and add the new object class to every entry in the existing directory that uses the custom attributes.
- Include the slapd.user_oc.conf and slapd.user_at.conf files in the slapd.conf file for the existing server using the useroc and userat directives, placing the new directives adjacent to include statements for other files.
At this point, all custom schema used by the existing server should reside in slapd.user_oc.conf or slapd.user_at.conf, and slapd.conf should include the files using the useroc and userat directives.
Migrating Existing Data
After handling custom schema, perform the following steps to migrate existing data to a new server.
- If you intend to initialize replication on the new Directory Server offline from files, obtain the files before proceeding.
Refer to the Sun ONE Directory Server Administration Guide for instructions on exporting Directory Server data.
- Ensure the new Directory Server is running.
- Work as a user having the right to start, stop, and run database export and import on both the old and new servers.
For example, become super user or log on as Administrator.
- Set environment variables as shown in Table 2-1.
Table 2-1 Environment Variables for Migration
Variable
Value
PATH
(UNIX) ServerRoot/bin/slapd/admin/bin:$PATH
(Windows) ServerRoot/bin/slapd/admin/bin;%PATH%
PERL5LIB
ServerRoot/bin/slapd/admin/bin
- Run the migration script under the new server instance:
# cd ServerRoot/bin/slapd/admin/bin
# perl migrateInstance5 -p port52 -D "cn=directory manager" -w password -o oldServ -n newServ
Here, oldServ represents the full path to the old server instance, such as /usr/iplanet/servers/slapd-ldap or /usr/iplanet/ds5/slapd-ldap, and newServ represents the full path to the new server instance, such as /var/ds/v5.2/slapd-dirserv.
The script generates output as it proceeds. You may choose to redirect this output to a file for review after migration completes.
Retire the old server only after migrating existing data to the new server.
(4.x to 5.2) Creating Replication Agreements
If an existing 4.x server is involved in replication, upgrading involves recreating replication agreements after migrating data. Read "(4.x to 5.2) Upgrading Replicated Servers" before proceeding with the upgrade process.
Refer to the Sun ONE Directory Server Administration Guide for instructions on configuring replication for 5.2 servers.
(Optional) Reusing the Existing Port Number
After migrating data from the old server to the new, you may choose to retire the old server and have the new server listen on the same port as the old. Using the same port may allow client applications to continue operating without changing their configurations.
Refer to the Sun ONE Directory Server Administration Guide for instructions on changing the server port. Be sure to stop the old server before the new server starts to listen on the old port.
(4.x to 5.2) Upgrading Replicated Servers
When upgrading replicated 4.x servers, start by replicating to a new master, and then proceed branch by branch through the replication topology. This approach limits the volume of server synchronization traffic.
Note Refer to the Sun ONE Directory Server Administration Guide for detailed instructions concerning replication configuration and initialization.
Preparing the New Master
During the upgrade, the 5.2 server is configured as a master but functions as a legacy consumer in the 4.x topology. After the upgrade, the 4.x consumer capability is disabled, and the new server functions as a master in the 5.2 topology.
This procedure calls for manual configuration of the new master server. You may therefore install the new master on a different host than the existing master.
- Proceed according to the instructions in Chapter 1 "Installing Sun ONE Directory Server," to install the new server.
- Manually reproduce the configuration of the 4.x master on the new server.
- Make the new server a master (for the 5.2 topology).
Refer to the Sun ONE Directory Server Administration Guide for instructions.
- Make the new server as a legacy consumer of the 4.x master (for the 4.x topology).
Again, refer to the Sun ONE Directory Server Administration Guide for instructions.
- Initialize replication from the 4.x master to the new server.
The process is described in Chapter 13, "Managing Replication," of the Netscape Directory Server Administration Guide. Refer to the section entitled, "Manual Consumer Initialization."
You may now upgrade the consumers.
Upgrading the Consumers
This procedure outlines the approach. Refer to subsequent procedures for details.
- Upgrade all branches in the 4.x topology.
- Add additional servers to the 5.2 topology as required.
- Disable the legacy consumer agreement on the new master to sever the new topology from the old.
Upon completion of this procedure, the update process is complete.
Upgrading a Branch
Think of the existing 4.x replication topology as a tree with the master as the root element. Here, a branch denotes a set of replicated servers in that tree for which the flow of replication originates at the root node supplier, continues out through consumers in the midst of the tree, and finally arrives at leaf node consumer servers.
Upgrading a branch consists of replacing all old servers in the branch with new servers, working from the top down.
Note While you upgrade a server, replication flow stops to all downstream servers in the branch. Consider redirecting client requests to another branch during the upgrade.
- Proceed according to the instructions under "Upgrading a Single Server" to upgrade the top server in the branch.
This cuts replication flow to the branch, temporarily bringing replication updates on downstream servers in the branch to a halt.
- Configure the replication agreement on the new server in the 5.2 branch to receive updates from a 5.2 server closer in the replication topology to the new master.
For example, configure the top server in the new branch to receive updates from the 5.2 master.
- Initialize replication from the 5.2 supplier to the new 5.2 server.
Depending on network capacity and volume of directory data compared to updates, offline initialization may be faster than online initialization.
- Apply Step 1, Step 2, then Step 3 recursively along the branch until you have completed the steps for all leaf consumers.
Refer to the Sun ONE Directory Server Administration Guide for instructions on configuring replication agreements and initializing replication.
At this point, the update process is complete for the branch. Repeat the procedure for the remaining 4.x branches.
Adding Additional Servers
After completing the upgrade from the 4.x topology to the 5.2 topology, you may add additional masters, hubs, and consumers as required for the new topology.
Perform the following steps for each additional server.
- Proceed according to the instructions under Chapter 1 "Installing Sun ONE Directory Server," to install the new server.
- Adjust replication agreements on the new server to fit the planned topology.
Refer to the Sun ONE Directory Server Administration Guide for instructions.
- Initialize replication on the new server.
Again, refer to the Sun ONE Directory Server Administration Guide for instructions.
Example 4.x Upgrade Scenario
Consider an upgrade for a 4.x master replicating to two branches, one with single consumer, one with hub supplying two consumers. This section shows the steps performed to upgrade to a new multi-master topology.
Figure 2-1 shows the 4.x topology before the upgrade.
Figure 2-1 Existing 4.x Topology Example
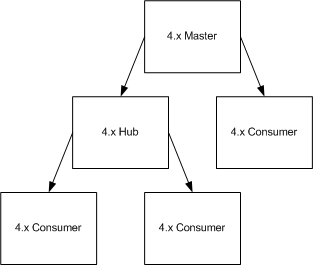
Figure 2-2 shows the addition of a 5.2 master that also functions as a legacy consumer of the 4.x master.
Figure 2-2 Example 4.x Topology with Additional New Server
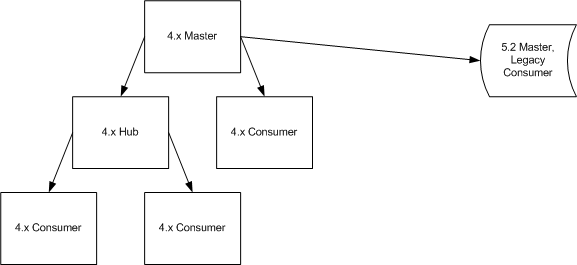
Figure 2-3 shows the first step in replacing a 4.x branch.
Notice the entire branch stops receiving replication updates during the upgrade. This interruption starts when the upstream 4.x consumer is stopped for upgrade, and ends when you restart the 4.x consumer.
As mentioned in the instructions, you may choose to direct client requests to consumers on another branch if clients require the very latest updates available.
Figure 2-3 Example 4.x Branch During Upgrade - Step 1
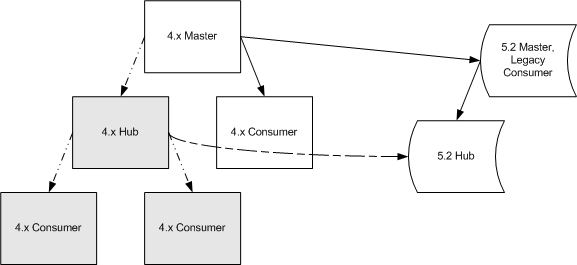
Figure 2-4 shows the next step in replacing a 4.x branch.
Figure 2-4 Example 4.x Branch During Upgrade - Step 2
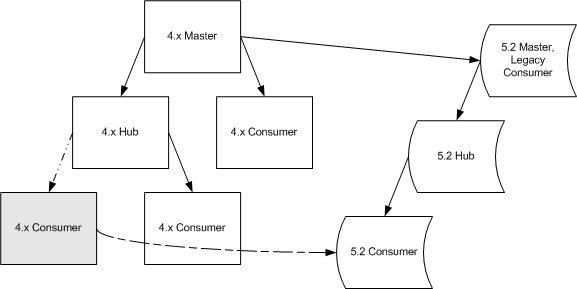
Figure 2-5 shows the next step in replacing a 4.x branch.
Figure 2-5 Example 4.x Branch During Upgrade - Step 3
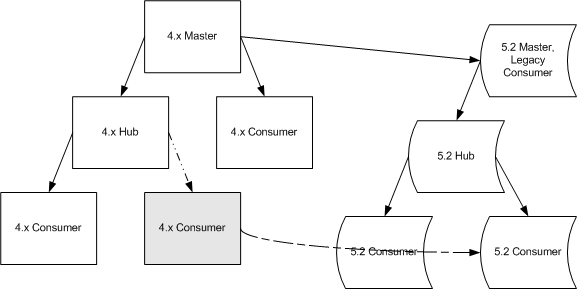
Figure 2-6 shows replacement of the other 4.x branch.
Figure 2-6 Example 4.x Branch During Upgrade - Next Branch
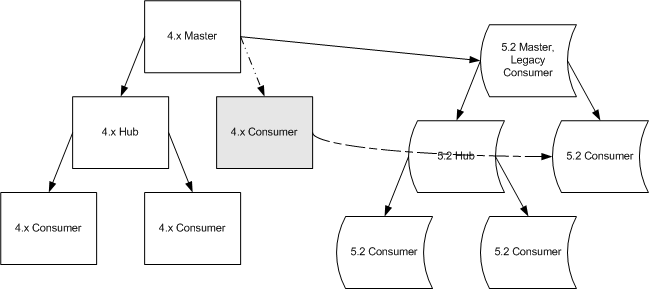
Figure 2-7 shows the two topologies side by side.
Figure 2-7 Example of 4.x and 5.2 Topologies During Upgrade
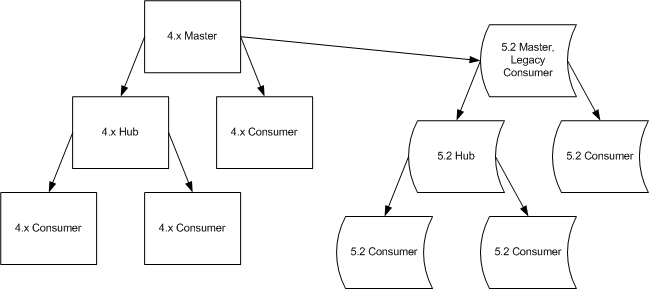
Figure 2-8 shows the addition of a master, a hub and additional replication agreements to the new topology.
Figure 2-8 Adding Servers to the 5.2 Topology
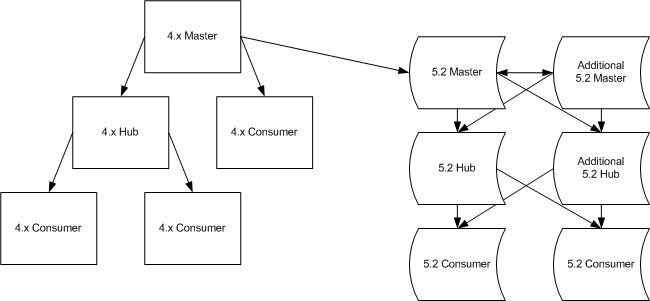
You may also add additional servers after completing the upgrade process.
Figure 2-9 shows removal of the replication agreement from the old 4.x master to the new 5.2 master.
Figure 2-9 Removing the Replication Agreement
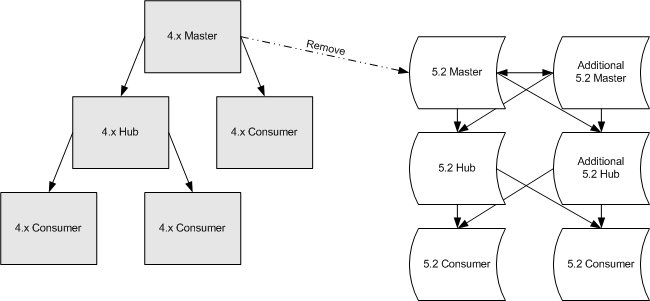
After redirecting client requests and removing the replication agreement, you may disable the 4.x servers.
Figure 2-10 shows the resulting 5.2 topology.
Figure 2-10 Resulting 5.2 Topology
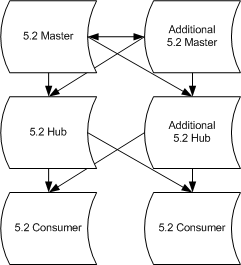
Client requests are now directed to the 5.2 topology.
(5.x to 5.2) Upgrading Replicated Servers
When upgrading replicated 5.x servers, you typically start with the consumers, continue with the hubs, and finish with the masters. This bottom-up approach involves interrupting only one server at a time, rather than interrupting an entire branch of the replication topology. The approach also helps you avoid potential custom schema synchronization issues between masters and consumers.
Upgrading 5.x Servers
- For each consumer in the existing topology, proceed according to the instructions under "Upgrading a Single Server" to upgrade the consumer.
- For each hub in the existing topology, proceed according to the same instructions to update the hub.
- For each master in the existing topology, proceed according to the same instructions to update the master.
Adding Additional Servers
After completing the upgrade from the 5.x topology to the 5.2 topology, you may add additional masters, hubs, and consumers as required for the new topology.
Perform the following steps for each additional server.
- Proceed according to the instructions in Chapter 1 "Installing Sun ONE Directory Server," to install the new server.
- Adjust replication agreements on the new server to fit the planned topology.
- Initialize replication on the new server.
Refer to the Sun ONE Directory Server Administration Guide for instructions on configuring replication agreements and initializing replication.
Upon completion of this procedure, the update process is complete. Clients may begin using servers in the upgraded replication topology.
Example 5.x Upgrade Scenario
Consider an upgrade for 5.x dual masters replicating to two hubs supplying two consumers. This section shows the steps performed to upgrade the topology to use 5.2 servers.
Figure 2-11 shows the 5.x topology before the upgrade.
Figure 2-11 Existing 5.x Topology Example
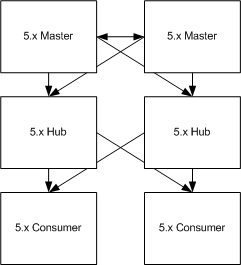
The first step involves upgrading consumers. Figure 2-12 shows the resulting topology.
Figure 2-12 Example 5.x Consumer Upgrade Step
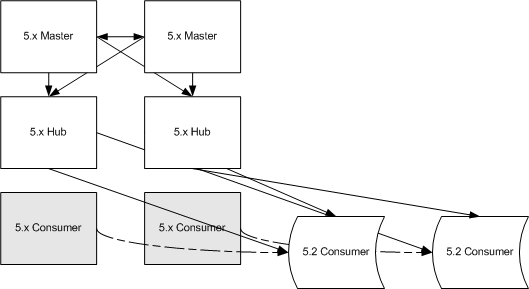
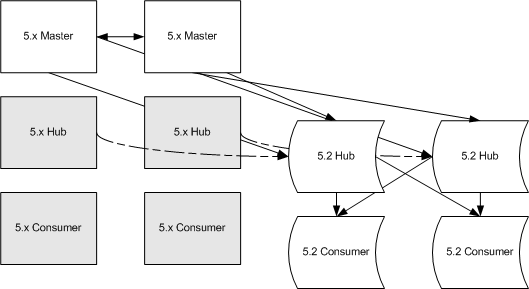
The next step involves upgrading hubs. Figure 2-13 shows the results.
Figure 2-13 Example 5.x Hub Upgrade Step
The next step involves upgrading masters. Figure 2-14 shows the results.
Figure 2-14 Example 5.x Master Upgrade - Step 3
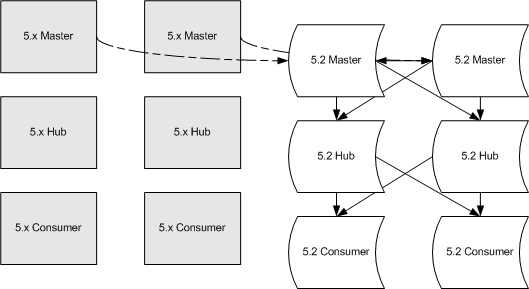
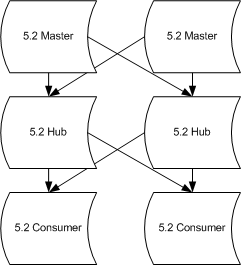
Figure 2-15 shows the 5.2 topology following the upgrade. At this point, servers in the old topology may be retired, and new servers added to the 5.2 topology.
Figure 2-15 Example 5.2 Topology after Upgrading
Client requests are now directed to the 5.2 topology.