Enabling SKIP
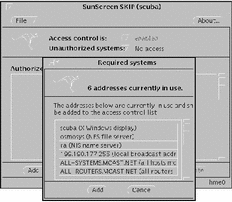
The last step in setting up SunScreen SKIP is to enable access control for the system. Enable SunScreen SKIP by selecting enabled from the Access Control button on the main window. When SKIP is enabled for the first time, it checks for all systems with which you are talking in the clear. It detects the NFS, X Windows, NIS, and DNS servers with which you are communicating and offers the possibility of adding the systems automatically to the ACL when you select Add from the Required Systems window (Figure 3-11). Choosing Cancel can hang your system or prevent your access to the system or network the next time you try to log in because certain necessary servers may not have been added. To prevent this, select disable after canceling.
Figure 3-11 Enabling SKIP

Understanding the Symbols in the Authorized Systems List
The authorized systems area lists all the hosts that are allowed access. The excluded systems area shows all those known hosts that are explicitly denied access. The graphic preceding the host name or IP address depicts what type of security is being used with that host.
-
A blank box preceding the host name indicates no encryption (Security = Off).
-
A box with a lock in it indicates that the system is using SKIP as the encryption method (Security = SKIP).
-
A box with the Sun Microsystems' logo in it indicates that the system is using SKIP Version 1 (Security = SKIP version 1).
-
A box with a question mark "?" indicates that the system is using manual keying (Security = ESP/AH).
-
A box with an N indicates a system that is Nomadic (that is, it is identified by its key ID not its IP address) and that it is using either SKIP or SKIP Version 1 as the security method.
Iconify SunScreen SKIP
Once you have enabled SunScreen SKIP, it is no longer necessary to keep the window open. At this time, you may wish to iconify the main window. The skiptool icon (Figure 3-12) shows SKIP's status. If you have set unauthorized systems to No Access, you can quit skiptool.
Figure 3-12 SKIP Icon Showing Both the Enabled and Disabled States

If you quit the application, SKIP stays in whatever mode it was last in (enabled or disabled).
Unauthorized Systems automatically changes to No Access, since there is no longer any way to notify you if an unauthorized system attempts to gain access.
- © 2010, Oracle Corporation and/or its affiliates
