| Previous Contents Index DocHome Next |
| iPlanet Application Server Administrator's Guide |
Chapter 8 Administering Database Connectivity
iPlanet Application Server applications can access database(s), to add, retrieve, and modify data. This chapter describes how to configure data access drivers and apply settings to database connectivity parameters.The following topics are included in this chapter:
About Data Access Drivers
Adjusting Database Connectivity Parameters
About Data Access Drivers
iPlanet Application Server applications often require database access. Database access is achieved through a data access driver, software written either by the database vendor or a third-party vendor. The following types of data access drivers can be configured with iPlanet Application Server to provide database connectivity:Make sure that data access drivers are installed before installing an instance of iPlanet Application Server. This way, iPlanet Application Server can automatically configure the drivers.
To Configure Data Access Drivers
When you open the Database window of iPlanet Administration Tool (iASAT), the left pane displays all data access drivers installed on a particular server whether the drivers are configured or not. A red X appears next to drivers that are not configured.To configure a data access driver, perform the following steps:
From iASAT toolbar, click Database to open the Database window.
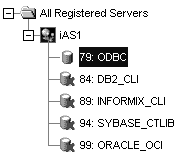
In the left pane of the Database window, select the driver you want to configure.
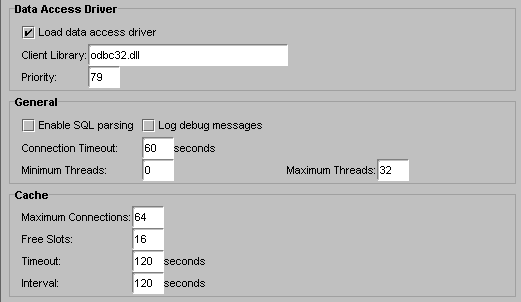
In the right pane of the Database window, mark the Load Data Access Driver checkbox, as shown in the following figure:
In the Client Library field, you can edit the library corresponding to the data access driver.
In the Priority field, you can edit the priority of the data access driver.
Click Apply Changes to save your changes to iPlanet Application Server.
- Giving a data access driver a priority of 1 means that driver has first priority over all other drivers. The higher the number, the lower the priority.
Adjusting Database Connectivity Parameters
iPlanet Application Server allows you to adjust database connectivity through connection parameters. Connection parameters allow you to optimize the speed with which iPlanet Application Server connects to a database or databases. The connection parameters are grouped in the following categories:This section describes the following topics:
To Set Connection Parameters
To Set Connection Parameters
You can set the length of time for which iPlanet Application Server attempts to make a database connection. These parameters optimize the performance of the iPlanet Application Server machine by keeping the server from wasting resources. For example, because iPlanet Application Server waits for open database connections when a request is made, the connection time limit is useful to limit the server from endlessly trying to connect to a database that is down.To set the connection parameters, perform the following steps:
From the iASAT toolbar, click Database to open the Database window.
In the left pane of the Database window, click the database for which you want to adjust the timeout parameter, as shown in the following figure:
In the right pane of the Database window, in the Connection Timeout field, enter the number of seconds.
Click Apply Settings to save the changes to iPlanet Application Server.
To Set Thread Parameters
You can set the minimum and maximum number of threads available for database connections. The thread parameters determine how many threads iPlanet Application Server allocates for asynchronous database queries. Such threads are usually used for queries returning a large number of rows and allowing the application to do other tasks while waiting for the query to finish. Asynchronous database queries are not supported by JDBC 2.0, a Java programming interface used to build on top on database drivers.The default thread allocations are adequate for most applications. If an application developer uses many asynchronous queries, you might want to increase the maximum number of available threads.
To set the thread parameters, perform the following steps:
From the iASAT toolbar, click Database to open the Database window.
In the left pane of the Database window, select the database for which you want to adjust the asynchronous thread parameters.
In the right pane of the Database window, in the Minimum Threads field, enter the number of threads.
In the right pane of the Database window, in the Maximum Threads field, enter the number of threads.
Click Apply Settings to save the changes to iPlanet Application Server.
To Set Database Cache Parameters
The database cache is an array used to hold active and recently used database connections. iPlanet Application Server adds database connections to cache when an application creates a database connection.While the application is using that database connection, iPlanet Application Server marks that connection "in use." Once the database operations are completed, the server marks the database connection "free." The cache then holds the free connection in the cache for a configured period of time. This allows the server to use the free cached connection and quickly handle a new request to the same database. Once a free connection exceeds the timeout, a cleaning thread removes the connection from the cache and opens a slot for a new connection to be cached.
You can adjust the following cache parameters:
maximum number of connections allowed in the cache
The default values are adequate for most applications, so adjustments are not usually required for initial application installations.number of slots held solely for free connections
timeout limit, in seconds, for free connections
interval, in seconds, at which the cache cleaner thread removes timed-out free connections
iPlanet Application Server dynamically adjusts the cache up to the maximum number of allowable connections. If there are no connections to cache, the array is allocated to zero spaces.
To set database cache parameters, perform the following steps:
From iASAT toolbar, click Database to open the Database window.
In the left pane of the Database window, select the database for which you want to adjust the database cache parameters.
In the right pane of the Database window, under Cache, enter values for the following parameters:
Click Apply Settings to save the changes to iPlanet Application Server.
Setting up Native and Third-Party JDBC drivers
JDBC is the Javasoft specification of a standard API that allows Java programs to access Database Management Systems (DBMSs). The JDBC API consists of a set of interfaces and classes that can be used to perform the following procedures:
Write applications and applets that connect to databases.
You can configure native and third party JDBC drivers when you install iPlanet Application Server. If you want to do this after installation, you can do so using a command line tool.The following sections describe how to configure native and third party JDBC Drivers on both Solaris and Windows machines:
To Set Up Native JDBC Drivers on Solaris
To Set Up Third-Party JDBC Drivers on Solaris
To Set Up Native or Third-Party JDBC Drivers on Windows
To Set Up Native JDBC Drivers on Solaris
To configure native JDBC drivers on Solaris, perform the following steps:
Go to <iasinstall>/ias/bin. Run the following script:
- dbsetup_sh
Specify the directory in your machine on in which iPlanet Application Server has been installed, for example, /iplanet. Press Enter.
- The setup prompts you to enter the following information. Follow the steps to set up native JDBC drivers.
Choose the driver you want to install. You can see the following options:
You are prompted to configure iPlanet Application Server with Oracle connectivity. Press `y' if you want to configure Oracle connectivity.
- 1. iPlanet Type 2 JDBC Drivers
- 2. Third Party JDBC Drivers
- Type (1) to configure native JDBC drivers, and press Enter.
Specify the database home directory on your machine. If you choose to configure iPlanet Application Server with Oracle connectivity, specify the Oracle home directory, for example, /usr/oraclient.
- Press `n' to connect to any other database, such as Sybase, Informix, DB2. You can configure more than 1 database using the dbsetup.sh command line tool.
You are then prompted to configure resource manager. Resource managers are required to manage global transactions (sometimes referred to as distributed transactions). To configure resource manager, type Y and press Enter.
Specify a name for resource manager, for example, RM1. You can configure more than 1 resource manager for a driver.
Enter database type, for example, Oracle.
Provide the default names for the following, as indicated:
- Database Server Name: ksample
- Database User Name: kdemo
- Database User Password: kdemo
- These defaults will be used to construct open string formats for different types of databases. These default values are present in the TSNnames.ora file, which can be found in the home directory of the oracle client installation.
- For more information on database open string formats, refer to the Installation Guide.
To Set up Third Party JDBC Drivers on Solaris
To configure third party JDBC drivers, perform Steps 1 and 2 as described in "To Set Up Native JDBC Drivers on Solaris". In Step 3, choose the second option, that is, Third Party JDBC Drivers.
Specify the number of drivers you want to configure and press Enter.
Enter driver class name, for example Database.Jdbc.driver.DatabaseDriver. If your database is Oracle, type Oracle.Jdbc.driver.OracleDriver.
- On Windows machines, you can configure a maximum of 3 third party JDBC drivers. These drivers can be configured for the same or different database clients.
Enter the Driver class path, for example JDBC/LIB/Classes/Classes111.zip. This zip file holds the library classes for the driver. Specify the complete path as shown in the following example:
Specify the native driver directory for example, usr/oraclient/lib.
- usr/oraclient/jdbc/classes/lib/classes12.zip.
- Specify the native driver directory if you have installed third party JDBC driver Type 2. This entry is optional for JDBC drivers type 1, 3 or 4. For more information on driver types, visit java.sun.com.
- You are prompted to configure 2 more drivers. You can choose to do so, or press Ctrl+C to abort the process.
To Set Up Native or Third-Party JDBC Drivers on Windows
Perform the following steps to set up native or third party JDBC drivers on a Windows system:
Navigate to the <iASinstall>/ias6/ias/bin path. Run the following script:
In the Add tab of the Third Party JDBC Configuration window, specify a name for the driver, for example Driver1.
Enter driver classname, for example Database.Jdbc.driver.DatabaseDriver. If your database is Oracle, type Oracle.Jdbc.driver.OracleDriver. You cannot leave this field blank.
Enter the Driver class path, for example JDBC/LIB/Classes/Classes111.zip. This zip file holds the library classes for the driver. Specify the complete path as shown in the following example:
Click Add to register the driver.
- usr/oraclient/jdbc/classes/lib/classes12.zip.
Note If you are setting up a native JDBC driver, do not specify this class path.
- Specify the native driver directory for example, usr/oraclient/bin.
- If you have installed third party JDBC driver Type 2, you need to specify this directory. This entry is optional for third party JDBC drivers Type 1, 3 or 4.
- You are prompted to configure 2 more drivers. You can choose to do so, or click Cancel to abort the process.
Modifying JDBC Driver Settings. Open the Edit tab of the Third Party JDBC Configuration window. Click Update after modifying the settings.
Deleting a JDBC Driver. Open the Edit tab of the Third Party JDBC Configuration window. Select the required driver from the Driver Identifier field. Click Delete. The driver is removed from the registry.
Configuring Resource Manager
You need resource manager(s) to manage multiple databases and global transactions. Resource manager lets you connect to the relevant database back-end for global transactions. You need to configure a resource manager for each database back-end to which you want to connect. You can configure a maximum of 32 resource managers on your machine.
To Configure Resource Manager
To configure resource manager on Windows, perform the following steps:
Go to <iASinstall>/ias6/ias/bin. Run the following script:
In the Add tab of the Database Connectivity Setup window, specify a name for a resource manager, for example, RM1.
Mark the checkbox Enable this Resource Manager, to use this resource manager to manage your database(s).
Enter the Database Open-String. This string provides information such as database name, host name, login ID, password, session time, login directory etc., to the resource manager. Refer to the Installation Guide for more information on string syntax.
Modifying Resource Manager Settings. Open the Edit tab of the Database Connectivity Setup window. Click Update after modifying the settings.
Deleting a Resource Manager. Open the Edit tab of the Database Connectivity Setup window. Select the required resource manager from the Name of new Resource Manager field. Click Delete. The driver is removed from the registry.
Configuring Data Sources
A data source contains information pertaining to the database client that the database driver needs to know, to connect to the database. Before you add a data source, you need to install and configure the database driver(s) on your machine. See "Setting up Native and Third-Party JDBC drivers", for more information on setting up database drivers.The following sections explain how you can add a data source, to both native and external database drivers:
To Add a Data Source To a Native Database Driver
To Add a Data Source To a Native Database Driver
To add a data source to a Native database driver, such as a Type 2 JDBC driver, perform the following tasks:
Start iASAT. On Windows, from the Start menu, choose Programs>iPlanet Application Server 6.0>iPlanet Application Server Administration Tool.
In the iASAT toolbar, click Databases.
- On Solaris, navigate to <iASInstallDir>/ias/bin/ and type the following command:
- kvsradmin
In the left pane of the window, select the iPlanet Application Server instance for which you want to add a data source. You can see all the database connectivity settings that have been set for that machine.
Select the iPlanet Type 2 JDBC Datasources folder, as shown in the following figure:
To add a data source, click Add in the right pane of the Databases window. The iPlanet Type 2 JDBC Datasource Registration window appears, as shown in the following figure:
In the JNDI name field, enter a name for the data source, for example, BankDB. When you register the data source, a node is created with this name.
Note The JNDI name should be unique for each data source that you add
In the Driver Type drop-down list, select the driver for which you want to add a data source.
Note For a native driver, you need to install the database client on your machine
In the DataSource field, enter the relevant value depending on the database client for which you are adding a data source. The database connects to the driver using this value. The following table provides the values for each database type that iPlanet Application Server supports:
In the DataBase field, provide the name of the database, for example, Oracle.
In the Username field, enter the user name that was provided when the database client was installed.
In the Password field, enter the password for that user name.
Click OK to register the data source. You need to stop and start iPlanet Application Server, for the changes to take effect. See , for more information on starting and stopping iPlanet Application Server.
To Add a Data Source to an External Database Driver
To add a data source to an external database driver, such as a Type 4 JDBC driver, perform the following tasks:
Start iASAT.
In the iASAT toolbar, click Databases. You can see all the database connectivity settings that have been set for that machine.
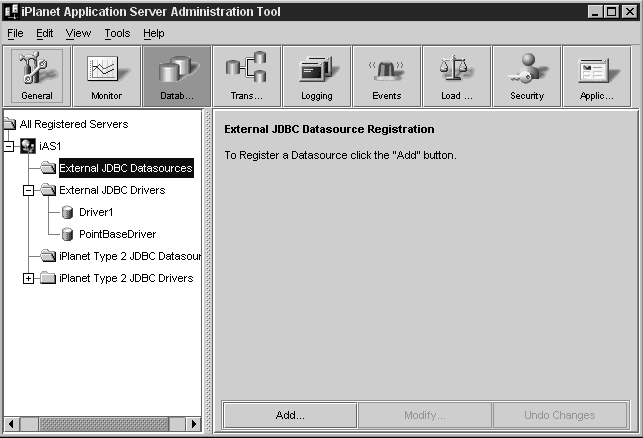
Select the External JDBC Datasources folder, as shown in the following figure:
To add a data source, click Add in the right pane of the Databases window. The Datasource Registration window appears, as shown in the following figure:
In the JNDI name field, enter a name for the data source, for example, Bank/PbaseDB. When you register the data source, a node is created in iASAT with this name.
Note The JNDI name should be unique, for each data source that you add.
From the Driver Type drop-down list, select the driver for which you want to add a data source.
Note Type 4 drivers, you do not need to install the database client on your machine or server.
In the Username field, enter a user name that is registered in the database.
- In the DatabaseURL field, provide the URL that points to the machine or server on which the database client has been installed. If the database client is installed on a machine which is connected to a different server, you need to mention the port number of this machine along with the URL.
- For example, oracle:host@oracle:1521.
In the Password field, enter the password for that user name.
Click OK to register the data source. You need to stop and start iPlanet Application Server, for the changes to take effect. See for more information on starting and stopping iPlanet Application Server.
To Delete a Data Source
To delete a data source, you need to remove the relevant entries from iPlanet Registry. To delete a data source, perform the following steps:
Start iPlanet Registry.
Open the following key:
- (See , for more information).
You will see a list of all the registered data sources, as shown in the following figure:
- Software/iPlanet/Application Server/6.0/DataSource/
You will be prompted to confirm deletion. Click Yes to confirm. The datasource entry is deleted from iPlanet Registry.
- Select the datasource you want to delete and click Edit>Delete.
Stop and start iPlanet Application Server for the changes to take effect.
Note You can remove a datasource that you have added, by removing the relevant entry from iPlanet Registry. You cannot remove a datasource using iASAT, as this feature is not yet implemented.


Previous Contents Index DocHome Next
Copyright © 2001 Sun Microsystems, Inc. Some preexisting portions Copyright © 2001 Netscape Communications Corp. All rights reserved.
Last Updated June 25, 2001