| Solaris Fibre Channel and Storage Multipathing Administration Guide |
| Solaris Fibre Channel and Storage Multipathing Administration Guide |
| C H A P T E R 7 |
|
Sun Solaris 10, Update 1, x86/x64 Fibre Channel Operating System Booting Procedure |
Starting with Sun Solaris 10 Update 1 (1/06), x86/x64 Operating System (OS), Fibre Channel (FC) devices now appear in the disk selection portion of Solaris Suninstall. An interactive Solaris 10, Update 1, installation is now required due to the potentially large number of devices that might appear in the disk selection portion of Solaris Suninstall.
This chapter describes how to manually install the Sun Solaris 10, Update 1 (1/06), x86/x64 FC OS. This OS includes Sun StorageTek SAN Foundation software with the Sun 2-Gbit and 4-Gbit Fibre Channel (FC) HBA drivers, and the Sun Solaris Fibre Channel and storage multipathing software.
The Sun Solaris 10, Update 1 (1/06), x64/x86 OS can be installed from a CD-ROM, DVD-ROM, or network.
This chapter contains the following topics:
This sections provides the requirements for installation.
The minimum HBA BIOS level for compatibility with the Sun Solaris FC and storage multipathing software can be downloaded from:
http://qlogic.com/support/sun_page.html
The minimum HBA BIOS level for compatibility with the Sun Solaris FC and storage multipathing software can be downloaded from:
http://emulex.com/ts/docoem/sun/10k.htm
You must have the following for installation.
This overview serves to familiarize you, before you begin the installation procedure. In order to successfully complete the installation, use an FC-based device during the "disk selection" portion of the installation. At the end of the interactive installation, you must select "Manual Reboot".
After OS installation and before rebooting, gather the configuration information by issuing the luxadm command on the newly installed logical unit number (LUN). The luxadm command output provides a map from c#t#d# to the array WWN and LUN number. Record the HBA World Wide Name (WWN) and array WWN port information.
During rebooting, use the WWN and LUN number to set the HBA BIOS for each HBA to be used to boot from each LUN on the same array. Change the system BIOS to perform booting from "CD-ROM" or "Network" to "disk"
|
Note - Console access is required for HBA and system BIOS changes. |
In addition, the following notes must be observed during the Sun Solaris OS installation.
Follow the instructions in the appropriate Sun HBA installation guide found at http://docs.sun.com/app/docs?q=StorageTek+Host+Bus+Adapter.
2. Install the Sun Solaris OS as described in the next section, To Perform a CD ROM, DVD ROM, or Network-Based OS Installation
|
After installing the HBA (see Installation Procedure), perform the following steps for an interactive network-based installation of the Sun Solaris 10, Update 1 (1/06), x86/x64 OS.
For more information, refer to Solaris 10 Installation Guide: Basic Installations,
817-0544-xx, found at http://docs.sun.com/.
1. If you are installing from a CD-ROM or DVD-ROM rather than over a network, insert the Sun Solaris Software into the CD-ROM or DVD-ROM drive.
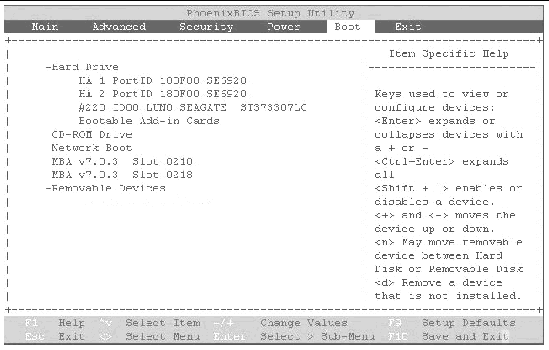
2. Upon initial power up, enter the system BIOS (method differs for each BIOS vendor) and configure it to boot from either the network or CD-ROM (DVD-ROM) as applicable.
See FIGURE 7-1 for an example of one of several BIOS setup screens.
|
Note - The system BIOS setup screens are different for each system BIOS vendor. |
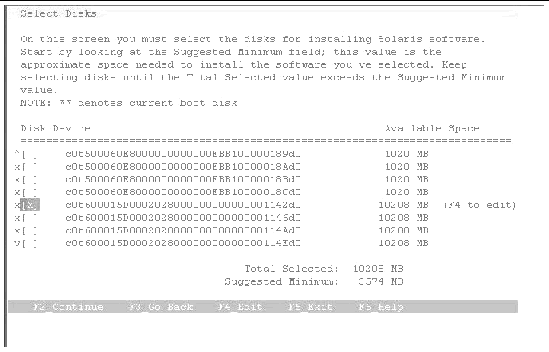
3. Install the Sun Solaris OS using the Solaris Interactive Installation (Suninstall). See FIGURE 7-2 for an example of one of several Suninstall screens.
4. During installation, select a desired array and its associated LUN.
5. Select "Manual reboot" at the end of the Suninstall utility screens and then verify your selections to start the Sun Solaris OS installation.
6. Before rebooting after the installation completes, issue the luxadm display command on the boot LUN. See FIGURE 7-3.
The following luxadm command output from the example in FIGURE 7-3 can be used to map the MPxIO based c#t#d# to the HBA WWN and array WWN:
7. During the reboot process, watch the monitor so you can enter the HBA #1 BIOS screen and specify the boot device to be the FC LUN onto which you just installed the Sun Solaris OS. Follow this step for each HBA to be used for multipathing, and specify the boot device to be the FC LUN on which you installed the Sun Solaris OS. See FIGURE 7-4 and FIGURE 7-5.
a. During host rebooting, press CTRL-Q to display the HBA BIOS screen.
b. Select the HBA that you want to enable as the boot device. Enable boot.
i. Select "Configuration Settings."
ii. Select "Selectable Boot Settings."
iii. Make sure that Selectable Boot is set to enable.
In this menu, you can select the boot device/LUN by the array WWPN.
d. Save and exit the HBA BIOS screen.
a. During host rebooting, press ALT-E to display the HBA BIOS screen.
b. Select the HBA that you want to enable as the boot device. Enable boot.
c. Select "Configure Boot Devices."
e. Select the WWPN of the desired boot device.
h. Select "boot device via the array WWPN."
i. Save and exit the HBA BIOS screen.
|
Note - As an example, the following modifications were made and entered and the resulting screen is shown in FIGURE 7-5:
|
8. Repeat the appropriate modifications for all HBAs and all LUNs.
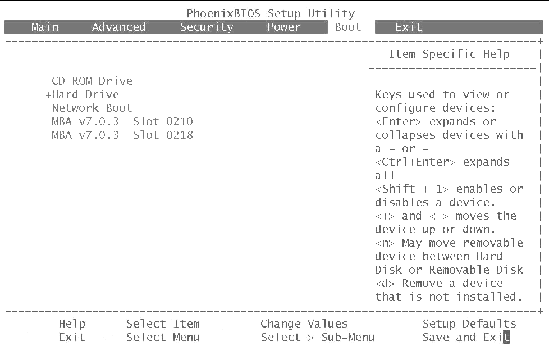
9. Enter the system BIOS (per the vendor's access method) and specify the boot device to be the FC LUN on which you installed the Solaris 10 Update 1 OS. See FIGURE 7-6 for an example of one screen in a vendor's system BIOS.
10. Reboot to the newly installed Solaris 10 Update 1 OS using the FC LUN specified in the system BIOS.
The following patches are recommended for the OS.
These patches can be found on the SunSolve web site at:
| Solaris Fibre Channel and Storage Multipathing Administration Guide | 819-0139-12 |
Copyright © 2006, Sun Microsystems, Inc. All Rights Reserved.
 To Perform a CD ROM, DVD ROM, or Network-Based OS Installation

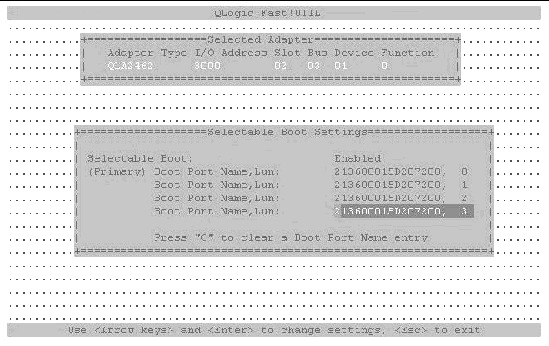
 Selectable boot = Enabled