Chapter 1 Configuring Hosts and Clusters
This chapter provides background information about configuring various aspects of the grid engine system. This chapter includes instructions for the following tasks:
-
Adding and Modifying Global and Host Configurations With QMON
-
Displaying the Basic Cluster Configurations From the Command Line
-
Modifying the Basic Cluster Configurations From the Command Line
About Hosts and Daemons
Grid engine system hosts are classified into four groups, depending on which daemons are running on the system and on how the hosts are registered at sge_qmaster.
-
Master host. The master host is central for the overall cluster activity. The master host runs the master daemon sge_qmaster. sge_qmaster controls all grid engine system components such as queues and jobs. It also maintains tables about the status of the components, about user access permissions and the like. The master host usually runs the scheduler sge_schedd. The master host requires no further configuration other than that performed by the installation procedure.
For information about how to initially set up the master host, see How to Install the Master Host in Sun N1 Grid Engine 6.1 Installation Guide. For information about how to configure dynamic changes to the master host, see Configuring Shadow Master Hosts.
-
Execution hosts. Execution hosts are nodes that have permission to run jobs. Therefore they host queue instances, and they run the execution daemon sge_execd. An execution host is initially set up by the installation procedure, as described in How to Install Execution Hosts in Sun N1 Grid Engine 6.1 Installation Guide.
-
Administration hosts. Permission can be given to hosts other than the master host to carry out any kind of administrative activity. Administrative hosts are set up with the following command:
qconf -ah hostname
See the qconf(1) man page for details.
-
Submit hosts. Submit hosts allow for submitting and controlling batch jobs only. In particular, a user who is logged into a submit host can use qsub to submit jobs, can use qstat to control the job status, or can run the graphical user interface QMON. Submit hosts are set up using the following command:
qconf -as hostname
See the qconf(1) man page for details.
Note –
A host can belong to more than one class. The master host is by default an administration host and a submit host.
Migrating qmaster to Another Host
Because the spooling database cannot be located on an NFS-mounted file system, the following procedure requires that the Berkeley DB RPC server be used for spooling.
If you configure spooling to a local file system, you must transfer the spooling database to a local file system on the new sge_qmaster host.
 How to Migrate qmaster to
Another Host Using a Script
-
Check that the new master host has read/write access.
The new master host must have read/write access to the qmaster spool directory and common directory as does the current master. If the administrative user is user root (check the global cluster configuration for the setting of admin_user), you should verify that user root can create files in these directory under his user name.
-
Run the migrate script on the new master host.
On the new master host, run the following script as user root:
# /etc/init.d/sgemaster -migrate
This command stops sge_qmaster and sge_schedd on the old master host and starts them on the new master host. The master host name listed in the file $SGE_ROOT/$SGE_CELL/common/act_qmaster is automatically changed to the new master host. If qmaster is not running, warning messages will appear and a delay of about one minute will occur until qmaster is started on the new host.
-
Modify the shadow_masters file if necessary.
Check if the $SGE_ROOT/$CELL/common/shadow_masters file exists. If the file exists, you can add the new qmaster host to this file and remove the old master host, depending on your requirements. Then stop and restart the sge_shadowd daemons by issuing the following commands on the respective machines:
/etc/init.d/sgemaster -shadowd stop
/etc/init.d/sgemaster -shadowd start
Note –The location of the system-wide sgemaster startup script may differ on your operating system. You can always use $SGE_ROOT/default/common/sgemaster.
Important Notes about Migration
The migration procedure migrates to the host on which the sgemaster -migrate command is issued. If the file primary_qmaster exists, any subsequent calls of sgemaster on the machine contained in the primary_qmaster file will cause a migration back to that machine. To avoid such a situation, change or delete the $SGE_ROOT/$SGE_CELL/common/primary_qmaster file.
Note –
Existence of the primary_qmaster file does not imply that the qmaster is actually running.
Although jobs may continue to run during the migration procedure, the grid should be inactive. While the migration is taking place, any running SGE commands, such as qsub or qstat, will return an error.
If the current qmaster is down, there will be a delay in shutting down the scheduler until it times out waiting for contact with the qmaster.
The shadow_masters file has no direct effect on the migration procedure. This file only exists if one or more shadow masters have been configured. For more information on how to set up shadow masters, see Configuring Shadow Master Hosts.
 How to Migrate qmaster to
Another Host Manually
-
On the current master host, stop the master daemon and the scheduler daemon by typing the following command:
qconf -ks -km
-
Edit the sge-root/cell/common/act_qmaster file according to the following guidelines:
-
On the new master host, start sge_qmaster and sge_schedd:
sge-root/cell/common/sge5
Configuring Shadow Master Hosts
Shadow master hosts are machines in the cluster that can detect a failure of the master daemon and take over its role as master host. When the shadow master daemon detects that the master daemon sge_qmaster has failed abnormally, it starts up a new sge_qmaster on the host where the shadow master daemon is running.
Note –
If the master daemon is shut down gracefully, the shadow master daemon does not start up. If you want the shadow master daemon to take over after you shut down the master daemon gracefully, remove the lock file that is located in the sge_qmaster spool directory. The default location of this spool directory is sge-root/cell/spool/qmaster.
The automatic failover start of a sge_qmaster on a shadow master host takes approximately one minute. Meanwhile, you get an error message whenever a grid engine system command is run.
Note –
The file sge-root/cell/common/act_qmaster contains the name of the host actually running the sge_qmaster daemon.
Shadow Master Host Requirements
To prepare a host as a shadow master, the following requirements must be met:
-
The shadow master host must share sge_qmaster status information, job configuration, and queue configuration logged to disk. In particular, a shadow master host needs read/write root access to the master host's spool directory and to the directory sge-root/cell/common.
-
Either the Berkeley DB RPC server or classic grid engine system spooling must be used for sge_qmaster spooling. For more information, see Database Server and Spooling Host in Sun N1 Grid Engine 6.1 Installation Guide.
-
The shadow-master-hostname file must contain a line that defines the host as shadow master host.
As soon as these requirements are met, the shadow-master-host facility is activated for this host. You do not have to restart the grid engine system daemons to activate the feature.
Shadow Master Hosts File
The shadow master host file, sge-root/cell/common/shadow_masters, contains the following:
-
The name of the primary master host, which is the machine where the master daemon sge_qmaster initially runs
-
The names of the shadow master hosts
The format of the shadow master hostname file is as follows:
-
The first line of the file defines the primary master host
-
The following lines define the shadow master hosts, one host per line
The order of the shadow master hosts is significant. The primary master host is the first line in the file. If the primary master host fails to proceed, the shadow master defined in the second line takes over. If this shadow master also fails, the shadow master defined in the third line takes over, and so forth.
Starting Shadow Master Hosts
To start a shadow sge_qmaster, the system must be sure either that the old sge_qmaster has terminated, or that it will terminate without performing actions that interfere with the newly-started shadow sge_qmaster.
In very rare circumstances, you might not be able to determine that the old sge_qmaster has terminated or that it will terminate. In such cases, an error message is logged to the messages log file of the sge_shadowds on the shadow master hosts. See Chapter 9, Fine Tuning, Error Messages, and Troubleshooting. Also, any attempts to open a tcp connection to a sge_qmaster daemon permanently fail. If this occurs, make sure that no master daemon is running, and then restart sge_qmaster manually on any of the shadow master machines. See Restarting Daemons From the Command Line.
Configuring Shadow Master Hosts Environment Variables
There are three environment variables which affect the takeover time for a shadow master:
-
SGE_DELAY_TIME - This variable controls the interval in which sge_shadowd pauses if a takeover bid fails. This value is used only when there are multiple sge_shadowd instances and they are contending to be the master. (the default is 600 seconds.)
-
SGE_CHECK_INTERVAL - This variable controls the interval in which the sge_shadowd checks the heartbeat file (60 seconds by default.)
-
SGE_GET_ACTIVE_INTERVAL - This variable controls the interval when a sge_shadowd instance tries to take over when the heartbeat file has not changed.
These variables interact in the following way.
-
The master host updates the heartbeat file every 30 seconds.
-
The sge_shadowd daemon checks for changes to heartbeat file every number of seconds defined by the SGE_CHECK_INTERVAL variable. So, this value must be greater than 30 seconds.
-
If the sge_shadowd daemon notices that the heartbeat file has been updated, it starts waiting again until it is once more time to check the heartbeat file.
-
If the sge_shadowd daemon notices that the heartbeat file has not been updated, it waits for number of seconds defined by the SGE_CHECK_INTERVAL variable to expire. This step lets you make sure that the sge_shadowd daemon is not too agressive in trying to takeover and allows the master host some leeway in updating the heartbeat file.
-
When the SGE_GET_ACTIVE_INTERVAL has expired, sge_shadowd daemon takes over if heartbeat file is still not updated.
A reasonable configuration might be to set the SGE_CHECK_INTERVAL to 45 seconds and the SGE_GET_ACTIVE_INTERVAL to 90 seconds. So, after about 2 minutes, the take over will occur. If you want to check the operation of the shadow host after you have configured these environment variables you will have to pull out the master host's network cable to simulate a failure.
Configuring Hosts
N1 Grid Engine 6.1 software maintains object lists for all types of hosts except for the master host. The lists of administration host objects and submit host objects indicate whether a host has administrative or submit permission. The execution host objects include other parameters. Among these parameters are the load information that is reported by the sge_execd running on the host, and the load parameter scaling factors that are defined by the administrator.
You can configure host objects with QMON or from the command line.
QMON Host Configuration dialog box has four tabs:
-
Administration Host tab. See Figure 1–3.
-
Submit Host tab. See Figure 1–4.
-
Host Groups tab. See Figure 1–5.
-
Execution Host tab. See Figure 1–1.
The qconf command provides the command-line interface for managing host objects.
Configuring Execution Hosts With QMON
Before you configure an execution host, you must first install the software on the execution host as described in How to Install Execution Hosts in Sun N1 Grid Engine 6.1 Installation Guide.
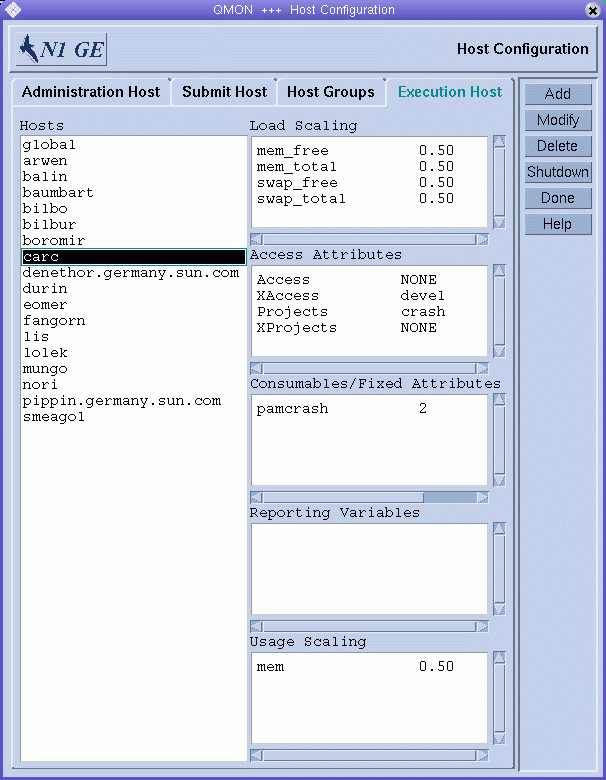
To configure execution hosts, on the QMON Main Control window click the Host Configuration button, and then click the Execution Host tab. The Execution Host tab looks like the following figure:
Figure 1–1 Execution Host Tab
Note –
Administrative or submit commands are allowed from execution hosts only if the execution hosts are also declared to be administration or submit hosts. See Configuring Administration Hosts With QMON and Configuring Submit Hosts With QMON.
The Hosts list displays the execution hosts that are already defined.
The Load Scaling list displays the currently configured load-scaling factors for the selected execution host. See Load Parameters for information about load parameters.
The Access Attributes list displays access permissions. See Chapter 4, Managing User Access for information about access permissions.
The Consumables/Fixed Attributes list displays resource availability for consumable and fixed resource attributes associated with the host. See Complex Resource Attributes for information about resource attributes.
The Reporting Variables list displays the variables that are written to the reporting file when a load report is received from an execution host. See Defining Reporting Variables for information about reporting variables.
The Usage Scaling list displays the current scaling factors for the individual usage metrics CPU, memory, and I/O for different machines. Resource usage is reported by sge_execd periodically for each currently running job. The scaling factors indicate the relative cost of resource usage on the particular machine for the user or project running a job. These factors could be used, for instance, to compare the cost of a second of CPU time on a 400 MHz processor to that of a 600 MHz CPU. Metrics that are not displayed in the Usage Scaling window have a scaling factor of 1.
Adding or Modifying an Execution Host
To add or modify an execution host, click Add or Modify. The Add/Modify Exec Host dialog box appears.
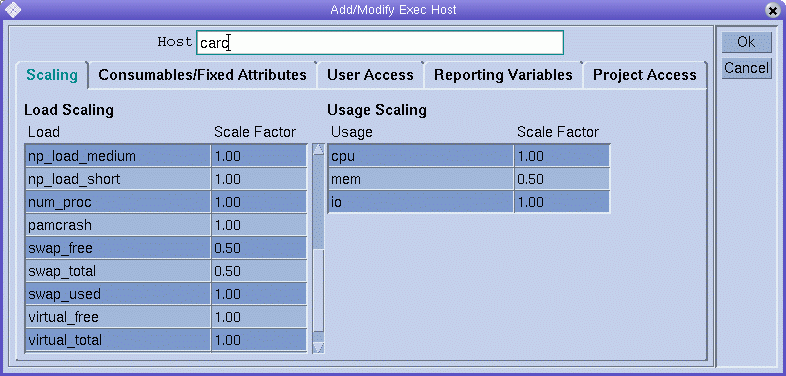
The Add/Modify Exec Host dialog box enables you to modify all attributes associated with an execution host. The name of an existing execution host is displayed in the Host field.
If you are adding a new execution host, type its name in the Host field.
Defining Scaling Factors
To define scaling factors, click the Scaling tab.
The Load column of the Load Scaling table lists all available load parameters, and the Scale Factor column lists the corresponding definitions of the scaling. You can edit the Scale Factor column. Valid scaling factors are positive floating-point numbers in fixed-point notation or scientific notation.
The Usage column of the Usage Scaling table lists the current scaling factors for the usage metrics CPU, memory, and I/O. The Scale Factor column lists the corresponding definitions of the scaling. You can edit the Scale Factor column. Valid scaling factors are positive floating-point numbers in fixed-point notation or scientific notation.
Defining Resource Attributes
To define the resource attributes to associate with the host , click the Consumables/Fixed Attributes tab.
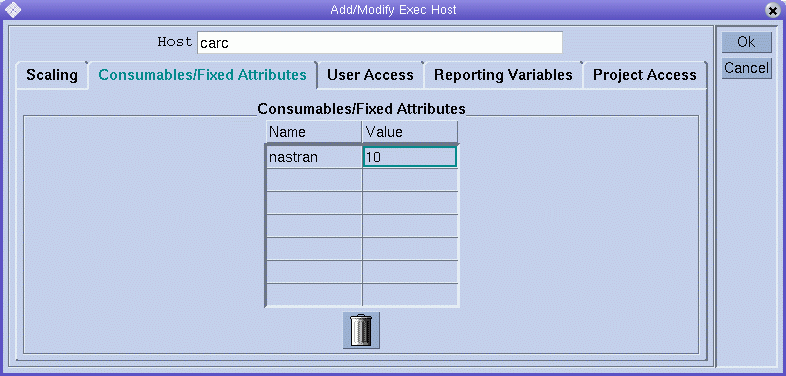
The resource attributes associated with the host are listed in the Consumables/Fixed Attributes table.
Use the Complex Configuration dialog box if you need more information about the current complex configuration, or if you want to modify it. For details about complex resource attributes, see Complex Resource Attributes.
The Consumables/Fixed Attributes table lists all resource attributes for which a value is currently defined. You can enhance the list by clicking either the Name or the Value column name. The Attribute Selection dialog box appears, which includes all resource attributes that are defined in the complex.
Figure 1–2 Attribute Selection Dialog Box
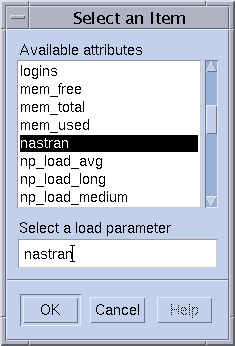
To add an attribute to the Consumables/Fixed Attributes table, select the attribute, and then click OK.
To modify an attribute value, double-click a Value field, and then type a value.
To delete an attribute, select the attribute, and then press Control-D or click mouse button 3. Click OK to confirm that you want to delete the attribute.
Defining Access Permissions
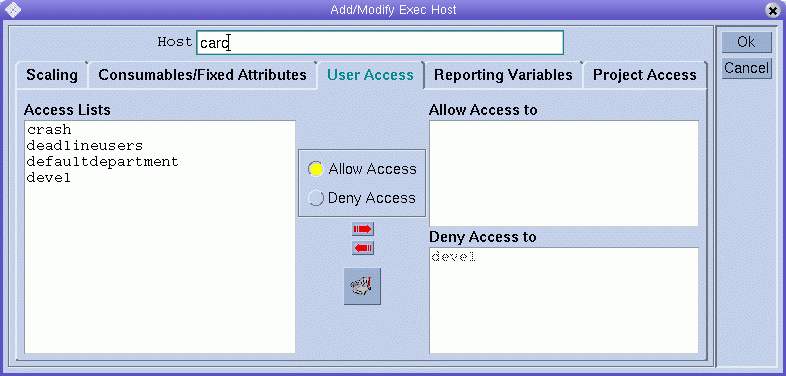
To define user access permissions to the execution host based on previously configured user access lists, click the User Access tab.
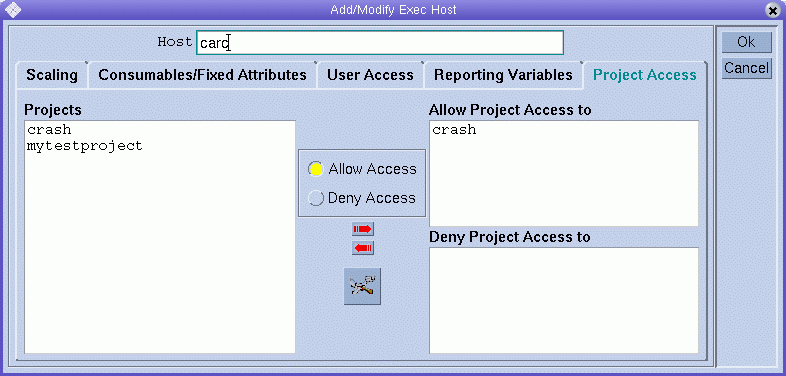
To define project access permissions to the execution host based on previously configured projects, click the Project Access tab.
Defining Reporting Variables
To define reporting variables, click the Reporting Variables tab.
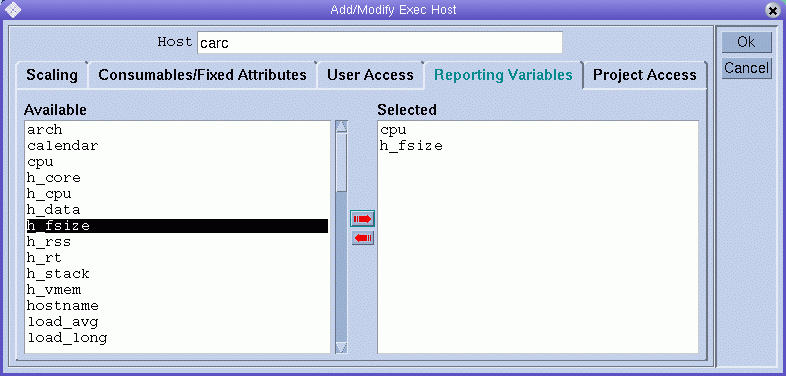
The Available list displays all the variables that can be written to the reporting file when a load report is received from the execution host.
Select a reporting variable from the Available list, and then click the red right arrow to add the selected variable to the Selected list.
To remove a reporting variable from the Selected list, select the variable, and then click the left red arrow.
Deleting an Execution Host
To delete an execution host, on the QMON Main Control window click the Host Configuration button, and then click the Execution Host tab.
In the Execution Host dialog box, select the host that you want to delete, and then click Delete.
Shutting Down an Execution Host Daemon
To shut down an execution host daemon, on the QMON Main Control window click the Host Configuration button, and then click the Execution Host tab.
In the Execution Host dialog box, select a host, and then click Shutdown.
Configuring Execution Hosts From the Command Line
To configure execution hosts from the command line, use the following arguments for the qconf command:
-
The -ae option (add execution host) displays an editor containing an execution host configuration template. The editor is either the default vi editor or an editor corresponding to the EDITOR environment variable. If you specify exec-host, which is the name of an already configured execution host, the configuration of this execution host is used as a template. The execution host is configured by changing the template and saving to disk. See the host_conf(5) man page for a detailed description of the template entries to be changed.
-
The -de option (delete execution host) deletes the specified host from the list of execution hosts. All entries in the execution host configuration are lost.
-
The -me option (modify execution host) displays an editor containing the configuration of the specified execution host as template. The editor is either the default vi editor or an editor corresponding to the EDITOR environment variable. The execution host configuration is modified by changing the template and saving to disk. See the host_conf(5) man page for a detailed description of the template entries to be changed.
-
The -Me option (modify execution host) uses the content of filename as execution host configuration template. The configuration in the specified file must refer to an existing execution host. The configuration of this execution host is replaced by the file content. This qconf option is useful for changing the configuration of offline execution hosts, for example, in cron jobs, as the -Me option requires no manual interaction.
-
The -se option (show execution host) shows the configuration of the specified execution host as defined in host_conf.
-
The -sel option (show execution host list) displays a list of hosts that are configured as execution hosts.
Configuring Administration Hosts With QMON
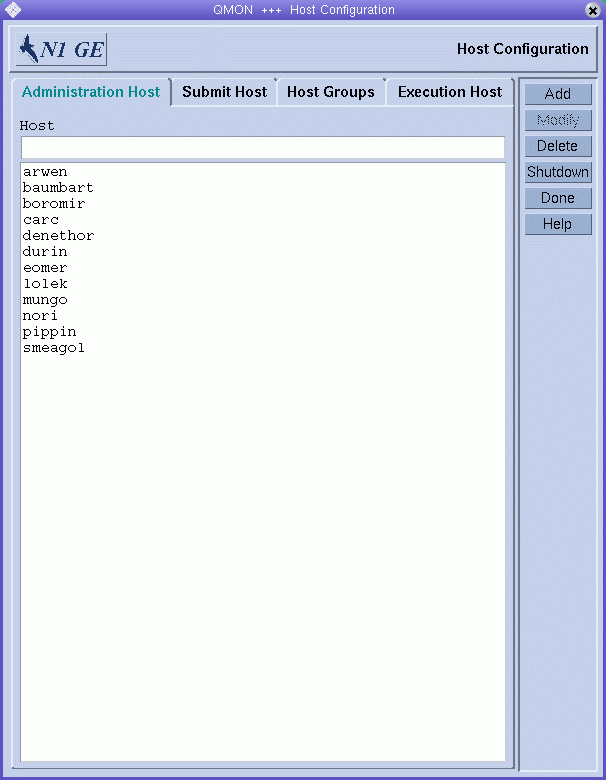
On the QMON Main Control window, click the Host Configuration button. The Host Configuration dialog box appears, displaying the Administration Host tab. The Administration Host tab looks like the following figure:
Figure 1–3 Administration Host Tab
Note –
The Administration Host tab is displayed by default when you click the Host Configuration button for the first time.
Use the Administration Host tab to configure hosts on which administrative commands are allowed. The Host list displays the hosts that already have administrative permission.
Adding an Administration Host
To add a new administration host, type its name in the Host field, and then click Add, or press the Return key.
Deleting an Administration Host
To delete an administration host from the list, select the host, and then click Delete.
Configuring Administration Hosts From the Command Line
To configure administration hosts from the command line, use the following arguments for the qconf command:
-
The -ah option (add administration host) adds the specified host to the list of administration hosts.
-
The -dh option (delete administration host) deletes the specified host from the list of administration hosts.
-
The -sh option (show administration hosts) displays a list of all currently configured administration hosts.
Configuring Submit Hosts With QMON
No administrative commands are allowed from submit hosts unless the hosts are also declared to be administration hosts. See Configuring Administration Hosts With QMON for more information.
To configure submit hosts, on the QMON Main Control window click the Host Configuration button, and then click the Submit Host tab. The Submit Host tab is shown in the following figure.
Figure 1–4 Submit Host Tab
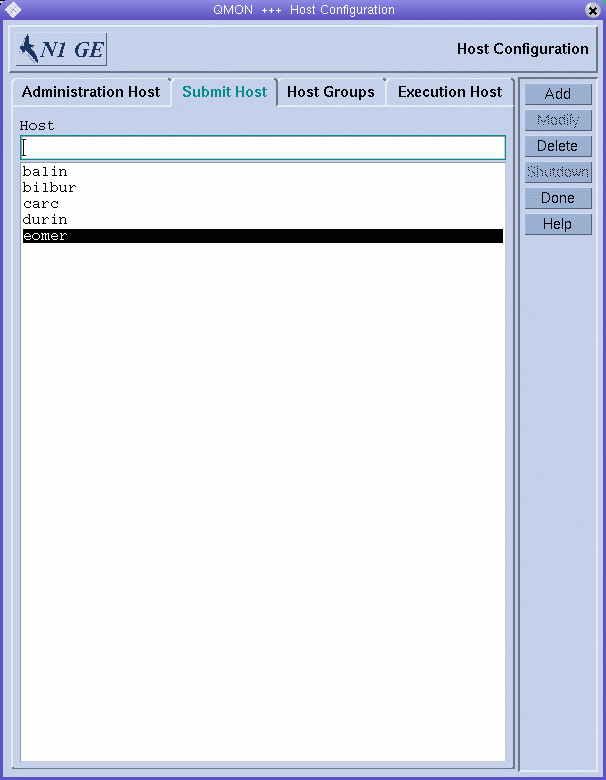
Use the Submit Host tab to declare the hosts from which jobs can be submitted, monitored, and controlled. The Host list displays the hosts that already have submit permission.
Adding a Submit Host
To add a submit host, type its name in the Host field, and then click Add, or press the Return key.
Deleting a Submit Host
To delete a submit host, select it, and then click Delete.
Configuring Submit Hosts From the Command Line
To configure submit hosts from the command line, use the following arguments for the qconf command:
-
The -as option (add submit host) adds the specified host to the list of submit hosts.
-
The -ds option (delete submit host) deletes the specified host from the list of submit hosts.
-
The -ss option (show submit hosts) displays a list of the names of all currently configured submit hosts.
Configuring Host Groups With QMON
Host groups enable you to use a single name to refer to multiple hosts. You can group similar hosts together in a host group. A host group can include other host groups as well as multiple individual hosts. Host groups that are members of another host group are subgroups of that host group.
For example, you might define a host group called @bigMachines that includes the following members:
|
@solaris64 |
|
@solaris32 |
|
fangorn |
|
balrog |
The initial @ sign indicates that the name is a host group. The host group @bigMachines includes all hosts that are members of the two subgroups @solaris64 and @solaris32. @bigMachines also includes two individual hosts, fangorn and balrog.
On the QMON Main Control window, click the Host Configuration button. The Host Configuration dialog box appears.
Click the Host Groups tab. The Host Groups tab looks like the following figure.
Figure 1–5 Host Groups Tab
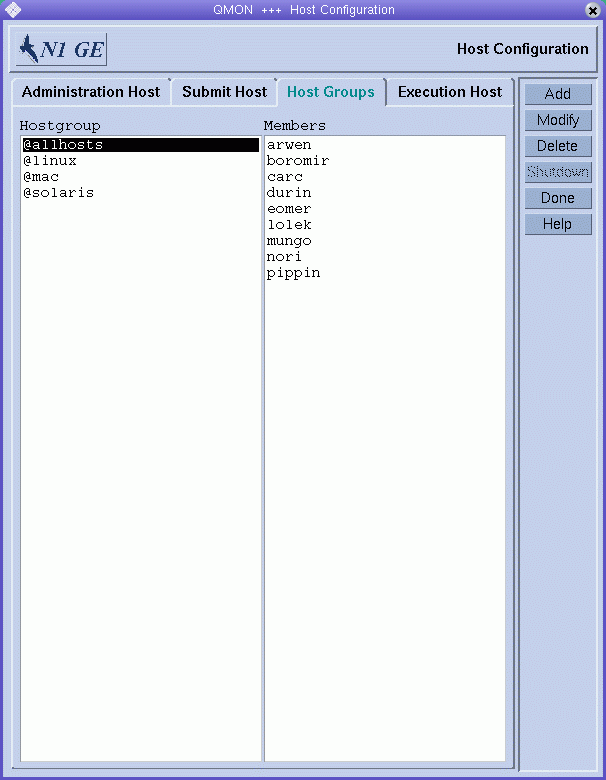
Use the Host Groups tab to configure host groups. The Hostgroup list displays the currently configured host groups. The Members list displays all the hosts that are members of the selected host group.
Adding or Modifying a Host Group
To add a host group, click Add. To Modify a host group, click Modify. The Add/Modify Host Group dialog box appears.
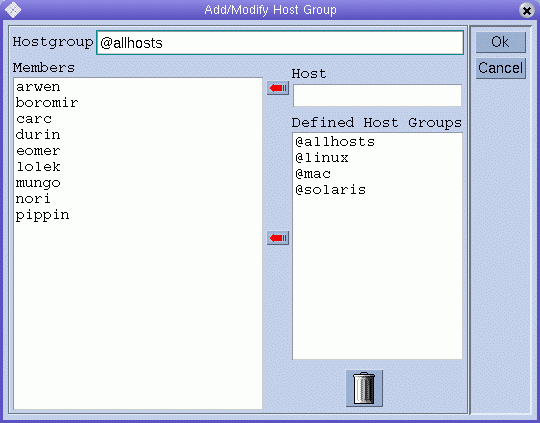
If you are adding a new host group, type a host group name in the Hostgroup field. The host group name must begin with an @ sign.
If you are modifying an existing host group, the host group name is provided in the Hostgroup field.
To add a host to the host group that you are configuring, type the host name in the Host field, and then click the red arrow to add the name to the Members list. To add a host group as a subgroup, select a host group name from the Defined Host Groups list, and then click the red arrow to add the name to the Members list.
To remove a host or a host group from the Members list, select it, and then click the trash icon.
Click Ok to save your changes and close the dialog box. Click Cancel to close the dialog box without saving your changes.
Deleting a Host Group
To delete a host group, select it from the Hostgroup list, and then click Delete.
Configuring Host Groups From the Command Line
To configure host groups from the command line, use the following arguments for the qconf command:
-
qconf -ahgrp [host-group-name]
The -ahgrp option (add host group) adds a new host group to the list of host groups. See the hostgroup(5) man page for a detailed description of the configuration format.
-
The -Ahgrp option (add host group from file) displays an editor containing a host group configuration defined in filename. The editor is either the default vi editor or an editor corresponding to the EDITOR environment variable. The host group is configured by changing the configuration and saving to disk.
-
The -dhgrp option (delete host group) deletes the specified host group from the list of host groups. All entries in the host group configuration are lost.
-
The -mhgrp option (modify host group) displays an editor containing the configuration of the specified host group as template. The editor is either the default vi editor or an editor corresponding to the EDITOR environment variable. The host group configuration is modified by changing the template and saving to disk.
-
The -Mhgrp option (modify host group from file) uses the content of filename as host group configuration template. The configuration in the specified file must refer to an existing host group. The configuration of this host group is replaced by the file content.
-
The -shgrp option (show host group) shows the configuration of the specified host group.
-
qconf -shgrp_tree host-group-name
The -shgrp_tree option (show host group as tree) shows the configuration of the specified host group and its sub-hostgroups as a tree.
-
qconf -shgrp_resolved host-group-name
The -shgrp_resolved option (show host group with resolved host list) shows the configuration of the specified host group with a resolved host list.
-
The -shgrpl option (show host group list) displays a list of all host groups.
Monitoring Execution Hosts With qhost
Use the qhost command to retrieve a quick overview of the execution host status:
% qhost |
This command produces output that is similar to the following example:
Example 1–1 Sample qhost Output
HOSTNAME ARCH NCPU LOAD MEMTOT MEMUSE SWAPTO SWAPUS ------------------------------------------------------------------------------- global - - - - - - - arwen aix43 1 - - - - - baumbart irix65 2 0.00 1.1G 91.5M 128.0M 0.0 boromir hp11 1 - 128.0M - 256.0M - carc lx24-amd64 2 0.00 3.8G 989.8M 1.0G 0.0 denethor aix51 1 4.54G - - - - durin lx24-x86 1 0.37 123.1M 46.5M 213.6M 26.6M eomer sol-sparc64 1 0.13 256.0M 248.0M 513.0M 93.0M lolek tru64 1 0.02 1.0G 790.0M 1.0G 8.0K mungo lx22-alpha 1 1.00 248.9M 78.8M 129.8M 2.5M nori sol-x86 2 0.38 1023.0M 372.0M 512.0M 37.0M pippin darwin 1 0.00 640.0M 264.0M 0.0 0.0 smeagol hp11 1 0.35 512.0M 425.0M 1.0G 95.0M |
See the qhost(1) man page for a description of the output format and for more options.
Invalid Host Names
The following is a list of host names that are invalid, reserved, or otherwise not allowed to be used:
|
global |
|
template |
|
all |
|
default |
|
unknown |
|
none |
Killing Daemons From the Command Line
To kill grid engine system daemons from the command line, use one of the following commands:
% qconf -ke[j] {hostname,... | all}
% qconf -ks
% qconf -km
|
You must have manager or operator privileges to use these commands. See Chapter 4, Managing User Access for more information about manager and operator privileges.
-
The qconf –ke command shuts down the execution daemons. However, it does not cancel active jobs. Jobs that finish while no sge_execd is running on a system are not reported to sge_qmaster until sge_execd is restarted. The job reports are not lost, however.
The qconf -kej command kills all currently active jobs and brings down all execution daemons.
Use a comma-separated list of the execution hosts you want to shut down, or specify all to shut down all execution hosts in the cluster.
-
The qconf -ks command shuts down the scheduler sge_schedd.
-
The qconf -km command forces the sge_qmaster process to terminate.
If you want to wait for any active jobs to finish before you run the shutdown procedure, use the qmod -dq command for each cluster queue, queue instance, or queue domain before you run the qconf sequence described earlier. For information about cluster queues, queue instances, and queue domains, see Configuring Queues.
% qmod -dq {cluster-queue | queue-instance | queue-domain}
|
The qmod -dq command prevents new jobs from being scheduled to the disabled queue instances. You should then wait until no jobs are running in the queue instances before you kill the daemons.
Restarting Daemons From the Command Line
Log in as root on the machine on which you want to restart grid engine system daemons.
Type the following commands to run the startup scripts:
% sge-root/cell/common/sgemaster % sge-root/cell/common/sgeexecd |
These scripts looks for the daemons normally running on this host and then start the corresponding ones.
Basic Cluster Configuration
The basic cluster configuration is a set of information that is configured to reflect site dependencies and to influence grid engine system behavior. Site dependencies include valid paths for programs such as mail or xterm. A global configuration is provided for the master host as well as for every host in the grid engine system pool. In addition, you can configure the system to use a configuration local to each host to override particular entries in the global configuration.
The cluster administrator should adapt the global configuration and local host configurations to the site's needs immediately after the installation. The configurations should be kept up to date afterwards.
The sge_conf(5) man page contains a detailed description of the configuration entries.
Displaying a Cluster Configuration With QMON
On the QMON Main Control window, click the Cluster Configuration button. The Cluster Configuration dialog box appears.
Figure 1–6 Cluster Configuration Dialog Box
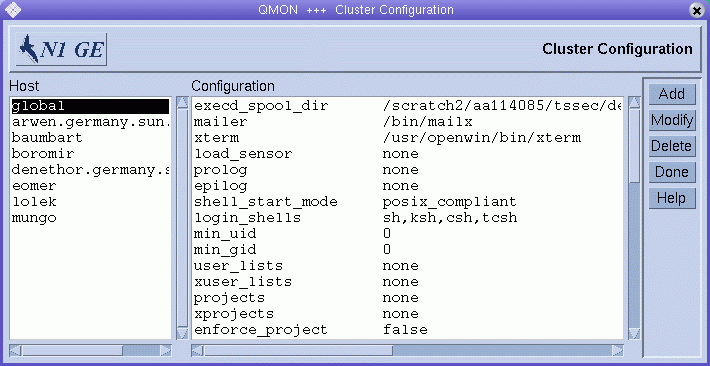
In the Host list, select the name of a host. The current configuration for the selected host is displayed under Configuration.
Displaying the Global Cluster Configuration With QMON
On the QMON Main Control window, click the Cluster Configuration button.
In the Host list, select global.
The configuration is displayed in the format that is described in the sge_conf(5) man page.
Adding and Modifying Global and Host Configurations With QMON
In the Cluster Configuration dialog box (Figure 1–6), select a host name or the name global, and then click Add or Modify. The Cluster Settings dialog box appears.
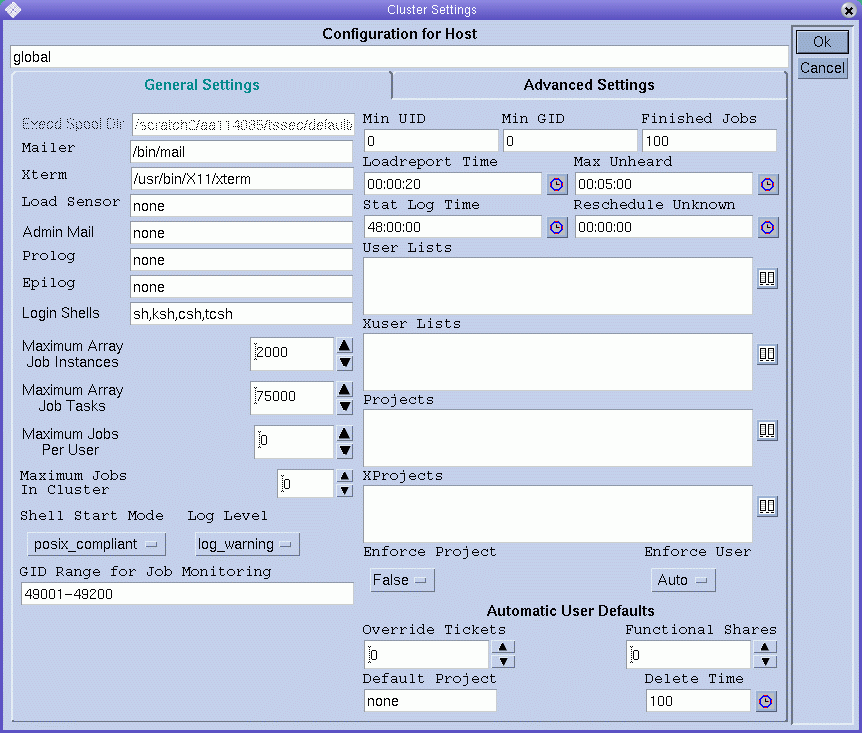
The Cluster Settings dialog box enables you to change all parameters of a global configuration or a local host configuration.
All fields of the dialog box are accessible only if you are modifying the global configuration. If you modify a local host, its configuration is reflected in the dialog box. You can modify only those parameters that are feasible for local host changes.
If you are adding a new local host configuration, the dialog box fields are empty.
The Advanced Settings tab shows a corresponding behavior, depending on whether you are modifying a configuration or are adding a new configuration. The Advanced Settings tab provides access to more rarely used cluster configuration parameters.
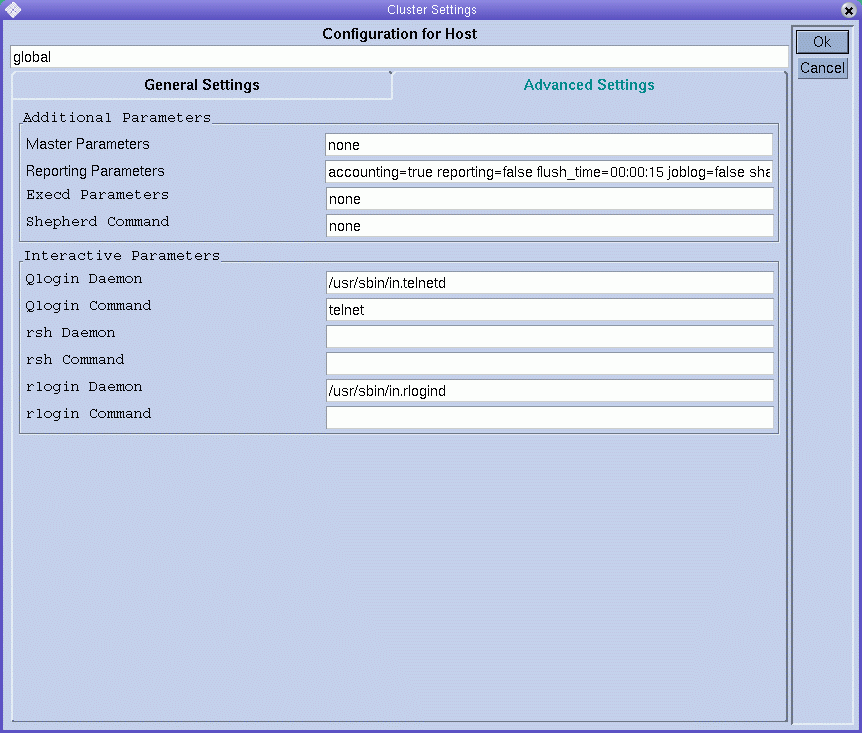
When you finish making changes, click OK to save your changes and close the dialog box. Click Cancel to close the dialog box without saving changes.
See the sge_conf(5) man page for a complete description of all cluster configuration parameters.
Deleting a Cluster Configuration With QMON
On the QMON Main Control window, click the Cluster Configuration button.
In the Host list, select the name of a host whose configuration you want to delete, and then click Delete.
Displaying the Basic Cluster Configurations From the Command Line
To display the current cluster configuration, use the qconf -sconf command. See the qconf(1) man page for a detailed description.
Type one of the following commands:
% qconf -sconf % qconf -sconf global % qconf -sconf host |
-
The qconf –sconf and qconf –sconf global commands are equivalent. They display the global configuration.
-
The qconf -sconf host command displays the specified local host's configuration.
Modifying the Basic Cluster Configurations From the Command Line
Note –
You must be an administrator to use the qconf command to change cluster configurations.
Type one of the following commands:
% qconf -mconf global % qconf -mconf host |
-
The qconf -mconf global command modifies the global configuration.
-
The qconf -mconf host command modifies the local configuration of the specified execution host or master host.
The qconf commands that are described here are examples of the many available qconf commands. See the qconf(1) man page for others.
- © 2010, Oracle Corporation and/or its affiliates
