| Oracle® Enterprise Data Quality for Product Data Governance Studio Reference Guide Release 5.6.2 Part Number E23609-02 |
|
|
View PDF |
| Oracle® Enterprise Data Quality for Product Data Governance Studio Reference Guide Release 5.6.2 Part Number E23609-02 |
|
|
View PDF |
This chapter explains how to run a Governance Studio project and use it to review your source data.
A Governance Studio job may be run synchronously or asynchronously. Synchronous execution runs in real time the foreground of the Governance Studio client workspace and is started by clicking on the job execution button. Program interaction is suspended until execution is completed when running a synchronous job. A synchronous execution runs in the background and releases the Governance Studio application to continue work. Large jobs should be run asynchronously though smaller jobs may be run using Synchronous execution.
To run your Governance Studio job in real time (synchronously), click the Run Synchronously button on the toolbar or from the Run menu, select Transform Data.
To run your Governance Studio job in the background (asynchronously), you would click the Submit Job button on the toolbar or from the Run menu, select Submit Job. This submits the job and closes your project.
If the DSA for your Governance Studio project contains an Ngram Match or an Attribute Match 2 (associated with Semantic Key 2), you can change the matching thresholds set in the DSA to use settings you provide for data transformation.
Note:
When the associated DSA does not contain these matching processes, this option is inactive.To run your Governance Studio with matching overrides, from the Run menu, select Transform Data with Overrides.
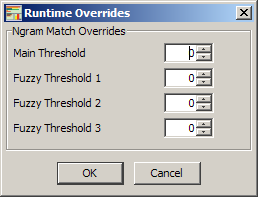
Use the Runtime Overrides dialog box to configure runtime only settings for the overall matching threshold and/or the fuzzy matching settings, and then click OK. Your data is immediately transformed using the runtime settings and the results are displayed.
For more information about the threshold settings, see Oracle Enterprise Data Quality for Product Data Application Studio Reference Guide.
Once your data transformation is complete, the Override button appears in the Governance Studio frame as in the following:
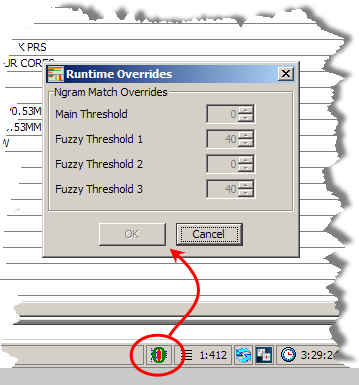
If you click Override, the override matching threshold settings are displayed for you to review and cannot be changed.
After running a Governance Studio project you can review the output and prepare some or all of the output for downstream processing. This includes sending alternatives to a web search interface to enable cross-sell or up-sell, or sending exceptions to knowledge engineers for appropriate modifications to data lenses to improve recognition and classification of the data.
You may also use the AutoSuggest feature to have the Governance Studio automatically suggest attributes that may have been missed due to misspellings or abbreviations. Autosuggested data may then be transferred to an Output tab table for further processing.
This section provides some examples of the Governance Studio output that extracts attributes and provides classification statistics and suggestions.
Depending on the type of output configured in the underlying DSA, you can take further action based upon your results. Each output type is indicated by a tab in the Governance Studio project.
Rows that have been selected in an Output tab may be 'checked' (selected) to continue processing based on the following actions designated in the underlying DSA output step:
| Action | Toolbar Button |
|---|---|
| Process (Apply DSA) | |
| Reprocess (Re-run DSA) | |
| Complete (Completion DSA) | |
| Quick Lookup (Lookup DSA) |
The primary DSA that is used to process the source data is displayed in the Status Field. When a secondary DSA will be used to process the data, it is displayed in parenthesis in the tooltip of that processing button so that you can view it before processing your data.
Once data has been reviewed, the set of data can be sent to another DSA to continue the processing and to generate text output. This text output can be inserted into a database, emailed, or saved as a file.
To apply a secondary DSA to a set of data, select a set of rows on an Output tab using the check mark column.
From the Run menu, select Apply Checked Rows or click the Apply button on the toolbar.
Similar to applying a secondary DSA to process a set of reviewed data, the Re-Run feature not only applies the DSA it automatically returns the results to the current project and merges it into existing output data. Once the results are merged, the data selected for processing is then deleted from the main DSA output.
To apply a secondary DSA to a set of data, select a set of rows on an Output tab using the check mark column.
Note:
All data selected for re-run is included in a re-run operation so all of the source data in the top task pane and the matching results in the bottom task pane are reprocessed.From the Run menu, click Re-run Checked Rows or click the Re-run button on the toolbar.
Note:
Re-run is not available (dimmed) if you have selected the Conserve Memory option. For more information, see "Configuring Options".You can associate a current DSA with a completion DSA to set a specific project run to a completed status. The completion DSA can include project closing tasks and functions necessary a final closeout of the project.
Once the project completion (closing) has occurred, the project is set to a read-only state that does not allow any further changes. The project can be used to create a new project using the New Project From… option though all other application functionality used to modify or manipulate data is made inactive (dimmed).
To close a project, click the Release Batch tab.
Locate the Release Batch ID that you want to close and click the adjacent check box.
From the Run menu, click Complete Project or the Complete Project button on the toolbar.
A verification dialog is displayed as shown in the following figure.
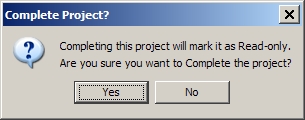
If you are sure that you want to close this project, click Yes; otherwise, click No to cancel the process.
A Quick Lookup DSA is assigned to the output step of a DSA that uses Ngram matching to allow you to show a variant in the context of the original description. The results are displayed in the Governance Studio on the Output tab for the Ngram output step as in the following sample tab:
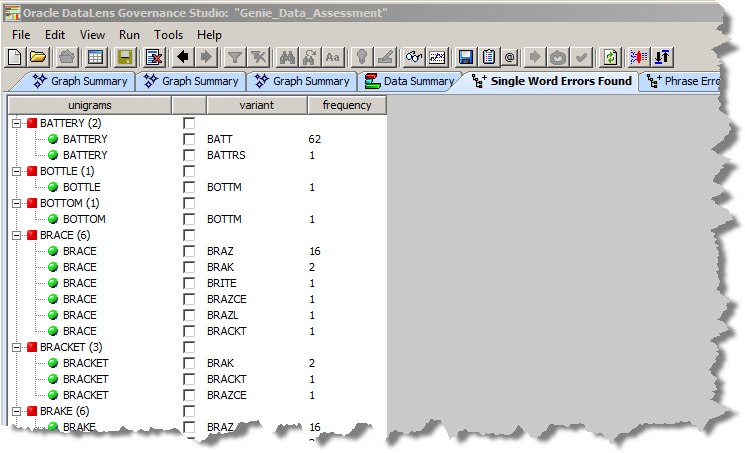
An output tab can contain a set of variants for either unigrams, bigrams, or trigrams along with the number of times (frequency) the variant is found in the input data.
To lookup the associated input data information for a given Ngram, select it and click the Quick Lookup button on the toolbar.
In the following example, the 'BATT' variant of the 'BATTERY' unigram is selected for a quick lookup of this variant in the input data:
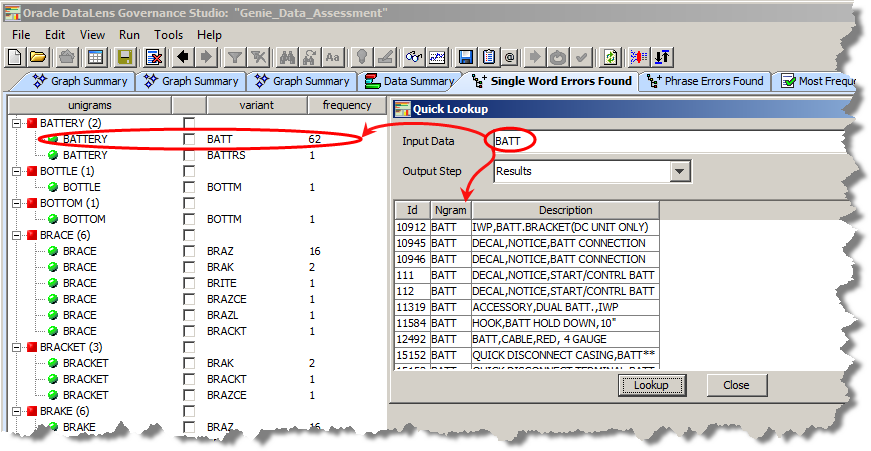
The 62 instances of the 'BATT' variant are displayed in the Quick Lookup dialog box.
You can enter a different variant to lookup for the selected Ngram in the Input Data field and click Lookup. Additionally, you can select a different DSA Output Step to use the Quick Lookup functionality on. Either of these options can be used repeatedly to locate result data.
Click Close to close the Quick Lookup dialog box.
This section describes other features that you can use to review data in your project.
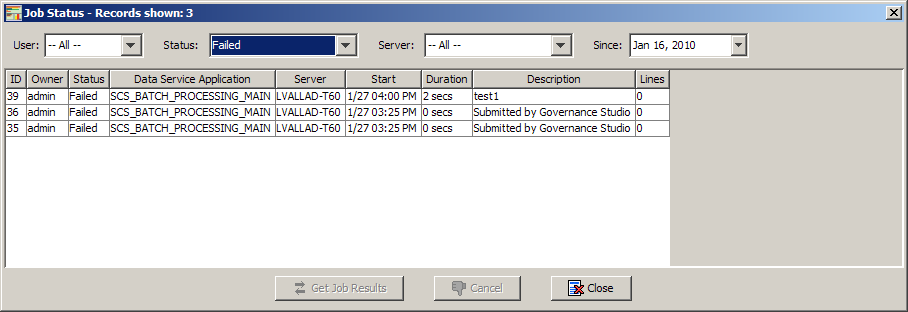
You can view the status of all jobs associated with a DSA at one time using the View Job Status option on the View menu.
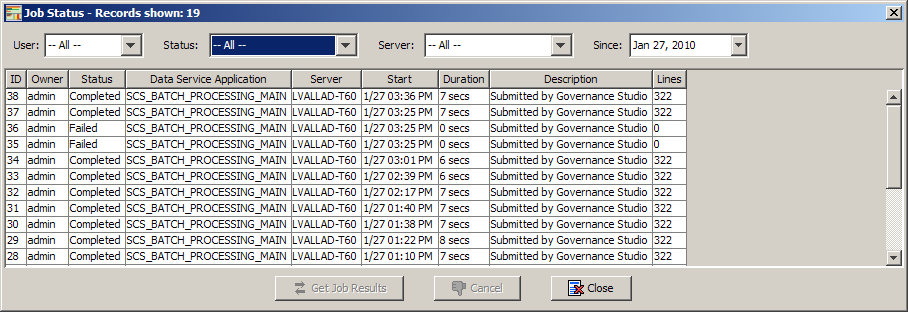
Any job that was created within the Governance Studio or the Oracle DataLens Server is displayed including those that are pending or have failed. By default, only the current user's jobs are listed.
The view can be changed using the User, Status, Server, and Since lists. These controls filter the displayed data based on your selections. For example, you could use the Since list to change the date that you want to set as the starting point for data retrieval. Alternatively, selecting Failed from Status filters all failed jobs from the data retrieved.
If a job is running, you can select it and click Cancel to stop it. For those jobs that output a result file, you can obtain those results by selecting the job from the list and clicking Get Job Results, which is described in the following section.
Any job that is run from the Oracle DataLens Server whose output is designated for display in the Governance Studio can be used to create a new project.
Caution:
When a DSA returns the results of a processing job (synchronous or asynchronous), you must retrieve or delete the data immediately, particularly for those jobs that return large amounts of data. Failure to do so can result in an Oracle DataLens Server crash once the server memory is exhausted. The memory can be exhausted from many small jobs that are not retrieved because each DSA job that is under the DSA maximum memory or chunk size set for the server is held in memory until it is retrieved or the server is restarted. For information about setting these values, see Oracle Enterprise Data Quality for Product Data Oracle DataLens Server Administration Guide.To view job run results and create a new project based on one, use these steps:
From the View menu, select View Job Status as described in the previous section.
The list of available jobs is displayed.
From the Status list, select Results Available. The Results Available status is only for completed jobs.
Select the job whose results you want.
Once you select a job that has results available, the Get Job Results button is activated.
Click Get Job Results.
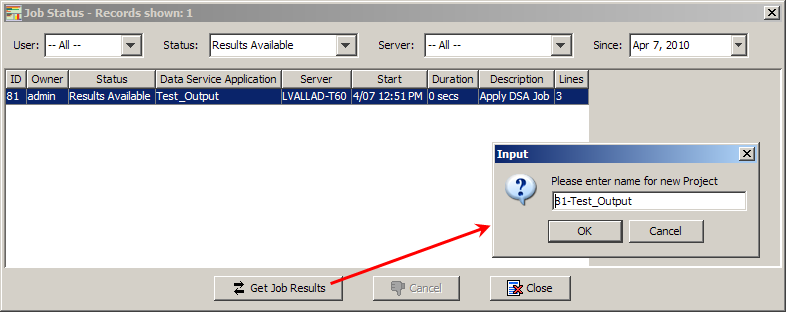
You are prompted for a name for the project. You can either accept the current name or enter your own name. The Input dialog box is populated with a name for the new project based on the job ID and the DSA name by default.
Enter a different name for the new project or use the default name provided, and then click OK.
The new project is created and the data transformed.
Note:
If you view job results while a project is open, it is closed before the new project is created and you are prompted to save any changes.This feature allows you to email only rows that have been selected by check marks; it does not save selected rows. For example, those rows that are not applicable to the Source tab. The checked rows are automatically saved to an Excel spreadsheet, with the file name created using the name of the tab, in the DataLens directory where the project resides. You can change the file name or save location in the dialog provided.
The ability to export a project that contains all of the associated source input data, DSA, and modifications is a powerful tool. It allows you to share a complete and cohesive project with others when they import it into the Governance Studio so that identical viewing and reporting can be achieved by multiple people.
Open the project you want to export.
Ensure that you have completed all project refinements and have transformed all data as appropriate.
From the File menu, select Export Project.
A file save dialog appears with the current project name populated as the file name with a .ams file extension.
Use the file name and directory provided to save the file in or enter them, and click OK.
The project with its data is exported into identified file name and directory for you to share with others.
|
Copyright © 2001, 2011, Oracle and/or its affiliates. All rights reserved. Legal Notices |
|