| Oracle® Enterprise Data Quality for Product Data Oracle DataLens Server Installation Guide Release 5.6.2 Part Number E23613-03 |
|
|
View PDF |
| Oracle® Enterprise Data Quality for Product Data Oracle DataLens Server Installation Guide Release 5.6.2 Part Number E23613-03 |
|
|
View PDF |
This chapter describes how to install an Oracle DataLens Transform Server in Development, Production, or QA environments on all supported operating systems.
Transform Servers are also installed using the EDQP installer by using a different option to specify the you are installing a Transform Server.
For a description of Oracle DataLens Administration and Transform Servers, see "Oracle DataLens Server Types".
Before you start the installation process, ensure that the following prerequisites are met:
You have installed an Oracle DataLens Administration Server on another server in the EDQP Server Topology. For more information about how to install an Oracle DataLens Administration Server, see Chapter 2 through Chapter 5.
Obtain Enterprise DQ for Product as described in "Creating and Populating the EDQP Installation Directory" as appropriate for the OS on your Transform Server.
Identify the hostname or IP address and the port number of server on which you will install your Transform Server.
Identify the location of the Data Directory on your Oracle DataLens Administration Server. For example, on a Linux or UNIX server using the default installation paths it would be /opt/Oracle/Middleware/opdq/.
On UNIX systems, only the WebLogic Application Server is supported.
The Oracle DataLens Transform Server configuration and installation involves three stages as follows:
Configuring the Oracle DataLens Administration Server to integrate with Transform Servers thus augmenting the EDQP Server Topology.
Configuring the Data Directory of the Oracle DataLens Administration Server to become shared so that Transform Servers can access it.
Installing an Oracle DataLens Transform Server.
The EDQP Server Topology defines one of three server group types, Development, QA, and Production. It depicts the Oracle DataLens Transform Servers assigned to each server group. You can run EDQP jobs on just one Oracle DataLens Transform Server in one server group or multiple server groups with multiple Oracle DataLens Transform Servers in each.
Complete the following tasks to configure your EDQP Server Topology in preparation for installing your Transform Server:
Go to your Oracle DataLens Administration Server Web page and login.
View your EDQP Server Groups by clicking Server Groups.
Create a new Server Group by clicking Create a New Server Group.
Enter the appropriate information for the server group (Development, Production, or QA), and then click Save.
You are returned to the Server Groups page.
Add your Transform Server to your Server Group by clicking Add a new Oracle DataLens Server.
Enter the appropriate information including hostname, port number, and server alias, and then select the server group from the Oracle DataLens Server Group list.
Note:
The hostname, port number, and server alias must be consistent with the information that you provide during the installation.Click Submit.
This new Transform Server is immediately added to the selected Server Group.
View your EDQP Server Groups by clicking Platform Topology.
View your new Server Group by clicking on it's icon.
The topology for the selected Server Group is displayed. The Transform Server that you added with the preceding tasks is displayed as "DOWN" because it has not been installed so it cannot respond to the queries from the Oracle DataLens Administration Server.
This section explains how to configure and install an Oracle DataLens Transform Server on all supported operating systems.
This section describes how to install an Oracle DataLens Transform Server on a Linux or UNIX server.
Note:
Throughout this section/admin_server_directory is used to indicate the home directory path to the Oracle DataLens Administration Server. For example, /opt/Oracle/Middleware/opdq/ is the default directory created by the EDQP installer.An administrator user account (for example, dlsadmin) is used for all of the servers in the EDQP Server Topology and was configured as part of preparing to install the Oracle DataLens Administration Server. For more information, see "Establishing an Administrator User Account".
Ensure that the UIDs and GUIDs for all of the administrator user accounts match on the Oracle DataLens Administration Server and machines that you want to use as Oracle DataLens Transform Servers. NFS tracks users by the UID, so these must match on all servers.
Contact your system administrator for assistance in setting up and configuring administrator user accounts (dlsadmin or other) on the servers that you want to use in the EDQP Server Topology.
Issuing the ls -l command followed by the ls -n command on one of the directories in the EDQP installation hierarchy lists the group and user IDs that own the files as in the following example:
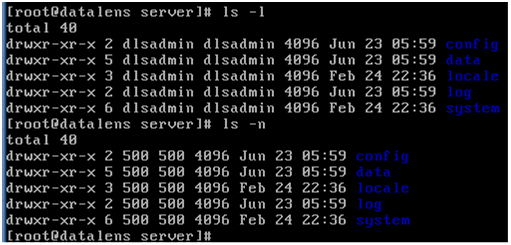
The administrator user account owns the files and both the UID and GID values are 500. These settings must be the same on all servers in the EDQP Server Topology for NFS file sharing to be configured properly.
This section describes how to configure the necessary shared file system using the root user and NFS as an example file sharing method.
Note:
Other network file sharing configurations can be used as long as the shared data directory on the Oracle DataLens Administration Server is accessible by the Transform Servers. Contact your System Administrator for information about configuring network file sharing in your environment.The NFS daemon must be running prior to setting up NFS mount points.
On the Oracle DataLens Administration Server, execute:
/etc/init.d/nfs status
The response shows whether the nfs daemon is running.
If no results are returned, you must add the nfs binary manually by executing the following command:
chkconfig --add nfs
If nfs is stopped or you just added the binary, you must start the nfs daemon by executing the following command:
/etc/init.d/nfs start
Once nfs is running, the /admin_server_directory/data/shared directory can be shared.
On Solaris only, create the NFS group, dlssservers, and a shared directory:
sharemgr create -P nfs dlsservers
sharemgr add-share -s /admin_server_directory/data/shared -d "EPDQ Server Share" dlsservers
Edit the following file:
On Linux:
/etc/exports
On UNIX:
/etc/dfs/dfstab
Add the /admin_server_directory/data/shared directory to the list of exports, and then add the following line:
On Linux:
/admin_server_directory/data/shared 192.168.0.0/16(ro)
Where the IP address shown is the IP address or hostname of your Oracle DataLens Administration Server.
If the hostname of the Oracle DataLens Administration Server does not resolve on the Transform Server, use the IP address. Contact your system administrator for assistance in setting up a domain name server on your Transform Servers or finding the IP address of the Oracle DataLens Administration Server.
On UNIX:
share -F nfs -o ro /admin_server_directory/data/shared
On both Linux and UNIX, the file system is mounted in read-only mode for the shared data files in the Oracle DataLens Administration Server file repository to make it available to the Transform Servers. The Transform Servers need access to this directory to load data lenses and DSAs that have been deployed. Transform Servers do not write to this directory so it should be mounted read only.
Verify that the file was edited correctly:
On Linux:
exportfs
The following should be displayed:
/admin_server_directory/data/shared 192.168.0.0/16
On UNIX:
sharemgr list
The following should be displayed:
share -F nfs -o ro /admin_server_directory/data/shared
Export the shared file system using the following command:
On Linux:
exportfs -a
On UNIX:
shareall
The Transform Servers must mount the Oracle DataLens Administration Server shared directory.
Log in to the server that you want to install as an Oracle DataLens Transform Server as an administrator user.
Create the mount point:
mkdir -p /admin_server_directory/data/shared
Edit the following file:
On Linux:
/etc/fstab
On UNIX:
/etc/vfstab
Add the following line to the end of the file:
On Linux:
datalens:/admin_server_directory/data/shared nfs defaults 0 0
On UNIX:
datalens:/admin_server_directory/data/shared nfs nfs - yes rw,soft
Mount the file system as defined in the previous step to the newly created mount point:
mount -a
Note:
If you have problems with themount command on the Transform Server, you may need to flush the firewall rules using the iptables -F command. Contact your IT Department for help resolving firewall issues that might be preventing the Transform Server from mounting the /admin_server_directory/data/shared directory from the Oracle DataLens Administration Server.Verify that the /admin_server_directory/data/shared directory is mounted correctly on the Transform Server:
ls /admin_server_directory/data/shared
common devdata proddata qadata
To install an Oracle DataLens Transform Server on a Linux or UNIX server:
Log in to the server that you want to install as an Oracle DataLens Transform Server as an administrator user.
Go to the installation directory:
cd /opt/dls_install/install
Change the permissions of the .sh files in the directory so that they are executable:
chmod +x *.sh
Change the permissions of the .sh files in the directory so that they are executable:
chmod +x *.sh
Execute the Oracle DataLens Server install script from the install directory:
On Linux:
./dlsinstall.sh
On UNIX:
./dlsinstall_solaris.sh
Note:
If you are logged in asroot, the following message is displayed:
You are installing as root. Do you want to continue? [Y/N] (Y):
Enter Y to continue or N to exit and log in as a different administrative user.
Welcome to the Oracle Enterprise Data Quality 5.6 Installation.Will this be a Tomcat Server based installation? [Y/N]: (Y)
If you want to install the Tomcat Application Server and your server is not running UNIX, enter Y. Otherwise, enter N and continue to the next step.
Please make sure that your existing Tomcat server is not running.
Enter Y to continue or N to exit and manually stop your Tomcat server [Y/N]: (Y)
If you have Tomcat installed and the server is running, enter N to exit and stop your server. Otherwise, enter Y to continue with the installation.
Please enter your DataLens Server Home directory (/opt/Oracle/Middleware/opdq/:
Press Enter to accept the default product home directory or enter a different home directory for your Oracle DataLens Server (for example, /opt/opdq) then press Enter.
If the directory does not exist, it is created.
Will this be an Admin or Transform server [A/T]: ()
Enter T to install an Oracle DataLens Transform Server.
This server should be added to a server group in the server topology before
executing the install script.
Enter Y to continue or N to exit and complete the server topology configuration
[Y/N]: (Y)
If you have not added your Oracle DataLens Transform Server to your server topology, enter N to exit the installer, and then return to "Configuring the EDQP Server Topology". Otherwise, enter Y and continue to the next step.
Please enter the path to your existing DataLens Server Shared Data directory:
Enter the directory path to your Data Directory, which is the directory you set to be shared previously, /admin_server_directory/data/shared
Note:
You must include the/data/shared directory in this path otherwise the installer will repeat the query until the path is correct.Messages similar to the following are displayed:Press Enter to accept the default product home directory or enter a different home directory for your Oracle DataLens Server (for example, /opt/opdq) then press Enter.
Copying the Server Files to /opt/Oracle/Middleware/opdq/...
Created directory /opt/Oracle/Middleware/opdq/data
Please enter the location for JDK installation (/opt/Java):
Press Enter to use the default Java directory or enter the directory path to your JDK installation then press Enter.
If you did not install Tomcat, then the installation completes and messages similar to the following are displayed:
Installing 64-bit JDK... This may take a few minutes...
Please enter DataLens Server port number (2229):
Otherwise, the installer begins to install Tomcat and messages similar to the following are displayed:
Installing 64-bit JDK... This may take a few minutes...
Installing Tomcat...
Please enter the Tomcat server port number:  (2229)
Press Enter to use the standard 2229 port or enter the port number you want your application server to run on.
Messages similar to the following are displayed:
Configuring the SvrPaths file... .
.
Copying the WAR file to /opt/Oracle/Middleware/opdq/datalens.war.
.
.
The JDK is installed, if set to do so, Tomcat is installed, the Oracle DataLens Administration Server and data repository are created.
If Tomcat was installed, the EDQP Web Archive (WAR) file has been automatically configured and deployed. The Tomcat service is running.
Note:
To ensure an automatic restart of your Oracle DataLens Server after a system reboot, see "Configuring Run Levels for Tomcat Automatic Restart".If WebLogic was installed, the EDQP WAR file is now ready for deployment to a WebLogic Application Server.
Set the EDQP environment variable:
export OPDQ_HOME=home_directory
Where home_directory is the home directory path you identified in Step 8.
You can verify successful installation by viewing the EDQP Server Topology and ensure that the server is not designated as "DOWN" as it was when it was added to the topology in "Configuring the EDQP Server Topology"
Additionally, you can view the log file for the Transform Server to ensure that no errors were encountered. For more information, see the Oracle Enterprise Data Quality for Product Data Oracle DataLens Server Administration Guide.
This section describes how to install an Oracle DataLens Transform Server on a Windows server.
Note:
Throughout this section the\admin_server_directory is used to indicate the directory path to the Oracle DataLens Administration Server. For example, C:\Oracle\Middleware\opdq is the default directory created by the EDQP installer.Ensure that there is a network administrator user account, dlsadmin for example, for use by all the servers in the EDQP Server Topology. This network account will be used for the following:
Running the Java Web Server, especially if using a Tomcat service needs to use the same user across all servers in the EDQP topology.
Transform Server remote access to the Oracle DataLens Administration Server for shared file system access.
Derby database updates written to log files that need the same ownership from all users.
Contact your system administrator for assistance in setting up and configuring EDQP user accounts on your servers.
The Data Directory must be shared with your administrator user. For example, the dlsadmin.
On the Oracle DataLens Administration Server, start Windows Explorer.
Locate the Data Directory directory, right-click it, and then select the share option. For example, your Data Directory may be located in \admin_server_directory\data or it could be located on a network drive.
Share this directory with everyone with read-only permissions. For more information about file sharing, contact your system administrator or see Windows Help.
You need to ensure that your Transform Server can access the Oracle DataLens Administration Server shared directory.
On the Transform Server, start Windows Explorer.
Locate the Data Directory that was shared. For example, \\server\admin_server_directory\data\ directory where server is the name of the server on which the Data Directory resides.
Verify that you see these directory folders:
common
devdata
proddata
qadata
Upon completion of your Transform Server installation, you can change the share permissions to share only with the dlsadmin or your administrator user as this is the only user that requires access to this directory.
To install an Oracle DataLens Transform Server on a Windows server:
Log on to the Transform Server as an administrator user.
Locate the MS-DOS Command Prompt (cmd.exe), right-click on it, and then select Run as administrator.
Run the command:
c:\dls_install\install\dlsinstall.bat
Welcome to the Oracle Enterprise Data Quality 5.6 Installation.
Will this be a Tomcat Server based installation? [Y/N]: (Y)
If you want to install the Tomcat Application Server, enter Y. Otherwise, enter N and continue to the next step.
Please make sure that your existing Tomcat server is not running.
Enter Y to continue or N to exit and manually stop your Tomcat server [Y/N]: (Y)
If you have Tomcat installed and the server is running, enter N to exit and stop your server. Otherwise, enter Y to continue with the installation.
Please enter your DLS Server Home directory: (C:\Oracle\Middleware\opdq\)
Press Enter to accept the default product home directory or enter a different home directory for your Oracle DataLens Server (for example, C:\opdq) then press Enter.
If the directory does not exist, it is created.
Will this be an Admin or Transform server [A/T]: ()
Enter T to install an Oracle DataLens Transform Server.
This server should be added to a server group in the server topology before
executing the install script.
Enter Y to continue or N to exit and complete the server topology configuration
[Y/N]: (Y)
If you have not added your Oracle DataLens Transform Server to your server topology, enter N to exit the installer, and then return to "Configuring the EDQP Server Topology". Otherwise, enter Y and continue to the next step.
Please enter the path to the OPDQ Shared Data directory: ()
Enter the directory one directory above your Data Directory, which is the directory you set to be shared previously, \\server\admin_server_directory\data\shared.
If you did not install Tomcat, then the installation completes and messages similar to the following are displayed:
Copying the Server Files to C:\Oracle\Middleware\opdq...
.
.
.
Please enter the DataLens Server port number:  (2229)
Otherwise, the installer begins to install Tomcat and the following prompt is displayed:
Copying the Server Files to C:\Oracle\Middleware\opdq...
Installing Tomcat...
.
.
.
Please enter the Tomcat server port number:  (2229)
Press Enter to use the standard 2229 port or enter the port number you want your application server to run on.
Messages similar to the following are displayed:
Configuring the SvrPaths file...
.
.
.
Copying the WAR file to C:\Oracle\Middleware\opdq\datalens.war
Starting the Tomcat6opdq service...
.
.
.
Finished the Oracle Enterprise Data Quality 5.6 Installation. (Return to Exit)
Press Enter to exit the installation script.
Your Oracle DataLens Transform Server installation completes. If your Transform Server is using a Tomcat Application Server, then it automatically started.
If your Transform Server is using a WebLogic Application Server, then you must start the your domain.
Set the EDQP home environment variable:
Right-click Computer, and then select Properties.
Click Advanced system settings.
Click Environment Variables.
From the System variables section, click New.
Enter OPDQ_HOME as the Variable name.
Enter is the home directory path you identified in Step 5 as the Variable value.
Click OK to close all dialogs.
You can verify successful installation by viewing the EDQP Server Topology and ensure that the server is not designated as "DOWN" as it was when it was added to the topology in "Configuring the EDQP Server Topology"
Additionally, you can view the log file for the Transform Server to ensure that no errors were encountered. For more information, see the Oracle Enterprise Data Quality for Product Data Oracle DataLens Server Administration Guide.
Deploy data lenses for use in transforming data, and then select those data lenses for the Transform Server to load so that they are available for processing data by completing the following tasks:
Go to your Oracle DataLens Administration Server Web page and login.
View your EDQP Server Topology Web page by clicking Platform Topology.
View the Server Group that contains your Transform Server by clicking the appropriate icon.
View your Transform Server Configuration Information Web page by clicking it's icon.
Deploy your choice of data lenses available to your Transform Server by selecting one or more check boxes, and then clicking Submit.
Caution:
You must complete this task list or your Transform Server will be unable to process any of the data on that Transform Server.For detailed information, see the Oracle Enterprise Data Quality for Product Data Oracle DataLens Server Administration Guide
|
Copyright © 2001, 2011, Oracle and/or its affiliates. All rights reserved. Legal Notices |
|