| Skip Navigation Links | |
| Exit Print View | |

|
Oracle Java CAPS Intelligent Event Processor (IEP) User's Guide Java CAPS Documentation |
| Skip Navigation Links | |
| Exit Print View | |

|
Oracle Java CAPS Intelligent Event Processor (IEP) User's Guide Java CAPS Documentation |
Designing Intelligent Event Processor (IEP) Projects
Intelligent Event Processor Overview
Complex Event Processing and Event Stream Processing
IEP Design-Time and Runtime Components
Creating an Intelligent Event Processing Module Project
To Create an Intelligent Event Processing Module Project
To Add an Event Processor to the Project
Adding and Configuring IEP Operators
To Add IEP Operators to an Event Processor
To Configure IEP Operators in an Event Processor
Disabling the Generation of Bindings and Services
To Disable the Generation of Bindings and Services
Creating and Deploying the Composite Application Project
To Create a Composite Application Project
To Add the IEP Module Project to the Composite Application Project
To Define the Binding Components and Connections
To Deploy the Composite Application Project
IEP Operator Inputs and Outputs
To Create a Relation Aggregator Operator
To Create a Time Based Aggregator Operator
To Create a Tuple Based Aggregator Operator
Correlation and Filter Operators
To Create a Relation Map Operator
To Create a Stream Projection and Filter Operator
To Create a Tuple Serial Correlation Operator
To Create an External Table Polling Stream Operator
To Create a Replay Stream Operator
To Create a Stream Input Operator
To Create a Table Input Operator
To Create a Batched Stream Output Operator
To Create an Invoke Stream Operator
To Create a Relation Output Operator
To Enable the Save Stream Operator Dynamically at Runtime
To Disable the Save Stream Operator Dynamically at Runtime
To Create a Stream Output Operator
To Create a Table Output Operator
To Create a Delete Stream Operator
To Create an Insert Stream Operator
To Create a Notification Stream Operator
To Create a Relation Stream Operator
To Create an Intersect Operator
To Create a Union All Operator
To Create a Contiguous Order Operator:
To Create a Gap Window Operator:
To Create an Attribute Based Window Operator
To Create a Partitioned Window Operator
To Create a Time Based Window Operator
To Create a Tuple Based Window Operator
WSDL Documents in IEP Module Projects
Data Types in the WSDL Document
Message Objects in the WSDL Document
Bindings and Services in the WSDL Document
Generating Concrete WSDL Documents
Generating Abstract WSDL Documents
Understanding the IEP Database
Configuring the IEP Database to Use Oracle
To Create the IEP User in the Oracle Database
To Install the Oracle Database Driver in the Application Server
To Create the Non-XA Connection Pool
To Create the Non-XA JDBC Resource
To Create the XA Connection Pool
To Create the XA JDBC Resource
To Enable Automatic Recovery of XA Transactions
To Configure the IEP Service Engine to Use the JDBC Resources
To Restart the IEP Service Engine and Create the Database Tables
Configuring the IEP Database to Use MySQL
To Create the IEP User in the MySQL Database
To Install the MySQL Database Driver in the Application Server
To Create the Non-XA Connection Pool
To Create the Non-XA JDBC Resource
To Create the XA Connection Pool
To Create the XA JDBC Resource
To Enable Automatic Recovery of XA Transactions
To Configure the IEP Service Engine to Use the JDBC Resources
To Restart the IEP Service Engine and Create the Database Tables
IEP Service Engine-Specific Database Tables
Configuring Message Reliability in an IEP Module Project
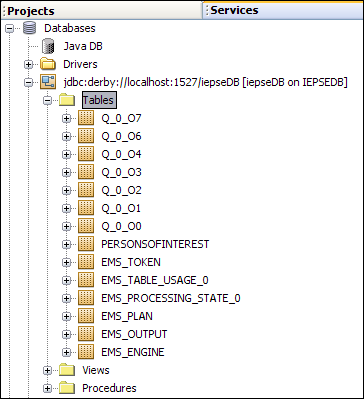
IEP uses a set of database tables to maintain information about the IEP Service Engine and deployed event processes. You can connect to the database through NetBeans, and then view the tables and their content through NetBeans windows. To view the IEP database tables, click the Services window of the NetBeans IDE. Expand the Databases node, the connection node, and the Tables node.

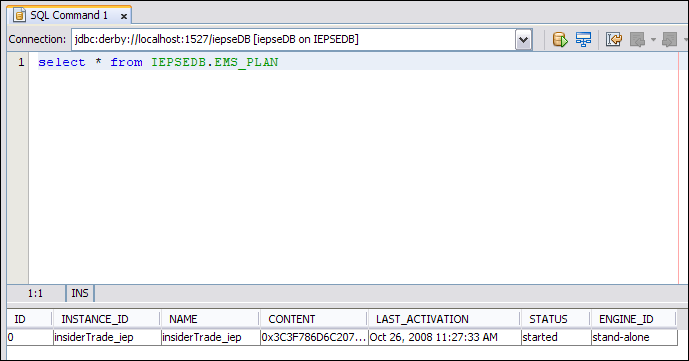
To view the contents of an IEP database table, right-click the table node and choose View Data. The SQL Editor appears and displays the appropriate SQL SELECT statement, which is performed on the table. The results of the query appear near the bottom of the SQL Editor.
The following image shows the contents of the EMS_PLAN table.

For information about supported database platforms and versions for the IEP database, see Java CAPS 6.3 Components and Supported External Systems in Planning for Oracle Java CAPS 6.3 Installation .
By default, the IEP database is configured to use Java DB. Java DB is the supported distribution of the open source Apache Derby database. After installation, you can configure the IEP database to use Oracle instead.
The first task is to create an IEP user in the Oracle database. You can run a provided SQL script that creates the IEP user and grants the appropriate privileges. The default version of the script contains the following SQL statements:
CREATE TABLESPACE "IEPSEDB_DB"
 DATAFILE
  'IEPSEDB_DB1.dat' SIZE 2000M,
  'IEPSEDB_DB2.dat' SIZE 2000M;

CREATE USER IEPSEDB IDENTIFIED BY IEPSEDB
DEFAULT TABLESPACE IEPSEDB_DB
QUOTA UNLIMITED ON IEPSEDB_DB
TEMPORARY TABLESPACE temp
QUOTA 0M ON system;

GRANT CONNECT TO IEPSEDB;
GRANT RESOURCE TO IEPSEDB;
GRANT CREATE VIEW TO IEPSEDB;

grant select on sys.dba_pending_transactions to IEPSEDB;
grant select on sys.pending_trans$ to IEPSEDB;
grant select on sys.dba_2pc_pending to IEPSEDB;
grant execute on sys.dbms_system to IEPSEDB;
grant select on SYS.dba_2pc_neighbors to IEPSEDB;
grant force any transaction to IEPSEDB;
You need to create two sets of connection pools and JDBC resources. A connection pool is a group of reusable connections for a particular database. The server maintains a pool of available connections to increase performance. A JDBC resource provides applications with a means of connecting to a database. Additional configuration of the service engine is also required.
To configure the IEP Service Engine to use Oracle, perform the following steps:
To Install the Oracle Database Driver in the Application Server
To Configure the IEP Service Engine to Use the JDBC Resources
To Restart the IEP Service Engine and Create the Database Tables
The New JDBC Connection Pool page appears.
The connection pool is created.
The Edit Connection Pool page appears.
The Admin Console attempts to connect to the database. If the connection does not succeed, check to see whether the database is running and verify the database connectivity properties, such as the URL string.
The New JDBC Resource page appears.
jdbc/iepseOracleNonXA
You will use the JNDI name in a later procedure.
The JDBC resource is created.
The New JDBC Connection Pool page appears.
The connection pool is created.
The Edit Connection Pool page appears.
The Admin Console attempts to connect to the database. If the connection does not succeed, check to see whether the database is running, and verify the connectivity parameters, such as the URL string.
The New JDBC Resource page appears.
jdbc/iepseOracleXA
You use the JNDI name in a later procedure.
The JDBC resource is created.
The Properties dialog box appears.
In an Oracle database, the database schema name is identical to the user name.
When you restart the IEP Service Engine, the database tables are automatically created in the database you specified through the connection pools and runtime properties.
By default, the IEP database is configured to use Java DB. Java DB is the supported distribution of the open source Apache Derby database. After installation, you can configure the IEP database to use MySQL instead.
The first task is to create an IEP user in the MySQL database and install the MySQL driver. You also need to create two sets of connection pools and JDBC resources. A connection pool is a group of reusable connections for a particular database. The server maintains a pool of available connections to increase performance. A JDBC resource provides applications with a means of connecting to a database. Additional configuration of the service engine is also required.
To configure the IEP Service Engine to use MySQL, perform the following steps:
To Install the MySQL Database Driver in the Application Server
To Configure the IEP Service Engine to Use the JDBC Resources
To Restart the IEP Service Engine and Create the Database Tables
create user username@hostname identified by 'password';
create database database-name;
grant all on database-name.* to username@hostname;
Note - In the default Java DB database, the database schema name, username, and password are all IEPSEDB. You do not need to use these values.
The New JDBC Connection Pool page appears.
port – The port number for the database. By default, MySQL uses 3306.
databaseName – The name of the database schema.
serverName – The name of the server on which the database is located.
user – The login ID of the IEP user (for example, IEPSEDB).
password – The password of the IEP user (for example, IEPSEDB).
url – The string for connecting to the database (for example, jdbc:mysql://myserver:3306/IEPSEDB).
The connection pool is created.
The Edit Connection Pool page appears.
The Admin Console attempts to connect to the database. If the connection does not succeed, check to see whether the database is running and verify the database connectivity properties, such as the URL string.
The New JDBC Resource page appears.
jdbc/iepseMySqlNonXA
You will use the JNDI name in a later procedure.
The JDBC resource is created.
The New JDBC Connection Pool page appears.
port – The port number for the database. By default, MySQL uses 3306.
databaseName – The name of the database schema.
serverName – The name of the server on which the database is located.
user – The login ID of the IEP user (for example, IEPSEDB).
password – The password of the IEP user (for example, IEPSEDB).
url – The string for connecting to the database (for example, jdbc:mysql://myserver:3306/IEPSEDB).
The connection pool is created.
The Edit Connection Pool page appears.
The Admin Console attempts to connect to the database. If the connection does not succeed, check to see whether the database is running, and verify the connectivity parameters, such as the URL string.
The New JDBC Resource page appears.
jdbc/iepseMySqlXA
You use the JNDI name in a later procedure.
The JDBC resource is created.
The Properties dialog box appears.
When you restart the IEP Service Engine, the database tables are automatically created in the database you specified through the connection pools and runtime properties.
When you start the IEP Service Engine for the first time, the following tables are created in the IEP database. These tables apply to the IEP Service Engine as a whole.
 | Caution - Do not delete or alter these tables. |
The EMS_PLAN table maintains information about the event processes that are deployed to the IEP Service Engine. The EMS_PLAN table contains the following columns:
ID. An integer that uniquely identifies the event process.
NAME. The name of the event process.
CONTENT. The XML content of the event process. The value is displayed in binary format.
LAST_ACTIVATION. The last time the event process was started.
STATUS. The status of the event process definition. The valid values are started, stopped, deployed, and undeployed.
ENGINE_ID. The ID of the cluster node that is running the event process. If you are not running IEP in cluster mode, then the value is stand-alone.
The EMS_OUTPUT table maintains information for event processes that have a Table Output operator. The EMS_OUTPUT table contains the following columns:
PLAN_INSTANCE_ID. The instance ID of the event process that has the Table Output operator.
OUTPUT_NAME. The name of the table.
OUTPUT_DESCRIPTION. The description of the table.
LAST_UPDATED. The last time the output table was updated.
The EMS_ENGINE table is used when you are running IEP in cluster mode. The EMS_ENGINE table contains the following columns:
ID. A value that uniquely identifies the IEP instance (instance1, instance2, and so on). If you are not running IEP in cluster mode, then the value is stand-alone.
INSTANCE_LOCATION. The IP address of the computer where the IEP instance is running.
LEASE_EXPIRATION. A timestamp that the cluster nodes use to determine which IEP instance is active.
The EMS_TOKEN table is used when you are running IEP in cluster mode. The EMS_TOKEN table contains the following columns:
ID. The unique identifier of a token that can be acquired and released by cluster nodes.
NAME. The name of a token that can be acquired and released by cluster nodes.
When you deploy an event process, the following tables are created in the IEP database. If you undeploy the event process, then the tables are deleted.
 | Caution - Do not delete or alter these tables. |
The EMS_PROCESSING_STATE_N tables are used by the IEP Service Engine to maintain execution state for an event process. The EMS_PROCESSING_STATE_N tables contain the following columns:
PROCESSING_STATE. The execution state of the event process. The value is displayed in binary format.
PREV_TIMESTAMP_TO_CHECK. A timestamp that the IEP Service Engine uses to maintain execution state for the event process.
PREV_TIMESTAMP_TO_PROCESS. A timestamp that the IEP Service Engine uses to maintain execution state for the event process.
The EMS_TABLE_USAGE_N tables are used in garbage collection. The EMS_TABLE_USAGE_N tables contain the following columns:
TABLE_NAME. The name of a table.
USER_ID. The ID of the operator that is using the table.
EMS_TIMESTAMP. A timestamp that is used in garbage collection.
In the IEP Service Engine, one or more tables are created per operator. These tables are specific to operator behavior and functionality.
 | Caution - Do not delete or alter these tables. |
The following table names illustrate how the names are formatted.
Q_0_O0
Q_0_O1
Q_1_O0
Q_1_O1
The first character of the table name is always Q.
The character after the first underscore is the ID of the event processor in the EMS_PLAN table.
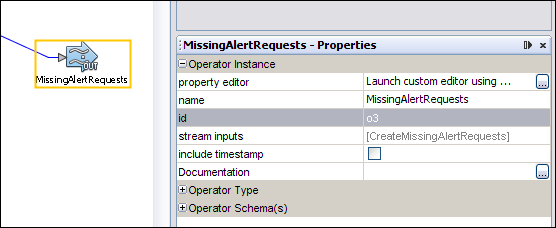
The characters after the second underscore are the ID of the operator. You can view the operator ID in the IEP design view by selecting the operator and displaying the Properties window.

The operator ID is automatically generated. You cannot change the ID.