64 Working with the Lists Service
Use the Lists service to create, publish, and manage lists in WebCenter Spaces. Create lists from Excel spreadsheets or from prebuilt templates, or create your own custom lists from scratch. When you create a list, it becomes available in the Resource Catalog. You can add lists from the catalog to any page in the Space in which it was created.
This chapter describes how to use the features offered through the Lists service. It includes the following sections:
This chapter is for users who are interested in viewing, creating, populating, revising, importing, exporting, and removing lists and filtering list data. Such users must be granted, minimally, the Space-level permission View Pages and Content. Such users can view lists. Users who plan to create and manage lists require the Space-level permission Customize Pages and Edit Content.
Note:
Tasks discussed in this chapter are not available if the Lists service is not enabled in the current Space.64.1 What You Should Know About the Lists Service
The Lists service provides a means of creating, publishing, and managing lists (Figure 64-1).
Lists are useful for many Space activities, such as tracking issues, capturing project milestones, publishing project assignments, and much more. The lists you create in WebCenter Spaces can be widely varied in their complexity. For example, you can start with a list of team members, and then include columns for contact information, project role, and links to relevant documents, such as any plans or proposals associated with a listed team member.
The Lists service is available to all Spaces except the Home Space. Whether it is exposed for use depends on the actions of your Space moderator (for more information, see Section 51.10.1, "Enabling and Disabling Services Available to a Space"). The lists you create in a Space are unique to that Space. One Space cannot consume the lists created in another Space.
Create and populate lists using the controls on the Lists page. Place populated lists on a page using the List Viewer task flow. Users must have appropriate permissions to perform actions on lists (for more information, see Audience).
Use the controls on the Lists page to create and revise lists and list data and to view all of a Space's current lists (Figure 64-2).
On the Lists page, you can make use of templates for rapid creation of lists and tools for designing and revising list structure. If you prefer, you can create a list from scratch, adding and configuring all of the columns yourself, or you can create a list from an Excel spreadsheet. For more information, see Section 64.2.3, "Creating and Managing Lists."
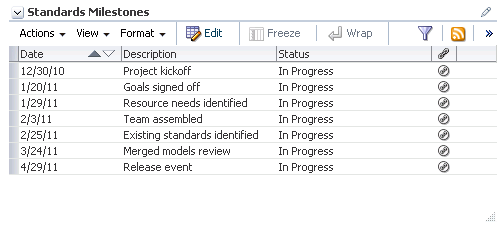
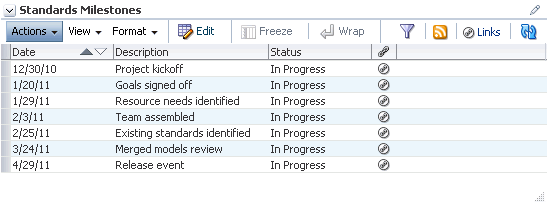
The List Viewer task flow (Figure 64-3) provides a means of placing a particular list on a page.
The List Viewer provides easy access to all the tools required for adding and revising list data, importing/exporting list data, filtering list data, obtaining a list RSS feed, and linking to other WebCenter Spaces objects from the list and from a list row.
Additionally, the List Viewer provides access to customization tools that enable you to control the look of a particular list instance and its data. For example, use customization to control color banding of rows or columns or to apply filters to list data. For more information, see Section 64.2.5, "Customizing Lists."
Use the Lists page and the List Viewer to add and revise list data throughout the life of the list (for more information, see Section 64.2.4, "Adding and Managing List Data"). Add and revise content directly on a list, or use the list Export/Import feature to send list data to an Excel file, revise it there, and then import it back into the original list in WebCenter Spaces (for more information, see Section 64.2.7, "Exporting a List and Importing a List from an Excel Spreadsheet").
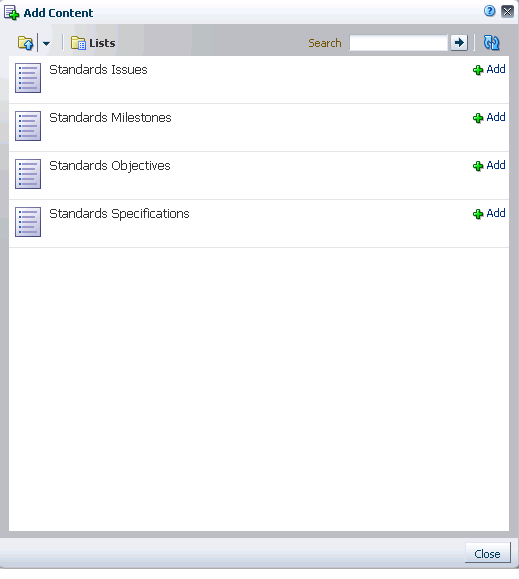
All of the lists created in a given Space are available on the Lists page and through the Space's Resource Catalog (Figure 64-4).
Tip:
By default, you can find lists under Lists in the Social and Communication folder in the Resource Catalog. However, the location of lists in a Resource Catalog depends on how the catalog was structured by its designer. You can use the catalog's Search feature to search for Lists or the list name.In the Resource Catalog, click the Add link next to a list to add it to the current page (for more information, see Section 17.5.1, "Adding a Component to a Page"). The list is rendered within a List Viewer task flow.
The Lists page is available in any Space where the Lists service is enabled. If the Lists page is not shown by default when you navigate to a Space, you can open it through the Personalize Pages page. For more information, see Section 29.3.4, "Showing Hidden Pages."
Note:
The Lists service is not available in the Home Space.Through its tight integration with the Links service, the Lists service provides the opportunity to associate other WebCenter Spaces items with an entire list or an individual list row. Linking enables you to associate documents, notes, and URLs with a list or a list row. For more information, see Chapter 63, "Working with the Links Service."
The Lists service additionally provides RSS feeds for all lists and for individual lists. For information about the Lists service and RSS, see Chapter 68, "Working with the RSS Service."
64.2 Working with Lists Service Features
This section provides information about using the features available through the Lists page and the List Viewer task flow. It includes the following subsections:
64.2.1 Adding Lists to a Page
For the steps to add a list to a page, see Section 17.5, "Adding Resource Catalog Components to Pages."
See Also:
If you do not find lists in the Resource Catalog, it may be that you need to add them. For more information, see Section 16.3.1.2, "Adding Resources."64.2.2 Viewing Lists
To view the lists associated with a particular Space, you must have access to that Space. Once you have access, you can view all of a Space's lists on its Lists page.
To view a list on the Lists page:
-
Go to the Space that contains the list you want to view, and open its Lists page.
If the Lists page is not available, see Section 29.3.4, "Showing Hidden Pages."
-
From the Lists panel, select the list you want to view.
List details appear to the right (Figure 64-5).
64.2.3 Creating and Managing Lists
This section describes how to create, edit, copy, and delete lists on the Lists page.
This section includes the following subsections:
64.2.3.1 Creating Lists
In WebCenter Spaces, you can create a list using one of the following methods:
-
Create a blank list for which you create and configure all columns (up to 30).
-
Create a list from a template, and use that "as is" or as a starting point.
-
Create a list from a Microsoft Excel spreadsheet.
This section describes how to create a list using each method.
To create a list:
-
Go to the Lists page of the Space where you want to create a list.
-
In the Lists panel toolbar, click the Create a new list icon (Figure 64-6).
-
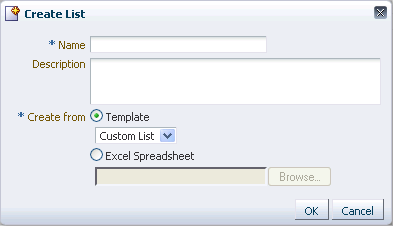
In the resulting Create List dialog, enter a name for the list in the Name field (Figure 64-7).
-
Optionally, in the Description field enter a description of the list.
Tip:
In a completed list, the description appears between the list title and list data. -
Under Create From, select to create the list using a Template or from an Excel Spreadsheet.
-
If you select to create a list from a Template, select a template from the Template menu:
-
Custom List—To create a list without using a template.
-
Issues—To create a list of, for example, project issues. By default, this template provides the columns Subject, Assigned To, Closed, and Comments.
-
Milestones—To create a list of, for example, project milestones. By default, this template provides the columns Date, Description, and Status.
-
Objectives—To create a list of, for example, project objectives. By default, this template provides the columns Title, and Description.
If you select to create a list from an Excel Spreadsheet, click Browse to navigate to and select the spreadsheet:
-
The first row of the spreadsheet is used as column headings. The subsequent rows are added as data.
-
All the columns are created with the data type
Plain Text. After creation, you can modify the data types as desired. For information about data types, see Table 64-1, "Data Type Selections for List Columns"
Tip:
You can use the Excel Spreadsheet option to import a list from a different Space or from a different WebCenter instance. That is, you can export the list from the Space or WebCenter instance and import it into the current Space or instance. -
-
Click OK.
The new list appears in the Lists panel on the Lists page.
You may now revise default list columns and add new columns to the list by clicking the Edit list icon. For more information, see Section 64.2.3.2, "Editing List Structure." For a custom list, you must add columns to the list before you can add rows.
See Also:
For information about adding new list rows, see Section 64.2.4, "Adding and Managing List Data."64.2.3.2 Editing List Structure
When you edit list structure, you can revise everything about the list. For example, you can change column details; remove, add, and rearrange columns; and rename or redescribe the list.
This section describes the various tasks you can perform while editing a list structure. It contains the following subsections:
-
Section 64.2.3.2.1, "Renaming a List and Revising a List Description"
-
Section 64.2.3.2.4, "Rearranging List Columns on All Instances of a List"
64.2.3.2.1 Renaming a List and Revising a List Description
To rename a list and revise a list description:
-
Go to the Space where you want to rename a list or revise a list description, and open its Lists page.
-
In the Lists panel, select the list you want to change, and click the Edit list icon (Figure 64-8).
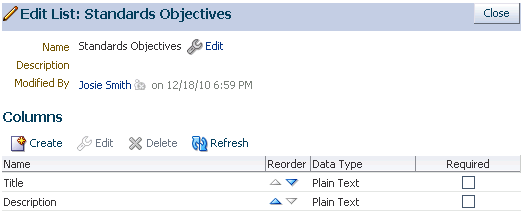
The list enters edit list mode (Figure 64-9).
-
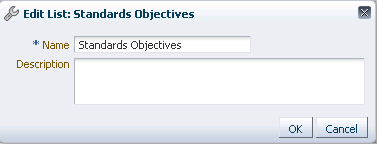
Click the Edit link to the right of the Name field to open the Edit List dialog (Figure 64-10).
-
Revise the list name and description.
-
Click OK to close the dialog and save your changes.
-
Click the Close button in edit list mode to return to view list mode.
64.2.3.2.2 Adding Columns to a List
This procedure is useful when you create a custom list or you want to alter a list that you created from a template or a spreadsheet.
When you add a column to a list, the new column is added after the selected column. If no column is selected, the new column is added as the first column.
To add columns to a list:
-
Go to the Lists page of the Space where you want to add columns to a list.
-
In the Lists panel, select the list to which to add columns and click the Edit list icon (Figure 64-11).
The Lists page enters list edit mode (Figure 64-12).
-
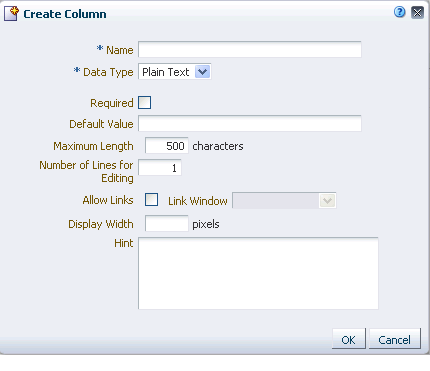
Under Columns, click the Create button to open the Create Column dialog (Figure 64-13).
Tip:
Select a column to add a new column after it. -
In the Name field, provide a name for this column.
-
From the Data Type list, select the type of data you want to enter in this column.
Note:
The data type you select affects the type of data that can be entered for the column and the way the data is rendered (see Table 64-1 and Table 64-2). It also affects the type of validation that is run on column data when you and other authorized users add list rows. For example, if you select aDateTimedata type, and a user enters text that is not in theDateTimeformat, WebCenter Spaces returns an error.Table 64-1 lists and describes the data types available to list columns, and provides information about the additional details that appear for each type.
See Also:
For information about additional column details, see Table 64-2, "Data Type Column Details".Table 64-1 Data Type Selections for List Columns
Data Type Description Comments Unformatted text, provides options for making the text a link
Additional column details include:
-
Required
-
Default Value
-
Maximum Length
-
Number of Lines for Editing
-
Allow Links
-
Link Window
-
Display Width
-
Hint
Rich, formatted text entered through a rich text editor, may include links
Additional column details include:
-
Required
-
Display Width
-
Hint
Numbers
Additional column details include:
-
Required
-
Format
-
Default Value
-
Minimum Value
-
Maximum Value
-
Display Width
-
Hint
For Format, select from:
-
Number—an unformatted number; decimal separator is based on the currently selected locale. For more information, see Section 35.2, "Choosing Your Preferred Display Language." -
Currency—value is formatted as a currency value; the currency symbol and decimal separator are based on the currently selected locale. For more information, see Section 35.2, "Choosing Your Preferred Display Language." -
Percent—value is formatted as a percentage; the value 0.6 is formatted as0.6%; the value 60 is formatted as60%.
The Number data type supports numbers from ±1.79769313486231570e+308 with 14 to 15 significant digits.Foot 1
Dates and times in the format specified in a given user's WebCenter Spaces Preferences (for more information, see Section 35.3, "Setting Date and Time Preferences")
Additional column details include:
-
Required
-
Format
-
Default Value
-
Display Width
-
Hint
For Format, select from:
-
Date—For requiring a date. -
Time—For requiring a time. -
Date and Time—For requiring a date and a time.
The way the selected Format is rendered is controlled by the user's date and time preferences.
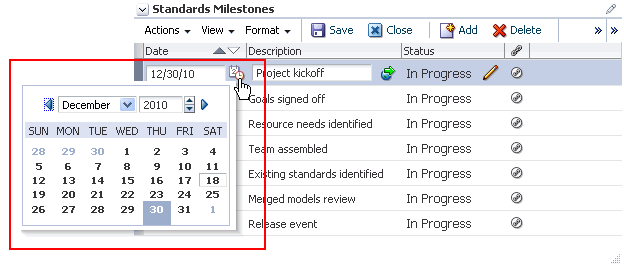
The Default Value field includes a date picker, which you can use to select a default date in the correct format. The current date has a box around it, for example, March 30th in the following figure.
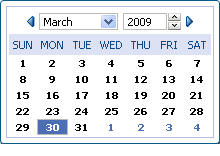
This field does not require leading zeroes, for example, it does not require
05/04/2009. Instead, you can use5/4/2009.Either
TRUEorFALSEAdditional column details include:
-
Default Value
-
Display Width
-
Hint
TRUEorFALSEis rendered as a checkbox. Checked equalsTRUE; cleared equalsFALSE.A directory path to an image (the image is rendered in list view mode)
Additional column details include:
-
Required
-
Display Width
-
Hint
A valid user name
Additional column details include:
-
Required
-
Range of Users
-
Default Value
-
Display Width
-
Hint
The Range of Users field enables you to limit the valid range of users to the membership of the current Space (or to include all users). The Default Value field includes a Find user icon, which you can use to locate and select a default user. Click the Find user icon, and in the resulting dialog, enter, minimally, two consecutive characters from the name of your search target, using an asterisk as a wild card for preceding or following characters (the search term
*dofinds bothcondoleezaanddoug). Click the Search icon, and all names in your company LDAP directory that match your search criteria appear in the results area. To populate the Default Value field with your selection, select a user and click OK.The list column contains a presence indicator next to the user name. Click the presence indicator to open a context menu with options for making contact with the person instantly. For more information, see Section 62.4.1, "Viewing the Status of Other Users."
Footnote 1 Number data-type columns adhere to the range and precision specified for the 8 byte IEEE 754 double data type. When the maximum number of significant digits is exceeded, the number is rounded.
-
-
After you select a data type, enter values for the remaining fields.
Table 64-2 lists the possible remaining fields and their associated data types.
Table 64-2 Data Type Column Details
Column Detail Description Associated Data Type(s) Specify whether to allow column data to be hyperlinked. Specifying Allow Links enables the user to enter both a column value and a URL. If a URL is specified, the column value is rendered as a hyperlink.
Plain Text
Optionally, provide a default value for the column entry, such as a default image, number, user name, and the like.
-
Plain Text
-
Number
-
DateTime
-
Boolean
-
Person
Enter a value in pixels to set the column width.
All data types
Use this pick list to specify the format for column values. For more information, see Table 64-1.
-
Number
-
DateTime
Enter text to assist the user in understanding the content to enter into the column. This text appears when focus is on this column in edit list data mode.
All data types
Indicate how a hyperlink on column data should open.
Choose from:
-
New Window—The link opens in a new browser tab or window.
-
Current Window—The link opens in the current browser window.
Plain Text
Enter the maximum number of characters for this column entry. This includes character spaces.
Plain Text
Indicate the highest number that can be entered in this column.
Number
Indicate the lowest number that can be entered in this column.
Number
Indicate the number of lines to make available for editing. When the value is
1, the user enters data in a single line text field when editing list data. Long values scroll horizontally. When the value is greater than1, the user enters data in a multiline text field. Long values scroll vertically. This makes entering and viewing large values much easier.Plain Text
Indicate whether to limit the selection of users to members of the current Space (Space Members) or to allow a selection from all authenticated users (All Users).
Person
Select this checkbox to require that data is entered in this column.
-
Plain Text
-
Rich Text
-
DateTime
-
Number
-
Picture
-
Person
-
-
Click OK to save your changes and exit the dialog.
-
Click Close to exit List Edit mode.
64.2.3.2.3 Revising List Column Details
You can revise every detail of a list column. That is, you can rename the column, change the column data type, require a value, or remove a value requirement. Keep in mind, however, if you change a column data type, any values currently entered in the list column are either converted to the new data type or removed irrevocably.
For example, if you move from a Plain Text data type to a Number data type, values that can be converted to a number are retained; other values are removed. Before any values are removed by the change, you are asked for confirmation. In contrast, if you move from a Number data type to a Plain Text data type, all values are retained.
Note:
Validation occurs only on data entry. If a user changes column details after data has been entered into the column, the existing data is not affected (that is, validated) even if it does not meet the new column detail conditions on the columns.If you want to validate new list data, you can export the list data to an Excel spreadsheet and then import it. On import, all rows are validated. The rows that fail validation are noted. You can fix invalid rows in the spreadsheet and import again.
See Also:
For more information, see Section 64.2.7, "Exporting a List and Importing a List from an Excel Spreadsheet."To revise list column details:
-
Go to the Lists page of the Space where you want to revise list column details.
-
In the Lists panel, select the list you want to change and click the Edit list icon (Figure 64-14).
The Lists page enters edit list mode (Figure 64-15).
-
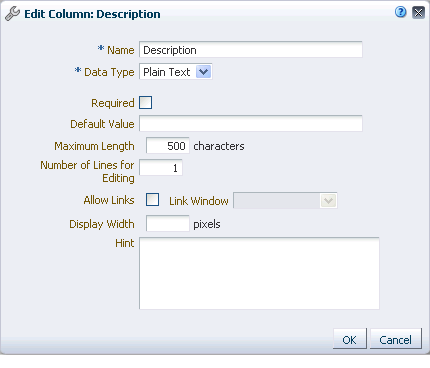
Under Columns, select the list column you want to revise and click the Edit button to open the Edit Column dialog (Figure 64-16).
-
Edit column details as you prefer.
For information about column details, see Section 64.2.3.2.2, "Adding Columns to a List."
-
Click OK to save your changes and close the dialog.
-
Click the Close button to exit edit list mode.
64.2.3.2.4 Rearranging List Columns on All Instances of a List
You can rearrange list columns in the list structure, affecting all instances of a list, by clicking rearrange icons or by dragging and dropping.
See Also:
For information about rearranging column order of a particular list instance in your view or everyone's view, see Section 64.2.5.3, "Changing Column Order on a List Instance."To rearrange columns on all instances of a list:
-
Go to the Lists page of the Space where you want to rearrange list columns.
-
In the Lists panel, select the list you want to change and click the Edit list icon to enter list edit mode.
-
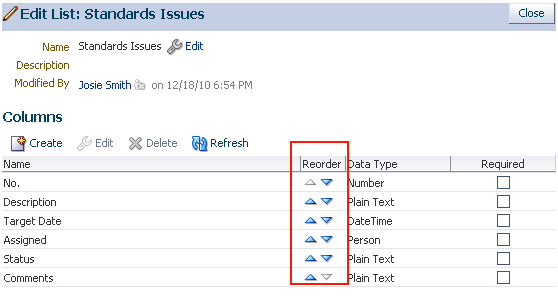
Under Columns, click an icon under the Reorder column to move a column higher or lower in the order of columns (Figure 64-17).
Tip:
Moving a column higher causes it to appear further to the left in column display order. Moving a column lower causes it to appear further to the right.Alternatively, drag and drop a column higher or lower in the column hierarchy.
-
Click the Close button to exit list edit mode.
64.2.3.2.5 Deleting a List Column
-
Go to the Lists page of the Space where you want to delete list columns.
-
In the Lists panel, select the list you want to change and click the Edit list icon to enter list edit mode (Figure 64-18).
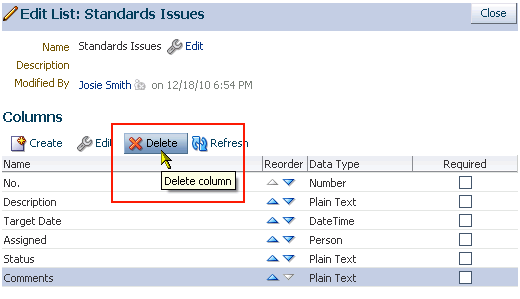
-
Select a column, and click the Delete button (Figure 64-19).
-
In the resulting confirmation dialog, click the Delete button to complete the deletion.
64.2.3.3 Copying a List
You can use an existing list as a template simply by copying it. First, copy the list, and then edit the copied list as you like.
To copy a list:
-
Go to the Lists page of the Space that contains the list you want to copy.
-
In the Lists panel, select the list you want to copy.
-
Click the Copy List icon (Figure 64-20).
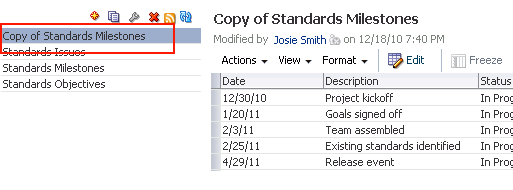
A copy of the list becomes available for selection in the Lists panel (Figure 64-21).
See Also:
For information about changing the list name or description, see Section 64.2.3.2.1, "Renaming a List and Revising a List Description." For information about revising list structure, see Section 64.2.3.2, "Editing List Structure."64.2.3.4 Deleting Lists
-
Go to the Lists page of the Space that contains the list you want to delete.
-
In the Lists panel, select the list you want to delete.
To select multiple lists, use Ctrl+Click; to select a range of lists, use Shift+Click.
-
Click the Delete list icon (Figure 64-22).
-
In the resulting confirmation dialog, click the Delete button.
After confirmation, the selected lists are removed from the Lists panel.
64.2.4 Adding and Managing List Data
Once you have created a list structure, you can add data to the list. This section describes how to add, edit, and refresh list data, and how to delete lists rows. It includes the following subsections:
See Also:
For information about list structure, see Section 64.2.3, "Creating and Managing Lists." For information about list data types, see Table 64-1, "Data Type Selections for List Columns" and Table 64-2, "Data Type Column Details".64.2.4.1 Adding Data of a Given Data Type to a List
This section describes how to add data to a list. When you add data to a list, you do so row-by-row (unless you are importing a spreadsheet). The placement of a new row depends on the following considerations:
-
When you add a new row, it is created after the selected row.
-
If no row is selected, the new row is created as the first row.
-
Once you save, list data is refreshed and rows are shown in sort order.
See Also:
for more information, see Section 64.2.5.1, "Sorting List Data on a Column"
You can add one or multiple list rows before you add content, or you can create a list row and add content to it right away.
This section provides an overview procedure for adding list data, and steps you through how to add data for a given data type. It includes the following subsections:
Tip:
TheNumber and Boolean data types are not included here because, for a Number data type, you simply enter a number, and, for a Boolean data type, you simply select or clear a checkbox.64.2.4.1.1 Adding Data to a List
-
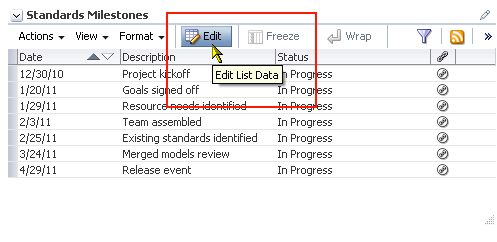
Go to the Lists page or the List Viewer task flow that displays the list you want to populate with data, and click the Edit List Data icon to open the list in edit list data mode (Figure 64-23).
Tip:
You can also enter list edit mode by selecting Edit from the Actions menu or by pressing Crtl+E. -
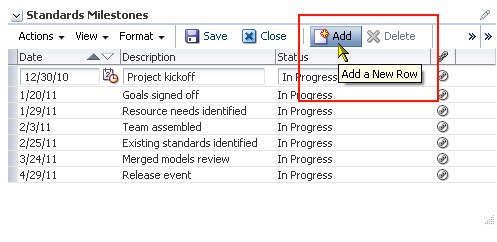
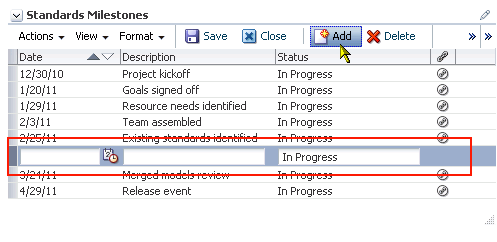
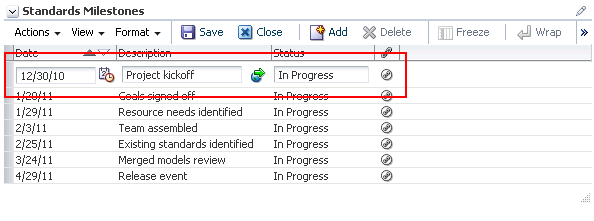
Click the Add a New Row icon to add a row to the list (Figure 64-24).
Tip:
You can also start the add-row process by selecting Add Row from the Actions menu or by pressing Ctrl+I.The new row is added after the selected row. If no row is selected, it is added as the first row (Figure 64-25).
-
Add data to the new row.
Tip:
You can only edit the row with focus. Click a row to give it focus and edit it. -
Repeat the previous two steps to create new rows and add data.
-
When you finish adding rows and data, click Save to save your changes and exit edit list data mode.
Tip:
To save, you can also select Save from the Actions menu, or press Ctrl+M. To close, click Close, select Close from the Actions menu, or press Ctrl+Q.
When you save your changes, the list data is refreshed and the rows are rendered in sort order (for more information, see Section 64.2.5.1, "Sorting List Data on a Column").
64.2.4.1.2 Adding Plain Text Data to a List
The Plain Text data type allows for the entry of unformatted text, and provides options for making the text a link.
Tip:
To create a hyperlink on aPlain Text data type, the list column must be configured to allow for the creation of hyperlinks. For more information, see Section 64.2.3.2.2, "Adding Columns to a List."To enter Plain Text data into a list row:
-
Enter edit list data mode as described in Section 64.2.4.1.1, "Adding Data to a List."
-
Go to the column that is formatted to support the
Plain Textdata type:To enter unlinked text, enter text in the field provided.
To enter linked text:
-
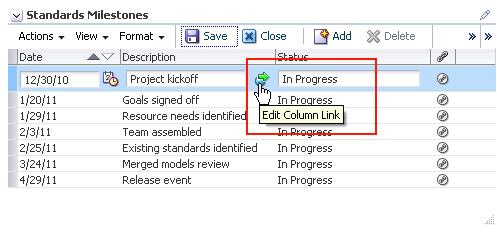
Click the Edit Column Link icon to the right of the data entry field (Figure 64-26).
-
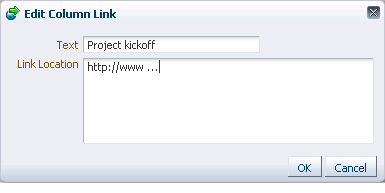
In the resulting Edit Column Link dialog, enter text in the Text field, and enter a full URL in the Link Location field (Figure 64-27).
-
Click OK.
Tip:
To remove a link, click the Edit Column Link icon, and delete the URL from the resulting dialog. -
-
When you finish adding rows and data, click Save to save your changes and exit edit list data mode.
Tip:
To save, you can also select Save from the Actions menu, or press Ctrl+M. To close, click Close, select Close from the Actions menu, or press Ctrl+Q.If both text and a link location were specified, the text is rendered as a hyperlink.
64.2.4.1.3 Adding Rich Text Data to a List
The Rich Text data type allows for the entry of rich, formatted text through a rich text editor. Rich text may include links.
See Also:
For information about using the Rich Text Editor, see Section 41.11, "Using the Rich Text Editor (RTE)."To enter Rich Text data into a list row:
-
Enter edit list data mode as described in Section 64.2.4.1.1, "Adding Data to a List."
-
Go to the column that is formatted to support the
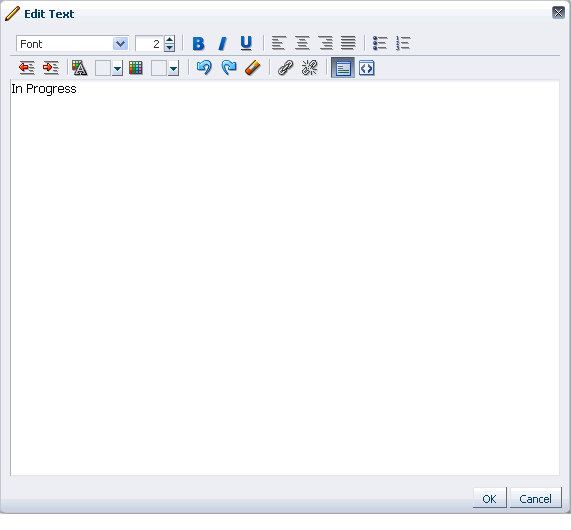
Rich Textdata type, and click the Edit Text icon to the right of the data entry field (Figure 64-28).This launches the rich text editor (Figure 64-29).
-
Enter text and apply styles according to your requirements.
-
To add a link:
-
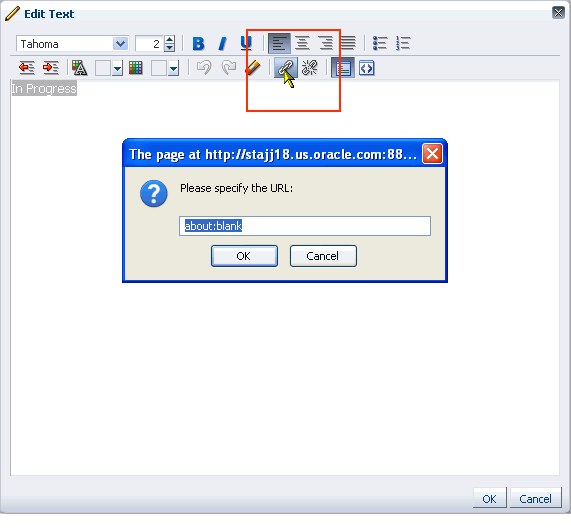
Highlight the link text, and click the Add Link icon in the editor's toolbar (Figure 64-30).
-
In the resulting dialog, enter a URL in the field provided.
-
Click OK.
Tip:
To remove a link, highlight the linked text and click the Remove Link icon. -
-
Click OK to exit the editor.
-
When you finish adding rows and data, click Save to save your changes and exit edit list data mode.
Tip:
To save, you can also select Save from the Actions menu, or press Ctrl+M. To close, click Close, select Close from the Actions menu, or press Ctrl+Q.
64.2.4.1.4 Adding DateTime Data to a List
The DateTime data type allows for the entry of dates and times in the format specified in a given user's WebCenter Spaces Preferences (for more information, see Section 35.3, "Setting Date and Time Preferences").
To enter DateTime data into a list row:
-
Enter edit list data mode as described in Section 64.2.4.1.1, "Adding Data to a List."
-
Go to the column that is formatted to support the
DateTimedata type, and enter a value or click the Select <data type> icon to the right of the data entry field (Figure 64-31). -
If you click the icon, from the resulting calendar, select a date, a time, or a date and time, according to the column's requirements (Figure 64-32).
-
If the column requires just a date, the calendar closes once you select a value.
If the calendar requires a time or a date and time, click OK to close the calendar.
-
When you finish adding rows and data, click Save to save your changes and exit edit list data mode.
Tip:
To save, you can also select Save from the Actions menu, or press Ctrl+M. To close, click Close, select Close from the Actions menu, or press Ctrl+Q.
64.2.4.1.5 Adding Picture Data to a List
The Picture data type allows for the entry of a path to an image (the image is rendered in list view mode).
To enter a Picture data type into a list row:
-
Enter edit list data mode as described in Section 64.2.4.1.1, "Adding Data to a List."
-
Go to the column that is formatted to support the
Picturedata type, and enter a path to a picture or click the Edit Picture icon to the right of the data entry field (Figure 64-33). -
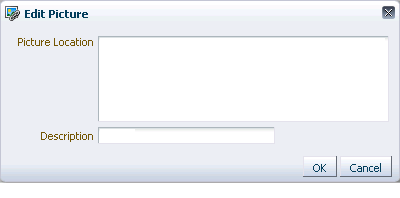
If you click the icon, in the Edit Picture dialog, enter a directory path or a URL to an image in the Picture Location field (Figure 64-34).
For example, enter:
http://www.oracleimg.com/admin/images/ocom/hp/oralogo_small.gif
Or
d:/corporateImageBank/images/myimage.png
Tip:
The image must be available in a location that does not require login credentials for access.You can select an image that is located in your WebCenter Spaces Document Library. In a Documents service task flow, select the image and use the Get a Link option on the View menu to access a link to the image. Copy the link and paste it into the Picture Location field.
-
Provide
ALTtext for the image in the Description field. -
Click OK.
-
When you finish adding rows and data, click Save to save your changes and exit edit list data mode.
Tip:
To save, you can also select Save from the Actions menu, or press Ctrl+M. To close, click Close, select Close from the Actions menu, or press Ctrl+Q.
64.2.4.1.6 Adding Person Data to a List
The Person data type allows for the entry of a user name from your company's identity store. The selection of a Person may be further limited to the members of the current Space. If you search for a user name, the values returned indicate whether such a limit is in place.
To enter a Person data type into a list row:
-
Enter edit list data mode as described in Section 64.2.4.1.1, "Adding Data to a List."
-
Go to the column that is formatted to support the
Persondata type, and enter a user name or click the Find user icon to the right of the data entry field (Figure 64-35). -
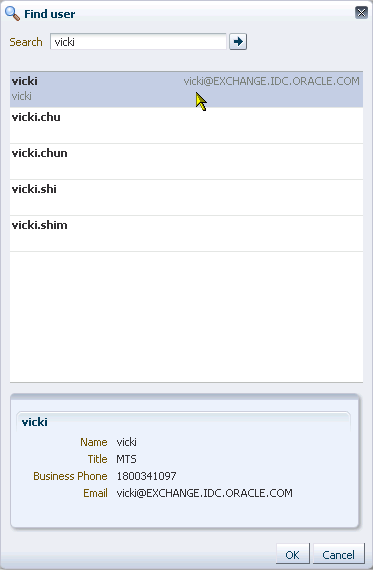
If you click the icon, in the resulting Find user dialog, enter, minimally, two consecutive characters from the name of your search target, using an asterisk as a wild card for preceding or following characters (the search term
*dofinds bothcondoleezaanddoug), and click the Search icon.Either all names in your company LDAP directory, or those users who belong to the current Space, that match your search criteria appear in the results area (Figure 64-36).
-
Select a user, and click OK to populate the field with your selection.
-
When you finish adding rows and data, click Save to save your changes and exit edit list data mode.
Tip:
To save, you can also select Save from the Actions menu, or press Ctrl+M. To close, click Close, select Close from the Actions menu, or press Ctrl+Q.
64.2.4.2 Editing List Data
When a list is in edit mode, you can edit one or multiple list rows. In edit mode, you can initiate a row edit simply by clicking within the row. You can continue to click in rows and edit row content until you exit edit mode.
To edit list data:
-
Go to the list that contains data you want to edit, and click the Edit List Data icon to open the list in edit mode (Figure 64-37).
-
Click a list row to revise its data (Figure 64-38).
Tip:
The type of list data affects the action that you take:-
To edit a
Picturedata type, click the Edit Picture icon next to the data entry field. Enter the URL to the picture and ALT text. -
To edit a
Rich Textdata type, click the Edit Text icon next to the data entry field to launch the editor. -
To edit a hyperlink in a column that allows links, click the Edit Link icon.
-
-
Continue clicking rows and revising data until you are finished.
-
Click Save to save your changes and exit edit list mode.
Tip:
To save, you can also select Save from the Actions menu, or press Ctrl+M. To close, click Close, select Close from the Actions menu, or press Ctrl+Q.
64.2.4.3 Deleting List Rows
You can delete one or multiple list rows in one operation.
Tip:
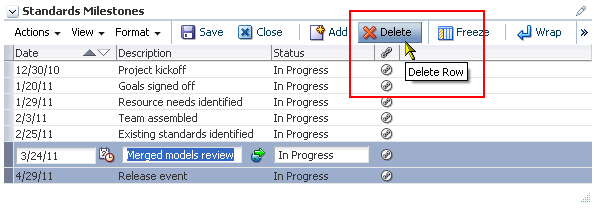
selecting a row and clicking Delete marks a list row for deletion. The row is removed from your view, but the list data continues to exist in the WebCenter repository. The actual delete takes place when you save the change.To delete one or multiple list rows:
-
Go to the list with rows to delete.
-
Click the Edit List Data icon to open the list in edit mode (Figure 64-39).
-
Select one or more rows to delete.
In Windows, use Ctrl+Click to select multiple rows. In UNIX, simply click multiple rows. In both operating systems, use Shift+Click to select a range of rows.
-
Click the Delete button above the list (Figure 64-40).
The selected rows are marked for deletion removed from your view of the list.
-
Click Save to save your changes and exit edit list mode.
Tip:
To save, you can also select Save from the Actions menu, or press Ctrl+M. To close, click Close, select Close from the Actions menu, or press Ctrl+Q.
64.2.4.4 Refreshing List Data
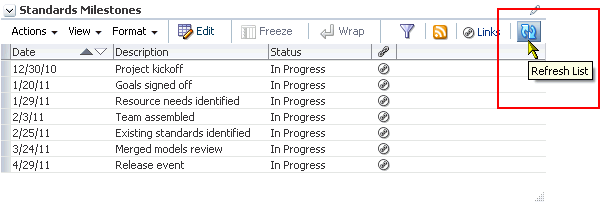
All lists come with a Refresh List icon, which you can click to refresh the display of list data (Figure 64-41).
64.2.5 Customizing Lists
You can perform user customizations on your own view of a list instance, or you can perform application customizations on a list instance, affecting everyone's view. User customizations involve changes made in page view mode; while application customizations involve changes made in page edit mode (that is, in Oracle Composer). Everyone can perform user customizations their own view of a list; but page edit privileges are always required for application-level list customizations.
User and application customizations apply to a list rendered in a List Viewer task flow. They do not apply to lists rendered on the Lists page.
A second instance of a list is not affected by the customizations you make to the first instance. For example, imagine that you have placed the Issues list on both the Sales page and the What's New page. If you sort the list by the Number column on the Sales page, the Issues list is not automatically sorted by Number on the What's New page.
While application customizations affect everyone's view of a list instance, user customizations are layered over them. For example, someone may perform an application customization on a list containing columns A, B, and C, so that column C is first in list column order (C, A, B). You can then perform a user customization on the list so that column A is first in list column order in your personal view of the same list instance (A, C, B).
Note:
In page edit mode, you see only application customizations. In page view mode, you see user customizations layered over application customizations. If the same property is set at both the application and user levels, the user value takes precedence in your own view.This section describes various application- and user-level customizations you can make to a list instance. It includes the following subsections:
64.2.5.1 Sorting List Data on a Column
By default, list data is sorted by create date. You can control the sort order of list data by clicking sort icons in each column's header. You can perform an advanced sort using View menu options.
Sort list data in the List Viewer task flow. You can sort list data on the Lists page, but the sort is not persisted. It will revert back if you change lists or navigate away from the page.
To sort list data on a column in your view, perform the actions described in this section in page view mode. To sort list data on a column in everyone's view, perform the actions described in this section in page edit mode.
This section describes regular and advanced sorting. It includes the following subsections:
Note:
When your WebCenter Spaces application is running against an Oracle database, a click on a column header in the List View results in a linguistic sort based on your locale. For non-Oracle databases, the sorting is based on the linguistic sorting specified in the database (collation in the case of SQL Server). This means when you connect to a WebCenter Spaces instance in different languages, list rows are sorted according to the default collation of the database, regardless of the language your application is currently using.64.2.5.1.1 Sorting List Data Using Column Icons
To sort list data on a column using column icons:
-
Go to the list instance you want to change.
-
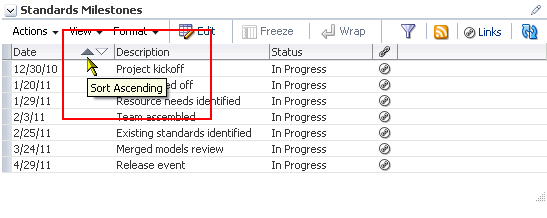
Go to the column you want to use to control the sort, roll your mouse over the column header, and click the Sort Ascending icon to sort the list in ascending order (1, 2, 3, a, b, c); or click the Sort Descending icon to sort the list in descending order (c, b, a, 3, 2, 1) (Figure 64-42).
Tip:
You can also sort list data on a column by selecting a column and then selecting Sort and then Ascending or Descending from the View menu. You can right-click a column and select these options from a context menu.
64.2.5.1.2 Performing an Advanced Sort of List Data
The View menu provides an Advanced option that presents another way to sort list data.
To use the Advanced option to sort list data:
-
Go to the list instance you want to change.
-
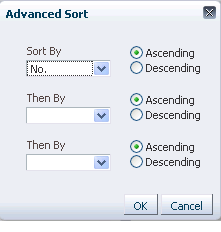
From the View menu, select Advanced to open the Advanced Sort dialog (Figure 64-43).
-
From the Sort By list, select the column to be considered first in sorting list data.
The Sort By and Then By fields are arranged in order of precedence, with Sort By considered first, and Then By in second and third positions.
-
Select either Ascending, to sort list data on the selected column in ascending order (1, 2, 3, a, b, c), or Descending, to sort list data on the selected column in descending order (c, b, a, 3, 2, 1).
Note:
Currently, you can sort against only one column. Look to future releases for this feature to be fully realized. -
Click OK.
Tip:
You can access the options described in this section by right-clicking a column header and selecting from a context menu.64.2.5.2 Resizing List Columns
You can control the width of a list column by dragging it wider or by setting a specific column width through a dialog. You can also control column width by expressing a default width in column details (for more information, see the Display Width detail in Table 64-2, "Data Type Column Details").
Resize columns in the List Viewer task flow. You can resize columns on the Lists page, but these are not persisted and will revert back when changing lists or navigating away.
To resize list columns in your view, perform the following actions in page view mode. To resize list columns in everyone's view, perform the following actions in page edit mode.
Note:
To resize list columns, the list must contain at least one row.To resize list columns:
-
Go to the list instance you want to change.
-
Resize columns using one of the following methods:
-
Click and hold on a column splitter, and drag it to make the column wider or narrower.
-
In the list, select the column to resize.
From the Format menu, select Resize Columns.
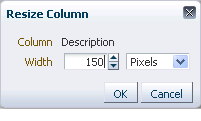
In the resulting dialog, enter a column width and select a unit of measure (Figure 64-44).
Choose from:
-
Pixels—To express column width in a specified number of pixels.
-
Percent—To express column width as a percentage of the total list width.
Click OK.
-
Tip:
You can access the options described in the section by right-clicking a column and selecting from a context menu. -
64.2.5.3 Changing Column Order on a List Instance
You can rearrange the order of list columns by dragging a column and dropping it to the desired position or by using the reorder dialog.
Change column order in the List Viewer task flow. You cannot change column order on the Lists page.
To change column order on a list instance in your view, perform the following actions in page view mode. To change column order on a list instance in everyone's view, perform the following actions in page edit mode.
Note:
To reorder columns by dragging, the list must have at least one row.To change column order:
-
Go to the list instance you want to change.
-
Rearrange list columns using one of the following methods:
-
Click and hold on a list column title, and drag and drop it to the desired location.
-
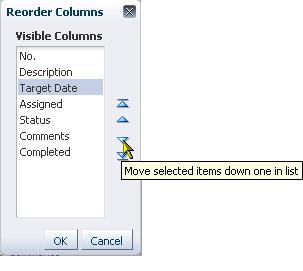
Select Reorder Columns from the View menu.
In the resulting dialog, select a column and click a Move icon to the right of the list of Visible Columns to reposition your selection (Figure 64-45).
Repeat until you have columns arranged in the desired order.
Click OK.
Tip:
You can access the options described in the section by right-clicking a column and selecting from a context menu. -
64.2.5.4 Hiding and Showing List Columns
You can use an option on a list's View menu to hide selected list columns. To hide or show columns in your view, perform the following actions in page view mode. To change column order in everyone's view, perform the following actions in page edit mode.
Hide or show list columns in the List Viewer task flow. You can hide or show columns on the Lists page, but this setting is not persisted and reverts back when changing lists or navigating away.
To hide or show list columns:
-
Go to the list instance you want to change.
-
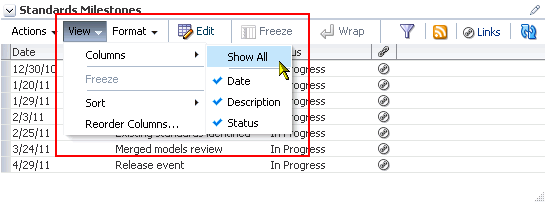
On the View menu, open the Columns submenu (Figure 64-46):
-
Select a column you want to show (a check appears on the menu next to shown columns).
-
Clear a column you want to hide (no check appears on the menu next to hidden columns).
-
Select Show All to show all columns (all columns are checked on the menu).
-
64.2.5.5 Freezing a Column Position
When a list is too wide to display all of its columns in one view, you can scroll the list left and right. If there is a column you always want to keep in view, you can use column freezing to hold a column in place during scrolling. Freezing causes a selected column to hold its position while the columns to the right of it scroll by. You can set Freeze on one column on a given list instance. Freezing holds in place the selected column and any column to the left of it.
Note:
To freeze a column position in your view, perform the following actions in page view mode. To freeze a column position in everyone's view, perform the following actions in page edit mode.To freeze a column position:
-
Go to the list with a column you want to freeze.
-
Select the relevant column by clicking its header.
The Freeze icon becomes available.
-
Click the Freeze icon (Figure 64-47).
Tip:
You can also freeze a column by selecting it and then selecting Freeze from the View menu.
To unfreeze a column, select it as described in step 2, and click the Freeze icon again.
Tip:
You can access the options described in the section by right-clicking a column and selecting from a context menu.64.2.5.6 Wrapping Column Data
Use the Wrap feature to control whether to allow column data to wrap in a selected list column. Data that wraps breaks onto additional lines if it would otherwise exceed the column width. Data that does not wrap, shows only as much data as fits into the current column width (you can widen the column to view the data if you prefer, see Section 64.2.5.2, "Resizing List Columns").
Note:
By default, column data is wrapped.To wrap column data:
-
Go to the list in which to wrap column data.
-
Select the relevant column by clicking its header.
-
Click the Wrap icon.
Tip:
You can also wrap data by selecting the column and then selecting Wrap from the Format menu.You can access the options described in the section by right-clicking a column and selecting from a context menu.
If any data was previously truncated, it now appears in the row with line breaks to accommodate the column's width.
To turn wrapping off, select the relevant column and click the Wrap icon again.
64.2.5.7 Applying Color Banding to List Rows
Color banding refers to a transparent overlay of color applied at specified intervals to list rows or columns. When you define color banding on a list, you specify whether to apply color banding and how often to apply it.
You can easily enhance the readability of a list by applying row or column color banding (Figure 64-48).
You can apply color banding to your personal view of a list instance or to everyone's view of a list instance. This section describes how. It contains the following subsections:
-
Section 64.2.5.7.1, "Applying Color Banding to Your Personal View of a List"
-
Section 64.2.5.7.3, "Applying Color Banding to Everyone's View of a List Instance"
-
Section 64.2.5.7.4, "Removing Color Banding from Everyone's View of a List"
64.2.5.7.1 Applying Color Banding to Your Personal View of a List
You can apply color banding to list rows or to list columns.
To apply color banding to your personal view of a list instance:
-
Go to the list you want to change.
-
Click the Personalize icon on the task flow header (Figure 64-49).
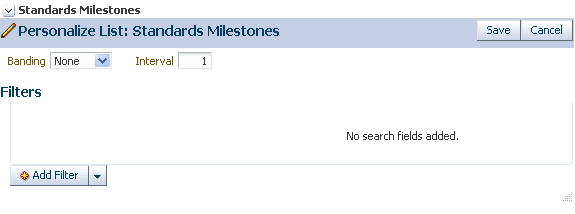
The List Viewer enters personalize list mode (Figure 64-50).
-
From the Banding pick list, select a banding style for the list instance.
Choose from:
-
Row—To specify color banding on list rows.
-
Column—To specify color banding on list columns.
-
None—To turn color banding off.
-
-
In the Interval field, enter the number of rows or columns to skip between color bands.
For example, when you apply color bands to rows, a value of
1applies a color band to the second row, fourth row, sixth row, and so on. Figure 64-51 illustrates an interval value of1. -
Click Save to save your settings and return to the list.
List data is refreshed, now reflecting your color banding settings.
64.2.5.7.2 Removing Personal Color Banding
To remove personal color banding from a list:
-
Go to the list from which to remove color banding.
-
Click the Personalize icon on the task flow header (Figure 64-52).
The List Viewer enters personalize list mode.
-
From the Banding pick list, select None.
-
Click Save to save your settings and return to the list.
List data is refreshed, now showing no color banding.
64.2.5.7.3 Applying Color Banding to Everyone's View of a List Instance
When you want your color banding settings to affect everyone's view of a particular list instance, follow the steps in this section.
Note:
If you have previously performed a user customization on a list instance to omit color banding, you may need to reset your user customization, as described in Section 64.2.5.7.1, "Applying Color Banding to Your Personal View of a List." Your user customizations take precedence over Space-level customizations, and thus may prevent you from seeing the change described in this procedure.To apply color banding to everyone's view of a list instance:
-
Go to the list you want to customize with color banded rows or columns.
-
Enter edit page mode.
See Also:
For information about entering edit page mode, see Section 17.3.1, "Entering and Exiting Page Edit Mode."The page opens in Oracle Composer.
-
Go to the list instance you want to customize, and click the Edit icon on the task flow header (Figure 64-53).
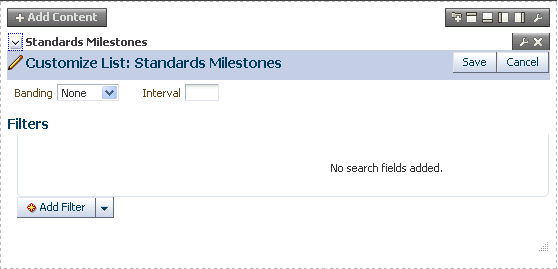
The list enters customize list mode (Figure 64-54).
-
Configure color-banding settings as described in Section 64.2.5.7.1, "Applying Color Banding to Your Personal View of a List."
-
Click Close to exit Oracle Composer.
64.2.5.7.4 Removing Color Banding from Everyone's View of a List
To remove color banding from everyone's view of a list instance:
-
Go to the list from which to remove color banding.
-
Enter edit page mode.
See Also:
For information about entering edit page mode, see Section 17.3.1, "Entering and Exiting Page Edit Mode."The page opens in Oracle Composer.
-
Go to the list instance you want to customize, and click the Edit icon on the task flow header (Figure 64-55).
The List Viewer enters customize list mode.
-
From the Banding pick list, select None.
-
Click Save to save your changes and exit customize list mode.
The list refreshes, with color banding removed.
-
Click Close to exit Oracle Composer.
64.2.5.8 Filtering List Data
The Lists service provides data filtering options for your personal view of a list instance and for everyone's view of the instance. Filtering provides a means of limiting the display of list data to those rows that match your filtering criteria.
Temporary, personal filtering (also called ad hoc filtering) is available with both the List Viewer task flow and Lists page. Custom filtering that affects everyone's view of a list instance is available only with the List Viewer task flow.
This section describes the processes of applying ad hoc, permanent personal, and permanent list filters. It contains the following subsections:
-
Section 64.2.5.8.1, "Applying an Ad Hoc Filter to a List Instance"
-
Section 64.2.5.8.2, "Applying a Permanent, Personal Filter to a List Instance"
-
Section 64.2.5.8.3, "Removing a Permanent, Personal List Filter"
-
Section 64.2.5.8.4, "Applying Filters to Everyone's View of a List"
-
Section 64.2.5.8.5, "Removing Filters from Everyone's View of a List"
64.2.5.8.1 Applying an Ad Hoc Filter to a List Instance
Use ad hoc list filtering to easily find a particular list entry or group of entries in a list instance.
Note:
Ad hoc list filtering applies only toPlain Text and Person data types. Columns that use other data types, such as Date and Number, are not used in ad hoc filtering. For example, if you have dates shown in format dd-mon-yy and you filter on jan, you do not see rows with dates in January.To apply an ad hoc filter to a list instance:
-
Go to the list that contains the data you want to temporarily filter.
-
Click the Filter Rows icon in the List toolbar (Figure 64-56).
Tip:
You can also select Filter Rows from the Actions menu.The Filter field opens (Figure 64-57).
-
Enter space-separated keywords in the Filter field, and click the Filter icon to execute the filter.
All row details that match any of the keywords are shown.
-
Click the Filter Rows icon again to hide the Filter field and remove the temporary filter.
Tip:
You can also select Cancel Filter from the Actions menu.
64.2.5.8.2 Applying a Permanent, Personal Filter to a List Instance
In addition to an ad hoc filter, you can apply a permanent personal filter to your view of a list instance. We use the term permanent to convey the fact that you can keep your list filtered in a particular way for as long as you like. The filter is retained across page navigations within a browser session and across browser sessions.
It is still possible to remove such a filter. This section describes how to apply and remove a permanent personal filter.
To apply or remove a permanent filter on your view of a list instance:
-
Go to the list that contains the data you want to permanently filter.
-
Click the Personalize icon on the task flow header (Figure 64-58).
The list enters personalize list mode (Figure 64-59).
-
From the Add Filter list, select a column against which to apply a filter.
The selected column appears, ready for a filter definition.
-
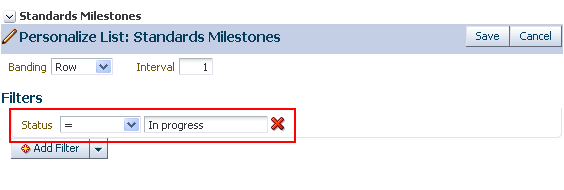
Select an operator from the list, and enter the filter content in the field provided (Figure 64-60).
The filter operators that appear on the list vary according to the data type of the selected column. Table 64-3 lists and describes filter operators as they apply to different data types.
Table 64-3 Filter Operators for List Data Types
Data Type Description Use
Booleandata type filter operators to specify that Boolean values in the selected list column must:-
= —Match the value you specify
-
<>—Not match the value you specify
The Boolean value is expressed as a checkbox. A checked box means TRUE or YES; a cleared box means FALSE or NO.
Use
DateTimedata type filter operators to specify that date and time values in the selected column must be:-
= —The same as the date or date and time that you specify
-
>= —More recent or the same as the date or date and time that you specify
-
<>—Any date or date and time other than the value you specify
-
>—More recent than the date or date and time that you specify
-
<= —Preceding or matching the date or date and time that you specify
-
<—Preceding the date or date and time that you specify
Use
Numberdata type filter operators to specify that number values in the selected column must be:-
= —Equal to the value you specify
-
>= —Equal to or greater than the value you specify
-
<>—Greater or lesser than the value you specify
-
>—Greater than the value you specify
-
<= —Equal to or lesser than the value you specify
-
<—Lesser than the value you specify
Use
Persondata type filter operators to specify that person values in the selected list column must:-
= —Match the user name you specify
-
Starts With—Start with the character(s) you specify
-
Ends With—End with the character(s) you specify
-
Contains—Include the character(s) you specify
-
<>—Contain any user name other than the one you specify
PictureYou cannot apply filter operators to a
Picturedata type in a list.Use
Plain Textdata type filter operators to specify that values in the selected column must:-
= —Match the characters you specify
-
Starts With—Start with the character(s) you specify
-
Contains—Include the character(s) you specify
-
Ends With—End with the character(s) you specify
-
<>—Contain any value other than the one you specify
Rich TextYou cannot apply filter operators to a
Rich Textdata type in a list. -
-
When you define multiple filters, Match All Any options appear:
-
Select All to require that displayed rows match all conditions.
-
Select Any to require that displayed rows match at least one condition.
-
-
Click Save to save your filter criteria and return to the list.
The list is refreshed, now displaying data that matches your filter criteria.
64.2.5.8.3 Removing a Permanent, Personal List Filter
To remove a permanent, personal list filter:
-
Go to the list from which you want to remove personal filtering.
-
Click the Personalize icon on the task flow header (Figure 64-61).
The List Viewer enters personalize list mode.
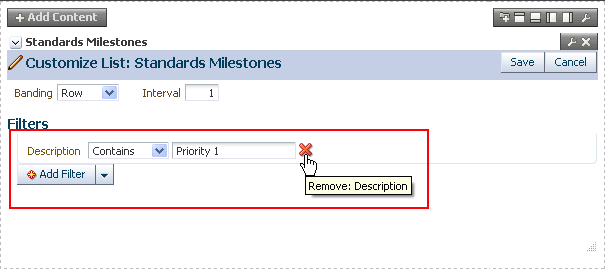
-
Click the Remove icon next to the filtering criteria you want to remove (Figure 64-62), and then click Save.
List data is refreshed, now displaying any data previously hidden by a filter.
64.2.5.8.4 Applying Filters to Everyone's View of a List
If you want the list filters you create to apply to all users' views of a particular list instance, simply create the filters in page edit mode.
To apply filters to everyone's view of a list:
-
Go to the list that contains the data you want to filter from everyone's view.
-
Enter edit page mode.
See Also:
For information about entering edit page mode, see Section 17.3.1, "Entering and Exiting Page Edit Mode."The page opens in Oracle Composer.
-
Go to the task flow instance you want to filter, and click the Edit icon on the task flow header (Figure 64-63).
The list enters customize list mode (Figure 64-64).
-
Create and apply filtering criteria as described in Section 64.2.5.8.2, "Applying a Permanent, Personal Filter to a List Instance."
-
Click Close to exit Oracle Composer.
See Also:
For information about removing a filter from everyone's view of a list instance, see Section 64.2.5.8.5, "Removing Filters from Everyone's View of a List."64.2.5.8.5 Removing Filters from Everyone's View of a List
To remove a filter from everyone's view of a list:
-
Go to the list from which to remove a filter.
-
Enter edit page mode.
See Also:
For information about entering edit page mode, see Section 17.3.1, "Entering and Exiting Page Edit Mode."The page opens in Oracle Composer.
-
Click the Edit icon on the List Viewer task flow header (Figure 64-65).
The list enters customize list mode.
-
Click the Remove icon next to the filters you want to remove (Figure 64-66), and then click Save.
List data is refreshed, now displaying all unfiltered data.
64.2.6 Sending a Link to a List to Other Users
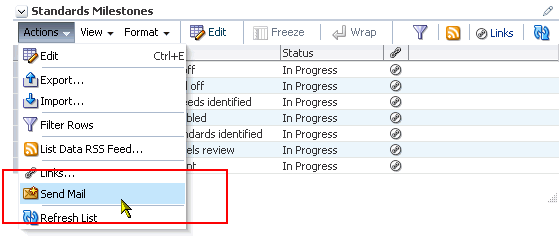
The list Actions menu includes a Send Mail option for sending a link to a list through a mail message.
To send a link to a list through mail:
-
Log in, and go to the list instance you want to send as a link through mail.
-
From the list Actions menu, select Send Mail (Figure 64-67).
A compose message window opens, addressed to Space members, with the following information:
-
The name of the Space from which the list instance originates
-
The list title and description
-
A link to the Space
-
A link to the list instance
Users click the link to the list instance to open a view of the list.
Note:
To view the list, users must have access to the Space that contains the list instance. -
-
Compose the message and send as you would any other mail message.
64.2.7 Exporting a List and Importing a List from an Excel Spreadsheet
The Lists service provides a means of exporting and importing lists. If you can view the list, you can export it to Microsoft Excel 1997 - 2003 and 2007 formats and revise list data in Excel. If you sufficient privileges to edit the list, you can import the revised list back into WebCenter Spaces.
Tip:
You can also create a list by importing an Excel spreadsheet. For more information, see Section 64.2.3.1, "Creating Lists."This section describes how to export and import lists and provides information about additional software that may be of use in this process. It includes the following subsections:
64.2.7.1 What You Should Know About Exporting and Importing Lists
Use list export and import to add and revise list rows in a Microsoft Excel spreadsheet. List structure and links for the list and list rows are unaffected by export and import. When exporting a list, only the list data is exported, not the list structure nor the links. When a list is imported, new links and modified links will not be affected by the import.
After you export a list, if other changes are made to list data in WebCenter Spaces, they are overwritten when you import the list. Before content is overwritten, a confirmation dialog provides you with an opportunity to stop the import and preserve the WebCenter Spaces changes.
Importing a spreadsheet cannot be used to modify list structure. However, you can import any spreadsheet to a list that has the same columns. A warning is raised if the spreadsheet was not created from an export of the list, but you can dismiss this warning and proceed if desired. You can also export a rowless list to a spreadsheet, add rows in Excel, and then import it.
You must take care when you export a list not to revise list structure in Excel nor in WebCenter Spaces. You cannot import an exported list if the list structure is changed in WebCenter Spaces after export. You can add and remove list rows in the spreadsheet; such changes are reflected in the list on import.
Adding and removing list columns in the spreadsheet does not affect the list structure. Consequently, when you import a spreadsheet with columns that were removed through Excel, the import succeeds. The columns continue to appear in the imported list; though the deleted column data does not.
When you export a list from WebCenter Spaces, you are prompted for the Excel format (1997 - 2003 and 2007 formats are offered). To import a spreadsheet, the same formats are accepted.
64.2.7.2 Exporting a List to a Spreadsheet
When you can view a list, you can export the list to a Microsoft Excel file. Exporting enables you to use your Excel skills to easily add to and revise list data. Controls for exporting lists are available in both the List Viewer task flow and on the Lists page.
To export a WebCenter Spaces list:
-
Go to the list you want to export, and select Export from the Actions menu.
-
Select a format for the output file:
-
MS Excel 2007
-
MS Excel 1997 - 2003
-
-
Follow your browser's prompts to save the exported file to your local file system.
The list is saved in the Excel format you select. The file name is the list name, with underscores in lieu of character spaces. For example,
my listbecomesmy_list.xlsxormy_list.xls.
64.2.7.3 Importing an Exported List
After you have created or revised list data and saved it in an Excel format, you can import it using controls available in both the List Viewer task flow and on the Lists page. To import list data, you must have, minimally, Edit permission on the page that contains the list.
To import an exported list:
-
Go to the list into which to import a spreadsheet, and select Import from the Actions menu.
-
In the Import from Excel dialog (Figure 64-68), click the Browse button and navigate to and select the relevant spreadsheet.
Note:
The spreadsheet must have the same columns as the list.The file must be in Excel 1997-2003 (
*.xls) or 2007 format (*.xlsx). -
Click Import.
If the spreadsheet was not created from an export of the list, a warning is given. Click Import to proceed.
The list is refreshed, now displaying the imported data. List data is validated on import. If any rows contain validation errors, such errors are presented in a dialog and the import is terminated. You can correct validation errors in the spreadsheet and import again.
64.3 Setting List Viewer Task Flow Properties
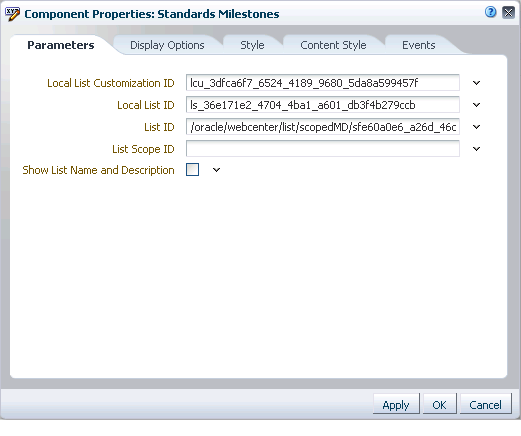
The List Viewer task flow has associated properties, which users with sufficient privileges can access through the Component Properties dialog in Oracle Composer (Figure 64-69).
See Also:
For information about accessing the Component Properties dialog, see Section 17.5.2.3, "Setting Component Properties."The following sections provide information about properties associated with the List Viewer task flow and describe the parameters that are unique to it:
64.3.1 What You Should Know About List Viewer Task Flow Properties
When you set property values on a List Viewer task flow, you are affecting only the task flow instance on which the value is set. Other instances of the same task flow are not affected by such changes.
The properties on the Parameters tab of the Component Properties dialog control the default task flow content. For descriptions of the parameters on this tab, see Section 64.3.2, "List Viewer Task Flow Parameters." For some task flows, parameters on this tab facilitate the wiring of the task flow to page parameters and page definition variables. For more information, see Chapter 19, "Wiring Pages, Task Flows, Portlets, and UI Components."
Changes to the properties on the Display Options, Style, and Content Style tabs affect the appearance and behavior of the task flow for all users. These properties are common to all task flows. For more information, see Section 17.5.2, "Setting Properties on Page Components."
All properties on the Parameters and Display Options tabs provide access to an Expression Language (EL) editor, which you can use to select or specify a variable value instead of a constant value. Click the Edit icon next to a property field to open the editor. For more information about using the editor and for descriptions of common EL expressions, see Appendix B, "Expression Language Expressions."
64.3.2 List Viewer Task Flow Parameters
Table 64-4 describes the parameters that are unique to the List Viewer task flow. Note that List Viewer task flow parameter values are set automatically and should not be changed.
Table 64-4 List Viewer Task Flow Parameters
