As previously stated, a multihead group is required for a multihead configuration.
A multihead group is comprised of a set of associated Sun Ray Clients controlled by a primary client to which a keyboard and mouse, are connected. This group, which can contain a maximum of 16 clients, is connected to a single session. A multihead group can be composed of virtually any mix of Sun Ray Clients, and each Sun Ray Client presents an X screen of the multihead X display.
All peripherals are attached to the primary client, and the group is controlled from the primary client. The remaining clients, called the secondary clients, provide the additional displays. If a secondary client tries to connect when the primary client is not available, a Waiting for Primary icon is displayed on the secondary client until the primary client is discovered.
Unless Xinerama is enabled, sessions with a multihead group will have a separate desktop toolbar with separate workspaces per screen and windows cannot be moved between screens. See Section 9.2.9, “How to Enable and Disable Xinerama” for more details.
If you hotdesk from a multihead group to a Sun Ray Client that is not part of a multihead group, you can still view all the screens created in the original multihead group on the single screen, or head, by panning to each screen in turn. This action is called "screen flipping."
There are two main steps to create a multihead group:
Create the multihead group using the utmhconfig (GUI) or utmhadm command. The command must be run on the primary client. You can use a smart card to identify the terminals.
Enable the multihead policy using either the utpolicy command or the Admin GUI.
Note the following limitations:
The Sun Ray 2FS and Sun Ray 3 Plus Clients are designed to run a single display across two screens without additional configuration. It uses a single frame buffer for two displays, always treating two attached heads as a single, unified display surface to be controlled with a single mouse and keyboard, and always presenting itself to the X server as a single screen
Video acceleration works only on the primary client. In a multihead group, the audio stream is directed only to the primary client, so audio/video synchronization is provided only on the primary client.
Regional hotdesking is not enabled for multihead groups.
When the multihead feature is used, a small window indicating the current session on each screen is displayed, with the current screen highlighted for easy identification. This window is automatically displayed for users during session creation. For example, Figure 9.2, “Multihead Screen Display” indicates that the user is on the second screen of a three-screen display.

The Xinerama extension to X11 creates a single large screen displayed across several monitors. With Xinerama, only one toolbar is displayed, and a window can be moved smoothly from one part of the screen to the next.
For CDE desktop sessions, a single CDE toolbar and set of workspaces manages the configured monitors. A window including the CDE toolbar itself can span monitors, because the monitor displays are still within the same screen.
See Section 9.2.9, “How to Enable and Disable Xinerama” for more details.
Xinerama can also be used with the Windows connector uttsc command.
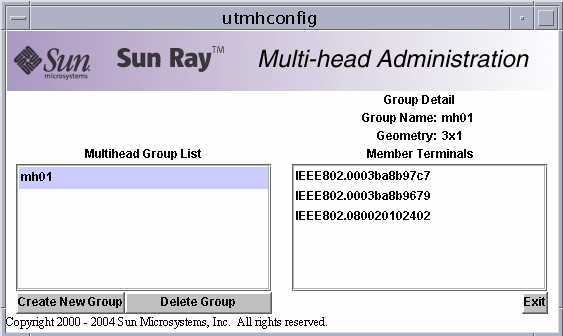
On the primary client, start the Multi-head Administration GUI.
# /opt/SUNWut/sbin/utmhconfig
On the initial screen, click Create New Group.
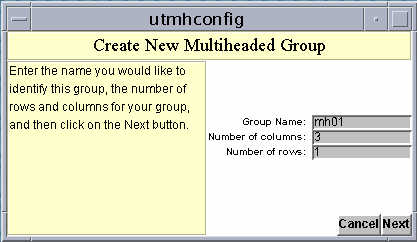
The Create New Multiheaded Group dialog box is displayed. The number of rows and the number of columns you provide are displayed as the group geometry when the group has been created.
Provide the information for the group.
Type a name for the group and the number of rows and columns.
Click the Next button.
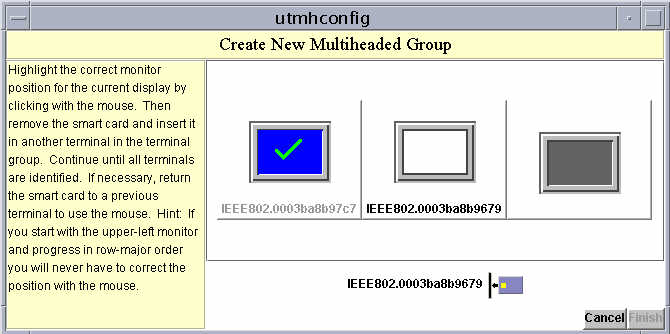
The following screen is displayed.
Select the clients within the multihead group and insert a smart card in each Sun Ray Client in turn to establish the order of the group.
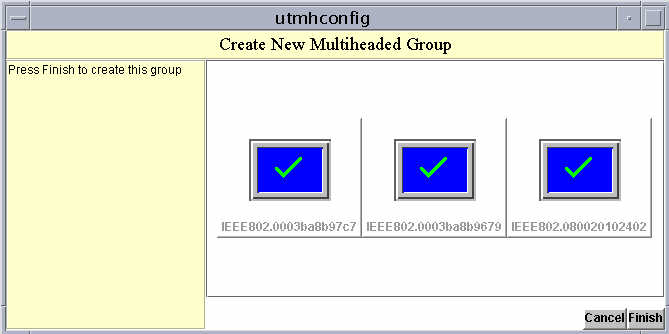
The Finish button, which was previously grayed out, is now active.
Click the Finish button.
Exit the session or disconnect by removing your card.
Enable the Multihead policy.
The following command enables the multihead policy for the failover group and restarts the Sun Ray Software with the new policy on the local server without disrupting existing sessions.
# /opt/SUNWut/sbin/utpolicy -a -m -g your_policy_flags
# /opt/SUNWut/sbin/utstart
Issue the utstart command on every
server in the failover group.
Screen dimensions for the multihead group are automatically set, by default, to the largest dimension supported by the primary client.
To override the automatic sizing of screen dimensions, use the utxconfig -r command.
If explicit screen dimensions are chosen, or if the resolutions of the monitors differ, you may have problems with unwanted on-screen movement called panning, or large black bands around the visible screen area.
% utxconfig -rwidthxheight
For example:
% utxconfig -r 1280x1024
A multihead group can have its screens arranged in various configurations. For example, a user can arrange a multihead group of four screens as two rows of two screens (2x2) or as a single row of four screens (4x1). By default, when a user logs into a multihead group, the session uses the number of screens available. The layout or geometry of these displays is generated automatically.
When the mouse pointer is moved past the edge between two screens, it moves from one screen to the next. The geometry of the multihead group determines which screen is displayed at that moment.
You can use the utxconfig -R command to manipulate the automatic geometry.
Users can enable or disable Xinerama as part of their X preferences. The utxconfig command handles this setting on an individual token basis. The user must log off for the changes to take effect.
Video acceleration is not available for Xinerama sessions. Video played without video acceleration can be dragged from one Sun Ray Client to another or can span multiple clients.
Xinerama tends to consume noticeable amounts of CPU, memory,
and network bandwidth. For optimal performance, set the
shmsys:shminfo_shmmax parameter in the
/etc/system file to at least
LARGEST_NUMBER_OF_HEADS *
width * height *
4.
If you disconnect the secondary clients without deleting the multihead group to which they belong, the screens are not displayed on the single primary client. The primary client is still part of the multihead group, and the mouse cursor can appear to get lost when it goes to the disconnected secondary client.
To recover from this situation, you can do one of the following actions:
Reconnect the missing client.
Delete the multihead group using the utmhconfig or utmhadm command.
Replace the missing client.
Create a new multihead group that incorporates the replacement client.