| Oracle® Clinical Remote Data Capture Onsite User's Guide Release 4.6.2 Part Number E18822-01 |
|
|
View PDF |
| Oracle® Clinical Remote Data Capture Onsite User's Guide Release 4.6.2 Part Number E18822-01 |
|
|
View PDF |
During the data entry process, you can add an investigator comment, such as an observation or an assessment note, to a CRF response. For example, a physician may include the following notation next to the diastolic blood pressure on a patient's chart: “This BP is in the normal range for this patient.”
Investigator comments provide a way for you to enter such notes or observations. Oracle Clinical Remote Data Capture Onsite (RDC Onsite) stores the comment with the response data.
Note:
If your sponsor has configured RDC Onsite to allow investigator comments, all users can display and review all entered comments. However, you can add and modify investigator comments only if you have update privileges.This chapter includes the following topics:
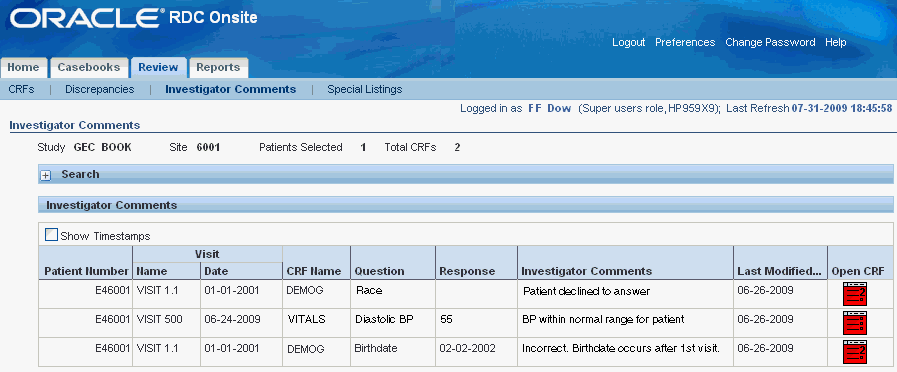
The Review Investigator Comments page provides a list of investigator comments that you can scroll through and sort. See Figure 5-1.
Each row contains the information for one investigator comment. If a CRF has more than one investigator comment, RDC Onsite lists each comment for that CRF in its own row.
The columns display the following information about each investigator comment:
The patient number
The visit name and date
The CRF name
The question and response that required an investigator comment
The text of the investigator comment
The date the comment was last modified
Figure 5-1 Review Investigator Comments Page

To navigate to the Review Investigator Comments page, you can:
Use the page tabs for direct access
Select a custom Activities link, if available
Drill down to the page with a selection of patients or CRFs from the Home page, the Casebooks page, or the Review CRFs page
To open the Review Investigator Comments page directly:
Click the Review tab, and then click the Investigator Comments tab.
Expand the Search pane.
Click Go to display all the CRFs that have at least one investigator comment.
The Activities section on the Home page can include a link for reviewing investigator comments. Your sponsor creates, customizes, and labels all the links in the Activities section. These links, if defined, are valuable shortcuts to your daily activities.

When you click the Review Investigator Comments link, RDC Onsite automatically:
Executes the search that your sponsor defined when creating the link
Opens the Review Investigator Comments page
Lists all the investigator comments across all the patients and CRFs for the current site
Your sponsor can name the link differently.
Note that after you click a customized activities link, you always have the option to expand the Search pane and specify a different set of patients or CRFs to review.
You can drill down to the Review Investigator Comments page with a patient selection from the Home page or the Casebooks page, or with a CRF selection from the Review CRFs page.
To drill down to the Review Investigator Comments page:
Open the Home page, the Casebooks page, or the Review CRFs page.
Enter your search criteria to find the patients or CRFs for your work.
Continue as follows:
On the Home page or Casebooks page, select one or more patients. Click the Select patients and... field, and then select Review Investigator Comments from the list.

On the Review CRFs page, select one or more CRFs. Click the Select CRFs and... field, and then select Review Investigator Comments from the list.
Click Go to open the Review Investigator Comments page and display the investigator comments for the selected patients and CRFs.
Use the following tools on the Review Investigator Comments page when reviewing investigator comments:
To sort comments by the content of a column, click a column header.
To show the time that the investigator comment was last modified, select the Show Timestamps check box. RDC Onsite adds the time stamp to the date in the Last Modified column.

To update a comment, click the CRF icon to open the CRF in the Data Entry window.
To limit or expand the number of CRFs displayed on the Review Investigator Comments page, use the options in the Search pane. You can click Clear to remove the current search criteria and then re-enter a different search.
In addition to the Review Investigator Comments page, you can use options in the Data Entry window to review investigator comments while you are entering and updating data in the CRF.
You can review investigator comments in the Data Entry window by:
Using Highlighting to Identify Fields with Investigator Comments
Using the Navigator Pane to Display and Update Investigator Comments
To highlight the fields in a CRF that have investigator comments:
Open the CRF in a Data Entry window.
Click the Highlight field in the toolbar, and then select Investigator Comments from the list.
All fields with an investigator comment are highlighted in magenta.
Click a field that has an investigator comment and then click the Investigator Comment icon to review the existing comment.
Alternatively, you can right-click a field and then select Investigator Comment from the menu.
To use the Navigator pane to review investigator comments:
Open the CRF in a Data Entry window.
Click the arrow at the right edge of the CRF to open the Navigator pane, if it is closed.
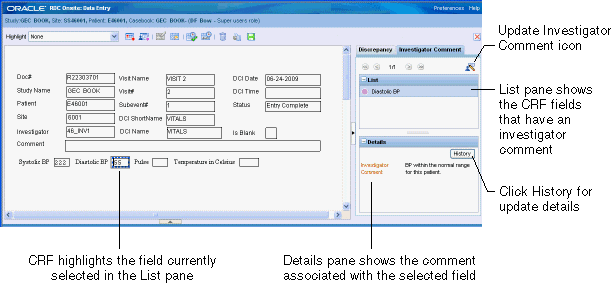
Click the Investigator Comment tab. The List pane displays the name of each CRF field that has an investigator comment. See Figure 5-2.
Click an entry in the list. Note that the Details pane displays the full text of the investigator comment. In addition, the associated field in the CRF is now highlighted with a blue dashed line around it.
Figure 5-2 Using the Navigator Pane to Review and Update Investigator Comments

While reviewing investigator comments in the Data Entry window, you can update a comment if you have update privileges.
To update an investigator comment:
Open the Navigator pane.
Click the Investigator Comment tab.
Select the comment you want to update from those shown in the List pane.
Click the Update icon. The Update Investigator Comment dialog box opens.
Update the existing comment with your changes.
Click OK to save your changes.
Alternatively, you can click a field that has an investigator comment and then click the Update icon to modify the comment. Note that when you can click Highlight in the toolbar and select Investigator Comments, RDC Onsite uses magenta to highlight those fields that have an investigator comment.
Click the History button in the Details pane to view update information for the currently selected investigator comment.
The Investigator Comment History dialog box displays details about the comment including the date of the update, the investigator comment text, the name of the individual who made the update, the reason for the update, and any additional comments.
When you are entering or updating the patient data in a CRF, you can add and update investigator comments associated with a response value (that is, a CRF field).
You can perform these actions:
Only from the Data Entry window
Only if you have update privileges
Only if your sponsor has configured RDC Onsite to support investigator comments
To add or update an investigator comment:
Open the CRF in the Data Entry window.
Position the cursor in a field and then click the Investigator Comment icon in the toolbar.
Alternatively, you can right-click a field in the CRF, and then select Investigator Comment from the menu.
RDC Onsite opens either the Add or the Update Investigator Comment dialog box depending on the selected field.
Click the Investigator Comment field.
If the field does not have an investigator comment, enter new comment text.
If the field already has an investigator comment, review and modify the existing text. You can add, edit, and delete comment text.
Click the Change Reason field, and then select an explanation for this change from the list. Note that:
If the CRF status is Saved Complete, and you add an investigator comment, you may or may not need to provide a change reason as configured by your sponsor.
If the CRF status is Saved Incomplete, you are not required to specify a change reason when you add or update an investigator comment.
If you modify a previously saved investigator comment, you must enter a change reason.
Click the Change Comment field if you want to provide any additional information about your changes or comments.
Click OK to save your changes.