34 Liking, Commenting On, and Sharing Objects
Opportunities are available throughout your portal to express a favorable judgment on an application object, through liking, and associate a comment with an application object, through commenting. Opportunities to share application objects, files, and URLs are also readily available.
This chapter provides information about liking, commenting, and sharing in WebCenter Portal: Spaces. It includes the following sections:
This chapter is intended for users assigned an application role that includes, minimally, the permission People Connections: Update People Connections Data. Users who plan to edit task flow properties must be assigned a role that also includes the permission Edit Pages. In a space (other than the Home space), users must be assigned a role that includes the permission Edit Page Access and Structure.
34.1 Liking and Unliking Application Objects
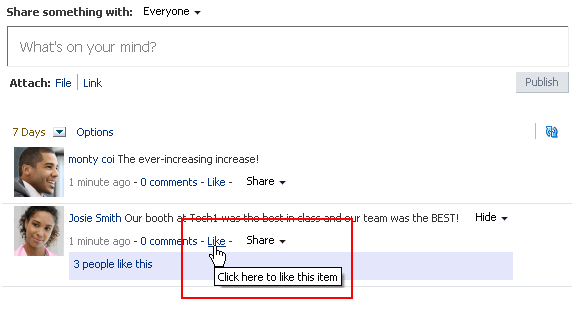
Liking is an accumulative rating system that enables you to see at a glance which objects are liked and who likes those objects. A counter keeps track of the number of users who like the object and a link is available for viewing the users who like it. In a group of objects, you can determine the most favored by its number of likes (Figure 34-1).
You can like streamed items that include objects. For example, you can like "Jack has updated doc.xml," but you cannot like "Jack and Jill are now connected."
You can express liking for the following types of application objects:
-
Message Board messages (for more information, see Section 33.1.1, "What You Should Know About Message Board")
-
Activity Stream items (for more information, see Section 32.1, "What You Should Know About Activity Stream")
Tip:
Whether you or any user can like an Activity Stream or Message Board object depends on whether the administrator has enabled liking for these features. For more information, see Section 6.4.3, "Configuring the People Connections Service for Spaces."
-
Documents (for more information, see Section 41.29, "Liking and Unliking a File")
To like something, click the Like link or icon (a star) (Figure 34-2).
To see who likes the document, click the number to the right of the star (X-REF TO IMAGE).
To remove your favorable rating (that is, unlike the object), click Unlike or click the Like icon again (Figure 34-3).
34.2 Commenting on Application Objects
Commenting provides a means of adding your thoughts, opinions, and questions directly to a given application object.
You can comment on the following types of application objects:
-
Message Board messages (for more information, see Section 33.1.1, "What You Should Know About Message Board")
-
Activity Stream items (for more information, see Section 32.1, "What You Should Know About Activity Stream")
Tip:
You can comment on streamed items that include objects. For example, you can comment on "Jack has updated doc.xml," but you cannot comment on "Jack and Jill are now connected."
-
Documents and other types of files (for more information, see Section 41.5.2, "Menus and Actions in the Document Viewer Preview Pane or Window")
Tip:
When you comment on a file through the Activity Stream, the comment appears with the file in the Document Library as well as in the Activity Stream.
Note:
Public users viewing a public document cannot comment on the document.
-
Wikis (for more information, see Chapter 47, "Working with Wiki Documents")
-
Blogs (for more information, see Chapter 48, "Working with Blogs")
To comment on an object:
-
Click an object's associated Comment link (Figure 34-4).
-
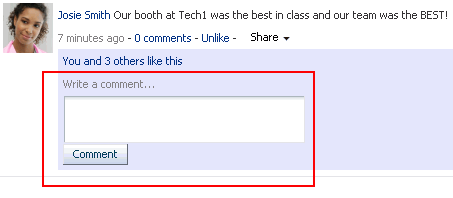
Fill in the resulting field (Figure 34-5)
-
Click the Comment button to save the comment.
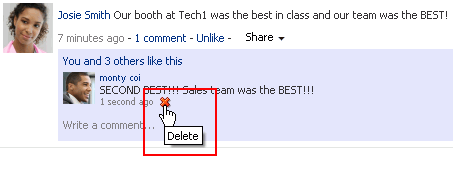
To delete the comment, click its associated Delete icon (Figure 34-6).
34.3 Sharing Files, URLs, and Streamed Items with Other Users
This section provides an overview of the different types of sharing that are available through WebCenter Portal: Spaces, and steps you through each type. It includes the following subsections:
-
Section 34.3.2, "Sharing Streamed Items with a Wider Audience"
-
Section 34.3.3, "Sharing Items, Files, and URLs Through the Publisher Task Flow"
34.3.1 What You Should Know About Sharing
Sharing provides a means of on-the-spot distribution of items, files, and URLs of particular interest to a selected audience. Sharing is available in a few different forms:
-
Share an item you receive in your Activity Stream by posting it to your connections' Activity Streams (for more information, see Section 34.3.2.1, "Reposting Streamed Items").
-
Share an item you receive in your Activity Stream through email (for more information, see Section 34.3.2.2, "Emailing Streamed Items").
-
Share an item, file, or URL through the Publisher task flow (for more information, see Section 34.3.3, "Sharing Items, Files, and URLs Through the Publisher Task Flow").
To share an item directly from your Activity Stream, the item must contain an object. For example, you can share "Jack has updated doc.xml," but you cannot share "Jack and Jill are now connected." Less obvious, you can share anything you post through the Publisher task flow because the post itself is an object.
34.3.2 Sharing Streamed Items with a Wider Audience
You can share items that appear in your view of the Activity Stream with a wider audience. For example, when your view of the Activity Stream reports that one of your connections updated a document of great interest to all of your connections, you can share that streamed item with all of your connections.
You can do so by posting the streamed item to all of your connections' Activity Streams or to the Activity Streams of connections who belong to a named space. You can also share streamed items through email, enabling you to share it with users to whom you are not connected or to make use of mail distribution lists.
Note:
To share an item directly from your Activity Stream, the item must contain an object. For more information, see Section 34.3.1, "What You Should Know About Sharing."
This section includes the following subsections:
34.3.2.1 Reposting Streamed Items
Use the Share menu's This activity option to share a streamed item with your connections through their view of the Activity Stream.
To repost a streamed item to your connections' Activity Streams:
-
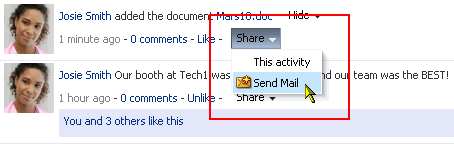
Go to the item you want to share, and from the Share menu select This activity (Figure 34-7)
-
In the resulting Share dialog:
-
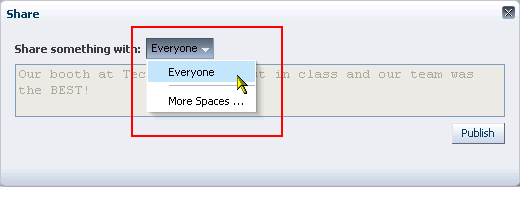
Select Everyone to share the item with all of your connections (Figure 34-8).
-
Select a space, or select More spaces to share the item with those of your connections who have access to the selected space.
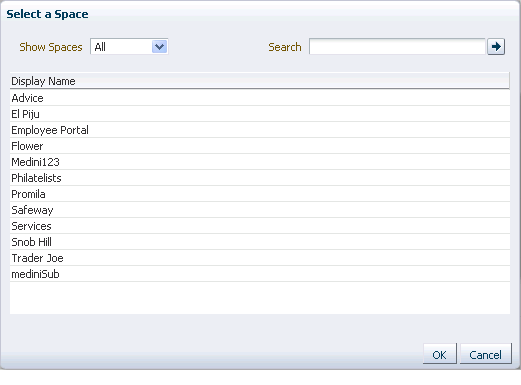
Selecting More spaces opens the Select a space dialog, from which you can choose a space (Figure 34-9).
From the Show spaces menu:
-
Select All to show all of the spaces to which you have access.
-
Select Joined to show all of the spaces you have explicitly joined.
-
Select Moderated to show all of the spaces for which you are a moderator.
-
Select Public to show all public spaces.
Alternatively, enter the name of a space in the Search field and execute the search. Results appear in the dialog.
Highlight a space, and click OK.
-
-
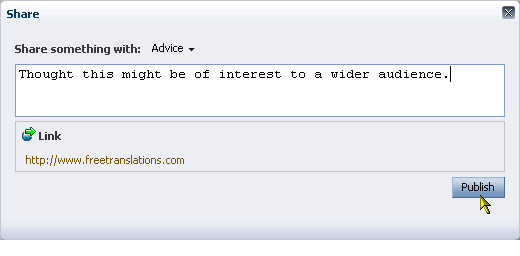
Optionally, in the Share dialog, enter a message to accompany the link (Figure 34-10).
Note:
When you share a message, rather than a file or a link, you cannot enter another message to accompany it.
-
Click OK.
The item is posted to the Activity Streams of the selected recipients.
-
34.3.2.2 Emailing Streamed Items
Use the Share menu's Send Mail option to share a streamed item through email. The Send Mail option is available on streamed items that include objects, such as a document. It is otherwise not available.
To share a streamed item through email:
-
Go to the item you want to share, and from the Share menu select Send Mail (Figure 34-11)
A mail message opens, prepopulated with a link to the selected item.
-
Address, write, and send the message as you would any other email.
34.3.3 Sharing Items, Files, and URLs Through the Publisher Task Flow
The Publisher task flow provides a means of publishing messages, files, and URLs to the Activity Streams of all of your connections or to those connections who have access to a specified space. Publisher also has an associated property, Is Update Status, that enables users to publish a message as their Profile status message.
This section steps you through Publisher features and provides information about its associated properties. It includes the following subsections:
-
Section 34.3.3.1, "What You Should Know About the Publisher Task Flow"
-
Section 34.3.3.2, "Selecting the Recipients of a Published Message"
-
Section 34.3.3.3, "Sharing Files Through the Publisher Task Flow"
-
Section 34.3.3.4, "Sharing Links Through the Publisher Task Flow"
See Also:
For information about Activity Stream, see Chapter 32, "Tracking Your Connections' Activities." For information about Profiles, see Chapter 30, "Managing Your Profile." For information about properties associated with the Publisher task flow, see Section 34.3.3.5, "Setting Publisher Task Flow Properties."
34.3.3.1 What You Should Know About the Publisher Task Flow
The Publisher task flow is very similar in operation to Message Board task flows (see Chapter 33, "Posting and Managing Messages and Feedback"). It differs in a few ways:
-
You can use it to send out messages, but not to receive them. It provides no feature for viewing messages.
-
It is specifically made to work in conjunction with Activity Stream, where the messages you enter are published.
-
It has its own distinct set of properties (see Section 34.3.3.5, "Setting Publisher Task Flow Properties").
-
It is not controlled by configuration settings at the application level nor through your own personal Preferences. You specify who sees your published messages through a control on the task flow itself. You can also exercise some control over the message destination through task flow properties. For example, the Publisher task flow has an associated property,
Is Update Status, that enables users to publish a message as their Profile status message.See Also:
For information about Profile, see Chapter 30, "Managing Your Profile."
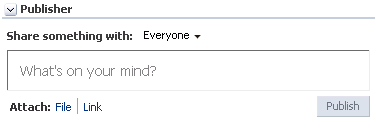
There is one Publisher task flow (Figure 34-12).
In default WebCenter Portal: Spaces installations, the Publisher task flow is placed on the Activities business role page, which is provided in the Home space for all authenticated users (that is, users who are logged in).
The default Activities business role page also contains an Activity Stream task flow where the messages you enter through the Publisher are published.
See Also:
For information about business role pages, see Section 7.1, "Working with Business Role Pages."
34.3.3.2 Selecting the Recipients of a Published Message
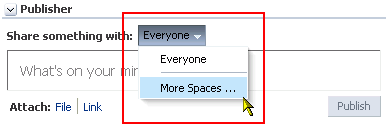
The Publisher task flow has a menu at the top where you can select who may see your message in their Activity Streams (Figure 34-13).
To select the recipients of a published message:
-
Go to the Activities page in the Home space.
Tip:
The way you access this page depends on the page template in use. For example, in a side navigation template, you may access it through an Activities link.
-
In the Publisher task flow, select a value from the Share something with menu:
-
Select Everyone to share the item with all of your connections.
-
Select a space, or select More spaces to share the item with those of your connections who have access to the selected space.
Selecting More spaces opens the Select a space dialog, from which you can choose a space (Figure 34-14).
From the Show spaces menu:
-
Select All to show all of the spaces to which you have access.
-
Select Joined to show all of the spaces you have explicitly joined.
-
Select Moderated to show all of the spaces for which you are a moderator.
-
Select Public to show all public spaces.
Alternatively, enter the name of a space in the Search field and execute the search. Results appear in the dialog.
Highlight a space, and click OK.
-
-
-
Click in the text area, and enter your message (Figure 34-15).
Note:
When you share a message, rather than a file or a link, you cannot enter another message to accompany it.
-
Click Share.
Your message appears in your view of the Activity Stream and in the Activity Streams of the selected recipients.
34.3.3.3 Sharing Files Through the Publisher Task Flow
In addition to sharing messages through the Publisher task flow, you can select to share files. When you share a file through the Publisher task flow, the uploaded file is also stored in the Public folder of your personal document library.
Tip:
If you prefer to have greater control over where a shared file is stored in your document library, you can upload it to the folder you prefer. Such uploads are also reported in your connection's activity streams, provided your activity stream is configured to show them. For more information, see Section 32.2, "Setting Activity Stream Preferences."
A Publisher task flow can be configured to hide the Attach: File link. If you do not see this link below the task flow, it could be because the instance is configure, through the Hide Document Uploader property, not to show it. For more information, see Section 34.3.3.5.3, "Prohibiting File Uploads Through a Publisher Task Flow Instance."
To share files through the Publisher task flow:
-
Go to an instance of the Publisher task flow, and select the recipients of your message.
See Also:
For more information, see Section 34.3.3.2, "Selecting the Recipients of a Published Message."
-
Optionally, click in the text area and enter the message you want to accompany the file.
-
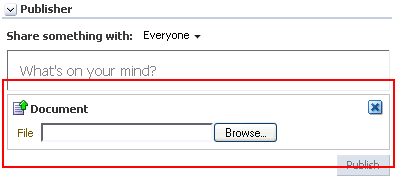
Next to Attach, click the File link to open a file upload feature (Figure 34-16)
-
Click Browse to navigate to and select the file you want to share.
-
Click Publish.
The file is streamed to your Activity Stream and to the Activity Streams of your selected recipients.
See Also:
Whether a file or a link to a file is shown depends on how the Activity Stream task flow instance is configured. For more information, see Section 32.5.4.2, "Hiding File Previews in Streamed Items."
34.3.3.4 Sharing Links Through the Publisher Task Flow
In addition to sharing messages through the Publisher task flow, you can select to share links.
To share links through the Publisher task flow:
-
Go to an instance of the Publisher task flow, and select the recipients of your message.
See Also:
For more information, see Section 34.3.3.2, "Selecting the Recipients of a Published Message."
-
Optionally, click in the text area and enter the message you want to accompany the link.
-
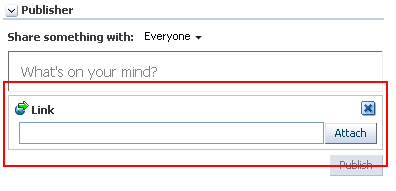
Next to Attach, click the Link link to open a field for entering a URL (Figure 34-17)
-
Enter the URL you want to share, and click Attach.
-
Click Publish.
The link is streamed to your Activity Stream and to the Activity Streams of your selected recipients.
34.3.3.5 Setting Publisher Task Flow Properties
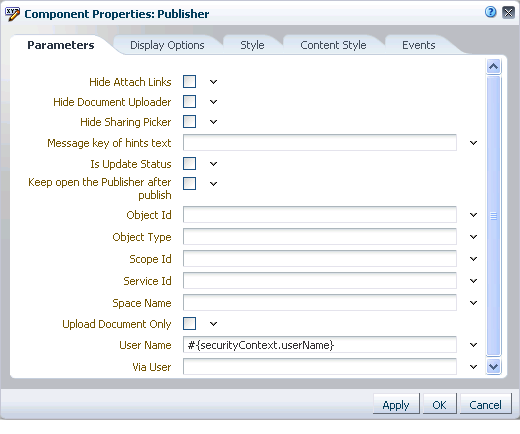
The Publisher task flow has associated properties, which users with sufficient privileges can access through the Component Properties dialog in Composer (Figure 34-18).
See Also:
For information about accessing the Component Properties dialog, see Section 17.5.2.3, "Setting Component Properties."
The following sections provide information about properties associated with the Publisher task flow and describe the properties available on the Parameters tab:
-
Section 34.3.3.5.1, "What You Should Know About Publisher Task Flow Properties"
-
Section 34.3.3.5.3, "Prohibiting File Uploads Through a Publisher Task Flow Instance"
-
Section 34.3.3.5.5, "Using the Publisher as a Profile Status Updater"
-
Section 34.3.3.5.6, "Using the Publisher as a File Uploader"
34.3.3.5.1 What You Should Know About Publisher Task Flow Properties
When you set property values on the Publisher task flow, you are affecting only the task flow instance on which the value is set. Other instances of the same task flow are not affected by such changes.
The properties on the Parameters tab of the Component Properties dialog can affect the default task flow content. For descriptions of the parameters on this tab, see Section 34.3.3.5.2, "Publisher Task Flow Parameters." For some task flows, parameters on this tab facilitate the wiring of the task flow to page parameters and page definition variables. For more information, see Chapter 19, "Wiring Pages, Task Flows, Portlets, and UI Components."
Changes to the properties on the Display Options, Style, and Content Style tabs affect the appearance and behavior of the task flow for all users. These properties are common to all task flows. For more information, see Section 17.5.2, "Setting Properties on Page Components."
The content of the Events tab depends on the events supported by the task flow. For more information, see Section 17.5.2.8, "Working with Component Contextual Events."
All properties on the Parameters and Display Options tabs provide access to an Expression Language (EL) editor, which you can use to select or specify a variable value instead of a constant value. Click the Edit icon next to a property field to open the editor. For more information about using the editor and for descriptions of common EL expressions, see Appendix B, "Expression Language Expressions."
Note:
Wherever you enter EL on the generic Display Options tab in the Component Properties dialog, the entry is automatically validated. If the EL is invalid, an error appears and the value is neither applied nor saved. Generic Display Options are those cataloged in Table 17-1.
EL validation is not performed on non-generic display options.
34.3.3.5.2 Publisher Task Flow Parameters
Table 34-1 describes the parameters that are unique to the Publisher task flow.
Table 34-1 Publisher Task Flow Parameters
| Parameter | Description |
|---|---|
|
Specifies whether the Attach: File|Link option is shown or hidden
|
|
|
Specifies whether the Share document icon is available on the task flow for uploading a document
|
|
|
Specifies whether the Share something with option is shown or hidden
|
|
|
Indicates whether the message entered in the task flow instance should also be published as the user's Profile status message
If you attach a file or URL to a published message, then no matter what the state of For information about Profiles, see Chapter 30, "Managing Your Profile." |
|
|
Specifies whether the text box remains active after a user clicks the Publish button
|
|
|
Specifies the resource bundle class and message key for hint text Use the format |
|
|
The ID of the object to be shared This property value assists in generating a link for use in navigating to the published object. It is not necessary to provide a value, unless you plan to do so using an EL expression. For information about EL expressions, see Appendix B, "Expression Language Expressions." |
|
|
The type of object to be shared This property value assists in generating a link for use in navigating to the published object. It is not necessary to provide a value, unless you plan to do so using an EL expression. For information about EL expressions, see Appendix B, "Expression Language Expressions." |
|
|
The ID of the scope to which to publish This property value assists in generating a link for use in navigating to the published object. It is not necessary to provide a value, unless you plan to do so using an EL expression. For information about EL expressions, see Appendix B, "Expression Language Expressions." |
|
|
The service ID of the service to which the shared object belongs This property value assists in generating a link for use in navigating to the published object. It is not necessary to provide a value, unless you plan to do so by entering a specific service ID or using an EL expression. For a list of valid service IDs, see Table B-19, "Service IDs". For information about EL expressions, see Appendix B, "Expression Language Expressions." |
|
|
The name of the space in which to publish the messages entered in this task flow instance Enter the space internal name and not the space display name. The space internal name is the name specified by the space URL on the General page of a space's administration settings. The space display name is specified by Display Name, and is the name that appears in the space banner at the top of the space. |
|
|
Specifies that only the file upload feature is available in the task flow instance, hiding the text entry area and the Share link icon
|
|
|
The name of the user who owns the current view This value is supplied by default. We recommend that you do not change the default value, |
|
|
The user name of the person who provided the object the current user is sharing For example, John is sharing a document with everyone that Jane originally shared with him. In this case, Jane is the via user. |
34.3.3.5.3 Prohibiting File Uploads Through a Publisher Task Flow Instance
You can use the Hide Document Uploader property to omit the display of the Share document icon on a Publisher task flow instance. Users will be able to share links but not files.
To prohibit file uploads through a Publisher task flow instance:
-
Edit the properties of a Publisher task flow instance.
See Also:
For information about editing task flow properties, see Section 17.5.2, "Setting Properties on Page Components."
-
In the Component Properties dialog, bring the Parameters tab forward.
-
Select the checkbox for the property
Hide Document Uploader. -
Click OK.
34.3.3.5.4 Limiting the Scope of Recipients
You can use the Space Name property to limit the scope of recipients of published messages to a user's connections in a particular space. When you do this, the message does not even stream to your own view of the Activity Stream in the Home space. It is streamed only to your and your connections' views of the Activity Stream in the named space.
To limit the scope of recipients to a particular space:
-
Edit the properties of a Publisher task flow instance.
See Also:
For information about editing task flow properties, see Section 17.5.2, "Setting Properties on Page Components."
-
In the Component Properties dialog, bring the Parameters tab forward.
-
Enter the internal name of the space in the
space Namefield.Tip:
The space internal name is the name specified by the space URL on the General page of a space's administration settings. The space display name is specified by Display Name, and is the name that appears in the space banner at the top of the space.
-
Click OK.
Messages posted through that Publisher task flow instance will be shared with only those connections who have access to the named space.
34.3.3.5.5 Using the Publisher as a Profile Status Updater
You can use the Is Update Status property to specify that all messages without attachments are published not only to specified recipients, but also as the user's Profile status message (Figure 34-19).
Messages that have an attached file or link are not simultaneously published as a Profile status message.
To specify that messages are also published as Profile status messages:
-
Edit the properties of a Publisher task flow instance.
See Also:
For information about editing task flow properties, see Section 17.5.2, "Setting Properties on Page Components."
-
In the Component Properties dialog, bring the Parameters tab forward.
-
Select the
Is Update Statuscheckbox. -
Click OK.
Messages that do not include attachments that are posted through that Publisher task flow instance are also shared as the user's personal Profile status message.
34.3.3.5.6 Using the Publisher as a File Uploader
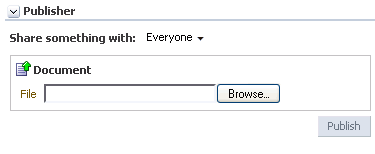
You can use the Upload Document Only property to limit the functionality of the Publisher task flow to a file uploader (Figure 34-20).
Files uploaded through the Publisher task flow are placed in the Public folder in the document library of the selected scope. That is:
-
In the Home space:
-
Select Everyone to publish the file to the Public folder in each of your connections' personal Document Library.
-
Select a named space to publish the file to the Public folder in the selected space's Document Library.
-
-
In a space, the file is published to the Public folder in the space's Document Library.
To use the Publisher task flow as a file uploader:
-
Edit the properties of a Publisher task flow instance.
See Also:
For information about editing task flow properties, see Section 17.5.2, "Setting Properties on Page Components."
-
In the Component Properties dialog, bring the Parameters tab forward.
-
Select the
Upload Document Onlycheckbox. -
Click OK.
The Publisher task flow instance renders as a file uploader (see Figure 34-20). The text area and the Share link icon are not rendered.
