15 Creating Databases Using Database Template
This chapter describes the process involved in creating single instance and cluster databases using database template based profiles. It contains the following sections:
15.1 Creating Databases Using Database Template
The DBCA template supports both structure plus data and structure only types. This database provisioning profile is created from the production or source database registered with Enterprise Manager. It supports both structure plus data and structure only types. This option is recommended if the database size being created is less than 50 GB.
The table below shows the list of tasks that are involved in creating a database using the database template based profile.
Table 15-1 Creating Databases Using Database Template
| Step | Task | Role |
|---|---|---|
|
1 |
Follow the steps in the Getting Started section to enable DBaaS. |
|
|
2 |
Create resource providers.
|
|
|
6 |
Create a DBCA template based database provisioning profile. |
See Section 15.1.2, "Creating a Database Provisioning Profile Using Database Template" |
|
4 |
Configure the request settings. |
|
|
5 |
Define quotas for each self service user. |
|
|
7 |
Create a service template based on the profile you have created. |
See Section 15.1.5, "Creating a Service Template Using Database Template Profile" |
|
8 |
Configure the Chargeback Service. |
|
|
9 |
While creating a database, select the service template (associated with the database template based profile) you have created. |
15.1.1 Creating Resource Providers
You must create one or more resource providers which include:
-
PaaS Infrastructure Zones: See Section 11.2.2.1, "Creating a PaaS Infrastructure Zone"
-
Database Pool: See Section 11.2.2.2, "Creating a PaaS Pool"
15.1.1.1 Creating a Database Pool for Database as a Service
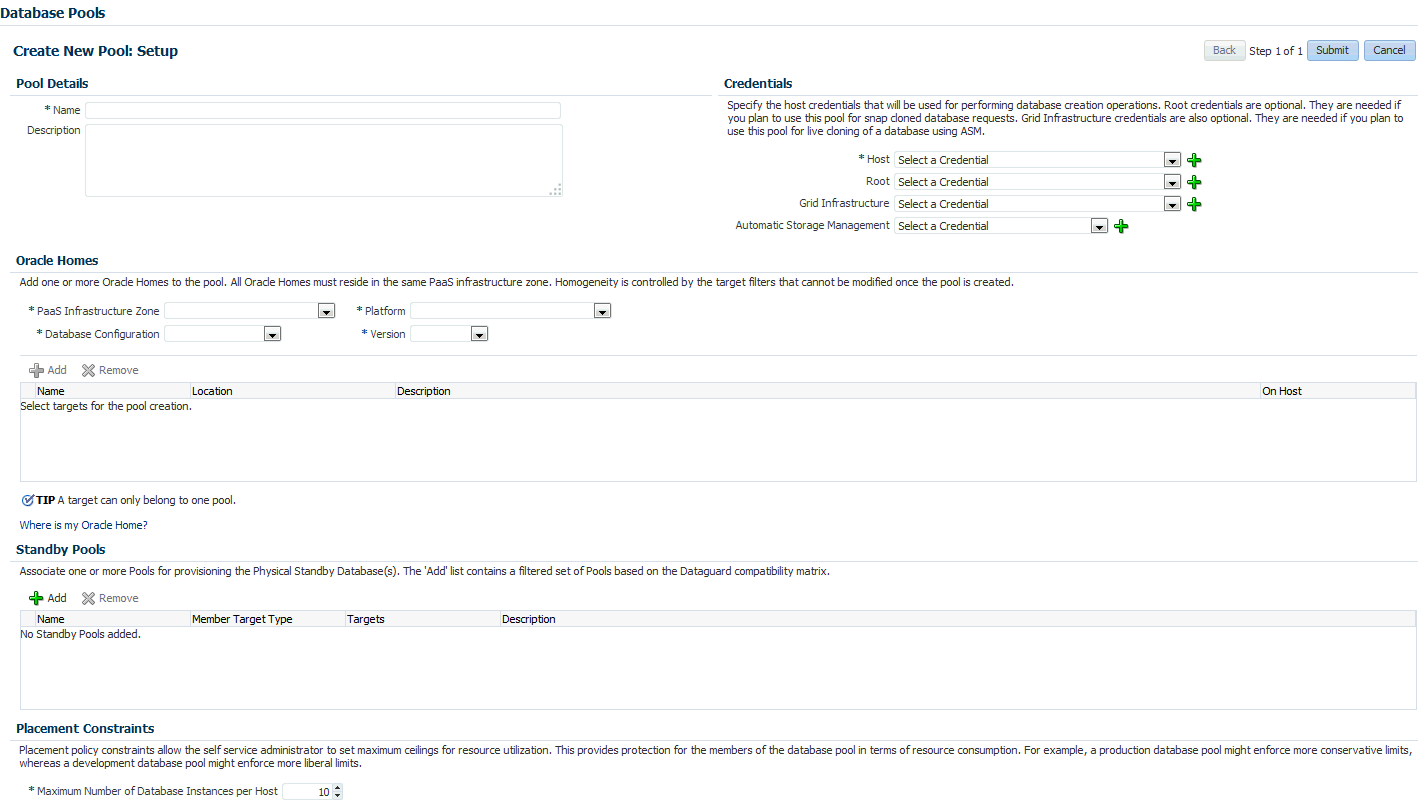
To create a database pool for database as a service, follow these steps:
-
Log into Enterprise Manager as a user with the
EM_SSA_ADMINISTRATORrole. -
From the Enterprise menu, select Cloud, then select Cloud Home. From the Oracle Cloud menu, select Setup, then select Getting Started. Click the Setup link next to the Database service family, click the Database Pool link and click Create.
-
In the Credentials region, specify the following credentials:
-
Host: Required for creating and starting the database.
-
Root: This is an optional field. It is required if you plan to use this database pool for database requests based on snap clone profile.
-
Grid Infrastructure: This is an optional field. It is required for registering database services with credentials.
-
Automatic Storage Management: This is an optional field. It is required if you plan to use this database pool for live cloning on any database running on ASM.
-
-
Enter a name and description for the database pool.
-
Specify the following details:
-
PaaS Infrastructure Zone: Select the PaaS Infrastructure Zone into which the database instance is to be provisioned.
-
Database Configuration: Specify the configuration of the database being provisioned. This can either be Single Instance or Cluster Database (RAC) but cannot be a combination of both.
-
Platform and Version: Specify the platform and version of the database being deployed.
-
-
Click Add and select one or more Oracle Homes to be added to the database pool.
-
In the Maximum Number of Database Instances (per host), enter the maximum number of database instances that can be running on each host in the pool.
Note:
For RAC databases. the value specified in this field is used to ensure that the nodes on which the database is be created meets this criteria. -
Click Submit to create a database pool. The newly created pool will appear in the Database Cloud Self Service Portal Setup: Database Pools page. The database pool can now be added to the Service Template.
15.1.2 Creating a Database Provisioning Profile Using Database Template
To create a database provisioning profile, follow these steps:
-
You can access the Database Provisioning page using either of the following ways:
-
From the Enterprise menu, select Cloud, and then select Cloud Home. On the Cloud home page, click Oracle Cloud, select Setup, and then select Data Sources. On the Database: Data Sources page, in the Data Profiles tab, click Create.
-
From the Enterprise menu, select Provisioning and Patching, and then select Database Provisioning. On the Database Provisioning page, in the Profiles section, click Create.
-
From the database target home page, click Oracle Database, select Provisioning, and then select Create Provisioning Profile.
-
-
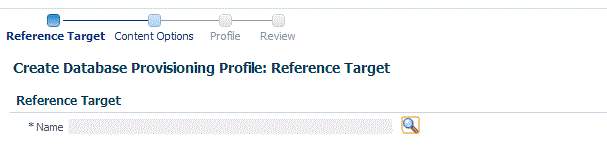
On the Reference Target page, click the search icon to select a target.
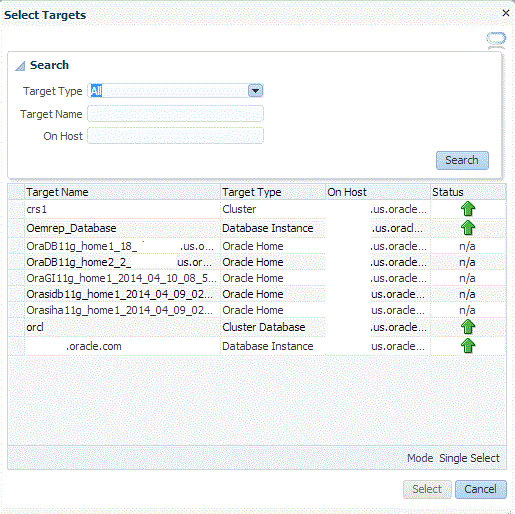
-
In the Search and Select:Targets display box, select the database you want to create a profile for, and then, click Select.
-
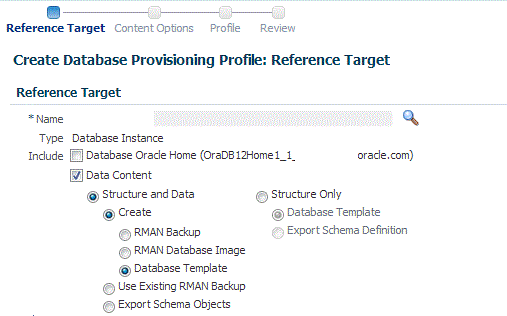
On the Reference Target page, select the following:
-
Data Content
-
Structure Only to include only the structural files in the template.
Note: You can use the Structure and Data option if the database size is lesser than or equal to 5 GB.
-
Create
-
Database Template
-
-
In the Credentials section, select the database. In the Credentials column, you can select Named Credentials and then select a credential name from the Credential Name column (or) select Preferred Credentials. Click Next.

-
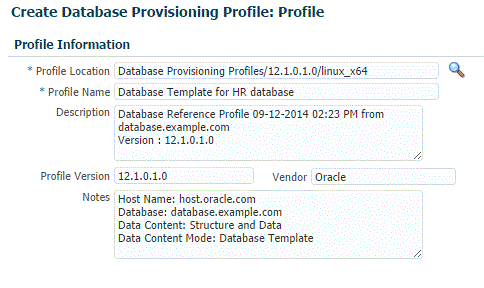
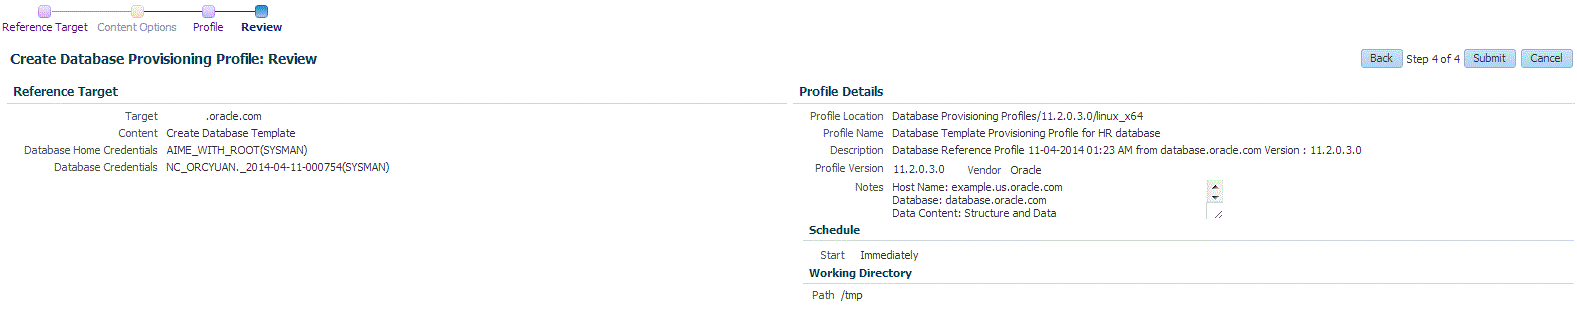
On the Create Database Provisioning Profile: Page, in the Profile Information section, do the following:
-
Specify or select a profile location in the software library where the database profile will be created.
-
Specify a unique profile name.
For example:
Database Template for HR database
-
Add a description for the profile.
-
Verify the profile version and the vendor.
-
Add any additional notes such as host name, database, data content, data content mode, and the like.
-
-
In the Schedule section, you can choose to start the profile creation immediately, or you can schedule it for a later time. You can also choose to repeat the creation of the provisioning profile, and set a repeat time.
-
Specify or select a working directory. Click Next.
-
On the Review page, ensure that the selections you have made in the previous pages are correctly displayed and click Submit. Otherwise, click Back repeatedly till you reach the page where you want to make changes. Click Cancel to abort the provisioning profile creation.
Once you have submitted the provisioning profile creation job, manually refresh the page if View Data has been set to Real Time: Manual Refresh. Else, set View Data to reload after a specific period of time, and then select an execution step from the Procedure Steps tree on the left pane to view the details.
To view the submitted jobs, select the Procedure Activity link in the Data Profiles tab.
15.1.3 Configuring Request Settings
You can configure the request settings by specifying when a request can be made, its duration, and so on. See Section 11.2.3, "Configuring Request Settings"
15.1.4 Defining Quotas
After configuring the request settings, you must define quotas for each self service user. See Section 11.2.4, "Setting Up Quotas"
15.1.5 Creating a Service Template Using Database Template Profile
A service template is a standardized service definition that is offered to self service users to create databases or schemas. Self service users can create one or more databases based on the service template definition.
-
Log into Enterprise Manager as a user with the
EM_SSA_ADMINISTRATORrole. -
From the Enterprise menu, select Cloud, then select Cloud Home. The Cloud Home page appears. From the Oracle Cloud menu, select Setup, then select Getting Started.
-
Click the Setup link next to the Databases option in the left panel. Select Database from the drop down menu.
-
Click the Service Templates link. The Service Templates page appears. Click Create. The Create Service Template: General page appears.
-
Enter a name and description for the service template. The description must be unique and provide information on the type of service template being created.
-
Click the Search icon next to the Source Identification field and select a DBCA template based profile from the list.
-
In the Database Definition region, specify the following:
-
Type: This can be Single Instance or Real Application Cluster (RAC). If you select RAC, specify the Number of Nodes.
-
Database SID: This is an optional field. You can select Specify Prefix or Specified by User at Request Time.
-
Specify Prefix: If you choose this option, enter a prefix that is to be used to generate a unique System Identifier (SID) at the time of database creation. The prefix helps to identify databases created using this service template. The prefix can be a maximum of 6 characters.
The new database name generated will be based on the SID Prefix specified here. For example, if the prefix is specified as MYDB, the SID for the new database is generated as MYDB0000, MYDB0001, MYDB0002, and so on.
For existing databases (running databases and in progress requests), a unique SID name is generated for single instance databases, or a unique name is generated for real application cluster databases. For example, if the existing SIDs running on a host are MYDB0000, MYDB0001, MYDB0002 And In progress are MYDB0003, MYDB0004, the new SID or database name generated for the new request is MYDB0005.
-
Specified by User at Request Time: If you choose this option, you can leave this field blank and specify the SID when you are making a database request.
-
-
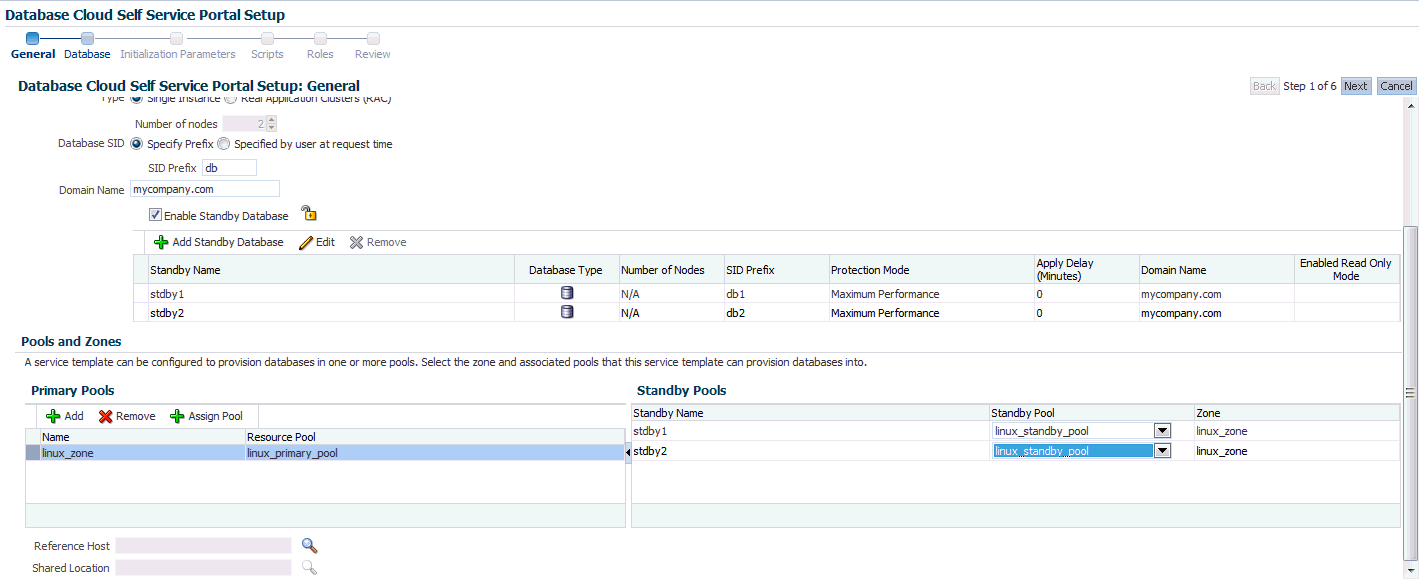
Domain Name: This is an optional field. Enter a Domain Name to be used for the new database being created. You must ensure that the domain name does not contain a preceding "." (dot).
-
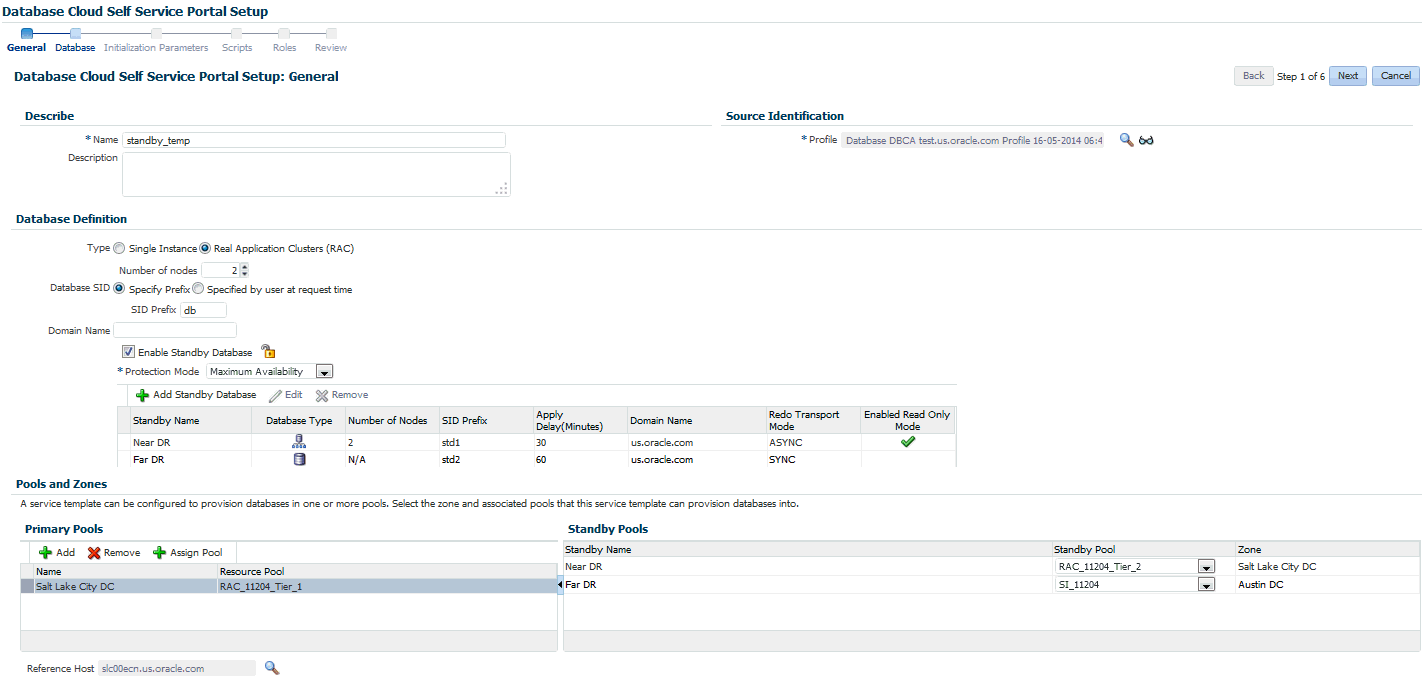
Enable Standby Database: Select this checkbox if you want to provision standby databases using this service template. If this checkbox is selected, you have to add standby databases. See Section 15.2.2, "Creating a Service Template" for details.
-
-
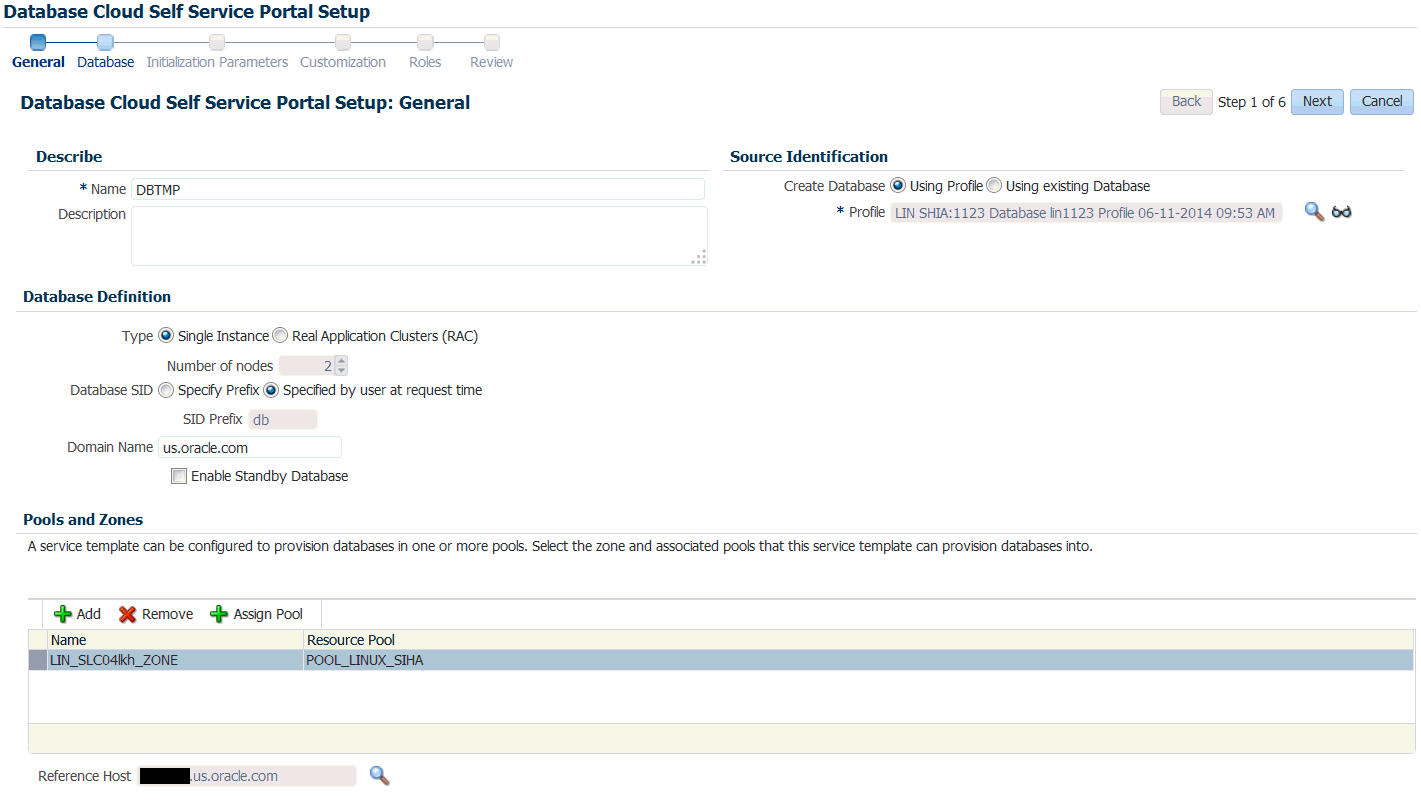
In the Zones region, click Add to select a PaaS Infrastructure Zone into which the database instance is to be provisioned. Click Assign Pool. Select a pool from the list and assign this pool to the PaaS Infrastructure Zone. The database will be provisioned into this pool.
-
After you have selected the zone and the pool, the host target is populated in the Reference Host field.
-
Click Next. The Create Service Template: Database page appears.
-
In the Reference Host region, the name of the PaaS Infrastructure zone, the database pool, and the reference host you have selected in the Database Cloud Self Service Portal Setup: General page are displayed.
The database values such as a Automatic Storage Management (ASM) disk group, location of the file system, and listener port you select must be available on the reference host.
-
Specify the following:
-
Storage Type: This can be:
-
Automatic Storage Management: The Oracle Automatic Storage Management (ASM) is a volume manager and a file system for database files that supports single-instance and RAC configurations. ASM groups the disks in your storage system into one or more disk groups. If you select ASM, select the Disk Group here.
-
File System: The Oracle Database File System creates a standard file system interface on top of files and directories that are stored in database tables. If you select this option, you must specify or select the Location of the File System.
-
-
Fast Recovery (Optional): To simplify the management of backup and recovery files, you can create a fast recovery area for your database. Select the Enable Fast Recovery Area checkbox to specify the location in which recovery related files must be stored. The fast recovery area can be a ASM disk group or a file system that provides a centralized disk location for backup and recovery file. Specify the location of the Fast Recovery Area and the Fast Recovery Size. The amount of disk space to allocate for the fast recovery area depends on the size and activity levels of your database.
To allow self service users to schedule backups and perform restore operations, configure a Fast Recovery Area and select the Enable Archiving check box.
-
Listener Port: In the Listener Port field, specify listener port number that is to be associated with the new database. If you have selected a 11.2 or later RAC database, you must specify the scan port number.
-
Administrator Credentials: Specify passwords for the system schemas of the new database. These schemas will not be available to the self service users. You can choose to use the same password for all the schemas or different passwords for each schema. If these values are not specified, default values will be used and the self service administrator can change them.
-
Non-Administrator Credentials: Apart from the system schemas, if you want to restrict access to other schemas, you can select them in the Non-Administrator Credentials region and specify the password. These schemas will be locked and the EM_SSA_USERS cannot access them. Click Next.
-
-
Click Next. The Create Service Template: Initialization Parameters page appears. In this page, you can configure the values of various initialization parameters that affect the operation of the database instance. Select a parameter and click the Set icon to modify the value of the parameter.
-
Click Next. The Create Service Template: Customization page appears. Specify the custom scripts that need to be executed before and after the database is created. See Section 24.1, "Pre and Post Request Creation / Deletion Scripts" for details.
-
In the Target Properties region, you can specify global target properties such as Location, Department, Line of Business, and so on. You can do the following:
-
Mark a property as mandatory by selecting the Required check box. If a property is marked as mandatory, the self service user must specify a value for this property while requesting a database.
-
Lock a property. When a property is locked, the self service user cannot modify the value of this property while requesting a database.
-
-
Click Next. The Create Service Template: Roles page appears. Click Add to select the SSA user roles to which this service template will be available. All users belonging to the selected role can use this service template. Click Next.
-
The Create Service Template: Review page appears. Click Create. The newly created service template will appear in the Database Cloud Self Service Portal Setup: Service Templates page.
15.1.6 Configuring Chargeback
Optionally, you can configure the chargeback service. See Chapter 43, "Chargeback Administration".
15.1.7 Requesting a Database
The self service user can now select the service template based on the database template profile and create a database. See Section 22.2, "Requesting a Database".
15.2 Provisioning Standby Databases
A data guard configuration consists of one primary database and one or more standby databases. The databases in a Data Guard configuration are connected by Oracle Net and may be dispersed geographically. There are no restrictions on where the databases are located, provided they can communicate with each other.
Oracle Data Guard ensures high availability, data protection, and disaster recovery for enterprise data. It provides a comprehensive set of services that create, maintain, manage, and monitor one or more standby databases to enable production Oracle databases to survive disasters and data corruptions. Oracle Data Guard maintains these standby databases as copies of the production database. If the production database becomes unavailable due to a planned or an unplanned outage, the Oracle Data Guard can switch any standby database to the production role, minimizing the downtime associated with the outage.
The production database, also referred to as the primary database an be either a single-instance Oracle database or an Oracle Real Application Clusters (RAC) database. A standby database is a transactionally consistent copy of the primary database. Using a backup copy of the primary database, you can create one or more standby databases and incorporate them in a Data Guard configuration. Using Enterprise Manager Database as a Service, users with the EM_SSA_ADMINISTRATOR role can setup the DBaaS Cloud with single instance of RAC standby databases.
Table 15-2 Provisioning Standby Databases
| Step | Task | Role |
|---|---|---|
|
1 |
Follow the steps in the Getting Started section to enable DBaaS. |
|
|
2 |
Create resource providers.
|
|
|
6 |
Create either of the following types of profiles:
|
See: |
|
4 |
Configure the request settings. |
|
|
5 |
Define quotas for each self service user. |
|
|
7 |
Create a service template based on the profile you have created. |
|
|
8 |
Configure the Chargeback Service. |
|
|
9 |
While deploying a database, select the service template (associated with the DBCA template based profile) you have created. Additionally, you can also specify the standby database information while requesting the database. |
15.2.1 Defining Database Pools for Provisioning Standby Databases
A Data Guard configuration consists of one production database and one or more standby databases. To define a database pool for provisioning standby databases, you must follow these steps:
-
Create a database pool. See Section 15.1.1.1, "Creating a Database Pool for Database as a Service".
-
Associate the database pool with one or more pools that host standby databases. See Section 15.2.1.1, "Associating a Standby Database Pool with a Primary Database Pool".
15.2.1.1 Associating a Standby Database Pool with a Primary Database Pool
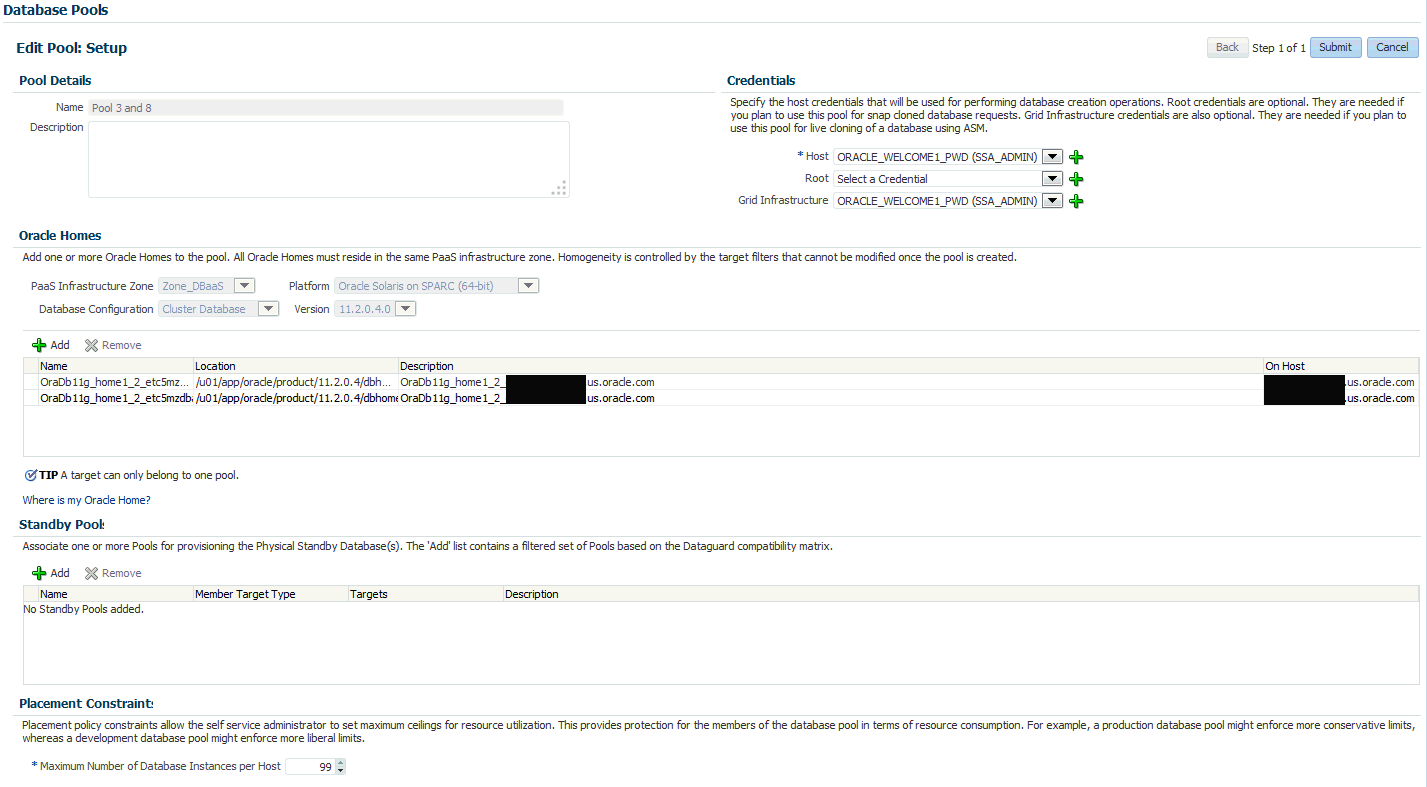
To include standby support, you must add one or more pre-created database pools on which the standby databases will be created by following these steps:
-
Log into Enterprise Manager as a user with the
EM_SSA_ADMINISTRATORrole. -
From the Enterprise menu, select Cloud, then select Cloud Home. From the Oracle Cloud menu, select Resource Providers, and select the database pool that has been designated as the primary database pool and click Edit. The Edit Pool: Setup page appears.
-
The pool details and the Oracle homes in the pool are displayed. You can now add one or more standby database pools and associate it with the primary database pool. Click Add in the Standby Pools region. The Add Standby Pools window appears.
-
Select one or more standby pools and click Select. The selected pools appear in the Standby Pools region. These pools are now associated with the primary database pool and can be used to provision standby databases.
Note:
The OS user name and password for the primary and standby database pool must be the same but the Named Credentials can be different. -
Specify the Placement Constraints that will allow the self service administrator to set the maximum limits for resource utilization. For example, if you are using the database pool to provision standby databases, you can specify a higher value in the Maximum Number of Database Instances Per Host field, since the standby database may not used for active operations all the time.
-
Click Submit. The primary pool is now associated with the standby database pool and can be used to provision standby databases.
15.2.2 Creating a Service Template
Service templates are standardized service definitions that allow self service users to create standby databases. Self service users can create one or more standby databases based on the service template definition. To create a database service template, follow these steps:
-
Log into Enterprise Manager as a user with the
EM_SSA_ADMINISTRATORrole. -
From the Enterprise menu, select Cloud, then select Cloud Home. The Cloud Home page appears. From the Oracle Cloud menu, select Setup, then select Getting Started.
-
Click the Setup link next to the Databases option in the left panel. Select Database from the drop down menu.
-
Click the Service Templates link. The Service Templates page appears. Click Create. The Create Service Template: General page appears.
-
Enter a name and description for the service template. The description must be unique and provide information on the type of service template being created.
-
Click the Search icon next to the Profile field and select a database provisioning profile.
-
You can select the following types of profiles:
-
RMAN Backup Based Database Provisioning Profile.
-
DBCA Template Based Database Provisioning Profile.
-
-
In the Database Definition region, specify the following:
-
Type: This can be Single Instance or Real Application Cluster (RAC). If you select RAC, specify the Number of Nodes.
-
Database SID: This is an optional field. You can select Specify Prefix or Specified by User at Request Time.
-
Specify Prefix: If you choose this option, enter a prefix that is to be used to generate a unique System Identifier (SID) at the time of database creation. The prefix helps to identify databases created using this service template. The prefix can be a maximum of 6 characters.
The new database name generated will be based on the SID Prefix specified here. For example, if the prefix is specified as MYDB, the SID for the new database is generated as MYDB0000, MYDB0001, MYDB0002, and so on.
For existing databases (running databases and in progress requests), a unique SID name is generated for single instance databases, or a unique name is generated for real application cluster databases. For example, if the existing SIDs running on a host are MYDB0000, MYDB0001, MYDB0002 And In progress are MYDB0003, MYDB0004, the new SID or database name generated for the new request is MYDB0005.
-
Specified by User at Request Time: If you choose this option, you can leave this field blank and specify the SID when you are making a database request.
-
-
Domain Name: This is an optional field. Enter a Domain Name to be used for the new database being created. You must ensure that the domain name does not contain a preceding "." (dot).
-
Enable Standby Database: Select this checkbox if you want to provision standby databases using this service template. The database lock icon and the Add Standby Database region appears. Click the database lock icon to lock the database. This forces the self service user to request standby databases. If unlocked, the self service user can deselect the standby database while submitting the database request.
-
-
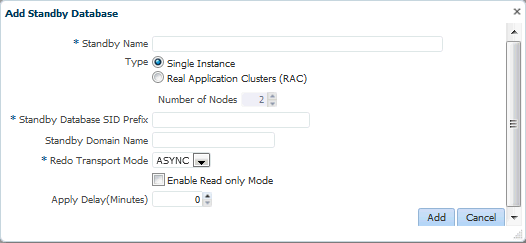
Click Add Standby Database. In the Add Standby Database window that appears, specify the following details:
-
Standby Name: The name used to identify the standby database.
-
Type: This can be Single Instance or Real Application Cluster (RAC). If you select RAC, you must specify the Number of Nodes.
-
Standby Domain Name: Enter a domain name for the new standby database that is to be created.
-
Standby Protection Mode: Specify the protection mode which can be:
-
Maximize Protection: Provides the highest level of data protection with no data loss. If this mode is selected, you must set the SYNC Redo Transport Mode on at least one standby database.
-
Maximize Availability: Provides very high data protection. If this mode is selected, you must set the SYNC Redo Transport Mode on at least one standby database.
-
Maximize Performance: Provides high data protection with the ASYNC Redo Transport Mode. If you select this mode, there is no performance impact on the primary database.
-
-
Enable Real Time Query: Select this option to enable real time data query on the database. This feature requires an active data guard license.
-
Apply Delay: Specifies the delay period before which the archived redo log data is applied on the standby database. When the property is set to 0 minutes, the redo log data is applied immediately on the standby database.
Note:
You can use a single service template to provision multiple standby databases. -
-
In the Pools and Zones (Primary Pools) region, click Add to add one or more PaaS Infrastructure zones into which the database instance is to be provisioned. Click Assign Pool and select a database pool which will be the primary database pook for the standby database.
-
In the Standby Pools region, you will see the list of standby databases that you have defined. From the drop down list, select the standby pool with which the standby database is to be associated. You can associate multiple standby pools with one primary pool.
Note:
If the Primary Pool is of single instance type, both single instance and RAC database pools are listed. But if the Primary Pool is RAC, only RAC database pools are listed in the Standby Pools region. -
Click Search in the Reference Host field to select a host target.
-
Specify the Shared Location and click Next to continue to the Database Cloud Self Service Portal Setup: Database page.
-
The name of the Zone, Pool, and Reference Host you have selected is displayed. You can select the ASM Disk Group, File System Location, and Listener Port that is available on the Reference Host.
Note:
The storage locations and listener ports must be identical on all the primary and standby pools.-
Storage Type: Storage type can be:
-
Automatic Storage Management: The Oracle Automatic Storage Management (ASM) is a volume manager and a file system for database files that supports single-instance and RAC configurations. ASM groups the disks in your storage system into one or more disk groups. If you select ASM, specify the Disk Group here.
-
File System: The Oracle Database File System creates a standard file system interface on top of files and directories that are stored in database tables. If you select this option, you must specify the Location of the File System.
-
-
Fast Recovery: To simplify the management of backup and recovery files, you can create a fast recovery area for your database. The fast recovery area can be a ASM disk group or a file system that provides a centralized disk location for backup and recovery file. Specify the location of the Fast Recovery Area and the Fast Recovery Size. The amount of disk space to allocate for the fast recovery area depends on the size and activity levels of your database.
To allow self service users to schedule backups and perform restore operations, configure a Fast Recovery Area and select the Enable Archiving check box.
-
-
In the Port Number field, specify listener port number that is to be associated with the new database. If you have selected a 11.2 or later RAC database, you must specify the scan port number.
-
In the Location fields, specify the RMAN Duplicate Backup location. This directory must be present on all members of the Primary and Standby pools. The free space available in this location must be equal to or more than the size of the database from which the profile has been created.
-
Specify the Administrator Credentials. Specify passwords for the system schemas of the new database. These schemas will not be available to the
EM_SSA_USERS. You can choose to use the same password for all the schemas or different passwords for each schema. If these values are not specified, default values will be used and theEM_ADMINISTRATORcan change them. -
Apart from the system schemas, if you want to restrict access to other schemas, you can select them in the Non-Administrator Credentials region and specify the password. These schemas will be locked and the
EM_SSA_USERScannot access them. -
Click Next. The Database Cloud Self Service Portal Setup: Initialization Parameters page appears. In this page, you can configure the values of various initialization parameters that affect the operation of the database instance. Select the parameter and click the Set icon to modify the value of the parameter.
Note:
Database sizes that can selected by the self service user while creating a service instance are defined globally using EMCLI commands. A subset of these global database sizes can be defined on the Initialization Parameters page and the self service user can choose one of these sizes while creating a database. -
Click Next. The Database Cloud Self Service Portal Setup: Scripts page appears. Specify the custom scripts that need to be executed before and after the database is created.
-
Click Next. The Database Cloud Self Service Portal Setup: Roles page appears. Click Add to select the SSA user roles to which this service template will be available. All users belonging to the selected role can use this service template.
-
Click Next. The Database Cloud Self Service Portal Setup: Review page appears. Review the information you have entered so far and click Create. The newly created service template will appear in the Database Cloud Self Service Portal Setup: Service Templates page. You can click on the Service Template Name link to view additional details.