16 Creating Schemas
You can create one or more schemas on a running database. Schemas can either be empty or based on a profile. This chapter covers the following sections:
16.1 Getting Started
The data content of this database provisioning profile is compiled from an export dump created using the Data Pump tool. You can choose to export Schema objects (structure only) or the Schema with data (structure + data).
The table below shows the list of tasks that are involved in creating an empty schema or a schema based on profile.
Table 16-1 Creating Databases Using Database Template
| Step | Task | Role |
|---|---|---|
|
1 |
Follow the steps in the Getting Started section to enable DBaaS. |
|
|
2 |
Create resource providers.
|
|
|
6 |
Create a database provisioning profile. This step is optional and is required if you are importing schemas from a profile. |
See Section 16.3, "Creating a Database Provisioning Profile Using Export Schema Objects" |
|
4 |
Configure the request settings. |
|
|
5 |
Define quotas for each self service user. |
|
|
7 |
Create as service template based on:
|
See Section 16.6, "Creating a Service Template for Schema Based on Profile" |
|
8 |
Configure the Chargeback Service. |
|
|
9 |
While creating a database, select the service template (associated with the database template based profile) you have created. |
16.2 Creating Resource Providers
You must create one or more resource providers which include:
-
PaaS Infrastructure Zones: See Section 11.2.2.1, "Creating a PaaS Infrastructure Zone"
-
Schema Pool: See Section 16.2.1, "Creating a Database Pool for Schema as a Service"
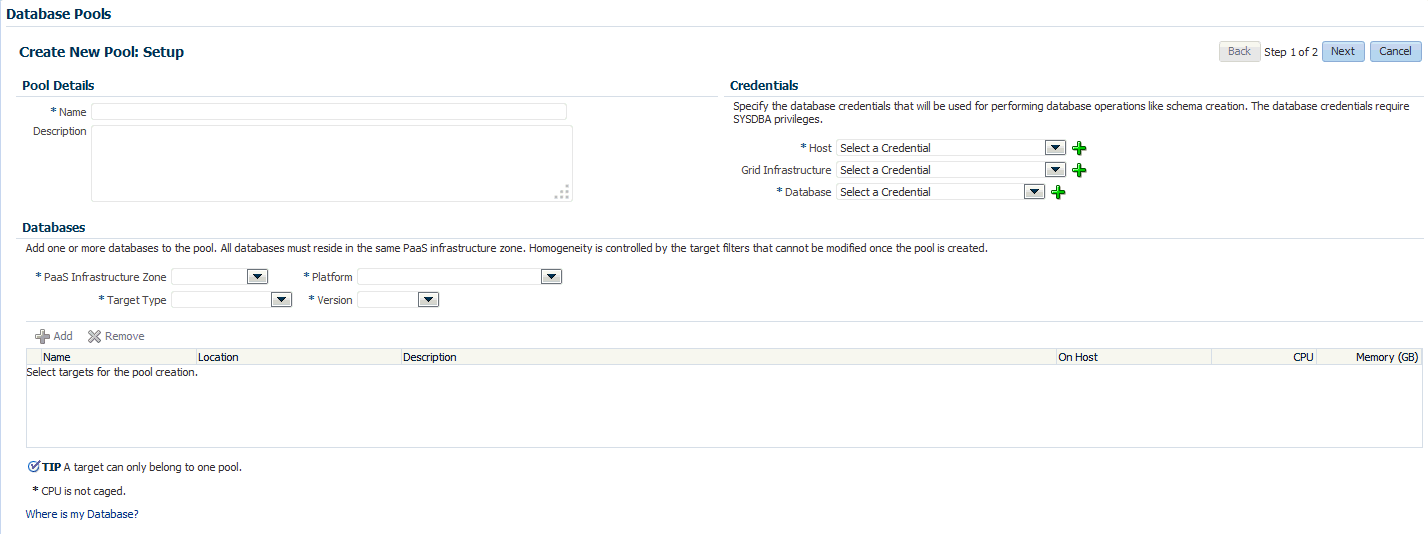
16.2.1 Creating a Database Pool for Schema as a Service
You can create a database service with one or more schemas with or without seed data and database objects. To do so, follow these steps:
-
Log into Enterprise Manager as a user with the
EM_SSA_ADMINISTRATORrole. -
From the Enterprise menu, select Cloud, then select Cloud Home. From the Oracle Cloud menu, select Setup, then select Getting Started. Click the Setup link next to the Database service family, select Schema from the drop down list, click Schema Pool and click Create.
-
Enter a name and description for the schema pool.
-
In the Credentials region, specify the credentials that will be used for performing database operations. Specify the following credentials:
-
Host: Required for starting the database.
-
Grid Infrastructure: Required to register a database service with grid infrastructure credentials. These credentials are used when schema backups taken by the self service user from ASM need to be deleted.
-
Database: Required for creating schemas on the database. The database credentials must have SYSDBA privileges.
-
-
Specify the following details:
-
PaaS Infrastructure Zone: Select the PaaS Infrastructure Zone in which the databases are present. The schemas will be created on the databases selected for the pool.
-
Target Type: Specify the configuration of the target database on which the schema is being deployed. This can be Single Instance or Cluster Database (RAC).
-
Platform and Version: Specify the platform and version of the database being deployed.
-
-
Click Add and select one or more databases to be added to the pool. All databases you select must be present in the same PaaS Infrastructure Zone.
Note:
You can search for database groups that meet your requirements by specifying a search string in the Groups field. -
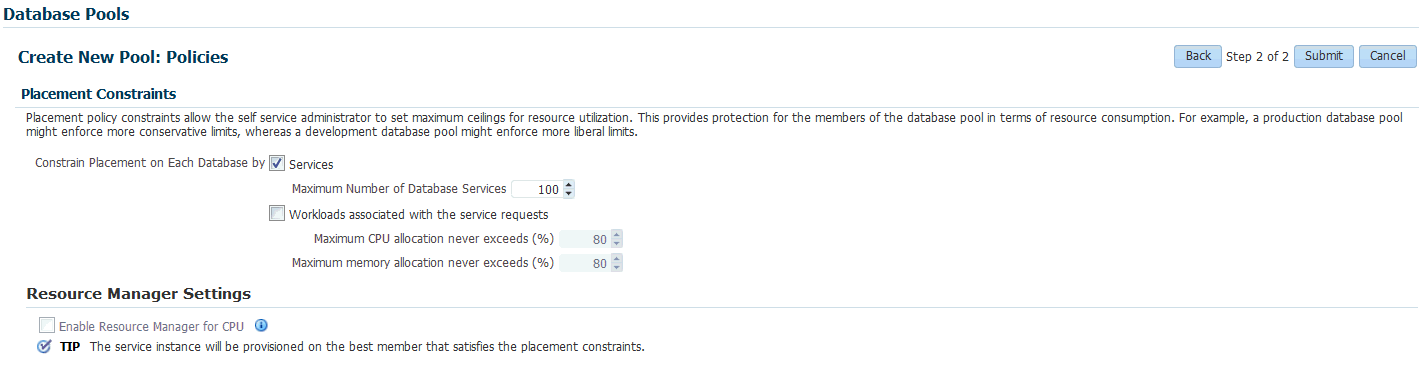
Click Next. The Create New Pool: Policies page appears.
Specify the placement policy constraints to set maximum ceilings for resource utilization on each database. Placement policy constraints for each database can be defined by services or workloads as follows:
-
Services: If you select this check box, you must specify the Maximum Number of Database Services that can be running on each database.
-
Workloads Associated with Service Requests: The amount of resources (such as CPU and memory) to manage the workload can be specified here. Specify the total workload for each database.
-
Maximum CPU Allocation: Specify the maximum CPU that can be allocated to each database.
-
Maximum Memory Allocation: Specify the maximum memory that can be allocated for each database.
-
-
-
If you have chosen to set the placement constraints by Workloads Associated with Service Requests, you can choose to enable the resource manager by selecting the Enable Resource Manager for CPU check box. You can use the resource manager to manage the CPU resource and ensure that
EM_SSA_USERwill not exceed the maximum allocated value. -
Click Submit to create a database pool. The newly created database pool will appear in the Database Cloud Self Service Portal Setup: Database Pools page.
16.3 Creating a Database Provisioning Profile Using Export Schema Objects
To create a database provisioning profile, follow these steps:
-
You can access the Database Provisioning page using either of the following ways:
-
From the Enterprise menu, select Cloud, and then select Cloud Home. On the Cloud home page, click Oracle Cloud, select Setup, and then select Data Sources. On the Database: Data Sources page, in the Data Profiles tab, click Create.
-
From the Enterprise menu, select Provisioning and Patching, and then select Database Provisioning. On the Database Provisioning page, in the Profiles section, click Create.
-
From the database target home page, click Oracle Database, select Provisioning, and then select Create Provisioning Profile.
-
-
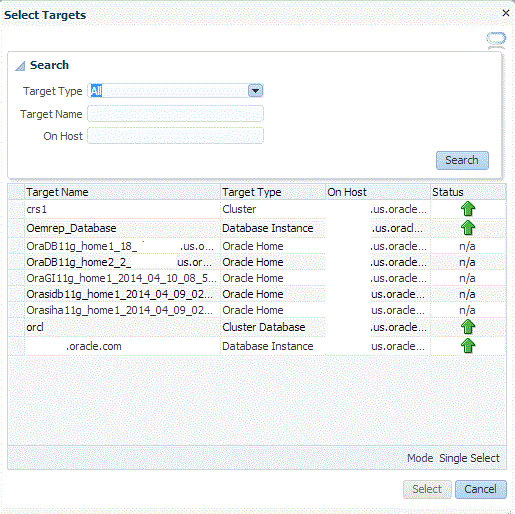
On the Reference Target page, click the search icon to select a target.
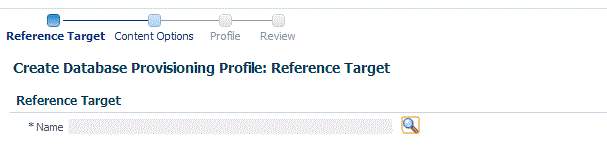
-
In the Search and Select:Targets display box, select the database you want to create a profile for, and then, click Select.
-
On the Reference Target page, select the following:
-
Data Content
-
Structure and Data to include physical and structural files from the database or Structure Only to include only the structural files in the template.
-
Export Schema Objects
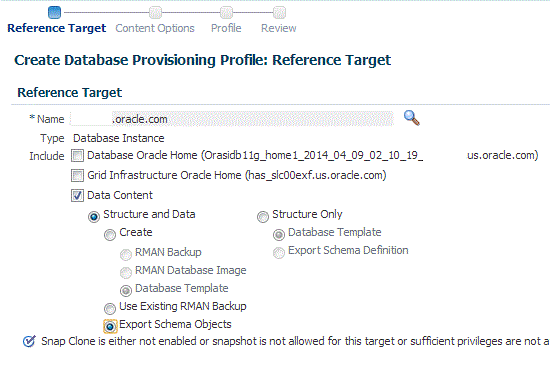
-
-
In the Credentials section, select the database. In the Credentials column, you can select Named Credentials and then select a credential name from the Credential Name column (or) select Preferred Credentials. Click Next.

-
On the Content Options page, do the following:
-
Select the schema you want to include in the profile by clicking on a schema in the Available Schema list and moving it to the Selected Schema list.
Note:
When one or more schemas are selected, the database checks if the dependent schemas are also selected for export. If the dependent schemas are not exported, you will receive a warning. You can choose to go ahead with the selected schemas, or to include the schemas which were not initially selected.The same warning is also displayed when you select a profile that does not have the dependent schemas exported.
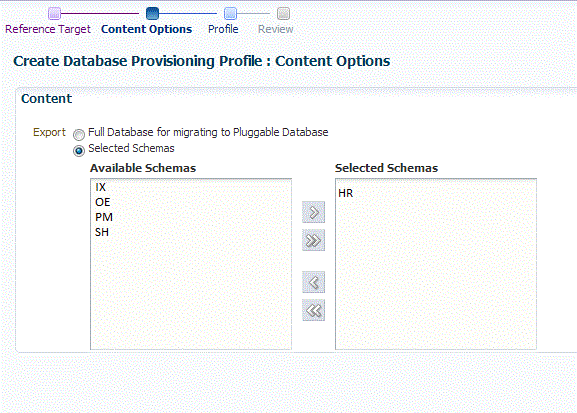
Note:
The Available Schemas section displays only the user created schemas that has data content in it. All the empty schemas are filtered out by default.Note:
System schemas such as SYS, SYSTEM, and DBSNMP will not be exported.The user schemas which do not have their own tablespace are not shown in left side of the shuttle.
-
In the Degree of Parallelism section, enter the number of threads required to perform the export operation.
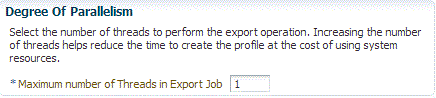
Note:
Increasing the number of threads helps reduce the time required to create the profile at the cost of using system resources. -
In the Directory Locations section, click on Add. In the Select Directory window, select a directory object listed to perform the export operation, and then click Select.
Note:
The number of export threads determines the number of parallel export processes that will run in parallel during export.Hence, the dump file names should contain
%U, to ensure the file names are auto generated with the running count to facilitate parallel operation along with the maximum size for the dump file. For example, 5GB. This means that the file rotation will start after 5GB limit is reached.Note:
Ensure that the directory location is accessible. The directory object that you select must refer to a location that is accessible across all the nodes. You can also create a directory object on ASM. However, it is not supported on ASM.
In the Log subsection, click on the search icon. In the Select Directory window, select the directory object you require to perform the export operation, and then click Select.
In the Log subsection, enter the file name, and then click on Next.
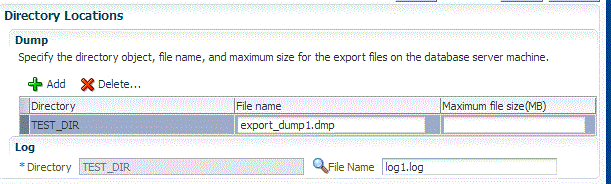
Note:
You can make use of degree of parallelism with dump file names. The default value of dump files contain %U which creates a running count when degree of parallelism is greater than 1.Also, this enables you to add multiple dump directories to distribute the storage if required.
-
-
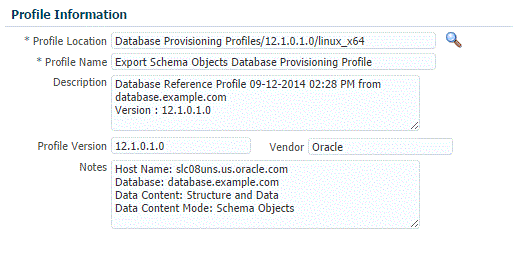
On the Create Database Provisioning Profile: Page, in the Profile Information section, do the following:
-
Specify or select a profile location in the software library where the database profile will be created.
-
Specify a unique profile name.
For example:
Export Schema Objects Provisioning Profile for HR database
-
Add a description for the profile.
-
Verify the profile version and the vendor.
-
Add any additional notes such as host name, database, data content, data content mode, and the like.
-
-
In the Schedule section, you can choose to start the profile creation immediately, or you can schedule it for a later time. You can also choose to repeat the creation of the provisioning profile, and set a repeat time.
-
Specify or select a working directory. Click Next.
-
On the Review page, ensure that the selections you have made in the previous pages are correctly displayed and click Submit. Otherwise, click Back repeatedly till you reach the page where you want to make changes. Click Cancel to abort the provisioning profile creation.
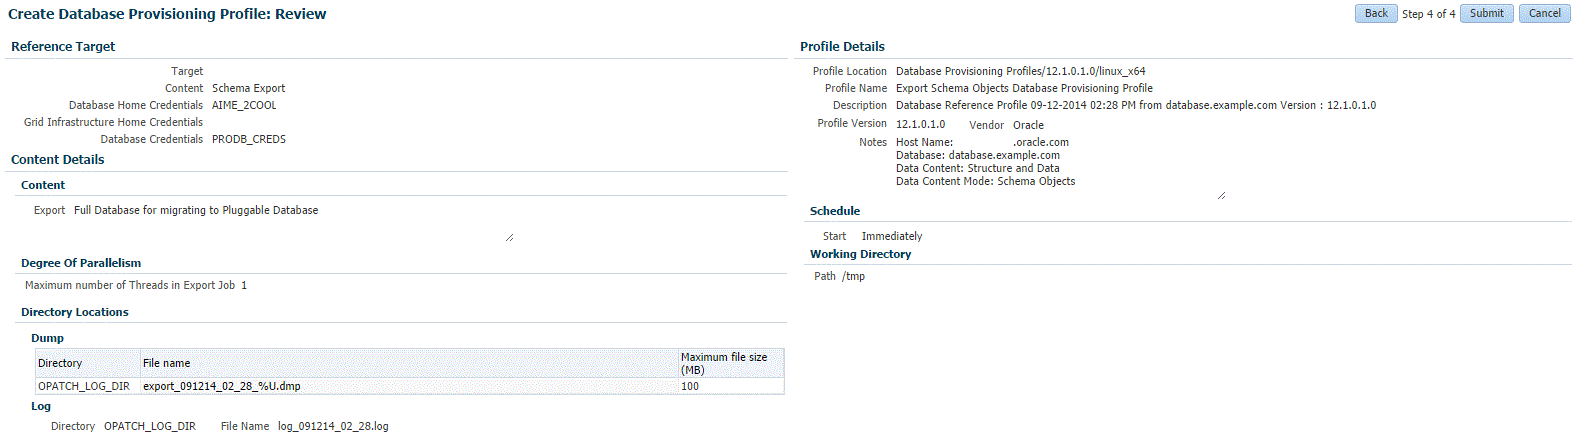
Once you have submitted the provisioning profile creation job, manually refresh the page if View Data has been set to Real Time: Manual Refresh. Else, set View Data to reload after a specific period of time, and then select an execution step from the Procedure Steps tree on the left pane to view the details.To view the submitted jobs, select the Procedure Activity link in the Data Profiles tab.
16.4 Configuring Request Settings
You can configure the request settings by specifying when a request can be made, its duration, and so on. See Section 11.2.3, "Configuring Request Settings"
16.5 Defining Quotas
After configuring the request settings, you must define quotas for each self service user. See Section 11.2.4, "Setting Up Quotas"
16.6 Creating a Service Template for Schema Based on Profile
One or more schemas can be created based on the service template definition. To create a service template for schema as a service, follow these steps:
-
Log into Enterprise Manager as a user with the
EM_SSA_ADMINISTRATORrole. -
From the Enterprise menu, select Cloud, then select Cloud Home. The Cloud Home page appears. From the Oracle Cloud menu, select Setup, then select Getting Started.
-
Click the Setup link next to the Databases option in the left panel. Select Schema from the drop down menu.
-
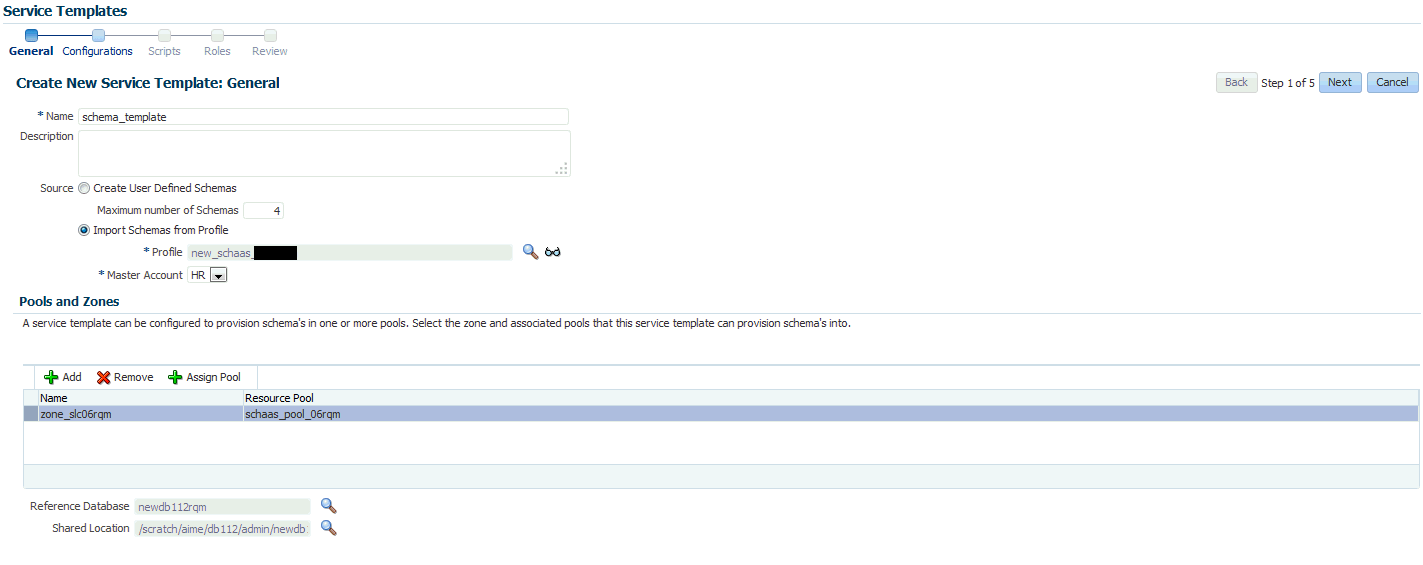
Click the Service Templates link. The Service Templates page appears. Click Create. The Create Service Template: General page appears.
-
Enter a name and description for the service template. The description must be unique and provide information on the type of service template being created.
-
In the Source region, select the Import Schemas from Profile option and select a database provisioning profile from which the schema is to be imported. Click the Search icon next to the Profile field and select an export schema objects based profile from the list. If a profile does not exist, you must create one. See Section 16.3, "Creating a Database Provisioning Profile Using Export Schema Objects".
-
After selecting the profile, you must select the Master Account that has privileges on all the schemas. If the Master Account is not selected, the self service user will have to select it when requesting a schema.
-
In the Zones region, click Add to select a PaaS Infrastructure Zone into which the service instance is to be provisioned. Click Assign Pool to add a Database Pool for the zone.
-
After you have selected the zone and the pool, the host target is populated in the Reference Host field. If you have added multiple zones and pools, you must click the Search icon and select a host target from the list.
-
If you creating a service template based on an export schema objects profile, in the Shared Location region, specify the Path or the Shared Location in which the schema dumps are present. The Shared Location must be accessible by all the databases.
-
Click Next. The Create New Service Template: Configurations page appears. Specify the following details:
-
Workload Size: Workload represents the total CPU, memory, and storage requirements for each service. You can define workload sizes such as small, medium, and large for the schema service. Click Create and in the Create Workload window, enter the name, CPU, Memory, and Storage limit for each service. Select a workload size and click Default to designate it as the default workload size.
-
Assign Schema Privileges: You can select existing roles or create a role that will be assigned to all the schemas. All database privileges such as
CREATE_SESSION,CREATE DIMENSION, and so on can be granted to the role. Enter the name of the user, description, and the privileges that will be granted to the user.Note:
-
If the role with the name specified already exists in the database, the database privileges cannot be modified.
-
The Master Account will have the
CREATE SESSION,CREATE DIMENSION,CREATE INDEXTYPE,CREATE OPERATOR,CREATE PROCEDURE,CREATE SEQUENCE,CREATE TABLE,CREATE TRIGGER,CREATE TYPE,CREATE VIEW, andCREATE SYNONYMprivileges over all the schemas created as part of this service request.
-
-
Tablespace: Specify the tablespace storage configuration. Enter the following details:
-
Maximum Size: The maximum size of the tablespace can be Unlimited or Specified by the workload size selected at request time.
-
Auto Extend: Select this check box to automatically extend the new data file.
Note:
If you are creating an empty schema, the tablespaces are not listed in the Tablespace Details section. In this case, you must specify the Initial Size and the Increment value for the tablespace and only one tablespace is created.
-
-
Tablespace Details: Based on the profile you have selected, one or more tablespaces are listed here. You can edit the following values in the table:
-
Initial Size: If you selected Specified by the workload size selected at request time in the Maximum Size field, enter the initial size of the tablespace.
-
Increment: If you have selected the Auto Extend checkbox, specify the size by which the data file is to be automatically incremented.
-
Maximum Size: If the tablespace storage is Specified by workload size specified at request time, enter the maximum size here that can be distributed across tablespaces.
-
-
-
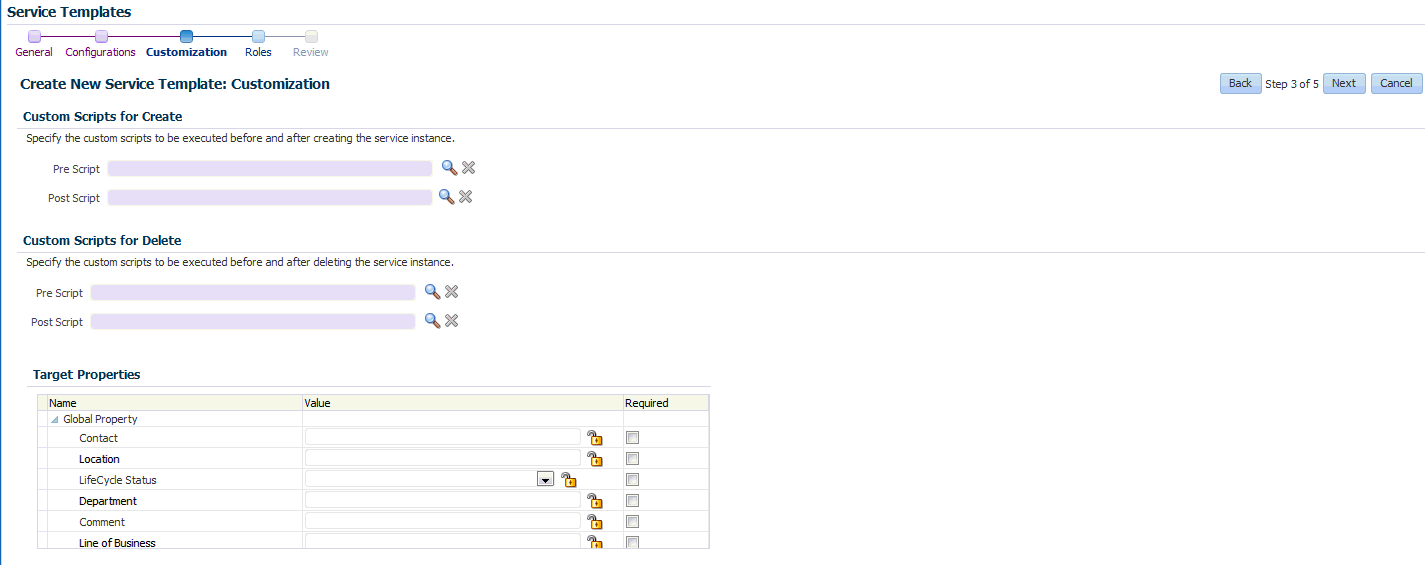
Click Next. The Create Service Template: Scripts page appears. Specify the custom scripts that need to be executed before and after the service instance has been created. See Pre and Post Scripts section for details.
-
In the Target Properties region, you can specify global target properties such as Location, Department, Line of Business, and so on. You can do the following:
-
Mark a property as mandatory by selecting the Required check box. If a property is marked as mandatory, the self service user must specify a value for this property while requesting a schema.
-
Lock a property. When a property is locked, the self service user cannot modify the value of this property while requesting a schema.
-
-
Click Next. The Create Service Template: Roles page appears. Click Add to select the SSA user roles to which this service template will be available. All users belonging to the selected role can use this service template.
-
Click Next to go to the Review page. Review the details entered so far and click Submit. The newly created service template will appear in the Database Cloud Self Service Portal Setup: Service Templates page. You can click on the Service Template Name link to view additional details.
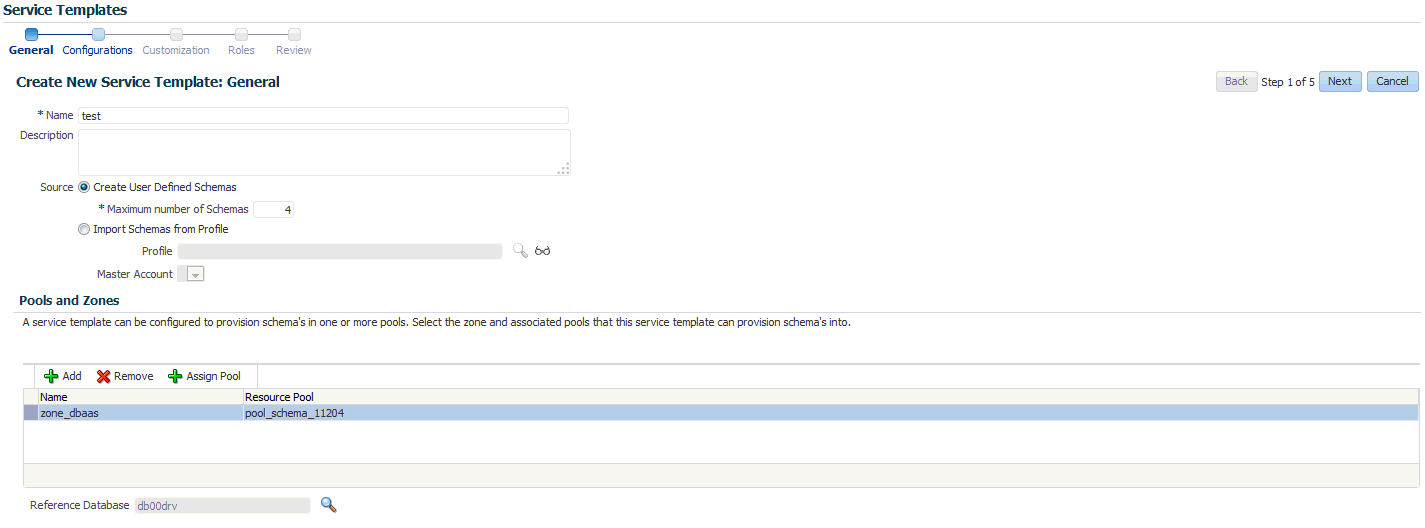
16.7 Creating a Service Template with Empty Schema
One or more schemas can be created based on the service template definition. To create a service template that can be used to create empty schemas, follow these steps:
-
Log into Enterprise Manager as a user with the
EM_SSA_ADMINISTRATORrole. -
From the Enterprise menu, select Cloud, then select Cloud Home. The Cloud Home page appears. From the Oracle Cloud menu, select Setup, then select Getting Started.
-
Click the Setup link next to the Databases option in the left panel. Select Schema from the drop down menu.
-
Click the Service Templates link. The Service Templates page appears. Click Create. The Create Service Template: General page appears.
-
Enter a name and description for the service template. The description must be unique and provide information on the type of service template being created.
-
In the Source region, select the Create User Defined Schemas option to create empty schemas which can be configured by the user. If you select this option, you must specify the Maximum Number of Schemas that can be created.
-
In the Zones region, click Add to select a PaaS Infrastructure Zone into which the service instance is to be provisioned. Click Assign Pool to add a Database Pool for the zone.
-
After you have selected the zone and the pool, the host target is populated in the Reference Host field. If you have added multiple zones and pools, you must click the Search icon and select a host target from the list.
-
Click Next. The Create New Service Template: Configurations page appears. Specify the following details:
-
Workload Size: Workload represents the total CPU, memory, and storage requirements for each service. You can define workload sizes such as small, medium, and large for the schema service. Click Create and in the Create Workload window, enter the name, CPU, Memory, and Storage limit for each service. Select a workload size and click Default to designate it as the default workload size.
-
Assign Schema Privileges: You can select existing roles or create a role that will be assigned to all the schemas. All database privileges such as
CREATE_SESSION,CREATE DIMENSION, and so on can be granted to the role. Enter the name of the user, description, and the privileges that will be granted to the user.Note:
-
If the role with the name specified already exists in the database, the database privileges cannot be modified.
-
The Master Account will have the
CREATE SESSION,CREATE DIMENSION,CREATE INDEXTYPE,CREATE OPERATOR,CREATE PROCEDURE,CREATE SEQUENCE,CREATE TABLE,CREATE TRIGGER,CREATE TYPE,CREATE VIEW, andCREATE SYNONYMprivileges over all the schemas created as part of this service request.
-
-
Tablespace: Specify the tablespace storage configuration. Enter the following details:
-
Maximum Size: The maximum size of the tablespace can be Unlimited or Specified by the workload size selected at request time.
-
Auto Extend: Select this check box to automatically extend the new data file. If this check box is selected, enter the following details:
Initial Size: Enter the initial size of the tablespace.
Increment: Specify the size by which the data file is to be automatically incremented.
-
-
-
Click Next. The Create Service Template: Scripts page appears. Specify the custom scripts that need to be executed before and after the service instance has been created.
-
In the Target Properties region, you can specify global target properties such as Location, Department, Line of Business, and so on. You can do the following:
-
Mark a property as mandatory by selecting the Required check box. If a property is marked as mandatory, the self service user must specify a value for this property while requesting a schema.
-
Lock a property. When a property is locked, the self service user cannot modify the value of this property while requesting a schema.
-
-
Click Next. The Create Service Template: Roles page appears. Click Add to select the SSA user roles to which this service template will be available. All users belonging to the selected role can use this service template.
-
Click Next to go to the Review page. Review the details entered so far and click Submit. The newly created service template will appear in the Database Cloud Self Service Portal Setup: Service Templates page. You can click on the Service Template Name link to view additional details.
16.8 Configuring Chargeback
Optionally, you can configure the chargeback service. See Chapter 43, "Chargeback Administration".
16.9 Requesting a Schema
The self service user can now select the service template based on the database template profile and create a database. See Section 22.2.1, "Requesting a Schema".