3 Discovering Exalogic Machine - Physical Configuration
This chapter describes the discovery steps for the Oracle Exalogic Elastic Cloud machine in a physical configuration. For this configuration, you must install the appropriate Enterprise Manager software to effectively manage and monitor your Exalogic hardware. Oracle Enterprise Manager Cloud Control provides many of the monitoring features used by system administrators.
Oracle Enterprise Manager Cloud Control 12c provides a holistic, end-to-end management solution to manage the software on the Exalogic nodes, and provides an interface to manage the Exalogic hardware. To use Oracle Enterprise Manager Cloud Control it must be installed and then the Exalogic assets must be discovered.
Follow the steps below to discover an Exalogic target in Enterprise Manager Cloud Control:
-
Prepare your Exalogic Machine as described in Appendix A, "Prepare Exalogic Machine for Discovery by Cloud Control."
-
Discovering Targets in Enterprise Manager Cloud Control 12c.
-
Once you have completed discovery of your Exalogic Machine in Enterprise Manager Cloud Control, complete the instructions in Post-Discovery Configuration and Verification.
3.1 Verifying Prerequisites
Before proceeding with discovery, you must verify that your Exalogic system meets the following minimal software requirements:
-
Oracle Exalogic Elastic Cloud Software (EECS):
-
For Exalogic X2-2 and X3-2: EECS version 2.0.3.0.6 or later.
-
For Exalogic X4-2: EECS version 2.0.6.1.1 or later.
-
-
Operating System: check the
/etc/issuefile to verify that a supported version of Oracle Linux is running. Asroot, run the following command:# cat /etc/issue
Output should look like this:
Oracle Linux Server release 5.9
Kernel \r on an \m
If the
/etc/issuefile does not exist or does not return an Oracle Linux Server entry, then contact Oracle Support.Note:
While the Exalogic System supports Oracle Solaris, the process for discovering an Exalogic System with Enterprise Manager on Oracle Solaris is not yet supported. -
Verify that the Exalogic Oracle Linux image is installed. Run the following command as
root:# imageinfo
Output of this command will display the Exalogic build information.
If the
imageinfocommand does not return any information or if theImage statusvalue is not SUCCESS, then the image is either not installed or not configured properly. Submit a service request (SR) to Oracle Support to ensure you have the image installed and configured. -
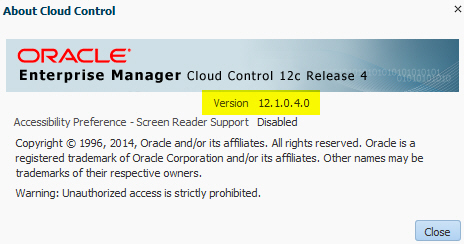
Enterprise Manager Cloud Control 12c: release 4 (12.1.0.4.0) or later. To check the version of Cloud Control:
-
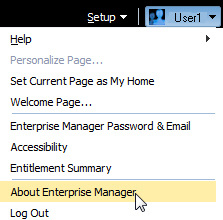
Click your login name in the upper-right corner of the Cloud Control window, then select About Enterprise Manager as shown in Figure 3-1:
-
In the pop-up window, verify that the version is 12.1.0.4.0 or later, as shown in Figure 3-2:
-
Click Close.
-
3.2 Installing Management Agents on Exalogic Rack Servers
If you want to see Oracle applications running on a compute node in the Software tab, then an Enterprise Manager Agent must be installed.
Note:
The two Enterprise Manager Control Nodes should have already been configured within the steps in Appendix A, "Prepare Exalogic Machine for Discovery by Cloud Control." This section should apply to all Primary and Backup Enterprise Manager Monitoring Compute Nodes.For details on how to download and install Management Agents, see the "Installing Oracle Management Agents" chapter of the Oracle® Enterprise Manager Cloud Control Basic Installation Guide:
http://docs.oracle.com/cd/E24628_01/install.121/e22624/install_agent.htm#CACJEFJI
3.3 Discovering Targets in Enterprise Manager Cloud Control 12c
Once you have installed Enterprise Manager Cloud Control 12c and the associated Manager Agent (that is, the Enterprise Manager Control Compute Node Manager Agent configured in Appendix A), you can now discover the targets to be monitored by Cloud Control Follow the discovery steps below:
3.3.1 Discovering the Oracle ZFS Storage Appliances
The Oracle Exalogic Elastic Cloud machine includes two Oracle ZFS Storage Appliances. Follow the steps below to view and manage the Oracle ZFS Storage Appliances in Oracle Enterprise Manager Cloud Control 12c:
-
Configuring Oracle ZFS Storage Appliance for Oracle Enterprise Manager Monitoring
-
Adding Oracle ZFS Storage Appliance Instances for Monitoring
-
Viewing metrics and accessing reports. The two primary ways to gather information about monitored instances of an Oracle ZFS Storage appliance are viewing metrics and accessing reports:
3.3.1.1 Deploying the Oracle ZFS Storage Appliance Plug-in
Install the latest release of the Enterprise Manager Oracle ZFS Storage Appliance plug-in on the Enterprise Manager Cloud Control agent. To deploy the plug-in:
-
Log in to Enterprise Manager Cloud Control.
-
From the Setup menu, select Extensibility, then select Plug-ins.
-
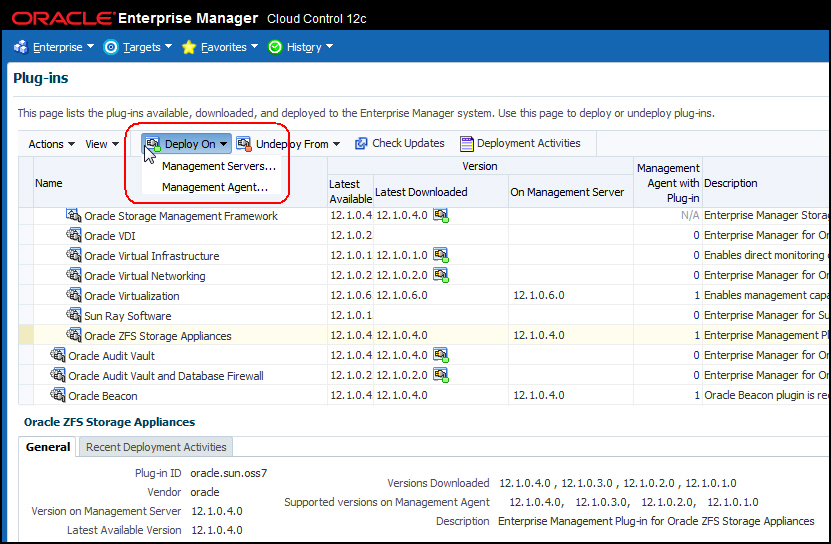
On the Plug-ins page, select the latest version of the Oracle ZFS Storage Appliance plug-in.
-
From the Deploy On menu, select Management Servers, as shown in Figure 3-3.
-
In the Deploy Plug-in on Management Servers dialog, enter the Management Repository SYS password, and click Continue. Proceed through the steps in the dialog box.
-
Click Deploy. Once successfully deployed, the plug-in appears. Click the General tab to verify the version deployed on the Management Server.
-
From the Deploy On menu, select Management Agents, as shown in Figure 3-3.
-
Deploy the Oracle ZFS Storage Appliance plug-in on both the Primary and Backup Enterprise Manager Control Compute Node Agents:
Note:
The plug-in must to be deployed on the primary and backup nodes.Click the General tab to verify the version deployed on the Management Agent.
For more information about plug-ins, see the "Plug-in Manager" chapter in the Oracle® Enterprise Manager Cloud Control Administrator's Guide:
http://docs.oracle.com/cd/E24628_01/doc.121/e24473/plugin_mngr.htm
3.3.1.2 Configuring Oracle ZFS Storage Appliance for Oracle Enterprise Manager Monitoring
Note:
Follow the instructions listed in this section for both Oracle ZFS Storage Appliances in your Exalogic Rack.To set up each appliance for monitoring from Cloud Control, enter the Oracle ZFS Storage Appliance Browser User Interface (BUI) as root or another user with the proper role to create worksheets, enable datasets, and create users and user roles on the appliance:
-
Log in to the Oracle ZFS Storage Appliance BUI and go to the Maintenance/Workflows tab.
-
Run the Configure for Oracle Enterprise Manager Monitoring workflow, entering and recording the password for the
oracle_agentuser. You can rerun the workflow later to reset the worksheet, re-enable data sets, or recreate the user. The following occurs when the workflow is run:-
A restricted role user named
oracle_useris created for use by the monitoring agent. The restricted access role associated with theoracle_agentuser is also namedoracle_agent. -
An analytics worksheet is automatically created to ensure smooth communication between the Cloud Control administrator and the storage administrator tasked with administering the target Oracle ZFS Storage Appliance.
-
-
Communicate the
oracle_agentpassword to the Cloud Control Administrator along with the following information:-
IP address for the network interface that you want Cloud Control to use to access management information (this interface must allow administration).
-
Full DNS name that is used to locate the system and corresponds to the IP address.
-
Port that is used by the BUI (typically 215 unless your company has a requirement to change management ports)
-
Important:
If the Oracle ZFS Storage Appliance plug-in is version 12.1.0.4 or later, then you must carry out the following additional steps:-
Click to edit the ”Oracle Agent” User name field.
-
Uncheck ”Kiosk user” if it is checked.
3.3.1.3 Adding Oracle ZFS Storage Appliance Instances for Monitoring
Note:
Follow the instructions listed in this section for both Oracle ZFS Storage Appliances in your Exalogic Rack.To add the Oracle ZFS Storage Appliance target to Oracle Enterprise Manager, complete the steps below:
-
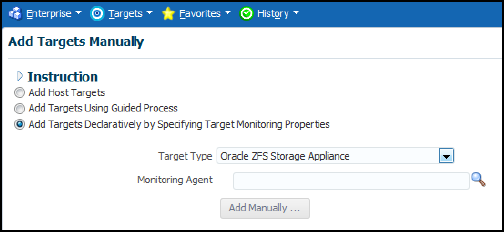
Click the Setup menu, then select Add Target, and finally Add Targets Manually.
-
Select Add Non-Host Targets by Specifying Target Monitoring Properties.
-
In the Target Type drop-down list, select Oracle ZFS Storage Appliance as shown in Figure 3-4:
-
For Monitoring Agent, click Search and select the Target Name displayed.
-
Click Add Manually.
-
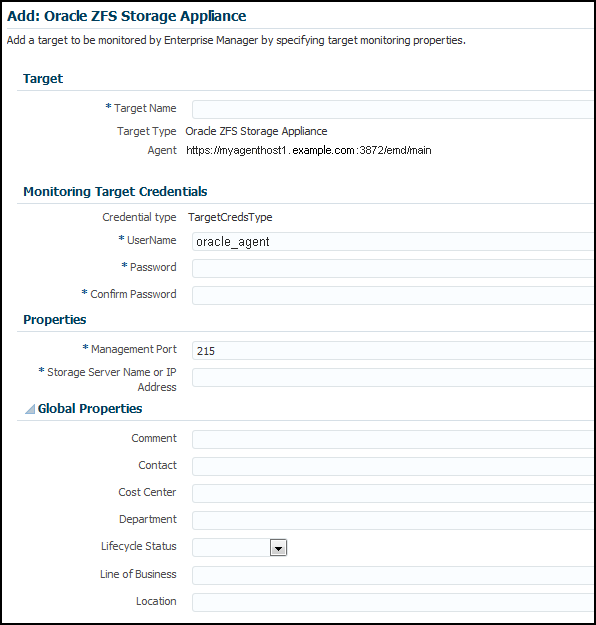
Add the Target details (Figure 3-5) and click OK.
Note:
It will take about 3 minutes to complete this process the first time, as the plug-in is also being installed on the agent.The user name should be the
oracle_agentcreated in Configuring Oracle ZFS Storage Appliance for Oracle Enterprise Manager Monitoring. -
To find the target, click the Targets menu, and select All Targets.
-
Select the Oracle ZFS Storage Appliance added above to go to the appliance home page.
3.3.1.4 Viewing Metrics
As a rule, more "point in time" information is available in raw metric information than in reports. Reports are focused on information that database administrators can use to analyze database performance and storage capacity.
To view the raw information collected from an Oracle ZFS Storage Appliance:
-
Log in to Enterprise Manager Cloud Control.
-
From the Targets menu, select All Targets. On the All Targets page, select the Oracle ZFS Storage Appliance.
-
On the Oracle ZFS Storage Appliance target home page, click the Target menu, then Monitoring, and finally All Metrics.
View the categories and information collected from the last collection interval.
3.3.1.5 Accessing Reports
To view reports for an Oracle ZFS Storage Appliance:
-
Log in to Enterprise Manager Cloud Control.
-
Click the Targets and select All Targets. On the All Targets page, select the Oracle ZFS Storage Appliance.
-
On the Oracle ZFS Storage Appliance target home page, click the Target menu, then Information Publisher Reports.
3.3.2 Discovering an Exalogic Elastic Cloud Target
To view the Exalogic schematic diagram (as shown in Figure 3-6) within Oracle Enterprise Manager Cloud Control 12c, the Exalogic Elastic Cloud target must be discovered by Enterprise Manager.
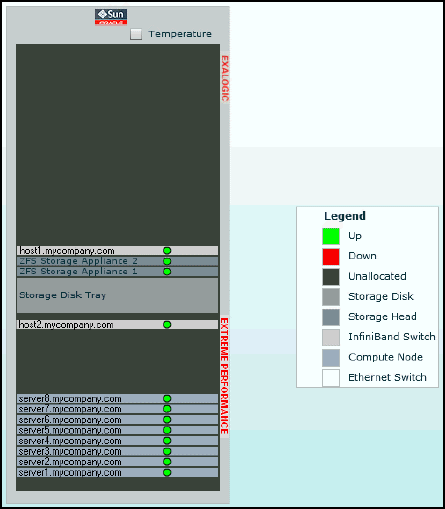
You can use the Exalogic Elastic Cloud Discovery wizard to discover and monitor an Exalogic target in Enterprise Manager. The Exalogic Elastic Cloud Discovery process identifies the hardware components present in the EEC and maps them to Enterprise Manager targets.
To discover an Exalogic Elastic Cloud target, follow these steps:
-
In Enterprise Manager, navigate to the Systems page.
-
From the Add drop-down list, choose Exalogic Elastic Cloud and click Add.
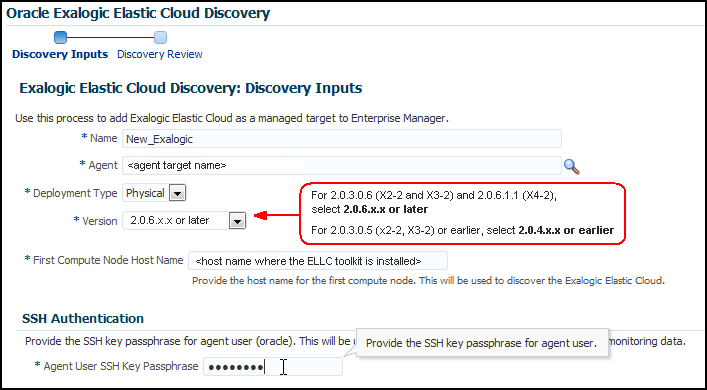
Enterprise Manager displays the Discover Exalogic Elastic Cloud Discovery wizard (Figure 3-7) which allows you to enter the parameters and values required to discover an Oracle Exalogic target.
-
Choose the Deployment Type from the drop-down (you can select either Physical or Virtual). Select Physical.
You must provide the desired Enterprise Manager target name and a corresponding Enterprise Manager agent on an Exalogic rack host target.
-
On the Discovery Inputs page, specify a unique Name for the Oracle Exalogic target you want to monitor in the Name field.
-
Enter or select an Agent where the Exalogic Lifecycle (ELLC) release 14.2 toolkit is run (as described in Prepare Exalogic Machine for Discovery by Cloud Control). For a full-rack scenario, there would have 30 agents but the discovery wizard expects only one of those two agents which have the ELLC toolkit installed.
If an Enterprise Manager Cloud Control Agent is not present on the compute node, deploy one using the following documentation:
http://docs.oracle.com/cd/E24628_01/install.121/e22624/install_agent.htm#CACJEFJI
Select an Agent on one of the hosts in the Exalogic System to perform the discovery.
-
Select the Version from the drop-down menu:
-
For 2.0.3.0.6 (X2-2 and X3-2) and 2.0.6.1.1 (X4-2), select 2.0.6.x.x or later from the Version drop-down menu.
-
For 2.0.3.0.5 (x2-2, X3-2) or earlier, select 2.0.4.x.x or earlier from the Version drop-down menu.
-
-
Provide the First Compute Node Host Name for the first compute node, which is the host name where the ELLC toolkit is installed. This will be used to discover the Exalogic Elastic Cloud.
-
In the SSH Authentication field, provide the Agent User SSH Key Passphrase. This will be used to discover Exalogic Elastic Cloud and to collect monitoring data.
Note:
In case no Key Passphrase was set up while pushing keys, then enter any value to proceed for discovery. -
After clicking Next, Enterprise Manager displays a Processing dialog box stating the following: "Finding Targets - In Progress. This operation cannot be canceled. Closing the browser window may cause the process to fail." Enterprise Manager then displays the Discover Oracle Exalogic Targets: Discovery Review page. The Review page displays the number of Targets Found after running the Discovery Inputs process. The page displays all member targets (such as PDU, Switches, ILOM) that are discovered as part of the system and displays other discovered hardware targets in physical discovery.
-
Use the Review page to specify the following information:
-
Enter or select the Primary Monitoring Agent to monitor Exalogic Elastic Cloud.
-
Enter or select the Backup Monitoring Agent to monitor Exalogic Elastic Cloud.
Note:
Backup Monitoring Agent and Monitoring Agent can be only those agents where the Exalogic Lifecycle (ELLC) release 14.2 toolkit is installed and run as described in Prepare Exalogic Machine for Discovery by Cloud Control.
-
-
Click Submit to save the targets as a Manageable Entity. You can also choose Back to return to the Discover Exalogic Elastic Cloud page or Cancel to terminate the discovery process.
Enterprise Manager displays a confirmation that the Exalogic Elastic Cloud instance has been added and begins to monitor the Exalogic Elastic Cloud target. The new target is displayed on the Systems page.