2 Discovering Exalogic Machine - Virtual Configuration
This chapter describes the discovery steps for the Oracle Exalogic Elastic Cloud machine installed in a virtual configuration with Oracle Exalogic Elastic Cloud Software (EECS) version 2.0.6.0.0.
For this configuration, your Exalogic hardware is pre-installed with Oracle Enterprise Manager Ops Center to manage your hardware components. Oracle Enterprise Manager Cloud Control provides many of the monitoring features used by system administrators.
The steps below provide the prerequisites and instructions to discover an Exalogic target in Enterprise Manager Cloud Control:
-
Installing Management Agent for Oracle VM Manager and Ops Center
-
Once you have completed the discovery of your Exalogic Machine in Enterprise Manager, follow the steps outlined in Post-Discovery Configuration and Verification.
2.1 Verifying Prerequisites
Before proceeding with discovery, you must verify that your Exalogic hardware meets the following minimal software requirements:
-
Oracle Exalogic Elastic Cloud Software (EECS): version 2.0.6.0.0 or later.
-
For Exalogic Machine in the virtual configuration (installed with EECS version 2.0.6.0.0), Oracle Enterprise Manager Ops Center is pre-installed. If Ops Center is not installed already on your Exalogic Machine, then submit a service request to Oracle Support.
-
For the Management Agents installed in the Installing Management Agent for Oracle VM Manager and Ops Center section, support is provided for Enterprise Manager Cloud Control 12c Release 3 (12.1.0.3.0) or later. Verify that the instance of Cloud Control you choose for monitoring is at 12.1.0.3.0 or later.
Note:
The Exalogic Infrastructure plug-in is not required for discovery of a Virtual Exalogic system.2.1.1 Critical Prerequisites for Oracle VM Manager Discovery
If the Oracle VM Manager Has NOT Been Discovered
If you have not yet performed discovery of the Oracle VM Manager in Cloud Control, then skip this section and proceed to Installing Management Agent for Oracle VM Manager and Ops Center and install the Management Agent for Oracle VM Manager and the Management Agent for Exalogic Hardware.
If the Oracle VM Manager HAS Been Discovered
This section only applies if you have an Enterprise Manager instance and have already discovered the Oracle VM Manager within the Exalogic Control stack VM. You must perform the following steps as a prerequisite in order to discover the Oracle VM Manager in read-only configuration.
As part of the original discovery of the Oracle VM Manager, the Management Agent for Oracle VM Manager is already installed. Once you have completed the steps outlined below, proceed to the Discovering Targets section.
Note:
If Oracle VM Manager was registered with Enterprise Manager Cloud Control prior to performing the read-only configuration procedure below, then you must perform Synchronize Operation from the Oracle VM Manager Target menu in Enterprise Manager to re-register it in read-only mode. Confirm that the Oracle VM Manager target is in read-only configuration.The Oracle VM Manager is part of the Exalogic Control Stack configured as part of the Exalogic installation process. If you have used an instance of Enterprise Manager to discover this target within the Exalogic Control Stack, then this process needs to take place to avoid an unsupported configuration.
-
Log in to the Exalogic Control VM that hosts the Oracle VM Manager component of the Exalogic Control stack as
oracleuser, and then perform the commands in the sequence below:cd /u01/app/oracle/ovm-manager-3/ovm_shell sh ovm_shell.sh --url=tcp://localhost:54321 --username=admin --password=<ovmm admin user password> ovm = OvmClient.getOvmManager () f = ovm.getFoundryContext () j = ovm.createJob ( 'Setting EXALOGIC_ID' );The
EXALOGIC_IDcan be found in theem-context.infofile ondom0located in the following file path location:/var/exalogic/info/em-context.info
You must log in to
dom0as arootuser to obtain this file. For example, if theem-context.infofile content is ExalogicID=Oracle Exalogic X2-2 AK00018758, then theEXALOGIC_IDwill be AK00018758.Note:
Domain zero (dom0) is the first domain started by the Xen hypervisor on boot. For an Exalogic Machine, it is any compute node of Exalogic.Continuing the command sequence:
j.begin ();
f.setAsset ( "EXALOGIC_ID", "<Exalogic ID for the Rack>");
j.commit ();
-
Press
Ctrl-Dto complete the sequence.
You can validate the configuration following these steps by observing that several menus for the manager/pool/server/guest vm target are disabled. Specifically, you can validate that Oracle VM Manager is in read-only mode by right-clicking the registered Oracle VM manager under Infrastructure Cloud.
All the active operation menu items in the second and third tier of the list, such as Create Zone, Create Virtual Server Pool, and Manage Network, are disabled (grayed out) and are not available for selection. Conversely, if you choose an item from the pull-down menus that are displayed when you click either the VM Manager or VM Guest menu option, the same menu items may not be grayed out. However, if you select one of the active management options, Enterprise Manager displays an error message stating that the action cannot be performed, thus indicating that the Oracle VM Manager is in read-only mode.
2.2 Installing Management Agent for Oracle VM Manager and Ops Center
The Management Agent is necessary to establish a connection between Enterprise Manager and Oracle VM Manager and Ops Center. This connection will allow you to manage your Exalogic Machine through Enterprise Manager Cloud Control. Install the Management Agent before proceeding to the discovery process:
2.2.1 Installing the Management Agent
Follow the steps below to install the Management Agent:
-
Ensure that you have downloaded and applied the latest version of Oracle Enterprise Manager Agent software for Oracle Linux 64-bit platforms.
-
In Enterprise Manager Cloud Control, do one of the following:
-
From the Setup menu, select Add Target, then select Auto Discovery Results. On the Auto Discovery Results page, click the Host and Oracle VM Manager tab and select a host that you want to monitor from the displayed list. Click Promote.
-
From the Setup menu, select Add Target, then select Add Targets Manually. On the Add Targets Manually page, select Add Host Targets and click Add Host.
-
-
On the Host and Platform page, do the following:
-
Accept the default name assigned for this session or enter a unique name of your choice. The custom name you enter can be any intuitive name, and need not necessarily be in the same format as the default name. For example,
add_host_operation_1.A unique deployment activity name enables you to save the installation details specified in this deployment session and reuse them in the future without having to enter all the details all over again in the new session.
-
Click Add to enter the fully qualified name and select the platform of the host on which you want to install the Management Agent.
Notes:
-
The host should be the VM where both Ops Center and Oracle VM Manager are installed.
-
The platform should be Oracle Linux 5 or later. At this time, Solaris is not supported.
-
-
Click Next.
-
-
At this point, the Management Agent is to be installed, which is a separate process. For details about installing the agent, see the "Installing Oracle Management Agent" chapter of the Oracle® Enterprise Manager Cloud Control Basic Installation Guide:
http://docs.oracle.com/cd/E24628_01/install.121/e22624/install_agent.htm
To configure the agent for an Exalogic machine, follow the steps below on the Installation Details page:
-
In the Deployment Type section, select Fresh Agent Install.
-
From the table, select the first row that indicates the hosts grouped by their common platform name.
-
In the Installation Details section, provide the installation details common to the hosts selected in Step b. For Installation Base Directory, enter the absolute path to the agent base directory where you want the software binaries, security files, and inventory files of the Management Agent to be copied.
-
For Instance Directory, accept the default instance directory location or enter the absolute path to a directory of your choice where all Management Agent-related configuration files can be stored.
-
From Named Credential list, select an appropriate profile whose credentials can be used for setting up the SSH connectivity between the OMS and the remote hosts, and for installing a Management Agent on each of the remote hosts.
-
For Privileged Delegation Setting, validate the Privilege Delegation setting to be used for running the root scripts. By default, it is set to the Privilege Delegation setting configured in Enterprise Manager Cloud Control.
-
For Port, accept the default port (3872) that is assigned for the Management Agent to communicate, or enter a port of your choice.
-
Repeat for every other row you have in the table in step b.
-
Click Next.
-
-
If you want to deploy Management Agents on the selected hosts in a rolling manner, such that the deployment proceeds continuously from one deployment phase to another, ignoring the failed hosts in each deployment phase, specify the following in the
$OMS_HOME/sysman/prov/agentpush/agentpush.propertiesfile:oracle.sysman.prov.agentpush.continueIgnoringFailedHost=true
-
On the Review page if you are satisfied with the details, then click Deploy Agent to install the Management Agent. You are automatically taken to the Add Host Status page that enables you to monitor the progress of the deployment session.
2.2.2 Importing the Oracle VM Manager Certificate into the Agent
Note:
The host described in this section is the VM where both Ops Center and Oracle VM Manager are installed.As you are integrating an Exalogic machine in a virtual configuration with EECS 2.0.6.0.0 or later with the Enterprise Manager Cloud Control 12c (Release 12.1.0.3) or later, a certificate is needed to be imported to the agent because of a hardening in the communication channel of the Oracle VM Manager.
Now that you have installed the Management Agent onto the Control VM where the Oracle VM Manager is hosted, it is possible to use a tcp:// connection instead of a tcps:// connection as the access method for Oracle VM Manager discovery. Oracle recommends that you use a tcps:// connection as it is a more secure access method.
To import the Oracle VM Manager certificate into the agent:
-
As the
rootuser on the Oracle VM Manager host, export the certificate from Oracle VM Manager:cd /u01/app/oracle/ovm-manager-3/ /opt/oracle/em12c/agent/core/12.1.0.3.0/jdk/bin/keytool -keystore ./ovmmCoreTcps.ks -exportcert -alias ovmm -file ovmm.cr Password: <Enter>
Note:
When prompted for the password, press Enter. The password has already been set up by the Exalogic Configuration Utility (ECU). -
As the EM Agent install user on the Enterprise Manager Agent host monitoring the Oracle VM Manager, to import the certificate into the Agent's truststore, the EMCTL
securecommand needs to be executed from the host on which the Agent is located:$AGENT_HOME/bin/emctl secure add_trust_cert_to_jks -trust_certs_loc <Location of the Oracle VM Manager Certificate> -alias ovmm Password: welcome
Note:
When prompted for the password, enter welcome. The password has already been set up by the ECU. -
As the EM Agent install user on the Enterprise Manager Agent host monitoring the Oracle VM Manager restart the agent:
./emctl stop agent
./emctl start agent
2.2.3 Importing Oracle Enterprise Manager Ops Center Certificate to the Oracle Management Agent Keystore
Note:
The host described in this section is the VM where both Ops Center and Oracle VM Manager are installed.This section provides step-by-step instructions about how to export the certificate from the Enterprise Manager Ops Center keystore and how to import the certificate into the Enterprise Manager agent keystore. These steps are a prerequisite for Exalogic Elastic Cloud discovery in Enterprise Manager Cloud Control.
Use these steps to export the Oracle Enterprise Manager Ops Center Enterprise Controller trust certificate and import it to the Enterprise Manager Cloud Control Management Agent:
-
Log in to the Enterprise Controller node as
root:-
Log in as
rootto the Exalogic Control VM that hosts the Oracle Enterprise Manager Ops Center Enterprise Controller component. -
When prompted, enter the password welcome unless changed from the default, and click Enter.
-
-
Change directory to
$OPS_CENTER_HOME/oem-ec/security/jssewhere $OPS_CENTER_HOMEis the path to the Oracle Enterprise Manager Ops Center home. For example,/etc/opt/sun/cacao2/instances/oem-ec/security/jsse:[root@localhost~]# cd $OPS_CENTER_HOME/oem-ec/security/jsseThis directory change is on the VM where the Oracle Enterprise Manager Ops Center Enterprise Controller is running.
-
Export the certificate using keytool that corresponds to the JDK configured to run Oracle Enterprise Manager Ops Center:
[root@localhost jsse]# $JAVA_HOME/jre/bin/keytool -export -alias cacao_agent -file oc.crt -keystore truststore -storepass trustpassNote:
Both export and import tasks should use the sameJAVA_HOMEdirectory.This command exports the certificate file (
oc.crt) in the local directory, for example,$OPS_CENTER_HOME/oem-ec/security/jsse. In the above command, trustpass is the default password for the Oracle Enterprise Manager Ops Center keystore unless changed. The Oracle Enterprise Manager Ops Center certificate is stored in theoc.crtfile. You can import the certificate to the Oracle Management Agent TrustStore using the following steps. -
Enter the following command:
$JAVA_HOME/jre/bin/keytool -import -keystore $AGENT_HOME/agent_inst/sysman/config/montrust/AgentTrust.jks -alias <alias_name> -file <path_to_oc_certificate_file>/oc.crt
For example, you can set the
<alias_name>value to be to bewlscertgencab.If
<alias_name>provided in the above command has already been used to import another certificate, you may see the following error:keytool error: java.lang.Exception: Certificate not imported, alias <alias_name> already exists.
In this case, provide another
<alias_name>in the command and try again:$JAVA_HOME/jre/bin/keytool -import -keystore $AGENT_HOME/agent_inst/sysman/config/montrust/AgentTrust.jks -alias <alias_name> -file <path to oc certificate file>When prompted, enter the password welcome unless changed from the default, and click Enter.
If you follow this step for exporting the certificate, the path to the certificate file will be
$OPS_CENTER_HOME/oem-ec/security/jsse/oc.crt -
To verify that the certificate has been imported correctly, run the following command:
$JAVA_HOME/jre/bin/keytool -list -keystore $AGENT_HOME/agent_inst/sysman/config/montrust/AgentTrust.jks
You should see the entry for
wlscertgencabalias name you created in the output. -
After verifying that the certificate has been successfully imported, restart the agent by using the stop and start procedure in the following documentation:
http://docs.oracle.com/cd/E25054_01/doc.1111/e24473/emctl.htm#BABEFBDI
2.3 Discovering Targets
Once you have installed Enterprise Manager Cloud Control 12c and the associated Manager Agent, you can now discover the targets to be monitored by Cloud Control. Follow the discovery steps below:
2.3.1 Discovering Oracle VM Manager
On an Exalogic machine in a virtual configuration, Oracle VM Manager is pre-installed as part of the Exalogic Control stack.
To install the latest release of the Enterprise Manager Oracle Virtualization plug-in on the Enterprise Manager Cloud Control Server and the agent:
-
Installing the Oracle Virtualization Plug-in on the Management Server
-
Deploying the Oracle Virtualization Plug-in to the Management Agent
2.3.1.1 Installing the Oracle Virtualization Plug-in on the Management Server
To install the latest release of the Enterprise Manager Oracle Virtualization plug-in on the Management Server:
-
Log in to Enterprise Manager Cloud Control.
-
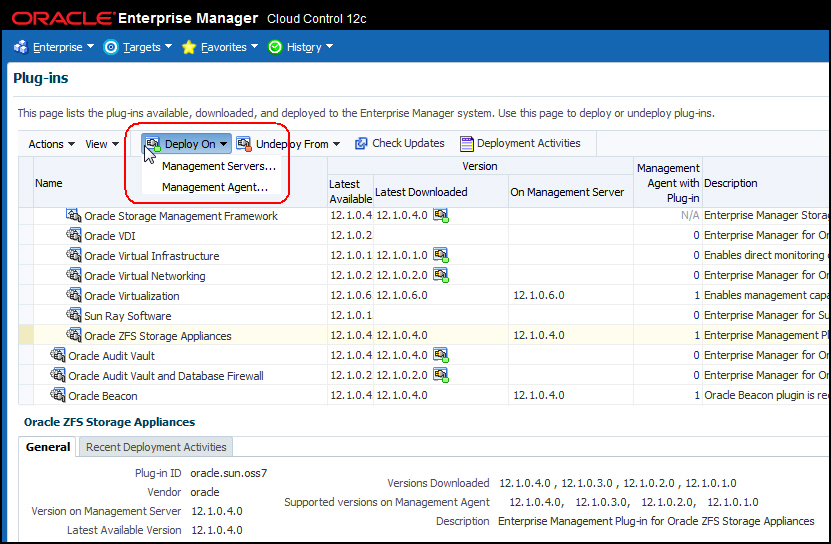
From the Setup menu, select Extensibility, then select Plug-ins.
-
On the Plug-ins page, select the latest version of the Oracle Virtualization plug-in, in the Servers, Storage and Network section.
-
From the Deploy On menu, select Management Servers.
-
In the Deploy Plug-in on Management Servers dialog, enter the Management Repository SYS password, and click Continue. Proceed through the steps in the dialog box.
-
Click Deploy. Once successfully deployed, the plug-in appears. Click the General tab to verify the version deployed on the Management Server.
For more information about plug-ins, see the "Plug-in Manager" chapter in the Oracle® Enterprise Manager Cloud Control Administrator's Guide:
http://docs.oracle.com/cd/E24628_01/doc.121/e24473/plugin_mngr.htm
2.3.1.2 Deploying the Oracle Virtualization Plug-in to the Management Agent
To deploy the plug-in to the Management Agent:
-
From the Setup menu of Enterprise Manager Cloud Control, select Extensibility, then select Plug-ins.
-
On the Plug-ins page, select the Oracle Virtualization plug-in you want to deploy.
-
From the Deploy On menu, select Management Agent.
-
In the Deploy Plug-in on Management Agents dialog, select the host name for the Management Agent for where Oracle VM and Ops Center are installed, then click Deploy. Once successfully deployed, the plug-in appears. Click the General tab to verify the version deployed on the Management Agent.
For more information, see the "Deploying Plug-Ins on Oracle Management Agent" section in the Oracle® Enterprise Manager Cloud Control Administrator's Guide:
http://docs.oracle.com/cd/E24628_01/doc.121/e24473/plugin_mngr.htm#CJGBIAGJ
2.3.1.3 Registering a New Installation of Oracle VM Manager
The Oracle VM Manager provides the user interface that allows you to create and manage zones, virtual server pools, virtual servers, and guest virtual machines. Before you use the Oracle VM Manager to manage virtualization targets in Enterprise Manager, you must register an existing installation of the Oracle VM Manager.
Notes:
-
The Oracle VM Manager that you register with Enterprise Manager must be at least version 3.0.2 or later.
-
The Oracle VM Manager must be associated with only one Enterprise Manager installation.
-
If you are registering Oracle VM Manager 3.3, you must ensure that the Enterprise Manager for Oracle Virtualization (Oracle Virtualization) plug-in 12.1.0.7 or a later version has been deployed on the Oracle Management Service and the Management Agent.
To register the Oracle VM Manager, you must first add it as an Enterprise Manager target. To do so, follow these steps:
-
From the Enterprise menu of Cloud Control, select Cloud, then select Oracle VM Infrastructure Home.
-
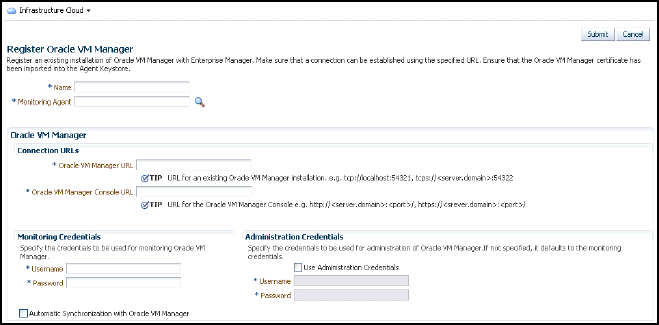
From the Infrastructure Cloud menu, select Register OVM Manager. The Register Oracle VM Manager page appears as shown in Figure 2-1:
On the Register Oracle VM Manager page, continue with the steps below to complete the registration.
-
In the Name field, enter the target name for the Oracle VM Manager instance to be registered.
-
In the Management Agent field, select the Management Agent to monitor and manage the Oracle VM Manager instance to be registered.
It is recommended that the Management Agent with Enterprise Manager for Oracle Virtualization plug-in (listed as Oracle Virtualization in Self Update) is present on the same machine where the Oracle VM Manager instance is running.
-
In the Oracle VM Manager URL field, enter the Oracle VM Manager URL. Refer to Support Note 1490283.1 (available in My Oracle Support) for details on configuring Oracle VM Manager for
tcpsaccess.https://support.oracle.com/epmos/faces/DocumentDisplay?id=1490283.1
The URL must be in one of the following formats:
-
tcp://localhost:<port>For example:
tcp://localhost:54321(If the Oracle VM Manager version is 3.1.1 or greater, you can specify only thetcpsURL.) -
tcps://<hostname:<port>For example:
tcps://server.domain:54322
Note:
Oracle recommends that you use atcps://connection as it is a more secure access method. -
-
In the Oracle VM Manager's Console URL field, enter the Oracle VM Manager's Console URL. This is the URL to enable the VNC Console for the Guest VMs. For example:
https://ovmmgr.example.com:7002/ovm/console
The URL must be in the following format:
https://<hostname>:<port>
Note:
If you are registering Oracle VM Manager 3.3, this URL is used to connect to the Oracle VM Manager. -
By default, data from Oracle VM Manager is automatically synchronized with Enterprise Manager at fixed intervals of time. If you do not wish to enable this option, you must disable the Automatic Synchronization check box and manually synchronize the data.
For more details on the automatic and manual synchronization options, see the "Synchronizing the Oracle VM Manager Targets" section of the Oracle® Enterprise Manager Cloud Control Administrator's Guide:
http://docs.oracle.com/cd/E24628_01/doc.121/e28814/cloud_iaas_setup.htm#EMCLO186
-
In the Administrator Credentials section, enter the administrator user name and password to connect to the Oracle VM Manager URL provided in Step 5. If you want to use separate credentials for managing Oracle VM Manager, check the Use Administration Credentials check box. If these credentials are not specified, the monitoring credentials are used by default.
-
Click Submit to register the Oracle VM Manager. You can now use the Oracle VM Manager to monitor and manage the virtualization targets in Enterprise Manager.
For further details, see the "Registering the Oracle VM Manager" section of the Oracle® Enterprise Manager Cloud Administration Guide:
http://docs.oracle.com/cd/E24628_01/doc.121/e28814/cloud_iaas_setup.htm#CEGICIFE
2.3.1.4 Synchronizing an Existing Installation of Oracle VM Manager
When EECS 2.0.4.0.0 is upgraded to EECS 2.0.6.0.0, the following steps must be taken to re-register the upgraded Oracle VM Manager in Enterprise Manager:
-
Create a blackout for the Oracle VM Manager target in Enterprise.
-
Upgrade Exalogic from 2.0.4.0.0 to 2.0.6.0.0
-
Import the upgraded Oracle VM Manager's Certificate into Enterprise. See Importing the Oracle VM Manager Certificate into the Agent.
-
End the blackout for the Oracle VM Manager target.
-
Synchronize the Oracle VM manager in Enterprise Manager. From the Oracle VM Manager Target menu, select Synchronization.
Note:
If Exalogic with EECS 2.0.6.0.0 or later is used, then the Oracle VM Manager certificate needs to be imported to agent keystore.Note:
Register the Oracle VM Manager with Enterprise Manager Cloud Control-
Use the Enterprise Manager Cloud Control Agent deployed on the same Exalogic Control VM as the Oracle VM Manager. If an Enterprise Manager Cloud Control Agent is not present on the Exalogic Control VM please deploy one using the following documentation:
http://docs.oracle.com/cd/E24628_01/install.121/e24089/part_installing_agent.htm -
In order to see Exalogic Control VMs in the Enterprise Manager Cloud Control 12c Exalogic navigation tree, you must register the Oracle VM Manager with Enterprise Manager Cloud Control.
2.3.2 Discovering the Oracle ZFS Storage Appliances
The Oracle Exalogic Elastic Cloud machine includes two Oracle ZFS Storage Appliances. Follow the steps below to view and manage the Oracle ZFS Storage Appliances in Oracle Enterprise Manager Cloud Control 12c:
-
Configuring Oracle ZFS Storage Appliance for Oracle Enterprise Manager Monitoring
-
Adding Oracle ZFS Storage Appliance Instances for Monitoring
-
Viewing metrics and accessing reports
The two primary ways to gather information about monitored instances of an Oracle ZFS Storage appliance are viewing metrics and accessing reports:
2.3.2.1 Deploying the Oracle ZFS Storage Appliance Plug-in
Install the latest release of the Enterprise Manager Oracle ZFS Storage Appliance plug-in on the Enterprise Manager Cloud Control agent. To deploy the plug-in:
-
Log in to Enterprise Manager Cloud Control.
-
From the Setup menu, select Extensibility, then select Plug-ins.
-
On the Plug-ins page, select the latest version of the Oracle ZFS Storage Appliance plug-in, in the Servers, Storage and Network section.
-
From the Deploy On menu, select Management Servers, as shown in Figure 2-2.
-
In the Deploy Plug-in on Management Servers dialog, enter the Management Repository SYS password, and click Continue. Proceed through the steps in the dialog box.
-
Click Deploy. Once successfully deployed, the plug-in appears. Click the General tab to verify the version deployed on the Management Server.
-
From the Deploy On menu, select Management Agents, as shown in Figure 2-2.
-
In the Deploy Plug-in on Management Agents dialog, select the host name for the Management Agent for where Oracle VM and Ops Center are installed, then click Deploy. Once successfully deployed, the plug-in appears. Click the General tab to verify the version deployed on the Management Agent.
For more information about plug-ins, see the "Plug-in Manager" chapter in the Oracle® Enterprise Manager Cloud Control Administrator's Guide:
http://docs.oracle.com/cd/E24628_01/doc.121/e24473/plugin_mngr.htm
2.3.2.2 Configuring Oracle ZFS Storage Appliance for Oracle Enterprise Manager Monitoring
Note:
Follow the instructions listed in this section for both Oracle ZFS Storage Appliances in your Exalogic Rack.To set up each appliance for monitoring from Cloud Control, enter the Oracle ZFS Storage Appliance Browser User Interface (BUI) as root or another user with the proper role to create worksheets, enable datasets, and create users and user roles on the appliance:
-
Log in to the BUI and go to the Maintenance/Workflows tab.
-
Run the Configure for Oracle Enterprise Manager Monitoring workflow, entering and recording the password for the
oracle_agentuser. You can rerun the workflow later to reset the worksheet, re-enable data sets, or recreate the user. The following occurs when the workflow is run:-
A restricted role user named
oracle_useris created for use by the monitoring agent. The restricted access role associated with theoracle_agentuser is also namedoracle_agent. -
An analytics worksheet is automatically created to ensure smooth communication between the Cloud Control administrator and the storage administrator tasked with administering the target Oracle ZFS Storage Appliance.
-
-
Communicate the
oracle_agentpassword to the Cloud Control Administrator along with the following information:-
IP address for the network interface that you want Cloud Control to use to access management information (this interface must allow administration).
-
Full DNS name that is used to locate the system and corresponds to the IP address.
-
Port that is used by the BUI (typically 215 unless your company has a requirement to change management ports)
-
Important:
If the Oracle ZFS Storage Appliance plug-in is version 12.1.0.4 or later, then you must carry out the following additional steps:-
Click to edit the ”Oracle Agent” User name field.
-
Uncheck ”Kiosk user” if it is checked.
2.3.2.3 Adding Oracle ZFS Storage Appliance Instances for Monitoring
Note:
Follow the instructions listed in this section for both Oracle ZFS Storage Appliances in your Exalogic Rack.To add the Oracle ZFS Storage Appliance target to Oracle Enterprise Manager, complete the steps below:
-
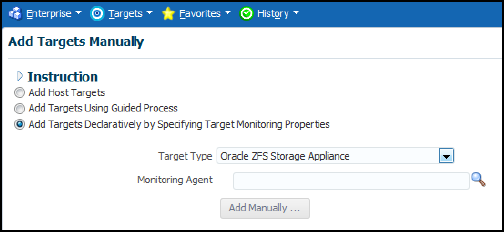
Click the Setup menu, then select Add Target, and finally Add Targets Manually.
-
Select Add Non-Host Targets by Specifying Target Monitoring Properties.
-
In the Target Type drop-down list, select Oracle ZFS Storage Appliance as shown in Figure 2-3:
-
For Monitoring Agent, click Search and select the Target Name displayed.
-
Click Add Manually.
-
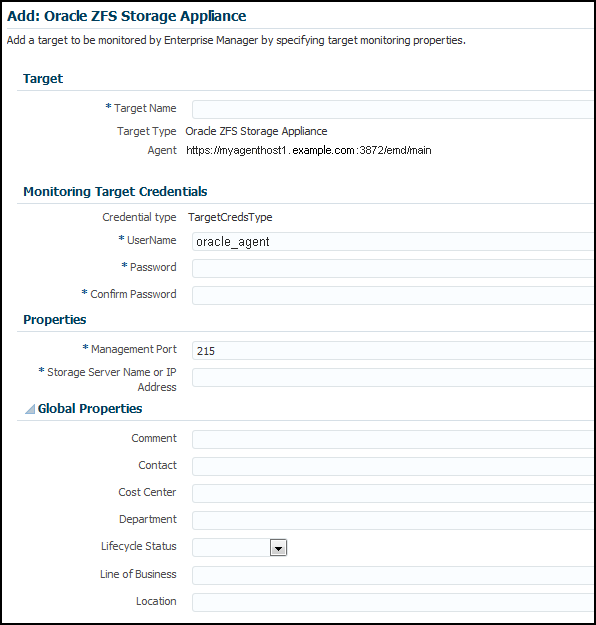
Add the Target details (Figure 2-4) and click OK.
Note:
It will take about 3 minutes to complete this process the first time, as the plug-in is also being installed on the agent.The user name should be the
oracle_agentcreated in Configuring Oracle ZFS Storage Appliance for Oracle Enterprise Manager Monitoring. -
To find the target, click the Targets menu, and select All Targets.
-
Select the Oracle ZFS Storage Appliance added above to go to the appliance home page.
2.3.2.4 Viewing Metrics
As a rule, more "point in time" information is available in raw metric information than in reports. Reports are focused on information that administrators can use to analyze database performance and storage capacity.
To view the raw information collected from an Oracle ZFS Storage Appliance:
-
Log in to Enterprise Manager Cloud Control.
-
Click the Targets and select All Targets. On the All Targets page, select the Oracle ZFS Storage Appliance.
-
On the Oracle ZFS Storage Appliance target home page, click the Target menu, then Monitoring, and finally All Metrics.
View the categories and information collected from the last collection interval.
2.3.2.5 Accessing Reports
To view reports for an Oracle ZFS Storage Appliance:
-
Log in to Enterprise Manager Cloud Control.
-
Click the Targets and select All Targets. On the All Targets page, select the Oracle ZFS Storage Appliance.
-
On the Oracle ZFS Storage Appliance target home page, click the Target menu, then Information Publisher Reports.
2.3.3 Discovering an Exalogic Elastic Cloud Target
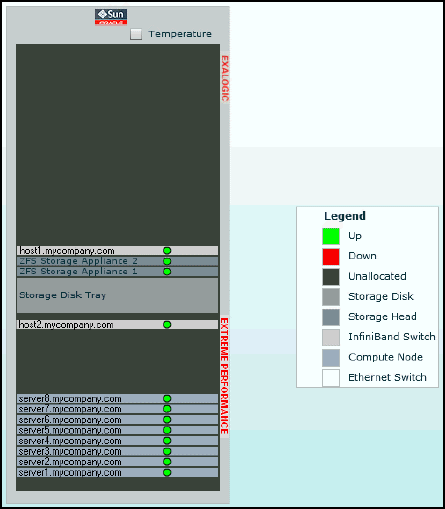
The Exalogic Elastic Cloud Discovery process identifies the targets present in the Exalogic Elastic Cloud and maps them to Enterprise Manager targets, then adds Enterprise Manager targets as Exalogic Elastic Cloud system members. The system members are represented in the schematic diagram (as shown in Figure 2-5) within Cloud Control.
You can use the Exalogic Elastic Cloud Discovery wizard to discover and monitor an Exalogic target in Enterprise Manager. Follow these steps:
-
In Enterprise Manager, navigate to the Systems page.
-
From the Add drop-down list, choose Exalogic Elastic Cloud and click Add.
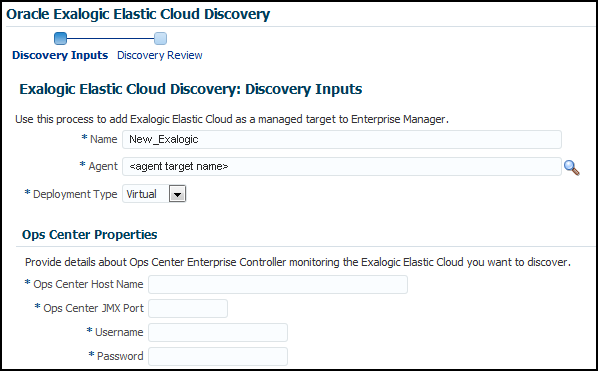
Enterprise Manager displays the Discover Exalogic Elastic Cloud Discovery wizard (Figure 2-6) which allows you to enter the parameters and values required to discover an Oracle Exalogic target.
-
On the Discovery Inputs page, specify a unique Name for the Oracle Exalogic target you want to monitor in the Name field.
-
Enter or select an Agent on one of the hosts in the Exalogic System to perform the discovery. Select the agent running on the same Exalogic Control VM as the Exalogic enterprise controller. If an Enterprise Manager Cloud Control Agent is not present on the Exalogic Control VM, deploy one using the following documentation:
http://docs.oracle.com/cd/E24628_01/install.121/e22624/install_agent.htm#CACJEFJI
If you choose an agent that is not part of the Exalogic System, an error message appears stating that no Exalogic Property File can be found and indicating that you must choose an Agent which is on an Exalogic System Host. For a virtual deployment, the host may not have the ID.
-
Choose the Deployment Type from the drop-down (you can select either Physical or Virtual). Select Virtual.
-
Enter the Ops Center Properties:
-
Ops Center Host Name: the host name of the Control VM where Ops Center and Oracle VM Manager are installed.
-
Ops Center JMX Port: The default Ops Center JMX port is 11172. Run the following command as the
rootuser to verify the port number:/opt/sun/cacao2/bin/cacaoadm get-param jmxmp-connector-port -i oem-ec
-
Username and Password credentials.
-
2.4 Monitoring Tasks for Exalogic Virtual Configurations
The following monitoring tasks are only available for the Exalogic Machine in a virtual configuration:
Note:
For monitoring and management tasks common to both physical and virtual Exalogic configurations, see Monitoring and Managing Exalogic and Monitoring Hosts and Applications.2.4.1 Monitoring the Exalogic Control Stack
The Exalogic Elastic Cloud Software control software stack can be monitored by selecting Control Stack in the left hand navigation tree of the Exalogic target. Enterprise Manager Cloud Control displays a master-detail page of Exalogic Elastic Cloud Software virtual machines, corresponding hosts and control software element. Selecting each row master element results in a change in the detail of the page and corresponding key performance indicator charts. This page provides a unified view of incidents related to the Exalogic Elastic Cloud Software control software stack.
2.4.2 Viewing and Managing Exalogic Consumption Tracking
You can use resource utilization features in Enterprise Manager to view consumption tracking and set the license edition for each target of a Exalogic system. To view consumption tracking information, follow these steps:
-
From the Targets menu, select Exalogic.
-
From the list of Exalogic targets, click the Exalogic Elastic Cloud target for which you want to view consumption information.
-
From the Exalogic Elastic Cloud menu, choose Resource Utilization. and then select Consumption Tracking.
Cloud Control displays the vCPU Consumption page where you can perform the following tasks:
-
View the resource consumption trend for the previous 24 hours by choosing View Trends.
-
Export the data on the vCPU Consumption page for the selected Time Period, View, and Product by clicking Export.
-
Click Manage License Edition to access a dialog box where you can set the license edition for each target of the current Exalogic system.
-
View the details for the selected product in the Details table. The table displays the Collection Time/Host, vCPUs, Target Name, Target Type, Version, Cost Center, and Owner.
-
2.4.3 Viewing Incidents and Status Changes Created for an Exalogic System in Ops Center as Incidents in Cloud Control
This section describes how to configure Enterprise Manager Cloud Control in order to consolidate alarms/incidents from Oracle Enterprise Manager Ops Center and consequently view all the issues from both systems in a single console. Furthermore, this configuration enables you to use the existing integration between Enterprise Manager Cloud Control and the ticketing system to manage the Oracle Enterprise Manager Ops Center incidents. Please note that once you start to manage Oracle Enterprise Manager Ops Center incidents within Enterprise Manager Cloud Control, if for any reason you alter incidents in Oracle Enterprise Manager Ops Center, those changes will not be reflected in Cloud Control.
The functionality of viewing Oracle Enterprise Manager Ops Center alarms in Oracle Enterprise Manager Cloud Control is disabled by default. You can enable this functionality to view Oracle Enterprise Manager Ops Center alarms in Oracle Enterprise Manager Cloud Control by performing the following steps:
-
From the Exalogic System target menu, select Monitoring and then choose Metric and Collection Settings.
-
Enable the Collection Schedule for the Oracle Enterprise Manager Ops Center Alarms metric by clicking Collection Schedule.
To view incidents and status changes created for an Exalogic system in Oracle Enterprise Manager Ops Center as incidents in Oracle Enterprise Manager Cloud Control, follow these steps:
-
From the Targets menu, choose Exalogic.
Enterprise Manager displays the Systems page.
-
From the Systems page, click the Name of the Exalogic Elastic Cloud in the Systems table.
Enterprise Manager displays the Exalogic Elastic Cloud Dashboard.
-
Click the Hardware tab to view alarms and incidents in Oracle Enterprise Manager Ops Center as an incident in Oracle Enterprise Manager Cloud Control for the Exalogic System target.
2.4.4 Viewing the vCPU Consumption Report
To view the vCPU Consumption Report for the software components running on an Exalogic Machine, do the following:
-
On the vCPU Consumption page, select one of the time periods in the Time Period drop-down list.
Note:
When you select a time period, the Product table and Details table refreshes automatically for the chosen time period. -
From the Product list, select the product or the products for which you want to view the consumption report. By default all the products are selected.
-
From the Product table, select a Product for which you want to view the consumption report.
Note:
When you select a product, the Details table refreshes automatically to display the Consumption Report for the product. -
The Details table displays the consumption details for the product or products that you have selected.
You can add more details as columns to the Details table by clicking View, selecting Columns, and then selecting the items you want to be displayed. You can select which columns you want to be visible and which columns to hide by clicking Manage Columns.
By default, the Details table displays the collection time and the number of total vCPUs consumed. Expand the collection time and host name to view all the following details:
-
Collection time of the point when vCPU was collected
-
Host name of the host on which software is running
-
The Exalogic machine name
-
The number of total vCPUs consumed by the software/target running at that time
-
The target name
-
The target type
-
The owner of the target
-
2.4.5 Viewing the Resource Consumption Trend
To view the resource consumption trend for an Exalogic machine target, do the following:
-
On the vCPU Consumption page, from the Product drop-down list, select the product for which you want to view the resource consumption trend.
Select All if you want to view the resource consumption trend for all the targets.
Note:
When you make a selection from the Product drop-down list, the Product table and the Details table automatically refreshes to display the details for the product or products that you have selected. -
From the Time Period drop-down list, select the time period for which you want to view the resource consumption trend.
-
Click View Trends.
-
The Resource Consumption Trend window opens.
If you selected All products, then the graphical representation of the resource consumption for all the products will be displayed. You can choose to view trends for individual products as well, by clicking on the Product drop-down list, and selecting the product.
-
You can also choose to view the resource consumption trend in a table format by clicking Table View.
On the Table view page, you can customize the details you want to view in the table by clicking View.
-
Click OK to close the Resource Consumption trend window.
2.4.6 Exporting the vCPU Consumption Report
To export the vCPU consumption report for an Exalogic machine target, do the following:
-
On the vCPU Consumption page, select the following:
-
Time Period
Select a time period for which you want to view the vCPU consumption report for.
-
View
Select Product.
-
Product
Select the products for which you want to view the vCPU consumption report.
Select All if you want to view the vCPU consumption report for all the products.
-
-
Click Export.
-
On the Opening License dialog box, select the program with which you want to open the file. Microsoft Office Excel is the default program. Click OK.
2.5 Management Tasks for Exalogic Virtual Configurations
The following management tasks are only available for the Exalogic Machine in a virtual configuration:
Note:
For monitoring and management tasks common to both physical and virtual Exalogic configurations, see Monitoring and Managing Exalogic and Monitoring Hosts and Applications.2.5.1 Configuring the Exalogic Guest Base Template
The Exalogic Guest Base Template is an OS image in a certain format that can be used to create an Exalogic Control VM. By default, a server template is bound to a specific account. You can register a server template for public use within any account inside the Exalogic Virtual Data Center (vDC). All virtual servers created in the Exalogic vDC use a Server Template.
Before you configure the Exalogic Guest Base Template, ensure that the following prerequisites are met:
-
A configured virtualized Exalogic Elastic Cloud Software (EECS) installation must be present.
-
Enterprise Manager Cloud Control 12c installation must be present.
-
All Exalogic Control VMs are expected to have a public IP; so, the Enterprise Manager agent can be pushed.
-
Root privileges required to mount and edit the Exalogic Guest Base Template.
-
Oracle user account must have been defined on the Exalogic Guest Base Template.
Configuring the Exalogic Guest Base Template involves the following steps:
-
Customizing the Base Image for Specific Exalogic Deployments
-
Uploading and Registering the Exalogic Guest Base Template to the Exalogic Server
-
Known Issue: Deriving an Association between Host and Virtual Manager Guest
2.5.1.1 Expanding the Disk Size
The disk size of the Exalogic Guest Base Template needs to be expanded to accommodate the Management Agent. To expand the disk size of the Exalogic Guest Base Template, follow these steps:
-
Log in to a 64-bit Linux machine as a user with root privileges.
-
Visit
https://edelivery.oracle.com/. Complete your registration information (Name, Company Name, Email Address and Country) and click on the download agreement. Select the following:-
Product Pack: Oracle Fusion Middleware
-
Select Platform: Linux x86-64
-
-
Click Go. From the list of downloads, select Oracle Exalogic Elastic Cloud Software 11g Media Pack.
-
Download the latest Oracle Exalogic Base Guest Template for Exalogic Linux x86-64 (64 bit) to a working directory, referred to as the
template_directory. Follow the instructions as shown in the example below:unzip ../V32082-01.zip tar xzf ../el_x2-2_base_linux_guest_vm_template_2.0.6.0.0_64.tgz cd BASE
Navigate to the
BASEdirectory where theSystem.imgfile is located. -
Next, use
Modifyjeosto increase the disk space. To get started with Oracle Linux JeOS, visit Oracle Software Delivery Cloud and download Oracle Linux JeOS for x86 (32 bit) and x86_64 (64 bit). Follow the instructions below:-
Complete your registration information (Name, Company Name, Email Address and Country) and click on the download agreement.
-
Select Oracle Linux from the Select a Product Pack pull-down menu.
-
Select x86 32-bit or x86 64 bit from the Platform pull-down menu.
-
Click Go and then select from the list of downloads, either:
-
Oracle Linux JeOS for Building Oracle VM templates for x86 (32 bit)
-
Oracle Linux JeOS for Building Oracle VM templates for x86_64 (64 bit)
-
-
Download Linux JeOS for Building Oracle VM templates, unzip the files, and install
modifyjeosaccording to the instructions in the Readme.txt.
-
Navigate to the directory that contains the
System.imgfile. This is theBASEdirectory as specified in Step 4. -
Enter the command to increase the disk size as shown in the example below:
modifyjeos -f System.img -T 10240where
Tspecifies the disk size in MB. -
Enter the command to increase the Exalogic Guest Base Template swap size as shown in the example below:
modifyjeos -f System.img -S 1024where
Sspecifies the size of the swap partition in MB.
2.5.1.2 Enabling sudo to Deploy the Management Agent
To enable sudo, log in as user with root privileges and follow the instructions as shown in the example below:
-
Log in as
rootand run the following commands:/sbin/kpartx –av System.img mount -o loop /dev/mapper/loop0p2 /mnt
-
In the
sudoersfile (located at/mnt/etc/sudoers), change the following entries:Defaults ! visiblepw to Defaults visiblepw Defaults requiretty to Defaults ! requiretty
-
After the root
ALL=(ALL) ALLentry in thesudoersfile, add the complete entry shown below:oracle ALL=(root) /usr/bin/id, /*/ADATMP_[0-9][0-9][0-9][0-9]-[0-9][0-9]-[0-9][0-9]_[0-9][0-9]-[0-9][0-9]-[0-9][0-9]-[AP]M/agentdeployroot.sh, /*/*/ADATMP_[0-9][0-9][0-9][0-9]-[0-9][0-9]-[0-9][0-9]_[0-9][0-9]-[0-9][0-9]-[0-9][0-9]-[AP]M/agentdeployroot.sh, /*/*/*/ADATMP_[0-9][0-9][0-9][0-9]-[0-9][0-9]-[0-9][0-9]_[0-9][0-9]-[0-9][0-9]-[0-9][0-9]-[AP]M/agentdeployroot.sh, /*/*/*/*/ADATMP_[0-9][0-9][0-9][0-9]-[0-9][0-9]-[0-9][0-9]_[0-9][0-9]-[0-9][0-9]-[0-9][0-9]-[AP]M/agentdeployroot.sh
2.5.1.3 Customizing the Base Image for Specific Exalogic Deployments
This procedure lists the steps required to copy the Exalogic Identifier to the Exalogic Base Image Template. It must be performed for each Exalogic on a separate fabric. The Exalogic Identifier (present in the em-context.info file) is specific to each Exalogic Fabric. The resulting Exalogic Server Templates must be used with the same rack from which the corresponding em-context.info file was copied.
To customize the guest base template:
-
Copy the Exalogic identifier to the Exalogic Guest Base Template by following the steps shown in the following example:
mkdir –p /mnt/var/exalogic/info/
scp <user>@<dom0_ip>:/var/exalogic/info/em-context.info /mnt/var/exalogic/info/em-context.info
umount /mnt
/sbin/kpartx –d System.img
tar -pczvf template_name.tgz template_directory
-
Save the configured file.
2.5.1.4 Uploading and Registering the Exalogic Guest Base Template to the Exalogic Server
Upload and register the configured Exalogic Guest Base Template to the Exalogic Control by following the steps listed in:
http://docs.oracle.com/cd/E18476_01/doc.220/e25258/proc.htm#BABFFDDA
After the modified Exalogic Guest Base Template has been uploaded, follow instructions in Configuring the Exalogic Network to configure the Exalogic network. After the network has been configured, create an Exalogic Control VM using the above template within Exalogic Control. See Creating an Exalogic Control VM for details.
2.5.1.5 Known Issue: Deriving an Association between Host and Virtual Manager Guest
For Enterprise Manager to be able to map a Guest Virtual Machine on Exalogic to the corresponding host target, the host's serial number must be obtained. The GenerateSlNo.sh script is available to obtain the host's serial number. This script should be run on the operating system of all the Guest Virtual Machines which need to be associated with their Host targets. If your EECS does not include this script, follow the instructions below to create one and run it.
Note:
This script must be run on each and every Exalogic Control VM that would potentially be monitored via an Enterprise Manager "Exalogic Elastic Cloud" system type.-
Check to see if the
/var/log/cellos/SerialNumbersfile exists:If it does exist, check the content and see if it contains any serial number data. If the file is empty of serial numbers, then delete the
SerialNumbersfile before you run the script as described below; otherwise, the script will exit out. -
As the
rootuser, create a new text file in the/etcdirectory. Name the fileGenerateSlNo.sh. -
Add the following content to the text file:
serialCode=`dmidecode |grep Serial|grep -v Not|cut -d ":" -f2|cut -d " " -f2` if [ -f /var/log/cellos/SerialNumbers ]; then echo "File /var/log/cellos/SerialNumbers already exists." else mkdir -p /var/log/cellos echo "====START SERIAL NUMBERS====" > /var/log/cellos/SerialNumbers echo "==Motherboard, from dmidecode==" >> /var/log/cellos/SerialNumbers echo "--System serial--" >> /var/log/cellos/SerialNumbers echo "$serialCode" >> /var/log/cellos/SerialNumbers echo "--Chassis serial--" >> /var/log/cellos/SerialNumbers echo "$serialCode" >> /var/log/cellos/SerialNumbers fi -
Save the file and close it.
-
Edit the permissions of the file to make it executable:
# chmod 700 GenerateSlNo.sh
This permissions setting allows only the
rootuser to run the script.Note:
It is recommended that the EM Agent install user also have read permissions for the/var/log/cellos/SerialNumbersfile. -
Run the
GenerateSlNo.shscript:# /etc/GenerateSlNo.sh
-
After this script is run manually, you can either wait for the agent to re-read it (every 24 hours) or read it now and therefore populate the fields. To read it now, from the host target menu, select Configuration, then Last Collected, and finally select Refresh.
2.5.2 Creating an Exalogic Control VM
Create the Exalogic Control VM with an interface on the configured Enterprise Manager external network by following steps listed in http://docs.oracle.com/cd/E18476_01/doc.220/e25258/proc.htm#CHDIHDEI.
Note:
The IP address for the network is assigned when the Exalogic Control VM is created. Once the Exalogic Control VM is created, a new interface cannot be assigned.After the IP address has been created, do the following:
-
Configure the DNS by editing the
/etc/resolv.conffile. -
Log into the running Exalogic Control VM as user with
rootprivileges, set the password for the Oracle user account and follow the instructions to deploy the Management Agent.
2.5.3 Configuring the Exalogic Network
After you have uploaded and registered the configured Exalogic Guest Base Template, you need to configure the Exalogic Network and create a new Virtual Local Area Network (VLAN).
Prerequisites
-
All Exalogic Control VMs must be a part of the VLAN that is to be used for communication between Oracle Management Service (OMS) and the Management Agent.
-
The OMS must have access to the VLAN being used for communication between OMS and the Management Agent.
-
All Exalogic Control VMs must have publicly available host names (and corresponding IPs) that are accessible from the OMS.
To configure the Exalogic network, follow these steps:
-
The following steps are typically performed by a network administrator:
-
Identify all the available IPs on the external network with which the Guest virtual machines will be configured.
-
Identify the VLAN to be used for communication between the OMS and the Management Agent. If it is a tagged network then get the VLAN ID as well. The VLAN ID is added in Step 3 below.
-
-
Create external Ethernet over InfiniBand (EoIB) networks to isolate public traffic for different Accounts in the Exalogic Control. Follow the instructions in:
http://docs.oracle.com/cd/E18476_01/doc.220/e25258/proc.htm#BABHHEGG
-
Assign external EoIB networks to the Account. This step makes the external networks available to users belonging to the selected Account. To perform this step, you must identify the Account(s) for which the external EoIB networks are to be assigned. Follow the instructions listed in:
http://docs.oracle.com/cd/E18476_01/doc.220/e25258/proc.htm#BEJBAIGF