3 Oracle Database Appliance Discovery
This chapter provides instructions for discovery of the Oracle Database Appliance through Enterprise Manager Cloud Control 12c.
The following sections describe how to discover the Oracle Database Appliance and other supported targets:
See Also:
Oracle Enterprise Manager Cloud Control Administrator's Guide for more information about discovering and promoting targets3.1 Oracle Database Appliance Discovery Requirements
Before you begin the discovery process, verify the following items to ensure a smooth discovery.
-
Install agents on Oracle Database Appliance.
-
On bare metal deployments, the agent must be deployed on each node.
-
On virtualized platform deployments, the agent must be deploy on each node in ODA_BASE.
-
-
Deploy Oracle Database Appliance Plug-in on the agents.
-
If you are using the virtualized platform, the Oracle Virtualized Infrastructure Plug-In can be deployed to monitor running Virtual Machines and view the Hypervisor statistics.
-
The host names of the server nodes in each individual Oracle Database Appliance should have a unique name within the enterprise.
See Also:
Oracle Enterprise Manager Cloud Administration Guide for more information about monitoring the hypervisor and dom03.2 Oracle Database Appliance Discovery Process
To discover an Oracle Database Appliance target, follow these steps:
-
From the Enterprise Manager home page, select the Setup menu (upper right corner), Add Target, and then Add Targets Manually.
-
Select the Add Targets Using Guided Process option. From the Target Types drop-down, select Oracle Database Appliance. Click Add Using Guided Process.
Enterprise Manager displays the Oracle Database Appliance Discovery page.
-
Click Discover Now.
-
On the Agent URL page, enter the following information and click Next:
-
Agent URL: Click the Browse icon to open a list of Oracle Database Appliance agents to choose from. Select one and click Select.
-
Credential: Select New and configure the root credential for Oracle Database Appliance Discovery. Check the Save As box to give this credential a name for future use.
The Discovered Targets page opens and shows detail about the system
-
-
On the Discovered Targets page, you can optionally edit the fields, then click Next.
-
On the Credentials page, use the credentials you configured or used in Step 4. Uncheck the Same as the first one checkbox if the password is different on each node, then click Next.
-
Optionally, on the Tag Cloud page, you can select existing tags or create new ones to associate with the discovered system. You can also configure tags in the Oracle Database Appliance home page.
The Add Tag button is located at the bottom of the page under the list of available tags. See "Creating an Oracle Database Appliance Group" for instructions about creating tags.
-
On the Review page, verify each section is correct. Click Back to return to previous pages.
-
If the information on the Review page is correct, click Submit.
-
On the Target Creation Summary page, click OK.
3.3 Discover the Virtual Platform
If you have deployed the Oracle Database Appliance Virtualized Platform, follow these steps to discover the Hypervison and Virtual Servers.
-
In the Enterprise Manager Setup menu, select Add Target, then Add Targets Manually.
-
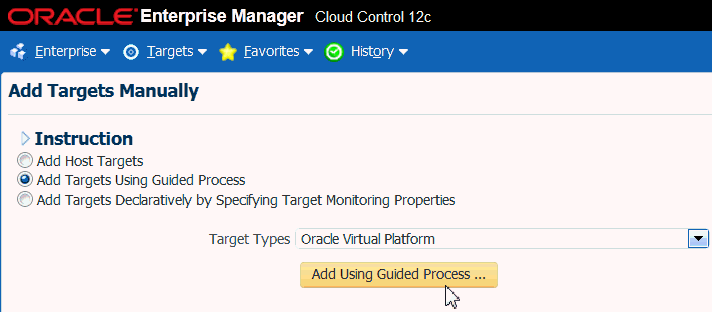
In the Add Targets Manually page, select Add Targets Using Guided Process and choose the Oracle Virtual Platform target type.

Description of the illustration virtual_platform_a.gif
-
Click Add Using Guided Process.
-
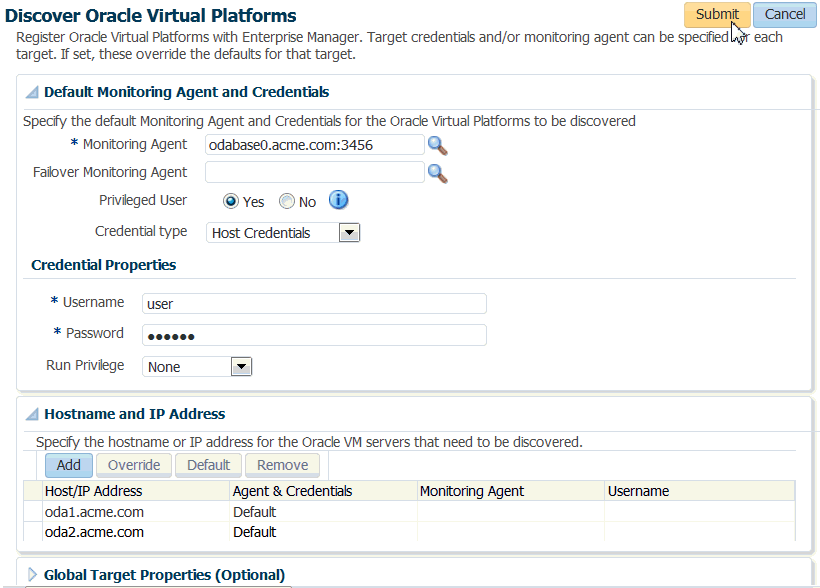
On the Discover Oracle Virtual Platforms page, next to the Monitoring Agent field, click the search icon (magnifying glass).
-
In the Search and Select: Agent Targets dialog, the agent that is deployed in the ODA_BASE domain on Node 0, and click Select.
The failover monitoring agent can be chosen as the Node 1 ODA_BASE agent.
-
Enter the host credentials of the DOM0 of the Oracle Database Appliance server, then click the Add button in the Hostname and IP Address section of the page as shown below.

Description of the illustration virtual_platform_b.gif
-
Enter the Dom0 node names in the Discover Virtual Servers dialog, and click Add.
-
Click Submit in the upper right corner of the page.

Description of the illustration virtual_platform_c.gif
Once the job completes, it may take a few minutes for the targets to be visible under the Oracle Database Appliance target.
See Also:
Oracle Enterprise Manager Cloud Administration Guide for more information about the Oracle Virtual Infrastructure plug-in3.4 Discover Grid Infrastructure and Oracle RAC
The following sections provide instructions for discovering Grid Infrastructure and Oracle Real Application Clusters targets:
See Also:
Oracle Enterprise Manager Cloud Control Administrator's Guide for more information about discovering and promoting targets3.4.1 Discover Grid Infrastructure (Cluster) Targets
To discover the Grid Infrastructure targets:
-
From the Setup menu, select Add Target, then Add Targets Manually.
-
In the Add Targets Manually page, select Add Targets Using Guided Process and Target Type as Oracle Cluster and High Availability Service.
-
Click Add Using Guided Process and follow the instructions in the wizard.
-
On the Add Cluster Target: Specify Host page, select the first database node and click Discover Target.
-
The cluster home details are displayed. Ensure that all database nodes are shown in Cluster Host and High Availability Services Targets section.
-
Click Save.
See Also:
Oracle Enterprise Manager Cloud Control Administrator's Guide for more information about discovering database targets3.4.2 Discover Oracle Real Application Clusters Targets
To discover Oracle RAC targets:
-
From the Setup menu, select Add Targets, then Add Targets Manually.
-
In the Add Targets Manually page, select Add Targets Using Guided Process and Target Type as Oracle Database, Listener and Automatic Storage Management.
-
Click Add Using Guided Process and follow the instructions in the wizard.
-
In the wizard pages, configure Cluster Databases (
dbsnmppassword required) and Cluster ASM (asmsnmppassword required).
See Also:
Oracle Enterprise Manager Cloud Control Administrator's Guide for more information about discovering and promoting targets3.5 Removing an Oracle Database Appliance Target
If you need to remove an Oracle Database Appliance target, you can perform this task within Enterprise Manager Cloud Control 12c:
-
Open the Enterprise Manager Target menu, and select All Targets.
-
In the All Targets page, in the navigation tree, find and expand the Engineered Systems category.
-
Select Oracle Database Appliance System.
-
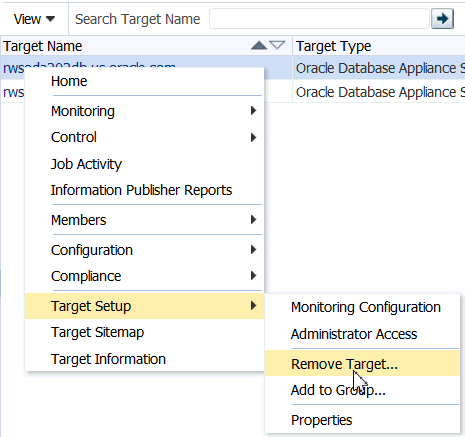
Right click the target name to open a context menu.

Description of the illustration target_remove.gif
-
Select Target Setup, then Remove Target.
-
A warning page will display to confirm the target deletion. Click Yes to continue.