5 Working With Event Templates
This chapter provides details on the default event templates shipped along with the TEC Connector. The event templates specify the mappings between an Enterprise Manager event attributes and TEC web service attributes.
5.1 Familiarization with Event Templates
This section describes the default mappings between the Enterprise Manager event data fields and the IBM TEC event data fields.
This section discusses the following topics:
5.1.1 Default Templates
The event templates XML Style Sheet (XSL) files contain the mappings between the two systems These files are located in the Self Update archive that was installed in Section 2.3, "Installing the Connector in Enterprise Manager". To extract the installation file, perform the steps in Section 5.2.3.1, "Exporting the Template Files".
Table 5-1 lists the XSL files that perform the mappings and provides a summary of each.
Table 5-1 XSL Files that Perform Mappings
| File | Description |
|---|---|
|
|
Transforms the Oracle Enterprise Manager event data to the IBM TEC event format for the createEvent operation. |
|
|
Transforms the Oracle Enterprise Manager event data to the IBM TEC event format for the updateEvent operation. |
5.1.1.1 Create Event Template
The Oracle Enterprise Manager Connector Framework invokes the createEvent operation whenever an event is generated in Oracle Enterprise Manager and there is a rule configured to invoke the TEC connector. createEvent_request.xsl is invoked during the process to transform the data from Oracle Enterprise Manager format to TEC event format. Table 5-2 lists the create-event template mappings between the IBM TEC event and the Oracle Enterprise Manager event.
Table 5-2 Create Event Template Mappings
| TEC Slot Name | Required | Value |
|---|---|---|
|
msg |
Yes |
Set to the formatted contents of the event as specified in the section below entitled ”Formatted Enterprise Manager Event Contents". |
|
severity |
Yes |
Set the severity based on the event severity. See the section entitled ”Severity Mapping” below for details. |
|
status |
Yes |
Hardcoded to "OPEN". |
|
Class Name |
Yes |
Set the class name based on the target type. See the section entitled "Class Name Mapping" below for details. |
|
source |
Yes |
Hardcoded to "OracleEnterpriseManager" |
|
origin |
No |
Set to the Target Type Label field in the event. |
|
hostname |
No |
Set to the Object Name field in the event. |
|
fqhostname |
No |
Set to the Object Name field in the event. |
|
repeat count |
No |
Hardcoded to 0. |
|
date |
No |
Set to the ReportedDate field in the event. |
|
action flag |
No |
Hardcoded to "CREATE". |
|
extid |
Yes |
Set to the SequenceID field in the event. |
|
sub source |
Yes |
Hardcoded to ”OracleEnterpriseManager”. |
|
sub origin |
No |
Set to the Target Name field in the event. |
5.1.1.2 Update Event Template
The Oracle Enterprise Manager Connector Framework invokes the updateEvent operation whenever an event is generated in Oracle Enterprise Manager and there is a rule configured to invoke the TEC connector.
updateEvent_request.xsl is invoked during the process to transform the data from Oracle Enterprise Manager format to TEC event format. Table 5-3 lists the update-event template mappings between the IBM TEC event and the Oracle Enterprise Manager event.
Table 5-3 Update Event Template Mappings
| TEC Slot Name | Required | Value |
|---|---|---|
|
Identifier |
Yes |
Set to the External Event ID field in the event. |
|
msg |
Yes |
Set to the formatted contents of the event as specified in the section below entitled "Formatted Enterprise Manager Event Contents". |
|
severity |
Yes |
Set the severity based on the event severity. See the section entitled ”Severity Mapping” below for details. |
|
status |
Yes |
Hardcoded to "OPEN". |
|
Class Name |
Yes |
Set the class name based on the target type. See the section entitled "Class Name Mapping" below for details. |
|
source |
Yes |
Hardcoded to "OracleEnterpriseManager" |
|
origin |
No |
Set to the Target Type Label field in the event. |
|
hostname |
No |
Set to the Object Name field in the event. |
|
fqhostname |
No |
Set to the Object Name field in the event. |
|
repeat count |
No |
Hardcoded to 0. |
|
date |
No |
Set to the ReportedDate field in the event. |
|
action flag |
No |
Set to "CLOSE" if the event Severity field is Clear. Otherwise, hardcoded to "UPDATE". |
|
extid |
Yes |
Set to the SequenceID field in the event. |
|
sub source |
Yes |
Hardcoded to ”OracleEnterpriseManager”. |
|
sub origin |
No |
Set to the Target Name field in the event. |
5.1.1.3 Formatted Enterprise Manager Event Contents
Listed below is the format used by the templates for the Description fields. Text delimited by angle brackets (< and >) designates an Enterprise Manager Event field name that will be replaced by the actual field contents. Lines marked with double asterisks indicate they will only be present if the designated event field contains data. The Notes section below contains information about some of the fields.
Received event reported by Oracle Enterprise Manager:
Occurred Date: <OccurredDate>
ReportedDate: <ReportedDate>
Event Class: <EventClass>
Event Name: <EventName>
Target Type: <SourceInfo/TargetInfo/TargetType>
Target Name: <SourceInfo/TargetInfo/TargetName>
Severity: <Severity>
Message: <Message>
URL: <EventURL>

Target Properties:**
    <TargetProperty/Name>: <TargetProperty/Value>**

Event Context:**
    <EventContextAttributes/StringAttribute/Name>: < EventContextAttributes/StringAttribute /Value>**
-
The Target Properties section will only be present if the event contains target property values. Listed below are some sample target property name/value pairs:
Line of business: Finance
Owner: Finance-DB Team
-
The Event Context section will only be present if the event contains event context attribute values. There can be StringAttribute or NumberAttribute values that contain a name/value pair.
-
URL is set to the URL of the event details page in Enterprise Manager. Copy the URL to a browser to directly view the event in Enterprise Manager.
5.1.2 Severity Mapping
The TEC event severity is set based on the Enterprise Manager event severity value. The following table shows the values used when creating the event in TEC.
| When the Enterprise Manager event severity is … | Set the TEC event severity to … |
|---|---|
| Fatal | Critical |
| Critical | Critical |
| Warning | Warning |
| Minor Warning | Warning |
| Informational | Harmless |
5.1.3 Class Name Mapping
The TEC event class name is set based on the Enterprise Manager event target type value. The following table shows the values used when creating the event in TEC.
| When the Enterprise Manager event target type is … | Set the TEC event class name to … |
|---|---|
| Database Instance | Database |
| Cluster Database | Database |
| Database Listener | Listener |
| Host | Host |
| Oracle Application Server | Application Server |
| All Other Values | Oracle Enterprise Manager |
5.2 Customizing Event Templates
Although the default mappings are sufficient for most implementations, you can change them as needed. The following sections discuss:
It is assumed that you already have a good understanding of XSL.
For reference information on the default mappings, see Appendix A, "Customizing IBM TEC."
5.2.1 XML Format of Oracle Enterprise Manager Events
Example 5-1 shows the format that the Oracle Enterprise Manager Connector Framework provides when an event is created or updated in Oracle Enterprise Manager.
Example 5-1 XML Format of Events
<EMEvent xmlns="http://xmlns.oracle.com/sysman/connector">
  <ExternalEventID/>
  <SystemAttributes>
    <EventClass/>
    <OccurredDate/>
    <ReportedDate/>
    <EventName/>
    <Severity/>
    <SeverityCode/>
    <SourceInfo>
      <TargetInfo>
        <TargetName/>
        <TargetTypeLabel/>
        <TargetProperty>
          <Name/>
          <Value/>
        </TargetProperty>
      </TargetInfo>
    </SourceInfo>
    <Message/>
    <EventURL/>
  </SystemAttributes>
  <EventContextAttributes>
    <NumberAttribute>
      <Name/>
      <Value/>
    </NumberAttribute>
    <StringAttribute>
      <Name/>
      <Value/>
    </StringAttribute>
  </EventContextAttributes>
</EMEvent>
Table 5-1 provides a description of the fields shown in Example 5-1.
Table 5-4 Field Descriptions for XML Format
| Field | Description |
|---|---|
|
ExternalEventId |
Unique identifier of the event in TEC. This will only be set for updates |
|
EventClass |
Identifies the type of event |
|
OccurredDate |
Date/time the event occurred |
|
ReportedDate |
Date/time the event was reported by OMS |
|
EventName |
Descriptive name of the event |
|
Severity |
Severity of the event: Fatal, Critical, Warning, Minor_Warning, Informational, or Clear |
|
SeverityCode |
Severity code for the event: FATAL, CRITICAL, WARNING, MINOR_WARNING, INFORMATIONAL, or CLEAR |
|
TargetName |
Target name that is a unique instance of the target type |
|
TargetTypeLabel |
Display name of the target type for which the event was generated |
|
TargetProperty |
Additional target properties that do not have a specific field in the event model (name:value pair) |
|
Message |
Description of the event |
|
EventURL |
Link to the web page for the event |
|
EventContextAttributes |
Additional event properties that do not have a specific field in the event model (name:value pair) |
5.2.2 Managing Templates in Oracle Enterprise Manager 12c
Oracle Enterprise Manager 12c (Release 12.1.0.2 and later) includes the functionality to allow you to manage templates within Cloud Control. Templates, which are included as part of the connector installation, are automatically registered and are shown within Enterprise Manager.
If you need to use new a template that is not included as part of the connector installation, then you will need to register it using the emctl command. See Changing a Mapping for more information. Once you have registered the template, you will be able to manage it through Enterprise Manager.
Using Enterprise Manager, you can edit a template, view the XML code, delete a template, and restore a deleted template.
To begin:
-
Log in to Enterprise Manager Cloud Control.
-
From the Setup menu, select Extensibility, then Management Connectors.
-
On the Management Connectors page, select the IBM TEC Connector. Click Configure.
-
On the Configure Management Connector page, click the Template tab.
Note:
This feature is available on Oracle Enterprise Manager Release 12.1.0.2.0 or later only. To verify your installed release version:-
Log in to Enterprise Manager.
-
From the Help menu, select About Cloud Control.
-
The pop-up window displays the installed version of Oracle Enterprise Manager.
5.2.2.1 Edit a Template with Enterprise Manager
To edit an existing template:
-
Log in to Enterprise Manager Cloud Control.
-
From the Setup menu, select Extensibility, then Management Connectors.
-
On the Management Connectors page, select the IBM TEC Connector. Click Configure.
-
On the Configure Management Connector page, click the Template tab.
-
Select a template and click Edit.
-
After you edit the Description or Template Contents fields, click Save. On the confirmation page, click Yes to complete the template save.
5.2.2.2 View Template Code in Enterprise Manager
To view template code:
-
Log in to Enterprise Manager Cloud Control.
-
From the Setup menu, select Extensibility, then Management Connectors.
-
On the Management Connectors page, select the IBM TEC Connector. Click Configure.
-
On the Configure Management Connector page, click the Template tab.
-
Select a template and click View.
The event templates are in XSLT format. A basic knowledge of XSLT is required to understand the code.
5.2.2.3 Delete a Template with Enterprise Manager
To delete a template:
-
Log in to Enterprise Manager Cloud Control.
-
From the Setup menu, select Extensibility, then Management Connectors.
-
On the Management Connectors page, select the IBM TEC Connector. Click Configure.
-
On the Configure Management Connector page, click the Template tab.
-
Select a template and click Delete.
-
Click Yes to confirm the delete operation.
5.2.2.4 Restore a Deleted Template with Enterprise Manager
To restore a deleted template:
-
Log in to Enterprise Manager Cloud Control.
-
From the Setup menu, select Extensibility, then Management Connectors.
-
On the Management Connectors page, select the IBM TEC Connector. Click Configure.
-
On the Configure Management Connector page, click the Template tab.
-
Select a template and click Restore.
-
Click Yes in the confirmation page that appears in order to restore.
Note:
You can restore out-of-box templates that you have may edited or customized to their default values. You cannot restore new templates that you have created (using theemctl register_template command) described in Registering Templates.5.2.3 Changing a Mapping
This section explains how to customize the mapping between Enterprise Manager and the IBM TEC web service. The procedure provides the steps required for changing a mapping.
-
Export the default template XSLT files from Enterprise Manager to use as a baseline. Follow the instructions in Exporting the Template Files to obtain copies of the default template files.
-
Copy the XSL file you want to change to a new file to hold the custom template.
-
Make the desired mapping changes to the template file. See Modifying Templates for guidance on mapping changes.
-
Register the new template with Enterprise Manager as specified in Registering Templates.
The files are now ready for integration. You do not need to stop and start the OMS. The changes will automatically be picked up.
See Template Customization Example for an example of how to customize templates.
5.2.3.1 Exporting the Template Files
The connector installation jar file is included in the Self Update archive that was installed in Installing the Connector in Enterprise Manager. To extract the installation file, perform the following steps.
-
Determine the command required to export the adapter installation file. To do this, perform the following steps:
-
From the Enterprise Manager console, click Setup.
-
Select Extensibility in the pane.
-
Select Self Update, then click Management Connector.
-
Click the TEC connector, then select Export from the Actions list.
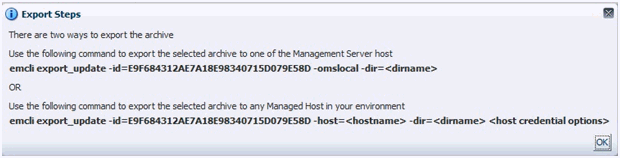
A popup window appears with the command required to export the file. See Figure 5-1 below for an example of the popup window.
-
-
Open a command window on the Management Server host machine and navigate to a temporary directory where the file can be copied.
-
Log into emcli using the following command. You will be asked to provide the password information for the sysman account.
emcli login -username=sysman -
Run the emcli export_update command from your system, changing <dirname> to the full path of the temporary directory.
A zip file will be created. The file name will be comprised of the id value specified in the export_update command with a .zip extension. In the example command in Figure 5-1, the zip file name would be E9F684312AE7A18E98340715D079E58D.zip
-
Extract the connector installation jar file from the zip file using the following command.
unzip *.zip archives/*connector.jar -
Extract the templates from the connector jar file using the following command:
$JAVA_HOME/bin/jar xf archives/*.jar createEvent_request.xsl updateEvent_request.xslNote:
If the system where the connector file is located does not have the JDK installed, you cannot extract the jar file contents. You must copy the jar file to a system that has the JDK installed and transfer the template files after they have been extracted.
5.2.3.2 Modifying Templates
A template is an XSLT file that transforms an input XML format to an output XML format. To make the mapping changes, you need to understand the input XML format being transformed and the output XML being generated by the template. The input document is the XML document that contains the Enterprise Manager event information. The output document is the request being sent to the TEC web service. The output XML document must conform to the data format specified in the TEC EventService WSDL.
Appendix C contains details on the format of the event data generated by Enterprise Manager. Appendix D contains details on the XML format required by the TEC EventService web service. Section A.1.1, "Mappings Between XML Format and Event Field Names" provides the mapping between the TEC EventService web service fields and the slot names in TEC. Listed below are the steps you should follow to modify the template file.
-
Review Section A.1.1, "Mappings Between XML Format and Event Field Names" and Appendix D to identify the names of the fields in the TEC web service that you are planning to modify. For example if you wanted to populate the source slot in TEC, look the field up in Section A.1.1 and you would see that the TEC web service expects the data in the /create/event/source/name XML path.
-
If you are planning on using data from the event, review Appendix C to identify the field(s) you want to use in the mapping. Appendix B has sample transactions that could be very helpful in identifying what data is present in the XML document from Enterprise Manager.
-
Open the custom template file in a text editor or a utility that can be used to build XSLT files.
-
Make the necessary changes to the custom template file and save.
-
Unless the change is very simple, you should test the changes that you have made using the sample data from Appendix B. This will require a utility that performs XSLT translations.
5.2.3.3 Registering Templates
You must reregister your customized templates before they are recognized in Enterprise Manager.
For each customized template, run the following emctl register_template connector command as a user with execute privilege on emctl and the ability to read the template:
$ORACLE_HOME/bin/emctl register_template connector
-t <template.xsl> -repos_pwd <reposPassword>
-cname <connectorName> -iname <internalName>
-tname <templateName> -ttype 2 [-d <description>]
Where:
<template.xsl> is the full pathname of the template file
<reposPassword> is the Enterprise Manager root (SYSMAN) password
<connectorName> is the name of the connector instance installed in step 5 of section 3.1 ”Creating a Connector Instance”.
<internalName> is the internal name to use for the template
<templateName> is the name to display for the template
<description> is the description of the template
For example: This command updates the createEvent template for the connector instance with the name of ”TEC”:
emctl register_template connector
-t /home/oracle/customized_templates/createEvent_request.xml
-repos_pwd sysmanpass
-cname "TEC"
-iname "createEvent"
-tname "Create Event Request"
-ttype 2
-d "Demo template"
Note:
The createEvent_request.xml is the name of the default create template. You can choose a different name by copying the createEvent_request.xml file contents to a file with a name of your choosing.5.2.3.4 Template Customization Example
By default, the origin slot in the IBM TEC event is set to the Oracle Enterprise Manager target type, and the sub_origin slot is set to the target name. The following example shows how to change the value where the target type and name information is placed in TEC. In this example, the target_type and target_name slots were added to the class definition to contain this information.
The changes made to the default mapping are as follows:
-
The origin slot is modified to use a hard-coded value of Oracle Enterprise Manager.
-
The sub_origin slot is not set to any value.
-
The new target_type slot is set to the Oracle Enterprise Manager target type.
-
The new target_name slot is set to the Oracle Enterprise Manager target name.
-
Navigate to the Management Connector Updates page and export the TEC Connector. Copy the first emcli command listed in the Export Steps window for later use.
emcli export_update -id=DD4E9161C5E7129F9641447FB4F0497B -omslocal -dir=<dirname> -
Open a command window on the OMS server machine and change the working directory to the temporary directory.
cd /home/oracle/customized_templates -
Log into emcli.
emcli login -username=sysman -
Run the emcli command from Step 1 to export the zip file to the temporary directory.
emcli export_update -id=DD4E9161C5E7129F9641447FB4F0497B -omslocal -dir=/home/oracle/customized_templates -
Extract the connector jar file from the zip file.
unzip *.zip archives/*connector.jar -
Extract the template files from the jar file. This command will extract the createEvent and updateEvent template files.
$JAVA_HOME/bin/jar xf archives/*.jar createEvent_request.xsl updateEvent_request.xsl -
Make a copy of the createEvent_request.xsl file and name it custom_createEvent_request.xsl
-
Make a copy of the updateEvent_request.xsl file and name it custom_updateEvent_request.xsl.
-
Open the custom_createEvent_request.xsl file in your text editor.
-
Change the appropriate sections to reflect the new mapping.
Before Changes
The code below shows the impacted sections in the file before the changes.
<source>
  <!-- TEC slot = source -->
  <name>OracleEnterpriseManager</name>
  <!-- TEC slot = origin -->
  <computerName><xsl:value-of select="a:SystemAttributes/a:SourceInfo/a:TargetInfo/a:TargetTypeLabel"/></computerName>
</source>
…
<extended-fields>
  <!-- TEC fields that are not mapped to the common object model -->
  <string-field name="action_flag">CREATE</string-field>
  <string-field name="ext_id"> <xsl:value-of select="a:SystemAttributes/a:SequenceID"/></string-field>
  <string-field name="sub_source">OracleEnterpriseManager</string-field>
  <string-field name="sub_origin"><xsl:value-of select="a:SystemAttributes/a:SourceInfo/a:TargetInfo/a:TargetName"/></string-field>
</extended-fields>

After Changes
The code below shows the Extended Fields section in the file after the changes. The changes are shown in bold.
<source>
  <!-- TEC slot = source -->
  <name>OracleEnterpriseManager</name>
  <!-- TEC slot = origin -->
  <computerName>Oracle Enterprise Manager</computerName>
</source>
…
<extended-fields>
  <!-- TEC fields that are not mapped to the common object model -->
  <string-field name="action_flag">CREATE</string-field>
  <string-field name="ext_id"><xsl:value-of select="a:SystemAttributes/a:SequenceID"/></string-field>
  <string-field name="sub_source">OracleEnterpriseManager</string-field>
  <string-field name="target_type"><xsl:value-of select="a:SystemAttributes/a:SourceInfo/a:TargetInfo/a:TargetType" /></string-field>
  <string-field name="target_name"><xsl:value-of select="a:SystemAttributes/a:SourceInfo/a:TargetInfo/a:TargetName" /></string-field>
</extended-fields>
-
Save your changes after making the updates.
-
Open the custom_updateEvent_request.xsl file and make the same changes. In this case, you cannot just cut and paste the Extended Fields section because there are differences between the create and update translations. You must edit them separately.
-
Save your changes after making the updates.
-
To set up for testing, create the create.xml and update.xml files and open them in a text editor.
-
Copy the contents of the XML document in the ”Create Sample” section of Appendix B into the create.xml file and save.
-
Copy the contents of the XML document in the ”Update Sample” section of Appendix B into the update.xml file and save.
-
Test the new templates using a utility that performs XSLT translations using each of the create.xml and update.xml files as the input XML document.
-
Examine the output XML document and verify the results are correct.
Note:
You can also use an XML client to send the XML output document to the TEC web service to verify that it is a format accepted by the web service. -
If the XML document has problems, make any necessary corrections and repeat Steps 17 and 18.
-
At the OMS server system, run the following command to reregister your customized createEvent template.
emctl register_template connector
-t /home/oracle/customized_templates/custom_createEvent_request.xsl
-repos_pwd sysmanpass
-cname "TEC R2"
-iname "createEvent"
-tname "Create Event Request"
-ttype 2
-d " This is the customized request xsl file for the createEvent method"
-
At the OMS server system, run the following command to reregister your customized updateEvent template.
emctl register_template connector
-t /home/oracle/customized_templates/custom_updateEvent_request.xsl
-repos_pwd sysmanpass
-cname "TEC R2"
-iname "updateEvent"
-tname "Update Event Request"
-ttype 2
-d " This is the customized request xsl file for the updateEvent method"