3 Configuring the Connector
This chapter provides the following information for setting up and configuring the CA Service Desk Connector and related tasks:
3.1 Creating a Connector Instance
To create a connector instance:
-
From the Setup menu of the Enterprise Manager console, select Extensibility, then Management Connectors.
-
Select a connector from the Create Connector drop-down list, and then click Go.
Note:
See Chapter 1, "Introduction to the Connector" for information about which CASD connector to select. -
Enter the connector name and description on the next page, then click OK.
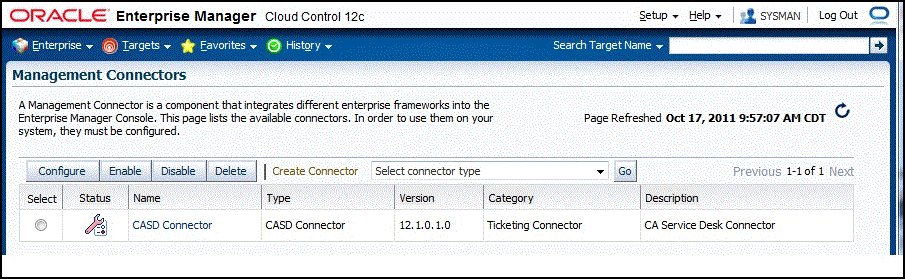
The connector instance appears as unconfigured in the Management Connectors page, as shown in Figure 3-1.
3.2 Configuring the Connector
To perform a basic configuration:
-
Click on the name of the CA Service Desk Connector.
The General tab of the Configure Management Connector page appears, as shown in Figure 3-2.
-
Provide the required settings. See Section 3.4, "Providing General Settings" for details.
-
Click OK.
The Management Connectors page reappears. The row for the CA Service Desk Connector should have a check mark in the Configured column.
-
Optionally, you can click the configure icon again to check for the available ticket templates.
-
Click the Ticket Templates tab.
All out-of-box ticket templates should appear in the table.
If you choose HTTPS as the protocol to establish a connection between CASD and Enterprise Manager, see Section 7.3, "Importing the Adapter Certificate into Enterprise Manager".

3.3 Enabling or Disabling the Connector
You can enable or disable a connector from the Management Connectors page by selecting the connector and clicking either Enable or Disable. After a connector is disabled, a red cross icon appears under the status column. By default, the connector instance is enabled as soon as it is configured.
Note:
Only enabled connectors are available for ticketing operations.3.4 Providing General Settings
The following sections explain how to provide various configuration details.
3.4.1 Connection Settings
The CA Service Desk Connector communicates with the Service Desk through a web service provided by the CASD Adapter. All fields are mandatory.
-
Web Service End Points - End points to createTicket, updateTicket, and getTicket web services exposed by the CASD Adapter. See "Using the Correct URL for CASD Adapter Operations" in Appendix A for additional information.
-
CASD Adapter Username - User name that was configured for accessing the Adapter web service in step 10 of the appropriate adapter installation section
(Section 2.4.2.1 for Unix and Section 2.4.3.1 for Windows). -
CASD Adapter Password - Password that was configured for accessing the Adapter web service in step 11 of the appropriate adapter installation section
(Section 2.4.2.1 for Unix and Section 2.4.3.1 for Windows). -
Ticket Number - Enter a required valid ticket number to test the connection when you save the configuration.
-
If you specify the correct Web service end points and enter a valid ticket number, the following message appears on the Management Connectors page after you click OK:
Connection test succeeded. The configuration was saved.
-
If you have not previously saved the connector configuration and enter incorrect Web service endpoints or an invalid ticket number, the following message appears on the Management Connectors page after you click OK:
Connection test failed. The configuration was saved.
-
If you have not previously saved the connector configuration and enter incorrect Web service endpoints or an invalid ticket number, the following message appears on the Management Connectors page after you click OK:
Connection test failed. The configuration was not saved.
-
3.4.2 Web Console Settings
Web Console settings are required if you want the Connector to provide links to CA Service Desk tickets created by Enterprise Manager in the context of an incident.
To enable this functionality, provide the following Web console settings.
-
Enable Web Console - Check this box to launch the CASD ticket page within the context from Enterprise Manager.
-
CASD Server Port - Port number used by the CASD server for the web console.
-
CASD Server Host - Host name or IP address of the CASD server that hosts the web console.
3.4.3 Grace Period
You can enable and disable the grace period and configure its value. By default, the grace period is disabled. See Section 1.4, "Grace Period" for details. This setting applies to all incidents the CA Service Desk Connector processes.
3.4.4 Retry Option
You can enable and disable the Retry option and configure its interval, which is an integer value in hours. By default, the Retry is disabled. See Section 1.5, "Retry" for details. This setting applies to all incidents the CA Service Desk Connector processes.
3.5 Working with Ticket Templates
When a connector instance is created in Enterprise Manager, all associated templates are available for ticket create/update operations. For Auto Ticketing, a notification method is created based on the ticket template selected while creating an incident rule. For manual ticketing, a ticket template is selected while creating a ticket from the Enterprise Manager console.
There are two default templates for the CASD Connector:
-
CASD_Default_Incident_AutoClose.xsl
-
CASD_Default_Incident.xsl
Tip:
See Section 5.1, "Understanding the Template Process" for detailed information about these templates.3.6 Changing Web Service Credentials
Sometimes problems occur when accessing the web service, because the credentials provided are incorrect. Whenever this happens, you receive an HTTP 403 error from the web service. You first want to check the specified credentials and verify that you entered the correct information. If the credentials you have specified appear to be correct, but you still receive the 403 error, the best option is to reset the web service credentials.
Perform the following steps to reset the web service credentials:
-
Open a command prompt window and change the working directory to:
<CASD_ADAP_INSTALL>/adapters/conf
... where <CASD_ADAP_INSTALL> is the installation directory for the CASD connector.
-
Enter the following command to change the user name and password for accessing the CASD web service:
../bin/propertiesEditor.sh –h
framework.username=”<username>” –e
framework.password=”<password>” framework.properties
… where <username> is the user name to specify for the web service and <password> is the password.
The propertiesEditor.sh script is specifically for the UNIX platform. The equivalent script for Windows platforms is propertiesEditor.bat.
-
Stop and then start the web service as instructed in Section 2.4.2, "Installing and Running the CASD Adapter on Unix" and Section 2.4.3, "Installing and Running the CASD Adapter on Windows".