4 Creating JD Edwards EnterpriseOne BI Publisher Report Definitions
This chapter contains the following topics:
-
Section 4.1, "Understanding JD Edwards EnterpriseOne BI Publisher Report Definitions"
-
Section 4.5, "Managing BI Publisher Objects in Object Management Workbench"
-
Section 4.6, "Configuring BI Publisher Objects for Object Management Workbench"
4.1 Understanding JD Edwards EnterpriseOne BI Publisher Report Definitions
Report definitions specify the information that BI Publisher requires to process and deliver BI Publisher output. The details in a report definition include:
-
The UBE and optional version to use as the data source.
-
Associated templates, transformations, and localizations.
-
Output types.
-
Language options.
-
Bursting options.
-
Delivery options.
You use the BI Publisher Report Definitions application (P95620) to create, update, copy, and delete report definitions. After a report definition is created, it can be submitted to BI Publisher to produce the defined output types.
Note:
Before creating a report definition, ensure that the necessary templates have been created and uploaded into the BI Publisher Object Repository (P95600).See Chapter 3, "Creating JD Edwards EnterpriseOne Embedded BI Publisher Objects".
4.2 Creating BI Publisher Report Definitions
This section provides an overview of the report definition process and discusses how to:
-
Define the source of data, template names, and transformations.
-
Define languages and output types.
-
Define bursting and delivery options.
4.2.1 Understanding the Report Definition Process
Although the BI Publisher Report Definitions application (P95620) is available on both the web client and the Microsoft Windows client, you must use the Microsoft Windows client to create a new report definition or to modify an existing report definition.
Adding a report definition is a three-step process. The first step consists of entering the required details for the report definition and defining the source of data and the templates to process. Additionally, if a template uses one or more transformations, they are defined in this step.
Second, you define the output types that a user can select when submitting the report definition. You also define the default output types and default languages for the XML output.
In the third step, you define the optional bursting field for the report definition, as well as the delivery options for the output. A report definition must comply with the following conditions to allow bursting to be configured:
-
Templates of type TL (Microsoft Excel) and TS (XSL) cannot be used.
-
A transformation cannot be used.
-
Microsoft PowerPoint and XML output types cannot be used.
4.2.2 Forms Used to Create BI Publisher Report Definitions
| Form Name | FormID | Navigation | Usage |
|---|---|---|---|
| BI Publisher Report Definitions | W95620A | On JD Edwards Solution Explorer EnterpriseOne Life Cycle Tools task view, select Report Management, BI Publisher, Report Definitions or enter P95620 in the Fast Path field. field. | Select a BI Publisher report definition. |
| Add Report Definition | W95620C | Click Add on the BI Publisher Report Definitions form. | Add a report definition. |
| Add Report Definition-Languages and Output Types | W95620H | Click Next on the Add Report Definition form. | Define available output types, default output types, and default languages. |
| Add Report Definition-Bursting and Delivery | W95620J | Click Next on the Add Report Definitions-Languages and Output Types form. | Define an optional bursting field for the report definition, and delivery details for the output. |
| Update Report Definition | W95620C | On the BI Publisher Report Definitions form, select a record in the grid and then click Select.
On the Update Report Definition form, from the Form menu select Output/Languages or Burst/Delivery to update the desired options. |
Update a report definition. |
4.2.3 Report Definition Naming Conventions
Report definition names can be a maximum of 10 characters and should be formatted as RDwwwxxxxyy, such as RD743005A where:
RD = Report definition template
www = Three characters for the system code
xxxx = Three to four characters to identify the associated UBE. For example, use 3005 if the source UBE is R743005)
yy = One to two sequential characters to identify the different report definitions associated with the same UBE, for example RD743005A and RD753005B.
4.2.4 Defining Source of Data, Template Names, and Transformations
Access the Add Report Definition form.
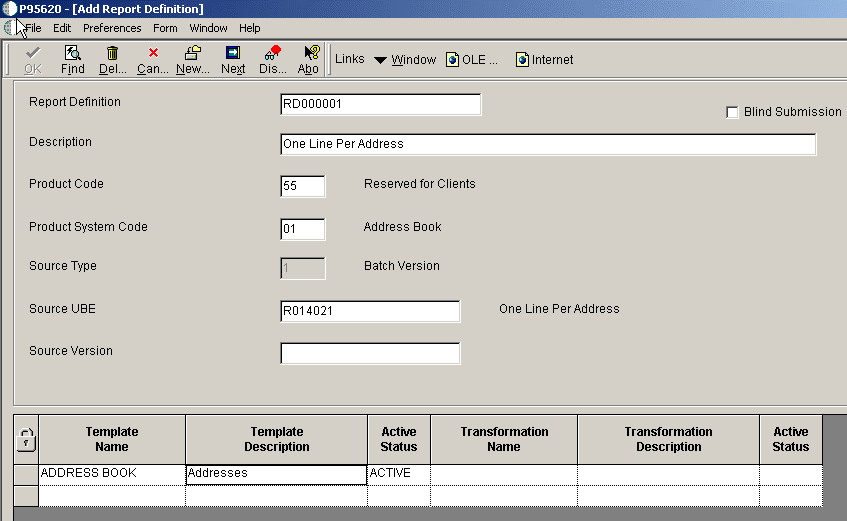
- Report Definition
-
Enter the name of the report definition, using a maximum of 10 characters and should be formatted as RDwwwxxxxyy, such as RD743005A. Oracle recommends that report definition names start with the letters RD.
- Description
-
Enter a meaningful description for the report definition.
- Product Code
-
Select a product code from the 55–59 client reserved range.
- Product System Code
-
Select a product code that indicates where the reporting data resides.
- Source Type
-
The source type (user-defined code (UDC) H95|RY) appears automatically and is based on the source type of the data that the report definition uses.
- Source UBE
-
Enter the name of the Report Design Aid (RDA) report template that is used to generate data for the report definition.
You can also use a subsystem report, such as R42520/XJDE0006, Print Pick Slips - Subsystem, as the source UBE and version for a report definition. Subsystem reports are batch processes that continually run independently of, but asynchronously with, JD Edwards EnterpriseOne applications. Subsystem reports offer many advantages, such as the elimination of startup time, one-time initialization of environment and specifications, and better utilization of the processor on the server.
For information about subsystem jobs, see "Working with Subsystem Jobs" in the JD Edwards EnterpriseOne Tools Report Design Aid Guide.
- Source Version
-
(Optional) Enter the name of a version only if the report definition is limited to one version of the UBE. If a version is not specified, the user will have to select a version at submission time.
- Blind Submission
-
(Optional) Leave this option blank to prompt the user with the available output, delivery, and language options when submitting the report definition to BI Publisher. If blind submission is selected, the user is not allowed to change the report definition options when submitting the report definition.
- Template Name
-
Enter the name of the template that you want to associate with the report definition.
- Template Description
-
The template description appears automatically and cannot be changed.
- Active Status
-
Active Status is determined by the effective dates of the template. The status appears automatically and indicates whether the template is active or inactive.
- Transformation Name
-
(Optional) Enter the name of the transformation that you want to associate with the report description.
- Transformation Description
-
The transformation description appears automatically and cannot be changed.
- Active Status
-
Active Status is determined by the effective dates of the transformation. The status appears automatically and indicates whether the transformation is active or inactive.
After entering the required report definition details, click Next to move to the Languages and Output Types form.
4.2.5 Defining Languages and Output Types
Access the Languages and Output Types form.
Figure 4-2 Report Definition-Languages and Output Types form
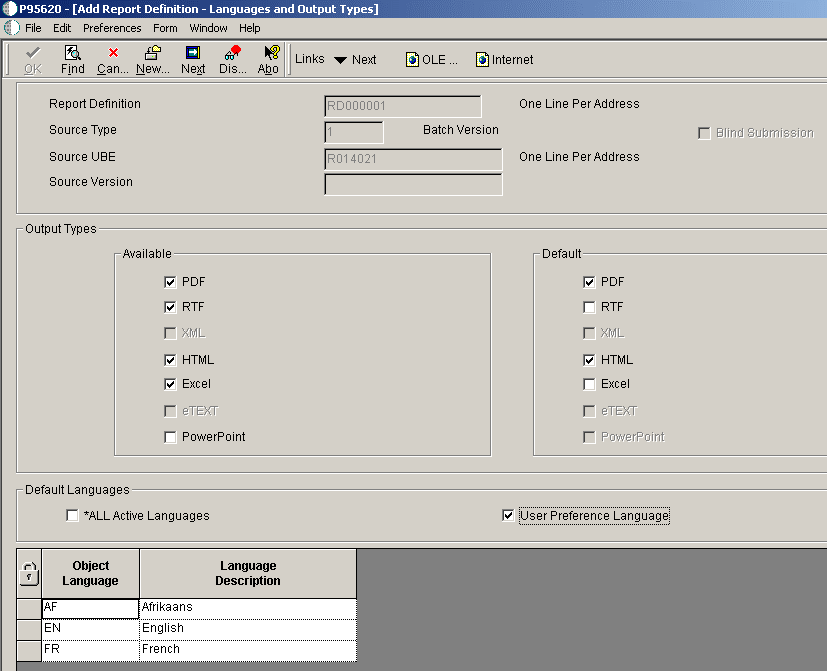
Description of "Figure 4-2 Report Definition-Languages and Output Types form"
Note:
The templates, translations, and localizations that are attached to the report definition determine the languages that appear in the Object Language column.- Available Output Types
-
Select the output types to be available to users when they are submitting the report definition. The type of template attached to the report definition determines which output types are available.
- Default Output Types
-
Select the default output types that will be selected when the report definition is submitted. Default output types are not enabled unless they are first defined as available output types. If the report definition is defined as blind submission, the default values indicate the type of output that will be produced when the report definition is submitted to BI Publisher.
Note:
When you run a report definition, the system does not automatically generate a PDF. - *ALL Active Languages
-
If this option is selected, all languages for the defined templates, localized templates, and translations that are active will process when a report definition is submitted to BI Publisher. Languages associated with the templates are displayed in the grid.
- User Preference Language
-
If this option is selected, when a report definition is submitted to BI Publisher and the sign on user's language preference has been defined, the language preference for the sign on user is processed. A user's language preference is defined in the user's system profile. The User Preference Language option is not enabled if *ALL Active Languages is selected.
- Object Language
-
A code that indicates the language defined for a template, localization, or translation.
- Language Description
-
A description of the language code assigned to a template, localization, or translation.
The output types available depend on the type of template that is used, as described in this table:
| Template Type | Output Type |
|---|---|
| RTF | PDF, RTF, Excel, HTML |
| EFT/EDI (eText) | eText |
| Excel | Excel |
| XSL | XML |
After defining the output types and languages, click Next to move to the Add Report Definition-Bursting and Delivery form.
4.2.6 Defining Bursting and Delivery Options
The Update Report Definition - Bursting and Delivery form contains the following two tabs:
-
Bursting/Delivery
-
Override Output File Name
Access the Bursting/Delivery tab in the Update Report Definition - Bursting and Delivery form.
Figure 4-3 Update Report Definition - Bursting/Delivery form
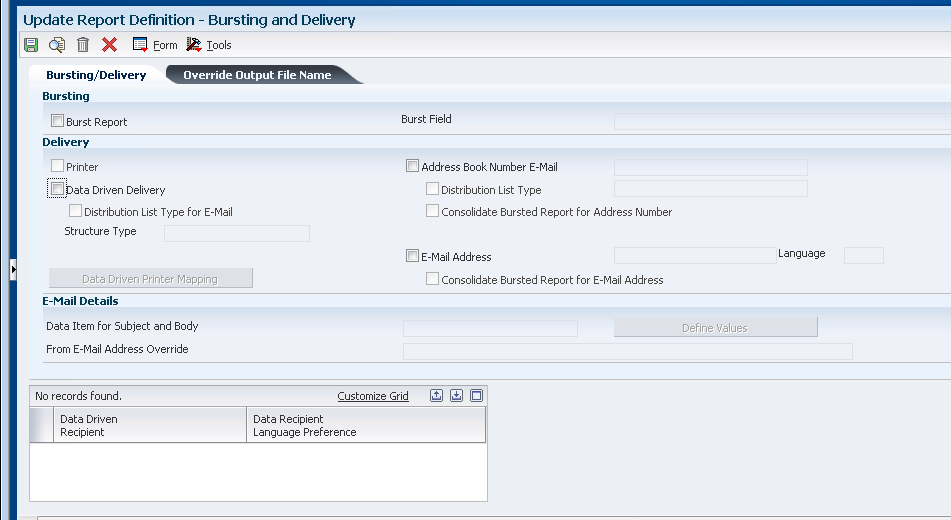
Description of "Figure 4-3 Update Report Definition - Bursting/Delivery form"
- Burst Report
-
(Optional) Select this option if bursting will be performed for a report definition.
- Burst Field
-
A report definition can burst on any level break section defined within the batch or report version that is used as its source of data. Typically, when you burst a report, you break on a level break header section. The field must contain the complete XPath as it appears in the XML data output that was created from the batch process.
- Printer
-
Select this option to direct output to a static printer, which is the default printer assigned to a combination of a user/role, a report, a version, a host, and an environment in the Printers application (P98616). Selecting this option directs all report definition PDF output to the default printer.
- Address Book Number E-Mail
-
Select this option to deliver output to the email address that is associated with a specific Address Book number. When a report definition is submitted to BI Publisher, all output produced is sent to the email address.
- Distribution List Type
-
Select this option to deliver output to all members of the distribution list type who are associated with the provided Address Book number. If the distribution list type is not entered, the output is sent to the primary email address associated with the Address Book number.
- Consolidate Bursted Report for Address Number
-
Select this option to deliver all the bursted output in a single report to the email address associated with the provided Address Book number.
- E-Mail Address
-
Select this option to deliver output to a specific email address. When the report definition is submitted to BI Publisher and an email delivery address has been defined, all output produced is sent to the defined email address.
- Language
-
Select the language in which you want the output delivered.
- Consolidate Bursted Report for E-Mail Address
-
Select this option to deliver all the bursted output in a single report to the email address.
- Data Driven Delivery
-
Select this option to deliver the output to email recipients and printers based on data generated by the source batch version or report version.
- Distribution List Type for Email
-
Select this option to deliver output to all members of a distribution list and distribution list type that are associated with the data. If the distribution list type is not entered, the output is sent to the primary email address associated with the Address Book number.
- Data Driven Printer Mapping (Release 9.1 Update 3)
-
Select this option to enable a report definition to send output to specific printers based on data generated by the source batch version or report version.
- Data Item for Subject and Body
-
(Optional) Specify a data dictionary glossary item for the subject and body of the delivery email.
- From E-Mail Address Override
-
Specify an alternate email address if you want to override the from email address for the delivery email.
- Data Driven Recipient
-
(Optional) To deliver the report definition output to recipients or printers as determined by the data from a particular item within the XML output, specify the XPath field that contains the recipient data.
- Data Recipient Language Preference
-
(Optional) Select this option if you want to deliver the report definition output to the recipients determined by the language preference within the XML output. The field must contain language data from the 01/LP or the H95/XL UDCs (User Defined Code).
After defining bursting and delivery details, click End to save the report definition and exit.
Access the Override Output File Name tab in the Update Report Definition - Bursting and Delivery form:
Figure 4-4 Update Report Definition - Override Output File Name form
Description of "Figure 4-4 Update Report Definition - Override Output File Name form"
- Override Output File Name
-
Select this option to customize the name of the output file from a report definition.
See Section 4.2.10.1, "Customizing Report Definition Output File Name"
4.2.7 Data Driven Delivery
In addition to the options to send report definition output to static printers and specific email addresses, you can direct output to recipients and printers based on an XPath field from the XML data. For bursted reports, the XPath value could be different for each recipient, depending on which XPath is used.
Three different combinations are possible with data driven delivery:
-
Data driven email only.
-
Data driven printers only.
-
Both data driven email and printers.
The system handles email to address book number and distribution list types differently than other recipient values. Data driven delivery for address book numbers and distribution lists relies on existing JD Edwards EnterpriseOne address book functionality. As a result, you only need to enter an XML field that contains address book numbers (such as <AddressNumber_ID1>) as the data driven recipient for report definition output.
In the case of data driven delivery to printers, you must first create a relationship between an appropriate XML field (such as <Company_ID5>, <CostCenter_ID7>, etc.) and a printer delivery mapping name. The XML field is also known as a delivery tag. Once the mapping name has been created, you associate different XML field values with the desired printer delivery name and assign a printer device to each field value as required. (Release 9.1 Update 3)
To use both data driven email and data driven printer delivery for the same report definition submission, you must create a custom report variable (RV) in Report Design Aid and populate it with either an address book number (for email delivery) or an appropriate XML field (such as <Company_ID5>, <CostCenter_ID7>, etc.) for printer delivery. You would then enter the custom delivery tag as the delivery tag in the Report Definitions Printer Mapping application (P95621).
See Section 4.2.7.3, "Combined Data Driven Email and Data Driven Printing (Release 9.1 Update 3)"
4.2.7.1 Data Driven Email
If you select the Data Driven Delivery option for report definition output, you can direct output to address book numbers contained in the XML field (such as AddressNumber_ID1) that you enter in the Data Driven Recipient grid on the Bursting and Delivery form. Additionally, if you specify a burst field, many different reports can be created from one report definition submission.
A report definition can burst on any level break section defined within the batch or report version that is used as its source of data. Typically, when you burst a report, you break on a level break header section. You enter the complete XPath of the tag that defines the level break section (as it appears in the XML data output) in the Burst Field on the Bursting and Delivery form.
The level break section can contain an email recipient in one of the following formats:
-
An address book number for an individual or a distribution list.
-
An SMTP email address.
-
An SMTP distribution list.
Data driven email delivery requires that email addresses be set up correctly in the Address Book application (P01012).
For external email, JD Edwards EnterpriseOne provides an integrated mail system that is able to send messages to external email addresses. The system uses the Simple Mail Transfer Protocol (SMTP) to do this. SMTP is a TCP/IP protocol for sending messages from one computer to another on a network. SMTP is used on the internet to route messages.
In addition to having address book email addresses, data driven email delivery to external email addresses requires changes to the JDEMAIL section of the JDE.ini file, so that JD Edwards EnterpriseOne can communicate with the mail server.
See "Setting Up External Mail Access" in the JD Edwards EnterpriseOne Tools Workflow Tools Guide
4.2.7.1.1 Defining Data Driven Email Recipients
Access the Report Definition application (P95620).
-
Select a report definition in the grid, and then click the Select button.
Note:
If you are adding a new report definition, you can define a data driven email recipient on the Bursting and Delivery form, as described below. -
On the Update Report Definition form, from the Form menu, select Burst/Delivery.
-
(Optional) If you want to burst the report, enter an XPath from the XML output in the Burst Field.
-
In the Delivery section, click the Data Driven Delivery checkbox.
-
(Optional) Enter a distribution list type if you want to send
the output to a distribution list.
-
In the Data Driven Recipient column, enter an XPath from the XML output that contains the recipient data.
-
Click OK to save the data driven email information.
4.2.7.2 Data Driven Printers (Release 9.1 Update 3)
If you select the Data Driven Delivery option for report definition output, you can direct the output to specific printers based on an XPath field (a delivery XML tag) from the XML data. For bursted reports, the XPath field value could be different for each recipient, depending on which XPath is used.
Clicking the Data Driven Printer Mapping button launches the Data Driven Printing form. The value in the Delivery Tag column is passed into the Data Driven Printing form from the data driven recipient that you select on the Bursting and Delivery form. You can change the delivery tag on the Data Driven Printing form if necessary, or enter a new delivery tag from the XML data
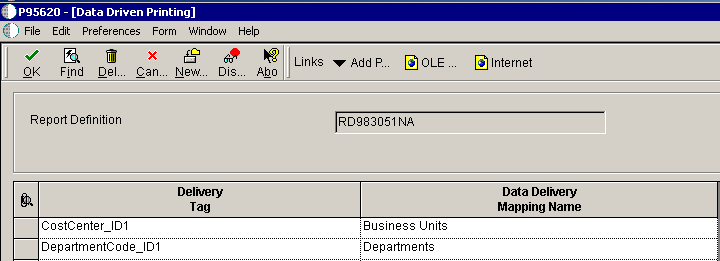
You use the Data Driven Printing form to associate a delivery tag with a printer delivery mapping name, as shown in the following example:
Description of the illustration printer_mapping_f95627.gif
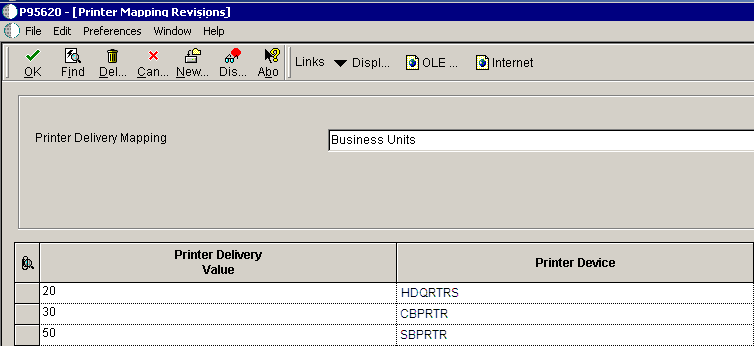
After the delivery tag has been assigned to a data delivery mapping name, you can associate printer delivery values and their respective printers to the data delivery mapping name. To do this, select Add Printer Mapping from the Form menu on the Data Driven Printing form to access the Printer Mapping Revisions form. You can enter a printer in the Printer Device column, or you can use the visual assist to select a printer name.
Description of the illustration printer_mapping_f95628.gif
You can also add, modify, or delete report definition mapping records in the Report Definition Printer Mappings application (P95621).
The Report Definition Printer Mappings application (P95621) uses two tables for the printer mapping records. The tables define the relationship between the data and the printer devices.
-
XMLP Report Definition Data Map (F95627)
The F95627 table contains the XPath field from the report definition source XML and the printer mapping name for each record in the table. For example, the XPath field value CostCenter_ID1 could be mapped to the printer delivery mapping name Business Units.
Data Driven XPath Printer Delivery Mapping Name CostCenter_ID1 Business Units DepartmentCode_ID1 Departments -
XMLP Report Definition Printer Map (F95628)
The F95628 table contains the printer mapping name, printer delivery value, and printer device name. For example, the printer delivery mapping name BusinessUnits could be mapped to the values in the CostCenter_ID1 XPath, such as 30, 20, 50, and so on. Each value can then be assigned to a specific printer device, as the following example illustrates.
Printer Delivery Mapping Name Printer Delivery Value Printer Device Business Units 20 HDQRTRS Business Units 30 CBPRTR Business Units 50 SBPRTR Departments 7392 APPRINTER Departments 7373 POPRINTER
4.2.7.2.1 Forms Used to Define Printer Mappings
| Form Name | FormID | Navigation | Usage |
|---|---|---|---|
| Add Report Definition-Bursting and Delivery | W95620J | When adding a new report definition, click Next on the Add Report Definitions - Languages and Output Types form.
To update an existing report definition, on the Update Report Definition form, select a record in the grid, and then from the Form menu, select Burst/Delivery. |
Define printer delivery details for report definition output. |
| Data Driven Printing | W95620M | On the Report Definition - Bursting and Delivery form, select a record in the Data Driven Recipient grid (optional), click the Data Driven Delivery option, and then click the Data Driven Printer Mapping button. | Define a printer mapping. |
| Data Driven Printer Mapping Search & Select | W95621D | On the Data Driven Printing form, click the visual assist for the Printer Delivery Mapping Name column. | Select a pre-defined printer as the Printer Delivery Mapping Name. |
| Printer Mapping Revisions | W95621F | On the Report Definition - Bursting and Delivery form, click the Data Driven Printer Mapping button.
Alternatively, on JD Edwards Solution Explorer EnterpriseOne Life Cycle Tools task view, select Batch Processing Setup. Report Definition Printer Mappings, or enter P95621 in the Fast Path field. On the Work With Report Definition Printer Mappings form, click Add to add a new printer mapping or Find to display the existing printer mapping records. To modify an existing printer mapping, select it in the grid and then click Select. |
Add or modify a printer mapping record. |
| Work With Report Definition Printer Mappings | W95621A | On JD Edwards Solution Explorer EnterpriseOne Life Cycle Tools task view, select Batch Processing Setup. Report Definition Printer Mappings, or enter P95621 in the Fast Path field. | View report definition printer mappings. Delete report definition printer mappings. |
4.2.7.2.2 Defining a Data Driven Printer Mapping Record
Access the Report Definition application (P95620).
-
Select a report definition in the grid, and then click the Select button.
Note:
If you are adding a new report definition, you can define a data driven printer mapping record on the Bursting and Delivery form, as described below. -
On the Update Report Definition form, from the Form menu, select Burst/Delivery.
-
(Optional) On the Bursting and Delivery form, in the Data Driven Recipient column, enter an XPath from the XML output that contains the recipient data.
Note:
If there is more than one data driven recipient XPath shown in the grid, ensure that you select the correct value before you define the data driven printer record. The tag for the selected value is passed into the Data Driven Printing form. If necessary, the value passed into the form can be changed. -
In the Delivery section, click the Data Driven Delivery checkbox.
-
Click the Data Driven Printer Mapping button.
-
On the Data Driven Printing form, enter the XPath field in the Delivery Tag column if the value was not passed in from the Bursting and Delivery form.
-
Enter a printer delivery mapping name, or use the visual assist to select a mapping name.
If an appropriate mapping name does not exist, follow the next steps to add a new printer delivery mapping name.
-
To add a new printer delivery mapping name, select Add Printer Mapping from the Form menu.
-
On the Printer Mapping Revisions form, enter a name in the Printer Delivery Mapping field.
-
Enter a value in the Printer Delivery Value field.
The printer delivery value must be a valid value from the XPath field that you specified as the delivery tag.
Note:
The printer delivery value can be any valid business view column or variable value in the XML source that you associate with a printer device to indicate where you want the output to be sent. You must enter the value exactly as it is shown in the XML source. For example, if the XML shows 00001 for Company, you must enter 00001 for the printer delivery value, not 1.Some values might have leading spaces in the XML source, as in the following example:
<CostCenter_1> 50</CostCenter_1>
Note that there are leading spaces. When you enter 50 as the printer delivery value on the Printer Mapping Revisions form, you must include the leading spaces.
However, you can remove the leading spaces in the XML source by using the ltrim function in Report Design Aid event rules. (To locate the ltrim function, select a value in the Expression Manager, and then expand the Text folder in the Advanced Functions list).
The following example shows an assignment using ltrim to remove leading spaces from the MCU value:
RV DeliveryTag = ltrim[BC Business Unit (F42565)(MCU)
As a result, the XML source will show the business unit value without leading spaces, as shown in the following example:
<CostCenter_1>50</CostCenter_1>
In this case, you can enter the value 50 as the printer delivery value without any leading spaces.
-
Enter a printer device, or use the visual assist to select a printer.
-
Click OK to save the data driven printer mapping record and return to the Bursting and Delivery form.
4.2.7.2.3 Revising a Printer Mapping Record
Access the Report Definition application (P95620).
Note:
Alternatively, you can access the Report Definition Printer Mappings application by entering P95621 in the Fast Path field.-
Select a report definition in the grid, and then click the Select button.
-
On the Update Report Definition form, from the Form menu, select Burst/Delivery.
-
Click the Data Driven Printer Mapping button.
-
On the Data Driven Printing form, modify the appropriate printer delivery mapping record.
-
If you need to add, modify, or delete printer delivery values, from the Form menu select Add Printer Mappings.
-
On the Printer Mapping Revisions form, enter a a name in the Printer Delivery Mapping field, and then click Find.
-
Modify the printer delivery value or printer device as necessary, and then click OK.
-
Click OK to save the data driven printer mapping record and return to the Bursting and Delivery form.
4.2.7.2.4 Deleting a Printer Mapping Record
Access the Report Definition application (P95620).
Note:
Alternatively, you can access the Report Definition Printer Mappings application by entering P95621 in the Fast Path field.-
Select a report definition in the grid, and then click the Select button.
-
On the Update Report Definition form, from the Form menu, select Burst/Delivery.
-
Click the Data Driven Printer Mapping button.
-
On the Data Driven Printing form, delete the appropriate printer delivery mapping record.
Note:
If you attempt to delete a printer mapping record that is used by a report definition, the system displays a message to advise you that the mapping record cannot be deleted. -
Click OK to return to the Bursting and Delivery form.
4.2.7.3 Combined Data Driven Email and Data Driven Printing (Release 9.1 Update 3)
To utilize both data driven email and data driven printing in a single report definition submission, you must create a customized delivery tag for either the email or printer delivery values. The customized delivery tag could be a report variable (RV) that you populate with delivery tag values using event rule logic in the Report Design Aid.
For example, if you want to send specific outputs as email to certain Address Book numbers, and specific outputs to different printers based on the data, you would populate the RV variable in the source UBE with the delivery values. In this way, the delivery tag has the necessary information to deliver the output appropriately.
Consider the following scenario: A company groups its customers by business unit and sends them statements on a monthly basis. Customers can receive an electronic statement by email or a printed statement sent by regular mail. The customer record has a field that denotes the email preference. If the email preference is not selected in the customer record or if an email address has not been specified, a printed statement is considered the preferred delivery method.
After creating a report variable for the delivery tag, the logic for this hypothetical scenario would be similar to the following:
 If EmailAddressValue is <blank>
   RV DeliveryTag = BC Business Unit (F4201)(MCU)
 Else
   RV DeliveryTag = [BC Address Number (F4201)(AN8)]
 End If
For printer delivery, the report variable would be mapped to a data delivery mapping name in the Report Definition Printer Mappings application (P95621); business unit values from the report variable would then be assigned to individual printer devices. As a result, the statements for customers who want a printed copy would be sent to the printer assigned to their business unit.
The Customized Delivery Tag must be set up as 1 in the Data Driven Recipient field.
No mapping is required for email delivery, because the Address Book application (P01012) contains logic to deliver the output to the email address associated with each address number.
For information about using report variables and event rules in the Report Design Aid, see "Working with Event Rules" in the JD Edwards EnterpriseOne Tools Report Design Aid Guide
4.2.8 Delivery Email Subject and Body
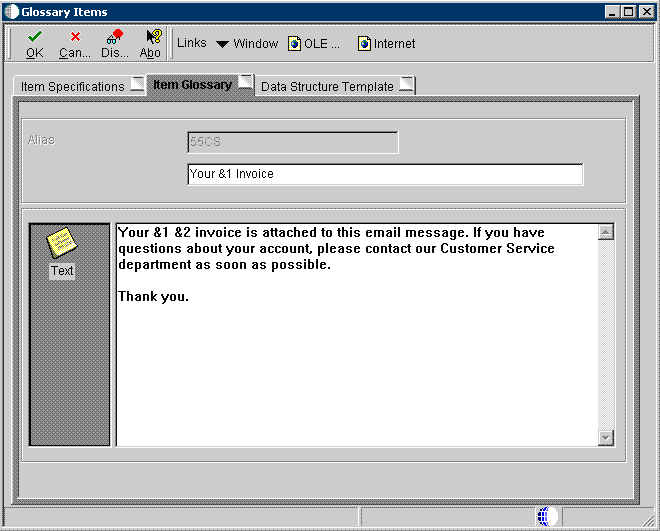
If report definition output is sent to an email address, you can define a customized subject and body for the email message. To utilize this enhancement, a data dictionary glossary item (glossary group E) must be associated with the report definition.
Glossary group E designates error, warning, and information messages. If a message contains values that will be substituted by data items from a data structure, the message will have a placeholder for each text-substituted value. The placeholders are indicated by an ampersand (&) and a number in the message text.
The following example shows a custom data dictionary glossary item with text-substitution placeholders. This glossary item could be used as the email subject and body for a report definition that produces customer invoices.
Figure 4-5 Data Dictionary Glossary Items form
Description of "Figure 4-5 Data Dictionary Glossary Items form"
In this example, &1 could be the date of the invoice and &2 the type of invoice. Invoices can be produced on a daily, weekly, bi-weekly, semi-monthly, or monthly basis. When users submit the report definition, they can enter values for the &1 and &2 variables so that the subject of the email could be "Your 6/30/10 Invoice," and the body of the message could be "Your 6/30/10 monthly invoice is attached to this email message. If you have questions about your account, please contact our Customer Service department as soon as possible. Thank you."
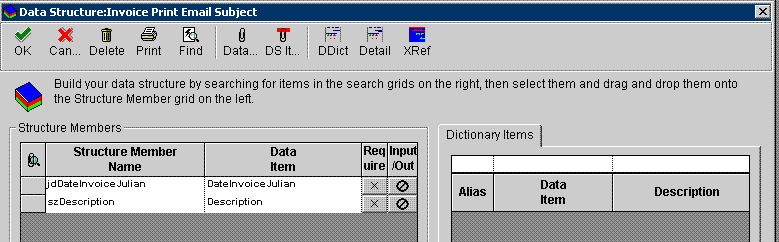
Data Structure Template
Text-substituted values are defined by data dictionary items in the data structure associated with a data dictionary glossary item. The Data Structure Template tab shows the name of the associated data structure. In the following example, a custom data structure template has been associated with the glossary item.
Figure 4-6 Glossary Items form - Data Structure Template tab

Description of "Figure 4-6 Glossary Items form - Data Structure Template tab"
The data structure consists of a data item for each text-substituted value in the subject and body of the glossary data item. Because the message in this example has two text-substituted values, the associated data structure consists of two data items, as shown in the following example.
Figure 4-7 Data structure with data items for text-substitution values
Description of "Figure 4-7 Data structure with data items for text-substitution values"
4.2.8.1 Report Definition Data Item for Subject and Body
To provide the subject and text for an email message, enter the name of a glossary data item in the Data Item for Subject and Body field on the Bursting and Delivery form.
If a glossary data item with an associated text-substitution data structure has been defined for the report definition, you can click the Define Values button to enter specific text for the email message when the report definition is submitted. The text entered in the Structure Member Value field on the Structure Member Value Revisions form will be substituted for the variables in the subject and body of the email message. In the following example, 6/30/10 and Monthly are the values for the text-substituted variables.
Figure 4-8 Structure Member Value Revisions form
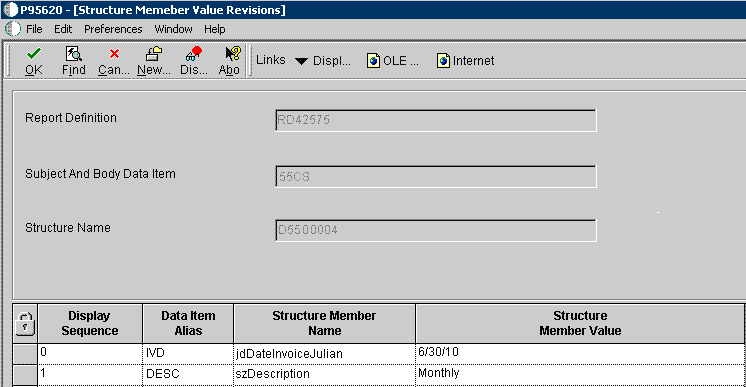
Description of "Figure 4-8 Structure Member Value Revisions form"
4.2.8.1.1 Dynamic Text-Substitution
Another text-substitution option is to use an XPath (from the XML data output) for the structure member value. Using an XPath enables dynamic text-substitution to occur for text-substituted values in the email subject and body. For bursted reports, the XPath value could be different for each recipient, depending on which XPath was used.
For example, if you wanted the email subject line to dynamically include the invoice date each time the report definition was published, you would provide an XPath similar to the following for the Structure Member Value:
Figure 4-9 Structure Member Value Revisions form
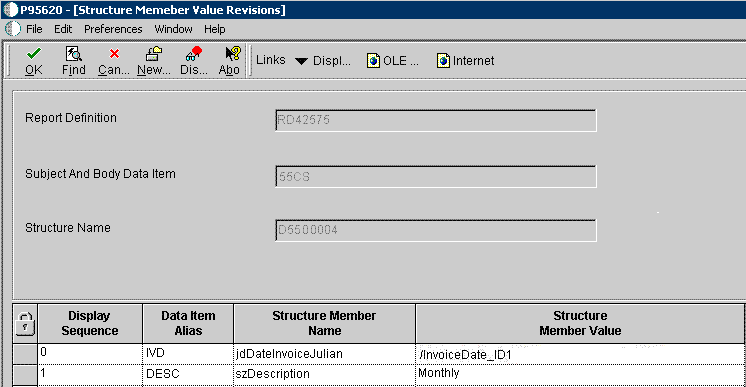
Description of "Figure 4-9 Structure Member Value Revisions form"
In the same way, a data item could be included in the data structure for the invoice number. With dynamic text-substitution, the invoice number would change for each customer in a bursted report.
Important:
The XPath must be preceded by a forward slash to be recognized as an XPath and not as a literal value. For example, if you want to dynamically substitute the customer invoice number, you would enter /CustomerInvoiceNumber_ID1 for the Structure Member Value, assuming that is the XPath in your XML output.4.2.8.2 Defining a Data Structure
Access Object Management Workbench.
-
In Object Management Workbench, select a project.
-
Click the Add button.
-
On the Add EnterpriseOne Object to the Project form, select Data Structure, and then click OK.
-
On the Add Object form, enter the appropriate information, and then click OK.
-
In the Object Management Workbench project, select the data structure object and then click the Design button.
-
Click the Design Tools tab, and then click the Data Structure Design button.
-
On the Dictionary Items tab, use the QBE line to locate the data dictionary items that you want to include in the data structure.
-
To include data items in the data structure, drag them from the Dictionary Items tab to Structure Members.
-
When the data structure is complete, click OK.
4.2.8.3 Defining a Glossary Data Item
Access Object Management Workbench.
-
In Object Management Workbench, select a project.
-
Click the Add button.
-
On the Add EnterpriseOne Object to the Project form, select Data Item, and then click OK.
The Data Dictionary Item Type message box appears.
-
Click Yes to add a glossary data item.
-
On the Item Specifications tab, complete the fields as follows:
Field Description Alias Enter a name that identifies the glossary item. Glossary Group Enter E for the glossary group. Glossary group E is used for error messages, warning messages, and information messages. Product Code Use product codes 55-59 for custom data items. Product Reporting Code Use product reporting codes 55-59 for custom data items. Description The description is used as the email subject when the report definition is submitted. You can use text-substituted variables in the description. Error Level Enter 3 to define the glossary item as an information message. -
Click the Item Glossary tab.
-
Enter the body of the message in the text area, inserting text-substitution variables as required.
-
Click the Data Structure Template tab.
-
Click the Text Substitution option.
-
Click the Browse button to locate and select the data structure with the data items that will be used for the text-substituted variables.
-
Click OK to save the glossary item.
Note:
You could also use the Work With Data Dictionary Items or the Error Messages selection on menu GH951 to add a type E glossary data item.4.2.9 Configuring Report Definition Jobs (9.1 Update 4)
When all the available BI Publisher Kernel(s) are busy processing the Report Definition jobs, and there is further influx of job load, the waiting jobs may end in error because the BI Publisher kernel(s) could not respond to the request in the stipulated wait time. To resolve this limitation, the system now uses a polling methodology to determine priority of jobs to be processed to ensure that no jobs end in error due to a system time out.
This section discusses how to configure report definition jobs and direct them to specific kernels or servers for processing by BI Publisher.
4.2.9.1 Configuring the Embedded BI Publisher Server Load
You can prioritize and queue BI Publisher jobs for optimum results by configuring Percentage of large and small job kernels.
The large report definition jobs will run on the large job kernels and the small report definition jobs will run on small job kernels based on the maximum size defined for the small job kernels in Embedded BI Publisher Server Load Configuration application (P95645).
However, a small report definition job can run on a large job kernel if all the small job kernels are busy and a large job kernel is available. But, a large report definition job will never run on a small job kernel.
To set up the percentage of large and small job kernels:
-
Access the Embedded BI Publisher Server Load Configuration application (P95645).
-
Click Add.
Figure 4-10 Embedded BI Publisher Server Load Configuration form
Description of "Figure 4-10 Embedded BI Publisher Server Load Configuration form"
-
Enter the Server Name. Alternatively, you can use the visual assist to select the server name. The Logical Data Source field gets populated automatically.
-
Enter the value in the Percentage of Large Job Kernels field. For example, enter 70.
-
The value 30 is automatically populated in the Percentage of Small Job Kernels field.
Note:
The system will not allow the total value of Percentage of Large Job Kernels and Percentage of Small Job Kernels to exceed or deceed 100.For example, if you enter a value <X> in the Percentage of Large Job Kernels field, the value <100-X> is automatically populated in the Percentage of Small Job Kernels field and vice versa.
If you set the Percentage of Large Job Kernels to 0, and Percentage of Small Job Kernels to 100, and run a large report definition job, the job status will remain as WX (Waiting for XML Publishing) since there are no large job kernels available for publishing.
If you set the percentage of Large Job Kernels to 100, and Percentage of Small Job Kernels to 0, and run a small report definition job, the job will be completed by the large job kernel.
-
Enter the required value in the Max size for Small Job Kernels in MB field. The default value is 10 MB.
-
Click OK.
Note:
You must restart the server every time you modify the Embedded BI Publisher Server Load Configuration to make the changes effective.
4.2.9.2 Overriding Report Definition Load Configuration
A report definition job runs on a large or a small job kernel depending on its XML size defined in the Embedded BI Publisher Server Load Configuration application (P95645).
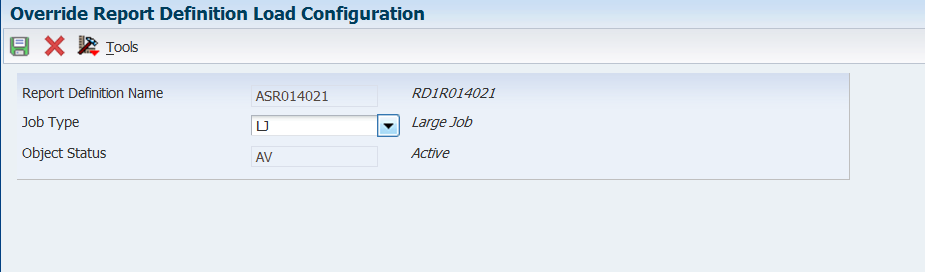
If for a particular business reason, the system administrator wants to override a specific job always to a large job kernel or a small job kernel, he/she can achieve that by overriding the jobs using the Override Report Definition Load Configuration application (P95646).
Access the Override Report Definition Load Configuration application (P95646).
-
Select the Report Definition you want to modify and click Select.
Figure 4-11 Override Report Definition Load Configuration form
Description of "Figure 4-11 Override Report Definition Load Configuration form"
-
Select the Job Type to LJ for large jobs or SJ for small job from the drop-down menu.
-
Click OK.
4.2.9.3 Configuring Embedded BI Publisher Server Group
To achieve the scalability, you can define a server group with multiple servers having the same server map data source and same port number.
In a defined server group, all the BI publisher kernels running on all the hosts will use a polling process to query for the next available job once they complete the assigned BI publisher job. When a particular kernel is assigned by the system to run a particular job, the job status is updated to X (Publishing).
To configure a server group, access the Embedded BI Publisher Server Group Configuration application (P95647).
Figure 4-12 Work With Embedded BI Publisher Server Group Configuration

Description of "Figure 4-12 Work With Embedded BI Publisher Server Group Configuration"
-
Click Add.
Figure 4-13 Embedded BI Publisher Server Group Configuration form
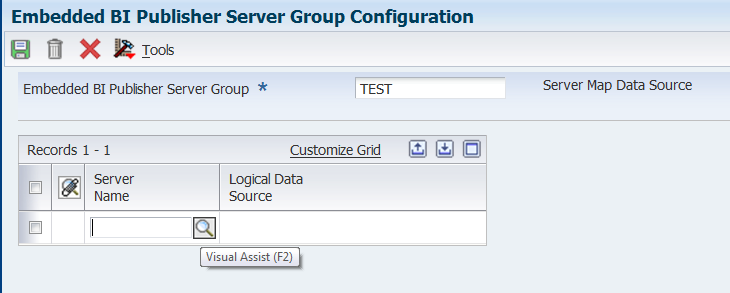
Description of "Figure 4-13 Embedded BI Publisher Server Group Configuration form"
-
In the Embedded BI Publisher Server Group Configuration form, enter an appropriate name in the field Embedded BI Publisher Server Group.
Note:
Make sure that the Embedded BI Publisher Server Group name is unique. If you enter an existing Embedded BI Publisher Server Group name, an error message is displayed. -
Enter the Server Name as required. The Logical Data Source field populates automatically.
Note:
Make sure that the server map data source and port number is same for all the servers. -
Click OK.
4.2.9.4 Configuring the Enterprise Server jde.ini File
You must configure the following settings in the [JDE JVM] section of the enterprise server ini file.
| Setting | Value | Purpose |
|---|---|---|
| OutProcessJVMHome | The parameter value should point to the JAVA_HOME and not the java executable path. For example, if java home is present at C:\Program Files\Java\jre6\bin\java.exe, you should set the value as C:\Program Files\Java\jre6 path.
If this path is missing , the system will use the InProcessJVMHome location. |
Define the JAVA_HOME location. |
The server manager screen is as shown below.
Description of the illustration SM_Config_Screen.png
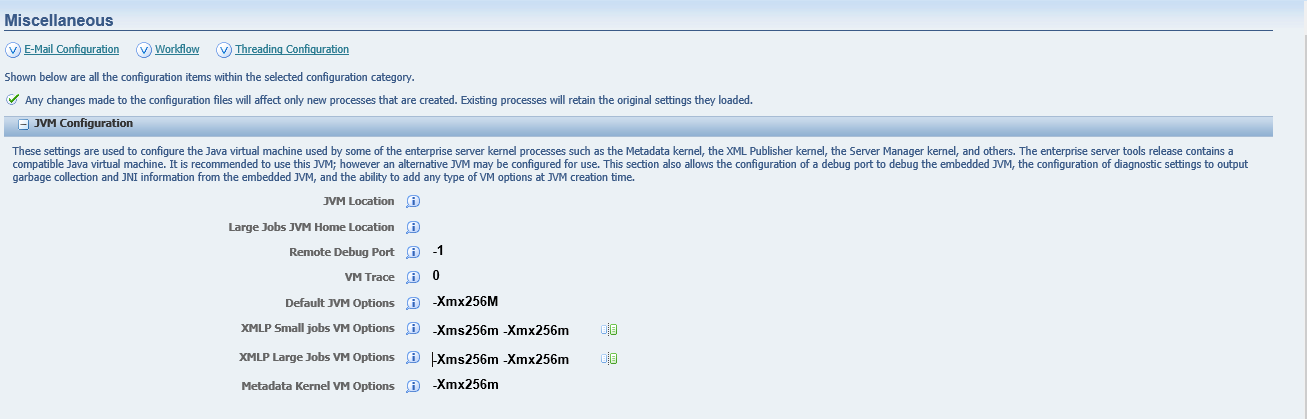
4.2.9.4.1 XMLP Large Jobs VM options
There is a separate INI entry to adjust the JVM options of the large job kernels since, the memory requirement of large job kernels is different from the small job kernels. Initially, this may be set same as the small job kernels but, depending on the customer's large job load, they can increase the JVM memory values.
4.2.10 Defining Report Definition Output (9.1 Update 4)
This section contains the following topics:
-
Customizing Report Definition Output File Name
-
Defining Report Definition Output Path
-
Creating Hierarchy for the Report Definition Output
Customizing the report definition output file name and the file path enables you to maintain and locate the output files easily.
For example, you can name the report definition output file as CustomerEmailAddress and specify the output file path if you using the Microsoft Windows operating system as C: /JDE/RDOutputStore. The output file with the name CustomerEmailAddress.pdf suggests that this PDF file contains email addresses of all customers.
Different paths and file names can be specified for different report definitions. This enables users to store the output on different locations.
You can also save the output files in the folder that contains the structural hierarchy.
See Section 4.2.10.3, "Creating Hierarchy for the Report Definition Output"
4.2.10.1 Customizing Report Definition Output File Name
The customized file name is reflected in the Report Definition Output Repository (W95630E) form and Work With Submitted Jobs form of the Use Report Definition Jobs (P95630) application. If the output delivery option is selected as email, the customized output file name is reflected in the email as well.
If the archiving option is turned on, the report definition output is saved with the customized file name in the defined location.
See Section 4.2.10.2, "Defining Report Definition Output Path"
Access the Report Definition application (P95620).
-
Select the report definition you want in the grid, and then click the Select button.
-
On the Update Report Definition form, from the Form menu, select Burst/Delivery.
-
In the Update Report Definition - Bursting and Delivery form, click the Override Output File Name tab.
Note:
If you do not use the Override Output File Name option, the output files will be saved with the default file name in the following format:<RD_NAME>_<RD_LANG>_<UBE_JOBNUMBER>_<RD_JOBNUMBER>_<SEQ_NO>.<OUTPUT_TYPE>
-
Select the option Override Output File Name. The Data Item for Output File Name field is enabled
-
In the Data Item for Output File Name field, enter the data dictionary item that has template substitution data structure defined. The Define File Name button is enabled.
-
Click Define File Name. The Output Structure Definition Value Revisions form displays.
Figure 4-14 Output Structure Definition Value Revisions form
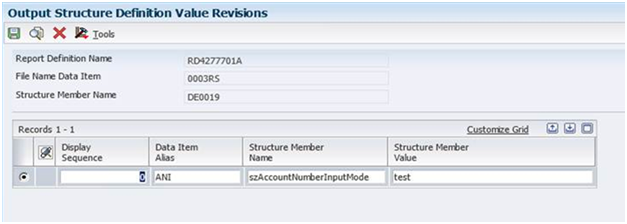
Description of "Figure 4-14 Output Structure Definition Value Revisions form"
-
If you have several data structures defined for the data item you selected, you can enter several values in the Structure Member Value field and define the sequence in which you want the names to be displayed.
-
The Data Item Alias and Structure Member Name fields are populated automatically.
-
Enter any one of the following values or a combination of the following values in the Structure Member Value field:
-
Static customized file name - Enter any static text you want to be the name of the report definition output file. For example, test.
-
Dynamic customized file name - Enter the name of the field you want to be the name of the report definition output file. Note. Prefix the name of the field with '/' character. This prefix indicates that the text is an XML field.
If the field is entered, the value of the field will be accessed from the XML source file of the report definition output and displayed as the name of the output file.
This is helpful since you do not have to change the file name every time you run a report definition. For example, if you are running the address book number report, you can include the AddressNumber field as part of the file name. The report definition gets generated with different address number as the output file name every time you run this report definition.
If you choose the data item with several data structures, you can define the name of the output file in a sequence.
-
-
Click OK.
Note:
If there is more than one entry in the Structure Member Value field with the same value, and if you want to archive the files in the same location, the duplicate file name might be generated based on the static and dynamic values of the Structure Member Value field. The dynamic value is taken from the source XML.If there is more than one similar static value in the Structure Member Value filed, and if duplicate files are archived at the same location, an email will be sent to the user informing that the file is archived with duplicate name when the report definition output is generated. The file is saved with the same name appended by (1) or (2) or (<any number>) depending on the number of duplications in the specified path.
Consider the following scenarios:
-
A static file name called Sample.pdf exists, and you want to create another output file with the same name in the same location. If you do so, an email will be sent to you informing that the file is archived with duplicate file name and the file is created with the name Sample (1).pdf in the specified path. You can access the Output Structure Definition Value Revisions form and correct the file name to avoid the duplication if you want.
-
Consider the value of the Structure Member Value field is a data structure with two parameters. The value of first parameter is a static value called Sample. The value of the second parameter is a dynamic value called /AddressNumber.
Now, the file generated for each output will be: Sample_[AN8 from xml].pdf
-
4.2.10.2 Defining Report Definition Output Path
See Section 6.6.1, "Configuring the Enterprise Server jde.ini File"
If you use the enterprise server jde.ini to define the path for archiving, all the report definitions will be saved in same path defined in enterprise server jde.ini file.
You can choose to define a customized output path for a specific report definition output using the Report Definition Server Mapping application (P95641).
Note:
If the path is not defined for a report definition in P95641, the output file is stored in the default path defined in the enterprise server jde.ini.To define output path for the report definition, access the Report Definition Server Mapping application (P95641).
-
Click Add.
-
On the Report Definition Archive Paths form, complete the following fields:
Field Description Report Definition Enter the report definition for which you want to define the output path. You can use the visual assist to select a report definition. Server Name Enter the name of the server. User/ Role Enter user/role. Path Enter the path where you want the output file to be saved. Note. If you enter a folder name in the path that does not exist, the folder structure is created and the output is stored at the specified path. For example, if you enter C: /JDE/RDOutputStore in the Path field and if the folder RDOutputStore does not exists, then the folder with the name RDOutputStore is created and the output file is stored in the path specified.
If you enter an invalid path, the report definition job will end in FD status. You can access P95630 application and select View Delivery option and then, select Re-Deliver Output option to correct the path and save the file again.
Object Status Select the following status as required. -
AV: If the object status is active, the report definition output is saved in the path defined above.
-
NA: If the object status is not active, the report definition output is saved in the path defined in the enterprise server jde.ini.
Status Description Status description populates automatically to Active if the object status is AV and Not Active if the Object status is NA. -
-
Click OK.
4.2.10.3 Creating Hierarchy for the Report Definition Output
You can choose to create hierarchy of folders with report definition name, report definition language and report definition job number for the report definition output.
To create the report definition output in folder hierarchy:
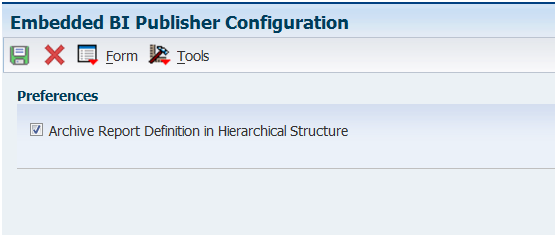
-
Access Embedded BI Publisher Configuration application (P95642).
-
Select the Archive Report Definition in Hierarchical Structure checkbox.
If Archive Report Definition in Hierarchical Structure is selected, the output file is saved in hierarchical structure in the path defined in Report Definition Server Mapping application (P95641). If the path is not defined in Report Definition Server Mapping application (P95641), the output file is archived in hierarchical structure in the path defined in enterprise server jde.ini.
-
Click Save.
4.3 Modifying BI Publisher Report Definitions
Access the BI Publisher Report Definitions form on the Microsoft Windows client.
-
On the BI Publisher Report Definitions form, select a report definition in the grid and then click Select.
-
On the Update Report Definition form, you can modify these options:
-
Description
-
Product code
-
Product system code
-
Source UBE
-
Version
-
Template
-
-
To modify output or language options, select Output/Languages from the Form menu.
-
On the Update Report Definition-Languages and Output types form, add options, modify options, or delete options, and then click OK.
-
To modify bursting or delivery options, select Burst/Delivery from the Form menu.
-
On the Update Report Definition-Bursting and Delivery form, add options, modify options, or delete options, and then click OK.
-
On the Update Report Definition form, click OK to save the report definition modifications.
Note:
Modifying the Source UBE, Version, or Template fields could invalidate the languages, output types, bursting, and delivery options that were defined previously for the report definition. If you modify any of these values, the Languages and Output Types form and the Bursting and Delivery form will appear automatically, enabling you to make any necessary changes.4.4 Copying BI Publisher Report Definitions
Copying and modifying a report definition might be more efficient than creating a new, but similar, report definition. The copy feature is available only in the Microsoft Windows version of the BI Publisher Report Definitions application.
To copy a report definition:
-
Enter P95620 in the Fast Path field.
-
On the BI Publisher Report Definitions form, select a report definition and then click Copy.
-
On the Copy Report Definition form, enter a name and description for the new report definition.
-
If the report definition will be submitted without user input, click Blind Submission.
-
After completing the required information, click OK.
4.5 Managing BI Publisher Objects in Object Management Workbench
When you access the BI Publisher Repository (P95600) or BI Publisher Report Definitions (P95620) applications from JD Edwards Solution Explorer, the objects that you create are added to your default project in Object Management Workbench (OMW). As non-Object Librarian objects, templates and report definitions are not available to users in other environments until they are advanced through project statuses and, finally, transferred to a data source. To advance the status of an object, you must move it from your default project to a project.
In addition to being available in JD Edwards Solution Explorer, you can also access the BI Publisher Repository and BI Publisher Report Definitions applications through OMW. To add new objects within OMW, select an OMW project and then click Add. Select either Report Definition or BI Publisher Object, as this form illustrates:
Figure 4-16 Object Management Workbench - Add Enterprise Object to the Project form
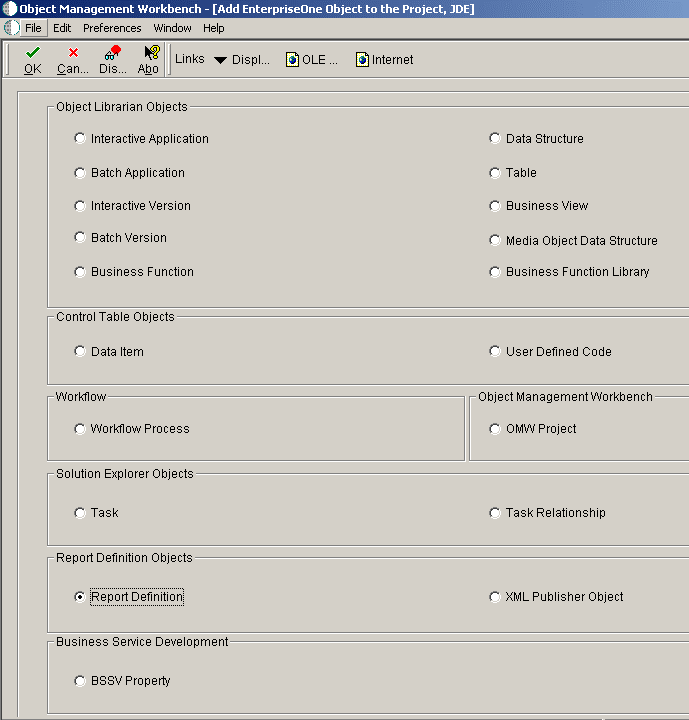
Description of "Figure 4-16 Object Management Workbench - Add Enterprise Object to the Project form"
When you click OK, either the BI Publisher Repository application or the BI Publisher Report Definition application launches, depending on the type of object that you are creating.
Once the objects exist in OMW, you can modify them by clicking the Design button, which will launch the appropriate application. You can also use OMW to copy or delete templates and report definitions, as you would with other OMW objects.
See the JD Edwards EnterpriseOne Tools Object Management Workbench Guide.
4.5.1 Searching for BI Publisher Objects
To search for BI Publisher objects or report definitions within OMW, in the Category field select either XML Publisher Objects or Report Definitions. After selecting the category, the Search Type field enables you to search by object name, description, or system code.
When you perform an Advanced Search within OMW, BI Publisher Objects are type XMLP and report definitions are type RPDF.
4.6 Configuring BI Publisher Objects for Object Management Workbench
To perform actions on BI Publisher objects and report definitions within OMW projects, you must configure object transfer activity rules. For each object type on which you want to perform an action, you must define this information:
-
Project statuses at which users can add, design, and delete objects.
-
Status changes at which objects will be transferred.
-
Project statuses at which object tokens are released.
See the JD Edwards EnterpriseOne Tools Object Management Workbench Guide.