5 Install a Management Agent
This chapter discusses:
-
Section 5.1, "Obtain the Management Agent Installer Application"
-
Section 5.2, "Distribute and Unzip the Management Agent Installer Application"
-
Section 5.5, "Troubleshoot the Management Agent Installation"
5.1 Obtain the Management Agent Installer Application
To obtain the Management Agent Installer application:
-
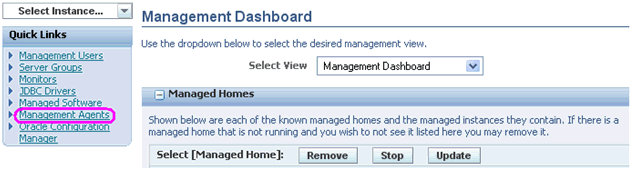
On Management Dashboard, in the Quick Links section in the left pane, click the Management Agents link.
-
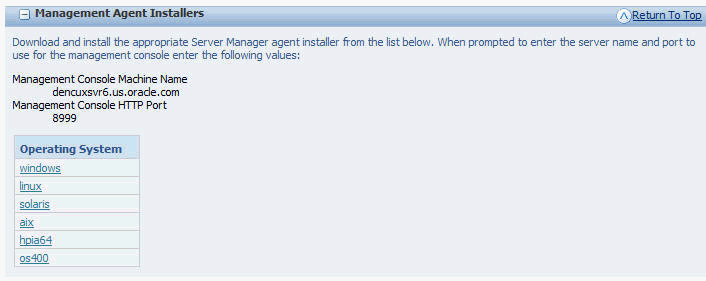
On the Server Manager Agent Downloads page, navigate to the Management Agent Installers section.
-
From the Management Agent Installers section, you can select from the available Management Agents, which are listed by operating system:
-
windows
-
linux
-
solaris
-
HP-UX on Itanium (HPIA64)
-
aix
-
os400
-
-
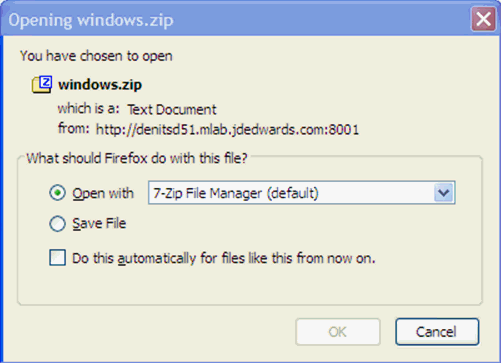
When you click a link to choose an operating system, depending on your browser, you are prompted to Save the
.zipfile.For example, if you select the windows Management Agent Installer, you will receive a prompt similar to this:
-
Depending which Management Agent Installer you choose, proceed to the following sections of this chapter entitled: Section 5.2, "Distribute and Unzip the Management Agent Installer Application".
5.2 Distribute and Unzip the Management Agent Installer Application
After you have saved the downloaded .zip file for the Management Agent installer appropriate to your platform, you must move it to the target on which you will run the downloaded installer and unzip it. The move process and the file names are platform-dependent as described in these sections:
Note:
Some of the functionality described in this topic is to accommodate legacy platforms. Refer to the Oracle Certify System on My Oracle Support for information about currently supported platforms.5.2.1 Microsoft Windows
Use this procedure to move and unzip the Management Agent Installer.
-
Move this
.zipfile (which you downloaded in the section of this guide entitled: Obtain the Management Agent Installer Application) using Microsoft Windows Explorer with mapped drives:windows.zip -
Extract the
.zipfile to a folder, resulting in the following subfolders:\Disk1\install \Translations
5.2.2 UNIX
These are the available versions of UNIX:
-
Linux
-
Solaris
-
AIX
-
HP-UX on Itanium (HPIA64) (For Tools Release 9.1 Update 3)
Caution:
Oracle User ID. You must login to the UNIX machine with an Oracle user ID; otherwise you cannot run the installer.Use this procedure to move and unzip the Management Agent Installer.
-
Move this
.zipfile (which you downloaded in the section of this guide entitled: Obtain the Management Agent Installer Application) using FTP services:Linux
linux.zipSolaris
solaris.zipAIX
aix.zipHP-UX on Itanium (For Tools Release 9.1 Update 3)
hpia64.zip -
Extract the
.zipfile to a folder, resulting in the following subfolders:\Disk1\install \Translations
5.2.3 IBM i (OS400)
Caution:
You cannot run the OS400 Management Agent installer directly on the IBM i machine. Therefore you must download and extract the Management Agent Installer file on a Microsoft Windows machine as described in this procedure. Likewise, you must run the Management Agent installer on a Windows machine, as described later in this section in the topic entitled: Run the Management Agent Installer.-
Move this
.zipfile (which you downloaded in the section of this guide entitled: Obtain the Management Agent Installer Application) using Microsoft Windows Explorer to a machine that can access your IBM i OS400 machine with mapped drives:os400.zip -
Extract the
.zipfile to a folder, resulting in the following subfolders:\Disk1\install \Translations
5.3 Run the Management Agent Installer
Running the Management Agent installer is platform-dependent:
5.3.1 Microsoft Windows
Use this procedure to run the Management Agent installer on Microsoft Windows target machines.
-
Double click this installer file to launch the installer:
\Disk1\install\setup.exeNote:
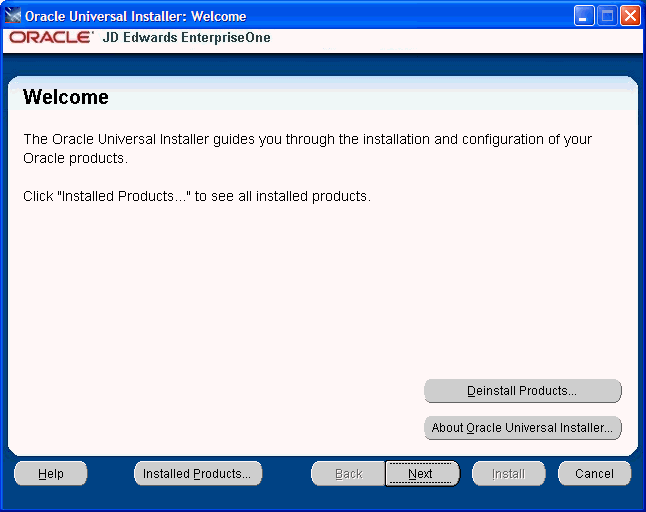
The unzipped installer files will be in the location specified in the section of this guide entitled Distribute and Unzip the Management Agent Installer Application in the subsection entitled: Microsoft WindowsThis process opens a Microsoft Windows command window as shown in the below example.

After the OUI installer is launched, the command window is closed and the Welcome screen is displayed.
-
On Welcome, click the Next button.
-
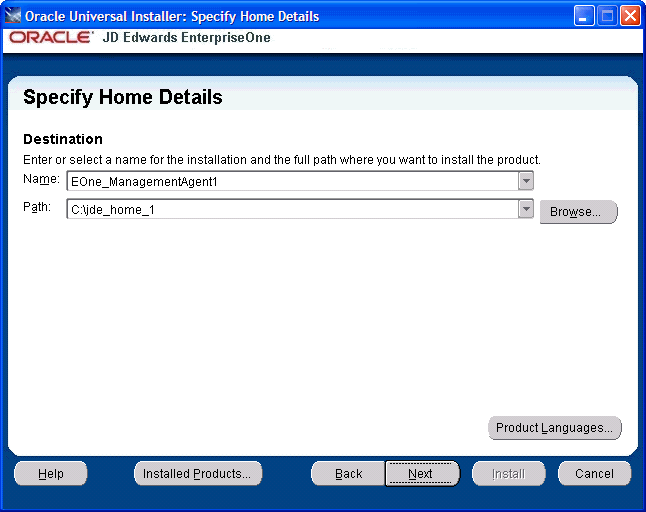
On Specify Home Details, complete these fields:
-
Name:
Enter a name for the Management Agent. The default name is:
EOne_Management_Agent
-
Path:
The installer automatically detects the root drive location on the Microsoft Windows machine and by default appends this value:
jde_homeNote:
Although jde_home is the default and recommended setting, you can specify any value to replace the default value.The directory that you specify cannot already exist.
-
-
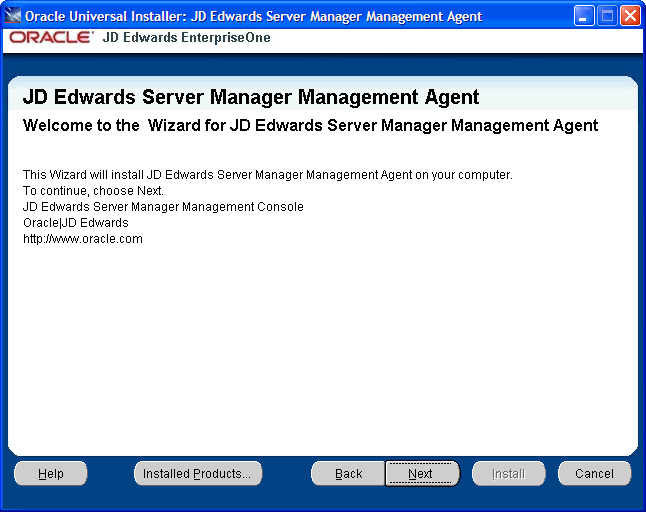
On Welcome to Wizard for JD Edwards Server Manager Management Agent, click the Next button.
-
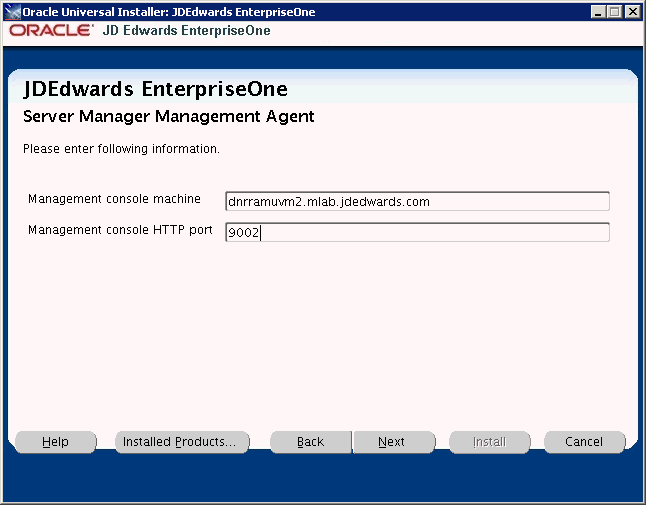
On Server Manager Management Agent, complete these fields:
-
Management console machine
You must specify the host name of an existing Management Console machine.
The installer verifies the connection to the Management Console during the install. The Management Console machine must be started and the Management Console must be running in order to run the installer. In some cases, depending on your machine, operating systems, or network, you might need to fully qualify your machine name. For example, instead of specifying only
dnrramuvm2you might need to specifydnrramuvm2.mlab.jdedwards.com.Tip:
You can determine the name of your Management Console from the information supplied on the Management Agent Installers screen. For navigation, refer to Step 2 in the section entitled: Section 5.1, "Obtain the Management Agent Installer Application". You can also view thereadme.txtfile in the root directory of the Management Console.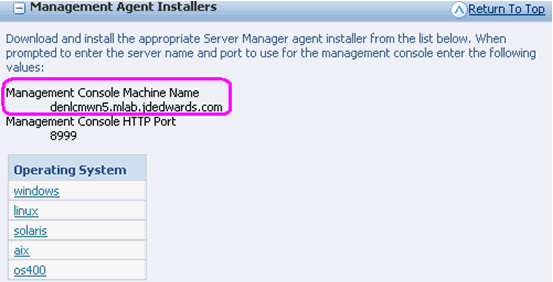
-
Management console HTTP port
You must specify a valid port of an existing Management Console machine.
The installer verifies the port connection to the Management Console. The machine must be started and the Management Console must be running in order to run the installer.
Tip:
You can determine the port of your Management Console from the information supplied on the Management Agent Installers screen. For navigation, refer to Step 2 in the section entitled: Section 5.1, "Obtain the Management Agent Installer Application".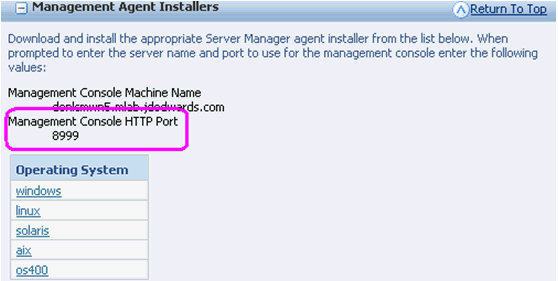
-
-
Click the Next button to verify the machine and port values.
-
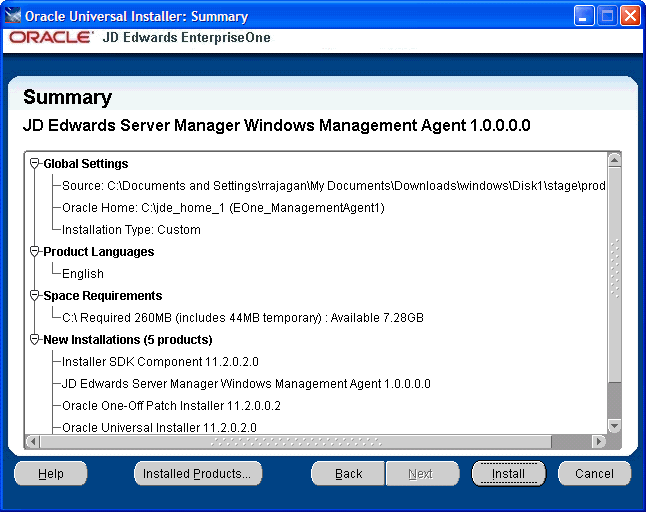
On Summary, review the information and click the Install button to begin the installation.
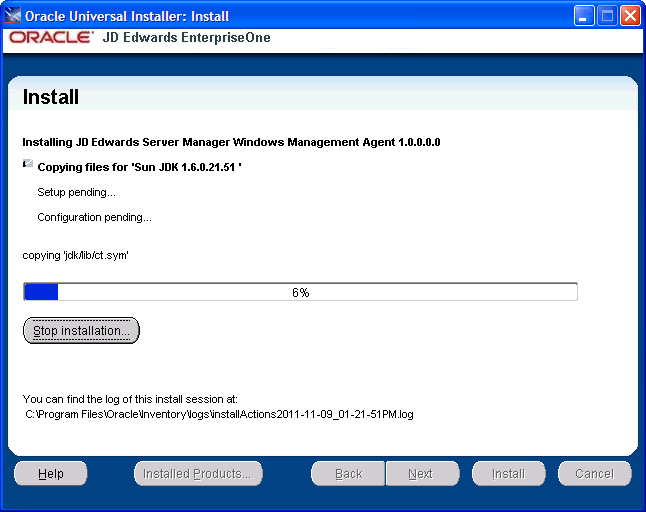
The Management Agent installer displays a panel showing the ongoing status of the installation.
-
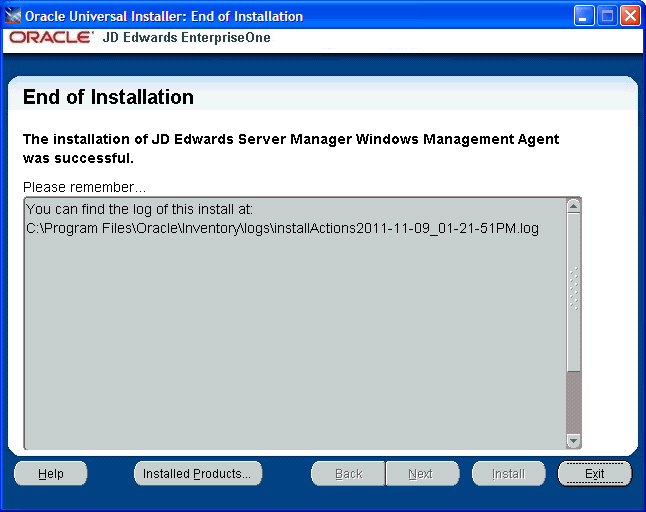
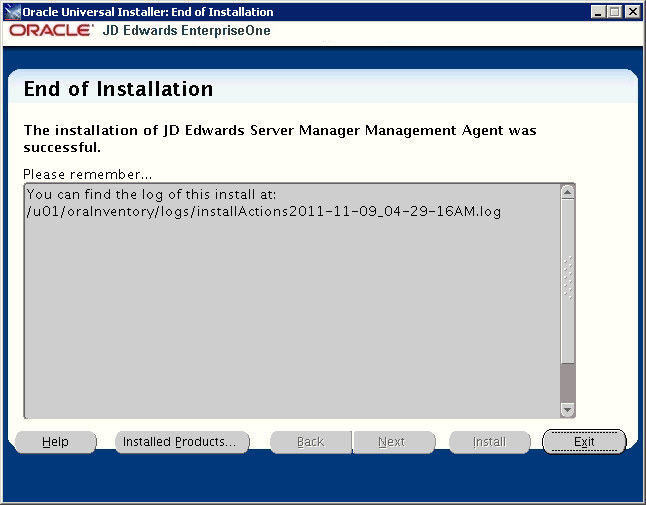
When the installation of the database finishes, the End of Installation screen is displayed.
Caution:
Examine the Installer Logs. This screen also displays the location of the install log. Even though the screen indicates that the installation was successful, you should you should always check the logs before you attempt to run the Deployment Server. The file is named log.txt and is located in the Deployment Server installation directory. For example:C:\Program Files\Oracle\Inventory\logs\InstallActions\ installActionsyyyy-mm-dd_hh-mm-ssPM.log -
Click the Exit button.

-
On the Exit dialog, click the Yes button to confirm you want to exit the Management Agent installer.
Note:
After a successful installation, the Management Agent automatically starts and connects to the Server Manager Management Console. The resulting newly installed Managed Home can be viewed in the Management Dashboard of the Management Console.5.3.2 UNIX
These are the available versions of the Management Agent installers for UNIX:
-
Linux
-
Solaris
-
AIX
-
HP-UX on Itanium (HPIA64) (Release 9.1 Update 3)
Before launching the Management Agent installer on UNIX platform, you should review these important notes as applicable to your installation and Server Manager environments:
To run the Management Agent installer for UNIX, refer to this section: Section 5.3.2.8, "Running the Management Agent Installer", which follows the Notes below.
5.3.2.1 Permissions
All files that you extracted from the .zip file must have execute permissions. You can use the chmod command to set these permissions.
5.3.2.2 /tmp location
The Management Agent installer uses the /tmp location to temporarily store files used during the installation. Before installing ensure that at least 400 MB is available in the /tmp location.
5.3.2.3 Oracle User ID
You must login to the UNIX machine with an Oracle user ID; otherwise you cannot run the installer.
5.3.2.4 Oracle Application Server
If you will be using the Management Agent to manage an Oracle Application Server, you must install the Management Agent as the same user as the Oracle Application Server. Therefore, before launching the installer you should switch to the appropriate user using the su command.
5.3.2.5 Enterprise Server
If you will be using the Management Agent to manage a UNIX-based Enterprise Server, you must install the Management Agent as the JD Edwards EnterpriseOne Enterprise Server user. For example, valid JD Edwards EnterpriseOne users might be jdeb9, jde811, jde812, or jde900. Therefore, before launching the installer you should switch to the appropriate user using the su command. For example:
su - jdeb9
5.3.2.6 Graphic Mode
For all UNIX environments, you should run the installer in graphic mode.
5.3.2.7 AIX and Solaris Operating Systems
Because the AIX operating system does not allow the Management Agent to be installed as a non-root user, you must install it as the ROOT user. On the Solaris operating system, you must install is as the oracle user. Once installed, you can change the owner of the Management Agent agent using the chown command. For example:
chown -R jde900:jde900 /u01/JDE_HOME
5.3.2.8 Running the Management Agent Installer
Use this procedure to run the Management Agent installer on UNIX-based target machines.
-
Run this script to launch the installer:
Launch this installer with the necessary GUI settings to run in graphic mode:
/Disk1/install/runInstaller.shNote:
The unzipped installer files will be in the location specified in the section of this guide entitled Distribute and Unzip the Management Agent Installer Application in the subsection entitled: UNIX.The UNIX system indicates that it is preparing to launch the Oracle Universal Installer as shown in the below example.
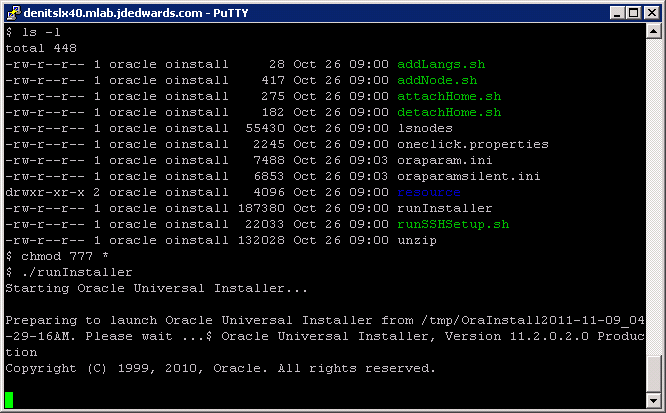
After the OUI installer is launched, the command window the Welcome screen is displayed.
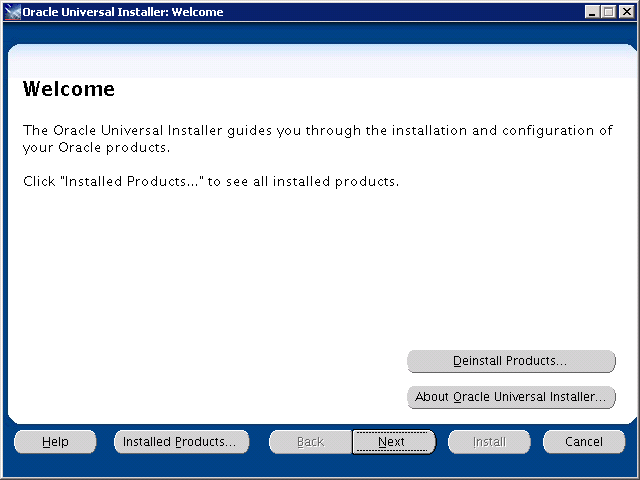
-
Double click this installer file to launch the installer:
/Disk1/install/runInstaller.shNote:
The unzipped installer files will be in the location specified in the section of this guide entitled Distribute and Unzip the Management Agent Installer Application in the subsection entitled: UNIXThis process opens a Microsoft Windows command window as shown in the below example.
After the OUI installer is launched, the command window is closed and the Welcome screen is displayed.
-
On Welcome, click the Next button.
-
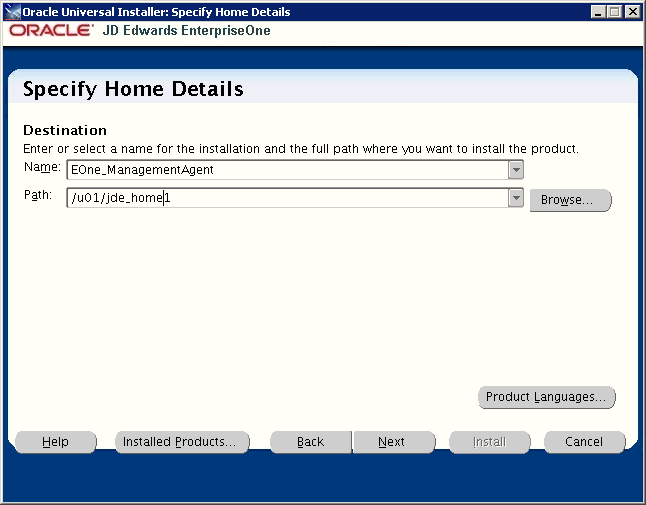
On Specify Home Details, complete these fields:
-
Name:
Enter a name for the Management Agent. The default name is:
EOne_Management_Agent
-
Path:
The installer automatically detects the root mount point location on the machine and by default appends this value:
jde_homeNote:
Although jde_home is the default and recommended setting, you can specify any value to replace the default value.The directory that you specify cannot already exist.
-
-
On Welcome to Wizard for JD Edwards Server Manager Management Agent, click the Next button.
-
On Server Manager Management Agent, complete these fields:
-
Management console machine
You must specify the host name of an existing Management Console machine.
The installer verifies the connection to the Management Console during the install. The Management Console machine must be started and the Management Console must be running in order to run the installer. In some cases, depending on your machine, operating systems, or network, you might need to fully qualify your machine name. For example, instead of specifying only
dnrramuvm2you might need to specifydnrramuvm2.mlab.jdedwards.com.Tip:
You can determine the name of your Management Console from the information supplied on the Management Agent Installers screen. For navigation, refer to Step 2 in the section entitled: Section 5.1, "Obtain the Management Agent Installer Application". You can also view thereadme.txtfile in the root directory of the Management Console. -
Management console HTTP port
You must specify a valid port of an existing Management Console machine.
The installer verifies the port connection to the Management Console. The machine must be started and the Management Console must be running in order to run the installer.
Tip:
You can determine the port of your Management Console from the information supplied on the Management Agent Installers screen. For navigation, refer to Step 2 in the section entitled: Section 5.1, "Obtain the Management Agent Installer Application".
-
-
Click the Next button to verify the machine and port values.
-
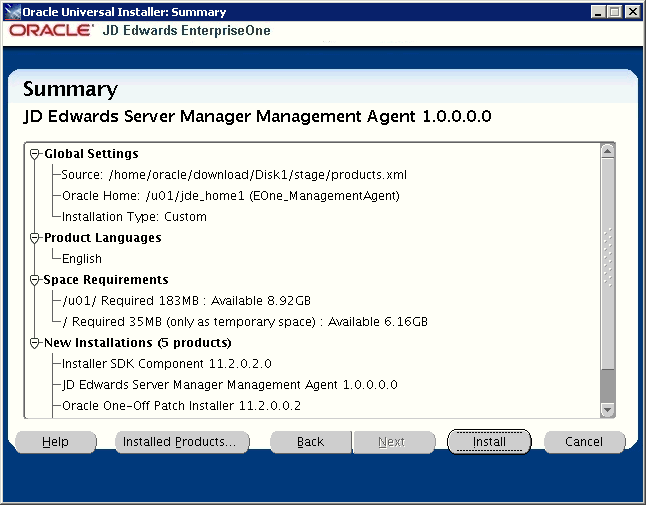
On Summary, review the information and click the Install button to begin the installation.
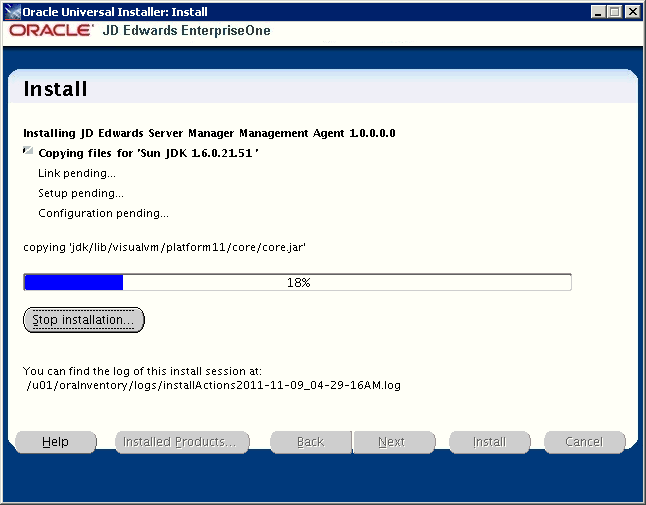
The Management Agent installer displays a panel showing the ongoing status of the installation.
-
When the installation of the database finishes, the End of Installation screen is displayed.
Caution:
Examine the Installer Logs. This screen also displays the location of the install log. Even though the screen indicates that the installation was successful, you should you should always check the logs before you attempt to run the Deployment Server. The file is named log.txt and is located in the Deployment Server installation directory. For example:/u01/oraInventory/logs/installActions2011-11-09_04-29-16AM.log -
Click the Exit button.
-
On the Exit dialog, click the Yes button to confirm you want to exit the Management Agent installer.
Note:
After a successful installation, the Management Agent automatically starts and connects to the Server Manager Management Console. The resulting newly installed Managed Home can be viewed in the Management Dashboard of the Management Console.5.3.3 IBM i (OS400)
You cannot run the OS400 Management Agent installer directly on the IBM i machine. Therefore you must download and extract the Management Agent Installer file on a Microsoft Windows machine as described in the section of this guide entitled: Distribute and Unzip the Management Agent Installer Application in the subsection entitled: IBM i (OS400). Likewise, you must run the Management Agent installer on a Windows machine, as described in this procedure.
Caution:
To deinstall the Management Agent from the IBM i machine, you must perform the deinstall from this same Microsoft Windows machine. This is because only the machine on which the installer runs contains the requisite information to perform the deinstallation.Before you run the Management Agent installer for IBM i OS/400, you must ensure that iSeries Navigator is installed on the IBM i target machine.
-
On the Microsoft Windows machine where you extracted the
.zipfile, and which is mapped to the IBM i machine, run this file:/Disk1/install/setup.exe
-
On the Microsoft Windows machine where you extracted the
.zipfile, and which is mapped to the IBM i machine, run this file:/Disk1/install/setup.exeNote:
The unzipped installer files will be in the location specified in the section of this guide entitled Distribute and Unzip the Management Agent Installer Application in the subsection entitled: IBM i (OS400)This process opens a Microsoft Windows command window as shown in the below example.
After the OUI installer is launched, the command window is closed and the Welcome screen is displayed.
-
On Welcome, click the Next button.
-
On Specify Home Details, complete these fields:
-
Name:
Enter a name for the Management Agent. The default name is:
EOne_Management_Agent
-
Path:
The installer automatically detects the root drive location on the Microsoft Windows machine and by default appends this value:
jde_homeNote:
Although jde_home is the default and recommended setting, you can specify any value to replace the default value.The directory that you specify cannot already exist.
-
-
On Welcome to Wizard for JD Edwards Server Manager Management Agent, click the Next button.

-
On iSeries Server and User Profile, complete these fields:
-
iSeries Server Name
Enter the name of your IBM i target server.
-
iSeries User Profile
Enter the user profile for the IBM i target server on which the Management Agent will be installed.
-
User Password
Enter the password for the IBM i user profile specified in the previous field.
-
Confirm Password
Confirm the password for the IBM i user profile specified in the previous field.
-
-
Click the Next button.
-
On Server Manager Management Agent, complete these fields:
-
Management console machine
You must specify the host name of an existing Management Console machine.
The installer verifies the connection to the Management Console during the install. The Management Console machine must be started and the Management Console must be running in order to run the installer. In some cases, depending on your machine, operating systems, or network, you might need to fully qualify your machine name. For example, instead of specifying only
dnrramuvm2you might need to specifydnrramuvm2.mlab.jdedwards.com.Tip:
You can determine the name of your Management Console from the information supplied on the Management Agent Installers screen. For navigation, refer to Step 2 in the section entitled: Section 5.1, "Obtain the Management Agent Installer Application". You can also view thereadme.txtfile in the root directory of the Management Console. -
Management console HTTP port
You must specify a valid port of an existing Management Console machine.
The installer verifies the port connection to the Management Console. The machine must be started and the Management Console must be running in order to run the installer.
Tip:
You can determine the port of your Management Console from the information supplied on the Management Agent Installers screen. For navigation, refer to Step 2 in the section entitled: Section 5.1, "Obtain the Management Agent Installer Application".
-
-
Click the Next button to verify the machine and port values.

-
On Summary, review the information and click the Install button to begin the installation.
The Management Agent installer displays a panel showing the ongoing status of the installation.
-
When the installation of the database finishes, the End of Installation screen is displayed.
Caution:
Examine the Installer Logs. This screen also displays the location of the install log. Even though the screen indicates that the installation was successful, you should you should always check the logs before you attempt to run the Deployment Server. The file is named log.txt and is located in the Deployment Server installation directory. For example:C:\Program Files\Oracle\Inventory\logs\InstallActions\ installActionsyyyy-mm-dd_hh-mm-ssPM.log -
Click the Exit button.
-
On the Exit dialog, click the Yes button to confirm you want to exit the Management Agent installer.
Note:
At the end of the installation of the Management Agent installer for OS/400, an agent installation directory will exist in the IFS directory root on the IBM i machine. The name of the directory is:jde_home_x_Agent
where "x", if it exists, is the numeric value to differentiate the jde_home if multiple agents exist on this machine.
For example, the IFS structure for the Management Agent install might look like this:

5.4 Post Installation Steps for WebLogic 11g, WebLogic 12c, WebSphere 7.0, or WebSphere 8.5 Web Server Instances
If you are going to be managing either a WebLogic 11g web server or a WebSphere 7.0 or 8.5 web server instance, the Server Manager management agent must be modified to use the correct JVM.
This section describes post installation tasks for these application servers:
5.4.1 WebLogic 11g
JD Edwards EnterpriseOne applications running under WebLogic web servers require that the WebLogic server uses a 64-bit JVM. In order to successfully manage a WebLogic server you must modify the Server Manager management agent to use a 64-bit, version 1.6 JVM.
This section describes post installation tasks for these platforms:
5.4.1.1 Microsoft Windows
Note:
Microsoft Windows 2008 is the only Windows version currently supported with EnterpriseOne running under WebLogic.WebLogic server is not supported on IBM i.
To configure WebLogic 11g web servers to support a 64-bit JVM on the Microsoft Windows platform:
-
Locate the
installAgentService.batbatch file in the bin directory under the agent install location. -
Edit the
installAgentService.batfile to change the JAVA_HOME environment variable to point to an appropriate 64-bit, version 1.6 JDK or JRE directory. -
Run the
updateAgentService.batbatch file.This file stops, uninstalls, re-installs, and starts the agent service so that it will use the correct java program when it starts.
5.4.1.2 UNIX
To configure WebLogic 11g web servers to support a 64-bit JVM on any of the supported UNIX platforms:
-
Locate the
runAgentscript in the bin directory under the agent install location. -
Edit the
runAgentscript to change the JAVA_HOME environment variable to point to an appropriate 64-bit, version 1.6 JDK or JRE directory. -
Restart the Server Manager agent.
5.4.2 WebLogic 12c
JD Edwards EnterpriseOne applications running under WebLogic web servers require that the WebLogic server uses a 64-bit JVM. In order to successfully manage a WebLogic server you must modify the Server Manager management agent to use a 64-bit, version 1.7 JVM.
This section describes post installation tasks for these platforms:
5.4.2.1 Microsoft Windows
Note:
Microsoft Windows 2008 is the only Windows version currently supported with EnterpriseOne running under WebLogic.WebLogic server is not supported on IBM i.
To configure WebLogic 12c web servers to support a 64-bit JVM on the Microsoft Windows platform:
-
Locate the installAgentService.bat batch file in the bin directory under the agent install location.
-
Edit the installAgentService.bat file to change the JAVA_HOME environment variable to point to an appropriate 64-bit, version 1.7 JDK or JRE directory.
-
Run the updateAgentService.bat batch file.
This file stops, uninstalls, re-installs, and starts the agent service so that it will use the correct java program when it starts.
5.4.2.2 UNIX
To configure WebLogic 11g web servers to support a 64-bit JVM on any of the supported UNIX platforms:
-
Locate the runAgent script in the bin directory under the agent install location.
-
Edit the runAgent script to change the JAVA_HOME environment variable to point to an appropriate 64-bit, version 1.7 JDK or JRE directory.
-
Restart the Server Manager agent.
5.4.3 WebSphere 7.0 and WebSphere 8.5
WebSphere 7.0 web servers use a version 1.6 JVM. In order to successfully manage a WebSphere 7.0 server you must modify the Server Manager management agent to use an appropriate version 1.6 JVM.
This section describes post installation tasks for these platforms:
5.4.3.1 Microsoft Windows
To configure WebSphere 7 web servers to support a 64-bit JVM on the Microsoft Windows platform:
-
Locate the
installAgentService.batbatch file in the bin directory under the agent install location -
Edit the
installAgentService.batscript to change the JAVA_HOME environment variable to point to an appropriate version 1.6 JDK or JRE directory.Tools Release 9.1 Update 2.3. For IBM WebSphere 8.5, you must ensure that this points to the SDK 1.7 delivered by IBM WebSphere 8.5. For additional information on this JDK 1.7, refer to the JD Edwards EnterpriseOne HTML Server Reference Guide for Microsoft Windows.
-
Run the
updateAgentService.batbatch file.This file stops, uninstalls, re-installs, and starts the agent service so that it will use the correct java program when it starts.
5.4.3.2 UNIX or IBM i (OS400)
To configure WebSphere 7 web servers to support a 64-bit JVM on any of the supported UNIX platforms or on IBM i:
-
Locate the
runAgentscript in the bin directory under the agent install location -
Edit the
runAgentscript to change the JAVA_HOME environment variable to point to an appropriate version 1.6 JDK or JRE directory.Tools Release 9.1 Update 2.3. For IBM WebSphere 8.5 and non-IBM platforms, you must ensure that this points to the SDK 1.7 delivered by IBM WebSphere 8.5 or other platform-specific JDK. For additional information on the JDK 1.7 delivered by WebSphere, refer to the JD Edwards EnterpriseOne HTML Server Reference Guide for your platform.
Tools Release 9.1 Update 2.3. For IBM i, the SDK 1.7 is part of the license program for Java option 14 and 15.
-
Restart the Server Manager agent.
5.5 Troubleshoot the Management Agent Installation
This section describes:
-
Section 5.5.4, "Management Agent Cannot Manage Oracle Application Server on Unix"
-
Section 5.5.5, "Management Agent Cannot Start or Stop a Unix Enterprise Server"
5.5.1 Management Agent Installer Failed
If the Management Agent installer fails to complete, an exception screen is displayed. For details, examine the log file located in the Oracle\Inventory\logs directory:
Tip:
The log file location is displayed on the End of Installation screen for the Management Agent installer. Refer to the section of this guide entitled: Run the Management Agent Installer.For example, the complete path and log file name might be:
C:\Program Files (x86)\Oracle\Inventory\logs\installActions2011-10-18-02-15-14PM.log
5.5.2 Management Agent Does Not Start
If the Management Agent does not start, verify that the port that the home agent is using is not used by another application. To determine the port that the home agent is using, view the e1agent_0.log file that is located in the root of specified installation drive in the installation directory of the Managed Home (the default value is JDE_HOME). This location is shown on the End of Installation screen when you installed the Management Console. For example:
C:\Program Files (x86)\Oracle\Inventory\logs\installActions2011-10-18-02-15-14PM.log
The log file should contain this message:
INFO: Starting the management agent listener on port 'xxxxx'
5.5.3 Management Agent Dies on Unix or IBM i
You must use the & switch when invoking the startAgent script to start the Management Agent as a background job. If you do not use the & switch, the Management Agent process terminates when the shell is exited on UNIX or shell is exited on IBM i.
5.5.4 Management Agent Cannot Manage Oracle Application Server on Unix
If you are using the Management Agent to manage an Oracle Application Server on a Unix platform, you must install the Management Agent with the same user and group as the Oracle Application Server. Use a directory listing to confirm that this is the case.
For example, this listing illustrates that the Management Agent was installed with user=oracle and group=oinstall:
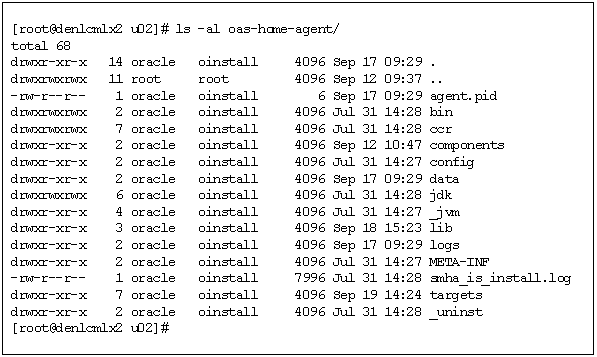
If the Management Agent is not installed as the correct user or group, use the chown command to change the owner or group of the Management Agent. For example:
chown R oracle:oinstall /u02/JDE_HOME
5.5.5 Management Agent Cannot Start or Stop a Unix Enterprise Server
If you are using the Management Agent to manage a Unix Enterprise Server, you must install the Management Agent with the same user and group as the Unix Enterprise Server. Use a directory listing to confirm that this is the case.
For example, this listing illustrates that the Management Agent was installed with user=jde812 and group=jde812:
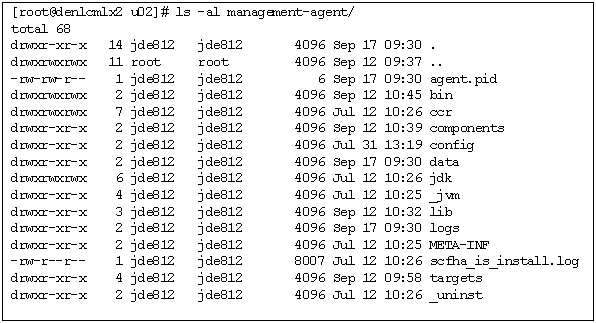
If the Management Agent is not installed as the correct user or group, use the chown command to change the owner or group of the Management Agent. For example:
chown R jde900:jde900 /u02/JDE_HOME
5.5.6 Management Agent Cannot Manage Secure Servers on WebSphere Application Server on IBM i
If you have trouble connecting to servers in a WAS profile for which administrative security is set to enabled, ensure that you have JDK 1.5 installed on the IBM i machine. The Management Agent needs security libraries from JDK 1.5 to connect to secure servers in WebSphere Application Server.
Tip:
The typical location for the JDK is:/QIBM/ProdData/java400/jdk15
5.6 Deinstall a Management Agent
Any Managed Instances registered or installed with a Managed Home must be removed before the Managed Home itself can be deinstalled. For instructions on removing an instance, refer to Chapter 19, "Remove a Managed Instance".
You must deinstall a Management Agent running the Oracle Universal Installer on the same machine that was originally used to install it.
This section describes deinstallation of the Management for these platforms:
5.6.1 Microsoft Windows and UNIX
Use this procedure to deinstall the Management Agent from Microsoft Windows and UNIX target machines. The Oracle Universal Installer must be used to properly deinstall the Management Agent.
Caution:
You must deinstall a Management Agent using the Oracle Universal Installer on the same machine that was originally used to install it.Caution:
If you will no longer use Server Manager on the machine on which you wish to deinstall the agent, before you deinstall the agent you should first deinstall any Server Manager-installed software components. Otherwise once the agent is deinstall you will no longer be able to deinstall those components.-
Launch Oracle Universal Installer:
-
Microsoft Windows
Disk1/install/setup.exeAlternately, you can navigate Start > Oracle - E1_Management_Agent_x > Oracle Installation Products > Universal Installer
where ”x”, if it exists, is the numeric value of the Management Agent that you want to deinstall.
-
UNIX
/<installation_home>/oui/bin/runInstaller.sh
After the OUI installer is launched, the Welcome screen is displayed.
-
-
On Welcome, click the Deinstall Products... button.
-
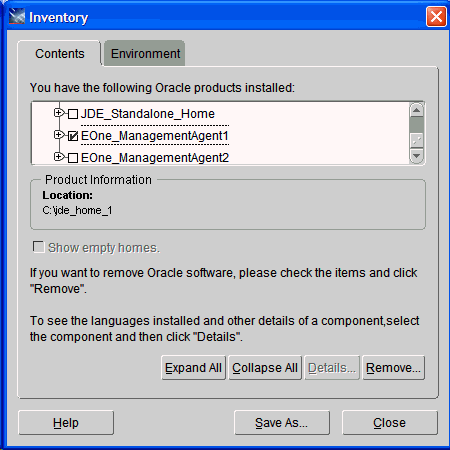
On Inventory, with the Contents tab selected, select the check box for the Management Agent that you want to deinstall. For example:
EOne_ManagementAgent1
-
Click the Remove button.
-
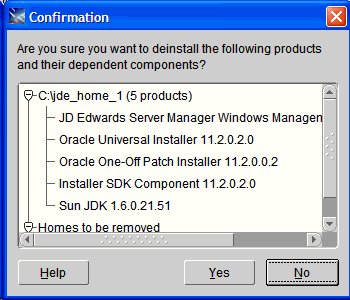
On Confirmation, ensure the selected jde_home on the target machine is that of the Management Agent that you want to install, and click the Yes button.
A deinstallation progress panel is displayed:
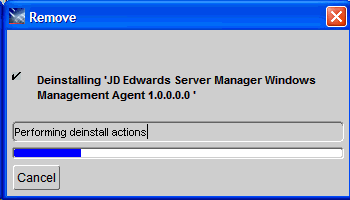
When the deinstallation complete, the Inventory screen is displayed.
-
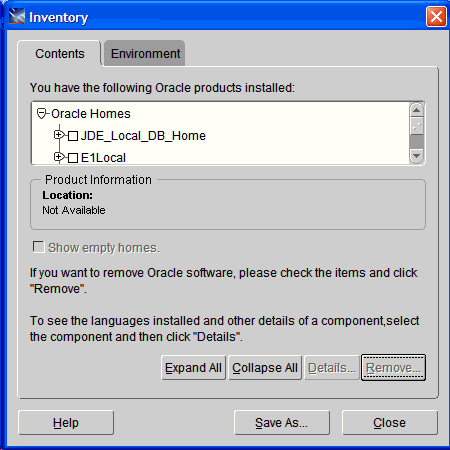
On Inventory, verify that the selected home for the Management Agent that you deinstalled is not displayed.
-
Click the Close button to close the Inventory panel and return to OUI.
-
On Welcome, click the Cancel button to exit the installer.
-
On the Exit dialog, click the Yes button to confirm you want to exit the installer.
5.6.2 IBM i OS/400
Use this procedure to deinstall the Management Agent from IBM i OS/400 target machines. The Oracle Universal Installer must be used to properly deinstall the Management Agent.
Caution:
You must deinstall a Management Agent running the Oracle Universal Installer on the same Microsoft Windows machine that was originally used to install it.Caution:
If you will no longer use Server Manager on the machine on which you wish to deinstall the agent, before you deinstall the agent you should first deinstall any Server Manager-installed software components. Otherwise once the agent is deinstall you will no longer be able to deinstall those components.-
Launch Oracle Universal Installer from this location:
Disk1/install/setup.exeAlternately, you can navigate Start > Oracle - E1_Management_Agent_x > Oracle Installation Products > Universal Installer
where "x", if it exists, is the numeric value of the Management Agent that you want to deinstall.
After the OUI installer is launched, the Welcome screen is displayed.
-
On Welcome, click the Deinstall Products... button.
-
On Inventory, with the Contents tab selected, select the check box for the Management Agent that you want to deinstall. For example:
EOne_ManagementAgent1
-
Click the Remove button.
-
On Confirmation, ensure the selected jde_home on the target machine is that of the Management Agent that you want to install, and click the Yes button.
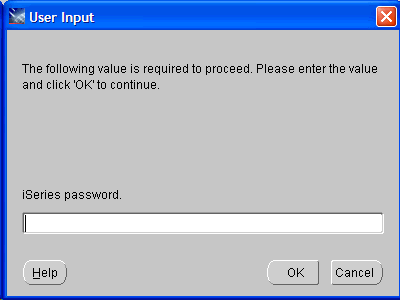
-
On the User Input dialog, enter the iSeries password.
-
Click the OK button.
A deinstallation progress panel is displayed:
-
When the deinstallation complete, the Inventory screen is displayed.
-
On Inventory, verify that the selected home for the Management Agent that you deinstalled is not displayed.
-
Click the Close button to close the Inventory panel and return to OUI.
-
On Welcome, click the Cancel button to exit the installer.
-
On the Exit dialog, click the Yes button to confirm you want to exit the installer.