2 Configuring the Application Interface Services Server
This chapter contains the following topics:
-
Section 2.2, "Deploying and Managing the AIS Server through Server Manager"
-
Section 2.4, "Remapping Fields for Customized EnterpriseOne Forms (Release 9.1 Update 4.6)"
2.1 Overview of the AIS Server Configuration for EnterpriseOne Mobile Enterprise Applications
EnterpriseOne mobile enterprise applications require a light interface to manage EnterpriseOne data from mobile devices. The Application Interface Services (AIS) Server provides a JSON over REST interface to EnterpriseOne applications and forms through the EnterpriseOne HTML Server. The AIS Server exposes this interface to enable communication between mobile applications and EnterpriseOne.
The AIS Server includes support for JSON representation of form service requests so mobile applications can easily format requests. The AIS Server submits these mobile application requests to the EnterpriseOne HTML server.
The AIS Server maintains sessions for mobile applications. You can configure the session timeouts for the AIS Server through Server Manager.
The following illustration shows how the AIS Server functions as the interface between mobile applications and the EnterpriseOne HTML Server.
Figure 2-1 JD Edwards EnterpriseOne AIS Server for Mobile Architecture
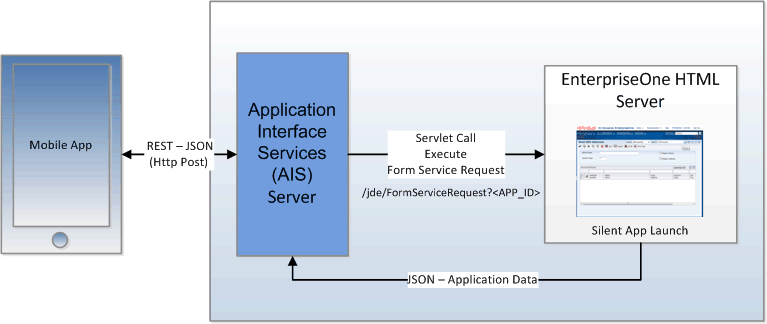
Description of "Figure 2-1 JD Edwards EnterpriseOne AIS Server for Mobile Architecture"
2.2 Deploying and Managing the AIS Server through Server Manager
Deploy the AIS Server as a managed instance through Server Manager. You can deploy the AIS Server on Oracle WebLogic Server or IBM WebSphere Application Server.
When deploying the AIS Server, remember the server name and port number. These values make up the URL that you need to provide to mobile users, for example: http://<ais_servername>:<portnumber>. The first time mobile users launch a mobile enterprise application, they are prompted to enter this URL to access the application.
For instructions on how to deploy the AIS Server as a managed instance, see "Create an Application Interface Services (AIS) Server as a New Managed Instance" in the JD Edwards EnterpriseOne Tools Server Manager Guide.
2.2.1 Managing the AIS Server through Server Manager
Server Manager provides settings and features that enable you to configure and manage the AIS Server. These include:
-
Configuration group settings to determine whether the Environment and Role fields and the Single Sign On option are displayed or hidden on the mobile application login screen. The configuration group settings also include settings for controlling session timeouts and other configuration options.
See "Configuration Groups" in the JD Edwards EnterpriseOne Tools Server Manager Guide for more information about configuration groups for all EnterpriseOne server types.
-
Starting with Tools Release 9.1 Update 5, runtime metrics that show various user and server-related information, which enable you to view a list of users connected to the AIS Server and monitor user activity.
See "Application Interface Services Server Runtime Metrics" in the JD Edwards EnterpriseOne Tools Server Manager Guide for more information.
-
Starting with Tools Release 9.1 Update 5, configuration group settings for the AIS Server. These settings include display options, AIS Server and HTML Server communication options, security options, and logging options.
See "EnterpriseOne Application Interface Services" in the JD Edwards EnterpriseOne Tools Server Manager Guide for more information.
2.3 Additional Required Server Configurations
After deploying the AIS Server through Server Manager, perform the following tasks in this section to complete the configuration between the AIS Server and EnterpriseOne HTML Server:
-
Configuring the Allowed Hosts Setting for the EnterpriseOne HTML Server
-
Verifying the JAVA Argument for AIS Server (Oracle WebLogic Server Only)
-
Configuring Oracle WebLogic Server Domain for HTTP Basic Authentication (Release 9.1 Update 5.5)
2.3.1 Configuring the Allowed Hosts Setting for the EnterpriseOne HTML Server
In Server Manager, configure the Allowed Hosts setting for the EnterpriseOne HTML Server to specify the AIS Server host from which the EnterpriseOne HTML Server will receive requests.
-
In Server Manager, access the EnterpriseOne HTML Server managed instance.
-
Expand the Form Service area, and in the Allowed Hosts field, enter the IP Address of the AIS Server.
-
Restart the server for the changes to take effect.
Note:
If the mobile enterprise application fails to connect to the server, verify that the IP Address of the AIS Server has been entered correctly in the Allowed Hosts field. If the IP Address is correct and the connection still fails, then enter an * (asterisk) in the Allowed Hosts setting, which enables the EnterpriseOne HTML Server to accept requests from any host.2.3.2 Verifying the JAVA Argument for AIS Server (Oracle WebLogic Server Only)
If the AIS Server is deployed on Oracle WebLogic Server, you must make sure that the server configuration includes a JAVA argument for starting the server. To do so:
-
In the WebLogic Admin Console, locate the AIS Server instance.
-
Click the Server Start tab.
-
Verify that the following argument is in the Arguments field:
-DuseSunHttpHandler=true
2.3.3 Configuring SSL for the AIS Server
The availability of the AIS Server port number can enable mobile client access to the AIS Server without the use of a VPN. To protect information sent between the mobile client and the AIS Server, you should use SSL when configuring the AIS Server. If you enable the AIS Server for SSL (HTTPS), you must use a valid certificate. The encryption algorithm for the certificate must be one of these three types:
-
Signature.MD2withRSA
-
Signature.MD5withRSA
-
Signature.SHA1withRSA
2.3.4 Configuring Oracle WebLogic Server Domain for HTTP Basic Authentication (Release 9.1 Update 5.5)
Starting with EnterpriseOne Tools Release 9.1.5.5, REST services on the JD Edwards EnterpriseOne AIS Server can use HTTP Basic Authentication for access. Support for HTTP Basic Authentication is enabled out of the box and is required to run the EnterpriseOne Orchestrator Client, create custom Java calls from orchestrations, and use the AIS client Java API (versions 1.2.1.x and higher).
If your AIS Server is deployed on Oracle WebLogic Server, the WebLogic Server may require an additional configuration depending on the WebLogic Server configuration.
If you are maintaining a user registry in Oracle WebLogic Server that matches the user registry in EnterpriseOne, with identical sets of user names and passwords in each system, you do NOT need to modify your configuration.
If you are NOT maintaining identical sets of users in Oracle WebLogic Server and EnterpriseOne, then you need to perform the following steps to modify your Oracle WebLogic Server configuration. This ensures that Oracle WebLogic Server will not intercept HTTP Basic Authentication credentials passed from the REST service.
-
In the WebLogic Server domain for your AIS Server, in the Config directory, find the config.xml file.
-
Add this configuration as the last line within the
<security-configuration>element, just before the</security-configuration>tag:<enforce-valid-basic-auth-credentials>false</enforce-valid-basic-auth-credentials> -
Restart the AIS Server for the changes to take effect.
The following is an example of this configuration in the <security-configuration> element:
<node-manager-password-encrypted>{AES}tzAokzTHACTNNmkuutLPQEpP8bfk7Ble24vmoycooic=</node-manager-password-encrypted>
    <enforce-valid-basic-auth-credentials>false</enforce-valid-basic-auth-credentials>
  </security-configuration>
  <server>
2.4 Remapping Fields for Customized EnterpriseOne Forms (Release 9.1 Update 4.6)
This section contains the following topics:
2.4.1 Overview
If an EnterpriseOne mobile enterprise application invokes an EnterpriseOne form that has been customized, the mobile enterprise application might return unexpected data or not function. Customizations that can make a mobile enterprise application inoperative include changes to an EnterpriseOne form in Form Design Aid (FDA) or fields modified with global data dictionary overrides—overrides with no specified jargon or language.
To resolve this issue, Oracle provides a comparison utility called the JDE JSON Mapping Tool. This tool enables you to compare and identify mismatched fields between the mobile enterprise application and EnterpriseOne, and remap the fields through AIS endPoint mappings.
2.4.1.1 How AIS endPoint Mappings Work
JD Edwards EnterpriseOne mobile enterprise applications are developed based on the JSON output returned from a specific EnterpriseOne environment. For mobile enterprise applications to function properly, the client (mobile enterprise application) must receive JSON responses from the AIS Server (server JSON) that match the expected responses in the client. This is referred to as the client contract.
To generate modified JSON output, the system uses an AISEndPoint.xml file deployed to the EnterpriseOne AIS Server. The AISEndPoint.xml file contains ID mappings in endPoint elements. The ID mappings map the fields expected in the mobile enterprise application client to the fields being sent by the AIS Server for each EnterpriseOne form.
Note:
The AISEndpoint.xml file is included in the AIS deployment object (war file).In the AISEndPoint.xml file, the endPoint mapping is organized in a hierarchy that is equal to the hierarchy of an EnterpriseOne application form, which follows this order:
-
Form inputs for the main form or the parent form.
-
Any additional forms, which can be the main form or subforms.
-
Any form data controls, form action controls, or a grid within a form.
-
Any columns within a grid.
The AIS Server uses an endPoint mapping to transform the IDs used for both the input and output of a form service request. For input, the requested form IDs and all the IDs used in any grid or form action are replaced with values the server is expecting. For output, all of the IDs within the JSON response for the form are replaced with values expected by the mobile enterprise application client. Hence the "server" and "client" attributes in the mapping.
Transformations occur only when the application and form listed in the endPoint "module" parameter in the endPoint mapping match the application and form ID requested in the "formName" parameter of the service call. The module might not match the value in the "appOID" parameter. In this case, if the module matches the requested form name, the AIS Server will execute the form defined in the appOID, calling a different form than the form listed in the "formName" parameter.
The following example shows an endPoint mapping in the AISEndPoint.xml file.
Example 2-1 Example of an AIS Endpoint Mapping
<processingOptions appIdClient="P87NLPF1" appIdServer="P87NLPF1">
         <option longClient="dtSDFromDate1_34" longServer="dtSDFromDate_3"/>
         <option longClient="nInteger015_55" longServer="nInteger01_5"/>
  </processingOptions>

<endPoint module="P87TEST_W87NLPFA" appOID="P87NLPF_W87NLPFA" type="JAS">
  <mapping>
   <!--Form Inputs - both server and client required -->
     <formInput client="3" server="1"/>
     <formInput client="4" server="2"/>

<!--Forms - both server and client required, 0 is the id of the parent form for power forms -->
      <form client="0" server="0">
<!--controlData - both short and long names required with ids -->
            <controlData longClient="txtEnterpriseOneEventPoint01_46"
                             longServer="txtEnterpriseOneEventPoint01_36"/>
            <!--controlAction - both client and server ids required -->
            <controlAction client="95" server="15"/>
<!--Grid columns - both server and client required, both short and long names required -->
<column longClient="sPhoneType_89"
                            longServer="sPhoneType_25"/>
                </grid>
            </form>
<!--Forms - both server and client required, subforms have non-zero ids -->
            <form client="66" server="26">
                <controlAction client="30" server="50"/>
                < controlData longClient="txtEnterpriseOneEventPoint01_99"
                             longServer="txtEnterpriseOneEventPoint01_36"/>
                <grid client="20" server="20">
      <column    longClient="sPhoneType_88"
                            longServer="sPhoneType_25"/>
                </grid>
            </form>
        </mapping>
    </endPoint>
2.4.2 Using the JDE JSON Mapping Tool to Map Mismatched Fields
The JDE JSON Mapping Tool enables you to update the AISEndPoint.xml file with the proper JSON client-server mappings. After updating the AISEndPoint.xml file, you deploy it to the AIS Server to produce the expected JSON responses. The tool enables you to:
-
Map mismatched fields to the current fields in the EnterpriseOne form.
-
Save the mappings to a file so that later, you can incorporate the mappings into the AISEndPoint.xml file.
To map mismatched fields:
-
Locate the JDE_JSONMappingTool.zip file and unzip it to your local machine.
-
Double-click the jar file to launch the application.
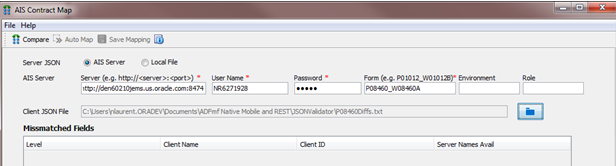
-
Complete the following fields to identify the location of the server JSON information:
-
Server. Enter the path to the server where the AIS Server is deployed, for example:
http://<server>:<port> -
User Name. Enter a user name for the EnterpriseOne HTML Server.
-
Password. Enter a password for the EnterpriseOne HTML Server.
-
Form. Use the following syntax to identify the form for which you want to compare form service responses:
<application ID>_<form ID>. For example:P08460_W08460A -
Environment.
-
Role.
Note:
You can also select the Local File option if you have the file with server JSON information on your local machine. -
-
In the Client JSON File field, click the folder button to select the locally stored file with the client contract, which contains the client's expected JSON response for that form.
-
Click the Compare button in the menu bar. The tool displays any mismatched fields in the grid.

-
Click the Auto Map button to map the fields automatically.
Auto Map matches fields where only the ID is different, or it matches fields that have the same ID and type but different names.
-
Review the mappings and map any remaining mismatched fields manually by using the drop-down menu in the Server Names Avail column.
-
Click the Save Mapping button and enter a unique name to save the xml file as a new file. Later, you must manually copy the endpoint information from this file into AISEndPoint.xml file.
-
Click OK on the confirmation message.
-
Open the xml file to review and verify the output.
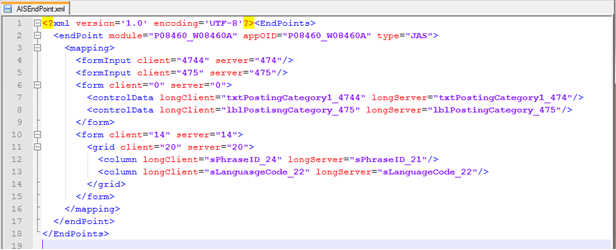
Description of the illustration endpoint_xml_file.png
-
Follow the instructions in the Modifying and Deploying AIS Field Mappings section to deploy the updated mappings.
2.4.3 Modifying and Deploying AIS Field Mappings
Perform the following tasks to modify and deploy AIS field mappings:
-
Locate and Save the AIS Server Component JAR File as a New JAR
-
Modify the AISEndpoint.xml in the AIS Server Component JAR File
2.4.3.1 Locate and Save the AIS Server Component JAR File as a New JAR
To do so:
-
Locate the JAR file, which should be named similar to this:
E1_AISServer_9.1.4.6_03-13-2014_12_48.jar.This is the same JAR file used to deploy the AIS Server.
-
Copy the JAR file to your local machine, renaming the file to differentiate it from the original.
2.4.3.2 Modify the AISEndpoint.xml in the AIS Server Component JAR File
Update the AISEndpoint.xml file in the new JAR file with the endPoint mappings from the mapping file generated from the JDE JSON Mapping Tool. To do so:
-
Use a zip utility to open the archive.
Note:
If you use 7-zip, you can open it (without unzipping it) and drill down to the folder that contains the JAR file, edit the JAR file, and then save it. If you use another zip utility, you may have to unzip the archive, edit the JAR file, and then rezip it. -
In an editor, open the AISEndPoint.xml, which you can find in the following location:
\E1_AISServer_Release_Name_ReleaseDate.jar\JDERestProxy.ear\JDERestProxy.war\WEB-INF\classes\With Release 9.1.5.5, the location of the AISEndPoint.xml has changed.
If you do not have the file path to the XML files defined in the Server Manager configuration settings for AIS, you can directly deploy the AISEndPoint.xml file as always, but in this location in the war file:
\E1_AISServer_Release_Name_ReleaseDate.jar\JDERestProxy.ear\JDERestProxy.war\WEB-INF\classes\Configuration\If you defined the path to the XML files in Server Manager, you do not need to modify the deployment. Simply place the AISEndPoint.xml file directly in the folder defined in the configuration.
If you defined the path to the XML files in Server Manager, and you choose to not place the AISEndPoint.xml file in that location, the system will still look for the AISEndPoint.xml file in the deployment JAR file.
-
In an editor, open the mapping file generated by the JDE JSON Mapping Tool.
-
In the mapping file, copy each
<endPoint>section from the start tag to the end tag, and paste it into the AISEndPoint.xml as a child of the<EndPoints>element. -
After you modify it, save and close it. If a message box appears asking if you want to update the modified file, click OK.
2.4.3.3 Use Server Manager to Deploy the New JAR File with the Updated AISEndpoint.xml to an AIS Server Instance
To do so:
-
In the JAR file, update the date and time.
-
Navigate to the top level of the JAR file. Click OK if any dialog boxes appear asking if you want to update files in the archive.
-
Right-click the scf-manifest.xml file and select Open.
-
At the top of the file, modify the description attribute to uniquely identify it.
The following screen shot shows an example of an scf-manifest.xml file with an updated description and time:

Description of the illustration scf-manifest_xml.png
-
Save and close the file. Click OK if a dialog box appears asking if you want to update the archive.
-
Close the archive or rezip the files into the archive, depending on the zip utility you are using.
-
Access Server Manager.
-
Find the AIS Server managed instance and click the Change button to change the software version to the following base version if it is not already set:
EnterpriseOne Application Interface Services Server 9.1.4.6 03-13-2014_12_48
-
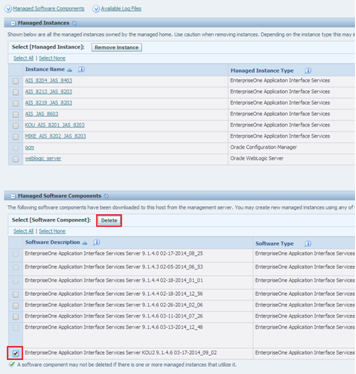
Go to the managed home and delete the previous component that was assigned to your server.
-
In the left pane, select Manage Software, and then click the Choose File button.
-
Select the file you just modified, and then click the Upload button.
-
If you receive the following message, delete any existing uploads that were based on the same JAR. This will not affect any current deployments.
"Caution: The uploaded file already exists in the management console. The uploaded file has been discarded."After uploading the file, you need to distribute it.
-
To distribute the file, select the managed home with the AIS Server instances. If the check box for the AIS Server instance is not selected, then you need to perform steps b and c.
-
Go to your managed instance and stop it.
-
For the Software Component Version, click the Change button, select the new one you just distributed, and then click the Change Component button.
Server Manager automatically restarts the server.
-
Test the updated mappings by running the mobile enterprise application. If the application functions properly, you have successfully updated the mappings.