21 Activate PC Download
This chapter contains the topic:
21.1 Activating PC Download
From the FASTR menu (G83), choose Financial Statements
You can make certain modifications to your FASTR report on a PC that you cannot make using an AS/400. These modifications include entering footnotes in your report and adding colors to your headings.
Before you can make these modifications, you must activate a PC download so that you can transfer a report from the AS/400 to a PC.
21.1.1 To activate a PC download
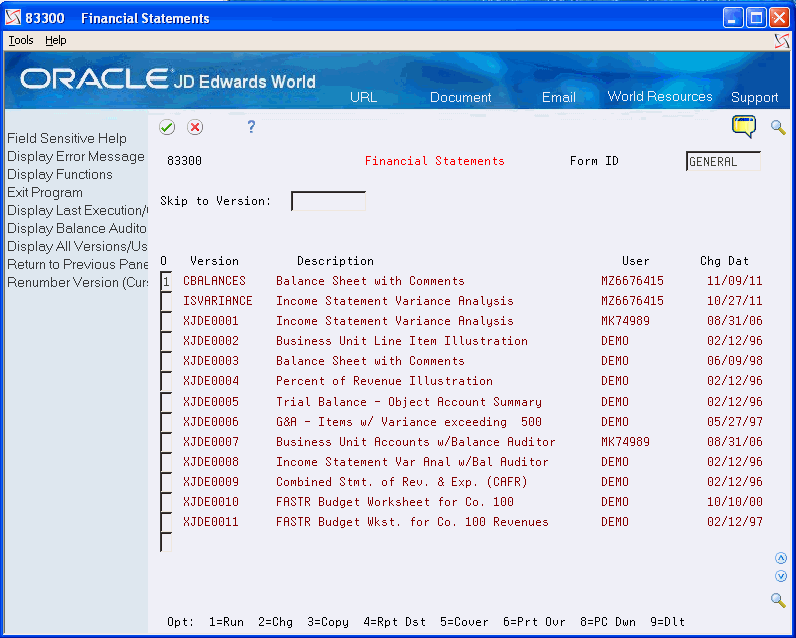
On Financial Statements
-
Access FASTR Definition Options.
-
Choose Override Default Information.
-
Page down to the second screen.
Figure 21-1 Override Default Information screen
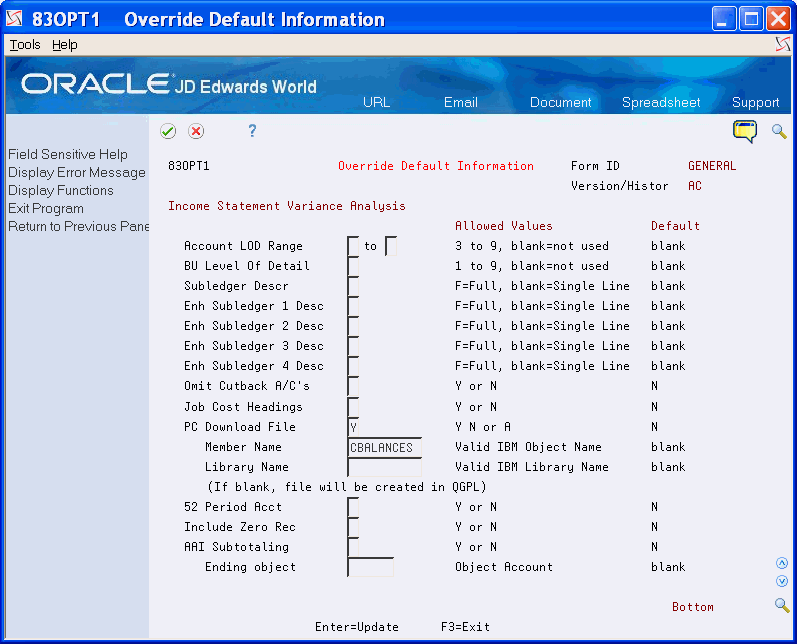
Description of "Figure 21-1 Override Default Information screen"
-
On Override Default Information, enter Y in the following field:
-
PC Download File
-
-
Enter the version ID in the following field:
-
Member Name
-
-
Enter the library name in the following field:
-
Library Name (must be a valid IBM object name)
Note:
If left blank, the file will be created in QGPL
-
-
Press Enter until you return to the versions list.
-
On the versions list, enter 1 in the field next to the version you want to submit.
-
When the version is finished running, resubmit it by entering 8 in the field next to your version.
Figure 21-3 PC Download Processing Options screen
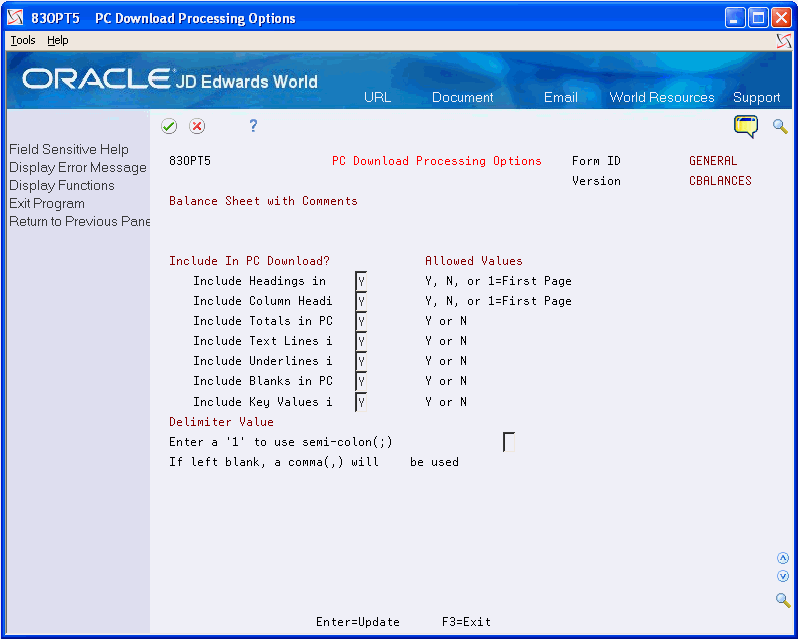
Description of "Figure 21-3 PC Download Processing Options screen"
-
On PC Download Processing Options, complete the following fields to include in the PC download:
-
Include Headings
-
Include Column Headings
-
Include Totals
-
Include Text Lines
-
Include Underlines
-
Include Blanks
-
Include Key Values
Note:
To omit headings from being downloaded to your spreadsheet, suppress all of the PC download processing options.
Field Explanation Include Headings in PC Download Determines which report headings are included in the PC download. Values are: Y – Include all heading report lines.
1 – Include only the heading report lines from the first page.
Include Column Headings in PC Download Determines which column headings are included in the PC download. Values are: Y – Include all column heading lines.
1 – Include only the column heading lines from the first page.
Include Totals in PC Download Determines which report totals are included in the PC download. Values are: Y – Include report totals. These totals are the level break totals in column-only reports and the calculated rows in row reports.
N – Do not include report totals.
Include Text Lines in PC Download Determines which text lines are included in the PC download. Values are: Y – Include text report lines.
N – Do not include text report lines.
Include Underlines in PC Download Values are: Y – Include underlines from reports in the PC download.
N – Do not include underlines.
Include Blanks in PC Download Values are: Y – Include blank report lines from reports in the PC download.
N – Do not include blank report lines.
Include Key Values in PC Download Values are: Y – Include key values from the keys defined on General Specifications in the additional columns of the PC download.
N – Do not include key values.
-
-
Press Enter to reformat the version that was processed and save it in an EBCDIC format to the disk fileF8309.
Figure 21-4 Display Physical File Master screen
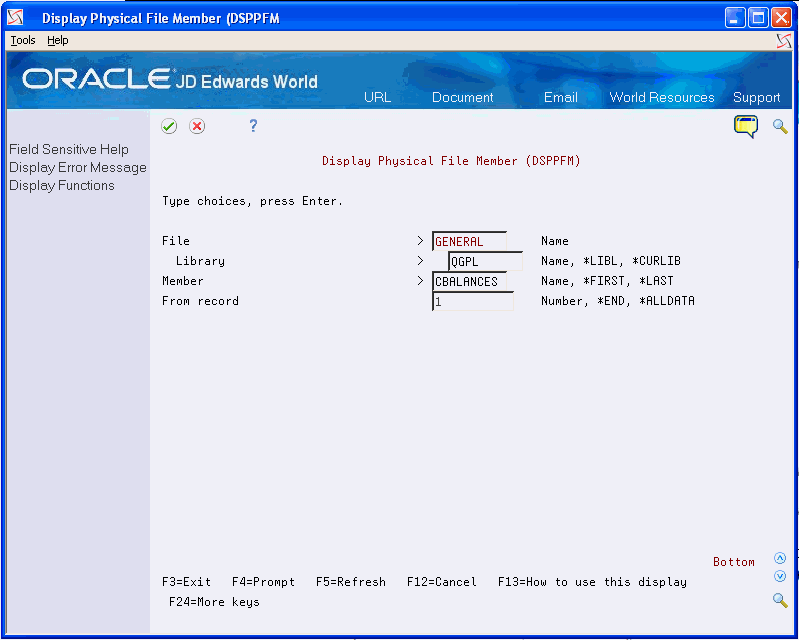
Description of "Figure 21-4 Display Physical File Master screen"
-
You should have the file to be converted to ASCII at this point. You can view this file by entering the following commands on the AS/400 command line:
-
From the Command Line: DSPPFM (F4)
-
File: FASTR Form ID (e.g., General)
-
Library: QGPL, or library specified in Override Default Information
-
Member: Version Name (e.g., xjde0001)
-
-
Press Enter.
Note:
If the file exists and resembles the version that you submitted, proceed to the next steps; otherwise, return to Step 1. You are ready to use the PC support product to create the transfer.
Transferring the Data via your PC Support Product
-
Access your PC support product. The following instructions are for IBM Client Access on a Windows NT 4.0 platform.
-
Double click on the selection Data Transfer from AS/400.
-
AS/400 System Name: Type your system name (e.g., JDEG1)
-
File Name: Click on Browse and select -
-
Library/Form Name/(Version Name ) e.g., QGPL/TEACHER(XJDE0001)
-
PC Output Device: File
-
Select the subdirectory and file name with a .prn extension where you want this file to reside on your PC.
-
Click Transfer Data From AS/400.
-
A window appears with the message: Receive completed successfully.
Excel Instructions
-
Once in Excel, click the File/Open button.
-
Locate your file with the .prn extension in the subdirectory and open it.
-
In the Text Import Wizard Step 1 of 3 window, select the following settings:
Delimited
File Origin = DOS or OS/2 (PC-8)
-
Click Next.
-
In the Text Import Wizard Step 2 of 3 window, select the following options:
For Delimiters, select comma only
Text Qualifier: '"
-
Click Next
-
In the Text Import Wizard step 3 of 3 window, select the following options:
Column Data Format: General
-
Click Finish.
-
Organize the data as needed.