11 Review Test Results
This chapter contains these topics:
11.1 Reviewing Test Results
The test results contain important information that can help you closely monitor product quality. You can review test results to help you:
-
Make timely decisions about product quality to reduce the high costs of rework and scrap
-
Reduce labor costs by minimizing the time spent inspecting material, collecting data, and reworking or repairing defective material
-
Reduce service trips by identifying suspect components before shipment
-
Reduce material scrap costs by identifying inferior components
-
Improve overall product quality and customer satisfaction
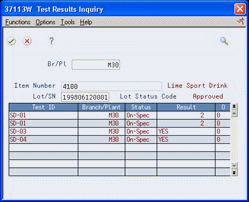
11.2 Reviewing Test Results for an Item
From Manufacturing Systems (G3), choose Quality Management
From Quality Management (G37), choose Test Results Inquiry
You can inquire on and review the test results for an individual item. You can select the item by test category codes, order number, lot or serial number, customer/supplier number, or by the item number alone. This allows you to gather and compile your information more efficiently.
On Test Results Inquiry
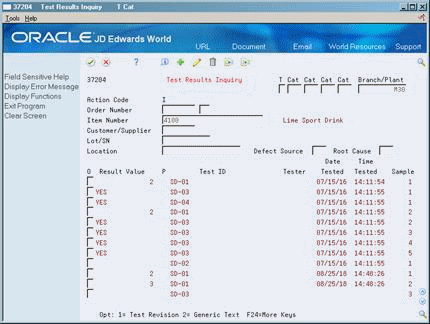
-
Complete the following fields to find test results:
-
Order Number
-
Item Number
-
Customer/Supplier
-
Lot/SN
-
Location
-
-
Review the following fields:
-
Result Value
-
P
-
Test ID
-
Tester
-
Date Tested
-
Time Tested
-
Sample
-
-
Access the detail area (F4).
Figure 11-2 Test Results Inquiry (Detail) screen
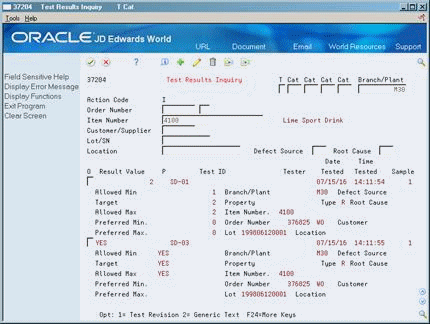
Description of "Figure 11-2 Test Results Inquiry (Detail) screen"
-
Review the following additional fields:
-
Allowed Min
-
Target
-
Allowed Max
-
Preferred Min.
-
Preferred Max.
-
Branch/Plant
-
Property
-
Item Number
-
Order Number
-
Lot
-
Defect Source
-
Root Cause
-
Customer
-
Location
-
| Field | Explanation |
|---|---|
| T | Controls how the system processes tests as you enter test results. Allowed values are:
R – Required (Default) - Result values are required during Results Entry. The system does not allow an item to pass quality inspection until you enter results for each required test. O – Optional - Result values are optional during Results Entry. The system allows an item to pass quality inspection regardless of whether you have entered results for each optional test. G – Guaranteed - Result values are optional during Results Entry. You can control whether Guaranteed tests appear as you enter test results with the 'Display Test' field on Test Revisions. In addition, guaranteed tests print on the Certificate of Analysis. |
| Cat | A test code. |
| Result Value | The result of the performed test. |
| P | The value that identifies whether the test passed (P) or failed (F). |
| Test ID | The unique identification for a test to be performed on an item. |
| Tester | An eight-position number used to identify each entry in the Address Book, e.g., employees, customers, suppliers, special mailing addresses, etc. |
| Sample | A number assigned to a group of tests within the same sample. |
| Allowed Min | The lowest value for the desirable test result. |
| Target | The preferable or target test result within the test results range. |
| Allowed Max | The highest value for the desirable test result. |
| Preferred Min. | The lowest value for the desirable test result. |
| Preferred Max. | The highest value for the desirable test result. |
| Property Type | An item characteristic to be measured, such as color, density |
| Defect Source | A reason for the item's test failure. |
| Root Cause | The test responsible for the item's test failure. |
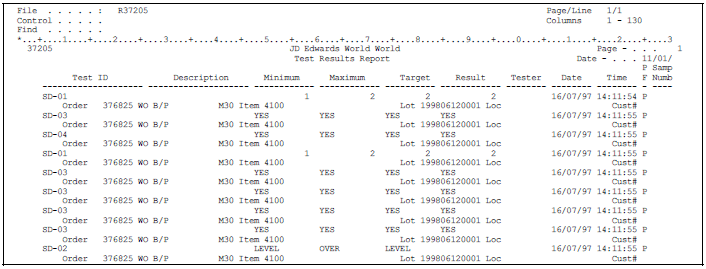
11.3 Printing Test Results
From Manufacturing Systems (G3), choose Quality Management
From Quality Management (G37), choose Test Results Report
Print program P37205 allows you to use data selection to print any combination of fields from the Test Result file F3711. Use this program for reports on non-lot-controlled items only.
To access processing options:
-
For Test Results Reports, use P37205 on Versions List.
11.4 Reviewing Test Results by Lot
From Inventory Management (G41), choose Lot Control
From Lot Control (G4113), choose Lot Master Revisions
As you work with lots in your Inventory Management and Sales Order Management systems, you can locate test results by lot to determine which lots have passed or failed quality tests.
On Lot Master Revisions
-
To locate an item for which you have entered test results, complete the following fields:
-
Branch/Plant
-
Lot/SN
-
Item Number
-
-
Choose the Test Results Inquiry option.
Figure 11-4 Test Results Inquiry (Lot Master Revisions) screen
Description of "Figure 11-4 Test Results Inquiry (Lot Master Revisions) screen"
-
On Test Results Inquiry, review the following field to determine if a lot has passed quality inspection:
-
Status
-
| Field | Explanation |
|---|---|
| Average | This field will be used to indicate whether a result record is an averaged result. Averaged results are computed by totaling all result values for a particular test and dividing by the number of occurrences of that test. |
11.4.1 What You Should Know About
11.5 Reviewing Tested Lots
From Manufacturing Systems (G3), choose Quality Management
From Quality Management (G37), choose Tested Lot Search
You can use the Tested Lot Search program to find items in inventory which meet the test ranges that you define.
-
To locate a specific item and lot, complete the following fields:
-
Branch/Plant
-
Item Number
-
Test Identification
-
From Result Value
-
To Result Value
-
-
Review the following fields:
-
Value
-
Lot/SN
-
S (Specification/Test ID)
-
Status
-
Expiration
-
Available Quantity
-
-
Access the detail area (F4)
Figure 11-6 Tested Lot Search (Detail) screen
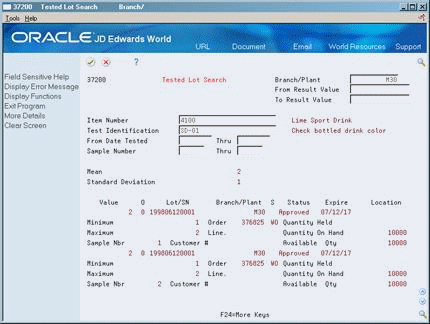
Description of "Figure 11-6 Tested Lot Search (Detail) screen"
-
Review the following additional fields:
-
Minimum
-
Maximum
-
Sample Nbr
-
Order
-
Line
-
Customer #
-
Quantity Held
-
Quantity On Hand
-
Available Qty
-
| Field | Explanation |
|---|---|
| Status | A user-defined code (table 41/L) that indicates the status of the lot. If you leave this field blank, it indicates that the lot is approved. All other codes indicate that the lot is on hold.
You can assign a different status code to each location in which a lot resides on Item/Location Information or Location Lot Status Change. |
| Expiration | The date on which a lot of items expires.
The system automatically enters this date if you have specified the shelf life days for the item on Item Master Information or Item Branch/Plant Information. The system calculates the expiration date by adding the number of shelf life days to the date that you receive the item. You can commit inventory based on the lot expiration date for items. You choose how the system commits inventory for an item on Item Master Information or Item Branch/Plant Information. |
| Quantity | The quantity available can be the on-hand balance minus commitments, reservations, and backorders. Availability is user-defined and can be set up in branch/plant constants. |
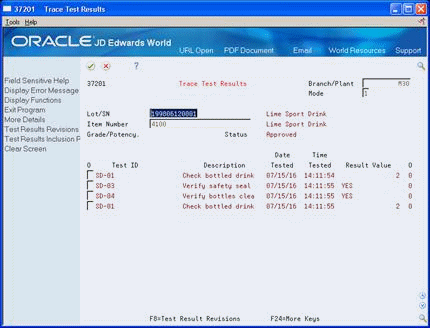
11.6 Reviewing Trace Test Results
From Manufacturing Systems (G3), choose Quality Management
From Quality Management (G37), choose Trace Test Results
Use the Trace Test Results program to find test results for components of an assembled item, or for an item that has been reclassed.
-
To locate a specific item and lot, complete the following fields:
-
Branch/Plant
-
Mode
-
Lot/SN
-
Item Number
-
-
Review the following fields:
-
Grade/Potency
-
Status
-
Test ID
-
Description
-
Date Tested
-
Result Value
-
Pass/Fail
-
-
Access the detail area (F4).
Figure 11-8 Trace Test Results (Detail) screen
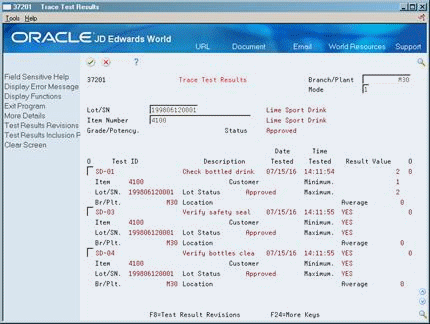
Description of "Figure 11-8 Trace Test Results (Detail) screen"
-
Review the following fields:
-
Item
-
Lot/SN
-
Br/Plt.
-
Customer
-
Lot Status
-
Location
-
Minimum
-
Maximum
-
-
To review the linked lots, enter 2 in the following field:
-
Mode
-
| Field | Explanation |
|---|---|
| Mode | A code that indicates how you want the system to display lot trace and track information. Valid codes are:
1 – Single level trace/track 2 – No intermediate levels (displays only top or bottom levels) 3 – Multi-level trace/track 4 – Multi-level indented trace/track |
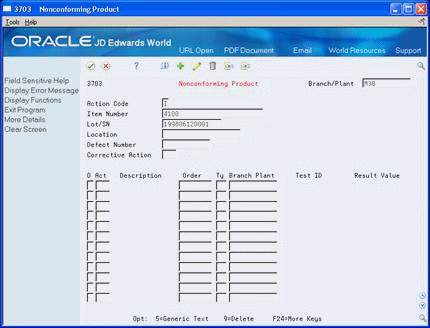
11.7 Reviewing Nonconforming Products
From Manufacturing Systems (G3), choose Quality Management
From Quality Management (G37), choose Nonconforming Product
Use the Nonconforming Product program to review all test results for items that have not passed test evaluation.
To review nonconforming products
-
To locate a specific item, complete the following fields:
-
Branch/Plant
-
Item Number
-
Lot/SN
-
Location
-
-
Review the following fields:
-
Order
-
Type
-
Branch Plant
-
Test ID
-
Result Value
-
-
Access the detail area (F4).
Figure 11-10 Nonconforming Product (Detail) screen
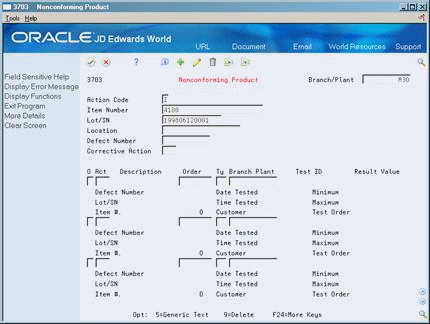
Description of "Figure 11-10 Nonconforming Product (Detail) screen"
-
Review the following fields:
-
Defect Number
-
Lot/SN
-
Item #
-
Date Tested
-
Time Tested
-
Customer
-
Minimum
-
Maximum
-
Test Order
-
-
To enter rework orders for a failed item, complete the following fields:
-
(Corrective) Act
-
Order
-
Order Type
-
Branch/Plant
A highlight indicates generic text for a test result.
-
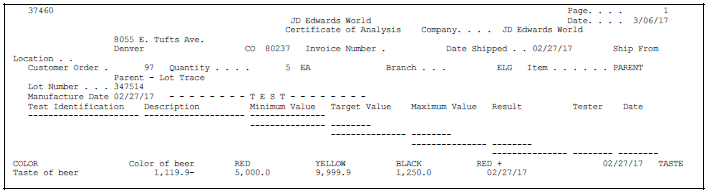
11.8 Printing a Certificate of Analysis
From Manufacturing Systems (G3), choose Quality Management
From Quality Management (G37), choose Certificate of Analysis
If your customers require additional reporting, you can print a certificate of analysis (COA) which lists all of the tests performed and their results for lots sold to a customer.
Note:
You can set processing options within the Ship Confirm and Load and Delivery Confirm programs to print certificates of analysis automatically.You can also print a Certificate of Analysis from the Test Results Revisions screen.
11.8.1 Before You Begin
-
Use the Print Test Flag on Test Definitions to control which tests and generic text are printed on the Certificate of Analysis. See Section 4.2, "Defining Tests."
-
Use the COA Print Control on Customer Billing Instructions to determine which customers should receive a Certificate of Analysis. See Section 8.1, "Setting Up Customer Billing Instructions."
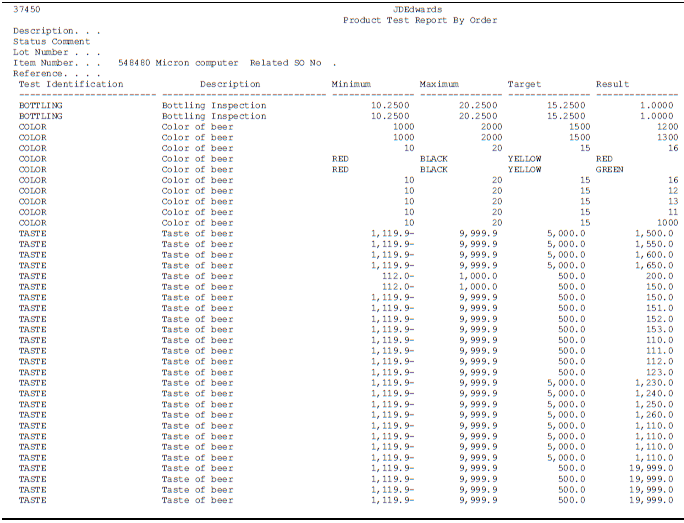
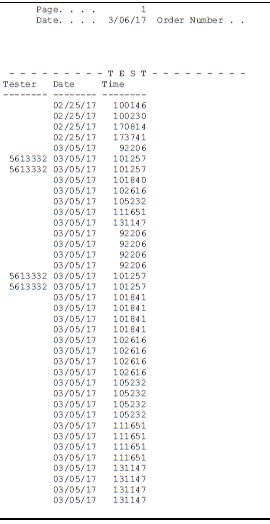
11.9 Printing Test Results for Lot-Controlled Items
From Quality Management (G37), enter 29
From Quality Management Setup (G3741), choose Product Test Report
Use the Product Test Report to review all test results for the work order, purchase order, or lot number you select. Use this information to review quality information for your orders.
Although this report is intended for internal use, you can print test results in a certificate of analysis (COA) format without a sales order. For example, you might print COAs for inventory that will be placed in stock and sold later to unknown clients. In this case, you package the COA with the item prior to placing it in stock but before you sell it.
Based on data you select, the system searches for test results for the related order information. If you set the processing option for trace processing, the system searches for multi-level test results for each lot located. The system prints all test results for each lot on the product test report.
To generate a product test report, you must first use the extract program to obtain the information. Then from the extract program, you select the default or a custom Product Test report to print.
To access processing options:
-
For Product Test Report Extract, use P37901 on Versions List.
-
For Product Test Report, use P37450 on Versions List.