45 Set Up Records of Employment
Before you generate Records of Employment (ROE), you need to define certain information that the system uses during processing. You define this information to meet all the reporting requirements of the Canadian government.
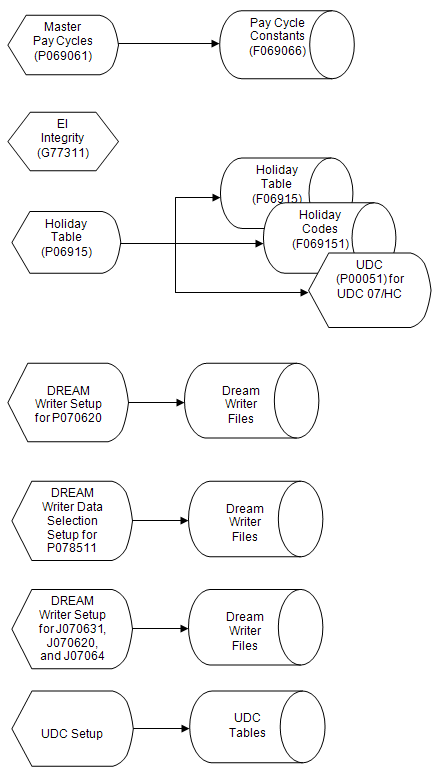
The following graphic illustrates the basic setup for all ROEs:
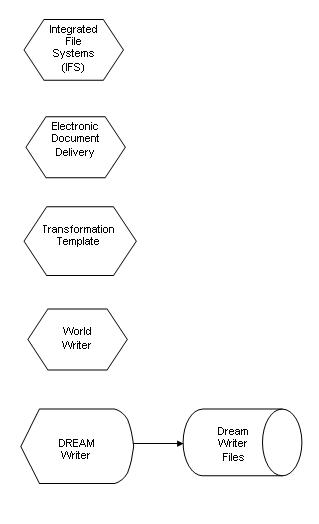
If you plan to submit XML files (electronic ROEs) via ROE Web, there are additional programs and features that you must set up. The following graphic illustrates the additional setup for XML file delivery of electronic ROEs.
Ensure that all Employment Insurance (EI) information is current. See Setting Up Employment Insurance Rates in the Canadian Payroll II Guide and Working with Employment Insurance History Integrity in the Canadian Payroll Year-End Processing (T4) Guide.
Setting up ROEs includes the following tasks:
-
Section 45.1, "Working with User Defined Codes (UDCs) for ROEs"
-
Section 45.5, "Setting Up for XML File Delivery of ROEs via ROE Web"
45.1 Working with User Defined Codes (UDCs) for ROEs
In order to create and process ROEs, you must set up or verify that the UDCs for ROEs, and related UDCs, are set up correctly.
Setting up UDCs for ROEs includes the following tasks:
-
Reviewing UDCs for ROEs
-
Setting up pay frequencies
-
Set up job types
-
Set up holiday codes
See Setting Up User Defined Codes for Payroll in the Canadian Payroll II Guide for more information.
From Governmental Reports (G7724), choose Record of Employment Menu
From Record of Employment (G77241), enter 29
From Record of Employment Setup (G772411), choose the appropriate UDC
45.1.1 Reviewing UDCs for ROEs
JD Edwards World recommends that you review the UDCs listed below for ROEs. These are hard-coded and set up to meet government requirements.
These UDCs include values in the Special Handling Code field that the Canadian government defines for the ROE Web XML specifications. The system uses these for processing the ROE Web XML file you submit to the Canadian government. The available values for each position of the Special Handling fields are as follows:
-
B = Must be blank
-
O = Optional
-
M = Mandatory
-
Y/N - Yes/No (whether to include in block 15C, pay period 1)
Example of Special Handling Code Values
UDC 77/VC - Vacation Codes
| Value | Description | Start Date | End Date | Amount | In block 15c for PP1? |
|---|---|---|---|---|---|
| 1 | Included with each pay | B | B | B | N |
| 2 | Paid because no longer working | B | B | M | Y |
| 3 | Paid for a vacation leave period | O | O | M | N |
| 4 | Anniversary (Paid on a specific date each year) | O | B | M | Y |
For example, while entering an ROE, if you enter 1 in the Vacation Code field, the Vacation Start Date, Vacation End Date, and Vacation Pay Amount fields must be left blank (B) and the vacation pay amount is not included in Block 15C, Pay Period 1 on the ROE.
These UDCs include:
-
Other Monies (77/OM). Use this to identify the other types of money you pay to employees. For example, you can choose bonuses, sick leave, severance, etc.
-
Special Payment Types (77/SP). Use this for long term absences, such as maternity leave. If you complete this field when you enter an electronic ROE, the Start Date for:
-
PSL01 and MAT01 must be prior to or equal to the Last Day for Which Paid.
-
WLI01 must be after the Last Day for Which Paid.
-
-
Vacation Codes (77/VC). Use to indicate the type of vacation pay. If the vacation is paid as a result of an anniversary date, the amount should be included in the pay period in which the date falls or, if the date is after the last day for which paid, include the amount in block 15C, pay period 1.
You should also review Separation Codes (77/SC). This UDC includes the values set by the government for separation of employment and the system uses this UDC in the XML if you use ROE Web.
If the Language Preference field in the Employee Master is set to F for French, you set the values in the Description-2 field for this UDC in French.
45.1.2 Set Up Pay Frequency
Each employee record includes the pay frequency, which indicates how often the employee receives payments. Typical pay frequencies include weekly, biweekly, semi-monthly, and monthly.
Depending on the value in the Language Preference field in the Employee Master you must set up one of the Pay Frequency UDCs.
-
If the Language Preference field in the Employee Master is set to E for English, you set the values for UDC 07/PF in English.
-
If the Language Preference field in the Employee Master is set to F for French, you set the values in the Description-2 field for UDC 77/PF in French.
45.1.3 Set Up Job Types
Depending on the value in the Language Preference field in the Employee Master you must set up one of the Job Type UDCs.
-
If the Language Preference field in the Employee Master is set to E for English, you set the values for UDC 07/G in English.
-
If the Language Preference field in the Employee Master is set to F for French, you set the values in the Description-2 field for UDC 77/G in French.
45.2 Setting Up Master Pay Cycles
When you create either single or multiple ROEs, you enter the date in the Final Pay Period Ending Date field. The system determines how many pay periods of information to include on the ROE based on that date and identifies any gaps in pay based on the pay period end dates in the Master Pay Cycles. A gap in pay occurs when the employee has no insurable earnings within a specific pay period that falls between the dates in the First Day Worked and Last Day for Which Paid fields on the ROE. Therefore, you must ensure that the master pay cycle information is up to date.
See Setting Up Master Pay Cycles and Reviewing the Master Pay Cycles Report in the Canadian Payroll II Guide
From Governmental Reports (G7724), choose Record of Employment Menu
From Record of Employment (G77241), enter 29
From Record of Employment Setup (G772411), choose Master Pay Cycles
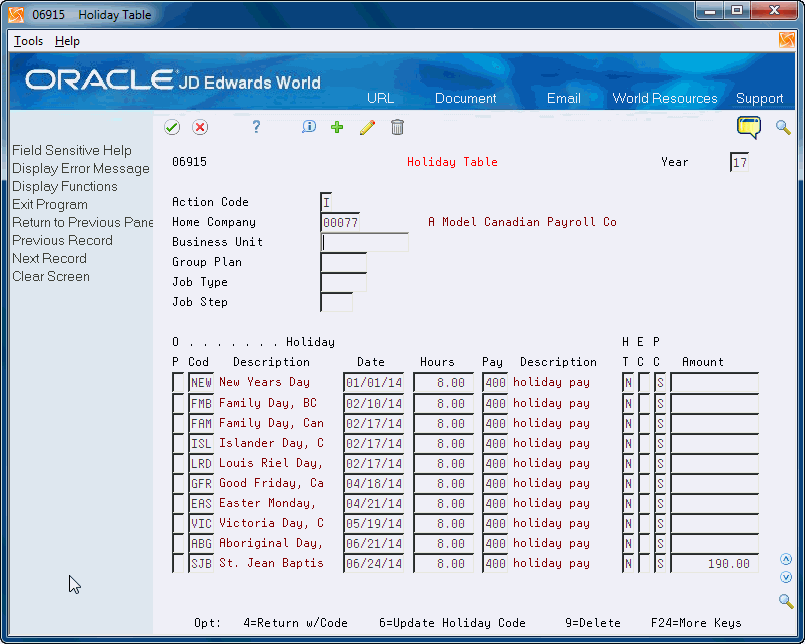
45.3 Setting Up the Holiday Table
When you create either single or multiple ROEs, you must identify any holiday pay that is payable to the employee after the date in the Last Day for Which Paid field. You can set up a holiday table that you can access from the ROE entry forms. You can then choose the holidays from the table and the system enters the appropriate date on the ROE.
Once you set up a holiday table for one or more years, you do not need to change it until the dates in the table are out of date. You can use the same holiday table information for all ROEs.
Set up user defined code list 07/HC to identify the codes for each holiday your company acknowledges
From Governmental Reports (G7724), choose Record of Employment Menu
From Record of Employment (G77241), enter 29
From Record of Employment Setup (G772411), choose Holiday Table
-
On Holiday Table, complete the following fields.
-
Year
-
Home Company
-
-
Complete the following optional fields:
-
Business Unit
-
Group Plan
-
Job Type
-
Job Step
-
-
Complete the following fields for each holiday:
-
Code
-
Date
-
Hours
-
Pay
-
Holiday Type (HT)
-
-
5. Complete the following optional fields and click Add.
-
Eligibility Code (EC)
-
Pay Class (PC)
-
Amount
Field Explanation Code - Holiday Type The user defined code (07/HT) that designates the type of holiday defined. Codes are: C – Company designated holiday
N – National holiday
Code - Holiday Eligibility The user defined code (07/HE) that identifies the eligibility rules pertaining to the holiday. -
45.4 Setting Up Dream Writers
You must set up Dream Writer versions for the following:
-
ROE Process Program (P078511)
-
Create Multiple ROE Requests (P070620)
See Work with Dream Writer in the Technical Foundation Guide.
45.4.1 Processing Options
See Section 58.2, "Create Multiple ROE Requests (P070620)" and Section 58.6, "ROE Process Program (P078511)".
45.5 Setting Up for XML File Delivery of ROEs via ROE Web
If you plan to submit an XML file with ROEs via ROE Web, there are additional programs and features that you must set up.
Setting up for XML file delivery of ROEs via ROE Web includes the following tasks:
-
Setting up the Integrated File System (IFS) directory
-
Setting up Electronic Document Delivery (EDD)
-
Setting up the Transformation Template
-
Setting up the World Writer
-
Setting Up Canadian Government System Requirements
45.5.1 Setting Up the IFS Directory
You must set up a shared IFS directory that stores the XML files that the World Writer builds.
JD Edwards World includes an XSLT file in the ROE Web download and you must move it from the download into the IFS directory that you create.
See Set Up Import/Export in the Technical Tools Guide.
45.5.2 Setting Up EDD
EDD provides various methods for you to distribute documents, such as reports, spreadsheets, or text documents, that you create using JD Edwards World software. In order to process electronic ROEs using ROE Web, you can use EDD functionality. For example, you can use EDD functionality if you want to distribute the resulting XML file via email.
See Set Up EDD in the Technical Tools Guide for system setup requirements. See Work with EDD in the Technical Tools Guide for information about email lists, distribution profiles, and email template setup.
From Governmental Reports (G7724), choose Record of Employment Menu
From Record of Employment (G77241), enter 29
From Record of Employment Setup (G772411), choose Electronic Document Delivery
45.5.3 Setting Up the Transformation Template
You must set up a transformation template to inform the World Writer of the name and location of the XSLT file that performs the transformation. You also enter the name and location of the final XML file that you plan to upload to the Canadian government.
-
On Transformation Template Revisions, complete the following fields:
-
Template Name
-
Description
For example, Electronic ROE and Electronic ROE XML Transformation.
-
-
On Transformation Template Revisions, enter values in the fields as follows:
-
Template Type - Enter 1 for an XSL template.
-
Template File - Enter the name of the ROE Web XSLT file that JD Edwards World includes with the download, including the extension (.xsl).
-
Template Path - Enter the IFS path where the XSLT template file resides.
-
Output File - Enter the name of the ROE Web XML file that the World Writer creates. If you create several ROE Web XML files per day, you can utilize the @DATE and @TIME variables in this field. For example: ROEWeb_Out_@DATE_@TIME.xml)
Note:
If you do not utilize the @DATE and @TIME variables in the Output File field, each time you run the Process ROEs/Update History program (P070671), the system overwrites the file. JD Edwards recommends enter a different file name each time you run P070671 or rename the file in the IFS path after you create it. -
Output Path - Enter the IFS path where you store the output files (final XML files).
-
See Working with Transformation Templates in the Technical Tools Guide for more information.
45.5.4 Setting Up World Writer
Before you can process electronic ROEs using ROE Web, you must to set up a World Writer to process the data.
You use the World Writer to export the data in the ROE Web flat file (F0717X) to an XML source file. An XSLT file transforms the XML source file into a target XML document in the format that meets government requirements.
If you create several ROE Web XML files per day, you can utilize the @DATE and @TIME variables in the Import Export File field on the Database Export Parameters screen. For example: ROEWeb_@DATE_@TIME.xml)
See the World Writer Guide for more information.
-
If you are distributing the XML file via email, ensure email addresses are setup for the recipients in the Address Book system. See Working with Address Book Email and URL Addresses in the Address Book and Electronic Mail Guide.
-
Set up an IFS Directory.
-
Set up EDD.
-
Set up a transformation template.
From Governmental Reports (G7724), choose Record of Employment Menu
From Record of Employment (G77241), enter 29
From Record of Employment Setup (G772411), choose World Writer
-
On Version List, add a version.
-
On Version Title & Files, complete the following fields:
-
Version Owner
-
Version Title
-
Report Title
-
-
Enter F0717X in the File Name field.
-
Continue to click Enter to display the Field Selection List screen.
-
On Field Selection List:
-
Select all of the fields in the F0717X file except the following:
-
ROE Replacement Serial Number - JXROER
-
Work Station ID - JXJOBN
-
User ID - JXUSER
-
Program ID - JXPID
-
Date Updated - JXUPMJ
-
Time Last Updated - JXUPMT
-
-
Do not select any of the presumptive join fields. Because you select Address Number - JXAN8, you do not select the extra address fields (JXAN801 through JXAN810) that the system displays in the World Writer.
-
Ensure the Print When field (PW) is set to A or the fields do not output to the XML file.
-
-
Click Enter.
-
On Data Selection, ensure you include the following fields with these values and then click Enter:
-
Address Book Number greater than 0
-
XML Processed Flag with A or 1
-
-
On Data Sort & Totaling, setup the file keys, ensure the Summary Function field is set to N, and click Enter.
-
Continue to click Enter to access the Versions List.
-
On Versions List, locate the version you set up for ROE Web.
-
Enter 8 in the Option field next to the version.
-
On Database Export Parameters, enter values in the fields as follows:
-
The filename for the XML output from the World Writer, including the file extension (.xml), in Import Export File
-
N in Excel XML Y/N
-
The IFS path to store the XML files and XSL template in IFS Path
-
Y in Replace Records
-
N in Header Detail Join Relationship
-
N in Include Column Headings
-
Y in Enabled Y/N
-
The distribution profile in Distribution Profile if you are using EDD to email the XML files
-
The email template name in Email Template if you are using EDD to email the XML files
-
ROEWEB in Transformation Template
-
-
Click Enter.
45.5.5 Setting Up Canadian Government System Requirements
You are responsible for registering in the Canadian government ROE Web program.
All system requirements enabling the use of the Canadian government ROE Web program are the responsibility of the employer, including running the employer file through a validating parser prior to uploading it to the Canadian government website.
A validating parser is software you use to verify that an Extensible Markup Language (XML) document conforms to a schema. A schema refers to the definition language your system uses to construct and control the validity of XML documents. The schema includes the XML Schema Definition (XSD) file, PayrollExtractXmlV2.xsd, that the system uses to validate the XML file structure. To validate the file, you must run the XML export file that you generate using JD Edwards World through a validating XML parser prior to transferring the file to ROE Web.
Note:
JD Edwards World highly recommends that you validate the files prior to submitting them to the Canadian government to avoid submitting an invalid file. An invalid file suggests that the file layout is incorrect and that government is unable to open it. JD Edwards World does not provide a facility for reversing export files in Submit (final) mode that you submit to the government.You can use any validating parser to perform the XML validation. XML editor products that provide a validating parser include, but are not limited to:
-
Cooktop
-
XMLSpy
-
XMLWriter
-
XRay