12 Promote Project Updates
This chapter contains these topics:
12.1 Promoting Project Updates
The version control process for project updates includes the following steps:
To create the transfer library
-
From the Software Install menu (G9262), choose Build Transfer Library.
-
After you read the warning message, press F6 (Execute).
Figure 12-2 Build Transfer Library screen
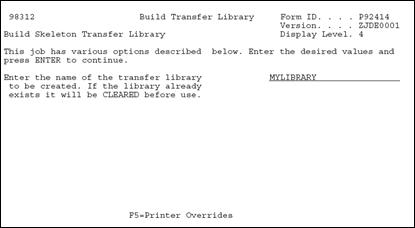
Description of "Figure 12-2 Build Transfer Library screen"
-
In the processing option field, enter a name for the transfer library you want to create.
To prepare your SAR system, see Chapter 6, "Work with Software Action Requests"in this guide.
From the Version Control menu (G9261), choose Manage Promotion Paths. Use the project update library name as your promotion path name. For information about defining a promotion path, see Section 10.3, "Defining a Promotion Path" in this guide.
To define a project, see Section 10.4, "Defining a Project" in this guide.
From the Software Install menu (G9262), choose Edit and Promote. For information about updating a SAR, see Section 6.1, "About SAR System Setup" in this guide.
To validate the promotion path
From the Software Install menu (G9262), choose Edit and Promote. For information about validating a promotion path, see Section 11.3, "Validating a Promotion Path" in this guide.
From the Software Install menu (G9262), choose Edit and Promote. For information about promoting a SAR, see Chapter 11, "Promote a Project" in this guide.
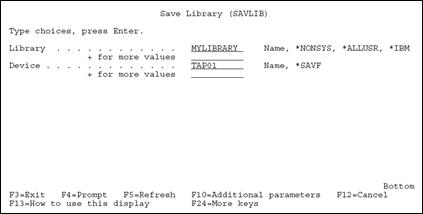
To save the transfer library to tape
-
From the Software Install menu (G9262), choose Save Library to Tape.
-
In the Library field, type the name of your transfer library.
-
In the Device field, enter the name of your tape device.
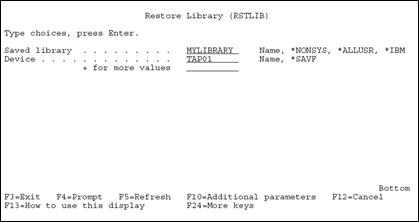
To restore the transfer library from tape
-
From the Software Install menu (G9262), choose Restore Library from Tape.
-
In the Saved Library field, type the name of your transfer library.
-
In the Device field, enter the name of your tape device.
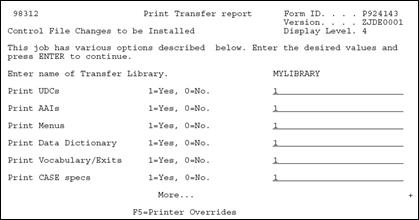
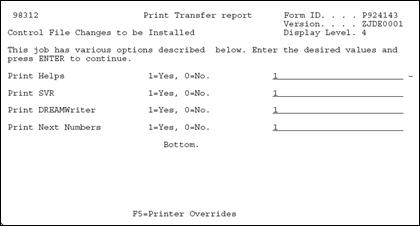
To print the transfer library report
-
From the Software Install menu (G9262), choose Print Transfer Report.
A processing options form displays. Use the cursor keys to display additional processing options.
-
In the first processing option field, type the name of your transfer library.
-
In the remaining processing option fields, select the types of control files for which you want to print information.
-
To print the report, press Enter.
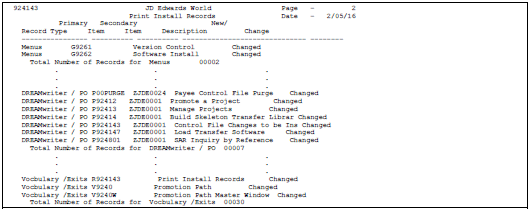
An example of the Print Install Records report (P924143) follows. It provides the total number of records for each type of control file. It also shows whether the transfer record already exists in your control file.
Before you load the transfer library, you must create new target libraries for the objects, source code, and data files you will transfer. In your target source library, you must create the following multi-member source files:
-
JDESRC
-
JDECPY
-
F98CRTCMD
Load the contents of your transfer library into your target libraries. The process merges control file records into your library files. You also can transfer control file records individually. For more information, see Transfer Individual Control File Records following this procedure.
-
From the Software Install menu (G9262), choose Load Transferred Library.
-
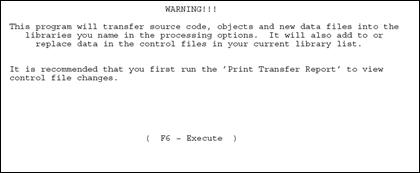
After you read the warning message, press F6 (Execute).
A processing options form displays. Use the cursor keys to display additional processing options.
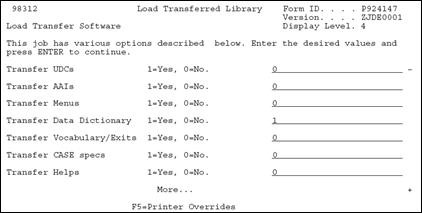
Figure 12-9 Load Transferred Library screen
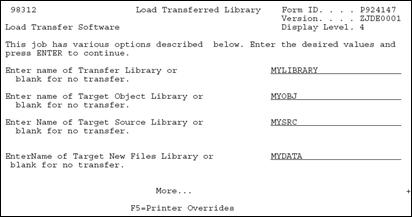
Description of "Figure 12-9 Load Transferred Library screen"
-
In the first processing option field, specify the name of your transfer library.
-
In the next three fields, specify the libraries you created for the source code, objects, and data files you will transfer.
Figure 12-10 Load Transferred Library screen (part 1)
Description of "Figure 12-10 Load Transferred Library screen (part 1)"
Figure 12-11 Load Transferred Library screen (part 2)
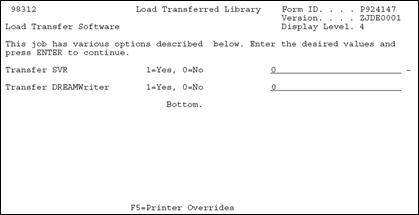
Description of "Figure 12-11 Load Transferred Library screen (part 2)"
-
In the remaining fields, select the control files you want the system to transfer.
-
To begin the transfer, press Enter.
The system merges the control files into the target data library. For non-control files, the system adds the file if it currently does not exist in the target data library. If the file does exist in the target data library, the system does not transfer the file or any data. After the transfer process completes, you must change these files manually based on information in the Print Install Records report (P924143).
Even though you can include next numbers in the transfer library and display information about them in the Print Install Records report, the system will not transfer them automatically. This protects your next number tables. After the transfer process completes, you must change them manually based on information in the report.
To transfer individual control table records
-
From the Software Install menu (G9262), choose Copy DD,VO,DW,UDC,SVR,Menus.
Figure 12-12 Copy DD, VO, DW, UDC, SVR, Menus screen
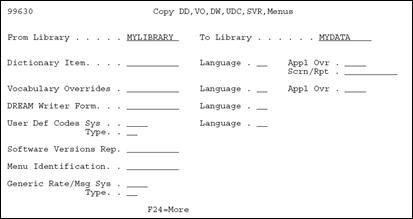
Description of "Figure 12-12 Copy DD, VO, DW, UDC, SVR, Menus screen"
-
In the From Library, type the name of your transfer library.
-
In the To Library, type the name of the target data file library.
-
In the appropriate fields, enter information that is specific to the control file record you want to transfer.