13 Set up Approvals Management
This chapter contains these topics:
Prior to processing transactions, you must set up the Approvals Management system.
-
Optionally, you can convert your purchase order approval levels in the Approval Levels table (F43008) to Approvals Management purchase order approval rule sets. See Appendix C, "Convert Purchase Order Approval Levels to Approvals Management Rule Sets" for more information.
13.1 Setting up Approvals Management
To set up JD Edwards World Approvals Management system, complete the following tasks:
-
To set up user information
-
To set an email address
-
To set an email address using the approvals notification process
-
To set up constants
-
To create an output queue for approvals
-
To create a job description
From Master Directory (G), choose Hidden Selection 27
From Advanced & Technical Operations (G9), choose Security Officer
From Security Officer (G94), choose User Information
To include users in the approvals management process, they must have a unique employee address number. Verify that each user has this unique employee address number, and if not, you must assign each user a unique employee address number. The employee address number must first exist in the Address Book system. Unexpected results can occur if you assign an employee address number to multiple users.
You use the User Information program (P0092) to assign the unique employee address number to the user ID.
-
User ID
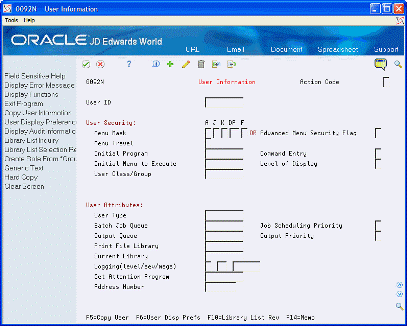
| Field | Explanation |
|---|---|
| User ID | The IBM-defined user profile. |
| Employee Address Number | A number that identifies an entry in the Address Book system. Use this number to identify employees, applicants, participants, customers, suppliers, tenants, special mailing addresses, and so on. |
From Master Directory (G), choose Address Book
From Address Book (G01), choose Address Book Revisions
All users in the approvals management process must have an e-mail address in the Address Book system. Verify that each user has an email address, and if not, you must set up an email address.
-
On Address Book Revisions, locate the user.
-
Access Phone Numbers (F12).
-
Enter the e-mail address in the following field:
-
Phone Number
-
-
Enter I (internet address) in the following field:
-
Phone Type
-

To set an email address using the approvals notification process
You must verify that all users in the approvals process have an email address in the Email/URL table (F01018), and if not, you must set up an email address. See Entering Address Book Email/URL Revisions in the JD Edwards World Address Book and Electronic Mail Guide for more information.
Ensure that the following field values are in each email address:
-
Who's Who = 0
-
Email/URL Type and Email/URL Line = 1
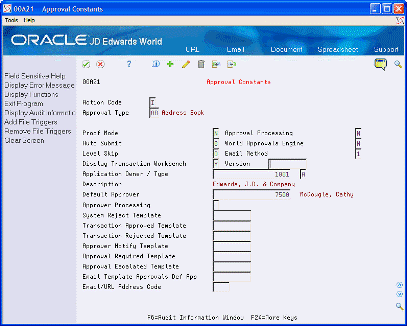
From Approvals Management (G00A), choose Hidden Selection 29
From Approvals Management Setup(G00A41), choose Approval Constants
You must use the Approvals Constants program (P00A21) to set up system processing for approvals.
JD Edwards World provides the values for the Approval Type field and you use the balance of the fields on this screen to determine the parameters for each approval type. For example, for procurement activities, you can use the approval types PH for the purchase order header and PD for the detail line. You can set up constants for approval types PH, PD or both; depending on how detailed you want the approval process to be.
You use the Auto Submit field to have the system automatically submit the transaction into the system and begin the approval process. If you do not enter 1 in this field, you must manually submit the transaction. For example, you enter 0 in the Auto Submit field. When you create a new purchase order, or you add to or change the information in a purchase order, you can continue your work on the order until you submit the order using the Transaction Workbench program (P00A11). If you set this field to 1, when you create a new order or you add to or change the information in an order, when you exit the program, the system submits the order automatically and the approval process begins. If you prefer manual submission, you can set the Display Transaction Workbench and Version fields to automatically display a specific version of the Transaction Workbench program.
After you set the constants, if you change the Proof Mode, Approval Processing, or World Approvals Engine fields, you must log off and log back into the system to invoke the approvals process.
The system stores the constants in the Approvals Management Constants file (F00A21).
On Approvals Constants, complete the following fields:
-
Approval Type
-
Proof Mode
-
Approval Processing
-
Auto Submit
-
World Approvals Engine
-
Level Skip
-
Email Method
-
Display Transaction Workbench
-
Version
-
Application Owner / Type
-
Default Approver
-
Type
-
Approver Processing
-
System Reject Template
-
Transaction Approved Template
-
Transaction Rejected Template
-
Approver Notify Template
-
Approval Required Template
-
Approval Escalated Template
-
Email Template Approvals Def App
-
Email/URL Address Code
| Field | Explanation |
|---|---|
| Approval Type | Select a UDC (81QM), for the Address Book system.
Screen-specific information The approval type specifies to which system this set of approval constants applies. |
| Proof Mode | A code that determines if proof mode is turned on for a given approval type. In proof mode, all master file information is written to work files. The information stays in the work files until the transaction is submitted. Once submitted, the information is committed to the master files.
Screen-specific information Set this field to Y to activate proof mode. Activating proof mode allows users to change records in the system without affecting production data. Changes do not appear in production until the originating user submits the changes to production. JD Edwards World does not recommend that users activate and deactivate this setting frequently. All users accessing the Approvals Management system must sign off and sign on whenever this flag is changes. |
| Approval Processing | A code that determines if approval processing is turned on for a given approval type. Proof mode must be turned on if approval processing is turned on.
Screen-specific information Enter Y in this field to activate approval processing for a given system. When you enter Y in this field, you must also activate the Proof Mode field. JD Edwards World does not recommend that users activate and deactivate this setting frequently. All users accessing the Approvals Management system must sign off and sign on whenever this flag changes. |
| Auto Submit | A code that controls when a transaction gets submitted. Valid values are:
0 – The transaction is not submitted until the user manually submits it from the transaction workbench. 1 – All open transactions for the user currently accessing the system are automatically submitted whenever the user exits out of a maintenance program and back to the menu. Screen-specific information Enter 1 to automatically submit all open transactions for a user whenever the user exits a maintenance program. |
| World Approvals Engine | A code that determines if the World Approvals Engine is used to process approvals. *** FUTURE USE ***
Screen-specific information You must set this field to Y if the Approval Processing field is set to Y. |
| Level Skip | A code that designates how approval request levels are processed. Valid values include:
0 – Level skipping is not allowed. An assigned approver is not allowed to approve/reject the approval request until the approval request reaches the user level. Example: An approval request contains four levels. The approval request is at level one. An approver assigned to level three of the approval request can view the approval request but cannot approve/reject it until it reaches the user level. 1 – Level skipping is allowed. An assigned approver can approve/reject an approval request regardless of the user level |
| Email Method | Used to specify how the Approvals Management system sends emails.
Valid values are: 0 = No emails sent. 1 = Emails sent in real time using Send Distribution (SNDDST). 2 = Emails sent in batch using one of the Approvals Email Notification Processors. The Approvals Notification Processor uses the Electronic Document Delivery system (00E) to send emails. |
| Display Transaction Workbench | A code that determines if the transaction workbench is displayed after the user exits a maintenance program.
Screen-specific information Set this field to Y to automatically display the Transaction Workbench program (P00A11) when exiting a Maintenance program, version ZJDE0001 |
| Version | Identifies a specific set of data selection and sequencing settings for the application. Versions may be named using any combination of alpha and numeric characters. Versions that begin with 'XJDE' or 'ZJDE' are set up by JD Edwards World.
Program-Specific Information This designates the Dream Writer version of Approvals Transaction Workbench to be used when the Workbench is invoked automatically upon exit from a maintenance program that has generated approval transactions. If left blank, the default version of ZJDE0001 will be used. |
| Application Owner / Type | The text that names or describes an address. This 40-character alphabetic field appears on a number of forms and reports. You can enter dashes, commas, and other special characters, but the system cannot search on them when you use this field to search for a name. |
| Default Approver | This is the Address Book Number of the Default Approver. The system uses the Default Approver in situations where a valid approver can not be derived from the current setup. Example: When processing rules with S roles, if the transaction originator does not have a supervisor assigned and the assignee on the rule is blank, the system adds the default approver to the assigned approver list. |
| Type | A code that determines whether an approver is required to approve an approval request. Valid values are:
A = Approver must approve or reject an approval request. B = Approver is an expedite approver. When an approval request gets expedited by the expedite approver, the approval request immediately gets approved and all remaining approvers get bypassed. The expedite approver is not required to approve the approval request. N = Approver only receives e-mail notification of an approval request. The user is not required to approve or reject the approval request. G = Designates that the value entered into the Person/Group/Route field is an approver group. R = Designates that the value entered into the Person/Group/Route field is an approver route. 0 = Used in real time event transactions to designate that the value entered into the Person/Group/Route field is a program call. Program calls must be setup in UDC. Program-Specific Information 'B' (Expedite Approver), 'N' (Notify) and 'R' (Route) are not valid role values for Application Owner on P00A21. Set the role to 'A' (Approver) if the application owner is a single approver. Set the role to 'G' (Group) if the application owner is a group of approvers. |
| Approver Processing | This field is no longer reserved for future use. Please specify an appropriate value.
This code determines how the system treats approval requests where the transaction originator is the only assigned approver. Valid values are: 0 or Blank = transaction originator added to assigned approver list as the only approver. The system automatically approves the approval request. 1 = transaction originator and application owner(s) added to assigned approver list. If the transaction originator is an application owner, the system automatically approves the approval request. |
| System Reject Template | This is the name of the Distribution Profile. In EDD, a Distribution Profile is used to store format and distribution options for an Email.
Screen-specific information The system uses the value in this field to notify the transaction originator whenever the system rejects a transaction. An E-mail template contains the E-mail subject line and the body text of an E-mail. Use template XJDEAPP01 as an example. See Chapter 10, "Work with EDD" for more information. The system uses this field only when the Email Method field is set to 2. You can leave this field blank if the Email Method field is set to 0 or 1. You can leave this field blank if you do not want to send an email notification when the system rejects a transaction. |
| Transaction Approved Template | This is the name of the Distribution Profile. In EDD, a Distribution Profile is used to store format and distribution options for an Email.
Screen-specific information The system uses the value in this field to notify the transaction originator whenever a transaction is approved. An Email template contains the Email subject line and the body text of an Email message. Use template XJDEAPP02 as an example. See Chapter 10, "Work with EDD" for more information. The system uses this field only when the Email Method field is set to 2. You can leave this field blank if the Email Method field is set to 0 or 1. You can leave this field blank if you do not want to send email notification when a transaction is approved. |
| Transaction Rejected Template | This is the name of the Distribution Profile. In EDD, a Distribution Profile is used to store format and distribution options for an Email.
Screen-specific information The system uses the value in this field to notify the transaction originator when a transaction is rejected. An Email template contains the Email subject line and the body text of an Email message. Use template XJDEAPP03 as an example. See Chapter 10, "Work with EDD" for more information. The system uses this field only when the Email Method field is set to 2. You can leave this field blank if the Email Method field is set to 0 or 1. You can leave this field blank if you do not want to send email notification when a transaction is rejected. |
| Approver Notify Template | This is the name of the Distribution Profile. In EDD, a Distribution Profile is used to store format and distribution options for an Email.
Screen-specific information The system uses the value in this field to notify the assigned approver when an approval request is created and the approval request reaches the approver's level. The system uses this email template when the approver's role is set to N. An Email template contains the E-mail subject line and the body text of an Email message. Use template XJDEAPP04 as an example. See Chapter 10, "Work with EDD" for more information. The system uses this field only when the Email Method field is set to 2. You can leave this field blank if the Email Method field is set to 0 or 1. You can leave this field blank if you do not want to send an email notification to the assigned approvers with a role set to N. |
| Approval Required Template | This is the name of the Distribution Profile. In EDD, a Distribution Profile is used to store format and distribution options for an Email.
Screen-specific information The system uses the value in this field to notify the assigned approver when an approval request is created and the approval request reaches the approver's level. The system uses this email template when the approver's role is set to A. An Email template contains the E-mail subject line and the body text of an Email. Use template XJDEAPP05 as an example. See Chapter 10, "Work with EDD" for more information. The system uses this field only when the Email Method field is set to 2. You can leave this field blank if the Email Method field is set to 0 or 1. You can leave this field blank if you do not want to send an email notification to the assigned approvers with a role set to A. |
| Approval Escalated Template | This is the name of the Distribution Profile. In EDD, a Distribution Profile is used to store format and distribution options for an Email.
Screen-specific information The system uses the value in this field to notify the transaction originator, all assigned approvers, and all application owners when an approval request is escalated. An Email template contains the Email subject line and the body text of an Email message. Use template XJDEAPP06 as an example. See Chapter 10, "Work with EDD" for more information. The system uses this field only when the Email Method file is set to 2. Y can leave this field blank if the Email Method field is set to 0 or 1. You can leave this field blank if you do not want to send email notification whenever an approval request is escalated. |
| Email Template Approvals Def App | The system uses Email Templates in the Electronic Document Distribution system to define the e-mail body text and subject line. |
| Email/URL Address Code | A user defined code (01/UC) that provides a description of the Email Address or URL Address.
Program-Specific Information Specify the email type to use when retrieving email addresses from the Address Book - Email/URL Address file (F01018). The Approvals Management system will use the email address defined for the zero who's who line number. Screen-specific information The system uses this field only when the Email Method field is set to 2. You can leave this field blank if the Email Method field is set to 0 or 1. |
From Approvals Management (G00A), choose Hidden Selection 27
The system moves data in proof mode to production using the JD Edwards World Service Enablement system. The JD Edwards World Service Enablement system requires a valid user ID and password to access the JD Edwards World system. This user ID is referred to as the proxy user id. You specify the proxy user id and password using the Approvals Commitment Setup program (P00A22)
On Approvals Commitment Setup, complete the following fields:
-
Approval Type
-
Proxy User ID
-
Password
Figure 13-4 Approvals Commitment Set screen
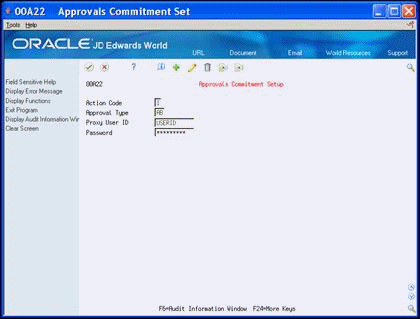
Description of "Figure 13-4 Approvals Commitment Set screen"
| Field | Explanation |
|---|---|
| Approval Type | Select a UDC (81QM), for the Address Book system.
Screen-specific information Enter the approval type to specify to which system the user ID and password apply. |
| Proxy User ID | The user ID used by the system to sign on during the commitment phase of Approvals Management.
Screen-specific information The User ID the World Service Enablement system uses. |
| Password | The password used by the system to sign on during the commitment phase of Approval Management.
Screen-specific information Enter the Proxy User's password. |
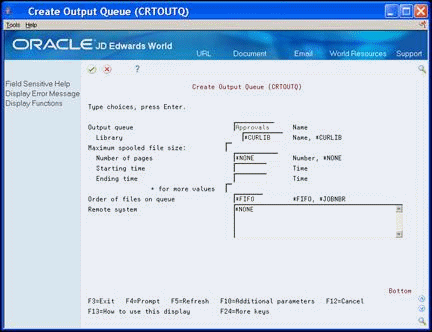
To create an output queue for approvals
During daily processing, if the World Service Enablement system encounters errors, it sends them to the Approvals output queue. You must create the Approvals output queue.
-
Enter CRTOUTQ on the command line and press F4.
-
On Create Output Queue, enter Approvals in the following field:
-
Output queue
-
The Approvals Management system executes the Word Service Enablement system in batch mode. The system executes the batch job using the JDEAPPRVL job description. You must create the JDEAPPRVL job description.
-
Enter CRTJOBD on the command line and press F4.
-
On Create Job Description, access Additional Parameters (F10).
Figure 13-6 Create Job Description screen
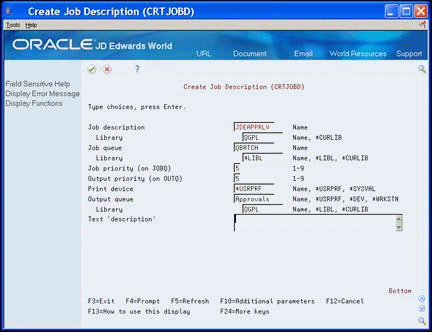
Description of "Figure 13-6 Create Job Description screen"
-
Enter JDEAPPRLV in the following field:
-
Job description
-
-
Enter QGPL in the following field:
-
Library
-
-
Enter Approvals in the following field:
-
Output queue
-
-
Enter QGPL in the following field:
-
Library
-
-
Page down and enter *NO in the following field:
-
Allow multiple threads
Figure 13-7 Create Job Description (Additional Parameters) screen
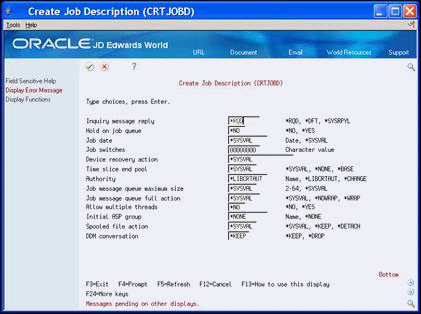
Description of "Figure 13-7 Create Job Description (Additional Parameters) screen"
-
-
Set the balance of the fields to meet your business requirements.
13.2 Configuring Approvals Management
You must configure Approvals Management system to meet your business requirements. You must configure the groups for approval processing as well as the routes each approval takes in the Approvals Management system. You must also set up rules for each approval request and the schedules, which are the rules for each transaction type.
Complete the following tasks:
-
To configure approver groups
-
To configure approver routes
-
To configure approval rule sets
-
To configure approval rule set calculations
-
To configure approval schedule
Additionally, you can convert your Purchase Order Approval Levels so you can use the Approvals Management system to approve purchase orders. See Appendix C, "Convert Purchase Order Approval Levels to Approvals Management Rule Sets" for more information.
13.2.1 To configure approver groups
From Approvals Management (G00A), choose Hidden Selection 29
From Approvals Management Setup(G00A41), choose Approver Groups
You must configure approver groups for the Address Book system. You use the Approver Groups program (P00A18) to do so. The system stores the approver groups in the Approver Group file (F00A18).
-
On Approver Groups, complete the following fields:
-
Approver Group Name
-
Description
-
And/Or
-
Responsible Person
-
Role
-
-
Complete the following optional fields:
-
As of
-
Option
-
Effective From
-
Effective Thru
-
| Field | Explanation |
|---|---|
| Approver Group | Enter the approver group name. |
| Description | A 30-digit, free-form, user defined description or remark. |
| As of | Select a date that this approver group becomes effective. |
| And/Or | A code that determines whether compound data selection logic is based on an A = AND condition or an O = OR condition. Valid values are:
I - If A - And O - Or * - Then E - Else (catch all) Screen-specific information I, *, and E are not valid values for approver groups. You cannot use 'If then' selection logic in approver groups. Use A and O to group approvers. For example, you can require Sue and Frank or Bob and Sally to approve the approval request. |
| Responsible Person | The text that names or describes an address. This 40-character alphabetic field appears on a number of forms and reports. You can enter dashes, commas, and other special characters, but the system cannot search on them when you use this field to search for a name. |
| Role | A code that determines whether an approver is required to approve an approval request. Valid values are:
A = Approver must approve or reject an approval request. B = Approver is an expedite approver. When an approval request gets expedited by the expedite approver, the approval request immediately gets approved and all remaining approvers get bypassed. The expedite approver is not required to approve the approval request. N = Approver only receives e-mail notification of an approval request. The user is not required to approve or reject the approval request. G = Designates that the value entered into the Person/Group/Route field is an approver group. R = Designates that the value entered into the Responsible Person field is an approver route. 0 = Used in real time event transactions to designate that the value entered into the Person/Group/Route field is a program call. Program calls must be setup in UDC. Program-Specific Information 'G' (Group) and 'R' (Route) are not valid values for Approver Groups (P00A18). Groups containing other Groups or Routes are not allowed. |
| Option | Enter a value. Valid values are:
1 - Insert line 2 - Audit Information window 9 - Delete/Cancel |
From Approvals Management (G00A), choose Hidden Selection 29
From Approvals Management Setup(G00A41), choose Approver Routes
An approver route is a list of approvers that can add a level on an approver rule set. Approver routes include levels that allow approvers to reside in a hierarchy. Using levels on an approver route enforces the order in which approvers can approve an approval request. For example, you want approver A to approve the request before approver B. You create an Approver Route with two levels. Assign approver A to the first level and approver B to the second level.
You must configure approver routes for the Address Book system. You use the Approver Routes program (P00A19) to do so. The system stores the approver routes in the Approver Route file (F00A19).
-
On Approver Routes, complete the following fields:
-
Route Name
-
Description
-
And/Or
-
Level
-
Role
-
Assignee
-
-
Complete the following optional fields:
-
As of
-
Option
-
Effective From
-
Effective Thru
-
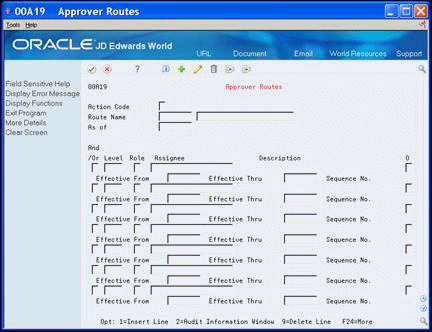
| Field | Explanation |
|---|---|
| Route Name | Enter the route name. |
| Description | A 30-digit, free-form, user defined description or remark. |
| As of | Select a date that this approver group becomes effective. |
| And/Or | A code that determines whether compound data selection logic is based on an A = AND condition or an O = OR condition. Valid values are:
I - If A - And O - Or * - Then E - Else (catch all) Screen-specific information I, *, and E are not valid values for approver routes. You cannot use 'If then' selection logic in approver routes. Use A and O to group approvers. For example, you can require Sue and Frank or Bob and Sally to approve the approval request |
| Level | The current level of the approval request. The assigned approver list on an approval request can be setup using levels. Levels allow for a hierarchy of approvers to be setup for an approval request. All approvers on one level are sent e-mail notification at the same time. The next level of approvers will be e-mailed after all approvers on the current level approve the approval request. |
| Role | A code that determines whether an approver is required to approve an approval request. Valid values are:
A = Approver must approve or reject an approval request. N = Approver only receives e-mail notification of an approval request. The user is not required to approve or reject the approval request. G = Designates that the value entered into the Assignee field is an approver group. |
| Assignee | The text that names or describes an address. This 40-character alphabetic field appears on a number of forms and reports. You can enter dashes, commas, and other special characters, but the system cannot search on them when you use this field to search for a name. |
| Option | Enter a value. Valid values are:
1 - Insert line 2 - Audit Information window 9 - Delete/Cancel |
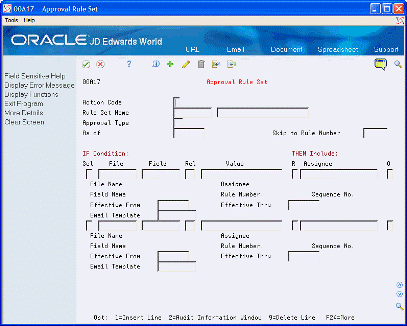
To configure approval rule sets
From Approvals Management (G00A), choose Hidden Selection 29
From Approvals Management Setup(G00A41), choose Approval Rule Set
The approval rule set defines the conditions that you require for the system to create an approval request. For example, you have a new employee and want to generate an approval request each time the new employee makes changes in the Address Book system.
You must configure approval rule set for the Address Book system. You use the Approver Rule Set program (P00A17) to do so. The system stores the approval rules in the Approvals Rule Set file (F00A17).
-
On Approval Rule Set, complete the following fields:
-
Rule Set Name
-
Description
-
Approval Type
-
Sel (And/Or selection)
-
File
-
Field
-
Rel (relationship)
-
Value
-
R (role)
-
Assignee
-
-
Complete the following optional fields:
| Field | Explanation |
|---|---|
| Rule Set Name | Enter the rule set name. |
| Description | A 30-digit, free-form, user defined description or remark. |
| Approval Type | Select a UDC (00/AT), for the Address Book system.
Screen-specific information The approval type specifies to which system this set of approval constants applies. Approvals Management is currently only available for the Address Book system. |
| As of | Select a date that this approver group becomes effective. |
| Sel | A code that determines whether compound data selection logic is based on an A = AND condition or an O = OR condition. Valid values are:
I - If A - And O - Or * - Then E - Else (catch all) Screen-specific information O is not a valid value for approval rule sets. You can set up an equivalent Or selection. Add another rule immediately following the rule this utilized the Or logic. |
| File | Select a UDC (00/BF), for the file in the rule. When a user makes changes to this file, the system generates an approval request. |
| Field | When you specify a file in the File field, the File Field Description window (98FFD) displays. This allows you to select a field to evaluate. The file in the File field determines which fields you can evaluate. |
| Rel | A code that indicates the relationship in the approval rule set definition. Valid values are:
EQ = Equal to LT = Less than LE = Les than or equal to GT = Greater than GE = Greater than or equal to NE = Not equal to |
| Value | A free-form, alphanumeric field used to store the approval rule value.
There are a number of special values you may use in this field, as follows: *ADD = Any add transaction for the file will evaluate "true". *CHANGE = Any change transaction for the file will evaluate "true". *DELETE = Any delete transaction for the file will evaluate "true". *PRIOR = Compares a field to its pre-change value. *BLANK = Field is compared to a value of all blanks. Use this only with alphanumeric fields. *ZERO = Field is compared to a value of zero. Use this only with numeric fields. *S = Sum the field or calculation defined in the rule for all true records. Sum functionality only applies to F4311 and calculations. *ANYCHANGE = Used in purchase order header and detail transactions to check for any changes within a group of similar F4311 records. ANYCHANGE functionality only applies to F4311 and calculations. *RELEASE = Used in purchase order header and detail approval types to designate the assignee as the person responsible for releasing a held order. Routes, Groups, Notify assignees, and Expedite approvers can not be setup as release approvers. Release approvers must approve the approval request like any other approver. When the release approver approves the approval request, the system calls the Release Held Orders program (P43070) allowing the approver to release the order. Note: use caution with skip level turned on when using release approvers. In some cases the release approver could get skipped and the order would get approved without releasing it from hold. If this situation occurs, you can release the order from the Release Held Orders program (P43070). Special values *ADD, *CHANGE, *DELETE, and *PRIOR are not allowed for file F4316. *O = Used in purchase order header and detail approval types to sum the field defined in the rule for all purchase order detail lines with the same original order number as the submitted order. Use this value to catch situations where the PDUORG, PDAEXP, PDFEA, or PDFEC for all the orders released from a requisition order is greater than the requisition order. |
| Role | A code that determines whether an approver is required to approve an approval request. Valid values are:
A = Approver must approve or reject an approval request. N = Approver only receives e-mail notification of an approval request. The user is not required to approve or reject the approval request. G = Designates that the value entered into the Person/Group/Route field is an approver group. R = Designates that the value entered into the Person/Group/Route field is an approver route. |
| Assignee | The text that names or describes an address. This 40-character alphabetic field appears on a number of forms and reports. You can enter dashes, commas, and other special characters, but the system cannot search on them when you use this field to search for a name. |
| Option | Enter a value. Valid values are:
1 - Insert line 2 - Audit Information window 9 - Delete/Cancel |
| Email Template | This is the Email template name. An Email template contains the Email subject line and the body text of an Email. The body text can be on the Email template or in an HTML file referred to by the template.
If the Rule does not contain an e-mail template, the system defaults the e-mail template from the approval constants. |
To configure approval rule set calculations
From Approvals Management (G00A), choose Hidden Selection 29
From Approvals Management Setup(G00A41), choose Approval Rule Set Calculations
You use the Approval Rule Set Calculation program (P00A10) to define simple mathematical rules based on fields in a single record. For example, you might want to create a purchase order rule based on the addition of the extended price and amount on hold. You create an approval rule set calculation that sums the extended price and amount on hold, then use the calculation when defining your purchase order rule.
The system stores the approval rules in the Approval Rule Set Calculation File table (F00A10).
On Approval Rule Set Calculation, complete the following fields and click Add.
-
Rule Set Calculation Name
-
Description
-
Approval Type
-
File
-
Field
-
Operator
Figure 13-11 Approval Rule Set Calculation screen
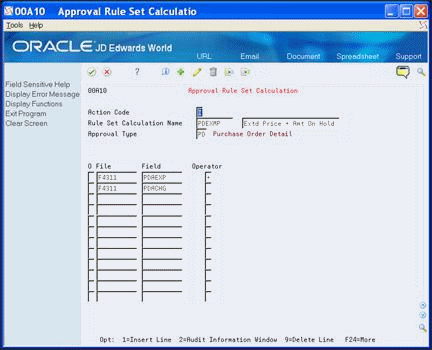
Description of "Figure 13-11 Approval Rule Set Calculation screen"
| Field | Explanation |
|---|---|
| Rule Set Calculation Name | A 10 character, free-form, user defined, alphanumeric field used to identify a rule set calculation.
Screen-specific information Enter a user-defined code (00/AD) to indicate rule set calculation. |
| Approval Type | A user defined code (00/AT) that indicates the type of approval request.
Screen-specific information Enter a user-defined code from 00/AT. |
| File | Enter a file number. |
| Field | Enter a field name. |
| Operator | A single character alphanumeric field used to store the operator. |
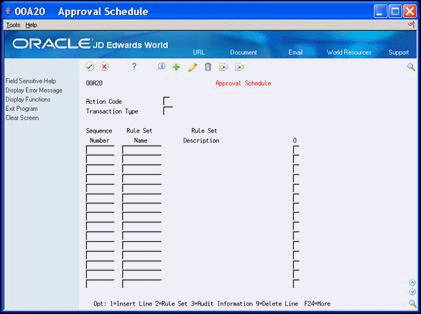
To configure approval schedule
From Approvals Management (G00A), choose Hidden Selection 29
From Approvals Management Setup(G00A41), choose Approval Schedule
You use the approval schedule to assign approval rule sets to a type of action a user performs, add, change, delete, and so forth. For example, you might only want to approve any records a user adds and changes and not the records that a user deletes. You assign the approval rule set to Address Book add and Address Book change schedules.
You must configure approval schedule for the Address Book system. You use the Approver Schedule program (P00A20) to do so. The system stores the approval rules in the Approval Schedule file (F00A20).
On Approval Schedule, complete any the following fields:
-
Transaction Type
-
Sequence Number
-
Rule Set Name
-
Option
| Field | Explanation |
|---|---|
| Transaction Type | Select a UDC (00/TN), for the type of action a user performs in the Address Book. |
| Sequence Number | Used to store a record's sequence within a file. |
| Rule Set Name | Enter the rule set name. |
| Option | Enter a value. Valid values are:
1 - Insert line 2 - Exit to Approval Rule Set 3 - Audit Information window 9 - Delete/Cancel |