19 Work with Activity Monitor Tables
This chapter contains the topic:
19.1 Working with Activity Monitor Tables
You use the Maintain Activity Monitor Files - List program (P009252) to add, change, and delete the JD Edwards World tables that you want to monitor for user activity reporting and to define the tables you want to include when you generate the File Update Activity Summary Report.
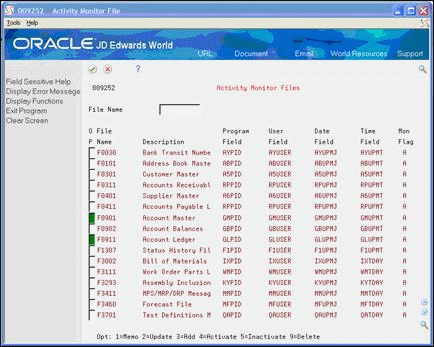
JD Edwards World includes the following tables in the Files to monitor for User Activity table (F009252):
| Table | Description |
|---|---|
| F0030 | Bank Transit Number Master File |
| F0101 | Address Book Master |
| F0301 | Customer Master |
| F0311 | Accounts Receivable Ledger |
| F0401 | Supplier Master |
| F0411 | Accounts Payable Ledger |
| F0901 | Account Master |
| F0902 | Account Balances |
| F0911 | Account Ledger |
| F1307 | Status History File |
| F3002 | Bill of Materials Master File |
| F3111 | Work Order Parts List |
| F3293 | Assembly Inclusions Rules |
| F3411 | MPS/MRP/DRP Message File |
| F3460 | Forecast File |
| F3701 | Test Definitions Master File |
| F3901 | Item/Pool Valuation Master |
| F4070 | Price Adjustment Schedule |
| F4071 | Price Adjustment Name |
| F4072 | Price Adjustment Detail |
| F4101 | Item Master |
| F4102 | Item Branch File |
| F4111 | Item Ledger File |
| F4201 | Sales Order Header File |
| F4211 | Sales Order Detail File |
| F4301 | Purchase Order Header File |
| F4311 | Purchase Order Detail File |
| F4602 | Location Detail Information |
| F4901 | Trip Master |
| F4911 | Trip Detail |
Working with Activity Monitor Files includes the following tasks:
-
To add activity monitor tables
-
To view or change activity monitor tables
-
To activate or inactivate activity monitor tables
From User Activity Reporting (G00925), choose Activity Monitor Files
To add activity monitor tables
Before you can generate reports in UAR, you must choose which tables you want to include in the UAR reports. You can add tables to those that JD Edwards World provides in the Files to Monitor for User Activity table (F009252). When you add activity monitor tables, the program sets the Active/Inactive field to A (active).
-
On Activity Monitor Files, locate the last blank line and enter 3 in the Option field.
-
On Add/Change File Information, complete the following fields and click Add:
Figure 19-2 Add/Change File Information screen
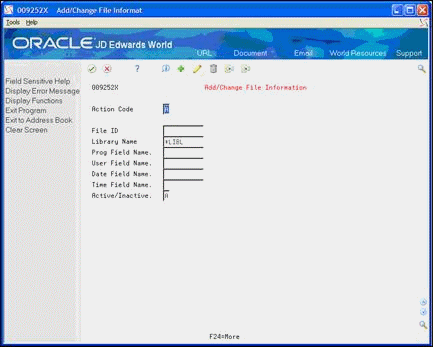
Description of "Figure 19-2 Add/Change File Information screen"
| Field | Explanation |
|---|---|
| File ID | The identification, such as program number, table number, and report number, that is assigned to an element of software.
Screen-Specific Information You must enter a value in this field. The number of the JD Edwards World table that you want to include in the File Update Activity Report. |
| Library Name | These are the names of the libraries that contain JD Edwards World files and programs. Each file should exist in only one library in the environment other than the 'JDF' library (usually JDFDATA). You may, however, enter multiple 'COM' or 'DTA' libraries.
COM Common Files (for example, DREAMWriter and Data Dictionary) CSO Custom executable programs CSS Custom source library DTA Data files (for example, F0411 and F0911) JDF JD Edwards World data (for example, JDFDATA) KBG World Case files OBJ JD Edwards World executable programs (for example, JDFOBJ) SEC Security files (for example, F0092, F0094) SRC JD Edwards World source code (for example, JDFSRC) Screen-Specific Information This can be a specific name, or you can enter a library list choice, such as *LIBL. |
| Program Field Name | The name of the object.
Objects can be libraries, source members, job queues, print queues, and files. Consult your IBM documentation for a full explanation of objects. Screen-Specific Information You must enter a value in this field. The name of the field in the JD Edwards World table which contains the name of the program to last update the table. |
| User Field Name | The name of the object.
Objects can be libraries, source members, job queues, print queues, and files. Consult your IBM documentation for a full explanation of objects. Screen-Specific Information You must enter a value in this field. The name of the field in the JD Edwards World table which contains the name of the user to last update the table. |
| Date Field Name | The name of the object.
Objects can be libraries, source members, job queues, print queues, and files. Consult your IBM documentation for a full explanation of objects. Screen-Specific Information You must enter a value in this field. The name of the field in the JD Edwards World table which contains the date the table was last updated. |
| Time Field Name | The name of the object.
Objects can be libraries, source members, job queues, print queues, and files. Consult your IBM documentation for a full explanation of objects. Screen-Specific Information You must enter a value in this field. The name of the field in the JD Edwards World table which contains the time the table was last updated. |
| Active/Inactive | Is monitor on this file Active/Inactive? Valid values are:
A - Active I - Inactive Screen-Specific Information The default value for this field is A and the system enters an A when you access the Add/Change File Information screen. When you enter an A, the activity monitor file record is active and the system includes the JD Edwards World table in the File Update Activity Report. When you enter an I, the record is inactive and the system does not include the JD Edwards World table in the report. |
To view or change activity monitor tables
-
On Activity Monitor Files, enter 2 in the Option field next to the line you want to view or change and.
-
On Add/Change File Information, review the fields, change any of the fields, and click Change:
To activate or inactivate activity monitor tables
You must activate a table for the system to include the table in the File Update Activity Summary Report.
On Activity Monitor Files, perform one of the following and click Enter:
-
Enter 4 in the Option field next to the line you want to activate.
-
Enter 5 in the Option field next to the line you want to inactivate.