Resource Manager Implementation Overview
This chapter covers the following topics:
- Overview
- Installation Verification
- Resource Manager Dependencies
- Phase I: Setting Up Resource Manager
- Phase II: Managing Resources with Resource Manager
- Resource Manager Concurrent Programs
Overview
Resource Manager is used with other applications in the E-Business Suite to define, access, and maintain different categories of resources including employees, supplier contacts, parties, and partners. You can also define a Resource of type Other that is not a salesperson, but an individual or an object. Resource Manager enables you to perform these functions in a single application without having to access multiple repositories within the E-Business Suite on an individual basis. Implementing Resource Manager takes place in two phases. In the first phase, you set up Resource Manager by importing resources from other E-Business applications, optionally defining roles and role types, setting profile options, configuring resource fields for update, and defining skill levels. In the second phase, you manage resources by finding and viewing resources, assigning roles and role types to resources, creating groups and teams to which resources can be assigned, and viewing resource reports. In addition to successfully completing these phases, you can troubleshoot any problems with Resource Manager as required. Before implementing Resource Manager, it is necessary to understand the definition of resources, how Resource Manager operates with other E-Business suite applications, and the functionality of both the Forms-based and HTML versions of the product.
Resources
Resources are individuals or objects that are identified by categories based on the business function they perform. These categories include employees, parties, partners, and supplier contacts each of which is initially created and maintained in a specific E-Business application database. They also include resource of type other that can be objects such as items, assets, equipment, or property such as meals, audio/visual equipment, overhead projectors, and furniture. Resource Manager typically mass imports different types of resources from the E-Business application databases listed in the following table:
| Resource | Description | E-Business Application |
|---|---|---|
| Employee | A person hired to work for a company. | Human Resource Management System (HRMS) |
| Party | An entity that can enter into a business relationship. | Trading Community Architecture (TCA) |
| Partner | One of two or more people who contribute capital to establish or maintain a commercial venture and who usually share in the risks and profits. | TCA |
| Supplier Contact | The contact information for a person or agency that sells raw material or goods. | Purchasing (PO) |
| Other | Objects such as items, assets, equipment, or property. Examples include meals, audio/visual equipment, and furniture. | Oracle Property Manager |
Resource Manager Functionality within the E-Business Suite
Resource Manager imports data from the HRMS, TCA, and PO databases and provides the resulting resource information to other E-Business applications. The following diagram illustrates Resource Manager interactions within E-Business and core applications. This diagram is explained in the table that follows.
Interaction with Other E-Business and Core Applications
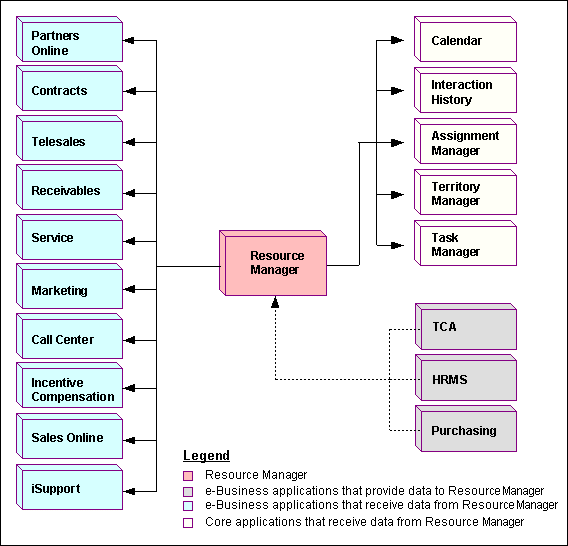
The following table describes Resource Manager Interactions with other E-Business Suite applications:
| Application | Type | Resource Manager Interaction |
|---|---|---|
| Partners Online | E-Business | Partners Online uses Resource Manager to setup partners, parties, and relationships from TCA. |
| Contracts | E-Business | Contracts uses Resource Manager to tie contracts to employees. For example, a service contract may be tied to one or more preferred engineers. |
| TeleSales | E-Business | TeleSales uses Resource Manager to set up a sales hierarchy. |
| Receivables | E-Business | Salesreps defined in Resource Manager are used by Receivables. |
| Marketing | EBusiness | Marketing uses Resource Manager to set up marketing groups, identify approvers, and execute marketing campaigns. |
| Service | E-Business | Service uses group and team lists of resources from Resource Manager for service request assignments. |
| iSupport | E-Business | iSupport uses Resource Manager to set up support groups to fulfill service and support needs. |
| Incentive Compensation | E-Business | Incentive Compensation uses Resource Manager to set up sales representatives and sales compensation group hierarchies. |
| Call Center | E-Business | Call Center uses Resource Manager for call center routing. |
| Sales Online | E-Business | Sales Online uses Resource Manager to set up a sales hierarchy. |
| Calendar | E-Business | Calendar uses Resource Manager to track the availability of resources. |
| Interaction History | Common Application Calendar | Interaction History uses Resource Manager to provide touch points. |
| Assignment Manager | Common Application Calendar | Assignment Manager uses Resource Manager to provide a list of qualified resources. |
| Territory Manager | Common Application Calendar | Territory Manager uses Resource Manager to select the resources for a particular territory. |
| Task Manager | Common Application Calendar | Task Manager uses Resource Manager to provide single, group, and team lists of resources for task assignments. |
| Trading Community Architecture (TCA) | E-Business | Resources of category Party and Partner can be imported from Accounts Receivables (AR) to Resource Manager and subsequently defined as E-Business Suite resources. |
| Purchasing | E-Business | Resources of category Supplier Contact can be imported as resources from Purchasing (PO). |
| Human Resource Management Systems (HRMS) | E-Business | Resources of category Employee can be imported as resources from Oracle Human Resource Management System (HRMS). |
Forms-based and HTML Versions of Resource Manager
Resource Manager was initially a Forms-based application and was subsequently expanded to include an HTML version. A number of features are available in both versions of Resource Manager, however some features are available in only Forms or HTML. The HTML version of Resource Manager, has additional implementation requirements such as setting the necessary profile options for the application.
Installation Verification
Before attempting to run Oracle E-Business Suite applications, first verify that you can perform the tasks outlined in the following table. The listed tasks are generic tasks that are typical of all users of the E-Business Suite. Depending on your business processes, and the modules that you are installing, not every listed task is applicable to your installation.
The following table describes the tasks that need to be performed before implementing Resource Manager.
| Application | Task |
|---|---|
| Application Object Library | |
| Oracle Human Resources | Create an employee |
| Oracle Human Resources | Create a new business unit |
| Oracle Receivables | |
| Oracle Workflow | Create a workflow with notifications |
| Oracle Inventory | |
| Oracle Purchasing | Create a supplier contact |
| Oracle Order Management | Define sales credit types |
| Oracle General Ledger | Set up descriptive accounting flexfields |
Application Procedures
You must be able to complete each of the following non-E-Business Suite tasks successfully for your E-Business Suite applications to work properly. If you are unable to complete a task successfully, then correct the problem before continuing.
Creating an FND User
Perform the following steps to create a FND user in the Application Object Library.
Reference
Oracle Application Object Library Security, Oracle E-Business Suite Security Guide
Prerequisites
None
Responsibility
System Administrator
Navigation
Navigate to Security > User > Define.
Steps
-
In the User window, enter a new user name in the User Name field.
-
Enter a password in the Password field.
-
Re-enter the password for verification.
-
Select the employee's name from the list of Values (LOV) in the Person Field.
-
In the Responsibilities sub-tab, select the CRM HTML Administration responsibility from the drop-down list of values.
-
Save the new user.
To verify that the user setup is successful, perform the following steps:
-
Login to your Personal Home Page as the newly created user.
-
Enter your new password when prompted.
You should now be able to access the Personal Home Page for this user.
Note: For this user to have access to HTML applications, you must set additional profile options. See: Resource Security Category and Resource Setup Category.
Assigning AOL Responsibilities to the User
A responsibility defines an application user's current privileges while working with Oracle Applications. When an application user signs on, they select a responsibility that grants certain privileges, specifically:
-
The functions that the user may access. Functions are determined by the menu assigned to the responsibility.
-
The concurrent programs, such as reports, that the user may run.
-
The application database accounts to which forms, concurrent programs, and reports connect.
You cannot delete a responsibility because this information helps to provide an audit trail. You can deactivate a user's responsibility at any time by setting the End Date to the current date. If you wish to reactivate the responsibility for the user, change the End Date to a date after the current date, or clear the End Date.
After creating the FND User, perform the following steps to assign the user AOL responsibilities.
Reference
People Management, Oracle Human Resources Management Systems Workforce Sourcing, Deployment, and Talent Management Guide
Prerequisites
None
Responsibility
System Administrator
Navigation
Navigate to Security > User > Define.
Steps
-
With the user information populated in the window, select the Responsibility field in the Responsibilities tab.
-
Select the necessary responsibility from the List of Values (LOV).
-
Define the Effective dates.
-
Save your work.
Setting Profile Options
A user profile is a set of changeable options that affect the way your application looks and behaves. As System Administrator, you control how Oracle Applications operate by setting user profile options to the values you want. You can set user profile options at four different levels: site, application, responsibility, and user.
After creating the FND User, perform the following steps to set profile options.
Reference
People Management, Oracle Human Resources Management Systems Workforce Sourcing, Deployment and Talent Management.
User Profiles, Oracle Human Resources Management Systems Configuring, Reporting, and Administration Guide.
Prerequisites
None
Responsibility
System Administrator
Navigation
Navigate to Security >Profile > System.
Steps
-
In the Find System Profile Values window, select an appropriate check box for the profile option that you want to set before clicking Find.
The System Profile Values window opens with the profile option you searched for.
-
Set an appropriate value for your profile option if the checkbox is selected:
-
Set the Site value. This field displays the current value, if set, for all users at the installation site.
-
Set the Application value. This field displays the current value, if set, for all users working under responsibilities owned by the application identified in the Find Profile Values block.
-
Set the Responsibility value. This field displays the current value, if set, for all users working under the responsibility identified in the Find Profile Values block.
-
Set the User value. This field displays the current value, if set, for the application user identified in the Find Profile Values block.
You should set site-level default values for any required options after installation of an application. If you do not assign a particular profile option at any of the four levels, that option does not have a default value and may cause errors when you use forms, run reports, or run concurrent requests.
-
-
Save your work.
Creating an Employee
To successfully run most of the E-Business Suite products, you must first create employee resources within the ERP Human Resource Management System (HRMS) application. Perform the following steps to define an employee for minimal functionality.
Note: If Oracle HRMS is not installed, then you must enter a new employee using the Enter Person form by navigating to Resource Manager > Maintain Employee > Employee.
Reference
People Management, Oracle Human Resources Management Systems Workforce Sourcing, Deployment, and Talent Management Guide
Prerequisites
None
Responsibility
US HRMS Manager or US Super HRMS Manager
Navigation
Navigate to People > Enter and Maintain.
Steps
-
Click New In the find window.
The People window opens.
-
Enter the following employee information in the appropriate form fields:
-
Last Name
-
First Name
-
Title
-
-
Select the person's gender from the drop-down list.
-
Select Employee from the type drop-down list.
-
Enter the person's social security number.
-
Save you work.
Creating a New Business Unit
A Business Group is a special class of organization. Every Business Group can have its own set of default values, with its own internal organizations, grades, jobs, positions, payrolls, employees, applicants, compensations and benefits.
Organizations are the basic work structure of any enterprise. They usually represent the functional, management, or reporting groups which exist within a Business Group. Perform the following steps to create a new business unit.
Reference
Creating an Organization, Oracle Human Resources Management Systems Enterprise and Workforce Management Guide
Prerequisites
None
Responsibility
US HRMS Manager or US Super HRMS Manager
Navigation
Navigate to Work Structures > Organization > Description.
Steps
-
Click New in the Find Organization window.
-
Enter the name for the Organization
-
Select Business Unit from the list of values (LOV) in the Type field.
The current date populates the From Date field.
-
Enter the Organization location details from the LOV.
-
Save your work.
-
In the Organization Classification region, select the classification from the LOV.
-
Select the Enabled check box.
-
Save your work.
-
Click Others for additional information on the classification you selected.
-
Save your work.
Creating a Customer
Perform the following steps to create a new customer, with an address and contact information in the Oracle Receivables.
Reference
Creating a Customer, Oracle Receivables User Guide
Prerequisites
None
Responsibility
Receivables Manager
Navigation
Navigate to Customers > Standard.
Steps
-
In the Find/Enter Customers window, select Person from the Customer Type drop-down list.
-
Enter the name of the customer in the Name column.
-
Click Find to ascertain if the customer already exists.
As this customer does not exist, the New button is enabled in the Decisions window.
-
Click New.
The Customer-Standard window opens.
-
On the Address tab, click New to create a new address.
The Customer Addresses window opens.
-
Fill in the necessary information. Yellow fields are mandatory.
-
On the Business Purpose tab, fill in the Usage, Location and select the Primary check box. For example:
-
Usage: Marketing
-
Location: 6op9
-
Primary: Yes
-
-
On the Contacts: Telephones tab, enter a new contact and phone number.
-
Save your work.
Verify Your Information
To verify that the process worked properly, perform the following steps.
-
Open the Customer-Standard window again.
-
Enter the company name you entered above.
-
Click Find to query for the record you created in the Match Results window.
-
If the record is found, click the Contacts: Telephone tab.
-
Place the cursor in the Last Name field.
-
From the menu, navigate to View > Query by Example > Enter.
-
Enter the contacts last name as the search criteria.
-
Select View > Query by Example > Run.
If the record for your contact name is populated, then you have successfully created a customer with an address and a contact person for the customer.
Creating a New Organization
Perform the following steps to create a new organization, with an address and contact information in the Oracle ERP Accounts Receivables application.
Reference
Creating a Customer, Oracle Receivables User Guide Customers
Prerequisites
None
Responsibility
Receivables Manager
Navigation
Navigate to Customers > Standards.
Steps
-
In the Find/Enter Customer window, select Organization from the Customer Type drop-down list.
-
Enter the name of a test corporation in the Name field.
-
Click Find to ascertain if the customer already exists.
As this customer does not exist, the New button is enabled.
-
Click New.
The Customer-Standard window opens.
-
On the Address tab, click New to create a new address.
The Customer Addresses window opens displaying the same business purpose table as on the first tab.
-
Fill in the necessary information. Yellow fields are mandatory.
-
On the Business Purpose tab, fill in the Usage, Location and select the Primary check box. For example:
-
Usage: Marketing
-
Location: 6op9
-
Primary: Yes
-
-
On the Contacts: Telephones sub-tab, enter a new contact and phone number.
-
Save your work.
Creating a Workflow With Notifications
Perform the following steps to create and run a workflow with notifications.
Reference
Defining a Workflow Process and Defining Workflow Process Components, Oracle Workflow Developer's Guide
Prerequisites
None
Responsibility
Workflow Administrator
Navigation
Navigate to Workflow > Launch Processes.
Steps
-
In the Launch Processes window, In the Item Type column, click Document Management. If you have renamed the item types, this option appears in the Internal Name column as WFDM.
The Initiate Workflow-WFDM page opens.
-
Enter values in the following fields:
-
Item Key: Enter your name plus a sequence number (for example, jdoe1001)
-
User Key: You may copy the value in the Item Key field
-
Process Name: Enter Document Review
-
Process Owner: Your logged in user name populates automatically
-
Send Document: Leave blank
-
Document Owner: Select a valid resource name
-
Document Reviewer: Choose one from the list of values
-
Comments: Enter Workflow Verification
-
Response Document: Leave blank
-
-
Click OK.
The Activities List page opens to show workflow statuses. The status of the workflow you just initiated should be Active.
-
If the status of the workflow is Error, click Exception in the Result column to see an explanation of the error.
-
Click View Diagram to see a graphical representation of the workflow process.
Leave the View Diagram window open as you continue to check the workflow.
-
Save your work.
To Review the Progress of a Workflow
Use the following procedure to verify that the Workflow notification is sent.
Steps
-
Login to your Personal Home Page.
-
In the list of Self Service Apps, choose the Workflow User Web Application responsibility.
-
In the Navigator, choose Workflow >Find Notifications.
The Find Notifications page opens.
-
In the Type field, enter Document Management. In the To field, enter the document reviewer.
-
Click Find.
The Worklist window opens.
-
Click Subject to open the notification.
If you see the notification, then workflow is set up correctly.
-
Click Approve to return to the Worklist window.
Further Verification
You may go back to the View Diagram window that you opened earlier. Click Reload in the browser window to refresh the contents of the window. After the workflow process completes successfully, you can see a green line from the Start icon to the End (Approve) icon.
Defining Categories
You can use categories and category sets to group items for various reports and programs. Perform the following steps to define categories.
Note: Category sets may be used as a means to develop custom lists of items on which to report and sort. You can also create other category sets such as John's Priority or Jane's Priority, with categories like high, medium, and low.
Reference
Defining Categories, Oracle Inventory User's Guide
Prerequisites
The categories you assign to a category set must have the same flexfield structure as the set itself. This is true even if you choose not to validate the category list.
Responsibility
Inventory
Navigation
Navigate to Setup > Items > Categories > Category Sets.
Steps
-
Select the appropriate organization name in the Organization window, if necessary.
-
In the Category Sets window, enter a unique category set name and description information.
-
Enter a flexfield structure.
-
Select a control level.
-
Master Level: Item assigned to this category set has the same category value in all organizations where it is assigned.
-
Org Level: Item assigned to this category set may have a different category value in each organization where it is assigned.
-
-
Select a default category.
This is the default category used when assigning an item to the category set. For example, a category set may have a default category called New. After an item is assigned to New, you can override the default category and choose another relevant category for each item.
-
Decide whether or not an item can be assigned to multiple categories within this category set.
-
Enable: You can assign an item to multiple categories within a category set. For example, you may define a Hazard category set. In this case, an item may be assigned to both the Poison and Corrosive categories.
-
Not Enable: You can assign an item to exactly one category. For example, you may define a Web Display category set. In this case, an item can be assigned to only one default display category.
-
-
Decide whether or not to enforce the list of valid categories.
-
Enable: You can assign an item only to those categories defined as valid categories for this category set. For Oracle Purchasing, this check box is not applicable, and you can assign items only to categories defined as valid for this category set.
-
Not Enable: You can assign an item to any defined category that uses the same flexfield structure as this category set.
-
-
Select a list of valid categories.
The list of values here includes only categories that use the same flexfield structure as the category set you are defining.
-
Save your work.
Defining Products and Platforms
You define and rate products and platforms in Oracle Inventory in order to set resource skill levels in the HTML Resource Manager. See the Oracle Inventory User's Guide for more information on how to define products and platforms.
Reference
Items, Oracle Inventory User's Guide
Defining Unit of Measure Classes
Perform the following steps to define a unit of measure class.
Reference
Defining Units of Measure Classes, Oracle Inventory User's Guide
Prerequisites
None
Responsibility
Inventory
Navigation
Navigate to Setup > Units of Measure > Classes.
Steps
-
In the Units of Measure Classes window, select File > New.
-
Enter a unique name for the unit of measure class.
-
Enter a description for the UOM class.
-
Define the base unit of measure for this class.
-
Enter a unique abbreviation for the unit of measure with a maximum length of three characters. Examples include, EA for each or HRS for hours.
-
Select the "inactive on" date from the date picker.
-
Save your work.
Defining Units of Measure
Units of measure are used by a variety of functions and transactions to express the quantity of items. The values defined in the Units of Measure window provide the list of values available in unit of measure fields in other windows. Units of measure are not organization–specific. Perform the following steps to define units of measure.
Reference
Defining Units of Measure, Oracle Inventory User's Guide
Prerequisites
At least one unit of measure class must exist.
Responsibility
Inventory
Navigation
Navigate to Setup > Units of Measure > Units of Measure.
Steps
-
With the Units of Measure window open, select File > New.
-
Enter a unique name for the unit of measure.
-
Enter a unique abbreviation for the unit of measure with a maximum length of three characters. Examples include, EA for each or HRS for hours.
-
Enter a Description for the UOM.
-
Select the check box if this is the base unit of measure for the unit of measure class.
-
Enter a unit of measure class.
-
Select an "inactive on" date from the date picker.
-
Save your work.
Creating a Supplier Contact
Set up suppliers in the Suppliers window to record information about individuals and organizations from whom you purchase goods and services. You can also enter employees whom you reimburse for expense reports. When you enter a supplier that does business from multiple locations, you store supplier information only once, and enter supplier sites for each location. You can designate supplier sites as pay sites, purchasing sites, RFQ only sites, or procurement card sites. For example, for a single supplier, you can buy from several different sites and send payments to several different sites. Most supplier information automatically defaults to all supplier sites to facilitate supplier site entry. However, you can override these defaults and have unique information for each site.
The system uses information you enter for suppliers and supplier sites to enter default values when you later enter transactions for a supplier site. Most information you enter in the Suppliers window is used only to enter defaults in the Supplier Sites window. When the system enters that information in a later transaction, it only uses supplier site information as a default, even if the supplier site value is null and the supplier has a value. If you update information at the supplier level, existing supplier sites are not updated.
When you enter a supplier, you can also record information for your own reference, such as names of contacts or the customer number your supplier has assigned to you. Perform the following steps to create a supplier contact.
Reference
Supply Base Management, Oracle Purchasing User's Guide
Prerequisites
-
Verify that the supplier does not exist in the system. Use the Suppliers Report and Supplier Audit Report.
-
Define the following lookups in the Oracle Purchasing Lookups window: Pay Group, Supplier Type, Minority Group.
-
Define Supplier Types in the Oracle Payables Lookups window.
-
If you have installed Purchasing, complete Purchasing setup.
-
If you use Oracle Purchasing, define Supplier Types in the Oracle Payables Lookups window.
-
If you use Oracle Purchasing, define FOB codes, Minority Groups, and Freight Terms codes in the Oracle Purchasing Lookups window.
-
If you use Oracle Purchasing, define Ship Via codes in the Defining Freight Carriers window.
Responsibility
Purchasing
Navigation
Navigate to Supply Base > Suppliers.
Steps
-
In the Suppliers window, enter a unique Supplier Name.
-
If the Supplier Number Entry option in the Financials Options window is set to Automatic, Payables automatically enters a Supplier Number for you. If this option is set to Manual, you must enter a unique Supplier Number.
-
(Optional) Enter the supplier's tax identification number in the Taxpayer ID field; for example, an individual's social security number, or a corporation or partnership's federal identification number/federal tax ID.
-
(Optional) Enter the value-added tax (VAT) registration number in the Tax Registration Number field if you are entering a VAT supplier.
If you want to prevent invoice or purchase order entry for this supplier after a certain date, then enter the date in the Inactive On field.
-
Enter supplier information in the appropriate tabs of the Suppliers window.
-
In the Suppliers window, choose the Sites button to navigate to the Supplier Sites window. Enter at least one supplier site name and address.
-
Save your work.
Defining Sales Credit Types
Order Management uses sales credit types to determine if the sales credit for an order is a quota or non-quota amount. Perform the following steps to define sales credit types.
Reference
Setting Up, Oracle Order Management Implementation Manual
Prerequisites
None
Responsibility
Order Management Super User
Navigation
Navigate to Setup > Sales > Credit Types.
Steps
-
Navigate to the Sales Credit Types window.
-
In the Sales Credit Type window, enter the Credit Type Name and Description for the credit type.
-
Select the Quota check box if the sales credit type applies to revenue quota sales credit that you assign to salespeople.
-
Select the Enabled check box to activate the sales credit type.
-
Save your work.
Setting Up Accounting Flexfields
Use descriptive flexfields to tailor General Ledger to fit your unique information needs. For example, you may want to collect additional information on budget organizations, such as the manager and the size of the organization. You can even define context–sensitive flexfields that prompt you for additional information based on your previous entries. Perform the following steps to set up accounting flexfields.
Note: You only need to set up accounting flexfields if you are using the Freight, Revenue, or Receivables Account fields, in the Resource Manager Receivables tab.
Reference
Defining Descriptive Flexfields for General Ledger, Oracle General Ledger Implementation Guide
Prerequisites
Use the Value Sets window to define any value sets you need.
Responsibility
General Ledger Super User
Navigation
Navigate to Setup > Financials > Flexfields > Descriptive > Segments.
Steps
Consult the following manuals for more information:
-
Oracle General Ledger Implementation Guide
-
Oracle Applications Flexfields Guide
Resource Manager Dependencies
Report Manager integrates with other Oracle applications in the e-Business Suite to provide and extend its functionality. Some are mandatory and some are optional. You must set up the mandatory modules before the Resource Manager can run. Setting up the optional modules is not required; however, if they are not set up, then the additional functionality provided by these modules is not available.
Many of these modules are included in your general installation. The following list of modules or applications is included with your installation but if you have not licensed the entire suite, you will only have access to the functionalities and tables. In other words, you will not be able to access the user interface (UI) or APIs for the application.
Note: The exception to the previous paragraph is that some UIs are shared. An example of this is in Oracle HRMS which will "share" some of it's Forms if you do not have HRMS set up.
Resource Manager Mandatory Dependencies
-
Oracle Application Object Library (AOL): Resource Manager uses AOL to manage responsibilities that are used in various modules, and set application profile options. (Required)
-
Oracle Human Resources: Resource Manager uses Oracle Human Resources to create employee resources so that the employee resources can be imported into Resource Manager. In addition, business units used in multi-organization are also created in Oracle Human Resources. (Required)
-
Oracle Purchasing: Resource Manager uses Oracle Purchasing to create supplier contacts. (Required)
-
Oracle Inventory: HTML-based Resource Manager users rate their skills based on the product and platforms defined in Oracle Inventory. (Required)
-
Oracle Receivables: Resource Manager uses Oracle Receivables to create customers that are of party or partner resource type. In addition, new organizations used in multi-organization are also created in Oracle Receivables. (Required)
-
Oracle Workflow: Resource Manager uses Oracle Workflow to send workflow notifications. (Required)
Phase I: Setting Up Resource Manager
Implementing Resource Manager takes place in two phases. In the first phase, you set up Resource Manager by defining and configuring required components. In the second phase, you use Resource Manager to manage your resources. This section summarizes the basic steps for Phase I: Setting up Resource Manager. Detailed instructions for these steps can be found in Overview of Setting Up Resource Manager. Before performing these steps, you should first determine that Resource Manager is installed and configured properly to work with other applications in the E-Business Suite.
Defining Resources
The first step in implementing Resource Manager is to define resources. Typically this is accomplished by mass importing resources from other Oracle E-Business applications or from legacy systems. In some cases, however, you may want to define an individual resources by importing it from the relevant E-Business application or by creating it directly in Resource Manager.
Mass Import Resource From Other E-Business Applications
Mass importing resources is the most common method of defining resources that are stored in E-Business applications such as HRMS, TCA, or Purchasing. This is accomplished using concurrent programs to synchronize data between Resource Manager and the HRMS, TCA, and Purchasing databases.
Import Resources From Legacy Applications Using APIs
APIs are required to import resources from legacy HRMS, PO, or AR systems into Resource Manager. To accomplish this, you must use the APIs of your legacy system and the Resource Manager public Published APIs.
Import Individual Resources From Other E-Business Applications
An individual resource can be imported into Resource Manager by logging in with the CRM Administrator responsibility, and selecting Resource Manager > Maintain Resources > Import Resources.
Create Individual Resources in Resource Manager
You can create one of the following in the Forms-based version of Resource Manager:
-
An employee that is defined as a salesperson in the Forms-based version of Resource Manager
-
A resource of type Other that is either an individual who is not a salesperson, or an object such as a hospital bed.
When you create Resources of these types in Resource Manager the information is written directly to the HRMS tables. If you want to create individual resources of other types, you must first create them in the appropriate application and then import them into Resource Manager.
Optionally Defining Roles Types and Roles
Resource Manager comes with seeded role types and roles that are used to better organize your resources. If you do not wish to use the seeded role types and roles, you can optionally create your own in Resource Manager.
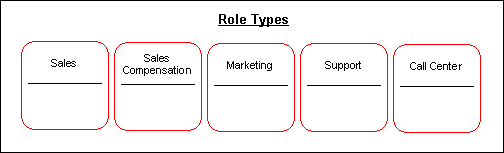
Role Types
A role type is a broad descriptive category such as "Sales" that contains one or more detailed descriptive categories such as "Sales Representative" or "Sales Manager". Sales, TeleSales, Marketing, Sales Compensation, Support, and Call Center are all examples of role types that are seeded by the different modules that access Resource Manager. You can also define custom role types for your business needs.
Role Types Example
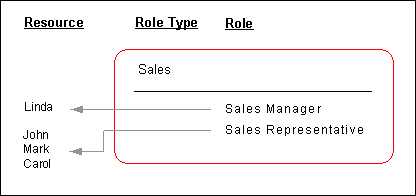
Roles
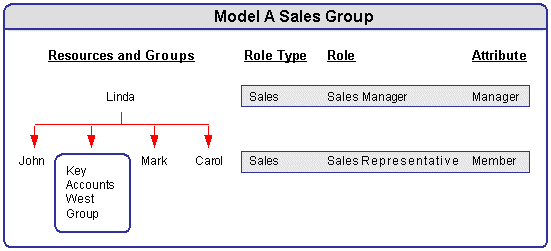
Roles are detailed descriptive categories that are grouped together within role types. A role can encompass one or more job descriptions and job titles that are used to assign responsibilities to resources, groups, and teams. For example, the Sales role type can encompass several roles including Sales Manager and Sales Representative. A resource named Linda who is a Sales manager can be assigned the Sales Manager Role while sales representatives, John, Mark, and Carol are assigned the Sales Representative role.
Roles Example
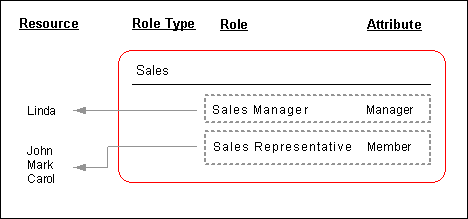
Role Attributes
When a role is created, it is associated with a specific role attribute. This enables different roles to be grouped together when defining a resource reporting hierarchy. The hierarchy is used in sales product families to control data access privileges, sales forecast rollups, and incentive compensation plans. It is also used for workflow notifications and escalations. When defining a role, you must also specify its attribute by selecting one of the Resource Manager seeded role attributes:
-
Member: This is the attribute for group members and is the default attribute for any group.
-
Lead: This is the attribute for the team lead within a group.
-
Admin: This attribute enables group members with the associated role to view and modify information about other group members. In the HTML Resource Manager, only a user in a group with either the Administrator or Manager group member role can update group member and group hierarchy information.
-
Manager: This attribute is used to set up the group reporting hierarchy. For example, all the forecasts for a group of sales representatives will roll up to the person with the Manager role attribute in that group. If Linda is a sales manager who is assigned the Sales Manager role that is associated with the Manager attribute, then only Linda will receive forecasts for the group. In addition, a user with the Manager group member role can update the group member and group hierarchy information in the HTML Resource Manager.
Role Attributes Example
Modifying Resource Fields in HTML
In the HTML version of Resource Manager, the appropriate users or system administrators with the Resource Self Service Administrator responsibility must set up the Define Resource Fields for Update window. This determines which fields for the resource's personal information can be updated and how the update should occur.
Defining Skill Levels in HTML
In the HTML version of Resource Manager, the appropriate users or system administrators with the Resource Self Service Administrator responsibility must set up the Define Skill Levels window. This determines the name of the skill level and its associated numeric value. Once this is specified, an individual resource can select an appropriate skill level from the LOV of the Level field in the Rate Skill window to rate their technical skills. These skill levels are standard regardless of whether the resource is rated at category, product, platform, or problem level. The numeric values for the related skill levels can be a part of the calculation when selecting the optimal individual for a service request.
Configuring Group and Team Member Notifications
Resource Manager enables group and Team members to receive Workflow notifications. This is particularly useful when important communications are sent to a group or team that require immediate dissemination to all of the their members. For example, if a support group or team receives a high priority service request then all members of the group or team can simultaneously be notified to ensure that immediate action is taken. Resource Manager accomplishes this by integrating resources, groups, group members, teams, and team members with Workflow roles. When a resource is created or updated, its information, including relevant attributes, is stored in both Resource Manager and the corresponding Workflow role tables. Notifications can only be sent to all group or team members if the group-to-membership or team-to-membership relationship information stored in Resource Manager is in sync with the data stored in the corresponding Workflow role tables. To accomplish this, Resource Manager administrators must run the Synchronize Workflow Roles concurrent program on a periodic basis.
Publishing Business Events
Resource Manager publishes events such as creating and importing resources, updating resources, and deleting resources using the Oracle Workflow Business Event System. Applications that contain data directly affected by these events can subscribe to them and synchronize or modify their data accordingly. For example if a resource that is assigned to a Task is deleted, this action is published or "raised" as a business event. Task Manager, can consequently subscribe to this event and reassign the task to an available resource.
Phase II: Managing Resources with Resource Manager
After successfully setting up Resource Manager in Phase I, you can proceed to Phase II: Managing Resources with Resource Manager. In this phase, you can optionally find and view resources, modify resources with roles and role types, create groups and teams, view resource reports, synchronize imported resources with updated records in their database of origin, and troubleshoot Resource Manager if required.
Finding and Viewing Resources
After importing a resource into Resource Manager, you can find and view the resource and manage it by performing any of the actions described in the remainder of this chapter.
Defining Groups
A group is a unit of organization based on the similar function or roles of its members. It can consist of individual resources and resource groups and any resource can belong to multiple groups. For example, a manufacturing company has sales groups for different product models. A sales manager named Linda, leads the Model A Sales Group and has three sales representatives, John, Mark and, Carol who report directly to her. The Model A Sales Group can also contain another resource group, Key Accounts West Group that handle sales in the west region for model A, and whose members also report to Linda.
Groups Example
Group Member Roles
Roles and responsibilities can be associated with all members of a resource group. For example, Linda is a sales manager; John, Mark, and Carol are sales representatives. The Sales Manager and the Sales Representative are job roles assigned to the Model A Sales Group. Each member can have multiple roles defined within a group or among groups. If the Key Accounts West Group only contains two resources, one of them can perform two roles, sales manager and field sales agent Or while Linda, the manager in the Model A Group, may also be a member of a group called Model B Group.
Dynamic Groups
Instead of assigning each individual or group resource to an existing group, you can create a dynamic group based on the criteria you define in SQL statements. For example, Oracle Interaction Center's Telephony Manager uses Dynamic Groups for skill-based routing. In active mode, Oracle Telephony Manager routes calls according to defined rules. The active mode is the default mode of operation. In active mode, Oracle Telephony Manager uses skill-based routing, a dynamic call routing intelligence that delivers inbound calls to an agent who is appropriately skilled to meet the needs of the caller. When inbound calls arrive at the switch, the switch issues a routing request. Oracle Telephony Manager monitors the routing request, then applies skill-based routing rules, and identifies suitably skilled agents. Meanwhile, a representation of the call waits in the virtual queue within Oracle Telephony Manager. When a suitable agent becomes available, Oracle Telephony Manager responds to the routing request and instructs the switch to deliver the call to the agent's extension through the Universal Work Queue (UWQ), where more specific pre-defined rules may apply in directing the call. In a dynamic group, the database automatically updates information about individual group members (dynamic routing executes the workflow/procedure to get an agent list).
Group Hierarchy
Because individual resources can be assigned to a group, and a group can belong to another group or to multiple groups, resources can be organized in a group hierarchy with a parent-child relationship.
Important: A group can belong to multiple groups but only one parent at a given point of time.
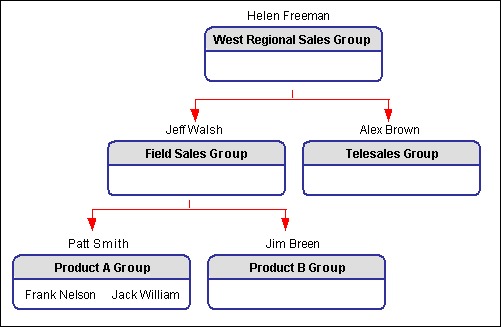
For example, Jack William and Frank Nelson are sales representatives who belong to the Product A group and report directly to Pat Smith, the sales manager of Product A; but they report indirectly to Jeff Walsh who leads the Field Sales group as field sales manager. The Field Sales group and the Product A group have a parent-child relationship.
You can use the group hierarchy to view direct reporting or all reporting information for a resource. For example, you can search for direct reporting information for the employee Jeff Walsh based on the above group hierarchy. You can see Pat Smith and Jim Breen listed as the results for direct reporting. Jack William and Frank Nelson are added to the list if it is for all the reporting information due to the parent-child relationship between these groups.
Group Hierarchy Example
Group Member Notifications
You can configure groups to receive notifications to ensure that important communications reach all group members.
Managing Roles and Groups
You can manage roles and groups by viewing role details, assigning roles to resources, or assigning resources to groups.
Defining Teams
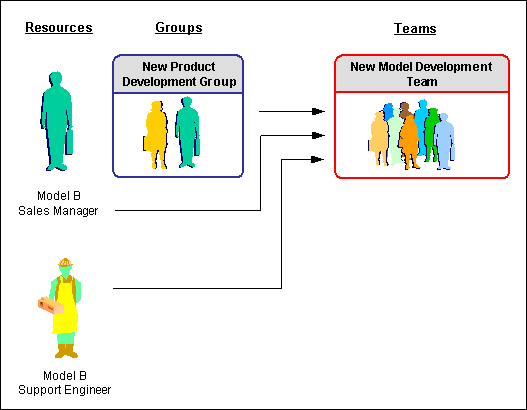
A team is a collection of groups and resources that is organized to accomplish a specific task or objective. Team members are chosen on the basis of their availability, qualifications, and location. For example, a manufacturing company wants to develop a new model that has the same features of a model called Model B. To accomplish this, the company sets up a new model development team can be established to have a new product development group, a sales manager for model B, and a support engineer who specializes in model B.
Teams Example
Team Member Roles
Each team member, whether it is an individual resource or a resource group, has a member role assigned to it. For example, the new model development group (a group resource) and the support engineer (an individual resource) can both have a development member team role. The Development Member role must be one of the group roles that have been assigned to the New Model Development Group. Like a group member, a team member can have multiple roles assigned to a team.
Team Roles
You can assign multiple roles to a team. For example, the New Model Development Team will play a Development Member role, and a Support Manager role at the same time.
Team Usage
Specify the usage of your team. For example, the New Model Development Team can be used in Support, TeleSales, and Service.
Team Member Notifications
You can configure teams to receive notifications to ensure that important communications reach all team members.
Running Reports
Resource Manager enables you to run Group Audit and Group Structure reports.
Group Audit Report
Resource Manager supports the ability to run an audit report detailing changes to resources and resource groups created within a date range. For example, any changes made to new members of a group are defined, but role change information is not. This provides an audit trail of the actions taken for specific groups, and resources.
For example, a sales manager can use the Group Audit Report to verify and trace a specific sales group for its group members' (sales representatives) change history information based on a specific time range. From the report, you can easily identify that Lisa Jones with her resource number has been changed from Key Accounts Central Group (group number 54) to Key Accounts Group (group number 43). This information can be an audit record for sales credits or compensation distribution.
Only the movement of a resource from a given group to another group is tracked. Resources changing roles within the same group are not reported in the Audit Report.
Group Structure Report
Resource Manager supports the ability to run a Group Structure Report. It displays only the group hierarchy and structure information.
For example, you can use the Group Structure Report to view the group hierarchy information for a specific group, such as Key Accounts Group. The group member's name and its resource category information (such as employee resource), child group name (Key Accounts Central), and numbers of level down from the selected group (such as the Key Accounts Central child group is one level down from the selected Key Accounts Group) and effective date information are all visible in the report.
Resource Manager Concurrent Programs
Resource Manager uses the following concurrent programs.
The table describes the types of seeded programs, their use, and the frequency in which you need to run them.
Note: It is strongly recommended that an employee, party, partner, or supplier contact not have more than one entry in FND_USERS. If an employee linked to two or more FND_USERS is imported into Resource Manager, then the USER_ID column in JTF_RS_RESOURCE_EXTNS table randomly picks a value from FND_USERS for that resource.