Technician Portal
This chapter describes an enhanced set of operations to process service order items.
This chapter covers the following topics:
- Overview
- Searching for Service Orders
- Service Order Page Overview
- Using the Evaluation Tab
- Using the Service Execution Tab
- Using the Debrief Report Tab
- Launching Service Order Orchestration in the Technician Portal
- Using Recommendations
- Generating Estimates
- Using the Complete Work button
- View Service Bulletins from the Technician Portal
- Manage ECOs
- Backflush Service Parts
- Auto-Issue Service Items to Jobs
- Using Time Clock
- Deleting Operations
Overview
The Technician Portal is an enhancement to the standard repair and return process. It automates and facilitates the creation of work orders, procuring and issuing materials, and assigning resources with minimal input and decision making from a service technician. Based on a finite number of possible symptoms and a finite number of responses to those symptoms, the system can recommend or dictate work to be done, materials demanded, and resources needed for low complexity services based on symptoms captured by a technician.
The following diagram shows an overview of the high volume repair processing, to be performed in two pages, the Service Order Search page and the Service Order page.
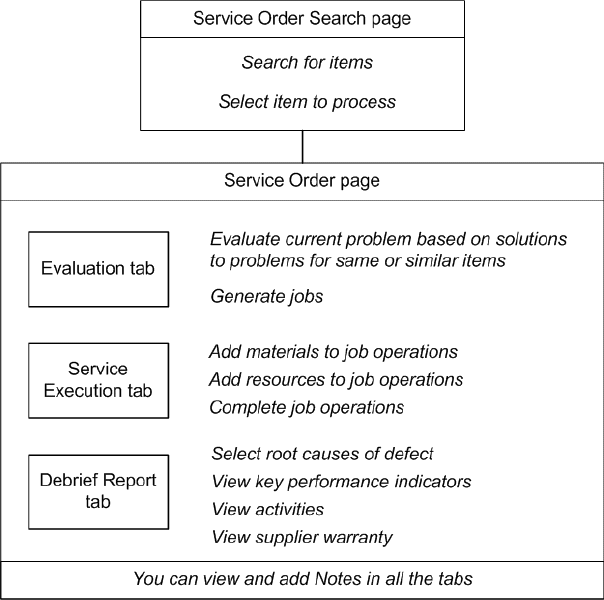
In the Technician Portal, users can view jobs that have been closed. Users however cannot modify closed jobs or transact materials and resources for closed jobs.
Searching for Service Orders
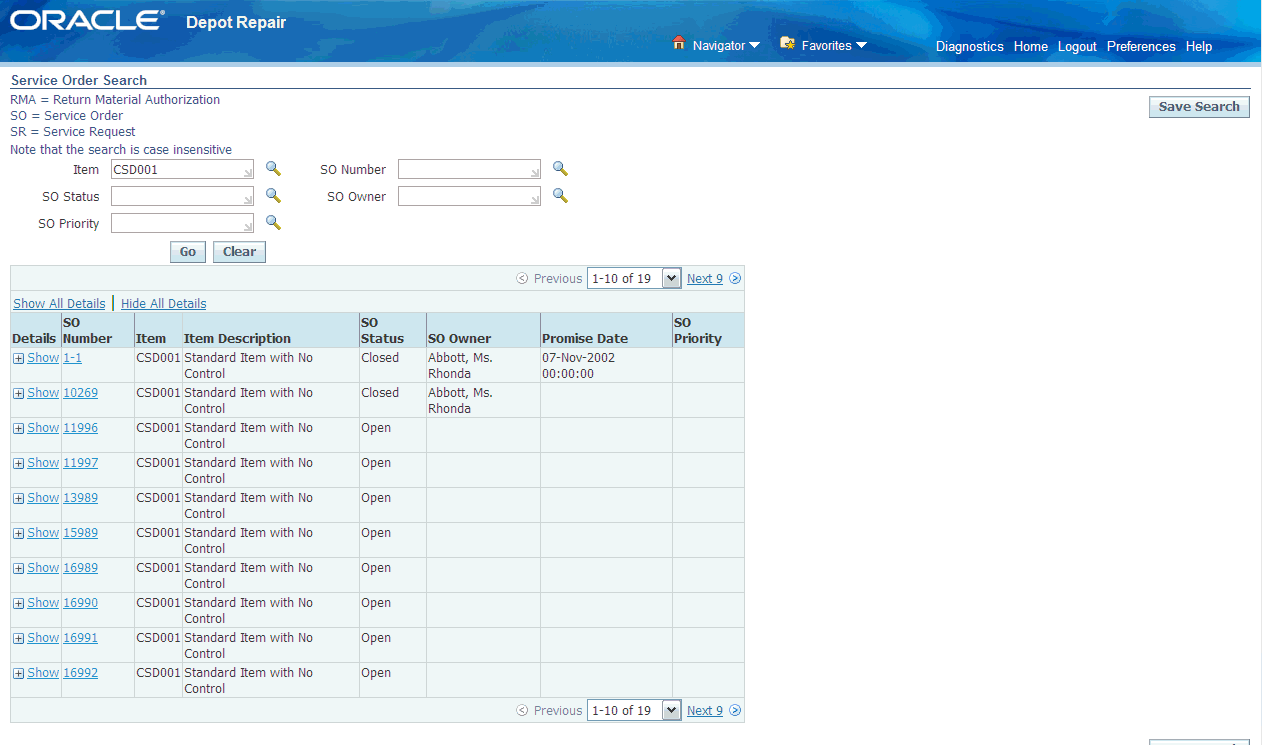
In the Service Order Search page, you can search for all non-draft service orders.
The seeded default search parameters are:
-
Item - Enter item information.
-
SO Number - Enter the service order number.
-
SO Status - Enter the service order status.
-
SO Owner - Enter the service order owner.
-
SO Priority - Enter the service order priority.
Note: You can update the search criteria in the Technician Portal using Personalization to search by current or original service orders using the Part Number or Serial Number fields. If you change the part number or serial number for a service order item, you can then search for it using the new part number or serial number.
After filling in one or more search parameters, click Go to perform the search.
In the results area, you can hide or show details about each service order.
Note: A Service Order maybe displayed twice in the Results region if it has two RMAs associated with it, that is, one entry per RMA is displayed.
Click the SO Number link to continue processing a service order in the Service Order page.
Service Order Page Overview
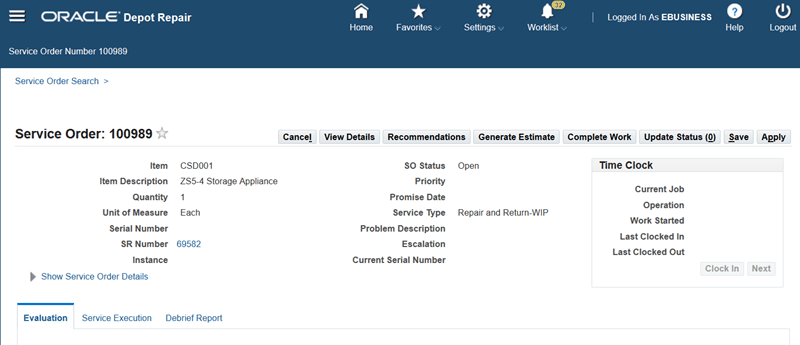
The top of the Service Order page contains general information about the item instance that is being serviced. You can also show or hide service order details in this region.
Note: You can view the Recall Number link if its view is personalized. Click on the link to drill down to the view-only Recall Details screen.
The main actions to perform in this page are controlled by the buttons: Save, Apply, Cancel, and Update Status.
Use the View Details button to launch the Service Order Orchestration page (see: Launching Service Order Orchestration in the Technician Portal ). For details about additional buttons you can enable and use on the Technician Portal, see the following topics:
To enable and use the Time Clock, see Using the Time Clock.
When a job is created, a logic starts off to determine if the job is impacted by supplier warranty.
The main body of the Service Order page contains three tabs - Evaluation, Service Execution, Debrief Report - where you perform the main service order processing.
For more details about these tabs, select one of the following:
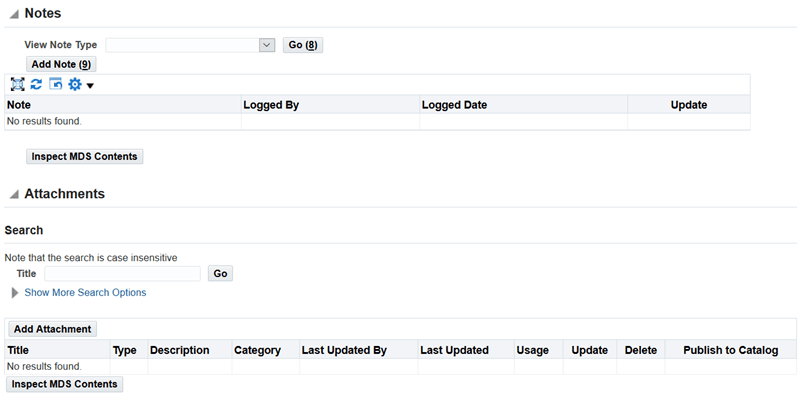
The Notes and Attachments region, at the bottom of the page, allow you to view and add notes and attachments.
Using the Evaluation Tab
The Evaluation tab enables you to examine summary information about previous service orders and service requests for the current service order item instance, and also the diagnostic codes and service codes associated with the current service order item. After evaluating this information, you can generate one or more WIP jobs.
The first-ever display of the Evaluation tab for a service order item shows the following:
-
All the diagnostic and service codes that have been associated with the service order item.
-
All the service orders that reference the current service order item instance. Click a Service Order link on the Service Order History region to view the details of that service order.
-
All the service requests that reference the current service order item instance. Click a Service Request link on the Service Request History region to view the details of that service request.
The main tasks to perform in the Evaluation tab are to select - that is, mark as Applicable - diagnostic codes and service codes to generate WIP jobs with appropriate bills and routings.
Diagnostic Codes Region
The Diagnostic Codes region displays the diagnostic codes associated with the service order item, that is, the diagnostic codes that fulfill at least one of the following conditions:
-
The diagnostic code has the service order item as one of its item domains.
-
The diagnostic code has a category domain which is the same as the category of the service order item.
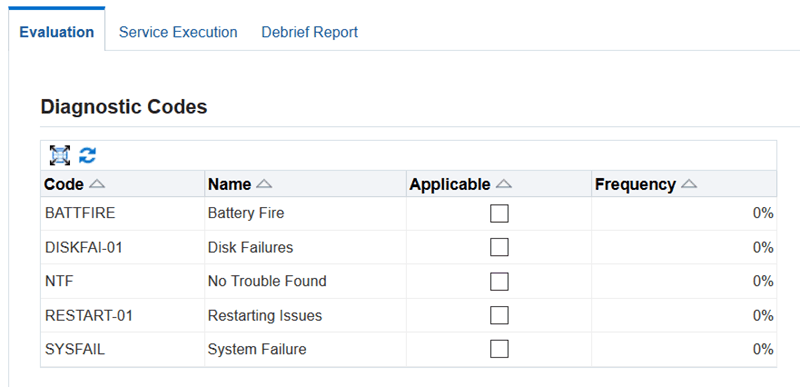
For more information, see the topic Setting Up Diagnostic Codes in the Oracle Depot Repair Implementation Guide.
The frequency indicates the percentage of times that the diagnostic code was marked as Applicable in all closed service orders that are for the same service item.
Using the Diagnostic Codes Region
-
Mark one or more of the diagnostic codes as applicable.
The applicable diagnostic codes are used in determining which service codes to use when you click Recommend Services in the Service Codes region.
-
Duplicate one or more of the diagnostic codes as applicable.
The Duplicate functionality enables you to save more than one set of DFF values for a particular diagnostic code in a service order. The Duplicate icon for a row is enabled if the diagnostic code is marked as Applicable.
-
Add one or more of the diagnostic codes to the existing list.
The Add Another Row button enables you to quickly add extra rows to input DFF data. You now do not have to search for the appropriate diagnostic code row and duplicate it using the Duplicate icon. When you add another row, you cannot duplicate it unless you save it. Also, it must be marked as Applicable.
Service Codes Region
The Service Codes region initially displays the service codes associated with the service order item, that is, the service codes which fulfill at least one of the following conditions:
-
The service code has the service order item as one of its item domains.
-
The service code has a category domain which is the same as the category of the service order item.
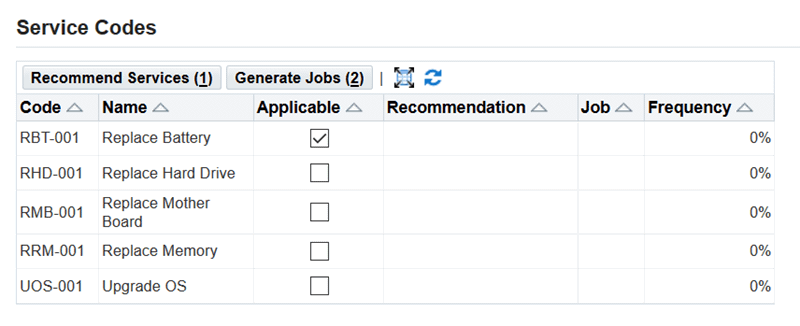
For more information, see the topic Setting Up Service Codes in the Oracle Depot Repair Implementation Guide.
The frequency indicates the percentage of times that the service code was marked as Applicable in all closed service orders for the same service item.
Using the Service Codes Region
-
Mark one or more service codes as Applicable.
-
Click Recommend Services.
Note: To use this feature, you must have previously set up the recommendations. See Setting up Service Code Recommendations in the Oracle Depot Repair Implementation Guide.
After you click Recommend Services, you may get several service codes returned and automatically marked as Applicable in the Service Codes region, depending on how you set up your recommendations.
When the profile option CSD: Mandate Service Code Recommendations is set to Yes, then any service codes returned which had been set up with a Recommendation type of Always are automatically marked as Applicable and are disabled. This is to ensure that the service codes are used in any jobs generated from this region.
-
Click Generate Jobs.
For each service code marked as Applicable, Oracle Depot Repair generates a WIP job, with any bills and routings that were previously associated with that service code.
For more information, see Setting Up Service Codes in the Oracle Depot Repair Implementation Guide.
-
In the Service Code table, click the hyperlinked Job number to drill into the WIP Details. The WIP Details page provides information on the available quantity for the parts required on a job, the operations which are for outside service, and other details that are provided in WIP Jobs.
Using the Service Execution Tab
The general objective of the Service Execution tab is to enable you to process and monitor the WIP jobs that you have generated for a service order item from the Evaluation tab of the Service Order page.
In the Service Execution tab, you can add materials and resources to jobs. To assist you in doing this, Oracle Depot Repair provides you with statistics of the most common materials and resources used in previous service orders for the same item.
You can complete operations, and even complete jobs.
-
In the Service Execution tab, you can also create jobs; to add materials and resources for these jobs, use WIP pages associated with Oracle Work In Process responsibilities.
-
Oracle Depot Repair provides E-records and E-signature (ERES) functionality in WIP mode via Oracle WIP.
When the following profile options are set to Yes, the current revision defaults and you are not prompted to enter a revision. When the profile options are set to No, the revision does not defaults and you navigate to the Material Details page to choose a revision along with other required item details:
-
CSD: Default Current Item Revision for Material Transactions
-
CSD: Default Current Item Revision for Job Completions
The two profile options behave independently, so that the revisions default for issuing materials but not job completions, or the other way round.
Note: When a user clicks the Service Execution tab, it may trigger custom logic your business has developed using user hooks embedded in this tab.
You can filter and view the Service Execution tab in the Technician Portal by job using the Job Filter drop-down. This drop-down defaults as hidden, and can be personalized.
Note: When the Service Execution tab is filtered to show only a single job, the Generate Estimate and Complete Work actions are disabled. To enable these buttons, revert to the unfiltered view by choosing the blank value in the Job Filter drop-down. When switching between job filters, any unsaved changes in the Service Execution tab are automatically saved. In case of errors during saving, users cannot change the job filter till the errors are resolved.
Service Operations Region
The Service Operations region shows the operations for the current service order item instance, whether generated from the Evaluation tab, or created explicitly in the Service Execution tab.

Using the Service Operations Region
-
Add operations to a job - Select the Add Another Row icon to add an operation to the job.
-
Complete operations - select one or more operations, and click Complete.
Note: If a Quality Plan is associated to the operation, the system will launch the Plan when the operation is completed. Note that operation-linked quality plans can only be launched at the operation completion.
See the topics To enter quality results during a Work in Process Move transaction and To enter quality data during a Work in Process Completion transaction in Quality Data Collection in Work in Process and Shop Floor Management, Oracle Quality User's Guide
-
Complete the job - select the Complete Job action from the Action list, select the job from the list of values, and click Go.
-
Release the job - to manually release an unreleased job, select the Release Job action from the Action list and click Go. You can also change the Job status to Unreleased or OnHold
Note: The ability to change the status of a job in the Technician Portal using the Action list is possible provided the following security function is granted: Depot: Allow Update of Job Status in Technician Portal.
-
Drill into WIP Details – Click the Job link to navigate to the Job Details page to drill into the WIP details of the job.
-
Click the DFF field to enter the DFFs for operations. The DFF name for operation is Depot Repair WIP Transaction Details and the context field shown in the table is determined by the profile, CSD: Descriptive Flexfield Context for Technician Portal Operations.
Materials Region
The Materials region has two sub-regions:
-
The general Materials area
-
The Most Common Materials Issued area

The Materials table shows all material demand for jobs linked to the service order. The Materials table provides functions to add material demand to a job, issue materials to a job, reverse issue materials from a job, requisition materials with a purchase requisition, and create internal service orders for materials recovered on a job.
Materials displayed on the Materials table can be added:
-
To a job by specifying a BOM when the job is created
-
Through the WIP Material Demand form
-
Manually on the Technician Portal Materials table
-
From the Most Common Materials bin on the Technician Portal
The service order item will also be defaulted as material demand on the Materials table if the profile option CSD: Default Service Order Item as Material on Job is set to Yes. Note that the service order item only defaults as material demand for the first open job on a service order, and not for any subsequently created jobs. This is because the system does not support having a single serialized item as demand for multiple open jobs. Additionally, the service order item must always be issued to the job before or at the time of completing the job.
The Most Common Materials Issued area, if populated, shows which materials were used in previous similar jobs and service orders.
Specifically, all closed service orders for the current service order item with completed or closed jobs are examined. The Frequency column for a material shows the proportion of those examined service orders whose completed and closed jobs used the material. The Average Quantity Used shows the average units used in all the "matching" service orders whose jobs contained the material, rather than in all the examined service orders.
The material table in the Materials region of the Technical Portal displays details of:
-
total issued quantity
-
total recovered quantity
-
net material transacted
These fields allow a technician to track the number of parts added to the item being serviced as well as the number of parts recovered from the item being serviced. Details of transactions performed can be viewed under the show-hide region of the materials table.
Note: In the Technician Portal, the Quantity to Issue field always displays the WIP Open Quantity. Users transacting materials in the WIP forms are advised not to use the Total Issued Quantity, Total Recovered Quantity, and Net Material Transacted columns in the Technician Portal as these are only supported for transactions performed using the Technician Portal. In WIP forms, users should use the Issued Quantity and refer to the show/hide section in the Materials table to see the details for material transactions.
Using the Materials Region
-
Examine the materials in the Most Common Materials Issued area, and decide if they are relevant to the current service order. If so, select one or more materials, and click Add to Materials.
Note: You cannot add materials that already appear in the general Materials area.
The selected materials appear in the general Materials area.
-
In the general Materials area, you can enter quantity and UOM values for a material before or after it is issued to a job.
The item being serviced is also considered material to be issued to the job. In the case where multiple jobs are created, the system will prevent the same serialized item instance from being saved against more than one active job at a time. A serialized item is not issued multiple times as inventory controls do not allow the same serialized item to exist in multiple places at the same time.
-
If the quantity to issue is 1 for a serialized item, you must also enter the Serial Number for the item.
-
For materials added from the Most Common Materials Issued area, enter and select values for Quantity to Issue, UOM to Issue, Operation, and Job.
-
The Reason column tracks the Disposition Code that indicates how materials were processed. You can override the defaulted value before issuing materials.
-
You also have the option to issue one quantity of a material with one Disposition Code, and issue more quantity of the material with a different disposition code.
-
Click Save to save the data you have entered so far.
If you selected an operation and job in the current session, the materials are added to the job details, but not issued to the job; the Job field displays a link to the job.
-
To issue materials to a job, select one or more materials, and click Issue.
-
For materials that require more information, the Material Issue Details page appears.
For example, if you want to issue more than one serialized item, you must enter the serial numbers here. Also, if your item has lot control, you must enter the lot number here.
-
After you have issued materials, the general Materials area shows the Issued Quantity and the primary UOM.
-
You can continue to enter Quantity to Issue values, including negative integer quantities. If the quantity is negative then the material will be added to the subinventory specified.
-
Click the DFF field to enter the DFFs for materials. The DFF name for materials is Depot Repair WIP Transaction Details and the context field shown in the table is determined by the profile, CSD: Descriptive Flexfield Context for Technician Portal Materials.
Additional Information: You can personalize the Materials table to enable the hidden Revision field. The Revision field allows you to enter and transact revision-controlled items. If the revision field is blank for a revision-controlled item, you are directed to the Material Issue Details page at time of issue or at time of operation or job completion for items with Assembly Pull Supply Type. If the revision field and all other required fields are entered then the item is issued immediately.

The Revision field defaults to the latest revision for revision- controlled items if the profile option CSD: Default Current Item Revision for Material Transactions is set to Yes. When the profile is set to No, the revision field is not defaulted and it is left blank.
You can personalize the Materials table to display the Request Parts button that enables a technician to create a purchase requisition for one or more items on the Materials table.
You can personalize the Materials table to display the Material Transaction Reason Code column that provides Disposition Code that is used in the Eco-Impact tab of the Environmental Impact Dashboard. For more information on the Environmental Impact Dashboard, please see: Environmental Impact Dashboard chapter.
You can personalize the Materials table to enable the hidden Create SO column which can be used to auto-create service orders for recovered parts after a technician has completed jobs. Use Defaulting Rule attributes to indicate for which parts service orders should be auto-generated. You can choose to auto create service orders for all parts, or for specific parts or situations. The workflow CSD: Auto-Create Service Orders for Recovered Parts is linked to the service order status transition once the technician completes the service work. You can view the activities SO Created and Component SO Created in the Technician Portal Activities region as well as from the Depot Workbench Activity form.
You can use the Technician Portal to add your selections from a Bills of Material (BOM) to a job using Personalization. Use the Add Materials from BOM to Job action to launch the Bills of Material page. In this page, search and select items from the BOM hierarchy, click Add Materials to Job, select the job operation for each material line, and save your information. The selected items from the BOM page are then added to the Materials table.
You can personalize the Materials table to enable the Issue Qty 1 and Quick Issue icons in the Technician Portal to issue a specified quick quantity of 1. You can use Issue Qty 1 to quickly issue the material quantity of 1 which then reduces the Quantity to Issue field by 1.
Resources Region
The Resources region has two sub-regions:
-
The general Resources area
-
The Most Common Resources Transacted area

The first-time display of the Resources area shows the resources automatically added to a job through service codes.
The Most Common Resources Transacted area, if populated, shows which resources were used in previous similar jobs and service orders.
Specifically, all closed service orders for the current service order item with completed or closed jobs are examined. The Frequency column for a resource shows the proportion of those examined service orders whose completed and closed jobs used the resource. The Average Quantity Used shows the average units used in all the "matching" service orders whose jobs contained the resource, rather than in all the examined service orders.
Using the Resources Region
-
Examine the materials in the Most Common Resources Transacted area, and decide if they are relevant to the current service order. If so, select one or more materials, and click Add to Resources.
Note: You cannot add resources that already appear in the general Resources area.
The selected resources appear in the general Resources area, with the Employee field set to the value of the profile option CSD: Default HR Resource.
-
In the general Resources area, you can enter quantity and UOM values for a resource before or after it is transacted to a job.
-
You can select a new employee.
-
For resources added from the Most Common Resources Transacted area, enter and select values for Quantity to Transact, UOM to Transact, Operation, and Job.
-
The Subinventory field defaults based on the value of the profile CSD: Default Material Subinventory. If no value is set for this profile, the user must enter a value before saving the material line.
-
Click Save to save the data you have entered so far.
If you selected an operation and job in the current session, the resources are added to the job details, but not transacted to the job; the Job field displays a link to the job.
-
To transact materials to a job, select one or more resources, and click Transact.
-
After you have transacted resources, the general Resources area shows the Transacted Quantity and the primary UOM.
-
You can continue to enter Quantity to Transact values, including negative integer quantities. If the quantity is negative then the material will be added to the subinventory specified.
-
Click the DFF field to enter the DFFs for resources. The DFF name for resources is Depot Repair WIP Transaction Details and the context field shown in the table is determined by the profile, CSD: Descriptive Flexfield Context for Technician Portal Resources.
Note: When you transact the resources in the Technician Portal either by Work In process (WIP) move or manual transact, the records are put into WIP interface tables. A WIP concurrent program then processes it. The control comes back immediately to Technician Portal page. However, the actual transaction data is not posted to the WIP tables immediately. Thus, if we try to import the actuals from WIP immediately after completing the job, the actuals may be incomplete at times.
Using the Debrief Report Tab
The Debrief Report tab enables you to view certain post-service details, such as activity events, summary activity statistics, key performance indicators, such as time to service, and supplier warranties.
You can also select one or more defect types to associate with the service order.
Root Cause of Defect Region
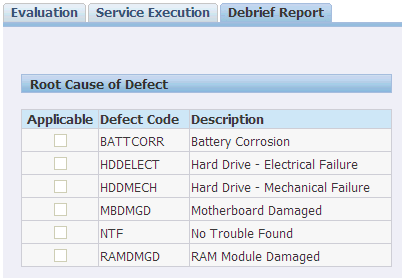
The Root Cause of Defect region lists the defects that you can associate with the service order. You can optionally select one or more of the defects as applicable to the service order.
Defect code domain setup enables you to link each root cause code to specific items or item categories. The Technician Portal displays only the root cause codes that match the item or category of the item on the service order.
See: Setting Up Defect Codes, Oracle Depot Repair Implementation Guide.
Key Performance Indicators and Activities Regions
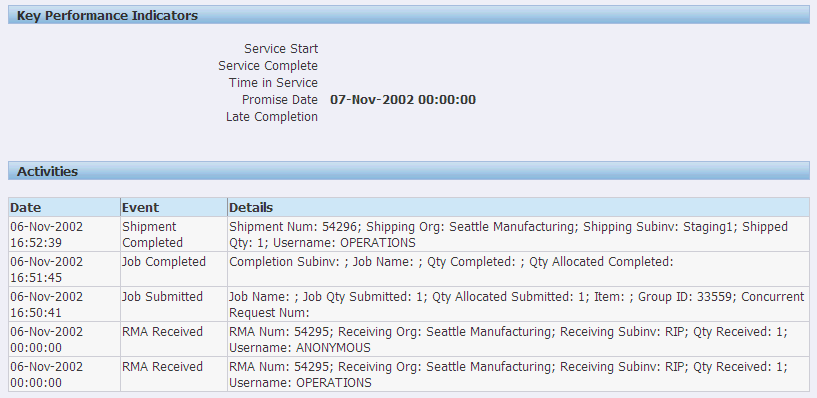
The view-only Key Performance Indicators and Activities region provides statistics about the service order, including a history of the service activity events.
Users can drill down to parent/child service orders in the Activities table. Note that the behavior is controlled by function security.
Supplier Warranty Region

The Supplier Warranty functionality provides the ability to manage supplier warranty claims resulting from maintenance and service work. The two key users involved in the supplier warranty flow are the technician and the warranty administrator.
The technician performs the following actions in Oracle Depot Repair using this new functionality:
-
View applicable supplier warranty information
-
Change or remove warranty
The warranty administrator performs the following actions in the Supplier Warranty Workbench using this new functionality:
-
Create Supplier Warranty Template
-
Create Supplier Warranty
-
Link Supplier Warranty to Item Instance
-
Create and Manage Warranty Claim
See: Oracle Complex Maintenance, Repair, and Overhaul User's Guide for more information on warranty administration.
The Supplier Warranty region displays the following information:
-
Item Warranty: The check mark in the Item Warranty column indicates that the item has one or more valid supplier warranties.
-
Item: Refers to the item on the service order.
-
Job Name: Refers to the service order name.
-
Warranty Contract: It is the unique number of the supplier warranty applied to the service order. The list of values (LOV) is active only for open work orders.
-
Description: Refers to the descriptive text from the CMRO supplier warranty contract.
-
Details icon: Click the Details link to launch the View Warranty Contract page.
Note: The Depot Repair application automatically applies supplier warranty to service order if only one valid warranty exists. If more than one valid warranty exists, a check mark in the Item Warranty checkbox is displayed.
Service Information Region
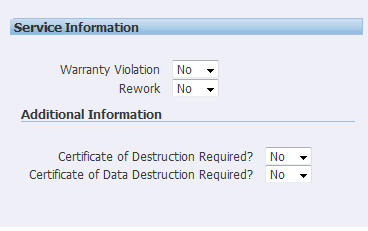
You can view or update service orders in the Technician Portal. Use the Service Information descriptive flex field in the Debrief Report tab to enter edits to service orders. You cannot edit service orders with the status Hold or Closed.
Note: The descriptive flex field is not visible on the screen until made visible by changing the Oracle Applications Framework Personalization setting to render it.
Launching Service Order Orchestration in the Technician Portal
Use the View Details button in the Technician Portal to launch the Service Order Orchestration page.
For more information on Service Order Orchestration page, see: Service Order Orchestration.
Using Recommendations
Use the Technician Portal's predictive analytics functionality to view recommendations based on historic data. The Data Miner Predictive Analytics Model, built using historic records and model building, can be run weekly or monthly based on your choice and the volume of data.
Enable the following profile options to use predictive analytics:
-
CSD: Predictive Analytics Probability Threshold - You can set the value for this profile option to specify the threshold for which recommendations will be shown for the service code and defect code.
-
CSD: Predictive Analytics Model - You can select to set the value for this profile option to Best Model, to ensure that application chooses the model which performs better and returns the highest probabilty.
For more information, see Setting Up Oracle Depot Repair Profile Options in the Oracle Depot Repair Implementation Guide.
To use recommendations
-
In the Technician Portal, search for the service order for which you want to view recommendations.
-
Click on the service order link to view the details in the Technician Portal.
-
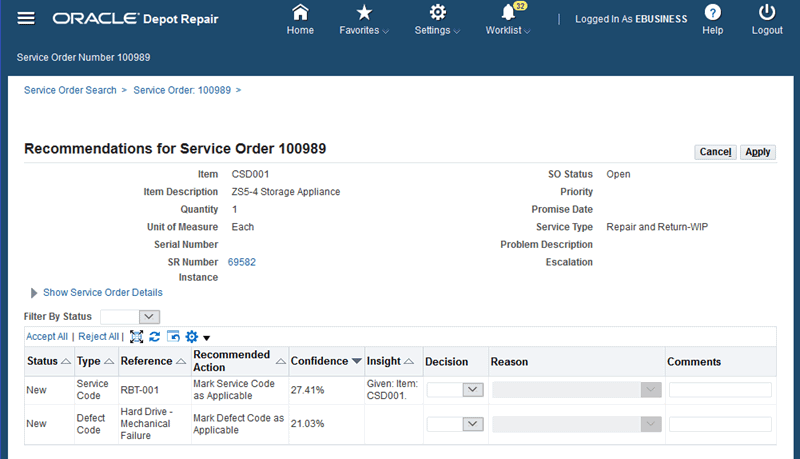
Click the Recommendations button for a service order number to view predictions for service code and defect code.
-
In the Recommendations page for the service order number, review the following:
-
Status: Shows if the recommendation is new, already viewed, or failed.
-
Type: Indicates the type as Service Code or Defect Code.
-
Reference: Specifies the related item.
-
Recommended Action: Shows the predictions for the service code and defect code.
-
Confidence: Indicates the degree of confidence that the recommendation should be applied for this service order.
-
Insight: Shows what factors were taken into consideration to produce the recommendation.
-
-
Select a value in the Decision field for a recommended action. You can choose to accept or reject the recommended predictions.
-
If you choose to reject the recommendation, select from the following values in the Reason field, to indicate why you are rejecting a recommended prediction.
-
Alternate Improvement Chosen
-
Bad Recommendation
-
Business Rule Conflict
-
No Reason
-
-
Click Cancel to exit the Recommendations page.
-
Click Apply to save your changes.
Running Depot Repair predictive analytics concurrent programs
Oracle Depot Repair provides the following concurrent programs to support the predictive analytics feature:
-
Depot Repair Predictive Analytics - This model building program is run using the Concurrent Manager. This program builds and tests the model based on the business's historical repair data.
-
Depot Repair Recommendations - This model scoring program runs automatically when you click the Recommendations button. This program applies the model on the individual service orders and inserts predictions for service code and root cause code into the Recommendations table. If a particular prediction is already present in the table, only the confidence level and status will be updated based on their status. Note that:
-
Predictions with the status Accepted or Viewed will not be updated.
-
Records in the status New are considered for updates.
-
Rejected records are maintained for audit purposes. In case of a better prediction for an already rejected record, a new prediction is created.
-
To run the Depot Repair Predictive Analytics program
-
On the Depot Workbench, select View from the Menu, and click Requests.
-
Choose Single Request and click OK.
-
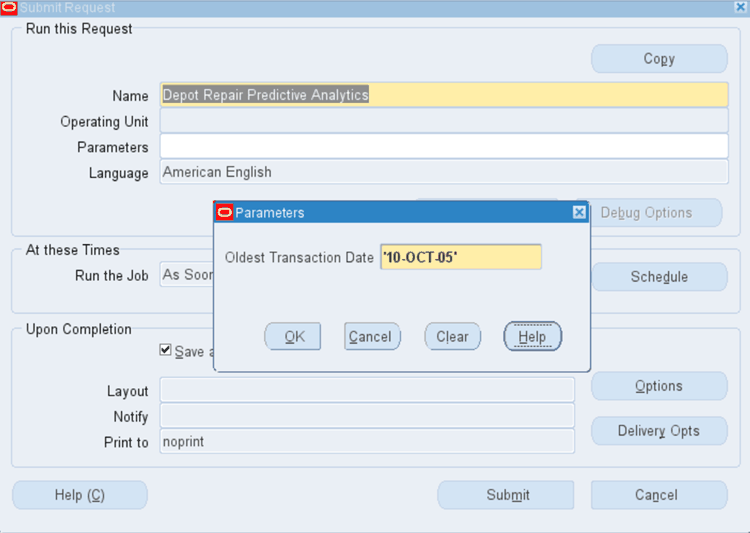
In the Name field on the Submit Request window, select Depot Repair Predictive Analytics.
-
Use the Parameters window to enter a date for the Oldest Transaction Date parameter.
-
Click OK on the Parameters window.
-
Click Submit to submit the concurrent request.
-
Review your request using the Requests window.
Generating Estimates
Once an item is inspected and analyzed, technicians can use the Generate Estimate button in the Technician Portal to create an estimate by first creating a job and then selecting the materials, resources, resource time and/or service codes required to complete the indicated service for the item.
When clicked, the Generate Estimate button creates an estimate using the materials and resources linked to a service order. If no estimate header exists, the function will create one. A new estimate will always be created in Draft status, and a regenerated estimate will always change the estimate status to Draft. The Generate Estimate function creates a single estimate even if there are multiple jobs created for the service order.
A customer service representative can then view the generated estimate on the Depot Workbench Estimate tab, apply service contracts, determine customer charges and send the estimate to the customer for approval. See: Estimates Generated in the Technician Portal in the Estimate Tab.
The following profiles determine which materials and resources are added to the estimate:
-
CSD: Import WIP Resources to Estimates
-
CSD: Import WIP Materials to Estimates
You can also use the CSD: Generate Estimate Overwrite Policy profile option to determine whether to regenerate and overwrite existing estimates, or only those estimates with the status Draft and New.
Note: Regenerating an estimate will cause all existing estimate lines to be deleted. You will not be prompted for any confirmation when you click the Generate Estimate button. After the estimate is generated, the estimate status is set to Draft.
For more information on these profile options, see: Setting Up Oracle Depot Repair Profile Options, Oracle Depot Repair Implementation Guide.
To generate estimates:
-
Create a service order.
-
Query the service order in Technician Portal.
-
Create a job.
-
Add Operation, Material, and Resource requirements.
-
Click Generate Estimate button.
Note: The Generate Estimate button will only be enabled if there is no existing estimate, or if the estimate header has the status New. When the estimate header is New, all existing estimate lines will be deleted prior to generating the estimate. The estimate does not support revisions and the deleted lines cannot be retrieved. The generated estimate will be created with the status Draft.
Using the Complete Work button
The Complete Work button in the Technician Portal enables you to achieve the following with a single click:
-
If clocked into the Time Clock, clock the user out.
-
Issue all material requirements that have not yet been transacted.
-
Transact all resource requirements that have not yet been transacted.
-
Complete all operations.
-
Complete all jobs.
-
Change the status of the service order after completing all jobs, as specified in the profile option CSD: Complete Work Service Order Status.
-
Launch associated quality plans to enter quality data during operation completion.
See the topics To enter quality results during a Work in Process Move transaction and To enter quality data during a Work in Process Completion transaction in Quality Data Collection in Work in Process and Shop Floor Management, Oracle Quality User's Guide
View Service Bulletins from the Technician Portal
Depot Repair automatically links a service bulletin to a service order based on customer defined service bulletin rules. A number of predefined bulletin types are seeded in the product, but you can add any additional bulletin types to fit your business needs. Service bulletins provide information to service managers and technicians regarding:
-
Recalls
-
ECOs, FCOs, or Supercessions
-
Regulatory Compliance - WEEE, RoHS, International Laws
-
Parts Shortages
-
Up-sells and Cross-sells
-
Special Customer Entitlements, Priority, or Expedited Processing
-
Processing Exceptions - Late Service Orders, RMAs, Loaners, or Vendor Shipments
To view service bulletins
-
Navigate to the Technician Portal. Query the service order number for the item to associate the service bulletin.
-
Click on the service order number link to navigate to the Service Order page. The Service Order page displays the detailed information of the corresponding service order number.
-
In the Service Bulletins region, click Retrieve New Service Bulletins to display the newly created service bulletins. You can view a service bulletin by Type. For example:
-
You can retrieve multiple service bulletins within one service order. In this case, one service order triggers multiple service bulletins.
-
You can retrieve service bulletin for Chronic Service Order. Set the profile CSD: Number of Days in Quality Check period to use this feature.
Note: The Depot Repair Service Bulletin Retrieval concurrent program checks the set of applicable service orders and links any service bulletins which apply to them and have not already been linked. This supports business scenarios that need to check all open service orders for service bulletin applicability. This concurrent program scans a selected set of open service orders based on parameters such as:
-
Service Bulletin Type
-
Service Order Status
-
Service Order Inventory Organization
-
Service Organization
-
Service Order Item
-
-
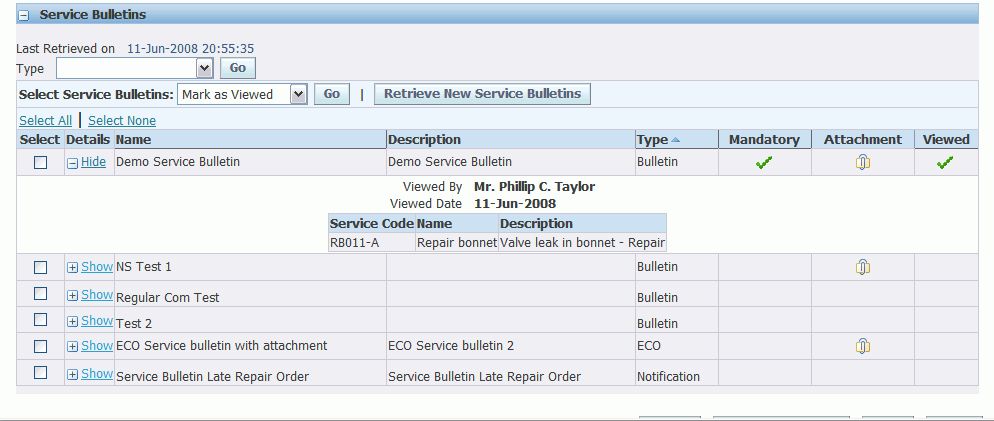
Select a service bulletin and click Show to display the following details:
-
The Mandatory flag represents that the service bulletin is marked as mandatory in the setup stage. This also indicates to the service technician that this service bulletin is mandatory.
-
The Attachment icon represents that an attachment is added to the service bulletin. Click the attachment to download the attachment.
-
The Viewed flag represents you have selected the service bulletin to Mark as Viewed from the list of values at the time when the service bulletin was set up. You can view who has viewed the service bulletin and the date of viewing. You can mark a service bulletin as not viewed by selecting Mark as Unviewed.
It enables a service organization to capture whether or not a technician has viewed and complied with a bulletin that contains an instruction. No enforcement for this exists within the application, but this provides a tracking mechanism if you choose to enforce it.
-
The Service Code represents that a service code is linked to the service bulletin.
-
-
Navigate to the Service Codes region. The selected Applicable checkbox represents that a service code is linked.
These service codes are attached to the service bulletin on the setup page. When you retrieve the service bulletin and attach it to an SO, if any of the service codes linked to the service bulletin at time of bulletin setup are valid for the service item and inventory organization then the Applicable checkbox on the Service Codes region of the Evaluation tab is checked.
-
At this point, service technicians can generate jobs from these service codes by clicking Generate Jobs. Once you generate a job, the job number displays in the Job column and the Applicable checkbox is disabled.

Manage ECOs
Engineering Change Orders (ECO) occur when a product has a fault, or when the technical team designs a better way to build it, finds better parts, or regulators specify that certain parts cannot be used anymore. Under these circumstances, the technical team creates a new revision of the master plan for the parts included, the technique to manufacture, or service an item. Technically, this process requires the creation of new bills of material, route and/or service code.
In Depot, the following two steps occur in the processing of an ECO:
-
A Service Bulletin notifies the service technician that an ECO exists for the item (the service technician pushes the Check ECO button).
-
The service bulletin automatically applies the specific service code to the service for taking the ECO.
Note: If the ECO is applied already, the profile stops the notification from triggering each time, assuming you have already applied the ECO the first time you were notified. This prevents you from receiving constant notifications.
When a job is created from the Evaluation tab of the Technician Portal, it uses the service code from the bulletin. Thus when the service technician goes to the Execution tab in the Technician Portal, he will see the parts and operations that the ECO requires.
Backflush Service Parts
Backflushing implies automatically performing an inventory material transaction whenever an operation is completed or whenever a job is completed. There are two Supply Type setup options in Inventory/BOM that allow backflush:
-
Assembly Pull: Assembly Pull issues the material to the job when the job is completed
-
Operation Pull: Operation Pull backflushes the item when the Operation is completed.
If either of these values are chosen for the supply type, then the item backflushes, if its non-serialized. This function reduces the service technician clicks on jobs where components are not tracked serially.
Auto-Issue Service Items to Jobs
The high volume repair centers mostly create a single job for any item they service. When an item is serviced using a WIP job, the item must be issued to that job, and when the job is completed the same item is transacted to the WIP completion subinventory.
Auto-issue service item to jobs feature enables a depot to automatically add the service item as material demand for a job, thus freeing service technicians from additional data entry.
Using Time Clock
A service technician works on services from his queue. To begin work, a technician selects the next physical item on the cart or shelf, takes that item to work area, and queries the service order in the system by scanning or entering the serial number. One option is to start the clock automatically once a service order opens and the other option is to punch in work starts. The Time Clock functionality enables a technician to clock in and clock out the time for a service. The system tracks the amount of time a technician spends clocked in on a service and automatically capture that time as a resource transaction. The technician need not manually track time spent on a job or enter information into the system. The technician can pause the clock when taking breaks and allocate time to different operations.
Time clock facilitates a service technician in the following ways:
-
It enables the technicians to mark the start time of a service. This time is logged in the system. This is triggered by opening the service or by manually clocking in.
-
It enables the technicians to clock out a service. You may clock out for various reasons: lunch break, resource shortage, missing parts, and the like. Clock out stops the clock but no other actions are triggered. This time is logged in the system.
-
When a service is finished, technicians perform many actions like: complete operations, complete jobs, log labor hours, transact resources, issue materials, change service status, or kick off a workflow. The Complete Work button enables them to stop the clock and trigger these actions automatically.
The Technician Portal contains a header level bin named Time Clock that facilitates clock in and clock out.
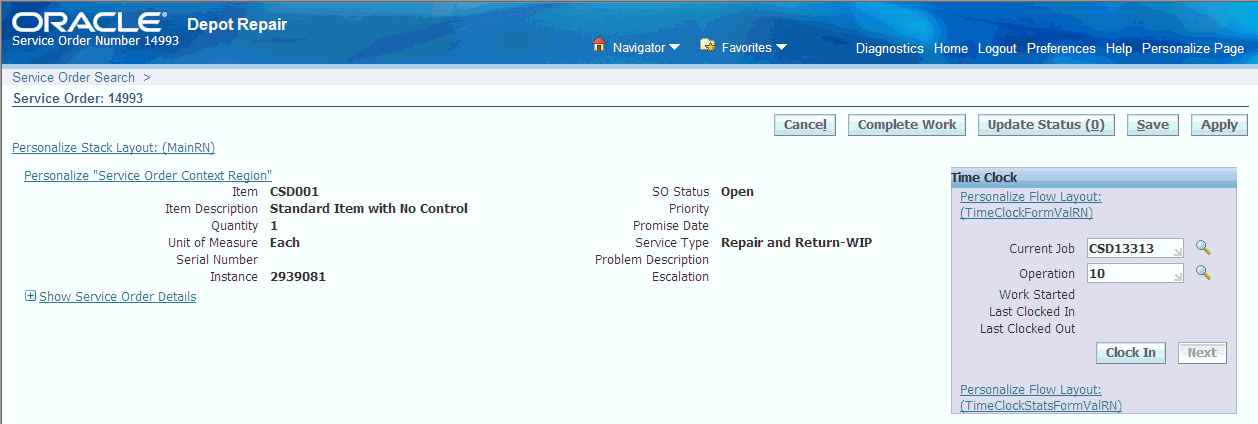
The Time Clock bin has the following layout:
Operation
-
This field defaults to the first operation on the Operations table.
-
If no operation exists, this field is left blank but defaults to operation 10 when creating Resource lines. You can select different operation from the list of values but you cannot select an operation outside of the Operations table.
-
You can update the Operation LOV before you clock in your time. You cannot update an operation once you clock in as the clock in time operates against a specific operation.
-
Operation LOV displays operations sequentially.
Work Started
-
Work Started field displays the first clock in time for a technician.
-
You can view the work-started time for your service order only.
Last Clocked In
-
This timestamp displays the last recorded clock in time and date for the current technician.
-
This field is blank for the first time the technician opens the service order.
-
When you clock in the time, this field reflects this new clock in time.
-
When you clock in the second time, the original clock in time is overwritten with the new time.
Last Clocked Out
-
This timestamp displays the last recorded clock out time and date for the current technician.
-
This field is blank of you are clocking out for the first time.
-
When you clock out, this field reflects this new value.
-
When you clock out the second time, the original clock out time is overwritten with the new time.
Clock In and Clock Out
-
Clock In and Clock Out are same buttons with toggled text.
-
This button displays Clock In when the clock is stopped and Clock Out when the clock is running.
-
You can clock in / clock out against a particular job multiple times.
-
Clock In button creates your record in the Resource Time table for the service order, resource item, resource name, operation, and clock in time.
-
Clock Out button updates the clock out time for your record in the Resource Time table for the service order, resource item, resource name, operation and clock out time.
-
You can clock in and clock out when there is no job or operation. The system assumes that all the time accrues to the first job created.
Note: If you fail to clock in or clock out you can notify the manager. The manager then opens the service order and adjusts the total labor on the Resources table and updates the service order status. This assumes that personalization is used to restrict access to the Resource table. In the absence of this personalization, you can add or remove resource time from the table.
You can set the profile option CSD: Automatically Clock In to Time Clock to Yes, to enable technicians to automatically clock in to the first available operation on the first available job when they log into the Technician Portal directly, or from the Execute Job button in the Depot Repair Workbench, and the Work Details button in the Returns Portal.
Next
-
This button permits to clock out from current operation and clock in to the next one.
-
The button is enabled when you clock in the first time and it is disabled when you clock in to the final operation for a service order.
-
This creates a new resource record in the Resource table. The Operation LOV gets updated to the next operation in the sequence. If more than one operation exists, the sequence is to complete all operations on the lowest job number first, then the next lowest job number operations and so on.
-
A new clock in record is also created for the resource item, resource name and new operation.
-
Users can launch associated quality plans at operation completion selecting operations to be completed manually (if a quality plan is associated to the operation being completed).
See: Quality Data Collection in Work in Process and Shop Floor Management, Oracle Quality User's Guide
The Technician Portal contains a header level button named Complete Work that enables you to stop the clock and trigger various actions like: complete operations, complete jobs, log labor hours, transact resources, issue materials, change service status, or kick off a workflow.
-
This button is enabled using personalization.
-
When you click this button, materials, resources, operations, and jobs are processed first. Then the status is updated which triggers the workflow.
-
Clicking this button automatically clocks out the technician if it is not done already.
-
When issuing serialized items, you have to manually capture the serial number before clicking Complete Work button.
-
This button processes only the unissued items, transacts only the un-transacted resources and completes the un-complete operations or jobs.
Note: Both the Time Clock bin and Complete Work order button are enabled by personalization.
Deleting Operations
You can use the Depot Repair Technician Portal's Delete functionality to delete saved operations which match all of the following criteria:
-
The operation can be deleted via WIP forms.
-
The user has not clocked into the operation using the Depot Time Clock feature
-
The user has not transacted any materials for this operation
Note: Limitations of the Delete functionality are as follows:
-
Depot will not support the deletion of WIP operations outside of the Repair Technician portal.
-
The first operation cannot be deleted as by default, the first operation in a WIP job created via Depot is always in to-queue status.
