Help for Sourcing Buyers
Buyers - Using the Negotiations Home Page
The Oracle Sourcing Negotiations Home page is the starting place for all your sourcing tasks. The tasks you can perform are organized into functional areas and are accessible from different tables and links
-
Requests Tab
You use the Requests tab to access the Demand Workbench feature. This feature allows you to access and use requisition demand stored in Oracle Purchasing to create Oracle Sourcing documents. You can use the Demand Workbench to create RFQs and auctions with either standard or blanket purchase order outcomes. You can define your own views to automatically display only the requisition demand that meets the search criteria you select.
-
Negotiations Tab
-
Searches
You can perform simple and advanced searches to locate negotiations of interest. A simple search allows you to specify a single search criterion and search value, and then locate all published negotiations that match the search value (published negotiations are open for supplier responding). An advanced search allows you to specify multiple search criteria and then locate published negotiations that match all search values.
-
Published Negotiations
The Published Negotiations table displays the negotiations which you have published. This display includes negotiations in which you are either the owner or for which you are a collaboration member. The entries in the table appear in the following order:
-
Open negotiations, in order of time left (paused negotiations are displayed with a pause icon to the right of the negotiation number).
-
Closed negotiations, ordered by negotiation number.
-
Cancelled negotiations, ordered by negotiation number
There are five entries in the table. To see all your negotiations, click Full List.
Click the negotiation number link to access the negotiation summary page to view information for that negotiation. Click the Monitor icon to access the Live Console and view supplier and response information for any responses to the negotiation.
-
-
Quick Links
The Quick Links section of the Negotiations Home page provides fast access to the most commonly performed operations in Oracle Sourcing.
-
Create
You use the links under the Create section to create new negotiations. There is a link for each negotiation type. You can also use the Copy link to access a draft or published negotiation and use it as the basis for you new negotiation document. You can also create events, which are collections of sourcing negotiations that can be viewed and managed as a group.
-
Manage
The Manage section allows you to:
-
Manage draft sourcing documents.
-
View and manage events
-
View the status of any Oracle Procurement Contracts deliverables that are associated with your negotiations.
-
Submit surrogate responses on behalf of suppliers who have no Internet access but wish to participate in a negotiation.
-
Research supplier performance by searching the Approved Supplier List information or viewing a supplier information to determine which suppliers are appropriate for a particular negotiation you are creating.
-
-
Templates
If you frequently conduct negotiations of a similar type that use many of the same attributes or suppliers, you can create templates based on the negotiation type. You can have multiple templates for each negotiation type. The templates you create are private and available for your use only. The Sourcing Super User may have created public templates for use by all Sourcing Buyers. Once a template has been created, you can use the template when creating your new negotiation. You use the Resuable Templates links to search for existing templates or to create new ones.
-
-
Containers
On the right side of the page, there are three possible containers identifying actions items you may need to address. If there are no entries for you for that particular type of task, the container does not appear.
-
Draft Negotiations
This container lists the draft negotiations for which you are either the owner or a collaboration team member. The entries appear by preview date (if specified), then by open date. If there are no dates specified, they appear according to the negotiation number. This container lists a maximum of fifty entries.
If you can edit the draft, clicking the link navigates to the Create Negotiation: Header page.
-
Unread Messages
While a negotiation is in progress, you can communicate with suppliers to provide additional information or answer of clarify questions. This container lists any unread messages. A maximum of fifty messages appear, according to the time sent. Clicking the link accesses the Message page where you can read the text of the message.
-
Incomplete Tasks
If you are a member of a collaboration team, you may have been assigned specified tasks to perform. For example, you may be responsible for defining the invitation list for a draft negotiation.
If there are outstanding tasks you need to perform, reminders for the fifty most current (displayed in order of target completion date) are displayed in this container. If no date for the task was specified, the entries appear according to the negotiation number.
Clicking the link displays the associated negotiation information.
-
-
-
Intelligence Tab
The Intelligence Tab provides access to the many reports available within Oracle Sourcing. You can use this tab both to generate the reports and view the report results. You can also export the report output to a spreadsheet for offline viewing and analysis.
-
Intelligence Reports
The following reports are always available:
-
Awards by Supplier
-
Savings by Category
-
Awarded Bids
-
Awarded Quotes
-
This tab also displays total award amounts for all negotiations awarded within the last 30 days. There is a breakdown by negotiation type (RFQ or auction), as well as the cumulative total of all negotiations.
You can drill into each report to see detailed information on the awards included in that report. Advanced filtering capabilities allow you to generate detailed award displays including graphs. For each award, you can access information on that award's response as well as the negotiation associated with that award.
-
-
Administration Tab
The Administration tab provides access to the tasks you use to administer and maintain Oracle Sourcing. These tasks are performed by the Sourcing Super User. If you do not have the Sourcing Super User responsibility, you do not see the tab.
Creating Negotiations
Creating RFIs, RFQs, and Buyer's Auctions
Using templates, spreadsheets, and lists
Using line attributes, attribute scoring, price factors, and price breaks
Understanding Earnest Money Deposit (EMD)
Suppliers often need to indicate to the buying organization their serious intent to bid for a negotiation (RFQ or Auction). Therefore the buying organization accepts a sum of money from the suppliers called Earnest Money Deposit so that the buying organization is certain that the supplier is committed to participating in the negotiation. This situation often occurs during the government tendering process or public-sector/federal negotiations. Earnest Money Deposit is paid to the buying organization by the suppliers before the suppliers submit a bid/quote. The buying organization retains this amount till the negotiation process is complete. When the negotiation is closed (completed), the Earnest Money Deposit (EMD) amount is refunded to all suppliers. In a case where the supplier has not conformed to the rules of the negotiation, the EMD amount can be forfeited, that is, the buying organization does not return the amount to the supplier and keeps it as a penalty charge. Also, some suppliers can be exempt from paying EMD, depending on the buyer's business rules.
Manually receiving and tracking EMD amounts can be very cumbersome. Especially in situations where the receiving and refunding/forfeiting processes of the EMD amount are tied to the journal entries of Accounts Receivables. Oracle Sourcing provides a complete end-to-end EMD functionality, which contains an automated EMD flow: the flow captures the process of receiving, refunding/forfeiting and updating the journal entries.
Overview of Earnest Money Deposit (EMD)
Earnest Money Deposit (EMD) indicates to the buying organization that the supplier is ready to enter a bid/quote for the negotiation and is serious about participating in the negotiation.
When a buyer creates a negotiation, the buyer can specify that the negotiation will be available to suppliers only if they have paid the EMD amount. The EMD amount has to be paid by the suppliers before they start responding to the negotiation. When a buyer creates a negotiation, the buyer can specify that the negotiation will be available to suppliers only if they have paid the EMD amount - the negotiation will be available for viewing, but the response cannot be created if the EMD amount has not been paid. When the negotiation is closed, the EMD amounts are refunded/forfeited for each supplier, as the case may be.
If a supplier uses Oracle Sourcing, he is able to make an online payment of the EMD amount (if he has made Corporate EMD deposit amount previously).
The responsibility EMD Administrator enables users (buyers) to enter and track the EMD amount for suppliers for negotiations.
Types of EMD
In Oracle Sourcing, there are three EMD types that a supplier can pay to the buying organization:
Direct Payment
This is an EMD amount that can be paid using the following payment types: Cash, Check, Demand Draft.
Corporate EMD
The supplier pays the buying organization a one-time deposit, which is usually a large amount. For every negotiation, the EMD amount is deducted from the Corporate EMD amount. For example, a supplier pays the buying organization a Corporate EMD amount of $100,000. If, for a negotiation, the EMD amount to be paid is $5000, the remaining Corporate EMD amount will be $95,000. This $95,000 amount will be used to pay for future EMD amounts whenever the supplier is participating in a negotiation with the buying organization.
Bank Guarantee
In a Bank Guarantee type of EMD, the supplier's bank creates a bank guarantee document that is used to inform the buying organization that the supplier can make the EMD payment if required to do so. That is, the bank stands as the guarantor for the supplier's ability to pay the EMD amount. However, it is important to note that the bank guarantee has a limited time period and it's expiration date is usually a few days after the close of the negotiation.
Using EMD in a Negotiation
Enabling / Disabling EMD in the Configuration and Negotiation pages – Buyer view
Login as a buyer and use the Create link to create a negotiation. Navigate to the Administration tab and click on the Negotiations Configuration link. Select or unselect the Enable Earnest Money Deposit for all RFQs and Auctions checkbox, depending on whether the user wants to enable the EMD functionality or not.
Creating a Negotiation with EMD information – Buyer view
When the buyer creates a negotiation (RFQ or Auction), the Negotiations tab first displays the header where information can be entered. If the buyer has selected the Enable EMD for all RFQs and Auctions checkbox in the Administration tab (Negotiations Configuration link), then the Enable EMD checkbox is displayed in the negotiation header.
Select the Enable EMD checkbox if the buyer wishes to enable the EMD functionality for this particular negotiation.
EMD Details in the RFQ page (Header tab)
Select the EMD checkbox, a region called EMD Information displays on the negotiation header page. Enter the following details in the EMD Information region:
-
EMD Amount – enter the amount (required field) that buyers expect the suppliers to pay as a deposit for participating in the negotiation. This amount is usually decided by the buying organization purchasing policies.
-
EMD Due Date – enter the date that buyers would prefer the suppliers to pay the deposit. It should not be later than the due date of the negotiation.
-
EMD Type – enter Bank Guarantee or Direct Payment as the type in this required field.
-
Additional EMD Information – enter any information that buyers would like to convey to the supplier or the EMD Administrator.
Response Currencies
When buyers specify response currencies, they allow suppliers to respond to the negotiation in any of the specified currencies. This also means that suppliers can pay the EMD amount in any of the specified currencies, other than the functional currency. The exchange rate for that currency will be calculated based on the GL's rate of exchange on that date when the transaction (remittance from the bank, refund, forfeit) is carried out. The EMD amount will be calculated based on the managed currency, and actual EMD receipt calculation will take place using GL currency rates.
In the Negotiations creation page, click Manage Response Currencies to add the other currency to the negotiation.
EMD Approval Process
Complete the negotiation creation and send it for approval if required. Please note that at least one member of the collaboration team must be an EMD Administrator and also an approver. In fact, the EMD Administrator is also an approver for the negotiation.
The approver receives a notification requesting his approval/rejection of the negotiation. The notification may be viewed by logging in as the approver and clicking on the Worklist link. This displays all open notifications on which the approver has to take action.
Click on the notification link the approver needs to approve, this will open the notification in a new page.
View or update the EMD Details using the EMD Update Page link. This opens the EMD Update page that is accessible only to the EMD Administrator. Save the changes and return to the notifications page.
In the notifications page, click Approve to approve the negotiation. On successful approval, the worklist main page displays.
Now that the approvals are completed, publish the negotiation so that it is available for viewing by suppliers. To publish the negotiation: login as the owner of the negotiation and open the negotiation. Check if the Approval Status for all the approvers (in the Collaboration Team region) is Approved. Then click Publish and a message displays stating that the negotiation has been successfully published.
Updating Abstract and Forms – Buyer View
Use the Abstract and Forms option to enable EMD information to be published on an external website for a negotiation.
Navigate to the Administration tab, then click on the Abstract and Forms link to enter EMD information. Enter the EMD related fields so that the buyer can publish the EMD information.
Supplier View
Payment of EMD by Supplier Users
A supplier can choose to pay the EMD amount online. When a supplier logs in and opens a published negotiation to which he wishes to respond, the EMD information is displayed along with the rest of the negotiation details.
Use the Pay EMD Online link in the EMD Details region to pay the amount online. The payment type supported for online EMD payment is Corporate EMD. This implies that supplier may not use the online EMD payment link for payments such as Cash, Check or Demand Draft. For Cash, Check and Demand Draft payments, the supplier will need to submit the payment instrument physically to the buying organization. These payments will be received in the system using the EMD Administrator responsibility.
Clicking the Pay EMD Online link opens the following page:
Use the Select Payment Method LOV to choose Corporate EMD payment type.
Click Submit to make the EMD online payment.
Using the EMD Administrator Responsibility
The EMD Administrator responsibility, enables buyers to administer the EMD receipts, payments, refunds, forfeits etc. Search for a particular negotiation and use the EMD Suppliers Information page to receive a payment, refund a payment, forfeit a payment etc.
EMD Home Page
Use the Quick Search to search for an active or draft negotiation that has EMD enabled (when a buyer are creating a negotiation, if the Enable EMD checkbox is selected, then the negotiation is EMD enabled).
Use the following criteria in Quick Search and click Go:
-
Created By
-
EMD Due Date Before
-
EMD Type
-
Event
-
Number
-
Supplier
-
Title
The search results display in the Results: Negotiations region. Click the EMD Report icon to display the EMD information (by supplier) for this particular negotiation.
Click on a negotiation number to open the EMD Suppliers Information (Negotiation Number) page.
The EMD Suppliers Information page displays the EMD details of the negotiation in the EMD Information region. These details come in from the negotiation that was created with EMD enabled.
The EMD Transactions for Suppliers region displays all the Suppliers EMD-related information. The EMD Status displays as Not Paid initially if the EMD amount hasn't been paid. Use the EMD Action LOV to Receive or Exempt the EMD amount. Later, the EMD Administrator can also enter the Refund or Forfeit Activity for each row for each supplier. Use the View EMD Details icon to see the EMD payment/refund/forfeit activity for each supplier. When the EMD amount has been received, click the Print Receipt icon to print the receipt, which will be given to the supplier.
An EMD Administrator can add a new supplier in the Add New Supplier region and add the selected supplier to the Negotiation as well, (provided the buyer has not restricted the negotiation to invited suppliers only).
Exempting EMD
If the EMD Administrator wishes to exempt a supplier from paying the EMD amount, select Exempt in the EMD Action LOV (in the EMD Transactions page, using the Sourcing EMD Administrator responsibility). Then click Submit to confirm. The EMD Status displays as Exempted.
Receiving the EMD Amount
Select the Receive option in the EMD Action LOV. The Enter EMD Details page opens, where the EMD Administrator can enter the Payment Method, Payment Date, Currency, Amount and Cash Bearer Name. If the supplier has chosen to pay in another currency, other than the functional currency of the negotiation, the exchange rate details are also displayed on the page:
Click Submit and then click Yes on the next page to confirm that the user would like to proceed with the transaction, and then return to the EMD Transactions page. The EMD Status displays the value Received. If the user has entered the EMD amount for a supplier (a single row), the EMD Action LOV will not be visible for that supplier. However the View EMD icon and Print Receipt icon are enabled. Click Print Receipt to print a PDF receipt that can be given to suppliers. Click the View EMD icon to open the report for that supplier. The EMD Summary information and EMD Payment Details are displayed on the report. Note the Receivables Transaction Number that is generated.
Using the Receivables responsibility, navigate to Receipts > Receipts. Enter EMD-Cash as the Receipt Method and any number as the receipt number. Enter the Receipt Amount (the original EMD amount that the supplier paid – this is in the currency submitted by the supplier). Accept all other defaults. Enter the Trans Number in the second field: this will be the Receivables Transaction Number that the user noted from the View EMD icon. The supplier details will get populated in the Customer region. Save your work.
Click Apply to apply the receipt updates for the EMD transaction. In the Applications window, select the Apply checkbox for that transaction line and then click Save. Close the windows and return to the EMD Administrator page. On the EMD Administrator page, the EMD Status should still show as Received, and the AR Receipt Status should display as Confirmed.
Using the Receivables responsibility, navigate to the Receipts > Remittances window. Enter the bank details in the Remittance region, then click AutoCreate. In the Create Remittance Batch window that opens, enter the receipt number (the one the user created in the Receipts window in the preceding step). Click the Create checkbox in the Actions region and then click OK. A concurrent program Automatic Remittance Creation Program (API) is run and after it completes successfully, navigate back to the EMD Administrator page to see the AR Receipt Status as Remitted.
When the amount is cleared in the bank, run the Automatic Clearing for Receipts concurrent program in the Receivables responsibility. Enter the required parameters and run the concurrent program. Using the EMD Administrator responsibility, verify that the AR Receipt Status for that supplier is Cleared. Also, in the EMD Transaction for Suppliers region (in the EMD Transactions page), the EMD Action LOV is visible again, containing 2 values – Refund and Forfeit. Now that you, as EMD Administrator, have received the amount and it has been cleared, you can either refund the amount to the supplier at the end of the negotiation cycle or forfeit the amount if the supplier hasn't conformed to the rules of the negotiation.
Refunding EMD
Select Refund from the EMD Action LOV if the EMD Administrator wishes to refund the EMD amount to the supplier. The EMD Details are displayed when Refund is selected, that is, the Show link in the Details column is expanded to show the EMD payment details. Click Submit to perform the refund. A concurrent program is run, and the request ID is displayed in the Details region. The EMD Status changes to Refunding while the concurrent program is running. When the concurrent program executes successfully, the EMD Status changes to Refunded. Click View EMD icon to view the EMD Details Report. In addition to the EMD Summary and EMD Payment Details, the report now displays the EMD Refund Details with the following fields: Currency, Amount, Payment Date, Receivables Credit Memo No, Payables Invoice No, Payables Payment No, and Refund ID. Note the Payables Invoice No.
Using the Payables responsibility, navigate to Invoices > Entry > Invoices. Query for your invoice number in the Invoice Num field using the Payables Invoice No noted above. The invoice information will be displayed. To view the invoice details, click All Distributions.
Forfeiting EMD
Once the EMD Administrator receives an EMD amount from the supplier, he can choose to retain the amount and not return it to the supplier if the supplier has not conformed to the rules of the negotiation. This is called forfeiting the EMD amount. The EMD Administrator must have received the amount first before he can forfeit it.
Select Forfeit from the EMD Action LOV. The EMD Administrator will be asked for a justification for forfeiting the EMD amount. Enter a justification and then click Submit.
A concurrent program is executed, which will perform the forfeit transaction. The concurrent request ID is displayed in the Details region. At the successful completion of the concurrent program, the EMD status shows Forfeited. Click View EMD to view the report that details the EMD Summary, EMD Payment Details and EMD Forfeit Details. The EMD Forfeit Details section displays the following information: Currency, Amount, Forfeit Date, Receivables Transaction No, and Justification.
EMD Financial Configuration tab
After the user has completed the setup steps in the section Setup Steps, enable the integration with Oracle Financials by selecting the Enable Integration with Oracle Financials checkbox in the EMD Financial Configuration tab. Please refer to Section 4 Setup Steps for more information on integrating with Oracle Financials.
The EMD Financial Configuration tab enables you to specify the various Oracle Financial entities (transaction types, payment terms etc) for EMD usage.
The header of the Financial Configuration tab displays the EMD details that default when a buyer creates a negotiation. The Default EMD Amount and Default EMD Currency values default when a buyer creates a negotiation.
The Enter Receivables Payment Type Information region enables the user to enter a Receipt Method and Refund Payment Method for the Payment Types that the user has set up for the EMD functionality. Please ensure that the Receipt Method values and the Refund Payment Method values are set up in Oracle Receivables before you can specify them in this tab. Select the Enabled checkbox to enable the Payment Type and its associated Receipt Method and Refund Payment Method.
In the Other Financial Setup Information region, enter the values the user set up in the Setup Steps section. The values required are for the following entities:
-
Receivables Transaction Type
-
Transaction Batch Source (Type Manual)
-
Transaction Batch Source (Type Imported)
-
Payment Term
-
Memo Line Type (Deposit)
-
Memo Line Type (Invoice)
Corporate EMD tab
The Corporate EMD tab enables a supplier to pay a large amount for current and future EMD amount on a one-time basis. The EMD amount for the current negotiation is deducted from the Corporate EMD amount.
Select an operating unit and then select a supplier. Search for a supplier by entering a supplier name or supplier contact.
Click Go to display the supplier details. The search results display in the View & Update Corporate EMD Information. The Corporate EMD is the original amount deposited for the Corporate EMD. The Corporate EMD Balance is the remaining amount of the Corporate EMD after EMD amounts have been deducted for individual negotiations. Edit the Corporate EMD amount by clicking the Update Corporate EMD icon. Click Apply to apply the new Corporate EMD amount. This new amount will override the existing amount.
Intelligence tab – Reports
The Intelligence tab enables the user to generate reports based on various search criteria. Search based on a combination of any or all of the following criteria:
-
From and To Dates
-
EMD Type
-
EMD Payment Method
-
EMD Status
-
Payment Currency
-
Buyer
Click Go to view the search results. Click Export to Spreadsheet to export the results of the search to a comma delimited spreadsheet.
Creating Auctions and RFQs
Creating RFIs, RFQs, and Buyer's Auctions
Creating a Request for Information (RFI)
Managing Responses in Multiple Currencies
Restricting a Supplier to a Particular Currency
Defining Service-Related Lines
Understanding Response Controls
Approving an Award Recommendation
Conducting Research on a Particular Supplier
Inviting Suppliers to Participate in a Negotiation
Restricting Suppliers to Particular Negotiation Lines
Submitting a Negotiation for Approval
Reviewing and Publishing a Negotiation
Creating a Negotiation
Use the instructions on this page to create Sourcing negotiations (RFIs, RFQs, and buyer's auctions).
There are four main steps to creating a new negotiation:
If you have previously created an RFI, RFQ, or auction, you can save time by copying an existing RFI/RFQ/Auction. You can also create new negotiations quickly by applying a negotiation template. You can create a negotiation and save it as a draft before submitting it. This allows you to return to the creation process at a later time or have multiple people working on the same negotiation.
Creating a Request for Information
RFI's are used to qualify suppliers and their goods and services for subsequent procurement activities. RFIs are used more for gathering information on goods and service provided by a supplier than to lock in particular price information. Therefore, one unique feature of an RFI is that buyers can choose to define negotiation line items without price and quantity and specify lists of criteria to which suppliers must respond. RFIs can be taken to multiple rounds until the buyer has enough information to identify supplier(s) with which to deal. At the conclusion of the RFI cycle, the information contained in the RFI can be copied into an RFQ or buyer's auction.
Creating an RFI
In general, you use the same process to create an RFI that you use to create a buyer's auction or RFQ.
Describe the RFI.
Add line information to the RFI
Specify responsecontrols.
Invite suppliers (possibly optional).
Specifying Criteria for Negotiation
You use line attributes to identify the criteria on which you wish to obtain information from the suppliers who respond to your RFI. For example, assume you're intending to acquire a purchasing application for use within your buying organization. A couple of the product criteria you might be interested in are:
-
the level of product support a supplier can provide.
-
the specific platforms the product can run on.
When you are defining your negotiation line (purchasing application software), you could add two required line attributes called Support and Platforms. Suppliers would then have to repsond to these line attributes by describing the level of support they can offer and identifying on which platforms their product runs. Note that at this point, you are not concerned yet with negotiating the price, only identifying the most appropriate suppliers. Since you use the attribute fields to specify detailed item information you are interested in, be aware of the following size limits:
-
Attribute name: 240 characters
-
Target value: 4000 characters
-
Response: 4000 characters
Taking an RFI to a subsequent round of responding.
If you defined the response control to allow multiple rounds of responding, you may wish to perform several rounds responding before you feel you have gathered enough information to complete the RFI.
-
To take an RFI to a new round, you must first close it. Once closed, you can return to the negotiation summary page.
-
On the negotiation summary page, select Start New Round from the Actions menu.
-
On the Start New Round page, you can modify many of the attributes of the RFI:
-
RFI Description information - you can change the RFI Title and/or style.
-
RFI Timing information - you can change the open, preview or close dates
-
Collaboration team members.
-
RFI Item information - you can edit or delete existing items, and add new items.
-
Invitee Information - you can invite new suppliers to participate or delete previous invitees.
-
-
When you have completed entering any new RFI information, click Continue.
-
On the Review and Submit page, check the information, and if correct, click Publish (if the document has approvers defined to the collaboration team, click Submit for Approval).
-
The confirmation page displays information on the new RFI version.
Converting an RFI to an RFQ/Auction
Once you have identified the suppliers with whom you wish to negotiate, you can close the RFI and use the information you've gathered to create an RFQ or auction document. There is no limit to the number of negotiations you can create from a single RFI.
To convert the RFI into an RFQ/Auction:
-
Create the RFI and publish it.
-
Respond as supplier.
-
Close the RFI.
-
Execute Complete from the Actions list.
-
Go to the Negotiations main page.
-
Click Copy link under Create.
-
Enter RFI in the number field.
-
Click Go, then click Copy.
-
Change the Document Type to RFQ and click Apply.
Using the Demand Workbench: Requisitions
Demand Workbench allows you to access and aggregate requisition demand existing in Oracle Purchasing to create new procurement documents. Using the Demand Workbench, you can:
-
Access requisition information from any organization to which you have security access
-
Review all approved requisition lines before placing specific requisition lines on a document.
-
Collect all requisition lines that meet a certain set of criteria that you establish
-
Create a new or add to an existing standard purchase order
-
If Oracle Sourcing is licensed and implemented, draft buyer's auctions or sourcing RFQs
-
Review or change your purchase order immediately after creation
-
Split one requisition line into several requisition lines
-
Replace one requisition line with one or more items from the catalog or favorites list updating source information
-
Consolidate multiple like requisition lines into single purchase order lines
-
Return requisition lines to requester
-
Maintain the relationships between the document lines and the backing requisitions
-
Buyers can review and manage their workload
-
Personal profile for saving default document type preference.
-
Requisition grouping preferences and default document type to be created
To use the Demand Workbench:
If you are new to Oracle Purchasing, then it is recommend that you review the following documentation:
-
Identify requisitions which you wish to fill. See: Searching for Requisitions.
-
Use those requisitions to create a procurement document. See: Create Documents.
Requisitions: Demand Workbench
-
Navigate to the Requisitions tab in the Buyer's Work Center. The initial page that opens is the Demand Workbench.

-
You can see all requisitions in the Oracle Purchasing requisition pool to which you have access based on your default view and your security profile.
-
To select a different view, select from the View list. If you change views, only the requisitions for that view are displayed. See: Using Requisition Views
-
If you would like to restrict the results to requisitions in a particular operating unit you need to navigate to the search region and specify the operating unit in the search region or create a personalized view for the operating unit.
-
-
Click Search to limit the requisitions displayed using Buyer, Requisition, Category, Supplier, or other conditions as criteria for search results. See: Using Advanced Search
You can also search for requisitions based on the content of their headers, lines, and distributions by clicking the Summary subtab. Note that you can save your search as a personalized view. Refer to Personalized Views in this section for more information.
-
When the page refreshes, you see all requisitions that matched the criteria for that view/search. For multiline requisitions, there is an entry for every requisition line (for example, you might see two entries: requisition 12345, line 1; and requisition 12345, line 2). If you see a requisition with multiple lines, but some of the lines are absent from the list, those lines have already been processed.
You can sort the results by clicking any column header.
You can see information for the requisition and requisition line by clicking the Requisition and/or Line links. If the suggested supplier has a profile defined in Oracle iSupplier Portal, you can view the profile information by clicking the Source link. If the source document is a blanket purchase agreement, click on the source document link to view the source document.
-
Once you have identified the requisitions you are interested in you can:
-
View the requisition by clicking its number.
-
Create procurement documents. See: Create Documents
-
Manage requisitions. See: Manage Requisitions
-
Using Requisition Views
There are predefined searches (views) that are available within the Demand Workbench. Additionally, there are any personalized views that you have created. To use a view, select the view from the View drop down menu and click Go.
You can use these views to search for requisitions as follows:
-
My Late Requisitions - This view displays requisitions that are past the need-by date entered by the requester. That is, the need-by date on the requisition is prior to today's date.
-
My Requisitions - This view displays all requisitions assigned to the buyer. Requisitions can be assigned to a particular buyer when the requisition was created.
-
My Requisitions for Goods - This view displays requisitions for goods assigned to the buyer.
-
My Requisitions for Services - This view displays requisitions for services assigned to the buyer.
-
My Requisitions Requiring a RFQ - This view displays requisitions lines that require a RFQ.
-
My Requisitions with a New Supplier - This view displays requisitions that suggest a supplier who has not yet been defined to the system (Oracle iProcurement can create requisitions and suggest a supplier that does not yet exist in the system).
-
My Requisitions with a Suggested Supplier - This view displays requisitions that are sourced to a supplier.
-
My Urgent Requests - This view displays requisitions that the requester marked as urgent.
-
Unassigned Requisitions - This view displays requisitions that have not been assigned to a sourcing buyer.
-
Personalized Views You can create your own specialized views that displays only those requisitions in which you are interested. Refer to Personalized Views in this section for more information..
Creating Personalized Views
If you frequently use the same advanced searches to restrict the display of requisitions, you can save these advanced views. These are called Personalized Views. To create a Personalized View:
-
On the Unprocessed Requests page, click Personalize.
-
The Personalized Views page displays the system views and any private views you have defined to the system.
-
If you wish to delete or modify a personalized view, select the view and click either the Delete or Modify icons.
-
If you wish to deactivate a view so it does not appear in the View drop down menu on the Unprocessed Requests page, select No from the Display View menu and click Apply.
-
-
To create a new view, click Create View.
-
On the Create View page, define your new view.
-
Give your new view a name.
-
Optionally, choose to make this view your default view.
-
Optionally, specify a view description.
-
Specify the default number of matching requisitions to display (the default is ten).
-
-
Use the instructions on advanced searching to create the appropriate search conditions.
-
Once you have defined your view, you can click Apply to save your definitions, or click Apply and View Results to save your definition and immediately execute it as well.
Using Advanced Search
You can use the advanced search function to create a combination of search criteria that helps locate the appropriate requisitions. To use the advanced search function click Search.
Advanced search allows you to search for requisitions on a combination of values for Buyer, Requisition, Category, and/or Supplier. You can add additional search criteria by clicking Add. A list appears displaying all possible search criteria (for example, you may wish to also search on Item Description).
When performing advanced searches, you can choose to require entries to match all the search values or allow them to match any of the search values.
-
Search results where each must match all values entered - Require entries to match all the search values you enter. For example, qualifying requisitions might be required to have the buyer be John Smith and the ship to location be New York. In this case, any qualifying requisitions must match both search values.
-
Search results where each may contain any value entered - Allow entries to match any of the search values. For example, qualifying requisitions might be allowed to have the buyer be Patricia Stock or the ship to location be San Francisco. In this case, the qualifying requisitions can match either or both search values.
Use the Find icons to search for and select search values. When you have finished specifying your search, click Go (clicking Clear resets the search value fields).
You can search for a Global Blanket Purchase Agreement with outside processing item for New Order type in Document Builder when autocreating purchase orders. Purchasing enables auto creation of purchase order based on sourcing rules when a requisition is auto created for the OSP item based on the job or operation release type. In the auto created purchase order, the price of the OSP item is updated based on the global blanket purchase agreement.
Viewing results
When the search results display, you see all requisitions that matched the criteria for the view/search (for organizations to which you have access). For multi-line requisitions, there is an entry for every requisition line. If you see a requisition with multiple lines, but some of the lines are absent from the list, those lines have already been processed. You can sort the results by clicking any column header. You can see information for the requisition and requisition line by clicking the Requisition and/or Line links. If the suggested supplier has a profile defined in iSupplier Portal, you can view the profile information by clicking the Source link.
Create Documents
When you have located the requisitions you wish to include in your document, use the Demand Workbench to create a new document.
To create a new document:
-
Scroll the Demand Workbench page to the right.
-
Select a Document Builder document Type. This indicates the outcome you expect from the Document Builder.
-
Select an operating unit for your document by clicking the OU Find icon and selecting an entry from the OU results.
-
Scroll the page back to the left.
-
Select your requisition line(s) by selecting the checkbox in the Select column for each Requisition row. Or, you could add all the lines of a requisition that are available in the search results table to the Document Builder. Scroll to the right and click the blue square icon in the Actions column to add all the eligible requisition lines belonging to that requisition to the Document Builder. The gray square icon indicates that you cannot add the requisition line(s) to the Document Builder.
If you wish to remove the added requisition from the Document Builder, click Clear, and the line(s) will be removed.
-
Click Add to Document Builder to place the lines in your document.
-
To create the document, scroll right. Enter any additional information your document type requires and click Create.
-
If you wish to clear the document builder and start creating the document again from the beginning, click Clear.
-
If you would like to make updates to the document builder parameter, enter your changes and click Update.
-
-
The document type you selected is displayed:
-
If you selected New Order or Add to Order, the Update Standard Purchase Order page is displayed. Refer to the sections on Purchase Orders that follow in the Buyer Work Center chapter.
-
If Oracle Sourcing is licensed and implemented, and you selected New Auction or New RFQ, the Oracle Sourcing Negotiations page is displayed. Refer to Create Negotiations in this section.
Note: By default the lines you selected are combined according to the rules below. See: Grouping Requisition Lines
-
-

Select Group Shipments if you want to group shipments during the automatic creation of purchase orders. Oracle Purchasing provides flexibility to buyers to decide whether they want to group shipments or not. If you select this check box, then shipments are grouped. Otherwise, Oracle Purchasing creates a separate shipment for each requisition line. Distributions are not grouped.
Important: In the Purchasing Options page, if the Group Shipments check box is selected, then the same selection is reflected in the AutoCreate Documents window as well as the Buyer Work Center Document Builder region. For requisitions created in Oracle Purchasing or Oracle iProcurement, if buyers want to group shipments during the autocreation of purchase orders, then the Group Shipments check box must be setup either in the Purchasing Options page or manually updated in the AutoCreate Documents window or the Buyer Work Center Requisitions Document Builder region.
The Group Shipments check box impacts only the requisitions from Oracle Purchasing and Oracle iProcurement. Buyers can decide whether to group shipments or not for requisitions from Purchasing and iProcurement.
Shipments are not grouped even if the Group Shipments check box is selected for requisitions from the following products:
-
Oracle Advanced Supply Chain Planning (ASCP)
-
Oracle Work In Process (WIP)
-
Oracle Order Management (OM)
-
Oracle Inventory
-
Oracle Enterprise Asset Management (EAM)
The following business rules apply to the Group Shipments functionality:
-
For manual requisitions, shipment grouping is done based on requisition lines and not on requisition distributions.
-
The PO line level grouping is based on the values defined for the following profiles:
PO: Use Need-by Date for Default Autocreate Grouping
PO: Use Ship-to for Default Autocreate grouping
-
-
Complete your document and click Create.
Manage Requisitions
Once you have located the requisitions you wish to work on, use the Demand Workbench management tools.
To manage requisition line notes:
Click the Manage Requisition Line Notes icon in the Actions column to open the Notes page. The Notes page enables you to add, edit, and delete notes for the specific requisition line.
The requisition line details are displayed in the top region of the Notes page. Using the Notes table, you can add new rows for one or more notes. Click the Add New Row icon (with the green plus sign) to add a new row for the note. Select a Note Type, and enter the details for the note such as Description, Planned and Actual Completion Dates, Owner, Status, Comment. You can add attachments to the note in the same way you would add attachments to a document header or line.
Click Save when you complete entering the note details. A confirmation message appears, informing you that the note is updated successfully. Click the Return to previous page link to return to the Demand Workbench.
To return requisition lines:
If the requisition lines should not be used in a document, you can return them to the requester.
-
Select your requisition line(s).
-
Click Return Lines to remove the requisition lines from the requisition pool and change their status in Oracle Purchasing to Returned.
-
Enter a return Reason.
-
Click Apply.
To reassign requisition lines:
If the requisition lines should be assigned to a different buyer, you can reassign them.
-
Select your requisition line(s)
-
Click Reassign.
-
Identify the new buyer.
-
Click Apply.
To update requisition lines from the catalog:
-
Select your requisition line.
-
Click the Replace with items from catalog icon in the Actions column.
-
Find the new item in the catalog and click Add to Document.
-
Click Complete.
To update requisition lines from your catalog favorites:
-
Select your requisition line.
-
Click the Replace with items from favorites icon in the Actions column.
-
Find the new item in the catalog and click Add to Document.
-
Click Complete.
To split requisition lines:
-
Select your requisition line.
-
Click the Split icon in the Actions column.
-
Enter the new quantities in the Qty column for each requisition line.
-
Click Save Split.
To add all eligible requisition lines in search results to Document Builder:
-
Find your requisition lines.
-
Click the Add all Lines from this requisition icon in the Actions column.
Grouping Requisition Lines
If you select multiple requisitions or a requisition with multiple lines, Demand Workbench consolidates multiple requisition lines with similar characteristics into a single sourcing document line. If you use default grouping multiple requisition lines are grouped together if they have the same values for the following characteristics:
-
Item category
-
Item number
-
Item revision
-
Item description
-
UOM
-
Ship-To address
-
Line type
You can add need-by date or ship-to organization and location to the default grouping by using the profiles PO: Use Need-by Date for Default Autocreate grouping or PO: Use Ship-to Organization and Location for Default Autocreate grouping.
If you use requisition grouping the document builder creates a document with one line for each requisition line.
For more details about requisition grouping, refer to the Using Automatic Creation Mode section.
Creating Complex Work Order Documents from Requisitions
Buyers can autocreate complex work order documents from requisitions using the BWC Autocreate Document Builder functionality.
The following table describes the definition of Complex Payment attributes and the complex work order tasks that can be performed using the BWC Autocreate functionality:
| Schedules | Progress Payments | Treat Progress Payments as Contract Financing | Description |
|---|---|---|---|
| Checked | Checked | Checked | You can: a) Create New Order for requisition lines with Inventory destination b) Add requisition lines with Inventory destination to existing Order documents |
| Checked | Checked | Unchecked | You can: a) Create New Order for requisition lines with Inventory destination b) Add requisition lines with Inventory destination to existing Order documents |
| Unchecked | Checked | Checked | You cannot: a) Create New Order for requisition lines with Inventory destination. b) Add requisition lines with Inventory destination to existing Order documents. |
| Unchecked | Checked | Unchecked | You cannot: a) Create New Order for requisition lines with Inventory destination b) Add requisition lines with Inventory destination to existing Order documents |
For more information, see:
-
Automatic Document Creation for Complex Work, Oracle Services Procurement Process Guide
-
Processing Complex Work Orders Created from RFQs, Oracle Services Procurement Process Guide
Creating Purchase Orders from Spot Buy Requisitions
In Demand Workbench, a buyer can view Spot Buy requisitions (provided requisitions are not created into PO automatically when any of the spot buy criteria doesn't meet) and can autocreate them to purchase orders.
Using the Source column, a buyer can view the supplier(s) or a requisition before the autocreate process.
The Source column displays the name of the supplier(s) that were suggested during the creation of the Spot Buy requisition. If there are more than one suppliers for the Spot Buy requisition, the link Multiple appears on the Source column. Click the Multiple link to view and select the supplier you (buyer) wish to create the purchase order for. If no supplier is assigned, you, as the buyer, need to select a supplier in the Document Builder region.)
If the requisition line has a transaction currency that is different from functional currency then the purchase order document is created in the functional currency, and appropriate currency conversion takes place to display the line amount in the functional currency in purchase order document.
Create Negotiations
To use the Demand Workbench, you identify requisitions for which you wish to source, and then use those requisitions to create a sourcing document.
Using the Demand Workbench, you can:
-
Access requisition information for any organizations to which you have access (you cannot combine requisitions from different organizations).
-
Create auctions and RFQs with either a standard purchaser order or blanket purchase agreement outcome.
-
Maintain the relationships between the negotiation document lines and the backing requisitions throughout the Sourcing lifecycle, including multiple rounds of negotiation.
-
Retain the requisition line numbers when negotiation lines are autocreated from the requisition lines.
To search for requisitions, you can use the views that already exist in the system, any of your personalized views, or you can use the Advanced Search function to define detailed search criteria by which to search.
AutoCreating Sourcing Documents
When you have located the requisitions you wish to include in your sourcing document, you use Demand Workbench to create a new negotiation document:
-
Select a document outcome from the dropdown list. Will your negotiation result in a Purchase Order or a Blanket Purchase Agreement? The values you can specify for this profile option are the values defined in the Purchase Document Styles, similar to the dropdown on the document Outcome field. Document Outcome is a mandatory field.
The profile option PON: Default Outcome for Sourcing Documents enables your administrator to specify a default value for the outcome document type in the Sourcing Demand Workbench. The default value in the document outcome dropdown list is the value your administrator specified in the profile option.
-
Click the Select check box adjacent to the Requisition row to select the requisition lines you wish to include in your new document, and click Add. If the requisition lines should not be used in a sourcing document, click Return Lines to remove them from the requisition pool and change their status to Rejected in Oracle Purchasing.
If you want autocreated negotiation lines to retain the requisition lines numbers, you must set the profile option PON: Use Requisition Line Numbers on Autocreated Negotiation Lines to Yes.
For more information about this profile option, see Oracle Sourcing Implementation and Administration Guide.
When you autocreate a negotiation document:
-
If you select the requisition lines with different numbers, then the new negotiation document will retain the same requisition line numbers.
For example, if the requisition line numbers you choose are 10, 20, and 30 from the first requisition and 40 and 50 from the second requisition, then the negotiation line numbers are 10, 20, 30, 40, and 50.
-
If you select requisition lines with the same numbers from two different requisitions, then the requisition line numbers are retained from the first requisition, but the negotiation line numbers created from the second requisition are generated by adding 1 to the highest negotiation line number from the first requisition and then incrementing by 1.
For example, if the requisition line numbers you choose are 10, 20, and 30 from the first requisition and 10 and 20 from the second requisition, then the negotiation line numbers are 10, 20, 30, 31, and 32.
-
-
To review the lines that were created for the document, click Lines.
-
The Document Builder page displays the lines that have been created for the sourcing document. By default the lines are combined according to the rules below. If you wish to change the grouping of requisition lines, select Requisition from the Requisition Grouping menu and click Go. If you wish to remove a line from the document, select the link and click the Remove icon. The line is returned to the requisition pool and is available for use by other buyers. If you wish to start the creation again, click Clear.
-
If satisfactory, click Create. You are taken into Oracle Sourcing with a new sourcing document created. Demand Workbench uses the requisition information to create the lines on the new document.
Creating Negotiations from Spot Buy Requisitions
In Demand Workbench, a buyer can view Spot Buy requisitions and can autocreate them to negotiations.
Using the Source column, a buyer can view the supplier(s) before the autocreate process.
The Source column displays the name of the supplier(s) that were suggested by the requester during the creation of the Spot Buy requisition. If there are more than one suppliers for the Spot Buy requisition, the link Multiple appears on the Source column. Click the Multiple link to view and select the supplier you (as the buyer) wish to create the RFQ or purchase order for. If no supplier is assigned, you, as the buyer, need to select a supplier in the Document Builder region.)
If the requisition line has a transaction currency that is different from functional currency then the RFQ document is created in the functional currency, and appropriate currency conversion takes place to display the line amount in the functional currency in the RFQ document.
Grouping Requisition Lines
If you select multiple requisitions or a requisition with multiple lines, Demand Workbench consolidates multiple requisition lines with similar characteristics into a single sourcing document line. Multiple requisitions lines are grouped together if they have the same values for the following characteristics:
-
Item Category
-
Shopping category (only if the outcome is a Blanket Purchase Agreement)
-
Item number
-
Item revision
-
Item description
-
UOM
-
Ship-To Address
-
Line Type
-
Need-By Date (provided the value of the PON: Use Need-by Date for Default Grouping profile option is set to Yes)
Editing and Using the Negotiation created from Demand Workbench
After the Demand Workbench creates the new sourcing document, you continue with the normal creation process.
In general, you can edit your document as you would any other sourcing document except for the non-modifiable information taken from the backing requisitions. Backing requisition information can be modified according to the rules in the list below:
Backing Requisition Columns that are Display Only
-
Operating Unit
-
Ledger Currency
-
Line Type
-
Item Number
-
Item Revision
-
Item Description
-
Category Name
-
Unit of Measure
-
Ship-To Address
Backing Requisition Columns that are Modifiable
-
Quantity: For quantity-based lines, this is modifiable. If multiple requisitions have been grouped, the quantity represents the sum of the individual requisition quantities. For amount-based line, this is always 1.
-
Line Level Attachments
-
Need-By Date: If there is a single date, it becomes the Need-By date. If there is a range of dates, the earliest becomes the Need-By date.
-
Bid Start Price: If multiple requisitions have been grouped, the lowest price becomes the Bid Start Price.
In general you use a negotiation created from the Demand Workbench the same way as other RFQs/auctions. Note, however, the following points:
-
If you take the RFQ/auction to multiple rounds of bidding/responding, the backing requisition information is updated to point to the new RFQ/auction.
-
If you cancel an RFQ/auction with line items originally created using the Demand Workbench, the backing requisitions are returned to the requisition pool. Also, if you only partially award a line item quantity, the unawarded quantity is returned to the requisition pool.
-
When you have completed awarding the RFQ/auction, Oracle Sourcing creates either a standard purchase order, or a blanket or contract purchase agreement and sends them back to Oracle Purchasing along with references to the originating requisition.
Creating a Negotiation Header
When you create a new negotiation, your first step is to create your negotiation header. This header contains negotiation level information related to the entire negotiation.
To create your negotiation header: Complete the following fields (*indicates a required field):
-
*Title The name by which this RFI, RFQ, or auction will be known. You must specify a title for your negotiation and once the negotiation is published, the title cannot be changed.
-
The negotiation style controls the structure of the negotiation document by identifying which sourcing document elements appear. Negotiation styles can streamline and standardize the creation of negotiation documents. For example, if input from a collaboration team is not required for many negotiations, the Sourcing Administrator can define a negotiation style in which fields related to collaboration teams do not appear. Also, if your negotiation is a large or very large negotiation, you must select a style that supports that type of negotiation.
-
Security Level You can select a security level to restrict access to the sourcing document.
-
Buyer The creator of the negotiation .
-
Requester If the Requester field is available, then select the business owner of the negotiation. By default, the buyer value defaults to the Requester field. You can select for example, the owner of the negotiation if this person is different from the creator of the negotiation.
Note: The Requester field is hidden by default and must be enabled using Oracle Application Framework personalization.
-
Organization The operating unit, such as a division or department, to which this negotiation applies. The organization you select here determines the values for many later attributes (such as the negotiation currency and shipping addresses). If this negotiation document was originally created in Oracle Purchasing, the backing requisition information is carried forward and this field cannot be updated. Note that if you have entered information on this page, for example in the Payment Terms field, and you change the Organization, the page refreshes and you will lose the information you entered. Once you proceed to the next step, this value cannot be changed.
-
Outcome(auction, RFQ only) Designate your RFQ or auction outcome as either a standard purchase order or a blanket or contract purchase agreement. This cannot be changed once you proceed to the next step.
The outcome field also contains values defined in the Purchase Document Styles. Similar to Negotiation Style, Purchasing Styles allow buyer organizations to implement various features in Purchasing. In Sourcing, user interface elements for the negotiation are hidden or displayed based on the Negotiation Style as well as the Outcome. Purchasing Document Styles are used when creating complex services RFQs. See Oracle Purchasing User Guide for instructions on defining Purchasing Document Styles and details on complex work document styles.
-
Sourcing Project:
If the current negotiation is being conducted in connection with a project in Oracle Projects, you can link this negotiation to the project by project number.
-
Collaboration Team You can identify a group of users from within your company who will collaborate on this negotiation. For each member, you can choose to:
-
Make the member an approver of the sourcing document.
-
Give the member the ability to score supplier responses to negotiation Requirements (if scoring is allowed by the negotiation style sheet).
-
Give the member view-only access to the document. View-only members can view the document but cannot update any information.
-
Define a particular task for that member to perform, and a target date by which the task should be completed. The team member marks the task as complete once it is finished.
-
See Working with Collaboration Teams for information on the document approval process. See "Understanding Security Levels" for information on the interaction between security levels and a collaboration team.
-
Terms
-
Global Agreement (Blanket Purchase Agreement only)
-
Effective Start/Effective End Date (Blanket Purchase Agreement only) Use the pop-up calendar to identify the start and end dates of the agreement.
-
Bill-To Address Address to which your RFQ/Auction bills should be sent. Click the flashlight icon to browser for other addresses. You can select any of the addresses address is defined in Oracle Purchasing.
-
Ship-To Address Address to which the RFQ/Auction items will be shipped. Click the flashlight icon to browse for other addresses. The possible values for your operating in Oracle Purchasing.
-
FOB The FOB terms for your supplier. The possible values and the default are defined in Oracle Purchasing.
-
Total Agreement Amount (Blanket Purchase Agreement only) The amount the buyer agrees to spend with the supplier over the course of the agreement.
-
Minimum Release Amount (Blanket Purchase Agreement only)
-
Payment Terms The payment terms for your suppliers. The possible values are defined in Oracle Payables. The default is set in Oracle Purchasing.
-
Carrier The freight carrier your supplier should use. The possible values for your operating unit are defined in Oracle Inventory. The default is set in Oracle Purchasing
-
Freight Terms The freight terms for your supplier. The possible values and the default are defined in Oracle Purchasing.
-
-
Currency Shows the default currency for the negotiation. This is the buyer's default currency. Click Manage Response Currencies to allow responses in more than one currency. See Accepting Negotiation Responses in Multiple Currencies for instructions on allowing additional currencies.
-
Price Precision The number of decimal places allowed for per-unit prices entered in the RFx/Auction currency. The precision you set doesn't apply to per-unit prices entered in a currency other than the RFx/Auction currency, nor does it apply to currency amounts such as Bid Total or the bid value of Fixed-Amount price elements. While you can set the precision for unit-prices entered in a non-RFx/Auction currency when you define your currency list, the precision for amounts is automatically governed by the standards defined by the ISO (International Organization for Standardization). The ISO standards are used automatically by Sourcing.
-
-
Requirements You can request information on suppliers at the negotiation level by defining negotiation Requirements. Requirements can be external, in which case responses are provided by the supplier. Examples of external requirement information might be a supplier's years in business, ownership, or personnel qualification. Requirements can also be used internally, in which case the response is provided by some kind of internal evaluator. Internal requirement responses might include level of customer service provided, or prior on-time history. Either way, responses to requirement requests can be evaluated and used by personnel when awarding the negotiation.
Responses to Requirements can be scored according to the desirability of the response. You can define the Requirement such that the system automatically scores the response (in which case you must specify the allowable values (or ranges of values) for that requirement and each one's score. Or evaluators can view the response and enter a score manually.
Additionally, if you have multiple Requirements for the negotiation, you can weight them to reflect the each requirement's importance relative to the other requirements.
See Defining Requirements for instructions on defining Requirements.
-
Additional Header Attributes (Buyer Only) Select the context in this region and record information as required. The details that you enter in this region are visible only to the buyers who can access the negotiation. You can provide additional information about the negotiation header for buyers, for example, internal negotiation details such as the name of the project, total budget sanctioned, and final approver.
Note: This region is hidden by default and must be enabled using Oracle Application Framework personalization.
-
Additional Header Attributes (Buyer & Supplier) Select the context in this region and record information as required. The information that you enter in this region is available to both buyers and suppliers. You can provide information for both buyers and suppliers, for example, additional supplier information such as the supplier address and contact number.
Note: This region is hidden by default and must be enabled using Oracle Application Framework personalization.
-
Abstracts and Forms
Abstracts and forms are used to publish information on upcoming sourcing events. This information is available publicly without the supplier needing to sign into the system.
-
Notes and Attachments
You can use notes and attachments to supply suppliers and internal users additional information on this negotiation.
Managing Responses in Multiple Currencies
When you create a new negotiation, the negotiation currency defaults to the ledger currency defined for your operating unit. However, you can accept responses in currencies other than the negotiation currency. Whenever you view the responses you have received, the system will automatically convert the responses to the negotiation currency.
Though suppliers in a multi-currency negotiation can submit responses in several currencies, they are allowed to respond in only one currency per response.
To define your currency list and currency exchange rates:
-
On the Create Header page, click Manage Response Currencies.
-
On the Header: Manage Response Currencies page, select the exchange rate type. The system may contain several different exchange rate types. Select the appropriate type for your negotiation. You can use predefined exchange rates (Corporate Exchange Rate) or specify your own exchange rates (User Specified Rate).
-
To use predefined exchange rates:
-
Enter the date for which you wish to use this set of exchange rates.
-
Select the response currency you will accept.
-
-
To define your own exchange rates
-
Select the User Specified Rate type. The page redisplays.
-
Select the response currency. The system's response currency codes are available from the drop down menu. The description field explains the code.
-
Define the exchange rate by entering the number of response currency units that equal one unit of the negotiation currency. For example, if the negotiation currency is United States dollars (USD) and the response currency you're defining is Swedish Kroner (SEK) the exchange rate might be .09 meaning .09 kroner to one dollar.
-
-
-
Specify the price precision for the currency. If the precision for the response currency is greater than the precision for the negotiation currency, the system will round when converting responses into the negotiation currency.
-
Select the checkbox to display the exchange rates if you want to allow respondents to see your response currency exchange rates.
-
If you are finished defining alternate currencies, click Apply. Otherwise click Add Another Row and continue defining currencies and exchange rates.
-
When you have finished defining currency information, continue creating your negotiation.
Restricting a Supplier to a Particular Currency
If you allow multiple response currencies for your negotiation, you can choose to restrict specific suppliers to particular response currencies. You assign currencies to specific suppliers when you invite the suppliers to your negotiation.
To restrict a supplier to a particular currency:
-
After you have selected your suppliers in Step 5, select a response currency for each supplier.
-
If you accept the default, Any, the supplier can respond in any currency you have allowed for this negotiation: the negotiation currency or any other response currency on your currency list.
-
If you select a specific response currency for a supplier, the supplier can only submit a response in either that currency or the negotiation currency.
-
If the response currency you select for a supplier is not on your currency list, that response currency is available to that supplier alone. No other suppliers may respond in that currency unless you also associate that response currency with them.
-
Multiple users in a supplier's organization can submit several initial bids, each in a different currency, to a multi-currency negotiation. However, if a user submits a rebid, the follow-up bid must be in the same currency as the initial response.
-
-
If you selected User Specified Rate in "Step 2: Defining Business Terms and Conditions," enter an exchange rate for the response currency you selected in the previous step.
-
Select a price precision for the response currency. The new price precision applies only to the suppliers to whom you assign it.
-
Continue creating your negotiation.
Using Lots and Groups
Buyers can define lots that contain a collection of lines, giving a hierarchical structure to the sourcing document. A lot may be an assembled product or lines may be organized into lots to obtain the most competitive bid. Suppliers are required to evaluate the entire lot and place a bid at the lot level for speed and convenience. Suppliers may optionally provide line-level bids as well.
Buyers analyze the bids and make award decisions at the lot level. When the buyer creates a purchasing document from the award, awarded lots are transferred to purchasing document lines.
Groups
Negotiation lines can also be organized into groups for ease of analysis and award. Groups are collections of related lines that allow buyers to model market baskets.
Suppliers bid on individual lines within the group, and pricing information is automatically rolled up to the group level for enhanced analysis. Buyers can analyze and make award decisions for the entire group, or they can choose to select the best supplier bids for individual lines within the group. Awarded lines are transferred to the purchasing document, if the buyer created one from the award.
Creating lots and groups
A lot is a complete negotiation line on its own. As such, it can have line attributes, price factors, and any other characteristics a negotiation line. A group is simply a named collection of negotiation lines. Groups have no attributes other than price (which is the sum of all its line private values). Lots and groups must have at least one subordinate line defined. You cannot imbed lots within groups or groups within lots. You can add independent lines into lots and groups (although you cannot move a line with a backing requisition into a lot), and you can move lot lines and group lines into other lots and/or groups. See Adding Lines to a Negotiation for details on defining lines, lots, and groups to a negotiation.
Processing lots and groups
Suppliers can respond to a lot at the lot level (required) and at the lot line level (optional). Suppliers cannot respond to groups, only group lines, and they must respond to each individually. See Submitting a Bid or Quote Online for details on how suppliers respond to lots and groups.
You award lots at the lot level (you cannot award individual lot lines). You can award groups at the group level or individually award group lines. See Awarding in different ways for information on how you can use lots and groups when making award decisions. See Awarding Business in an RFQ or Auction for details on awarding lots and groups.
Once your award decisions have been made, you can create purchase documents. When a purchase order is created:
-
The whole lot is created as a single purchase order line.
-
Each group line is created as an individual purchase order line.
Adding Lines to a Negotiation
When you create a new negotiation, or edit a draft negotiation, you must identify the goods or services you want to purchase or for which you want quotes. You can enter lines online or bulk load lines from a spreadsheet. The spreadsheet is useful if you are adding a large number of lines.
You can aggregate lines into lots and groups. This can simplify the response and award processes. See Using Lots and Groups for more information on using lots and groups.
-
From the navigation bar in the top left corner, click "Lines."
-
On the Create: Lines page, select how the line will be ranked and how the ranking will be displayed. Line ranking is not performed in RFIs.
-
If you wish to score and weight your lines, select Multi-Attribute Scoring as the Ranking type. Also specify the ranking display method and whether to display the scoring criteria to suppliers.
-
If this is a complex work negotiation, you can choose to allow suppliers to modify any pay items provided in the negotiation by selecting the "Suppliers can modify Pay Items" checkbox. .
-
The Sourcing Administrator has defined the default types of cost factors available to negotiations, but you can override this value if you wish to use different types of cost factors.
-
If the document outcome for your negotiation is a blanket or contract purchase order, and you wish to use price breaks, you can specify a default price break type for all negotiation lines by selecting a value from the Price Breaks menu (the initial default for this menu is defined by the Sourcing Administrator). You can override this value at the line level as necessary.
-
None - no price breaks will be used
-
Required - Suppliers must respond to your price breaks and cannot add or modify them.
-
Optional - Supplier do not have to respond to your price breaks. They can also modify the price breaks you specify, and/or add their own.
-
-
If the document outcome for your negotiation is a standard purchase order, and you wish you use price tiers, you can specify a default price tier for all negotiation lines by selecting a value from the Price Tiers list of values.
-
None - no price tiers will be used
-
Quantity Based – If you select Quantity Based, you can import price tiers from a spreadsheet.
-
Price Based – If you select Price Based, you can import price tiers from a spreadsheet.
To import a spreadsheet, select Import Price Tiers from the Actions list of values, and click Go. On the Price Tiers > Import Spreadsheet page that displays, click the Export button to download the price tiers list. Save this list to a location on your desktop and make your updates to it. Now, Browse and select the updated file and click Import to import the price tier list.
-
-
If this is a complex work project two additional sections appear.
-
Financing
-
Retainage
Select the payment attributes appropriate for this negotiation. You can allow the supplier to negotiate these financing and retainage attributes by clicking the "Negotiate" checkbox. See Negotiating Complex Services for details about payment attributes.
Note: If you are creating this negotiation from a sourcing template, you can default the values for the "Suppliers can modify Pay Items" and "Negotiate" flags.
-
-
Add your negotiation lines by selecting the appropriate method from the Actions menu. You can add individual lines, lots, lot lines, groups, and group lines. You can also search the Unified Catalog and your Favorites List and select items from them. You can import lines from a previously prepared spreadsheet file. Select the appropriate entry from the Actions menu and click Go. Click the Roll Up button on the Line Details page to automatically calculate total price for lots when sublines contains price and quantity details.
Note: You can override automatic calculation manually if you prefer.
-
Once you have your lines, lots and groups added, you can move them around if needed.
-
On the Lines: Create Line page, provide the following information. *Indicates a required field :
-
Line Type The available line types are defined in Oracle Purchasing. The line type determines whether this is a quantity-based line, such as 50 laser printers, or an amount-based item such as consulting services.
-
If Oracle Services Procurement is installed and licensed, you have additional line types such as rate-based temp labor.
-
If the line type is amount-based, the unit of measure and quantity default and are display only.
-
If this is a complex-work negotiation, only Goods-based and Fixed Price line types are available, and the line can not be used in a lot..
To change the line type, select the line type you want and click Go. The page refreshes and the fields available for the line reflect the line type you select. If a negotiation was created AutoCreated from Oracle Purchasing, the line type value is carried from the backing requisition and is display only.
-
-
Item, Rev The number and revision for this item. If this document was AutoCreated from Oracle Purchasing, these values are carried from the backing requisition line and are display only. If you are entering an item in Sourcing, you can enter item information directly or search for items from the Item Master by clicking the flashlight icon. On the Search and Select: Inventory Item page, enter search values for either the item number or item description and click Go (note that the search values are case sensitive). From the Results display, click the link for the item you wish to add to your negotiation. You are returned to the Lines: Create Line page with the item number and description values displayed. If there are revision values for the item you selected, you can select the appropriate value from the Rev pull down menu. The item category appears in the Category field and cannot be updated.
-
*Description A text description of the item. If the negotiation was created from a backing requisition, the description is carried from the backing requisition and is display only. If the item was selected from Inventory directly from Sourcing, the description from Inventory will default.
-
*Category The group within the Item Master to which the item belongs. The default category value is based on line type. Click the flashlight icon to search for a category. If the negotiation was created from a backing requisition, the category value is carried from the backing requisition line item and is display only. If you searched from Sourcing for an item from the Item Master, the category value defaults to the category for the item and cannot be updated.
-
Shopping Category (Purchase Agreement Outcomes only)If the negotiation outcome is a purchase agreement (Blanket Purchase Agreement, Global Blanket Purchase Agreement, or Contract Purchase Agreement), you can additionally select a Shopping Category value and search the Unified Catalog (iProcurement Catalog). The Unified Catalog is a subset of the Item Master and uses its own category values to further categorize items. Note: lines from the Unified Catalog can not be used in complex work negotiations.
Additionally, when a requisition is autocreated to an RFQ (negotiation), all descriptors are copied from the requisition to the negotiation. You can see the descriptors in the Attributes region that are displayed and differentiated from catalog descriptors (shopping category) or base descriptors.
-
Unit of Measure Unit of measure in which you plan to purchase your item. The system recognizes the UN standardized unit of measure codes. If you selected an amount based line type above, the default for this field is set by the Sourcing Super User. If the negotiation was AutoCreated from a backing requisition, the unit of measure value is carried from the backing requisition line item and is display only. If you selected the item from the Item Master directly in Sourcing, the UOM values available to you are only those appropriate to the item.
-
*Quantity (standard purchase order only) Number of units of the item you want to purchase. If you selected an amount-based line type above, this field is display only, defaults to 1, and cannot be scored in a Multi-Attribute Weighted Scoring RFQ/Auction. If the negotiation was created from multiple backing requisitions, this is the total of the backing requisition line item quantities.
-
Estimated Quantity (blanket purchase agreements only) The organization's best estimate of demand for the item over the life of the blanket agreement. Note that this field is required for blanket purchase agreements and can be hidden from suppliers. It cannot be scored.
-
Minimum Release amount (blanket purchase agreement only) The minimum monetary amount for a release against a blanket agreement. The amount of a release must be equal to or greater than the minimum.
-
*Ship-To Address (standard purchase order only) The default address is the address you selected in Step 2. Accept the default address or click the flashlight icon to browse for a different address. If this negotiation was created from backing requisitions, the ship-to address is display only.
-
Default Owner (complex work negotiations only)
You can assign a default owner for this line. The value is used to default the “Owner” field in the pay items associated with this line. When the negotiation is awarded and is being executed, you can route your pay item work confirmation to the owner of the pay item for acceptance.
-
Currency and Price Precision This is the default ledger currency for your operating unit and the price precision you selected when you created your negotiation header. You cannot change these values .
-
Start Price The price at which responding for one unit of an item must begin. A start price is not required, but if the buyer specifies one, all responses must be equal to or below the Start Price. If the negotiation was created from backing requisitions, the start price defaults to the lowest requisition price of all requisitions for that item. However, if the line type is amount-based, the start price defaults to the requisition quantity.
-
Target Price Price you hope to pay for one unit of your item. Select "Display to Suppliers" if you want the participants to see your target price.
-
Current Price Price you are currently paying for the item. The current price is used to calculate negotiation performance used for savings calculations in the application.
Note: Suppliers are never able to view the current price.
-
Need-By From/Need-By To (standard purchase order only) Select the dates necessary to specify when you need to receive the item. If you supply values for both fields, you specify a time window (inclusive of the end date). If you leave both fields blank, there is no time constraint on receiving the item. A value in Need-By From with no value in Need-By To indicates the date on or after which you need to receive the item. A value in Need-By To with no value in Need-By From indicates the date on or before which you need to receive the item. You can use the pop-up calendar to pick your dates. If the negotiation was created from a single backing requisition, the Need-By From and the Need-By To fields are set to the requisition need-by date. If the negotiation was created from multiple backing requisitions, the Need-By From field defaults to the earliest requisition line's need-by date. The Need-By To field defaults to the latest requisitions need-by date.
If you source for an item (as opposed to sourcing for a category), Need-By date(s) are required.
-
If this is a complex work negotiation, you can enter additional relevant information:
-
Financing/Retainage
Enter the values for financing and retainage attributes. Organizations can also decide to default these values from the sourcing template applied on the sourcing document. See Negotiating Complex Services for an explanation of Financing options and Retainage.
-
Default Project Information - If you have enabled Oracle Projects for the organization and there are no backing requisitions for this line, you can enter the project information associated with this negotiation. The Award field is displayed if you have enabled Oracle Grants. The project information provided for the line is used to default the project information for the Pay Items associated with this line.
-
Pay ItemsTo associate a pay item with this line:
-
Click Add Another Row.
-
Enter a number in the Pay Item column.
-
Select the type of pay item from the Type menu. There are three values for Type: Milestone, Rate and Lumpsum. You can restrict the usage of certain types by setting up the Document Style appropriately in Oracle Purchasing. Note that the Outcome field in the Sourcing Header shows the Document Styles created in Oracle Purchasing.
-
Enter a description of the pay item.
-
If you selected a pay item type of Rate, select the unit of measure from the Unit menu and enter a number in the Quantity column.
-
Optionally enter a target price and a need-by date.
If you need to modify any pay item information, or if you wish to associate specific project information or provide a note or attachment to a specific pay item, click the Update icon and enter the information on the Update Pay Item page.
-
-
-
Attributes Attributes are used to describe the good or service being purchased. They identify characteristics which will negotiated on in addition to item price. To add attributes, click Add Another Row or Add Attribute List. In a Multi-Attribute Weighted Scoring negotiation, you can assign weights and scores to attributes.
Note that depending on how your system is set up, if the outcome of this negotiation is a purchase agreement (Blanket Purchase Agreement, Global Blanket Purchase Agreement, or Contract Purchase Agreement) item descriptors assigned to an item in the Item Master or the Unified Catalog may be automatically added as Attributes for that item. These attributes are assigned to the default Attribute Group, but you can modify that if necessary. If the system is set up to not automatically add descriptors as Attributes, you can add them yourself by clicking Add Catalog Attributes. On the Search and Select: Add Catalog Descriptors, click Go to see all the descriptors defined for that item, or enter a search value to see only those descriptors whose name or description begin with those characters.
-
Price Breaks (blanket or contract purchase agreements only)
Enter price break information to negotiate a pricing structure with your supplier based on quantity, ship-to location, and effective-date values.
See Using Price Tiers for information on defining price breaks.
-
Cost Factors Cost factors allow you to capture additional item costs such as freight or special charges.
See Using Cost Factors for information on using cost factors.
Select the Negative Cost Factor check box to indicate that the cost factor is a negative cost factor. Note that you must ensure that the total of the line price is not negative.
-
Note and Attachments Optional information you can provide to users of your document. See Using Notes and Attachments for details on using notes and attachments.
-
-
When you have finished entering your line information, click Apply. You return to the Create: Lines page and the line you just entered appears in the Lines table. To enter another auction item online, click Go. Follow the preceding instructions. Note that if your negotiation is a large or very large negotiation, you only see the line(s) you just created in the Lines table (if you used spreadsheet upload, or added lines from the Catalog or your Favorites, you could have created multiple lines). To display more lines, you must use the Search facility.
To add a line from the Unified Catalog:
-
On the Create: Lines page, select the Create Line from Catalog option from the Actions menu and click Go.
-
On the Stores page, select a store type and enter a search item in the Search fields, and click Go.
-
When the Search Results page display, select one or more items for which you wish to create negotiation line(s).
-
Click Add to Document.
-
On the right side of the page, you see information about the negotiation you are creating and the items you are adding. View the information and if it is correct, click Complete.
-
You are returned to the Create: Lines. If the item you selected from the Unified Catalog has an item number associated with it, you must define a Need-By date. Click the pencil icon for the line to update the line information.
-
On the Lines: Create Line page, use the pop-up calendars to enter Need-By dates. If you have a single Need-By date, you can enter it in either the Need-By From or the Need-By To field. If you have a range of dates, enter the beginning of the range in the Need-By From and the ending date in the Need-By To field. The earliest Need-By date must be later than the close date of the negotiation.
-
After you have specified your Need-By value(s), click Apply.
Note that if there is a supplier associated with the item, that supplier is automatically added to the invitation list for this negotiation, and you must specify a supplier contact. See Inviting Suppliers to Participate in a Negotiation for details on how to specify supplier contacts.
To add a line from your Favorites List(s):
-
On the Create: Lines page, select the Create Line from Favorites option from the Actions menu and click Go.
-
On the Shopping List page, select a Favorites List type and click Go.
-
When the page displays the items for that Favorites List, select one or more items for which you wish to create negotiation line(s).
-
Click Add to Document.
-
On the right side of the page, you see information about the negotiation you are creating and the items you are adding. View the information and if it is correct, click Complete.
-
You are returned to the Create: Lines. If the item you selected from the Unified Catalog has an item number associated with it, you must define a Need-By date. Click the pencil icon for the line to update the line information.
-
On the Lines: Create Line page, use the pop-up calendars to enter Need-By dates. If you have a single Need-By date, you can enter it in either the Need-By From or the Need-By To field. If you have a range of dates, enter the beginning of the range in the Need-By From and the ending date in the Need-By To field. The earliest Need-By date must be later than the close date of the negotiation.
-
After you have specified your Need-By value(s), click Apply.
Note that if there is a supplier associated with the item, that supplier is automatically added to the invitation list for this negotiation, and you must specify a supplier contact. See Inviting Suppliers to Participate in a Negotiation for details on how to specify supplier contacts.
To add Alternate Lines to the negotiation:
You can add alternate lines to the negotiation if the checkbox Allow Alternate Lines is enabled in the Line Summary page and Line Details pages. This checkbox is enabled only if the checkbox Allow Alternate Lines on Supplier Responses on the Controls page is enabled.
-
On the Create: Lines page, use the instructions on creating independent lines to create your lot.
-
After clicking Apply, you are returned to the Create: Lines page.
-
Lot lines are indicated by the market basket icon in the Line column. Click the plus sign icon in the Add Line column to add your first lot line.
-
On the Create: Lines page, follow the instructions on creating independent lines, adding lines from the Catalog, or adding lines from your Favorites list to create you lot line.
-
Repeat the preceding two steps to create your remaining lot lines.
-
On the Lines: Create Group , page enter a name for the group.
-
Click Apply.
-
Group lines are indicated by the summary page icon (the Greek letter sigma) in the Line column. On the Create: Lines page, click the plus sign icon in the Add Line column to add your first group line.
-
On the Create: Lines page, use the instructions on creating independent lines, adding lines from the Catalog, or adding lines from your Favorites list to create your group line.
-
Repeat the previous two steps to create the remaining group lines.
Moving lines within a negotiation:
After you have created your lines, lots and groups you can change their locations if necessary. The order of negotiation rules is important if you use staggered closing staggered closing for your negotiation lines.
When moving lines, note the following rules:
-
If you move a lot or group, you move its sublines as well.
-
You can move a lot line into a group or a group line into a lot.
-
You can remove a line from a lot or group to make it an independent line, but you cannot then turn that line into a lot or group (to create a new lot or group, you must click Create Lot/Create Group and follow the instructions above).
-
If you use the Within option to move a line into a lot or group, it is appended to the end of the lot or group.
-
You cannot move a group into a lot or a lot into a group
-
If a line has a backing requisition, it cannot be added to a lot (it can be added to a group).
To move lines:
-
On the Create: Lines page, select the line, lot or group you wish to move and click Move.
-
On the Lines: Move Lines page, the entries you selected previously appear as greyed out radio buttons. select a destination line, and select either After Selection, Within Selection, or Before Selection, and click Apply (you can only use Within Selection if you select a lot or group as the destination. Within Selection does not appear as an option if you chose to move a lot or group).
-
The Create: Lines page redisplays showing the lines moved.
-
Once your lines are correctly located, continue defining your negotiation.
Note that you cannot move lines within a large or very large negotiation .
To bulk load lines or pay items from a spreadsheet:
-
Select Import Lines to add lines to a negotiation. Click Import Pay Items to add pay items for a complex work negotiation. Pay items for all lines created so far are uploaded.
-
On the Lines: Import Spreadsheet page, click Export.
-
Save the .zip file to a convenient location on your machine.
-
Open the Instructions file (the .htm file) and follow the directions to complete the template.
-
When you have completed the template, return to the Lines: Import Spreadsheet page, navigate to the location of your completed spreadsheet file, and click Import.
-
If there are errors with the upload, error messages are displayed describing the errors. For each error, the message will indicate the spreadsheet line, the column, and a description of the error. Access the spreadsheet, correct the errors and try uploading again.
If the upload is successful, the lines that you have uploaded are listed on the Create: Lines page.
-
When the upload has completed, the lines that you have uploaded are listed on the Add Lines page.
-
You can edit or delete existing lines by selecting a line and clicking the appropriate button.
-
You can still enter additional lines online.
-
If you created the negotiation using a spreadsheet, any spreadsheet item category values take precedence over item category values defined for the negotiation template.
-
If you used a negotiation template, any item attributes defined to the template are added to any item attributes defined in the spreadsheet. If the same item attribute is defined in both places, the spreadsheet value takes precedence.
-
You can use a spreadsheet to upload item attributes and price factors.
-
See Defining Service-Related Lines for information on defining service-related line types.
Instead of specifying a single date/time at which the entire negotiation is closed for responding, you can choose to have the closing time staggered across negotiation lines. When using the feature, the closing time for the second line of the negotiation is later than the closing time for the first line (you specify the time of the initial close and the close elapse interval by setting response controls). Staggered closing affects independent lines, lots and groups, that is, the lines within a lot or group are closed at the same time.
When you use staggered closing, the order in which the lines appear in your negotiation is important. If you choose to use this feature, you should plan the order in which you will define your negotiation's lines/lots/groups, although you can move lines after they are defined.
If AutoExtend is in effect and is triggered for a line, the close time for succeeding lines is adjusted accordingly.
See Understanding Response Controls for directions on setting response controls.
Defining Service-Related Lines
Services related line types allow you to negotiate on labor contracts and general services. The outcome document of the negotiation determined the type of services for which you can negotiate.
| Outcome | Fixed-Price Services | Fixed-Price Temp Labor |
| Standard Purchase Order | X | |
| Blanket Purchase Agreement | X | |
| Global Blanket Purchase Agreement | X | X |
| Contract Purchase Agreement | X | X |
You can include services-related lines with regular amount-based and goods-based lines.
To define a temporary labor, rate-based line:
-
From the Add Line menu on the Create Lines page, select Online to continuing entering your line description online, or click Load from Spreadsheet to upload a previously completed spreadsheet file containing all the line information
-
On the Lines: Create Line page, make sure you select a temporary labor, rate-based line type, and click Go.
-
Search and select a job from the Job menu. The Description, Job Details, Unit of Measure and Category will default according to the Job you select.
-
Enter values in your price fields if necessary.
-
Create attributes as needed to solicit additional information for this line.
-
Specify how price differentials are to be used within the negotiation (for example, is a response to the price differential required)
-
Select the price type (for example, vacation), and specify the differential associated with this price type.
-
If you need to specify price breaks, click Select Price Break Settings and ensure it is not set to None.
-
Enter your price breaks including Price Differentials, if appropriate.
-
Finally, add notes or attachments to the supplier.
-
Continue defining the remainder of the negotiation.
To define a temporary labor, fixed-price line:
-
Follow steps 1 and 2 above.
-
On the Lines: Create Line page, make sure you select a temporary labor, fixed-rate line type, and then click Go.
-
Search and select a Job from the Job menu. The Description, Job Details, and Category will default according to the Job you select.
-
Create attributes as needed to solicit any additional information for this line.
-
Finally, add any notes or attachments to the supplier.
-
Continue defining the remainder of the negotiation.
To define a general services fixed-price line
-
Follow steps 1 and 2 above.
-
On the Lines: Create Line page, make sure you select a general services, fixed-price line type, and then click Go.
-
Provide the line with a description and select a Category value.
-
Create attributes as needed to solicit additional information for this line.
-
Finally, add notes or attachments to the supplier.
-
Continue defining your negotiation ,
Understanding Response Controls
When you create a new RFI, RFQ, or Buyer's Auction, you set response controls to determine the negotiation length, participants, responding frequency, open and closing times and many other variables.
After you have entered the negotiation header, and added line(s), click the "Controls" link to access the Create Controls page for that negotiation. Complete the following fields as appropriate for the negotiation type. You must have created your negotiation header before you can create negotiation controls. Note that for fields where you enter a date and time, the default time value the system uses is the time when you entered a value in the field. You can edit the value to change the time if needed.
-
Preview Date Use the pop-up calendar to specify a date/time after which the negotiation information can be accessed by potential suppliers. They can view the negotiation's details but cannot place responses.
-
*Open Date Use the pop-up calendar to select the date/time after which all eligible suppliers are allowed to participate in the negotiation or choose to open the negotiation immediately.
Note: You can use the Manage Schedule page to modify the open date or close date of a negotiation that opens at a future date and is in a Submitted or Preview status. See Managing Schedules of a Negotiation.
-
*Close Date Use the pop-up calendar to select the date/time when the negotiation will be closed. Once closed, no further responses may be accepted. If you allow the control manual close/close early, the negotiation can be closed prior to the defined close date. If you allow the control manual extend, the time limit for the negotiation can be extended past the original close date. When you extend a negotiation you specify the new close date. The Close Date cannot be later than the Need-By Date.
Note: If you wish to use staggered closing for your negotiation line, click the Staggered Closing checkbox and specify the Close Date and the time interval to elapse between line closing.
-
Award Date Use the pop-up calendar to select the date/ time when you anticipate announcing the winner of the negotiation. This is displayed to the respondents.
-
Restrict to invited suppliers You can allow all suppliers to respond to the negotiation or you can specify that participation is by invitation only.
Note:If you specify that participation is by invitation only, you must invite at least one supplier to participate.
-
Allow supplier to see other suppliers' contract terms, notes and attachments You can specify that suppliers in the negotiation will be allowed to see any notes and attachments included with other suppliers' quotes or bids, or you can restrict suppliers from seeing other suppliers' notes and attachments .
-
Allow supplier to select lines on which to respond You can allow participants to respond to individual lines(s) in the negotiation, or specify that they must respond to all lines in the negotiation .
-
Require full quantity You can specify that participants must submit responses for the full quantity specified in the line. Alternatively, participants can submit responses for partial quantities. If you have weighted and scored the quantity attribute, you must set this to No .
-
Allow multiple responses You can specify that respondents must submit a single, best response in the negotiation, or may submit multiple responses during the negotiation open period. When this checkbox is selected, the system enables suppliers to submit multiple responses, of which only one can be active.
When you select this checkbox, another checkbox displays: Allow suppliers to submit Multiple Active Responses. Select this checkbox also, if you would like to provide suppliers the ability to quote or bid multiple times for the negotiation (or revise their response), and each offer is an active offer.
The checkbox Allow suppliers to submit Multiple Active Responses is enabled and displayed only if the checkbox Allow Multiple Responses is selected.
-
Allow multiple rounds of negotiation You can specify that the negotiation can continue into additional rounds after the close date, or you can specify that the negotiation will not be allowed to continue into additional rounds past the close date .
-
Allow Quote Withdrawal You can allow suppliers to withdraw their quotes (for RFIs and RFQs only) after they have submitted them. Allow Quote Withdrawal does not disqualify an offer, that is a different case: The supplier voluntarily withdraws their offer, either because they no longer wish to compete for an award. Offers can be withdrawn only as long as the negotiation is open. Withdrawn offers can be revised to match the solicitation requirements and can be updated by the supplier user. The revised offer contains all the elements (price, quantity, etc) of the original withdrawn offer because these data elements are defaulted from the system. withdrawn offer will not be visible to buyers during the quote evaluation / awarding process.
-
Require award approval You can choose to require the award decision to be approved before a purchase order can be generated. The approval chain can use both the Employee/Supervisor or the Position Hierarchy structure defined in Oracle Approvals Management.
-
Enforce supplier's previous round price as start price for this round You can specify that suppliers cannot bid any higher than their bid/quote in the previous round. Note that this bid control is only available for second or subsequent rounds in a multiple round negotiation.
-
Suppliers are required to lower the line price when submitting a revised response If you have allowed suppliers to submit multiple bids, you can specify that they must submit rebids that are reduced by a specific minimum amount or minimum percentage. That is, rebids must decrease by this minimum amount. You can enter either a straight amount or a percentage by which bids must improve. Use numbers, for example, "10." You can choose to have the new minimum response amount be calculated based on the current best response, or the supplier's previous response (if the previous response is also the current best response).
Note:A bid decrement amount will always be applied to a supplier's current bid price. If you specify your bid decrement amount as a percentage, the decrement percentage will be calculated based on a supplier's original bid price, but will be applied to the supplier's current bid price. For example :
Auction #1234; bid decrement = $100
-
Bidder A's original bid = $1000
-
Bidder B's original bid = $950 (becomes current best bid)
-
Bidder A' rebid = $850 ( $950 - $100)
Auction #2234; bid decrement = 20%
-
Bidder A's original bid = $1000
-
Bidder B's original bid = $950 (becomes best bid)
-
Bidder A's rebid = $750 ( $950 - ($1000 * .20))
-
-
Allow manual close before the Close Date You can choose to allow the negotiation to be closed before the close date. Otherwise, the negotiation cannot be closed until the close date and time specified above .
-
Allow Alternate lines on Supplier Responses The checkbox Allow Alternate lines on Supplier Responses enables suppliers to enter Alternate lines only if the checkbox is selected. If this checkbox is Allow Alternate lines on Supplier Responses not selected, the Allow Alternate Lines column in the Negotiation line summary page and in the line details page is not be displayed. If, in the first round of the negotiation, the buyer enables Allow Alternate lines on Supplier Responses on the Controls page then Allow Alternate Lines is displayed on line level; however, in the second round of the negotiation, if the buyer does not select Allow Alternate lines on Supplier Responses in the Controls page, then the checkbox Allow Alternate Lines on line level is not displayed on the Lines Summary and Line Details pages.
This checkbox enables alternate lines to be cascaded to new rounds or amendments of the negotiation as well.
-
Allow manual extend when the negotiation is open You can choose to allow a negotiation to be extended. When a negotiation is extended, you enter a new close date and time.
-
Allow AutoExtend You can have your auction automatically extended if a new winning bid is received during the final minutes of your auction. For example, if you enable an AutoExtend of 30 minutes, with AutoExtend set to start at the current scheduled auction close time, and a new winning bid is received in the final 30 minutes of the auction (the AutoExtend period), your auction will be automatically extended for 30 minutes past the currently scheduled close time.
Note:If you selected the option "Allow manual extend when the negotiation is open," you can revise your AutoExtend settings while the auction is in progress..
-
Lowest Triggering Response Rank
You can choose to have AutoExtend triggered for any number of the top ranked bids. For example, you could choose to have AutoExtend triggered whenever you receive a better bid for not only the current winning bid, but also for the current second or third best bids as well. If you know you will award this line to multiple suppliers, the feature allows you to encourage competition on not just the top bid, but competing bids as well. Enable this feature by specifying the lowest ranking bid for which the receipt of a bid can trigger AutoExtend. If this field is left blank, any bid will trigger AutoExtend.
-
Lines to AutoExtend You can extend bidding for all auction lines, or only for those lines that receive winning bids during the AutoExtend window. The AutoExtend period is determined by the length of each AutoExtension (see below).
-
Start Time of Extensions You can start AutoExtensions at the scheduled close time of the auction or at the time that a triggering bid is received during the AutoExtend period prior to the close time. For example, if you enable an AutoExtend of 30 minutes and a triggeting bid is received in the final 30 minutes of the auction, your auction will automatically extend for 30 minutes past the scheduled close time of the auction if you select "Close Date." However, if you select "Receipt time of the triggering response," your extension will begin as soon as a triggering bid is received within the AutoExtend period.
-
AutoExtend Period (minutes) You must specify the duration (in minutes) of each AutoExtend period. This setting also determines the end-of-auction period during which the receipt of a triggering bid triggers an AutoExtension .For example, if you specify that each AutoExtension is 20 minutes :
-
Each AutoExtension will last for 20 minutes after the start time you specify, and
-
The period from 20 minutes prior to the scheduled close of the auction to the scheduled close of the auction is the AutoExtend period during which the receipt of a competing bid will trigger AutoExtend .
-
-
Number of Extensions Enter the maximum number of extensions allowed before a line is finally closed for bidding. If this field is left blank, there is no limit to the number of extensions.
-
Allow Staggered Awards By default, this check box is clear. If you select this check box, the application will enable staggered awards for the negotiation. When you create an amendment, or copy this negotiation, the application copies this control to the new negotiation. This check box is available only for RFQs and Auctions.
Note: You can choose the Partially Awarded status and only when all lines are awarded, the status will change to Completed, Purchase Order Created. You can choose the Finally Complete Award action to close the negotiation for further awarding at any time after the negotiation is partially awarded. The Award by Line /Award by Quote options enable you to award only unawarded lines.
Approving an Award Recommendation
It may be the case that one or more approvers must review and sign off on your award recommendation before you can generate its associated purchasing document. This ensures that, once created, the purchasing document will not need to be changed in the future. You can require the approval of the award recommendation by clicking the "Require award approval" response control on theControlspage while creating your negotiation.
Once you have saved your award decisions, a notification is sent to the first approver in the approval chain requesting that the approver view the decision, which the approver can accept or reject. If the approver rejects the decision, a notification is sent to the negotiation creator. If the approver allows the decision, a notification is sent to the next approver in the approval chain. The approval cycle continues until all the required approvers have viewed and approved the decision. Once the decision has been approved, a notification is sent to the creator who can then begin generating the purchasing document. The approval chain is defined in Oracle Approvals Management and can use both the Employee/Supervisor and the Position Hierarchy structures.
Conducting Research on a Particular Supplier
You can use Oracle Sourcing's advanced supplier search facilities to search for suppliers based on a single or a complex combination of search values. Using Sourcing's Supplier Research capabilities, you can search supplier information contained in supplier profiles, the Approved Supplier List, or the history of recent sourcing transactions.
Using Supplier Research
You can use the Supplier Research feature to identify suppliers to add to a negotiation or a reusable invitation list you are creating. You can search for a particular supplier by name or use other search criteria to identify a single supplier or a group of suppliers. As you identify appropriate suppliers, you can add them to an invitation list and then apply the list to the negotiation you are creating. You can also save the list to apply to future negotiations.
You can also conduct in-depth research on recent sourcing transactions that you have conducted with a particular supplier. You can search the supplier's profile, see the supplier's recent transaction history, and view Approved Supplier List or contact information for that supplier.
Identifying Suppliers
There are several methods you can use when searching for a supplier or group or suppliers. You can use a single search value or a combination of multiple search criteria to tailor your search as broadly or narrowly as needed. You can also combine the multiple search types discussed below:
-
You can search for a specific supplier by supplier name (including the use of wild cards).
-
You can search supplier profiles, the Approved Supplier List, and/or recent negotiations history by an item category or a commodity value (A commodity is a group of item categories).
-
If you search supplier profiles, you see all suppliers whose Products and Services section of their supplier profile indicates that they can provide the item category or commodity.
-
If you search the Approved Supplier List, you see all supplier who are approved to supply the item or item category.
-
If you search the Negotiation History, you see all supplier from whom you have recently sourced for the item category or commodity.
When using category or commodity searches in the Approved Supplier List, you get a match on any supplier associated with an item defined to that category, or an item defined to a category that is defined to that commodity.
Note: The time period for which transation information is kept can be defined by the System Administrator.
-
-
You can perform complex, detailed searches on Approved Supplier List or Business Classification information.
-
Approved Supplier List searches are performed within a particular inventory organization. You can search by item name or description. You can search for suppliers with a particular ASL status. You can also search for suppliers who are distributors of a particular manufacturer.
-
You can search Business Classifications to find suppliers with a particular legal or ownership status.
-
To search by supplier name:
-
On the Supplier Research page, enter the name (or initial part of the name) for the supplier in the Supplier Name field and click Search.
-
To add a supplier or group to a negotiation's invitation list, select the supplier(s) from the search results display and click Add to Invitation List.
-
To view supplier information, click the supplier name link.
To search a supplier's profile, the Approved Supplier List, or transaction history using a category or commodity:
-
Select either Commodity or Category.
-
Enter a commodity or category value, or use the flashlight icon to search for and select a value.
-
Select any combination of Supplier Profile, Approved Supplier List, and/or Negotiation History.
-
Click Search.
To search the Approved Supplier List or Business Classifications information:
If the ASL and Business Classifications search fields are not already displayed, click "Show ASL and Business Classifications Criteria."
-
To search the Approved Supplier List:
-
Select an inventory organization from the drop down menu.
-
Enter a search value for one of the ASL search fields, or use the flashlight icon to search for and select a value.
Note: Searching by Item Description displays approved suppliers of any items whose item description includes the text you enter. searching by Manufacturer displays any suppliers who are defined as distributors for that item. Use ASL Status to search for suppliers with a particular status, for example, Approved.
-
Click Search.
-
-
To search by Business Classification
-
From the drop down menus, select all appropriate search values.
-
Click Search.
-
Viewing Supplier Information
Once you have identified a supplier in which you are interested, you can view in-depth information on that supplier by clicking its name link.
-
Transactions History - The Transactions History entries display summary information on recent sourcing and purchasing transactions you have completed with this supplier. The length of time transactions a retained is set by the Sourcing System Administrator.
-
Approved Supplier List - The Approved Supplier List table shows all items or item categories this supplier is approved to provide. It also shows whether the supplier is a direct supplier or distributor of the item.
-
Invitation List - Displays all invitation lists that include this supplier.
-
Templates - Displays all templates that include this supplier.
-
Products and Services - Displays the products and services this supplier indicates it can provide.
-
Business Classifications - Displays all classifications and certifications applicable to the supplier.
-
Registered Users - Displays the users at that supplier who are registered with Oracle Sourcing.
Inviting Suppliers to Participate in a Negotiation
Participation in RFQs
If you do not override the default, participation in RFQs is by invitation only and you must invite at least one supplier.
However, you can choose to open your RFQ to all suppliers. If you do, you do not have to explicitly invite any suppliers.
Participation in Auctions
Unless you specified differently on the negotiation Controls page, auctions are open to all bidders by default. Bidders will see your auction when they search using the Active Auctions page. Even though the auction is already open to them, you can choose to also send certain bidders notifications of a particular auction to encourage their participation. You can select the bidders you wish to notify from a list of suppliers, or if you frequently invite a certain group of bidders, you can apply a predefined invitation list that identifies these bidders.
You can restrict your auction to bidders you specifically invite by selecting the appropriate control on the negotiation Controls page.
Inviting suppliers
After entering your negotiations header, line(s), and any response controls, you can create a participants list on the Create Negotiation: Suppliers page:
-
Select how you wish to search for suppliers:
-
Click the Add Supplier to search for and add suppliers to your invitation list. You can add approved suppliers and/or prospective suppliers (suppliers whose registration requests have not yet been approved).
-
Click Add Invitation List to apply a predefined list of suppliers. Search for and select the Invitation List you want to apply. You can use the same list for different negotiations.
-
-
From the search results, select the suppliers you wish to invite and click Add to Invited Suppliers. You can continue to search and add additional suppliers.
You can click the Register New Suppliers button to create a registration request on behalf of a new supplier (if you have the authorizations, you can both register and approve the supplier). The prospective supplier is added to the invited suppliers list.
Once you have searched all your suppliers, click Apply to return to the Invited Suppliers page.
-
When clicking on the Supplier Name column, users can sort the suppliers by name.
Use the Delete and Delete All buttons to delete suppliers. When users click on Delete after selecting one or more suppliers, the suppliers get deleted from the invitation list. Users need to select at least one supplier for the delete operation to work, otherwise a warning message displays. Delete All ensures that all the suppliers get deleted from the invitation list. A confirmation window displays, asking if you want to proceed. If you click Yes, all suppliers will be deleted.
-
The system ensures that there are no duplicate combination of suppliers and contacts in the invitation list when a reusable supplier list is added to the Suppliers tab (using Add Supplier List) and there are existing suppliers in the invitation list. The following situations are addressed:
-
If a contact and supplier without a site are on the invitation list already, and the reusable list consists of the same contact name and supplier name, the supplier name (regardless of the site) will not be added again (multiple times) to the invitation list from the reusable list. However, you can add the same supplier with different contacts. Ensure that each supplier contact has a unique email address.
-
If the invitation list consists of a supplier with one or more site names, the system will not add the supplier name without any site or with the same site from the reusable list. However, the supplier with a different site may be added to the invitation list.
-
-
Once you have added all your suppliers, click Apply, you return to the Create Negotiation: Suppliers page.
-
If there are multiple supplier sites (Supplier Site is another term for Address Name), select the specific site you wish to invite to the negotiation. Users at different sites for the same supplier can each submit a response.
If there are multiple contacts for each site, select which contact you wish to notify about this negotiation from the contact list. Select the Primary Contact check box to identify a specific contact as the primary contact. You can add multiple contacts for a particular supplier or supplier site. Additionally, if you know the e-mail addresses of any other contacts at the company (including possibly a distribution list), you can enter it in the Additional Contact Email field (approved suppliers only).
If the contact is specified in the Additional Contact Email unregistered, a notification is sent to invite the contact to register and participate in the negotiation. The supplier user receives an email notification with the negotiation invitation and a link to access the user registration page. Once the registration request has been approved, the user can participate in negotiations.
Note that if you added a line from the Unified Catalog or one of your Favorites Lists, there may be a supplier associated with that item. If so, that supplier has been added to your invitation list and you must select a contact.
The system sends notifications to the invited suppliers providing them details of the negotiation.
Registering Suppliers
If you know the necessary information about a supplier, you can register that supplier directly through Sourcing. The supplier then shows up as a prospective supplier and can be added to an invitation list using the directions above. A registration request is generated for the invited supplier user. Once the registration is approved, that supplier user can respond to the negotiation. If you have the necessary authorizations, you can both register and approve the supplier. The supplier user shows up with the address added as an RFQ-only site for the supplier.
Note:You can also invite and register additional suppliers while the negotiation is in progress. Your invitees will receive email notifications inviting them to participate once the negotiation is successfully submitted.
Restricting Suppliers to Particular Negotiation Lines
You can restrict which negotiation lines a supplier can access and respond to. You can restrict access at the line, lot, or group level.
To restrict a supplier's access to a particular negotiation line:
-
Follow the instructions in Inviting Suppliers to Participate in a Negotiation to search for the suppliers you wish to invite and to add them to the negotiation invitation list
-
On the Create Negotiation: Suppliers page, select the supplier site/contact and click Control Access.
-
On the Suppliers: Control Access page, you see all the lines, lots and groups defined to the negotiation. There is also a column for each supplier/supplier site you selected on the previous page. By default, all suppliers/supplier sites have access to all lines, lots, and groups for the negotiation.
-
Deselect the lines, lots, or groups to which you wish to deny a particular supplier/supplier site access.
-
Click Apply. You return to the Create Negotiation: Suppliers page.
-
Continue defining your negotiation
Submitting a Negotiation for Approval
If any members of the collaboration team are designated approvers, you must obtain their approval on your negotiation document before you can publish it. All approvers must approve the document. Once you submit your document for approval, the approvers are sent notifications requiring their interaction. An approver can approve the negotiation document or reject it, in which case you receive a notification of the rejection. The rejection notification may include a request for more information or additional information explaining the reason for the rejection.
To submit a negotiation for approval:
-
Create your negotiation. On the Create Negotiation: Header page ensure that all necessary approvers are included on the Collaboration Team and marked as Approvers.
-
Continue creating your negotiation.
-
On the Create Negotiation: Review page, click Submit for Approval.
-
Optionally enter a note to the approvers. Otherwise click Submit.
During the approval process, you can view a table displaying the events that have occurred concerning your approval submission. These include your initial submission and any approvals or rejections your document has received.
To view the approval status of a negotiation document:
-
Access the document (the document will be in Draft status)
-
On the Manage Draft Negotiations page, select the negotiation and click Review and Update.
-
Note that a draft or approved negotiation can be edited by the buyer anytime during this stage.
-
On the Create Negotiation: Review page, select View Approval History from the Actions menu and click Go.
-
Once all approvers have approved the document, the Publish button becomes available on the Create Negotiation: Review page. Click Publish to open the negotiation for preview or responding.
Reviewing and Publishing a Negotiation
Once you have defined your negotiation, you have the opportunity to review all information prior to submitting it for approval or publishing it.
The Create Negotiation: Review page provides you access to all the information you defined to your negotiation. You can review and modify this information if necessary. You can view and modify
-
Header information
-
Line information
-
Negotiation controls
-
Contract-related information (if defined)
-
Supplier information
To view a particular set of information, click the tab for that section. To update information in a section, click Update.
You can print a hardcopy version of the entire negotiation (buyer version) or a supplier version, which does not contain internal details (for example, a target line price if not displayed to suppliers). You can also print a supplier-specific version that contains only details appropriate for that supplier. To print a copy of the negotiation, select the appropriate version from the Actions menu. You can save a .pdf copy or print the .pdf file directly.
Once you have reviewed your document and ensured that it complete and correct, you can submit it.
-
If your document must be approved, click "Submit for Approval"
-
In your document does not require approval, click "Publish."
Large and Very Large Negotiation
If your negotiation is very large, a concurrent program is started to publish the information. While the negotiation is being published, you cannot edit it.
You can view the progress of the publishing program from the
Manage Draft Negotiations page. If errors occurred, a link from the Status column displays a page containing information on the errors that happened. After correcting the errors, you can resubmit the document.
If the publication process completes after the open date/time, the negotiation is opened and the time is not adjusted. If the publication process completes after the close date/time, the negotiation is never opened at all.
Using templates, spreadsheets, and lists
Using Sourcing Document Templates
Creating Negotiation Templates
Creating and Editing a Reusable Invitation List
Using an Item Category in a Negotiation
Using Attributes or Price Factors in a Negotiation
Using Sourcing Document Templates
You can use a document template of a specific type (RFI, RFQ, or auction) to create a new document of the same type. See Creating Negotiation Templates for instructions on creating negotiation templates.
To use a sourcing document template:
-
Click the appropriate link under the Create area of Quick Links on the Negotiations Home page.
-
On the Create: Header page, click Apply Template.
-
Search for and select the template you want to apply. On the results display, select the template and click Apply to create a new negotiation with this template.
-
You can add to, edit, or delete any of the negotiation information provided by the template by proceeding through the steps of creating a negotiation.
Creating Negotiation Templates
If the majority of the negotiations you create contain the same features - attributes, terms and conditions, participation controls, etc. - you may want to create an negotiation template that you can use each time you create a new negotiation. Using a template saves time by streamlining the creation process. Your negotiation template contains the features that are similar among the negotiations you commonly create. When you create a new negotiation using a template, you simply apply the template to the negotiation, add to and edit details of the negotiation (as necessary), and publish your negotiation.
You can create and apply a template for a draft negotiation, or a negotiation created from a Blanket Purchase Agreement in Oracle Purchasing. The Apply Template button is not available when a template has already been applied, or when you create an amendment or start a new round of negotiations.
Note that, in general, current negotiation data is retained when a template is applied. Examples of retained data are requirements, currencies, item attributes, cost factors, and suppliers.
However, the negotiation style of the template is applied to the negotiation that replaces the existing current negotiation style. The negotiation style of the template also replaces the negotiation style of an RFQ, RFI, or Auction that is created in the Demand Workbench (Document Builder).
You can create as many templates as necessary. Since RFIs, RFQs, and buyer's auctions are different documents, each type has its own template or templates. You can create both "private" templates (templates that only you can view, edit, and use) and "public" templates (templates that all registered users in your company can view and use).
Creating a new negotiation template
-
Click the appropriate create link under the Templates area of Quick Links on the Negotiations Home page.
-
On the Templates page, click "Create New Template."
-
On the Step 1: Describe Your Template page, complete the following fields (required fields are marked with an *asterisk):
-
*Template Name
-
Description
-
Note: In order to create "public" offer templates, you must be assigned the appropriate authorization by your system administrator.
*Access. A template can be designated as either "public" (all Buyers in your company can view and use the template) or "private" (only you can view, edit, and use the template).
Your template status will default to Active. Active templates can be used immediately to create new negotiations. If you want to change your template's status to Inactive, you must complete and submit your template, then edit your template and select a new status from the drop-down menu at the Status field. Inactive templates will be stored in the system, but cannot be used to create a new offer until you change the status to Active.
-
-
Complete the remaining pages by filling out the fields as appropriate for the negotiation type. Once you have defined your template, click Submit on the Review and Submit page.
Creating and Editing a Reusable Invitation List
If you typically invite the same core group of suppliers to many of your negotiations, you can add these participants to a reusable invitation list. An invitation list can help standardize your business practices by ensuring that all appropriate participants are invited to targeted negotiations. You can add an invitation list(s) when creating a new Sourcing document; you can also attach an invitation list(s) to a Sourcing document template.
To create a new invitation list:
-
Click "Invitation" under the Reusable Lists area of Quick Lists on the Negotiations Home page.
-
On the Reusable Invitation Lists page, click "Create New Invitation List."
-
On the Create Invitation List page, complete the following fields (*indicates a required field):
-
*ListName
-
*Description
-
*Access Invitation lists can be public or private. Your new list will default to private. All users in your company with the correct authorizations can view and use public lists; only you can use your private lists. Sourcing Super Users or users with the Manage Invitation Lists authorization can create, edit and manage public invitation lists as well as their own private lists. Only you can create, edit, and use your private lists. The same list can be used for all types of sourcing document types (RFI, RFQ, auction).
-
Status Invitation lists are initially created as active. An active list can be used immediately. To inactivate a list, edit the list and change the status to inactive. An inactive list will be stored on the system, but will not be available for use until reactivated. Sourcing Super Users or users with the Manage Invitation Lists job function can create, edit, and manage public invitation lists, including change the access and status.
-
-
Click "Add Suppliers," then search for suppliers to add to your invitation list.
-
Select the supplier(s) and click Add to Invitation List.
-
If the supplier you selected has multiple sites defined in the system, you can choose a specific supplier site to associate with this list (Supplier Site is another term for Address Name).
-
If you wish to add more suppliers to your list, click "Add Suppliers" again and follow the perceiving instructions. For a supplier with multiple sites, you can add an entry for each site for that supplier if you choose .
-
When you have finished adding suppliers, click Submit.
To edit an invitation list you have created:
-
Click "Invitation" under the Reusable Lists area of Quick Lists on the Negotiations Home page.
-
Search for the list you wish to update.
-
On the search results page, find your list, then click Edit. If you are have the Manage Invitation Lists job function, you can edit public lists.
-
On the Edit Invitation List page, update your list description, status, and access as appropriate. You can also add or delete suppliers.
-
When you are finished, click Apply.
Using an Item Category in a Negotiation
A buyer can apply a predefined template to the RFQ or auction in creation Step 1 and then use the item creation by spreadsheet capability to upload details on multiple items in Step 3. If the template and spreadsheet have conflicting category values, the system uses the following hierarchy to determine which category value to use:
-
The value specified in the spreadsheet, or
-
The value defined for the RFQ/Auction template.
Using Attributes or Price Factors in a Negotiation
When you create an RFQ or auction by applying a template and then use the spreadsheet upload feature to add your items, any attributes/cost factors defined for the template are added to any attributes/cost factors you define via the spreadsheet.
For example, if there are three attributes/cost factors for your template, and your spreadsheet upload includes two items, item A with four attributes/cost factors, and item B with two attributes/cost factors, the result of applying the template and then uploading by spreadsheet is that item A now has seven attributes/cost factors and item B has five attributes/cost factors.
If there are duplicate attribute/cost factors between the template and the spreadsheet, the precedence is:
-
the attribute/cost factor specified on the spreadsheet
-
the attribute/cost factor specified by the template.
Using line attributes, attribute scoring, cost factors, and price breaks
Adding Line Attributes to Negotiation Lines
Adding Line Attributes to Auction or RFQ Lines
Basing Award Decisions on Line Attributes
Defining Weighted Attributes and Scores for Negotiation Lines
Understanding Transformational Bidding and Quoting
Associating Cost Factors and Cost Factor Lists with Negotiation Lines
Applying a Buyer Cost Factor to a Supplier
Using Requirements
You can request that participants in your negotiation provide high-level information beyond simply information provided for each negotiation line. This high-level information often solicits details about the supplier company itself. Note that participants could be both external, such as the suppliers themselves, or internal, such as approvers. Such high-level pieces of information are referred to as Requirements for the negotiation. Examples of Requirements might be
-
The number of years the supplier has been in business.
-
The supplier's business structure (public or private).
-
The supplier's business status (minority or woman owned).
-
Any appropriate certifications or licenses.
Using Requirements allows you to obtain important information on aspects of a supplier such as past performance, personnel qualification, and financial visibility. Knowing such information provides you with a better understanding of the supplier and allows you to make a more informed award decision.
Evaluating Requirements Responses When defining the Requirements for your negotiation, you can choose to have the system assign a score based on the participants' responses or choose to allow the response to be manually scored by members of an evaluation team (a Scoring Team). When using automatic system scoring, for each attribute you must also define the allowable values (or value ranges) and specify what score should be assigned to each.
See Scoring Responses to a Negotiation's Requirements for an explanation on entering score values and how a Requirement's score is calculated .
See Creating a Negotiation Header for instructions on creating header attributes .
See Using Team Scoring for details on setting up and using scoring teams.
Defining Requirements
You define Requirements to solicit high-level information about the suppliers who have responded to your negotiation. This information can come from the suppliers themselves or internal evaluators. You typically define Requirements in the form of questions.
Defining Requirements
You create collections of Requirements called Sections. You can later assign different Sections to evaluators for analysis and scoring. You are provided with a default container called Requirements. As you create your sections, you add them to the Requirements container.
To begin defining your Requirements:
-
In the Requirements area of the Create Negotiation page, select the entry for the default section called Requirements.
-
To add a new section, click Add Section.
-
On the Header: Add Section page, accept the default, Add Section, from the Add drop down menu to add a new section. Select Predefined Section to add an existing section that has been predefined by a Sourcing Administrator.
-
Enter a name for your new section.
-
If this is a two-part RFQ, select either Technical or Commercial from the RFQ Stage drop down menu to indicate the type of section. Two-part RFQs must contain both a Technical and a Commercial section. Once you have defined your section and identified it as either technical or commercial, you cannot change its designation without creating an amendment.
-
If you wish to create the section and continue on adding the Requirement for that section, click Apply and Add Requirement and continue with the next step. If you wish to create all your sections fist and then add then return and add the Requirements later, click Apply and Add Section and return to step 3 (you must specify the location of the new section, either before or after the previously created section).
-
On the Header: Add Requirement page, enter your Requirement question in the text box provided
-
Once you have defined your Requirement text, set the Properties for this Requirement as necessary:
-
Requirement Type Requirement Type describes how the Requirement is used within the negotiation. Values can be:
-
Display Only The Requirement is displayed to the supplier, but the supplier cannot enter a response to it. If the Requirement type is display-only, Display Target is set to Yes and Maximum Score is automatically set to zero. Display only Requirements merely notify suppliers of additional aspects in which buyers are interested.
-
Internal Internal Requirements can only be seen by buyers. If an internal Requirement is weighted, the total weight value seen by the supplier will not add up to 100. For example, if an Requirement is internal and has a weight of 10, the supplier sees no information on the internal Requirement and sees the sum of all weighted requirements as 90. If unweighted, new internal Requirements can be added while the negotiation is in progress. If weighted, new internal Requirements can be added if they are given a weight of zero or if their weight amount is subtracted from another internal Requirement. Internal requirements have Display Target set to No.
-
Internal Required Selecting this will make it mandatory for the internal scoring and evaluation teams to respond to this.
-
Optional Suppliers do not have to respond to this Requirement.
-
Required Suppliers must respond to this Requirement.
-
-
Value Type Select the type of characters suppliers can enter for this Requirement when responding: Text (letters/words, digits), Number (digits with decimals allowed), Date (numbers in date format), or URL (using the format http://www.oracle.com). The value type also governs the characters you can enter in the RFQ/Auction Value field.
Note: Text is the most flexible value type. If you select Text, suppliers can enter letters as well as digits. If you select Number, participants can only enter digits; if you select Date, suppliers can only enter digits in date format.
-
Target Enter a target value for the Requirement (for example: 30 or more years in business) .
-
Display to Supplier Indicate whether you want suppliers to see your Target value.
-
Scoring Method Select the method by which you wish to score responses to this Requirement, if you choose to have those responses scored.
-
None - Responses can not be scored.
-
Automatic - The system will assign a score based on scoring information you define. If you choose Automatic, you must define the allowable values (or value ranges) and the score for each.
-
Manual - evaluators will enter scores for a particular response by hand when scoring a participant's response.
Note that the scoring method chosen applies only to a particular Requirement. You can have a combination of both automatically and manually scored Requirements within the same negotiation.
If you choose to enable scoring for this Requirement, you can also set the following fields:
-
Maximum Score (Manual scoring method only)
You can set a maximum score allowable for this Requirement. The Sourcing Administrator may have set a default value for this property, but you can override it if necessary. When automatic scoring is enabled, the maximum score is derived from the list of possible values.
-
Knockout Score
You can specify a value that sets a threshold that applies to supplier responses. If the score for a supplier's response does not meet this threshold, that response is removed from the shortlist and therefore not available for analysis or award.
-
Weight (Automatic and Manual scoring methods only)
If you choose to use weighting, enter the weight of this Requirement. The value you assign should reflect the importance of this Requirement relative to all other Requirements for this negotiation. The higher the value, the more important this Requirement among the other Requirements. The total of all Requirement weights must be 100.
-
-
-
You can define which response values (or range of values) are acceptable for this Requirement. You can define the acceptable values yourself, or you can associate the Requirement with a predefined set of values. If you define acceptable response values, those values are displayed to the responder, who must provide an approved value.
Note that if you chose the Manual scoring method, these fields do not appear. Also note that if you chose the Automatic scoring method, you must define both the acceptable values and their scores.
To define acceptable values yourself:
-
Click the Add 5 Rows button under Acceptable Values.
-
Enter values for the following fields:
-
Response Value
Enter an acceptable value for this Requirement. You may enter as many separate values as is necessary to identify all possible acceptable responses. The values you enter should reflect the Value Type (text, URL, Date) you specified for this Requirement. This is a mandatory field.
-
Value From/Value To (number and date type Requirements only)
If your Requirement has a value type of number, you can enter specific numbers or you can define ranges of numbers. If you wish to define a single value, enter the number in both the From and the To fields. Otherwise, to define a range, enter the beginning value in the From field and the ending value in the To field.
-
To associate a set of values:
-
Click Apply Value Set.
-
On the Apply Value Set page, enter the name or description of a value set (you can enter partial values).
-
Click Go.
-
Using Team Scoring
In many organizations, one or more teams of people evaluate large and/or complex negotiations. These teams are mad up of individuals who may or may not be familiar with the specific negotiation (and are therefore unbiased in their evaluation of participants' responses), or they may have a particular area of knowledge or expertise that makes them suitable to evaluate the responses.
Accordingly, these teams may be assigned specific aspects of any responses to a negotiation's Requirements to evaluate. Teams can then provide a score reflecting their evaluation of the responses. Multiple teams can provide scores to different aspects of the same negotiation.
The creator of the negotiation can define negotiation Requirements. These typically take the form of questions to which participants respond, and usually solicit high-level information about a company. The person responding to the question can be external or internal to the buying company. External questions are answered by the suppliers themselves and usually request company information such the number of years in business or applicable certifications. Internal questions are answered by someone within the company and typically deal with aspects of a supplier's relationship with the buying company such as past performance or level of customer support. Requirements dealing with a particular aspect of the negotiation are grouped together into Requirement sections.
At any time prior to awarding the negotiation, a negotiation editor (the creator or any Collaboration Team member with Full access) can define a scoring team.. Members of the scoring team must be assigned to the Collaboration Team for that negotiation to be eligible for a scoring team. The same person can be on multiple scoring teams. Members of the team(s) can be added and removed until the scoring process is locked.
Once the scoring team has been defined, it can be assigned a section or Requirements to evaluate. When the negotiation has been closed, the team members access the negotiation and evaluate the responses to the Requirements for the section assigned to their team. While the scoring process is open, team members can see only the score values they themselves have entered. Once the scoring process is locked, team members can see their own and other members' score values.
Once a particular team has completed its evaluation and provided its score, that score is included with other Requirement scores to determine the negotiation winner. See Scoring Responses to a Negotiation's Requirements for information on how to score Requirements and how scores are calculated and used by the system.
Defining Scoring Teams
Scoring teams are groups of individuals who collectively evaluate a particular aspect of a negotiation based on their area of knowledge or expertise. Once the scoring teams have evaluated responses to a negotiation's Requirements, they provide a score value. Individual members' scores are used to determine a team score. This score is combined with scores from any other scoring teams and used along with the price to determine the winner of that negotiation line.
All scoring team members must be defined to the Collaboration Team for that negotiation. Scoring teams can be included as part of a negotiation template.
See Working with Collaboration Teams for details on Collaboration Teams.
To define a scoring team:
-
On the Create: negotiation page, define the member to the Collaboration Team. Give them either Full or Score access.
-
In the Requirements area of the page, click Select Scoring Settings.
-
Click Enable Team Scoring, if it is not already selected.
-
Click Add Another Row.
-
Give the team a name. You can optionally enter instructions to the team members.
-
If you deselect the Price Visibility checkbox, members of the team will not be able to view the pricing information offered by the supplier on the line. (The Price Visibility option can be changed any time before the award is completed.)
-
Click the pencil icon to add members to the team.
-
On the Scoring Team page, click Add Another Row.
-
Open the Name menu. The menu lists all members of the Collaboration Team who have either Full or Score access.
-
Select the member to add to the team.
-
Continue adding members to your scoring team until all appropriate members have been added. Note that the same member can appear on more than one team.
-
Click Apply.
To assign a scoring team to a Requirements section:
-
When you are returned to the Select Scoring Settings page, the Section column in the Section Assignment area lists all Requirement sections defined for the negotiation. Click the Team Assignment menu.
-
Select the appropriate scoring team and associate it with its Requirements section.
-
Click Apply.
Adding Line Attributes to Negotiation Lines
When you add a line to a new negotiation (RFI, RFQ, auction), you may choose to add one or more line attributes to that line. Line attributes define 1) unique specifications that you set for a negotiation line, and 2) the details that a participant should provide when responding to that negotiation line. Line attributes make your negotiation line more descriptive and can also be used to ensure that all responses submitted for the line include specific details not included elsewhere in the line information.
For example, a buyer can create an auction to buy a fleet of 12 vehicles for a delivery service. When the buyer adds the line (vehicle) to the auction, the buyer can add an attribute called "mileage" to specify that the bid item must have fewer than 12,000 miles on the odometer. While the buyer could enter this information in the auction line description, using an attribute to define this specification calls attention to the specification. In addition, if the buyer marks this attribute as required, then bidders must enter the mileage of any bid.
Line attributes can call attention to industry-specific characteristics. For example, retail industry negotiation items can include such attributes as "color," "style," and "SKUnumber." Metal industry negotiation items can include "grade of metal" as an attribute. Adding these as required item attributes that are displayed to bidders can customize your negotiation items to your specific industry.
If line attributes exist in the base lines, the attributes are copied to the alternate lines. The user can delete additional or unwanted attributes in the alternate lines.
For more information about how to add line attributes to your negotiation items, see Adding Line Attributes to Auction or RFQ Lines
Adding Line Attributes to Auction or RFQ Lines
You can add multiple line attributes to any line in your negotiation. The attribute(s) are added to that line only, and do not apply to all lines in the negotiation.
You can add line attributes when you add lines to your negotiation online, or when you upload your negotiation lines from a spreadsheet created offline. You can also add line attributes from a predefined attribute list or template.
If line attributes exist in the base lines, the attributes are copied to the alternate lines. The user can delete additional or unwanted attributes in the alternate lines.
To add line attributes online:
-
Create a new negotiation. After you enter your negotiation line information, click Add Another Row under the Add Attributes section of the Lines: Create/Update Line page.
-
When the page redisplays, enter your line attribute information. *Indicates a required field:
-
*Attribute (up to 240 characters) Name your line attribute (for example: Mileage; PPM Defect Rate; Grade).
-
Group Select an attribute group from the menu . Groups are used for categorizing attributes.
-
Attribute Type Your attribute can be required (all suppliers must enter a value for this attribute when responding), optional (suppliers are not required to enter a value for this attribute when responding), or display only (displayed without allowing any response).
-
Value Type Select the type of characters suppliers can enter for this attribute when responding: Text (letters/words, digits), Number (digits with decimals allowed), Date (numbers in date format), or URL (using the format http://www.oracle.com). The value type also governs the characters you can enter in the RFQ/Auction Value field.
Note: Text is the most flexible value type. If you select Text, suppliers can enter letters as well as digits. If you select Numbers, participants can only enter digits; if you select Dates, suppliers can only enter digits in date format.
-
Target Value (up to 4000 characters) Enter a target value for the line attribute (for example: Fewer than twelve thousand miles per vehicle; Fewer than eight defects per million parts manufactured).
-
Display Target Indicate whether you want participants to see your target value .
-
Weight (Multi-Attribute Scored negotiations only) Enter a number that reflects the importance of this attribute relative to other scored attributes for this line. For example, a scored attribute with a weight of 50 is twice as important as an attribute with a weight of 25. The sum of all weights cannot be more than 100. Weights and scores are used by the system when calculating response ranking .
-
Score (Multi-Attribute Scored negotiations only) Click the pencil icon to access the Update Line: Enter Scoring Criteria page. Use this page to enter the possible values you will accept for this attribute. You can use discrete values or value ranges .
-
-
Click Add Another Row to add additional attributes to this line. Click Apply when you are finished.
-
Continue through the steps of creating your negotiation.
Note that depending on how your system is set up, if the outcome of the negotiation is a purchase agreement (Blanket Purchase Agreement, Global Blanket Purchase Agreement, or Contract Purchase Agreement), descriptors (base descriptors, catalog descriptors or both) for the line may be automatically added as Attributes. If they are not added, you can search for and add them manually. These attributes can be weighted and scored just like other attributes. Any attributes you do not wish to negotiate on can be deleted from the line.
To add line attributes using a spreadsheet
To add line attributes using a spreadsheet, you must download and complete the spreadsheet prior to the bulk load .
Add your line attribute information into the Attribute, Group, Quote/Bid Response, Attribute Value Type, RFQ/Auction Value, and RFQ/Auction Value Displayed columns of your spreadsheet (see Step 2 above for more information on each of these columns). When you enter an line attribute on your spreadsheet, all line attribute fields except RFQ/Auction Value and RFQ/Auction Display are required.
If you want to add another line attribute(s), copy the following set of columns on the spreadsheet: Attribute, Group, Quote/Bid Response, Attribute Value Type, RFQ/Auction Value, and RFQ/Auction Value Displayed. Paste the set of six columns to the right of the existing set of line attribute columns (be sure to paste the set of columns into the spreadsheet before the End of line delimiter column) .
-
Create a new negotiation. When you are ready to upload lines to your negotiation, on the Create: Lines page, select Load from Spreadsheet from the Add Line menu and click Go .
-
On the Import Lines page, use the Browse button to navigate to the location of your spreadsheet file.
-
Click Import .
Note that depending on how your system is set, if you associate a line with a shopping category, any attributes for that category may be automatically added.
Toadd line attributes from a predefined attribute list:
-
Create a new negotiation. After you enter your negotiation line information, click Add Attribute List .
-
Search for the attribute list you want to apply. Click the Add icon .
-
When you have finished adding line attributes from the attribute list, you can enter additional line attributes online, apply another predefined attribute list, or continue through the steps of creating your negotiation .
To add line attributes from a template:
-
On the Create: Header page, click Apply Template .
-
On the Search and Select: Template page, enter search criteria and click Go .
-
Select the template and click Apply. Any attributes defined to the template are added to the new document .
Basing Award Decisions on Line Attributes
Generally you award business to the supplier who responds with the best price. But sometimes other negotiation attributes may be more important. For example, the date by which a supplier can supply a negotiation line may be more important than simply the price being offered. Or the best response may be from the supplier who can supply the largest amount of the line quantity you need even though the price is not as good as that offered by a different supplier.
When creating your RFQ or auction, you can select from two different types of response ranking: Price Only or Multi-Attribute Weighted Scoring. Multi-Attribute Weighted Scoring allows you to enter scores and weights to line attributes, Quantity and/or Need-By Date. Based on how a supplier responds, the system calculates a total score for the response. Responses are then ranked based on a ratio of price to total score. The lower the ratio, the more desirable the response. Note that you can still award the negotiation to any response or multiple responses regardless of the rank determined by the system.
The rank indicator is displayed to the buyer and suppliers and is selected by the buyer.
Planning weights and scores:
-
Identify the important attributes of your negotiation.
-
You can only score attributes which are defined as Required. For each attribute you wish to score, identify all the possible responses you will accept and group them into acceptable Quote/Bid responses. You can enter as many acceptable values as you need to indicate the importance of the different responses adequately. For number and date attributes, you may enter acceptable ranges. For text attributes you enter text values. These values are displayed to the trading partner in a list of values.
-
Assign each acceptable Quote/Bid response a score, with 100 indicating the most desirable and 0 indicating the least desirable response. Different Quote/Bid responses can have the same score. Scores cannot have decimals.
-
After scoring each acceptable Quote/Bid response value, rank the relative importance of the attributes by assigning each attribute a weight. Unlike scores, the sum of the attribute weights cannot total more than 100. Weights will be used as a percentage when the system calculates a response's value as explained below. See "Defining Weighted Attributes and Scores for Negotiation Lines" for actual details on defining scores and weights.
How weights and scores are used to calculate a response's rank
Once you have identified the important attributes of your negotiation and assigned them weights and scores, the system uses them to determine the total score for the responses to your negotiation. Since all weighted attributes are required attributes, each respondent must specify a value for that attribute. The system calculates the value of a response as follows:
-
For each response to a weighted attribute, the system determines the score based on the attribute value scores you defined. For date and number attributes, the system determines which accepted range the value falls in. If the response does not fall in an acceptable range, the response receives a score of 0 for the attribute.
-
The score determined is then multiplied by the weight assigned to the attribute.
-
The adjusted scores are added to determine the total score for the response. The total score is then divided by 100 to convert it to a percentage. The price is then divided by the total score to determine the price to total score ratio. The response with the lowest ratio is considered the more desirable response.
Example:
Assume a buyer has defined a negotiation and selected the following attributes to be weighted:
| Attribute | Weight |
| Quantity | 50 |
| Need-by Date | 30 |
| Color (user defined attribute) | 20 |
For each of these attributes, the buyer has also defined and scored all acceptable values:
| Attribute | Acceptable Values | Score |
| Quantity | <1000 | 60 |
| Quantity | > 1001 | 100 |
| Color | Red | 100 |
| Color | Blue | 75 |
Given these definitions, the price to total score ratios for the following two possible responses are calculated as shown, and Response 2 would be designated as the best response even though the bid price for Response 2 is higher.
Response 1:
| Attribute | Response Value |
| Quantity | 980 |
| Color | Blue |
| Price | $250 |
Total Score: (60 * 50) + (75 * 20) / 100 = 45
Price to Total Score Ratio: 250 / 45=5.56
Response 2:
| Attribute | Response Value |
| Quantity | 1200 |
| Color | Red |
| Price | $300 |
Total Score: : (100 * 50) + (100 * 20)/100 = 70
Price to Total Score Ratio = 300 / 70 =4.29
Defining Weighted Attributes and Scores for Negotiation Lines
Generally the winner of a negotiation is the supplier who offers the lowest price. However you may want to consider supplier responses to other line attributes in addition to price being offered when determining the best response. You can accomplish the by specifying weighting and scoring values for your line attributes. The system can then include the suppliers' responses to your line attributes when calculating the best response. See Adding Line Attributes to Negotiation Lines for information about defining line attributes. See Basing Award Decisions on Line Attributes for an explanation of how weights and scores are used to determine the best response.
To use weighting and scoring when defining a negotiation:
-
See Creating a Negotiation Header. After you have defined the negotiation header, click "Lines" in the navigation bar in the top left hand corner.
-
On the Create: Lines page, Make sure you select Multi-Attribute Scoring from the Ranking menu. Select a ranking method if the Sourcing Super User has set the system up to allow you to change ranking methods, and you do not wish to use the default. Select Online from the menu and click Go.
-
On the Lines: Create Line page, use the instructions in Adding Lines to a Negotiation to enter the line data and other required and optional line information.
-
To enter a line attribute, navigate to the Attributes table and click Add Another Row .
-
When the page refreshes, enter your line attribute information. *Indicates a required field:
-
*Attribute (up to 240 characters) Name your line attribute (for example: Mileage; PPM Defect Rate; Grade).
-
Group Select one of the predefined attribute groups . Groups are used for categorizing attributes .
-
Attribute Type How the supplier should respond to the attribute. Responses can be required or optional. Or the attribute can be for display only. To weight an attribute, it must have an attribute type of Required.
-
Value Type Select the type of characters suppliers can enter for this attribute when responding: Text (letters or words, digits), Number (digits only, decimals allowed), or Date (numbers in date format). The value type also governs the characters you can enter in the Target Value field.
-
Target Value (up to 4000 characters) Optionally enter a target value for the item (for example: Fewer than twelve thousand miles per vehicle; Fewer than eight defects per million parts manufactured). The target value represents the best or most desirable response from the supplier.
-
Display Target Indicate whether you want suppliers to see your target value.
-
Weight The relative importance of this attribute among the line's other wieghted attributes. Assign values one to 100. The sum of all the line's weights cannot be more than 100. Weights are used by the system when calculating the best response.
-
Score Clicking the Score icon accesses the scoring criteria page. You use this page to specify scores for the attribute values you anticipate receiving.
-
-
Click Score.
-
On the Create Line: Enter Scoring Criteria page, specify the acceptable values for this attribute and the score each value receives, with 100 indicating the most desirable value and 0 the least. Note that two values can have the same score. For example, assuming an attribute of color. The possible values might be red, blue, and green, and the score values might be 100 for both red and blue, but only 50 for green. Note that there is a limit of 30 characters for the values.
-
For text value types, enter and score every acceptable value. Respondents can select these values from a List of Values.
-
For number value types, assign a score to a single number or a range of numbers.
-
To specify a single number, enter that number in both the From and To fields.
-
To specify a delimited range, enter the beginning number in the From field and the ending number in the To field. Range values are inclusive.
-
To specify an open-ended range, enter the limiting number in either the From or To field. For example, to include all numbers less than 1000, enter nothing ( or 0) in the From field and 1000 in the To field. To include all numbers greater than 5000, enter 5000 in the From field and nothing in the To field.
-
Do not overlap values. Any numbers you don't score are assumed to have a score of 0.
-
-
For date value types, enter a valid date. Date values obey the same rules as number values. You can score a specific date, a delimited range of dates, or an open-ended range of dates.
-
-
If you need to add and score more values than fit on the page, click Add 5 Rows. When you have entered all your scores for this attribute, click Apply . You are returned to the Create Line page .
-
Repeat the preceding steps to define and score any additional attributes.
-
If the quantity is important to your auction, click Score to the left of the Quantity field. Use the instructions above on scoring number value types to specify scores for any quantity levels you may receive. By default, the full negotiation quantity is scored as 100. When you have scored your quantity levels, click Apply.
Note: Make sure to allow partial Quote/Bid values when you define your Negotiation Controls in the subsequent step otherwise you will receive an error message .
-
If a Need-by Date is important, enter a date or date range. To score the dates received in a response, click Score and use the instructions above on scoring date value types to score the date values you expect to receive. After scoring Need-by Date, click Apply.
-
After you have finished scoring your item attributes, you are returned to the Create Line page. Enter weighting values in the Weight field for every attribute you scored (the Weight field will be unavailable for any attributes defined as Optional or Display Only). Specify how much weight each attribute should be given when evaluating supplier responses. If you choose to add or modify scoring information for a line, you can click Score to access the scoring criteria page again.You do not have to weight every required attribute, but you must weight any attribute you have scored.
-
Enter a number from 1 to 100 to indicate the relative weight of each attribute .
-
The sum of all weights cannot be more than 100. Click Recalculate to see the currect total of your weight values for this line attribute .
-
Each number should indicate the relative importance of that attribute within the other weighted attributes.
-
To set the weights for all attributes equally, click Equalize Weights. If there are an odd number of attributes, the system will assign weights as equally as possible .
-
Understanding Transformational Bidding and Quoting
Transformation Bidding allows buyers to define cost factors to represent tangible and intangible costs in addition to the price of the goods or services, and incorporate these costs into the bidding, analysis, and award processes. For example a new and untried supplier (or a new manufacturing or shipping location at an incumbent supplier) exposes your buying organization to a higher risk of supply disruption simply because the buying organization has no experience of buying from the new supplier or from the new location. Conversely, buying from a tried and tested supplier or location reduces exposure to such risk. In either case, the buyer must account for these costs in the bidding process, and Transformation Bidding allows the buyer to do that
With Transformation Bidding, price factors can be defined as either Buyer and/or Supplier price factors, and the pricing basis of each factor can be set to either Per Unit, % of Line Price or Fixed Amount. During bidding and quoting, the quantified effect of all tangible and intangible costs factors is incorporated in each supplier's bid to compute a transformed Total Bid Price for each supplier, and the bid with the lowest transformed Total Bid Price receives the highest rank
Visibility of Transformed Responses
When defining the negotiation, the buyer has the option of exposing the transformed bid/quote prices to the suppliers. If a buyer chooses this option, then when a supplier enters a response in the Create Bid/Quote page, the transformed value of the response is shown on Review Bid/Quote page. The buyer always sees both the original response and the transformed response, and the ranking is calculated based on the buyer's view of the transformed response.
If the buyer chooses not to expose the transformed bid prices to the suppliers, a supplier sees no adjustment to the bid price, but the ranks that the supplier sees (assuming that ranks are displayed to the supplier) are still based on the buyer's view (the transformed view) of the Total Bid/Quote Price. Moreover, if this is an open negotiation (not blind or sealed), then a transformed view of the bid/quote price is displayed between suppliers such that factors assigned to one supplier are reflected in the bids/quotes/ of the other supplier and are not reflected in the viewing supplier's own bid/quote
Transformation Examples
Example 1.
Assume: Buyer applies a $5 price factor against Supplier B to reflect the risk associated with dealing with Supplier B. This example assumes suppliers do see their responses transformed and that multiple bids per round from the same supplier are allowed.
| Action | Supplier A then Sees | Supplier B then Sees | Buyer then Sees | Explanation |
| Supplier A bids $50 | My Bid: $50 Supplier B's Bid: No Bid Best Bid: $50 My Bid Rank #1 |
My Bid: No Bid Supplier A's Bid: $50 Best Bid: $50 My Bid Rank: n/a |
Supplier A's Line Price:$50 Supplier A's Bid Price: $50 Supplier B's Line Price: No Bid Supplier B's Bid Price: No Bid |
Supplier A is the only participating responder at this time. |
| Supplier B bids $49 | My Bid: $50 Supplier B's Bid: $54 Best Bid: $50 My Bid Rank #1 |
My Bid: $49 My transformed bid: $54 Supplier A's Bid: $50 Best Bid $50 My Bid Rank: #2 |
Supplier A's Line Price: $50 Supplier A's Bid Price: $50 Supplier B's Line Price: $49 Supplier B's Bid Price: $54 |
Due to the presence of the $5 price factor against him, Supplier B cannot hope to be the winning bid simply by placing a bid that is lower than Supplier A's bid. To beat Supplier A's bid, Supplier B's bid must be lower than Supplier A's bid by at least $5. |
| Supplier B bids $44 | My Bid: $50 Supplier B's Bid: $49 Best Bid: $49 My Bid Rank #2 |
My Bid: $44 My transformed bid: $49 Supplier A's Bid: $50 Best Bid: $49 My Bid Rank: #1 |
Supplier A's Line Price: $50 Supplier A's Bid Price: $50 Supplier B's Line Price:$44 Supplier B's Bid Price: $49 |
Supplier B rebids becoming the winning bid |
Example 2.
Assume Buyer applies a $5 price factor against Supplier B to reflect the risk associated with dealing with Supplier B This example assumes suppliers do not see their responses transformed.
| Action | Supplier A then Sees | Supplier B then Sees | Buyer then Sees | Explanation |
| Supplier A bids $50 | My Bid: $50 Supplier B's Bid: No Bid Best Bid: $50 My Bid Rank #1 |
My Bid: No Bid Supplier A's Bid: $50 Best Bid: $50 My Bid Rank: n/a |
Supplier A's Line Price:$50 Supplier A's Bid Price: $50 Supplier B's Line Price: No Bid Supplier B's Bid Price: No Bid |
Supplier A is the only participating responder at this time. |
| Supplier B bids $49 | My Bid: $50 Supplier B's Bid: $54 Best Bid: $50 My Bid Rank #1 |
My Bid: $49 Supplier A's transformed bid: $45 Best Bid $45 My Bid Rank: #2 |
Supplier A's Line Price: $50 Supplier A's Bid Price: $50 Supplier B's Line Price: $49 Supplier B's Bid Price: $54 |
Supplier B has entered a lower response than Supplier A's initial bid. But due to the $5 penalty assigned to Supplier B, his transformed view of Supplier A's bid is calculated as $50-$5=$45. Since Supplier A's bid appears as $45 to Supplier B, to remain competitive, Supplier B must place a bid that is lower than Supplier A's transformed bid. This automatically forces Supplier B to enter a bid that is not only lower than Supplier A's original bid, but also includes the $5 price factor that applies to him. |
| Supplier B bids $44 | My Bid: $50 Supplier B's Bid: $49 Best Bid: $49 My Bid Rank #2 |
My Bid: $44 Supplier A's transformed bid: $45 Best Bid $44 My Bid Rank: #1 |
Supplier A's Line Price: $50 Supplier A's Bid Price: $50 Supplier B's Line Price:$44 Supplier B's Bid Price: $49 |
Supplier B rebids becoming the winning bid |
Using Cost Factors
Cost factors allow a buyer to identify and control for additional costs associated with a line item. There are two types of cost factors:
-
Supplier cost factors identify additional costs associated with purchasing a particular negotiation line.
-
Buyer cost factors identify additional costs associated in dealing with a particular supplier.
Cost factors can be added to lines in a negotiation document, to line defaults in a negotiation template, or to reusable lists (called cost factor lists).
Cost factors can be calculated as either a per-unit cost, a percentage of the line price, or a fixed amount for the line. A single line can have one or more cost factors (of any type) defined for it. All cost factors are added to the line price (the price being offered by the supplier per unit) to obtain the bid/quote price. The bid/quote price is the actual price per unit when all applicable cost factors are applied. Bid/quote price is calculated as follows:
line price + ((line price * percentage of line cost factor) + per-unit cost factor + (fixed amount cost factor / response quantity))
Example bid calculation
The following example shows how a supplier's response is adjusted to take into account all the cost factors defined by the buyer. The numbers represent the values entered by the supplier for the line price and all the cost factors.
-
Line price = 30
-
Percentage of line cost factor = 35
-
Per-unit cost factor = 5
-
Fixed amount cost factor = 15
-
Response quantity = 100
Calculation: 30 + ((30 * 0.35) + 5 + (15/100)) = $45.65 (bid price)
Supplier Cost Factors
Supplier cost factors identify costs such as services, such as training or consulting, or discrete costs such as shipping fees. Buyers can specify supplier cost factors when they create the negotiation line and specify a target value for each cost factor (buyers can choose to display this value to the supplier). Suppliers respond with a bid/quote for these factors. Supplier cost factors allow you to:
-
Identify suppliers with the lowest total cost per line not just the lowest item price.
-
Take into account any additional costs or charges when considering outsourcing a project.
-
Identify hidden activities or cost drivers to facilitate improved analysis and decision making.
-
Support supply chain operations more efficiently by recognizing and analyzing how one organization's performance and costs affect another organization.
Note: The supplier's response prices to a line's cost factors are always rolled up into the line's total unit price, regardless of the type of negotiation outcome. Therefore, when creating a blanket or contract purchase agreement with a negotiation line that has a cost factor using a pricing basis of fixed-amount, you must enter a value for Estimated Line Quantity. See the information below on how the system uses fixed amount cost factors for further explanation.
Buyer Cost Factors
Buyer cost factors allow a buyer to control for tangible or intangible costs or benefits inherent in dealing with a particular supplier. Buyer cost factors account for both negative or positive aspects of dealing with a supplier. Such aspects could include the risk associated in dealing with a particular supplier because of supplier location, or possible negative past performance. Buyer cost factors are applied against a particular supplier for a particular negotiation line (note that in large and very large negotiations all buyer cost factors are applied against all lines for that negotiation). . Suppliers do not respond to buyer cost factors. Buyer cost factors are used in transformational bidding/quoting.
How the System Uses Fixed Amount Cost Factors when Comparing Responses and Determining Award Totals
When comparing competing supplier responses (for example on the Compare Bid page), any fixed amount cost factor(s) (either supplier or buyer cost factors) are added together and the total is divided by the number of units being offered by the supplier. That value is then added to the price being offered by the supplier together with other percentage of line and per-unit cost factors. this results in a per-unit price that reflects both the offer price and the effects of all cost factors. This allows you to more effectively evaluate competing responses.
( line price + (line price * % of line price cost factor(s) ) + per-unit cost factor) + (fixed amount cost factor / quantity offered by supplier)
| Line price offered | $100 |
| Quantity offered | 25 |
| Fixed price cost factor | $1000 |
| Per unit cost factor | $3 |
| % of line price cost factor | .20 |
($100 + (100 * .20) + 3)) + (1000 / 25) = $163
When calculating the total award amount for a line, the system first calculates the per-unit price, which consists of the offer (or line) price plus the line price multiplied by any percentage of line price cost factor(s) plus any per-unit cost factor(s). This per-unit price is then multiplied by the number of units awarded. Finally, any fixed amount cost factors are added. This amount results in an award amount that correctly reflects affect of the line's cost factor(s).
( line price + (line price * % of line price cost factor(s) ) + per-unit cost factors) * quantity awarded) + fixed amount cost factor )
| Line price offered | $100 |
| Quantity Awarded | 20 |
| Fixed price cost factor | $1000 |
| Per unit cost factor | $3 |
| % of line price cost factor | .20 |
(100 + (100 * .20) + 3) * 20 + 1000 = $3460
Cost Factor Lists
Reusable cost factor lists allow you to group several cost factors which are related or are typically used together. For example, you might create a list identifying normally expected transportation costs, for example, freight charges or import duty fees. Of you might create a list that identifies additional services such as consulting or training that will be required by a particular negotiation item. Once you have created a cost factor list, you can apply that list to any negotiation containing items to which those cost factors are applicable.
Using Cost Factors and Cost Factor Lists
Individual cost factors can be associated with t negotiation line, or a cost factor list can be defined that contains multiple cost factors that can then be associated with a negotiation line. A negotiation line can have both individual cost factors and cost factor lists associated with it. See Associating Cost Factors and Cost Factor Lists with Negotiation Lines for instructions on applying cost factors and lists to negotiation lines. See Applying a Buyer Cost Factor to a Supplier for instructions on associating a buyer cost factor to a particular supplier.
Related Topics
Creating Cost Factor Lists
Creating Cost Factor Lists
Reusable cost factor lists allow you to group several cost factors which are related or are typically used together. For example, you might create a cost factor list identifying normally expected transportation costs, for example, freight charges or import duty fees. Or you might create a list that identifies additional services such as consulting or training that will be required by a particular negotiation item. Once you have created a cost factor list, you can apply that cost factor list to any negotiation (RFQs or auctions) containing items to which those cost factors are applicable. You can create new cost factor lists or edit existing lists.
You must be assigned the Create Reusable Cost Factor Lists job function to create these lists.
To create a new cost factor list:
-
Click the Cost Factor link under Reusable Lists on the Quick Links section of the Negotiations Home page.
-
On the Cost Factor Lists page, click Create Cost Factor List.
-
On the Create Reusable Cost Factor List page, enter the following information:
-
List Name - You can enter up to 80 characters for the list name, but it must be unique among cost factor lists.
-
Description - You can enter up to 240 characters for the list description.
-
Status - The default status is Active. If you select Inactive, this list cannot be applied to any negotiation.
-
-
From the Cost Factors menu, select the cost factor you wish to add and click Add to List. To add additional cost factors, select the and click Add to List. Continue until you have added all the you need. After you have added the last cost factor, click Apply. If you wish to delete any from the list, select the cost factor and click Delete. Clicking Cancel discards any changes you have made, and returns you to the Cost Factor Lists page.
-
You cannot add inactive cost factors to a cost factor list, but if a cost factor in a list is made inactive, an error message displays. You must remove the element from your list, activate it, and then add it to the list again. A cost factor list is also validated when it is applied to a negotiation.
-
Click the Cost Factor link under Reusable Lists on the Quick Links section of the Negotiations Home page.
-
On the Cost Factor Lists page, search and select the list you want to edit. You can search for a particular price list by :
-
The list name.
-
The first few words of the list description.
-
The list status (Any, Active or Inactive).
-
The name of any cost factor defined to the list. (This returns all cost factor lists using that price element.)
-
-
When you have entered the search data, click Go.
-
The search results display any cost factor lists matching your search criteria.
-
To edit the list, you can either click the cost factor list name link, and click Update.
-
On the Edit Cost Factor List page, you can
-
update the description for the cost factor list.
-
change the cost factor list status.
-
add or delete from the list.
-
-
When you have finished making your changes, click Apply. The new list is validated. If any are inactive, you receive an error message.
Associating Cost Factors and Cost Factor Lists with Negotiation Lines
When defining your negotiation line, you can select and apply individual cost factors or apply a list of cost factors. applying a list allows you to apply multiple cost factors with one operation. After applying a list, you can delete any cost factors which do not apply to this negotiation line.
To apply a cost factor to a negotiation line:
-
On the Lines: Create Line page, click Add Another Row under the Cost Factors section.
-
Search and apply the cost factor you wish to add.
-
Change the pricing basis for this line if necessary. Supplier cost factors are always displayed to suppliers. You can choose to display or hide a buyer cost factor from suppliers. To hide a buyer cost factor uncheck the Display to Suppliers checkbox (this checkbox cannot be unchecked for a supplier cost factor).
-
If this is a supplier cost factor, enter a target value for this cost factor if necessary and choose to display the target to suppliers if appropriate. Note that you cannot enter a target value for a buyer price factor (the value for that cost factor for a particular supplier is set when the supplier is invited to the negotiation).
-
If you select cost factor type of Supplier & Buyer, you must specify whether this is a supplier or a buyer cost factor.
-
If you select cost factor types of Supplier or Supplier & Buyer for this negotiation line, you see an additional field called Line Target Price and a checkbox called Display To suppliers. You can optionally enter a target value for the line price int he field and choose to display the line price to the supplier.
-
Continue defining your line information.
To apply a cost factor list to a negotiation line:
-
On the Lines: Create Line page, click Add Cost Factor List under the Cost Factors section.
-
Search for the cost factor list you wish to apply. You can search by the list name, the name of a cost factor included on the list, or by word(s) included in the list description.
-
On the results display, you can view the cost factors defined to a list by clicking the list name or can click the Add icon to apply the list to your negotiation line. Select the Negative Cost Factor check box to indicate that the application should treat the cost factor as a negative cost factor.
-
Once the cost factors are added to your line, you can delete any that you do not need. You can also edit the definition as described in the preceding section.
-
Continue defining your line information.
Applying a Buyer Cost Factor to a Supplier
Buyer cost factors are response adjustments that occur when dealing with a particular supplier. Buyer cost factors account for negative (and positive) aspects inherent in dealing with a particular supplier. Such aspects could include the risk involved in dealing with a particular supplier because of supplier location, or possible supplier past performance. For example, a new and untried supplier (or new manufacturing or shipping location for an incumbent supplier) exposes the buying organization to a higher risk of supply disruption simply because the buying organization has no experience of buying from the new supplier or location. Buyer cost factors are used in transformational bidding/quoting.
To apply buyer cost factors to a supplier:
-
On the Create: Lines page, from the Cost Factors drop down menu, select either:
-
Buyer and Supplier - if you intend to define both supplier cost factors and buyer price factors for this negotiation line.
-
Buyer - if you intend to only define buyer cost factors for this line.
-
Supplier - if you intend to only define supplier cost factors for this line.
-
-
Also specify whether to display transformed responses to the suppliers. If you choose to display transformed responses, suppliers will see the modified response when they view their response history. If you choose Buyer & Supplier or Supplier cost factors, you must display transformed responses to suppliers. This is because it is not possible to display untransformed views when supplier have the ability to enter values for cost factors.
-
Continue defining your negotiation information.
-
Click the Suppliers link in the navigation bar in the upper left corner to specify supplier invitation information.
-
On the Create: Suppliers page, either apply an invitation list or search for and add the suppliers you wish to invite to this negotiation.
-
After building and applying your invitation list, and you are returned to the Create: Suppliers page, click the pencil icon under the Cost Factors column for the supplier to whom you wish to apply a cost factor.
-
On the Suppliers: Update Buyer Price Factor Values page, you see a table showing all the line items to which the invitee has access and a column for every buyer cost factor you defined earlier on the Create: Lines page (supplier cost factors do not appear on this page). For each line to which you wish to apply a buyer cost factor, enter the value by which you wish the adjustment to be made. Be sure to specify the pricing-basis used for the cost factor when determining what value to enter (the pricing basis defined for this cost factor is displayed in parenthesis in the column heading for each cost factor). If there is a large number of lines on the page, and you want the same value for a cost factor to apply to all lines, you may select the cost factor from the Cost list of values, enter the value in the Value field and click Update All Lines.
Note: If your negotiation is a large or very large negotiation, on the Update Buyer Cost Factors page, you do not see the lines defined to the negotiation. Instead you see a cumulative list of all buyer cost factors defined. Enter values for cost factors as appropriate, but be aware that any cost factor for which you provide values will be applied against every line for that supplier.
-
After you have specified values for all the buyer cost factors to be applied to this supplier, click Apply.
-
Continue entering buyer cost factor values to any remaining suppliers as appropriate.
Using Price Tiers
Price Tiers allow you to negotiate line prices with your supplier based on characteristics of your order. For example, you may expect to receive a discount from your supplier if you buy a large quantity of units, and you may specify several quantity levels and the prices you are willing to pay at each. Or you may be willing to pay more per unit if your supplier can ship the order to a special location, or by a certain deadline.
For each (goods or rate-based temp labor) line in your negotiation, you can define as many price tiers as are appropriate. Your suppliers respond to your negotiation specifying their responses to your requested discounts. You can then enter different assumptions into the system and have it calculate which response is the best.
There are two types of price tiering options available to you, based on the negotiation outcome:
-
Quantity-Based Price Tiers
Quantity-based price tiers apply only to the quantity of units for your negotiation line. You can add quantity-based price tiers in negotiations with outcomes of tandard purchase orders, blanket, or contract purchase agreements. However, you can only used quantity-based price tiers if the negotiation style you are using, as defined by the Sourcing Administrator, allows them.
-
Price Breaks
Price breaks can apply to the ship-to location, the quantity and/or the effective dates for your negotiation line. Price breaks can only be used with blanket and contract purchase agreements. They cannot be used with standard purchase orders.
Example: Assume you are purchasing PC keyboards. You specify $20 as your start or base price. You then set up two price breaks. The first offers a price of $19 per unit if buying more than 100. The second offers a price of $18 a unit if purchasing over 500. For these price breaks, you receive the responses shown in the table below.
| Your price break level | Your price offered | Supplier 1's Response | Supplier 2's response |
|---|---|---|---|
| 1 | $20 | $19 | $19 |
| 100 | $19 | $18 | $17 |
| 500 | $18 | $15 | $16 |
Once you have entered your price break values and your suppliers have responded to them, you can enter assumptions into the system and it will calculate which response is the best. For example, given the price break structure defined in the table above, if you buy 120 PC keyboards, the system will identify Supplier 2 as the best response. However, if you buy 550 PC keyboards, Supplier 1 is the best response.
To enable price tiers
-
On the Lines Summary page, specify which type of price tiers (if any) you will allow by selecting one of the following from the Price Tiers menu:
-
None - indicates that you will not use any price tiers for negotiation lines.
-
Price Breaks - allows you to define price breaks on the Quantity, Ship-To, and Effective date fields for blanket or contract purchase agreements. The Price Breaks option will not appear if the negotiation outcome is standard purchase agreement.
-
Quantity-Based - allows you to define price tiers only on the Quantity field. You can define quantity-based price tiers for all negotiation outcomes.
Note: (for BPA and CPA outcomes) If price breaks are not allowed on BPA and CPA documents in Oracle Purchasing, the price breaks options does not appear. Additionally, if the negotiation style (as defined by the Sourcing Administrator) you are using does not allow quantity-based price tiers, the Price Tiers menu does not appear.
Note: (SPO outcome)
If the negotiation style (as defined by the Sourcing Administrator) you are using does not allow quantity-based price tiers, the Price Tiers menu does not appear.
All lines in a negotiation must use the same type of price tiers. If you enter values for a line and then attempt to change the type of price tiers for an additional line, you receive an error message. If you continue, the allowable price tiers for the lines is changed, but any existing price tier values are deleted.
-
-
If using price breaks, you can also specify the default price break behavior by selecting a value from the Price Breaks menu
-
None - by default, lines are not expected to have price breaks. This allows you to define certain lines with price breaks by changing the price break setting to Optional or Required on the specific lines.
-
Optional - supplier responses to your price breaks are required, but suppliers can modify the breaks you define and/or add additional breaks themselves.
-
Required - supplier responses to your price breaks are required. Suppliers cannot modify the breaks you define nor can they offer different ones.
-
-
Click Add line, Add Lot, or Add Group and continue entering your line information.
To define price breaks for a negotiation line (BPA and CPA outcomes only):
When defining price breaks for a negotiation line, you must first specify how the supplier should interact with the price break and how the price break is tracked and calculated.
-
On the Lines: Create Lines page, click Select Price Break settings.
-
On the Create Line: Select Price Break Settings page, specify the type of response you want from the supplier and how any price breaks should be calculated.
-
Response (note that the choice show is the default you set on the previous page in the Price Breaks menu, but you can override it for a particular line).
-
None - no price breaks for this line.
-
Optional - suppliers must respond to your price breaks, but they can modify them and/or add their own.
-
Required - suppliers must respond to your price breaks and cannot modify them or add new breaks.
-
-
Agreement Release Quantity
-
Non-cumulative - only the release quantity for that particular response qualifies for that break discount.
-
Cumulative - the released quantity for the agreements increases with each new release, so that the release amount for this response is added to the previous cumulative amount and the new cumulative amount is applied against the price break.
Note that if cumulative price breaks are defined for a line, no Effective date fields can be used.
-
-
-
Click Apply.
Once you have specified your price break settings, you can define each price break value. Enter as many price breaks as are necessary to defind you pricing structure. Price breaks based on quantity can be tied to a specific Ship-To location or can be applies company wide. Any values entered in the Quantity field represents the top number for which this break applies. For example, a price break with a Ship-To value of San Francisco, a Quantity of 1000 and a Target Price of $10, means that the buyer wants to pay no more than $10 a unit when buying 1000 units or less that are being shipped to the San Francisco office. Price break target prices entered on Effective Date price breaks are independent of price breaks on ship-To or Quantity.
-
Click Add Another Row in the Price Breaks section of the page to display a row of input fields.
-
To define price breaks on the Ship-To location:
-
Select the appropriate Ship-To organization from the drop down menu.
-
Select the appropriate Ship-To location.
-
Enter the target price.
-
-
To define price breaks on the Quantity field
-
Enter the quantity.
-
Enter the target price for that quantity range.
-
-
To define price breaks on Effective Date fields (only if price break is non-cumulative).
-
Enter the target price for this date range.
-
Use the pop-up calendar to specify teh beginning date of the range in the Effective-From field..
-
Use the pop-up calendar to specify the ending date of the range in the Effective-To field.
-
-
-
Click Apply
-
to add another price break, click Add Another Row and enter the appropriate values.
To define Quantity-based price tiering:
You can define quantity-based price tiering for any negotiation, regardless of outcome, although you cannot mix quantity-based tiering with price breaks in the same negotiation. For each tier, you specify a minimum quantity, maximum quantity, and the target price you are willing to pay. If you quantity ranges overlap, you receive an error message. Any gaps between ranges are not flagged.
-
Click Add Another Row to display a row of input fields.
-
Enter your minimum, maximum and the target price you are willing to pay.
-
To add an additional price tier, click Add Another Row and enter your values.
-
When finished defining the price tiers for this line, click Apply.
Note: Analyzing quantity-based price tiers is done on using the Award Optimization feature by specifying quantity/amount constraints.
Analyzing Price Breaks
Once you have defined your price break expectations, and your supplier(s) have responded with bids/quotes, you can have the system evaluate the supplier responses based on scenario information you enter. For example, you could enter different order quantities and see which supplier response is the best for a certain quantity.
To analyze price break information:
-
Search for the negotiation you're interested in.
-
On the table of negotiations, click the negotiation number link.
-
On the negotiation summary page, click Analyze by Line from the Actions menus and click Go.
-
Select the negotiation line, and click Analyze Price Breaks.
-
On the Analyze Line: Analyze Price Breaks page, you can enter different values in the fields under Enter Assumptions and have the system calculate the best response based on the values you enter. You can enter values for all price breaks you defined and the system will calculate which of the responses is best for the values you entered.
Additional creation topics
Understanding Earnest Money Deposit (EMD)
Renegotiating an Existing Blanket Purchase Agreement
Using Shortcuts to Create a Sourcing Document
Using a Two-Stage Surrogate Quote
Using Contract Terms and Conditions in a Negotiation
Viewing Backing Information for AutoCreated Lines
Working with Collaboration Teams
Understanding Large Negotiations
Renegotiating an Existing Blanket Purchase Agreement
You can use Oracle Sourcing to renegotiate an existing blanket purchase agreement. In Oracle Purchasing, you can use either the Create Auction or Create Sourcing RFQ options from Tools menu on the Purchase Order Header page, or use the Agreements tab in the Professional Buyer's Work Center to create the new draft document.
The existing blanket agreement is used as the basis for a new draft sourcing document. You can use and modify this new document as you would any other copied sourcing document. You can:
-
Add or modify requirements.
-
Add or modify lines.
-
Add or modify response controls.
-
Add or modify invited suppliers.
As with a new draft copy, you can enter a new open date, and you must enter a new close date.
Using Negotiation Strategies
When creating a negotiation, you can use a number of techniques to facilitate the results you want:
-
Using item attribute requirements You can add item attributes to any of your items. Item attributes define 1) unique specifications that you set for an item, and 2) the details that a participant should provide when responding to that item.
If you want to ensure that specific details accompany every response to an auction item, add those details as item attributes, and mark the item attributes as required. All participants will be required to submit the requested attribute information with their responses.
-
Using AutoExtend and Bid Decrementprocessing (auctions only)
-
AutoExtend If you set AutoExtend to "yes," your auction is automatically extended if a new best bid is received during the AutoExtend window. The most competitive bids are often received in the closing minutes of an auction. By enabling AutoExtend, you allow all bidders the extra time to match and surpass the most competitive bids. Enabling several AutoExtensions can spark several rounds of competitive participation.
-
-
Bid Decrement If you enable bid decrement, you specify that bids must improve by the minimum amount you choose. Bid decrement enables you to eliminate fractional improvements in bid prices. Bid decrement accelerates improvements in bid prices and can help you quickly reach - and surpass - your target price. Bid improvement controls only apply to the current round of bidding. They are not carried over from one round of bidding to and subsequent round.
-
Setting a Quote/Bid Start Price and a Target Price You can set a Quote/Bid start price and/or a target price for each item.
-
Quote/Bid Start Price Starting price for one unit of your negotiation item. By setting a start price, you communicate to participants the threshold beyond which you will not award the auction item. Setting a start price enables you to ensure that no bids above the start price will be accepted.
-
Target Price Price you hope to pay for one unit of your negotiation item. By displaying a target price, you set an "ideal" threshold toward which the most competitive responders can strive. You can also quickly spark a round of competitive participation around your target price, potentially leading to a best response that improves upon your target price.
-
-
Controlling the visibility of competing quotes/bids You can create an open, blind, or sealed negotiation:
-
Open(auctions only) All buyers can see the responses in the negotiation, though the supplier identity is concealed.
-
Blind Only the buyer can see the negotiation responses.
-
Sealed Neither the buyer nor the suppliers can see the responses until they are unlocked and unsealed by the buyer.
-
In an open negotiation suppliers see the current best price for the negotiation, and immediately know whether they can respond competitively. An open negotiation enables you to eliminate responses that do not improve on the current best prices, and increases the likelihood that you will receive competitive responses that drive prices in your favor.
Alternatively, if you have an urgent supply need, you might consider creating a blind or sealed auction so that bidders cannot see other bidders' bid prices . In some cases, "blind" bidding may lead to better bid prices, because bidders are required to anticipate what other bidders will bid, and will therefore submit their best possible bid price more quickly.
-
Allowing or disallowing partial quotes/bids You can specify that suppliers must respond to all items in the negotiation.
If you require suppliers to respond to all negotiation items, suppliers may improve response prices on certain items (to remain competitive in the negotiation) while making their margins on other items. When you award the negotiation, you can award business by line item, which allows you to "pick and choose" among the best responses from several suppliers for each item. You can award the negotiation to multiple suppliers, each of whom has submitted the best price for a particular item or items.
-
Allowing multiple rounds of Quoting/Bidding After your RFQ or auction has closed, you can initiate a new round of bidding on the same auction if you set the response controls to allow multiple rounds of responses (RFQs always permit multiple rounds or quoting). You might decide to initiate a new round of quoting or bidding if you were unsatisfied with the responses from the first round or if you want to add to or change certain details of the RFQ or auction.
-
Using cost factors Cost factors identify additional item costs beyond just price. Such costs could include service related costs such as training or consulting services.
-
Using price breaks You can define price breaks on which you can then negotiate with your suppliers to develop a pricing structure based on item quantity, delivery location, or promise date
Using a Sourcing Event
A sourcing event is group of related negotiations. You may want to create a sourcing event if you need to monitor several related negotiations as a group rather than individually. You may also want to create an event if you want to encourage respondents to participate in multiple, similar negotiations .
To use events, you first create an event. Once the event is created, you can associate negotiations with the event while creating the negotiation on the Create Header page. You can continue to associate negotiations with the event until the event's inactive date is reached.
-
Click "Event" under the Create area of Quick Links on the Negotiations Home page.
-
On the Create Event page, enter a title, description, and an inactive date. Your event is opened as soon as it is created. You can then start associating negotiations with it. You can continue associating negotiations with the event until its inactive date is reached .
-
Click OK. This takes you to the Manage Events page.
-
Clicking OK on the Create Event page, or "Events" from the Manage area of Quick Links on the Negotiations Home page takes you to the Manage Events page.
-
To see event details, click the event number link.
-
To see the negotiations associated with the event, select the event and click "View Negotiations." Note that any draft negotiations associated with this event are not shown.
-
To cancel an event, click Cancel. You have the choice of canceling only the event or canceling the event and all negotiations associated with it as well.
-
To modify an event's information click Edit. On the Edit Event page, you can modify the description and inactive date. Note that you can move the inactive date forward in time to extend an event. You can also move an inactive date backward although not prior to the current date/time.
Using Two-Stage RFQs
Government organizations and departments as well as other public sector enterprises such as banks often follow a two-stage RFQ process. This process involves the submission of quotes in two separate sealed envelopes. One contains what is termed the technical quote, and the other contains what is called the commercial quote
The technical quote includes all responses to questions and parameters pertaining to the technical aspects that are used by the sourcing organization to evaluate the technical feasibility of the quotes and the capacity of the suppliers. The commercial quote addresses the issues of price and other factors associated with the execution of the sourced items.
This process is prevalent among private sector and government organizations where it is sometimes mandated by law that the buying organization offer the tender or sourcing contract to the lowest price bid from the qualified bidders. The buying organization initially assesses the suppliers to be technically qualified before their price quotes are unsealed and evaluated. This is done to ensure no bias in awarding the contract.
The Two-Stage RFQ process involves the submission by the suppliers of a technical quote and a commercial quote. The technical quotes are opened and evaluated first to determine a list of qualified suppliers, and only then are the commercial quotes of the qualified suppliers opened and evaluated.
Using Two-Stage RFQs in Oracle Sourcing
The process of creating and using Two-Stage RFQs in Oracle Sourcing is straightforward:
-
Create the Two-Stage RFQ
-
Publish the RFQ
-
Receive suppliers' quotes
-
Close RFQ
-
Unlock the technical responses (buyer and technical evaluators can now see technical response)
-
Unseal the technical responses - optional (suppliers can now see technical response of other suppliers)
-
Technical evaluators review the technical quotes and shortlist the qualified suppliers
Note: If the buyer has not locked the RFQ and tries to complete the Technical Evaluation, the application displays a message that states: “Scoring has not been locked, therefore manual scores are not included in the scoring.” You can cancel the evaluation at this stage, and go back to unlock the scoring, or proceed to complete the technical round, and then return to the commercial round.
-
Unlock the commercial responses of the qualified suppliers (Collaboration Team members with full access to the negotiations can see both technical and commercials responses, and Scoring Team members have access to the sections to which they have been assigned).
-
Unseal commercial responses - optional (suppliers can now see responses of other suppliers).
-
Commercial evaluators review the commercial quotes
-
Make award decisions
Note that during the evaluation stages, only evaluators assigned to the scoring team for that stage can view that stage's sensitive response information. If a buyer or supplier prints a pdf copy of the negotiation, the print indicates that it is a two-part RFQ, and labels Requirements sections appropriately.
| Quote Information | Technical Evaluators Can See |
|---|---|
| Technical Requirements responses | Yes |
| Commercial Requirements responses | No |
| Price | No |
| Quantity | Yes |
| Promised date | Yes |
| Line attributes (including Quantity and Promised Date for Multi-Attribute Scored negotiations) | Yes |
| Cost factors, price tiers and price breaks | No |
| Contract terms | Yes |
| Complex work terms | No |
| "From Supplier: Technical" attachments | Yes |
| "From Supplier: Commercial" attachments | No |
| Other response information | Yes |
After the commercial responses are unlocked, the entire quote is visible subject to regular RFQ security (for example, Scoring Team access settings, security level assignments).
Creating Two-Stage RFQs
Creating Two-Stage RFQs is similar to creating regular RFQs. The main difference is that you create two sections of Requirements, one or more identified as Technical and one or more identified as Commercial. In the technical section(s), you define Requirements that the technical evaluators will later use to determine which suppliers are capable of successfully addressing the technical requirements of your negotiation. The commercial section(s) include the Requirements that the commercial evaluators will review when determining which technically qualified supplier is offering the best commercial terms for the negotiation.
To create a Two-Stage RFQ:
-
On the negotiation header page, click the Two-Stage RFQ checkbox. .
-
Add all appropriate evaluators for both the technical and commercial stages as collaboration team members. Give them either Full or Score access.
-
Define at least two Requirements sections, one containing your technical questions to the supplier and the other containing your commercial questions.
-
Create appropriate scoring teams to perform the technical evaluation and the commercial evaluations. Assign each team its appropriate members and assign each team its appropriate sections.
-
Continue creating your RFQ normally. Be aware that responses to any line attributes will only be visible to technical evaluators, and responses to cost factors will only be visible to commercial evaluators.
After quotes have been submitted and you have closed the RFQ, you can process it.
Related Topics
Using a Two-Stage Surrogate Quote
Using a Two-Stage Surrogate Quote
Suppliers in remote locations who are not able to connect with the buyer organization via a portal submit their quotes in the form of sealed envelopes (hard copy), or email to the buyer organization. Buyers receive two sealed envelopes, or email– one for the technical quote and one for the commercial quote from each supplier.
The Two-Stage Surrogate Quote functionality allows buyers to enter the technical information, and the commercial information for a two-stage RFQ on behalf of a supplier. In the technical stage, a buyer enters the technical offer submitted by a supplier in Oracle Sourcing. The supplier's technical offer is evaluated and if it is found acceptable it is shortlisted for the commercial round. In the commercial evaluation process, the buyer enters the supplier's commercial offer in Oracle Sourcing and evaluates it. If both the technical quote, and the commercial quote are found acceptable, the supplier is awarded the order.
Technical Quote Round
The technical round is the supplier's response to the RFQ that addresses the technical requirements and other legal and contractual terms that pertain to the sourcing negotiation. Some of the technical quote considerations include:
-
Technical Merit
-
Quality
-
Global Capacity
-
Risk Management
-
Past History
-
Performance
Commercial Quote Round
The commercial round is the supplier's response to the RFQ that addresses only the price, and the other commercial terms such as:
-
Taxes
-
Import Duties
-
Other Government Levies
-
Transportation
-
Other Charges Associated with a line item
This may also address terms like delivery schedules and other logistics aspects related to the items.
Using the Two-Stage Surrogate Quote in Oracle Sourcing
The following are the pre-requisites for entering the two-stage surrogate quote in Oracle Sourcing.
-
You need to select Unlock Stage: Technical option from the Actions list to enable the buyer to enter the Surrogate Quote-Technical round.
-
You need to select Unlock Stage: Commercial option from the Actions list to enable the buyer to enter the Surrogate Quote-Commercial round.
The process of creating and using Two-Stage Surrogate Quote in Oracle Sourcing is as follows:
To create the Surrogate Quote-Technical round
-
Select a Two-stage RFQ.
-
Select Create Surrogate Quote-Technical action and click Go.
-
Select a supplier to enter the technical information.
-
Enter value for the technical requirement.
-
Enter technical information at the line level.
-
Enter note to the buyer.
-
View the technical information. The commercial information is hidden.
-
Submit the technical quote.
To create the Surrogate Quote-Commercial round
-
Select a Two-stage RFQ.
-
Select the Create Surrogate Quote-Commercial action and click Go.
-
You can select a supplier from the shortlisted suppliers and choose the Create Surrogate Quote-Commercial option. The shortlisted suppliers are defaulted from the technical round.
-
Enter value for a commercial quote. You cannot update the technical round details.
-
Review the technical, and the commercial information. The technical, and the commercial round information are displayed at the header, and the line level.
-
Submit the commercial quote.
-
Review the technical, and the commercial quote using the Negotiations tab.
Creating the Two-Stage Surrogate Quote:
Pre-requisites
The following are the pre-requisites for entering the two-stage surrogate quote in Oracle Sourcing.
-
You need to select Unlock Stage: Technical option from the Actions list to enable the buyer to enter the Surrogate Quote-Technical round.
-
You need to select Unlock Stage: Commercial option from the Actions list to enable the buyer to enter the Surrogate Quote-Commercial round.
Entering Evaluation Criteria for Two-Stage Surrogate Quote
The Two-Stage RFQ functionality enables you to evaluate supplier responses in the technical and the commercial stage based on the scoring criteria that you enter while creating a Two-Stage RFQ.
You can enter the line attributes as part of the technical round consideration and you can enter price tiers as part of the commercial round stage.
Please refer to the Using Two-Stage RFQs section for more information on Two-Stage RFQs.
XML Spreadsheet Support
You can import the two-stage surrogate quotes using a spreadsheet template with following options:
-
Include the user preferences in the excel for date and date/time.
-
Explain the difference between rich style and lightweight style.
-
Limitation due to Excel's limit of 65000 rows per worksheet, and the 42000 rows verification.
-
Limitation of maximum number of characters to 21 in the worksheet name in case of using multiple worksheets for Attributes Scoring.
To create the Surrogate Quote-Technical round
-
Navigate to the negotiations page.
-
Search for a Two-Stage RFQ with the status as Evaluation Process – Technical or Evaluation Process – Technical (Unseal).
-
From the Actions list select Create Surrogate Quote-Technical option and click Go.

-
The Create Surrogate Quote-Technical: Select Supplier and Contact page appears.
-
Enter the search criteria for the desired supplier and click Go.

-
Select the supplier and choose Create Surrogate Quote-Technical. The Terms and Conditions page displays.
-
Click Accept. The Create Quote page displays.

-
Enter a valid date for the Quote Received Time. Required.
Note: The Quote Received time should be between the RFQ: Open Date and RFQ: Close Date and it should be less than the system date.
-
Enter a valid date for the Quote Valid Until. Required.
-
Enter the value for Reference Number and Note to Buyer fields. Optional.
-
Select an Attachments type. For example, Desktop Files. Optional.
-
Click Lines tab and choose the Update pencil icon to enter the value for all the required Attributes. Required.
-
Enter a Quote Quantity for the line. Required.
-
Enter the Promise Date for the quote. Required.
Note: The promised date must be greater than the current date and time for a line.
-
Click Continue. The Create Bid: Review and Submit page appears.
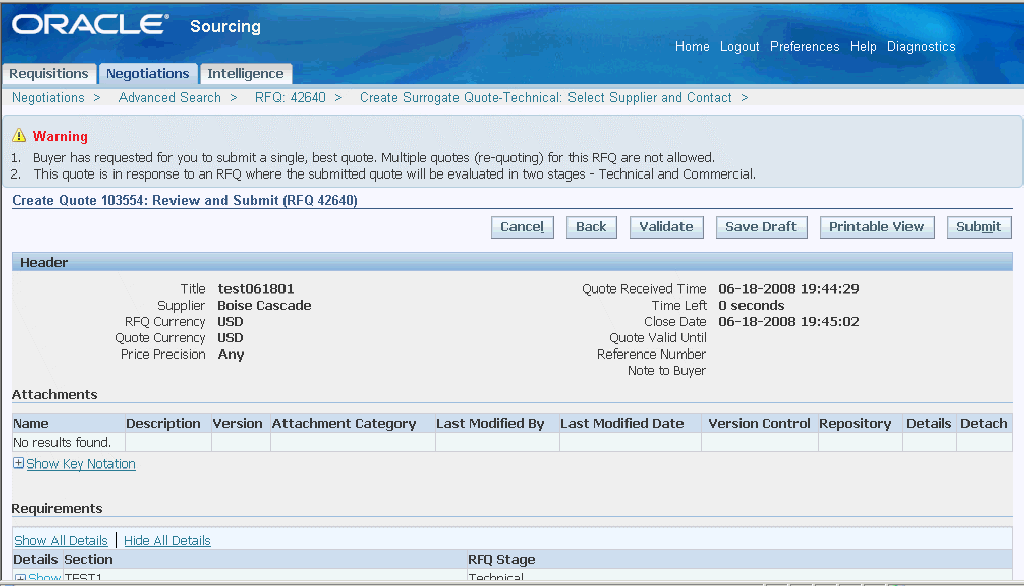
-
Click Submit to create a Surrogate Quote: Technical round.
Note: You can create the Surrogate Quote - Commercial round only after you enter the Surrogate Quote-Technical round details and complete the Surrogate Quote- Technical round.
To complete the Surrogate Quote-Technical round:
-
From the Actions list select Complete Evaluation-Technical option and click Go.

-
The Evaluation Complete: Technical page appears.

-
Click Complete to complete the creation of Surrogate Quote: Technical round.
To create the Surrogate Quote-Commercial round:
-
Once you complete the Surrogate Quote: Technical round.
-
From the Actions list select Unlock Stage: Commercial option and click Go.

-
After the commercial stage is unlocked, from the Action list select the Create Surrogate Quote: Commercial option and click Go.

-
The Create Surrogate Quote-Commercial: Select Supplier and Contact page appears.

Note: The shortlisted suppliers are defaulted from the Surrogate Quote: Technical round and you can select the desired supplier from the list. You can select a supplier from the shortlist for whom a surrogate quote technical round is completed.
-
Select a supplier and choose Create Surrogate Quote- Commercial. The Create Quote page appears.
-
Enter the value for the Commercial Requirements field. Required.

-
From the Lines tab choose the Update pencil icon to update the commercial round information.

-
Enter the Line Price value. Required.
-
Enter the Administration Fee value as the percentage of the line price. Required.
-
Enter the Quantity Based Price Tiers value, such as Minimum Quantity, Maximum Quantity, and Price for each unit. Optional
Note: The quantity entered for line must be equal to the maximum quantity entered in the Quantity Based Price Tiers. The price value entered in the Quantity Based Price Tiers must be equal to Line Price value.
-
Enter Note to the buyer. Optional
-
Add an attachment if desired. Optional.
-
Choose Apply.
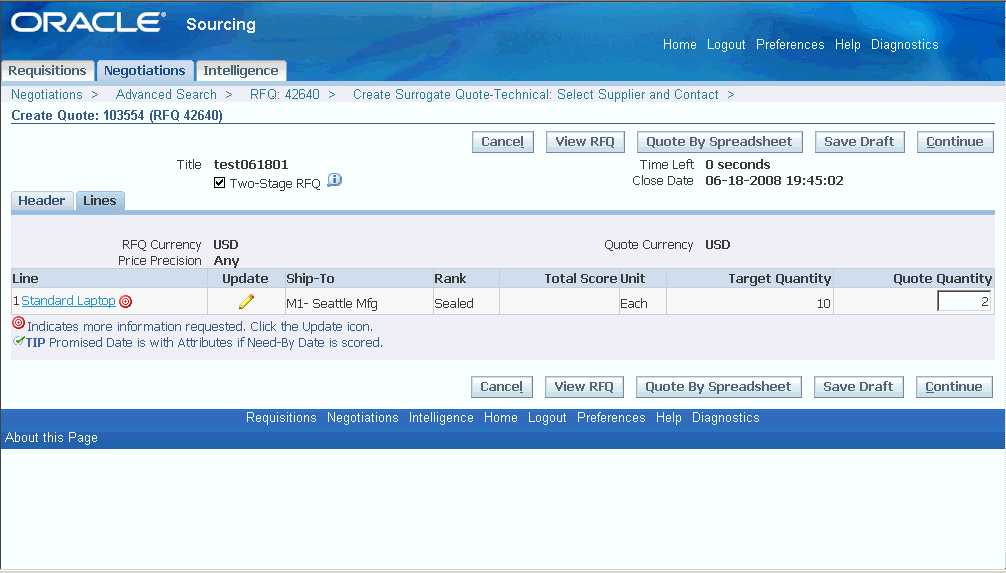
-
Choose Continue.
-
The Create Bid: Review and Submit page appears.
-
Click Submit to create a Surrogate Quote: Commercial round.
Managing Two-Stage Surrogate Quote draft responses
You can view the two-stage surrogate quote responses with following statuses:
-
Draft Technical Surrogate Quote, Submitted Technical Surrogate Quote, Draft Commercial Surrogate Quote, and Submitted Commercial Surrogate Quote.
-
Draft Technical Surrogate Quote and Draft Commercial Surrogate Quote statuses at the technical round, and the commercial round respectively.
-
Draft Technical Surrogate Quote status after the Evaluation Complete: Technical stage. Draft Commercial Surrogate Quote status after the Commercial Award.
Using Draft Negotiations
There may be times when you cannot finish creating your RFI, RFQ, or auction in a single session, or the creation process involves collaboration between several people. Or you need to create a negotiation but not actually submit it until sometime in the future. In each of these cases, you can create a draft of the RFI/RFQ/auction and save it for later editing or submission.
Creating a draft
Once you have completed the Create Header page, you can save your draft by clicking Save Draft. Your draft is assigned a number, and a confirmation message informs you that your draft has been successfully saved. Alternatively, once you proceed beyond the Create Header page, a draft is created automatically for you by the system behind the scenes. This draft has the same name as your negotiation and is updated every time you proceed to a new page in the creation process.
Accessing and editing draft documents:
To access and edit your draft document
-
On the Negotiation Home page, click the "Drafts" Quick Link under Manage. You can search for your draft
-
Once you locate your draft, you can:
-
Edit the draft by clicking Update.
-
Open someone else's draft for editing by clicking Unlock (you must have the correct authorization to update someone else's draft).
-
Publish the draft by clicking Review and Submit.
-
Create a new version of the draft by clicking Copy.
-
You can remove the draft from the system by clicking Delete.
-
If your negotiation is a very large negotiation, the concurrent program to create the draft may still be in progress. If so the Request Status column will show a status of Pending. This means your concurrent program is waiting to begin. You can end the concurrent program by selecting the negotiation and clicking Cancel Request. Also, if the status is Pending or Processing, you receive an error message if you click Copy, Delete, or Update. You can click Review and Submit, but you can only view the negotiation, you cannot submit it for publishing or approval.
-
See also: Copying a Negotiation Document.
Using drafts with multi-round negotiations
If you have chosen to take a negotiation to an additional round, you have the option of saving the new round's information as a draft. When you save a draft, the status of the previous round is changed to Round Completed and is therefore no longer available for awarding. Note however that once you save the draft, if you subsequently delete it, the status of the prior negotiation is changed back to Not Awarded, and it available for awarding.
Security on draft negotiations
Users with the Create Buyer's Negotiation function can save and subsequently edit their draft negotiations. When you access the Manage Draft Negotiations page, you always see the drafts which you own or on which you are a collaboration team member. If you are the draft creator, you can update, review and submit, unlock, or delete any of these drafts.
Anyone with the Edit Draft Sourcing Documents function can access and edit draft negotiations created using Demand Workbench..
Anyone with the Manage Draft Sourcing Documents function can access and edit drafts created by others at the same company. If you have this function and access the Manage Draft Negotiations page, you can edit any drafts that are not locked.
Additionally, anyone with the Unlock Draft Sourcing Documents function can unlock on a draft but not access it for editing or submission.
This is a useful authorization for an administrator to have in case a draft needs to be edited, but the buyer has locked it and is subsequently unavailable, for example, on vacation.
For private negotiations:
If you are a collaboration member with view-only access, you can view the draft but not edit it. If you are a collaboration member not restricted to view-only access, you can perform whatever tasks are allowed by your function security.
Note: The Sourcing Super User, by default, is authorized to manage and unlock drafts.
Using Abstracts and Forms
Many organizations have numerous rules and regulations pertaining to the advertising of their sourcing event. Many public sector organizations, for example, have regulations that require publishing information on upcoming procurement events to external sources (such as centralized web sites). Additionally, many companies want to advertise their negotiations to increase the number of suppliers that participate in the negotiation. If you need to advertise your negotiations, you can use the negotiation abstract and forms feature to provide both high-level and in-depth information about a particular negotiation.
If you wish to advertise a negotiation from your own website, you can do so completing an Abstract and publishing it to an external website. This external website will be accessible to suppliers without having to log into your system. Oracle Sourcing delivers a default template called Abstract. You can take this template and modify it as appropriate for the negotiation.
If you wish to advertise a negotiation on an external source (for example, a centralized website), you can do so using a Form. This assumes that the external source accepts XML files.
Before you can complete an Abstract or Form for a negotiation, the Sourcing Super User must perform some setup steps. Once they are done you can complete the Abstract and Forms anytime during the lifecycle of the negotiation. After you complete the Abstract or Form, you can publish the information they contain.
You can create or edit an Abstract or Form at anytime during the lifecycle of the negotiation.
To add an Abstract or form to a negotiation:
-
Add the Abstract or form to the negotiation:
-
If the negotiation is in draft status:
-
On the Create: Header page, click Add Another Row under the Abstract and Forms section. (If there is no active Abstract or Form, this section does not appear).
-
When the page refreshes, click the flashlight icon next to the name field.
-
On the Search and Select: Name page, search for your form.
-
To add the Abstract, enter "Abstract" as the search value, and click Go.
-
To add a form, search for the form name. You can search for any active Form.
-
-
When the results display, click the quick select icon, or click the radio button and then Go. You are returned to the Create: Header page.
-
If you wish to complete the Abstract or Form now, continue with the instructions in Step 2. Enter data into the Abstract or Form below. (Note: You are not required to enter data in the Abstract or Form in order to publish the negotiation. You can enter the data after the negotiation is published. See below for instructions on completing a published Abstract or Form.)
-
-
If the negotiation has been published
-
Search for the negotiation to which you will add the Abstract or Form.
-
From the negotiation summary page, select Manage Abstract and Forms from the Actions menu, and click Go.
-
On the Manage Abstract and Forms page, click Add Another Row.
-
When the page refreshes, click the flashlight icon next to the name field
-
On the Search and Select: Name page, search for your form.
-
To apply the Abstract, enter "Abstract" as the search value, and click Go.
-
To apply an application form, search on the form name.
-
-
When the results display, click the quick select icon, or click the radio button and then Go. You are returned to the Manage Abstract and Forms page
-
-
-
Enter data into the Abstract or form
-
Click the Enter Data icon to access the page where you will enter your Abstract or Form data.
-
On the Header: Abstract Details/Header: Form Details page (if the negotiation is in draft status), or on the Form Details (Abstract)/Form Details (form name) page (if the negotiation is published, complete the fields of the form.
Required fields are marked with an asterisk. Some fields may already be populated (for example, if the negotiation number and negotiation name were included in the default Abstract, they will already be populated). These are system generated fields and were included by the Sourcing Super User when the Abstract or Form was created. In some fields, you may need to enter a value, for other fields, you can select from a drop down menu or a pop-up calendar.
Once you have entered data for any required Abstract or Form fields, and all optional fields as are applicable, use the instructions in the following step to publish your Abstract or Form.
-
Click Apply to save your work. The Abstract or Form is validated for errors.
-
-
Publish the Abstract or form.
From the page where you entered your Abstract or Form details (as described in the previous step).
-
Click Publish Abstract to publish your completed Abstract. The Abstract is immediately available on the external website.
Note that if you select Include PDF, once the negotiation is published, suppliers can download a .pdf version of the negotiation Abstract from the external website.
-
Click Generate XML to publish your form information. Save the generated XML file locally and then send it to the administrator of the external web site for publication.
-
Note: PDF files for large and very large negotiations cannot be associated with the External Abstract page.
Publish Bid Tabulation/Award Decisions to external websites using Abstracts
Buying organizations can keep the bid tabulation specific to a negotiation server and provide URL access to this content. This URL can be published via Abstracts. The steps to follow in order to publish award decisions to external websites are:
-
Login and use the Sourcing Super User responsibility.
-
Navigate to Administration > Abstract and Forms > Manage Sections and Fields.
-
Create a field with the name as Bid tabulation or any appropriate name and specify the value type as URL.
-
Add this field to the Abstract. This can be added to any form as well.
-
Make the abstract or form active and click Apply,
-
Create a negotiation document and add the form or abstract to the negotiation.
-
Click the Enter Data icon and provide values for the URL fields. This is the URL the buying organization will use to publish the bid tabulation.
-
If you specify an external URL, the address should always be prefixed with 'http://'.
-
If the user specifies an internal URL, either the complete address is to be provided or the following can be used: '/OA_HTML/OA.jsp?OAFunc=PON_ABSTRACT_PAGE'. If the 'http://' is not prefixed, the system prefixes 'http://<hostname>:<portname>' by default.
-
After entering all the relevant details, click View Data to verify the information.
Using Notes and Attachments
You can use text notes and/or attached files to provide suppliers with additional information on your negotiation. You can add them at the header level or the line level. When you create a negotiation from one or more requisitions, the requisition attachments are copied to the negotiation. The requisition header attachments are attached to the negotiation header, and the requisition lines attachments are attached to the negotiation lines, respectively. The attachment description displays the attachment title along with the requisition number from which it is copied.
A note is a simple text that you enter directly into the sourcing document. This is viewable by the supplier when placing a response. Attachments are separate files you associate with your document. Attachments can be viewed by many different people. When you associate an attachment with your document, you specify who can view it.
-
Internal to Sourcing viewable only within Oracle Sourcing. This information is not carried over into Purchasing.
-
Miscellaneous can be seen my any internal user who can access the sourcing document.
-
To Approver Can be viewed by any approver of the sourcing document.
-
To Buyer Purchasing displays these attachments to buyers when creating purchase orders from requisitions.
-
To Payables Purchasing displays these attachments during invoice matching.
-
To Reciever Oracle Purchasing displays these attachments to the receiver in receiving windows.
-
To Supplier can be seen by the supplier when placing a response.
Using a Deliverable in a Negotiation Document
Businesses enter into contractual agreements with their trading partners and, as part of the contractual agreement, will have commitments to fulfill. The commitments on the contracts, besides products and services bought or sold, are classified as deliverables, under the terms and conditions of the contract. In addition to the contractual commitments that businesses need to fulfill, they might define other internal tasks that contribute to the overall execution of the contract. If Oracle Procurement Contracts is implemented, you can create a deliverable and assign it to a negotiation.
To create a deliverable for a particular negotiation:
-
On the Create Header page, click Contract Terms in navigation bar in the top left of the page.
-
Search for and apply a contracts template.
-
Click the Deliverables subtab and check that any deliverable already defined to this template is applicable for your negotiation. You can update a deliverable if needed or delete it altogether
-
To add a new deliverable, click Add Deliverable.
-
On the Create Deliverable page define your new deliverable.
-
After you have finished defining your deliverable, click Apply. If there are multiple deliverables to define, you can click Apply and Create Another. Once the page refreshes, you can define your next deliverable.
Copying a Sourcing Document
You can copy sourcing documents that you or any other users in your organization have created. You can copy an existing document to create a new document of the same type (RFI, RFQ, or auction).
To copy an existing negotiation:
-
Click "Copy" under the Create section of Quick Links on the Negotiations Home page .
-
Search for the negotiation you want to copy. You can click the negotiation number to see details about the negotiation.
-
Once you have found the negotiation you are interested in, click the Copy icon at the right of the page.
-
On the Copy page, you have the option of changing the document type or style. You can also retain any original attachments. If you are using Oracle Procurement Contracts and have clauses associated with the original document, you can retain the old clauses or have the system search for any new clauses.
-
Click Apply. A new document is created and you are placed on the Create Header page for this document.
-
Edit your new negotiation by continuing through the creation steps.
-
Note that you will have to specify new Open Date and Close Date values
-
When you have finished creating your new negotiation, click Review. Verify your negotiation information, then click Submit for Approval if approvers are specified for this negotiation, otherwise click Publish to open it for responding . If this is a very large negotiation, a concurrent program will be initiated to create the new copy. You can monitor the progress of this job from the Manage Draft Negotiations page.
Viewing Backing Information for AutoCreated Lines
You can use the AutoCreate feature of Oracle Purchasing to use existing requisition information in Oracle Purchasing to create an RFQ or auction in Oracle Sourcing. Once the new draft negotiation has been created, you can access it and continue creating your negotiation. This includes all the other tasks such as creating your header, adding any additional lines, specifying negotiation controls, and possibly inviting suppliers. Along the way, you may wish to view the requisition line information for the lines that AutoCreate carried over from Oracle Purchasing. For example, you may need to view the demand linked to a particular negotiation line. Or you may need the name of a contact who can answer questions you have about the negtiation line. You can see this line information on the View Requisition Line Summary display.
To view the backing requisition information during negotiation creation:
-
After you have created your header by adding a title (and adding/modifying any other information) click Lines in the top left navigation bar.
-
The Create Lines page displays any lines AutoCreate created using requisitions in Oracle Purchasing and allows you to create additional lines if necessary. .
-
For AutoCreated lines, click the requisition number link to view detailed information on the line.
-
On the Requisition Summary page, click the requisition number link, and then click the Details icon .
-
The Requisition Line Details page displays information in the following areas:
-
Requisition
-
Negotiation
-
Order
-
Shipment
-
Receipt
-
Invoice
-
Payment
-
Funcional Currency and Transaction (Foreign) Currency)
-
To view currency information in the requisition:
The requisition details displays the functional currency and transaction (foreign) currency information, along with the rest of the line information.
To view the backing requisition information after the negotiation has been published:
-
Access the negotiation.
-
From the negotiation summary page, click the Lines subtab.
-
For the line whose requisition information you wish to view, click the number link in the Requisition column. This takes you to the Requisition Summary page.
-
Click the number link in the Line column. This takes you to the Requisition Detail page.
Using Amount Based Line Types
Sometimes the item you need to negotiate is not a number of discrete units, but more of a service or activity. For example, you might need to negotiate training or consulting services. Such activities can be negotiated by using amount based line types.
When you create a negotiation, you can specify that an item is amount based by selecting an amount based Line Type value. The possible values are defined in Oracle Purchasing. If you select a line type that is amount based, the quantity and unit of measure defaults to the values defined by your administrator and is display only. A category value may also appear if your administrator has defined a default category for that line type.
Using Approvals Management Engine (AME) in RFQs, RFIs, or Auctions
Oracle Approvals Management Engine (AME) is used to manage and define approvals for Sourcing RFQs. The seeded Transaction Type called Negotiation Approval is used to enable AME Approvals for RFQs. AME uses the Document Total or Item Category to set the approval hierarchy.
Use the Administration tab > Update Negotiation Style page to start using AME for negotiation documents. For a specific negotiation style, navigate to the Approval Controls region, and select the AME Transaction Type value as Negotiation Approval. This value is defaulted in the dropdown. If you would like to use the collaboration team approval list instead, leave the value in the dropdown blank.
If you prefer AME to be used in the withdrawal of negotiations process, click the Allow Document Withdrawal checkbox. If you need withdrawal notifications to be sent to approvers, click the Send Withdrawal Notifications to all Approvers checkbox.
RFQ/RFI/Auctions Approvals
Buyers can send the negotiation document to various approvers, and reviewers may or may not receive the document. AME provides a list of approvers, in addition, buyers can add ad-hoc approvers too.
Reviews can be performed in serial mode, or parallel mode. Voting options are: First Responder Wins, Consensus, Serial. Approvers can approve, approve and forward, reject, reassign, or add their comments in the notifications page.
If the RFQ is rejected, the document is routed to the buyer. The buyer can either correct and re-submit the document, or to cancel the document. Note that the approval list that AME generated, is deleted by the workflow process.
If the RFQ is approved, AME sends out a notification to all the approvers, informing them of the approval.
The approval notification has two options: Transfer Notification (not applicable or enabled for AME notifications), and Delegate (applicable for AME notifications).
Negotiation Header page
If you have opted for the AME approvals option in the Negotiation Styles page (Administration tab), in the Negotiation Header page, the Approver checkbox does not appear in the Collaboration Team region. Thus you can use either the Collaboration Team approvals, or the AME approvals.
Negotiation Review page
Click Approval Options on the Negotiation Review page, to open the Approval Options page. This page displays a list of approvers (generated by AME) in ascending order for the negotiation document. You can also add an ad-hoc approver, by using the options in the Add Adhoc Approver subregion. The Approver Type typically should be a person in the HR database. Select an approver name from the list of values, and a category. The insertion point indicates where in this hierarchy you would like to place the ad-hoc approver name.
If AME has a list of approvers, the Negotiation Review page displays the following buttons: Approval Options, and Submit for Approval. If AME does not have a list of approvers, the Review page displays the Approval Options and Publish buttons.
Buyers can send the negotiation document to various approvers, and reviewers may or may not receive the document. A single document, multiple documents, or all documents may be sent for review. Reviewers receive notifications that enable them to view the document and also provide their comments in the notification.
Reviews can be performed in serial mode, or parallel mode. Voting options are: First Responder Wins, Consensus, Serial. AME sends notifications to the approvers, to approve the document. The approval notification has two options: Transfer Notification (not applicable or enabled for AME notifications), and Delegate (applicable for AME notifications).Reminder notifications are also sent periodically. When a document is approved, AME sends another notification informing approvers that the document has been approved.
Withdrawing RFQs
When a negotiation document needs to be withdrawn, use the Withdraw RFQ action in the Actions LOV to proceed with the withdrawal. The Withdrawal Reason page displays, where you need to enter a withdrawal reason in the text box. Click Apply when you are done, to complete the withdrawal. An FYI notification is sent to all the approvers and reviewers from the buyer, informing them that the RFQ has been withdrawn. The notification is sent to all approvers before the document is submitted for approval.
Note that the status of the RFQ should be In Progress in order to be successfully withdrawn. After withdrawal, the status of the RFQ is Draft. If the RFQ is approved, it cannot be withdrawn; it can be edited, as long as it is not published. If the RFQ is published, an amendment needs to be created, and it has to go through the approval cycle again.
Working with Collaboration Teams
When creating a negotiation, buyers can nominate collaboration team members to participate in the creation and administration of the sourcing document. This includes the entire life of the sourcing document from the initial creation to the award process. Buyers can optionally grant full access to some team members while restricting others to read-only access. Each member can be assigned specific tasks, and some team members may be required to approve the final document before delivery to potential suppliers. Such tasks could include defining the item attributes, inviting additional suppliers, scoring supplier responses, awarding business to supplier, and creating document outcomes.
Who can participate as team members?
The negotiation creator and anyone with Manage Collaboration Team job function can add/delete team members. You can define a collaboration team when creating the document, or you can use document templates to define collaboration teams. By default, all members have full access to the sourcing document, but members can be restricted to requirements scoring-only, or read-only access where appropriate. The buyer and the buyer's manager always default to the team. Buyers can delete their managers from the list of approvers for a negotiation. The manager name appears by default for any buyer in the list of approvers. Select the Delete icon to remove a manager from the list of approvers. Buyers can delete their managers from the list of approvers for draft and published negotiation. Any other user from the same buying organization can be added. Team members can be optionally assigned tasks with target dates. Team members with required tasks should indicate when those tasks are completed.
Collaboration team members must belong to the business group of the negotiation, which is determined from the owning operating unit. If the buyer changes the operating unit after defining the negotiation team, the system will validate that the team members belong to the new business group of the operation unit.
Note: This rule is only in effect if the profile option HR:Cross Business Group is not set to Yes. If the profile option is set to Yes, the buyer can add employees and contractors from different business groups.
Document Approval Process
Any user who is on the Collaboration Team can be designated as an approver for that document. Approvers can be added or removed as necessary at any time before the sourcing document is submitted for approval. Any user who has access to modify a draft document and has the functional security of "Manage Collaboration Team" can change the list of approvers.
If you are using Approvals Management Engine (AME) instead, for the document approvals, see: Using Approvals Management Engine (AME) in RFQs, RFIs or Auctions.
Alternatively. any user who is in the Collaboration Team can be designated an approver for that negotiation document. Approvers can be added or removed as necessary, any time before the Sourcing document is submitted for approval. Any user who has access to modify a draft document, and has the functional security (Manage Collaboration Team) can change the list of approvers.
Once the document has been submitted for approval, no changes can be made to it (other than having approvers removed) unless the document is rejected. You must have modification access and the functional security of "Manage Collaboration Team" to modify the collaboration team definition. The approval process is not hierarchical; all approvers can access and approve the document simultaneously. There are no dependencies among approvers.
Once the document has been approved, a Publish button appears to anyone who has the Publish Negotiations job function. Anyone with this job function can publish the approved negotiation to suppliers .
Note that throughout the approval process, notifications are sent between the buyer and the document approvers. Not until the document is approved and published are notifications sent to suppliers about the document.
Adding Collaboration Members
On the Create Header page, there is an area where a buyer can identify collaboration members. The buyer and the buyer's manager are automatically identified as team members. The buyer can search for and select additional collaboration team members if necessary . For each member, the buyer identifies:
-
If the member is an approver.
-
The members access level. Members with full access can update the document (including updating the collaboration list). Members with Scoring access are eligible for inclusion in a scoring team team. Members with View Only access cannot update the document (although the can be assigned tasks to perform)..
-
If that member has been assigned a task, and if so, when the target date is.
Processing Notifications
At various time, you are notified about events happening within the sourcing system. Some of these notifications are for information only, such as the confirmation you receive when you publish a negotiation. However, other notifications may require interaction on your part. For example, if you are an approver of a negotiation document or award decision, once that document or award is submitted for approval, you receive a notification to which you must respond.
To process a notification:
-
After you click on any Sourcing responsibility in the Navigator, click the Worklist link. This displays all your active notifications. If there are many notifications, you may wish to select To Do Notifications from the View menu to see only notifications that require a response.
-
Locate the notification you wish to process and click the text link in the header of the notification.
-
Depending on the type of notification, you may be asked to perform one of the following:
-
Approve (the document or award decision)
-
Reject (the document or award decision)
-
Request More Information from the originator of the notification.
-
Reassign the notification to someone else for processing.
-
Understanding Security Levels
Buyers creating sourcing documents can control visibility to the document by specifying a security level during the describe negotiation step. There are three possible security levels a buyer can select:
-
Public The document can be viewed by any other buyers in the buying organization.
-
Private The document can be viewed only by the creator, the creator's manager, and members of the document collaboration team (if any).
-
Hierarchy The document can be viewed only by the creator, the creator's manager, members of the document collaboration team (if any), and any members higher than the negotiation owner who are listed in the Security Hierarchy defined in Oracle Purchasing for that document type.
Security Levels and Collaboration Teams
The use of collaboration teams allows document creators to select a number of collaborators for the document creation and administration and define flexible security rules that can apply to each collaborator. For example, some collaborators can be defined as having read-only access, meaning they can view but not update the document throughout its lifecycle. Other members can be selected as approvers of the document. All members identified as approvers must approve the final version before the document can be published. Also, selected members can be assigned specific tasks which they must complete.
See Working with Collaboration Teams for more information on collaboration teams.
Negotiating Complex Services
Complex services negotiations are special types of RFQs having one or more of the following characteristics:
-
High dollar value projects.
-
Long lead time delivery schedules.
-
Progress payments based on work completion.
-
Contract financing.
Complex Services negotiations enable buying organizations to:
-
Negotiate on financing attributes such as advance amount, progress payment rate among others.
-
Negotiate on retainage attributes such as retainage rate.
-
Specify and mandate pay item structure or request the suppliers to provide the pay item structure as part of the quote.
Oracle Sourcing tightly integrates with Oracle Purchasing enabling organizations to enforce the negotiated advanced payment options (such as advance amount or retainage rate) and payment schedule after an award is made.
At the time of execution organizations can perform such operations as:
-
Make an advance payment on a line.
-
Track the progress on pay items using work confirmations provided by the supplier.
-
Retain a certain percentage of invoice to mitigate the risk of supplier non-completion.
-
Pay against a contract financing request.
Note: Complex service negotiations are available only with RFQs.
Definitions
Advance
An advance is a financing payment made to the supplier, usually before any work or service has been performed, or many a times at the point when an award is made. The payment is in anticipation of, and for the purpose of, complete performance under the contract.
Pay Items
Pay items represent a schedule of value (SOV) or statement of work (SOW) in a structured manner. Each pay item refers to a work or service being negotiated. After an award is made, the completion of a pay item makes the supplier eligible to be paid based on the means of payment negotiated for the pay item. There are three kinds of payment schemes that organizations can choose from:
-
Progress payments – Payment is based on the progress made on the pay item. For example, 30% of the pay item amount is paid when 30% of the work is completed on the pay item.
-
Performance or milestone based payments – In this case the pay item represents a milestone and supplier is paid in full when the milestone is achieved.
-
Rate based payments – Rate based pay items involves quantity and price. Supplier is paid based on the quantity delivered. It can also include cases like number of hours of consultant's time.
Contract Financing Payment
Financing payments are any payments that are made before final acceptance of work or products. In the government sector, financing payments include advances, performance based payments, and progress payments. In the private sector, only advances are considered financing payments.
Retainage
Retainage is the practice of withholding a fixed amount or percentage of payment until all work under a contract is complete and accepted to mitigate the possibility of the supplier not completing the contract. .
Recoupment Rate
The recoupment rate is the percentage of the invoice amount that can be used for recoupment of an advance or contract financing payment made earlier.
Purchasing Styles
Purchasing styles allow organizations to control the look and feel of the application to match the usage of the purchasing document. Organizations can turn on or off various features, thereby simplifying the user interface. For example, you can specify whether or not to enable complex work features such as advances, retainage and contract financing. The list of values for the Outcome field in a sourcing document has been extended to include user defined purchasing styles. While creating a sourcing document, only if you select an Outcome (that is, purchasing style) that enables complex work, does the sourcing document display information relevant for complex work negotiation.
See Creating a Negotiation Header for instructions on creating the header for a negotiation, including specifying the negotiation Outcome.
See Oracle Purchasing documentation for details on creating Purchasing Styles.
Using Global Agreements
Global agreements allow buying organizations to negotiate pricing and define agreements on behalf of a shared central environment. This is in contrast to a regular blanket purchase agreement which can exist only within the realm of a single operating unit. Execution against global agreements can be performed by multiple local operating units. Global agreements:
-
leverage buying power of all organizations within a company by negotiating and managing global discounts on pricing.
-
provide a standardized set of goods and services across a company.
-
achieve timely and accurate reporting information on agreement usage, supplier performance, and item utilization.
-
standardization on global terms and conditions with each supplier with optional flexibility to override at the local level.
Defining Agreement Scope
Sourcing professionals can negotiate prices on behalf of multiple organizations within an enterprise and then enable the resulting agreement ( prices + terms and conditions) to be shared by those organizations for procuring products and services. Although the agreement is meant for usage in multiple organizations, the agreement unambiguously identifies the parties between whom the agreement was originally crafted. This includes the negotiating organization in the deploying enterprise and the supplier/supplier site combination which represents the selling party
Managing the agreement
Although the agreement can be used by multiple organizations, all control and maintenance responsibilities remain within the organization that originally negotiated the agreement, this includes:
-
canceling lines
-
freezing the agreement
-
putting the agreement on hold
-
closing the agreement.
The negotiating organization of the agreement should own sole responsibility for approval of the agreement, and the agreement follows the approval policy for this organization. All approval submission checks applicable for the blanket purchase agreement are in effect for the global agreement as well.
Agreement Usage
Like blanket purchase agreements, global agreements have effective start and end dates, total release amount, and agreement currency. There are certain terms and conditions which apply globally regardless of where a release is being performed. These include such terms as FOB terms, freight terms, and attachments. But there are also terms which will depend on the organization performing a release against the agreement such as bill-to address.
Understanding Large Negotiations
In many cases, buyers need to create a negotiation that contains large numbers of Requirements and/or large numbers of negotiation lines. For example:
-
In public sector RFIs, there may be several hundred questions (represented by negotiation Requirements) suppliers must answer.
-
Companies negotiating entire catalogs need to represent the items in the catalog as lines on the negotiation.
-
RFXs and RFIs for large construction projects may need to list thousands of lines.
In these cases, the user needs to efficiently:
-
Create the initial document.
-
Create amendments.
-
Take the negotiation to a subsequent round of responding.
-
Easily and completely respond to the negotiation such that the integrity of the negotiation is retained.
-
Analyze responses and make awards.
-
Generate documentation about the negotiation.
Oracle Sourcing supports all these tasks when dealing with large negotiation. If you specify that your negotiation is large by selecting a large negotiation style when initially defining your negotiation. Afterwards whenever you access the negotiation lines, you can use a search function to display a subset of the entire collection of lines. You don't have to page backward and forward through all the lines to process particular negotiation lines.
Additionally, if your negotiation meets the criteria set by the Sourcing Administrator, and qualifies as a "very large" negotiation, the processing done at various point in its life is performed asynchronously. For example, if your negotiation contains several thousand lines, the publishing process could require considerable time. Therefore it is performed by a Concurrent Program running in the background. This frees up your terminal so you can continue working. Once the publishing process is completed, you receive a notification that the publishing is completed, and the negotiation appears with a status of Completed on your Negotiation Home page.
Since the Oracle Sourcing featuresAutoExtend, Power Bidding, and Proxy Bidding can affect large numbers of lines automatically, they are discourages for large negotiations and not allowed with very large negotiations. Additionally, since if you use a bid ranking method 1, 2, 3 the responses for all the lines must be sorted, this ranking method is discouraged.
Searching Lines Of a Large Negotiation
Once you have defined multiple lines to a large or very large negotiation, you can use the search function to view or process selected lines. This allows you to access and work with only those lines that meet your search criteria (for example, only lines whose items come from a particular category). There are two fields that display line number information. Number of Lines specifies the aggregate number of all lines defined to the negotiation, including constituent lot lines and group lines. Last Line Number refers to the last independent and/or parent line number. Lines in lots and groups are numbered as children of their parent line number and so are not reflected in Last Line Number. This means there can be a difference between the two. For example, if you have a negotiation with many lots, the Last Line Number might be 200, while the Number of Lines might be 375.
To search negotiation lines:
-
On the Lines page (Create, View, Bid) enter as many search criteria into the fields in the Search area as are necessary to define the set of lines you wish to process.
-
You can search on Line Number, Category, Line Description, and Item Number.
-
If you select "Show table data when all conditions are met," the lines retrieved must each of the criteria you define.
-
If you select "Show table data when any conditions are met," the lines retrieved must meet at least one of the criteria you define, but not necessarily all.
-
You can add multiple search clauses by selecting an entry from the Add Another menu and clicking Add. This enables you to search for a range of items (for example, Item Number > 123 and Item Number < 789), or for items from more than one category.
-
-
After you have specified your search criteria, click Go to display the results.
-
Once the lines are displayed, you can process them as you normally would.
Note that if you use a search clause with the comparison types of
-
Contains
-
Is not
-
Ends with
you must also include at least one search clause having a comparison type that is not one of the types listed above.
Using Oracle Services Procurement and Oracle Procurement Contracts
Using a Deliverable in a Negotiation Document
Negotiating for different kinds of Services
Defining Service-Related Lines
Using Contract Terms and Conditions in a Negotiation
Negotiating for different kinds of Services
If Oracle Services Procurement is installed and licensed, you can create documents that negotiate for many different types of services. You can negotiate for:
-
Rate-based temporary labor such as office clerical work or a database administrator who charges by unit of time and has higher rates on the weekend. The charge for this type of service is based on hourly rates per person.
-
Fixed-price temporary labor such as contractors, temporary administrators. There is a fixed amount limit attached to the service. .
-
Fixed-price services such as corporate accounting services, maintenance services, or consulting services. The charge for this type of service is based on a flat amount for the service provided .
Using Contract Terms and Conditions in a Negotiation
If Oracle Procurement Contracts is installed and licensed, you can create contract terms and apply them to your negotiation . You can use contract terms to specify legal and other requirements for your negotiation. Using contract terms is an easy way to create and maintain standardized contract text which can be customized as needed. You need the Contracts Terms Library Administrator responsibility to create and maintain clauses and contract templates in the Contract Terms Library. You need the Manage Contract Terms responsibility to create and maintain contract terms on negotiation documents .
To apply contract terms to your sourcing document:
-
On the Create Negotiation page, click Contract Terms in the navigation bar at the top left side of the page.
-
On the Create Contract Terms page, search for and select a contract template from the list of values. See the Oracle Procurement Contracts, Oracle Contracts Implementation and Administration Guide online help for information on using contract templates.
-
Click Apply Template.
-
You can edit the clauses applied by the template as needed. You can add, delete or modify text. See the Oracle Procurement Contracts, Oracle Contracts Implementation and Administration Guide online help for instructions on modifying clauses.
-
Select Validate from the Actions menu to verify the validity of the contract terms you are defining. If you receive any error messages, you must correct them and validate again.
-
When you have completed your contract terms, continue by either clicking Suppliers to define a supplier invitation list, or clicking Review to inspect the negotiation prior to publishing it .
Managing Schedules of a Negotiation
After submitting a negotiation that is opening in the future, the buyer can update the publishing dates (open date, close date, and preview date) in the document, if necessary. This update is called managing schedule. When the buyer updates the publishing dates, and if suppliers are already notified, then a new notification message is sent with the new dates. If suppliers are yet to receive a notification, then when they are notified, it is with the new dates. You can update the dates if the document is in Submitted or Preview status and is opening in the future.
To manage the schedule of a sourcing document:
-
On the negotiation summary page, select Manage Schedule from the Actions menu and click Go.
Note: This action is available only if the status of the document is Submitted or Preview.
-
The Manage Schedule page displays all the dates associated with the negotiation.
-
Select an option for Preview Date.
-
Immediately: To open the negotiation for preview immediately.
-
Specific Time: To open the negotiation for preview at a specific time. Use the pop-up calendar to specify a date and time.
Note: New preview date cannot be after the original open date. Also, suppliers can view details of the negotiation but cannot place responses.
-
-
Select an option for New Open Date.
-
Immediately: To open the negotiation for responses immediately.
-
Specific Time: To open the negotiation for responses at a specific time. Use the pop-up calendar to specify a date and time.
Note: New open date cannot be after the original close date.
-
-
Enter a New Close Date.
-
Enter a New Close Date.
-
Click Apply.
Monitoring Negotiations
Responding on Behalf of Suppliers - Surrogate Bid
Viewing the Published Negotiations section
Using Live Console to compare Bids or Quotes
Using the Monitor Supplier Activities page
Communicating while a Negotiation is in progress
Inviting Additional Suppliers to a Negotiation
Extending an In-progress Negotiation
Initiating a New Round of Responses
Canceling or Deleting a Negotiation
Creating an Amendment to a Negotiation
Printing Negotiation Information
Managing Deliverables Assigned to a Negotiation
Finding Negotiations
The Negotiations Home page is the central point of access for all your negotiations. From here, you can can create and submit new negotiations and continue working on any draft negotiations you have in progress. You can also monitor the progress of your open negotiations.
To create a new negotiation:
Click the appropriate link under the Create section of Quick Links. Follow the instructions in Creating a Negotiation to create a new negotiation.
To access a draft negotiation:
You can use draft negotiations to spread out the creation process over several sessions. You can also use drafts to allow a team of collaborators to all work on the same negotiation. To access a draft negotiation:
-
Click the "Manage" link under Draft in the Quick Links section of the Negotiations Home page.
-
On theManage Draft Negotiationspage,searchfor the negotiation you wish to access.
-
From the Results display, select a negotiation and click the appropriate button (Edit, Unlock, Review and Submit).
To search for your negotiations in progress:
At any one time, you may have several ongoing negotiations. You can monitor the progress of these negotiations by clicking the Number link for that negotiation's entry in the Your Negotiations at a Glance section of the Negotiations Home page. This takes you to the negotiation summary page for that negotiation.
Note that the Your Negotiations at a Glance section shows a limited number of entries based on time remaining. To see the complete list of negotiations you created, click Full List.
You also search for all open negotiations to which you have access.
Tracking Negotiations
Access the negotiation you wish to monitor. Click the negotiation number to access the negotiation summary page where you can see information on the negotiation. From the negotiations summary page, you can either
-
Select View Response History from the Actions menu and click Go.
-
Click the Responses number to access the Details page for the negotiation, and then click View Response History to see information on responses to this negotiation.
You can also use the Live Console to view and compare responses to your negotiation.
Viewing Responses
-
From the Your Negotiations at a Glance section of the Negotiations Home page, click the negotiation number link of the negotiation you wish to see.
-
On the negotiations summary page, select View Quote/Bid History from the Actions menu and click Go.
-
The Quote/Bid History page displays the responses the negotiation has received. There is an entry for each supplier who has placed a quote/bid in the negotiation.
-
To see details about a particular response, click the number link in the Quote/Bid column. The resulting page shows details about the response.
-
In the Administration > Negotiations Configuration page, select the checkbox Allow Suppliers to Edit Contract Terms, if you want to enable your suppliers to update, or download and update the contract terms. The revisions to the contract terms are reflected in the quote when it is completed by the supplier.
This checkbox, when selected, applies to new negotiation documents, and not existing negotiation documents.
-
While viewing a supplier's quote, buyers can also view the updated/revised contract terms that the supplier has completed. Use the action View Contract Changes by Supplier in the Quote page. This action appears only if the supplier has revised the contract terms. The View Contract Changes by Supplier action opens up a report that shows the buyer the header, summary of changes, and detailed clause changes that were done by the supplier. You can also view the changes on the screen. Additionally, you can view changes per clause. Changes such as strikethroughs, added text, and deleted text are highlighted in red, followed by a description of the nature of the change in blue collar. For example, “Service Liability : minimum of $50,000” is added text, and is shown in red collar. And next to it, the change description <line added> is in blue.
Responding on Behalf of Suppliers - Surrogate Bid
Sometimes suppliers cannot place their responses online since they have no online access. Oracle Sourcing buyers can place surrogate bids on behalf of such suppliers. Once the buyer has received all the bid/quote information, a surrogate bid can be entered into the negotiation.
To place a surrogate bid on behalf of a supplier:
-
Sign on to Oracle Sourcing with Sourcing Super User responsibility.
-
From the Negotiations Home page, access the negotiation in which you wish to bid by clicking its number. Negotiations in which you are participating appear under Your Negotiations at a Glance. If you do not see your negotiation, click Full List. Clicking the number of your negotiation takes you to the negotiation summary page.
-
On the negotiation summary page, select Create Surrogate Quote/Bid from the Actions menu, and click Go.
-
On the Create Surrogate Bid/Quote: Select Supplier and Contact page, enter the name or contact of the surrogate supplier in the Supplier field and click Go. To create a contact without a user account please follow the steps:
-
Navigate to the Buyer Work Center and click on Suppliers.
-
Search for a supplier.
-
On the Supplier Details window, select the Contact Directory link from the menu in the left pane. The Contacts directory page displays with all the existing contact details and with options to update existing contacts, create a new contact.
-
Click on the create new contact button. Enter details of contact and ensure you do not select the checkbox Create User Account for this Contact. After entering the details click on Apply. A new contact without a user account for the supplier is created.
-
-
Select a contact for the supplier and click Create Surrogate Bid/Quote.
-
Continue from the Terms and Conditions page as with a regular response if terms and conditions are required.
The Terms and Conditions page enables buyers to accept (or not accept) the terms and conditions on behalf of suppliers, that are displayed as follows. After the buyer selects the Create Quote action, the Terms and Conditions page displays, with the following checkboxes (the wording of the checkboxes may differ from the boilerplate text below):
-
I have read and accepted the terms and conditions
-
I do not have the authority to accept terms and conditions but would like provisional permission to participate
By default both checkboxes are unchecked. The buyer needs to select one of the checkboxes only (mandatory) before the Accept button is enabled. Click Accept to go to the Create Quote page where you, as the buyer can enter the bid.
-
-
On the Create Bid/Create Quote page, enter the Bid/Quote Received Time. It is when the buyer received the offline copy of the response or when the supplier mailed/faxed the response. It must be after the negotiation open time and before the current time.
-
Continue entering response information according to the instructions specified in the information from the supplier.
-
If a negotiation is created for temporary labor, and if there are descriptors associated to the negotiation line based on the Job-Purchasing Category – Shopping Category combination, the supplier can view the descriptors (attributes) during the Quote process. The supplier can respond to the attributes on a rate-based negotiation line.
Note: If the negotiation is a Two-StageRFQ, it must first be closed, and technical and commercial sections unlocked before a surrogate bid can be entered. Surrogate quotes can be entered during either of the two stages - Technical or Commercial.
Quoted
This dropdown has two values: Yes and No. When you enter information for the quote (such as item information, or price), and you need to change or remove several field values, select Yes in the Quoted dropdown. You need to provide all the line information again. This is an optional field, and helps you to remove all the quote data with a single click. Otherwise, removing all the field values in the quote would be cumbersome. If you change item or price information, the system automatically changes the value of Quoted to Yes. By default, the value of Quoted is No.
Alternate Lines
The Create Alternate Lines page enables you to create all the line types supported in Oracle Procurement : Amount Based, Quantity Based, Fixed Price and Rate Based Temp Labor line types. The Attributes region is available on the Create Alternate Line page. Attributes are copied from the main line(s).
You can create an alternate line and associate it to one or more negotiation lines using the following methods:
-
Click the Add Alternate Lines icon in the row of the RFQ line, if you wish to associate the RFQ line to the alternate line. This opens the line details page. The Related to RFQ Lines region displays in the line details page. The Related to RFQ Lines region shows you the RFQ lines that the alternate line is associated to. Also the relation of the RFQ line could be an additional line, or an alternate line. This can be specified in the Relation with RFQ Lines dropdown. Click Add RFQ Line to add one or more negotiation lines that you want the alternate or additional line to be associate with. You can delete an associated RFQ line by clicking the Delete icon at the end of each RFQ line row.
-
In the Alternate Lines region, select the Create Line action, then click Go. The line details page displays. Enter the quote / bid details such as Description, Quote Quantity, Quote Price, etc. You can also create your quote / bid with descriptors (attributes). Descriptors from the source lines are also available in the alternate line.You can associate the alternate line to one or more negotiation lines using the Related to RFQ Lines region. Save your work by clicking Apply or Save Draft to return to the main Lines page of the quote.
The Alternate Lines region enables you to delete alternate lines and their association with negotiation lines. Select a line and click the Delete button ; you could also delete a line by navigating to each row and clicking the Delete icon at the end of each row. The Actions dropdown also enables you to delete all lines by using the Delete All Lines option and clicking Go. Use the pencil icon at each row to update information for the alternate line.
The Ship-To address is copied from the negotiation header if the alternate line is associated with multiple main lines. If the alternate line is associated to a single main RFQ line, the Ship-To address is copied from that single main line.
Buyers can amend a negotiation before it closes or create a new round. Controls are copied to the amended Negotiation. However, supplier responses are not copied, including alternate lines. Alternate lines are not copied to amendments or a new round. Buyers or suppliers need to create alternate lines whenever they update existing response or create new response.
Revising Contract Terms
You can view the Contract Terms region in the Create Response page. The contract terms that the buyer specified is viewable in the region.
-
Click Preview Contract to view the contract as a PDF document.
-
Click Download Contract to save the contract as an XML or an RTF file to your local drive. When you complete updating, redlining and editing, or adding new clauses to the contract terms, save the changes.
-
Click Upload Contract to upload the revised contract terms as part of your quote/response.
-
You can review the uploaded contract using the Review Uploaded Contract page, and then continuing with the quote.
You can view all the changes made to thee bid using the Review Contract Deviations page.
-
Click the Update icon to update a specific clause. The system indicates which clauses are mandatory. You can preview or export the clause as well.
Withdrawing Surrogate Offers by Buyers on behalf of Suppliers
The Quote page enables you to revise or withdraw your offer, depending on your supplier's request. For example, your supplier may wish to revise or withdraw their bid because the amendment to the solicitation now contains terms and requirements that were not anticipated. You can withdraw only active offers from suppliers and offers for negotiations that are currently open for bidding and for negotiations on which quote withdrawal is allowed. Click the Quote Number from the Surrogate Quote History page. On the Quote page that displays, select Withdraw Offer from the Actions LOV enables you to withdraw an offer from the negotiation. Select Withdraw Offer from the Actions LOV and click Go. The Withdraw Offer page displays, and you need to enter a withdrawal reason and click Submit. You get a confirmation message that the offer has been successfully withdrawn. A notification is also sent to the supplier indicating that the buyer has withdrawn his offer. The status of the offer will appear as withdrawn and will no longer be available in buyer's offer analysis and award decision pages.
Viewing the Published Negotiations section
The Published Negotiations table displays the negotiations which you have published. This display includes negotiations in which you are either the owner or for which you are a collaboration member. The entries in the table appear in the following order:
-
Open negotiations, in order of time left (paused negotiations are displayed with a pause icon to the right of the negotiation number).
-
Closed negotiations, ordered by negotiation number.
-
Cancelled negotiations, ordered by negotiation number
There are five entries in the table. To see all your negotiations, click Full List.
To view published negotiation information:
-
Under the Published Negotiations section of the Negotiations Home page, identify the negotiation you wish to view. Note that the table displays only a limited number of entries. To view a complete list of your negotiations, click Full List.
-
To view the information about the negotiation such as item information, response controls or invitation list, click the negotiation number link.
-
To view information on responses, click the number link in the Responses column.
-
To view messages sent to you from suppliers (if any) click the number link under the Unread Messages column.
-
To view the graphical monitor of a negotiation, click the graph icon to the right of the negotiation. Select a negotiation item, then click View Monitor.
Note: The graphical monitor is not available for sealed style negotiations until they are unlocked. Only buyers can view the graphical monitor in blind style negotiations. All participants can view the graphical monitor in open style negotiations.
-
Using Live Console to compare Bids or Quotes
Live Console allows you to graphically view and compare responses to a negotiation. The Live Console gives you a single location from which you can generate many in-depth graphic displays. You can use these graphs to assist in analyzing your negotiation responses during and after a negotiation. Live Console is not available for:
-
RFIs
-
Contract Purchase Agreement negotiations that do not have lines.
-
Sealed negotiation (once the negotiation is unsealed, Live Console is available).
-
Draft negotiations (since the negotiation has no responses).
-
Additionally, line-level information and displays are not available for large or very large negotiations.
-
Also, information is not available for Two-Stage RFQs until the technical evaluation is completed and the commercial stage is unlocked.
To view the Live Console for a negotiation:
You can access the Live Console directly from either the Negotiation Home page or from a negotiation's summary page.
-
In the Published Negotiations table on the Negotiation Home page, click the monitor icon in the row for the negotiation whose information you wish to see (if you click Full List or perform a search, you generate an expanded Published Negotiations table).
-
Otherwise, click a negotiation's number link in the Published Negotiations table to see that negotiation's summary page. On the negotiation summary page, select View Live Console from the Actions menu and click Go.
Layout of the Live Console Display
Header Section
The Header section shows you the negotiation title and time remaining until the negotiation close. Within twenty-four hours before the close date, the countdown clock displays in real time the amount of time remaining until the negotiation closes. If staggered closing is in effect, the clock shows the time remaining until the next line closes. The Actions menu on the right provides access to the same displays available from the Actions menu on the negotiation summary page. Clicking the negotiation title name link navigates you to the negotiation summary page.
Overview Section
The Overview section displays response information at the negotiation level.
Suppliers Table
The Suppliers table on the left lists the top ten participating suppliers. If there are more than ten participating suppliers, you can navigate through the list by clicking "Next 10" or by using the drop down menu. Each supplier is identified by a shape symbol and color beside the supplier name. The entries in the supplier table are listed in the following order:
-
Suppliers with an active response
-
Suppliers with a draft response
-
Suppliers with no response
Within each of the above groups, suppliers are ordered by the time of the supplier's last activity. Note that as the Live console display refreshes, which top ten suppliers appear in the Supplier table and/or their ranking may change depending on any new responses that nave been received although information on all invited and participating suppliers is tracked and can be displayed.
The supplier name link displays the Supplier Details page. If the supplier has been locked out of the negotiation, a lock icon appears beside the supplier name.
The response number link navigates to the Response Details page. Draft responses have no number but are indicated by the word Draft. Partial responses are indicated by an exclamation point icon. If the negotiation has been amended and a new response has not yet been submitted, the response is marked as "Resubmission Required."
The final column in the suppliers table shows how long the supplier has accessed this negotiation This column does not appear once the negotiation has been closed.
Note: In a Two-Stage RFQ, the Suppliers Table will only include suppliers whose quotes have been shortlisted from the technical evaluation to the commercial stage.
Graphs Area
The Graph Area can display four types of graphs. Two graphs can be displayed at the same time. To generate a different graph, select the graph from the drop down menu for that window and click Go. (Note that the following graph names are applicable for an auction. RFQ graph titles refer to quotes not bids).
-
Additionally, there is a menu option that accesses the Auction Summary page.
Graphs are not available for
-
Contract Purchase Agreement negotiations that have no lines.
-
Blanket Purchase Agreements or Contract Purchase Agreement negotiations that have lines but no Estimated Quantity value.
-
Negotiations for which there are no responses (for example, a negotiation that is in Preview status.
-
Quotes that are not shortlisted from the technical evaulation stage of a Two-Stage RFQ.
Suppliers are identified on XY charts by shaped icons. Moving your mouse over a graph point or a chart bar displays the time, amount, supplier and supplier site for that response. For graphs showing responses over time, the maximum shown is six months.
Lines Section
The Lines section allows you to select and display information for a particular negotiation line. The table has an entry for each negotiation line, lot or group line. Selecting an entry displays the graphs for that entry. If the buyer entered a current price value, the entry shows the best savings for that line.
There are eight possible graphs. Two graphs can be displayed at the same time. To generate a different graph, select the graph from the drop down menu for that window and click Go.
-
Best Bids Price/Score (Multi-Attribute Scoring negotiations only)
-
All Bids Price/Score (Multi-Attribute Scoring negotiations only)
Graphs are not available for Contract Purchase Agreement negotiations that have no lines. They are also not available if there are no responses yet (for example, a negotiation in preview status).
Graphs will not include quotes that were not shortlisted from the technical evaluation stage of a Two-Stage RFQ.
The savings values displayed are calculated by the system and can be positive or negative numbers. Since many of the savings values use a current price entered by the buyer when the negotiation was created, any calculations involving current price may display as null if the buyer did not enter a value for current price.
For graphs showing responses over time, the maximum time limit shown is six months.
Live Console Information
Partial and surrogate responses are displayed on the Live Console graphs. Disqualified responses are not displayed. Bard representing a response are labeled either by the response number or the supplier name. If there are ties among bids, they are distinguished by time submitted.
Suppliers are identified on XY charts by shaped icon. Moving your mouse over a graph point or a chart bad displays the time, amount, supplier and supplier site for that response.
If a negotiation is amended or taken to a new round of responding, response information from the previous version is discarded. Pausing a negotiation does not affect Live Console information.
For charts that track responses over time, the time the first response is received becomes the leftmost entry in the graph. The right side of the graph is the close date. The time indicators are adjusted and displayed accordingly.
The countdown clock at the top of the Live Console displays the time remaining in real time. Live Console displays are automatically updated every three minutes. Two hours before the negotiation closes, the refresh interval decreases to every 60 seconds. One hour before the negotiation closes, the refresh interval decreases to thirty seconds. You can manually refresh the graphs at any time to obtain the most up-to-date information.
Graph Explanations
The graph shows bids for the top five suppliers based on the graph cirteria. if the supplier has multiple bids, all bids for that supplier are shown.
Notes at the bottom of the page indicate the negotiation currency and the last refresh time.
Using the Monitor Supplier Activities page
Use the Monitor Supplier Activities page to view the entire history of all supplier actions including acknowledging amendments. You can display the Monitor Supplier Activities page by opening a solicitation and then selecting Monitor Supplier Activities from the Actions LOV. The activities of each supplier are grouped in different regions. The activity Amendment Acknowledged indicates that the supplier has acknowledged the amendment and agrees to the new terms and conditions.
To access the Monitor Supplier Activities page:
-
From the Negotiations Home page, click the negotiation number link for the negotiation you wish to monitor.
-
On the negotiation summary page, select Monitor Supplier Activities from the Actions menu and click Go.
The Monitor Supplier Activities page shows detailed information on all suppliers participating in a negotiation. If there are 24 hours or less before the negotiation closes, the countdown clock at the top of the page display the time remaining. If staggered closing is in effect, the clock shows the time until the next line closes.
For each supplier, the page shows both supplier and contract level information. By default, both levels of information are displayed when you access the page although you can hide the contact level information by clicking the Hide link (to redisplay the contact level information, click the Show link).
For each supplier, the supplier-level information shows:
-
The supplier name (linked to the Supplier Details page).
-
Whether the supplier was explicitly invited to the negotiation.
-
Whether the supplier has been locked out of the negotiation.
The contact-level information shows:
-
the name of that supplier's contact who is participating in the negotiation (linked to the Contact Details page).
-
The site from which the contact responded (if the contact is associated with a supplier site).
-
the number of the contact's response (linked to the View Response page)
-
The status of the contact's response.
-
The time of that contact's activity.
-
The activity performed by that contact for example, View Negotiation, Amendment Acknowledgment, Create Response, and Submitted Response among others. The activity Amendment Acknowledged indicates that the supplier has acknowledged the amendment and agrees to the new terms and conditions.
Preventing Supplier Participation
Since suppliers do not always have to be explicitly invited to participate in a negotiation, there may be occasions when you have no control over which suppliers decide to access your negotiation. This can lead to situations in which you decide to exclude a supplier from any further participation in an ongoing negotiation.
For example, you may have a business practice that states that all participating suppliers must submit a response within a specified length of time. This prevents suppliers who have no intention of submitting a response from monitoring the responses from other participants to obtain competitive information. In either of these cases, you may wish to exclude that supplier from further participation in the negotiation.
To lock a supplier from further participation in a negotiation:
-
On the Monitor Supplier Activities page, locate the row displaying the information for that supplier.
-
Click the Lock icon at the end of the row.
-
On the resulting Warning page, click No to cancel the lockout, or click Yes to prevent further participation by this supplier.
-
A confirmation page verifies that the supplier has been locked out. On the Live Console page, a lock out icon appears beside the supplier's entry in the Supplier's table.
Once the supplier has been blocked, any action in progress is disallowed and at the next page refresh, the supplier user receives a message that access to that negotiation is no longer possible.
Downloading Responses
You can download all the bids and quotes you receive for a negotiation into a spreadsheet for offline viewing. This is useful if you have received a large number of responses and want to compare them offline. You can also update the spreadsheet with your award decisions and then upload it to identify winning responses.
You can download bids for analysis while the negotiation is still open.
To download responses:
-
From the Your Negotiations at a Glance section, click the negotiation number for the negotiation to access the Negotiation Summary page.
-
On the Analyze by Spreadsheet page, select Analyze by Spreadsheet from the Actions menu.
-
On the Download Spreadsheet Files page, select the type of spreadsheet you wish to download: XML Spreadsheet or Tab-Delimited (you can open XML Spreadsheet in Excel if you have version 2003 or later). If you select Tab-Delimited, you must then choose which spreadsheet to download: Requirements responses or line responses. For XML spreadsheets, you can only download statuses of Active or Shortlisted. For Tab-Delimited spreadsheets, you can download responses in all statuses, only active responses, or only responses that have been shortlisted.
-
Click Export.
-
Save the file to a convenient location.
-
Open the file and use the information contained to create your award decisions.
Analyzing Responses
There are several ways of analyzing the responses you have received for your negotiation. You can analyze by line or by response (you obtain different information depending on which type of analysis you perform). You can use AutoAward to have the system pick the best award. And if there are may lines or lines with complex attributes, you can also use a spreadsheet to perform your analysis offline . To analyze by response:
-
On the negotiations summary page, click Analyze by Bid/Analyze by Quote from the Actions menu .
-
The Analyze by Bid/Analyze by Quote page shows the response details from the different suppliers .
-
You can inspect the Requirement values (if any) by selecting multiple supplier responses and clicking Compare Requirements. The Compare Requirements page presents a side-by-side comparison of the Requirements. Note that the partial response icon denotes responses where the response quantity is lower than the quote/bid quantity for at least one of the lines of the negotiation, or where the response does not include responses to all negotiation lines.
-
If a negotiation is created for a temporary labor and if there are descriptors associated to the negotiation line based on the Job - Purchasing Category - Shopping Category combination; if the supplier has submitted a quote based on the Descriptors during the Quote process, then buyer can compare the suppliers' bids based on the descriptors that are associated to the line.
To analyze by line:
-
From the negotiation summary page for this negotiation, select Analyze by Line from the Actions menu and click Go.
-
The Analyze by Line page displays a table with an entry for each line in the negotiation and important information such as the best quote/bid, as well as additional information about each line including any backing requisition information. You can see the number of active bids against each line and the best quote/bid determined by the system for that line.
-
You can select any one entry in the table and click Graph Price or Analyze. If you select a line and click Graph Price, the resulting Monitor page shows your responses in a graph.
-
If you select a line and click Analyze, the resulting Analyze Line page displays additional information about the responses to that line, including that response's rank. You can click Compare to obtain a more complete, side-by-side display of all the responses.
-
-
The Analyze Alternate Lines button in the Analyze by Line page, when clicked, opens the Analyze Alternate Lines page. This page enables you to view all lines, alternate lines or related lines information on Quote/Bid for RFQ/Auction.
-
If you select the Alternate Lines radiobutton, the Related to RFQ Line dropdown displays. The dropdown enables you to search and select the line number which the supplier-provided alternate line is related to. If it is not related to any line, this field will remain blank for that record. If the Alternate line is linked to multiple negotiation lines, the field will displays a link called Multiple. If you click the Multiple link, a popup displays, that shows the negotiation lines to which this alternate line is linked.
This page shows multiple active responses/offers from the supplier and these offers can be awarded.
To use the AutoAward recommendation
AutoAward is a feature you can use when you need a quick, standard award. AutoAward uses the ranking capabilities and methods available in Oracle Sourcing to obtain its best award recommendation. For example, it will use the price being offered by the supplier for the most basic method of ranking responses. However, AutoAward can also use calculations available from Multi-Weighted Scoring negotiations to determine the best overall total cost. You can use AutoAward to quickly generate a benchmark against which other ranking methods and scenarios can be compared .
From the negotiation summary page for this negotiation, select View AutoAward. The AutoAward Recommendation page displays the response(s) that AutoAward has decided best fit the negotiation requirements .
To download responses via spreadsheet for analysis:
You can use the spreadsheet download feature to perform many tasks offline. You can use the spreadsheet download feature to export the response information for analysis offline. Once the negotiation is closed, you can download a spreadsheet with which to make award decisions and upload them to the system..
-
On the negotiations summary page, select Analyze by Spreadsheet from the Actions menu and click Go .
-
Download the spreadsheet.
-
Open the file up and use the instructions in the readme file (the .htm file) to process the spreadsheet.
Communicating While a Negotiation Is in Progress
During negotiation, buyers, collaboration team members, and suppliers sometimes need to contact each other for additional information or clarification. While a negotiation is in draft status, buyers and collaboration team can communicate with each other through internal messages. Once a negotiation has been published, buyers, collaboration team members, and suppliers can communicate with each other in an ongoing online discussion.
The negotiation creator and any collaborators who have full access to the negotiation can create and respond to messages from each other as well as from the supplier. Collaboration team members with view-only or scoring-only access can create and reply only to messages from other collaboration team members.
Using online discussions
Once a negotiation is published, you can start or join an online discussion from the Online Discussions page. To access the page, use either of these methods:
-
Selecting Online Discussions from the Actions menu on the negotiation summary page and click Go.
-
Click the Unread Messages alert icon, which appears on any page when you open the negotiation. The icon appears in the top right hand corner of a page to notify you that you have a message you have not read.
The Online Discussions page displays all discussions associated with a specific negotiation. There can be multiple ongoing discussions for a single negotiation. The Subject identifies each discussion. For each discussion, there is an entry for the first message in the discussion thread and an entry for each reply. Discussion threads are sorted and displayed based on the date, and time of the most recent message received. The message also displays the name of the sender.
When you read or reply to a message, the status of the message changes to either Read or Replied. If another collaboration team member also replied to a supplier message, then the Status Icon appears in the Status column, regardless of whether your status is Unread, Read, or Replied.
To create a new discussion:
-
Navigate to the Online Discussions page.
-
Click New Message.
-
Select recipients. You can send the message to:
-
All Suppliers or Selected Suppliers
For supplier recipients, if the negotiation style is open or blind, you can send the message to one or more collaboration team members, one or more supplier contacts, or all participants. If the negotiation style is sealed, you must send the message to all collaboration team members and all supplier contacts, or to the buyer's organization.
-
All Internal Members or Selected Internal Members
For internal recipients, you can send the message to collaboration team members and scoring teams if they are defined. Messaging capabilities are the same regardless of negotiation style.
-
-
Specify the subject heading.
-
Enter the full text of the message.
-
Optionally, add an attachment for additional information:
-
Click Add Attachment.
-
From the Add list, select either Desktop File/ Text/ URL or From Document Catalog.
If you select Desktop File/ Text/ URL, then:
-
Enter the Attachment Summary Information (Title and Description).
The Category defaults based on recipients you choose.
-
Select an attachment type (File, URL, Short Text, or Long Text).
-
Enter the file, URL, or text as appropriate.
-
Optionally, click Add Another to add another attachment.
-
After adding attachments, click Apply.
If you select From Document Catalog, then:
-
Search for the document catalog by title, or click More Search Options.
-
Select the document catalog from the search results table.
-
Click Apply to add the selected catalog.
-
-
-
Click Send.
Viewing Messages and Attachments
To view a message, click the message link in the Message column. The Message page displays the message text, and other message details, including attachments (if any).
View attachments from one of the following pages:
-
The Online Discussion page, click the View Attachments icon in the Attachments column.
-
The Message page, click the link in the Title column.
To reply to a message:
-
Click Reply to respond to the message you are viewing.
-
Select recipients of your reply and enter the text of your response.
-
Click Send.
To reply directly to a message without viewing the message:
-
Click Reply from the Messages table.
-
Select recipients of your reply and enter the text of your response.
-
Click Send.
A buyer can:
-
Reply to all participants or select a particular sender from a list of values.
-
Reply to a message and change recipients of the message.
A supplier can reply to a message from a buyer and include all participants. For messages from other suppliers, suppliers cannot view the name of the other supplier, or reply to the message. A supplier can select the Private check box to send the message to the buyer only.
Printing Messages
To print just the message you are viewing, click Print. Fill out the network print box and click Print.
To document all discussions associated with this negotiation click Printable Page, and then Print.
Online Discussion Participants Messaging Capabilities The table below details the rules governing the messaging capabilities of the negotiation creator, Collaboration Team members, and suppliers. Note that the rules vary depending on the style of negotiation and the access level of the Collaboration Team members.
| Negotiation Style | Negotiation Creator/Collaboration Team Member (Full Access) Can: | Collaboration Team Members (View-Only or Score Access) Can: | Negotiation Respondents Can |
| Open/Blind Negotiation |
|
|
|
| Sealed Negotiation |
|
|
|
Inviting Additional Suppliers to a Negotiation
Any user assigned the appropriate function can add suppliers to a negotiation any time before the negotiation closes.
To add suppliers to a negotiation:
-
Under the Your Negotiations at a Glance section of the Negotiations Home page, click the negotiation number link for the negotiation to which you wish to add additional suppliers. If you don't see the negotiation, click Full List.
-
Select Add Invitees from the Actions menu and click Go.
-
On the Invite Additional Suppliers page, follow the instructions to add new suppliers .
Extending an In-progress Negotiation
You can extend an negotiation beyond its scheduled close date and time only if you set your response controls to allow manual extension. You cannot manually extend your negotiation after it has closed. Additionally, you cannot extend an auction after its first AutoExtension has been triggered.
To manually extend your negotiation:
-
Under the Your Negotiations at a Glance section on the Negotiations Home page, click the negotiation number for the negotiation you wish to extend. If your negotiation is not displayed, click Full List.
-
On the negotiation summary page, select the Extend RFQ/Extend Auction option from the Actions menu and click Go.
-
On the ExtendRFQ/Extend Auction page, specify a new close date and time. You can also enable AutoExtend or modify your AutoExtend settings if you wish.
-
Click Apply .
-
Enter a new close date and time. Click Apply.
-
A notification will be sent to all participants.
If, when creating this negotiation, you entered an award date, need-by date, and/or long-term agreement dates, these dates will also be extended by the same number of days that you extend your negotiation if the dates are scheduled to occur before your extended close date. For example, if your negotiation includes a January 15 close date and a January 20 award date, and you extend that auction for 7 days, your new close date is January 22, and your new award date is January 27. However, if you extend that auction for only 3 days, your new close date is January 18, and your award date remains January 20.
Changing AutoExtend Settings
You can initially set your auction's AutoExtend settings while defining bid controls. However, you can still enable AutoExtend (if not enabled initially) or modify your initial AutoExtend settings after the auction opens for bidding if you selected "Allow manual extend when negotiation is open" while setting the bid controls.
If your auction enters AutoExtend mode, you can change the number of times that the auction can AutoExtend, but you cannot change any other AutoExtend settings.
You cannot enable or modify AutoExtend settings for an auction that is in a preview period or has closed for bidding.
To change your auction's AutoExtend settings:
-
Under Your Negotiations at a Glance on the Negotiations Home page, click the number for the negotiation whose AutoExtend values you wish to change.
-
On the negotiation summary page, select the Extend Auction option from the Actions menu and click Go.
-
On the ExtendAuction page, review your current AutoExtend settings (if any). You can also review and extend your auction's scheduled close date and time. You can modify the following AutoExtend options:
-
Lines you want to AutoExtend (AutoExtend all lines, or only those that receive bids during the AutoExtend period)
-
Number of extensions allowed
-
Length of each extension
-
Start time of each extension (at the scheduled auction close time, or upon receipt of a new winning bid)
-
-
Once you have made your changed, click Apply .
Shortlisting Suppliers
Shortlisting is a way to divide suppliers who have provided responses to a negotiation into two groups after response analysis. The first group consists of suppliers whose responses fall within an acceptable range and can be considered candidates for awards. The second group includes suppliers whose responses are unacceptable and whose further responses will be ignored for awards. All suppliers who participated in your negotiation are initially included in the shortlist. You must remove the supplier from the list by changing its status .
For example, after the analysis of a first round of responding in a multi-round negotiation, you may wish to eliminate certain suppliers whose offers were not acceptable. You do this by removing these suppliers from the short list.
Note: Once the negotiation is closed, and you are making your award decisions, you will see all the responses from the last round. If you choose to remove any suppliers from the shortlist, you will not be able to award them any business. Their response information is displayed only for comparison and analysis .
To change a supplier's shortlist status:
-
On the Negotiations Home page, search for and select the negotiation.
-
Close the negotiation if it is not already closed.
-
On the negotiation summary page, select Award by Quote/Award by Bid from the Actions menu, and click Go.
-
On the Award by Quote/Award by Bid page, select the suppliers and click Change Shortlist Status. Responses from these suppliers are no longer considered as viable for award decisions .
Note: If you choose to download your responses into a spreadsheet and make your award decisions there, you have the option of downloading only responses from shortlisted suppliers.
Initiating a New Round of Responses
After your RFI, RFQ, or auction has closed, you can initiate a new round of responding if you set the controls to allow multiple rounds of responses (RFQs always permit multiple rounds of quoting).
After you initiate a new round of responding, none of the previous responses submitted are available for awarding.
To initiate a new round of responding: You can only initiate a new round of responding after the current round has closed. You must either wait until the negotiation reaches its close date and time, or you must manually close it early.
After the RFI, RFQ, or auction has closed, you can initiate a new round of responding from the negotiations summary page:
-
On the Negotiations Home page, select a negotiation by clicking its Number link under the Your Negotiations at a Glance section. If the negotiation you're looking for is not displayed under Your Negotiations at a Glance, click the Full List button to see a display of all your published negotiations. You can also enter search values in the Search Negotiations fields to search for a negotiation. From the Results: Negotiations display, click the Number link for the negotiation you wish to see.
-
Select Create New Round from the Actions menu and click Go.
-
On the Create New Round page, you can change the negotiation type, for example, from an RFI to an RFQ, and also change the negotiation document style if necessary. If you have clauses and deliverables from Oracle Procurement Contracts, you can include the existing ones or update them to any new versions. Finally, you can carry over any attachments tied to the previous round
-
On the Create New Round: Header page, update your negotiation's header details as appropriate (*indicates a field that must be entered prior to the new responding round).
-
Possible Description Modifications
-
*Title/Style - You can give your negotiation a new name and change the negotiation style.
-
Security Level - You can change the level of security on the negotiation
-
-
Possible Collaboration Team Changes
-
You can change the makeup of the collaboration team working on this negotiation. You can add new members and/or delete existing members. You can update members' approval status, view only status, and task assignments.
-
-
Possible Terms Changes
-
You can change the Bill-To, Ship-To, FOB, Payment Terms, Carrier, and Freight Terms.
-
-
Possible Negotiation Currency Changes
-
If this is a multi-currency negotiation, and you originally chose to base exchange rates on a set of company exchange rates for a particular date, you can change the date to reflect more current rates.
-
-
Notes and Attachments
-
You can change any leader level existing notes and/or attachments
-
-
-
Click Lines to modify information about your negotiation lines on the Lines: Create Line page. When you are finished making line changes, click Apply to return to the Create New Round page. You can make the following line changes:
-
Response Ranking - You can choose to have the response evaluation based solely on price, or you can also identify other important attributes for your negotiation items and define weighting values to indicate their relative importance. The system can then include that information when calculating the quote/bid value.
-
Rank Indicator - You can change the type of display used to show response rankings. For example, you might have turned the ranking off during your previous round because you only wanted to gather information about potential trading partners but did not wish to rank them yet. Beginning with subsequent rounds, however, you might wish to start the actual ranking process.
-
-
Line Changes
-
You can modify the lines included in the negotiation. You can delete old lines, modify attributes of existing lines, or add new lines (note that suppliers will have to enter responses to any new or updated lines). Note, however, that if this is a multi-currency negotiation, you cannot add amount-based lines. You can also use the spreadsheet upload functionality to update negotiation lines.
-
If you are implementing Multi-Attribute Weighted Scoring for this round of negotiation, you will need to define scoring and weighting information for the appropriate attributes. If you used Multi-Attribute Weighted Scoring in previous rounds, the scoring and weighting information from the last round is carried over to the new round. But if you add any new lines to the new round, you may need to define new scoring and weighting values for that line's attributes.
-
If you defined price breaks for the previous round of this negotiation, you can modify the price break definitions.
-
-
Click Controls to modify negotiation control information.
-
Possible Date Modifications
-
*Open Date - Date and time you want the new round of responding to begin. You can also choose to open the negotiation immediately.
-
Preview Date - For RFIs, RFQs or auctions opening in the future, you can enter the date and time (prior to the open date and time) the negotiation is available for previewing by all eligible participants. You can also choose to open the negotiation for preview immediately.
-
*Close Date The new date and time the RFI, RFQ, or auction closes. Note that you have to specify a new closing date.
-
Award Date (RFQs and auctions only - ) You can choose to enter a new award date/time if this differs from the timing in the previous round of negotiation.
-
-
Response Controls
-
Modify other Response Controls as necessary.
-
-
-
Click Suppliers to modify your invitation list .
-
Possible Invitation List Changes
-
If you invited suppliers in the previous round, they are automatically added to the invitation list for the new round. Additionally, any uninvited suppliers who responded in the previous round are also automatically added to the invitation list for the new round. You can remove any supplier from the invitation list for the new round.
-
You can also add new suppliers.
-
-
-
Click Review. Review your updated negotiation information. If there are approvers defined for this document, click Submit for Approval. If there are no approvers defined for this document, click Publish.
Closing a Negotiation
You can close a negotiation early only if you set your response controls to allow a manual close. Note that you cannot manually close an auction after its first AutoExtension has been triggered.
To close your negotiation early:
-
Under the Your Negotiations at a Glance section of the Negotiations Home page, click the negotiation number for the negotiation you wish to close.
-
On the negotiation summary page, select the Close Early option from the Actions menu and click Go.
-
On the Close Early page, enter the new date and time you want to close the negotiation or choose to close it immediately.
-
If desired, enter a note to your suppliers. This note is included in the notification that will be sent.
-
Click Apply .
Canceling a Closed Negotiation
You can cancel a negotiation even after it has been closed. Open a closed negotiation, and use the Cancel option in the Actions dropdown to cancel the closed negotiation.
Pausing a Fast-Moving Auction
There may be times when you are in the middle of a fast-moving negotiation such as an auction, and you need to answer a supplier's question or disseminate information to suppliers. For example, during the last few minutes before a negotiation closes, a supplier may ask for clarification on some aspect of the negotiation. In this case, you can pause the negotiation briefly while you answer the question and then resume the negotiation and allow it to run to completion.
-
No active responses can be submitted while a negotiation is paused. Only draft responses can be submitted.
-
Once the negotiation is resumed, the Close time is incremented by the amount of time the negotiation was paused.
To pause a negotiation:
-
From the negotiation summary page, select Pause Auction/RFQ/RFI from the Actions menu and click Go.
-
On the Pause: Auction/RFQ/RFI page, you can enter a note explaining the reason the negotiation is being paused.
-
Click Apply.
-
The negotiation is successfully paused, and on online message is sent to all participants notifying them of the pause. Also, a pause icon appears beside the negotiation number in any negotiation display list, for example, the Published Negotiations section on the Negotiation Home page
-
Use the online message feature to communicate with the participating supplier(s) if necessary. To reply to any messages sent by suppliers, return to the negotiation summary page and select View Online Discussions from the Actions menu.
-
Once you have addresses the issue or question, you should resume the negotiation.
To resume a negotiation:
-
Return to the negotiation summary page. Select Resume Auction/RFQ/RFI from the Actions menu, and click Go.
-
The negotiation is resumed. An online message is sent to all participants informing them that the negotiation has been resumed.
Creating an Amendment to a Negotiation
After publishing a negotiation, the buyer can update information defined in the document if necessary. This update is called an amendment. Respondents are notified that the sourcing document has been amended and are required to review their previous response and resubmit it in accordance with the amendment. Amendments can be created anytime after the preview date/time (or open date/time, if no preview date/time was specified) and before the close date/time.
To create an amendment to a sourcing document:
-
On the negotiations summary page, select Create Amendment from the Actions menu. You go to the Create Header page. Notice that the negotiation number has now been given a suffix, for example, 12345,1. This suffix is incremented every time you create a new amendment for this document.
Note: If your negotiation is a very large negotiation, a concurrent program is generated to create the new version when you select Create Amendment. You can monitor the progress of this job from the Manage Draft Negotiations page. Once the draft has a Status of Completed Successfully, you can access it and update it as described below.
-
On the Create Amendment Header page, you must enter a new Description for the amendment and make any other header level attribute changes you need. Note that the negotiation Organization, Outcome and Style cannot be changed.
-
On the Create Amendment: Lines page, enter any line changes, additions, deletions, or updates to line information if necessary.
If there are price tiers, you cannot change the type of tiering allowed in the negotiation (for example, quantity-based breaks versus price breaks) however you can change the tier values for a particular line.
-
Change the negotiation rules on the Create Amendment: Controls page if necessary.
-
If Oracle Procurement Contracts is implemented, and there are clauses and deliverables defined to this negotiation, these can be changed on the Create Amendment: Contract Terms page.
-
You cannot add or delete suppliers on the Create Amendment Suppliers page during an amendment. To invite new suppliers, use the active negotiation's negotiation summary page.
-
You can review the new changes compared to the current active negotiation by clicking Review.
-
When you create an amendment, your messages and attachments from the original negotiation are also available in the amendment document.
-
If you have approvers identified on the Collaboration Team on the Create Header page, you can submit the amendment for approval by clicking Submit for Approval on the review page. Approvers will receive notification that they need to approve the amendment. Once approved (or if approval is not required), the Submit button changes to Publish. Once you click Publish, no new responses can be received on the previous negotiation. All suppliers will be required to acknowledge the amendment and resubmit their responses to be eligible for award.
You can save the amendment as a draft at anytime during the creation process if you click Save Draft. Draft amendments are available on the Negotiations Home page if you click Drafts in the Manage Quick Links section.
Note: If your negotiation is a very large negotiation, a concurrent program is generated to create the new version when you click Publish. You can monitor the progress of this job from the Manage Draft Negotiations page. Note that once your job completes, it disappears from the Manage Draft Negotiations page and appears in Published Negotiations on the Negotiations Home page.
Printing Negotiation Information
Much business communication today is carried and managed offline. Government organizations in particular present solicitation packages according to a unified format. Buyers need the capability to download and print a negotiation for offline review. Responders should be able to complete negotiation documents and return the results by FAX, mail or email.
The printed buyer version of the negotiation contains all details of the negotiation. You can print a supplier version that contains only supplier related information, or a supplier-specific version, if there are invited supplier included in the negotiation (for example, if a particular supplier is restricted to a subset of negotiation lines). You can print a copy of a draft negotiation.
To print a published negotiation:
-
On the Negotiations Home page, search for the negotiation you wish to print. Access the negotiation by clicking its negotiation link. These negotiations are listed under the Your Negotiations at a Glance section. If you cannot see all your negotiations, click Full List.
-
Generate the version you wish to print:
-
To print the buyer version of the negotiation, select Buyer Printable View from the Actions menu, and click Go.
-
To print a supplier version, select Supplier Printable View and click Go.
-
To print a supplier-specific version, click the Suppliers tab. The suppliers table shows any suppliers which have been explicitly invited to this negotiation. To print a version for a specific supplier, click the icon in the Printable view column for the supplier.
-
-
When the prompt box appears, open and inspect the print directly, or save it to a location on your machine and review the document there.
Note that prior to publishing it, you can also print your negotiation document from the Review page.
To print a draft negotiation:
-
On the Negotiations Home page , click Drafts under the Manage Quick Links.
-
Search for the negotiation you wish to print by clicking the Negotiation Number link.
-
On the search results page, select the negotiation and click Review.
-
On the Review page, use the instructions above to select and print the particular (buyer, supplier, or supplier-specific) version you wish.
-
When the prompt box appears, open and inspect the print directly, or save it to your machine for later review.
To print contract terms only:
-
On the Negotiations Home page, search for the negotiation for which you wish to print the contract terms by clicking the negotiation number link.
-
Click the Contract Terms link in the navigation bar.
-
Click Preview Contract Terms.
-
When the prompt box appears, open and inspect the print directly or save it to a location and review the document locally .
To print response details:
-
On the Negotiations Home page, search for the negotiation for which you wish to print the response by clicking the negotiation number link.
-
On the negotiation summary page, select Bid/Quote/Response History from the Actions menu and click Go.
-
On the response history page, click the response number for which you wish to print details.
-
On the response details, select Printable View from the Actions menu and click Go.
-
When the prompt box appears, open and inspect the print directly or save it to a location and review the document locally.
Canceling or Deleting a Negotiation
Canceling a Negotiation
Sometimes, the responses to your negotiation do not meet your needs. For example, there may have been too few responses, or responses with unacceptable terms, or your business needs may have changed. In any of these cases, you may wish to simply cancel the negotiation.
-
Under the Your Negotiations at a Glance section of the Negotiations Home page, click the negotiation number for the negotiation you wish to cancel. If you do not see the negotiation, click Full List.
-
On the negotiation summary page, select the Cancel RFQ/Cancel Auction option from the Actions menu and click Go.
-
On the Cancel page, you can enter a text note to participants explaining why you are canceling the negotiation.
-
Click Apply. The system notifies all the invitees and participants of the cancellation.
Deleting a Negotiation
You can delete negotiations that have been closed. You might need to do this for negotiations that were created during training sessions, mock RFQs or auctions, or for negotiations with obsolete information created before a specific date or time.
Navigate to the Administration tab, and select Cancel / Delete Negotiation (in the Negotiation Tools region). The Cancel / Delete Negotiation page appears, asking you to enter the number of the negotiation that you wish to delete or cancel. When the search results appear, click either Cancel Negotiation or Delete Negotiation.
Managing Deliverables Assigned to a Negotiation
Deliverables are additional requirements which must be provided by a supplier as part of the negotiation process. For example, a buyer may ask a supplier to provide copies of personnel certification, a detailed project plan, or delivery schedule before the buyer will consider finalizing a contract with that supplier. If Oracle Procurement Contracts is installed and licensed, you can create and manage deliverables for your negotiations .
At any point in time, you may have many negotiations in progress, some of which will require deliverables. You can easily view the status of all your deliverables. This allows you to quickly pinpoint any negotiations that are at risk because a deliverable has not been provided.
To view and update your deliverables:
-
Click "Deliverables" under Manage in the Quick Links section of the Negotiations Home page.
-
On the Manage Deliverables page, enter enough search values to restrict the results to the deliverable(s) in which you are interested.
-
When results are displayed, scroll if necessary to find your deliverable.
-
To see information on the deliverable, click the entry in the Deliverable Name column.
-
To see information on the negotiation to which the deliverable is assigned, click the entry in the Document Number column.
-
See the Alert column for important information on the deliverable's status.
-
-
To update the information on a deliverable, click the Update icon. On the Update Deliverable page, you can perform the following modifications (note that changes to the deliverable status are tracked and can be displayed):
-
Change the deliverable status.
-
Modify or delete an existing attachment, or add a new attachment .
-
-
When you are finished updating the deliverable information, click Apply .
Awarding Negotiations
Unlocking and Unsealing a Sealed RFQ or Auction
Awarding Business in an RFQ or Auction
Scoring Responses to a Negotiation's Requirements
Using a Downloaded Spreadsheet to Award Negotiation Items
Allocating Awarded Items Among Suppliers
Disqualifying Auction or RFQ Responses
Viewing Negotiation Information
Viewing Award Approval History
Generating a Purchase Order Document
Understanding Contract Binding
Unlocking and Unsealing a Sealed RFQ or Auction
In a sealed RFQ or auction the buyer cannot see the bids until the RFQ/auction is unlocked. In addition, respondents in the RFQ or auction cannot see other quotes/bids until the buyer also unseals the RFQ/auction (although the identity of other suppliers is revealed to the suppliers in an auction). An RFQ/auction can only be unlocked and unsealed after it is closed. Additionally, an RFQ/auction cannot be awarded until it is unlocked.
Note:You will always be able to unlock and unseal an RFQ/auction you have created. In addition, other users from your company who have the appropriate function security can also unlock and unseal your RFQ/auction.
To unlock and unseal an RFQ/auction:
-
Close the negotiation if it is still open.
-
On the negotiation summary page, select Unlock from the Actions menu and click Go .
-
On the Confirmation page, click "Return to Negotiation Summary."
-
Select Unseal from the Actions menu and click Go.
Scoring Responses to a Negotiation's Requirements
If the negotiations creator defined Requirements for a negotiation, you may be asked to evaluate and score the responses to this Requirement. If team scoring has been enabled for a negotiation, you must be a member of a scoring team to enter scores. If team scoring is not enabled, you must be a negotiation editor (either the negotiation creator or a Collaboration Team member with Full access) to enter scores. If the scoring method for the Requirement is None or Automatic you do not enter scores (for Automatic scoring, the system assigns a score to the response based on the acceptable values defined by the negotiation creator).
The negotiation must be closed before entering scores.
To enter scores:
-
From the Negotiation Home page, access the negotiation for which you wish to enter scores.
-
Select Enter Scores from the Actions menu.
-
On the Enter Scores by Response page, click the pencil icon in the Enter Scores column for the response whose Requirements you wish to score.
-
On the Enter Scores page, view the Requirement and its response and enter a value in the Score column. Note that you can not enter a value higher than the maximum score the negotiation creator defined for that Requirement. You may optionally enter an internal note. Note that is it mandatory to enter a value for at least one of these two fields.
-
Click Submit Score.
-
Continue scoring subsequent responses.
Locking Scores
Once all your evaluators have scored their Requirements, you may wish to lock the scores. Locking scores prevents members of the scoring team who have scoring access only from entering new score values. It also allows the system to use the score values entered manually to calculate the total score for the Requirements (until the scores are locked, a Requirement with a scoring method of Manual has a score of zero). Note that once the manual score for a Requirement is calculated, the overall score for the bid/quote is also updated. Even though scores are locked, scoring team members with full access can override the scores entered and/or unlock the scores.
To lock/unlock scores:
-
Access the negotiation.
-
From the Actions menu, select Manage Scoring Teams and click Go.
-
On the Manage Scoring Teams page, click Lock Scoring (if scores are unlocked). Scores can no longer be entered for Requirements. Alternatively click Unlock Scoring (if scores are locked). After scores are unlocked, all scoring team members can enter new scores.
To override score values:
-
Access the negotiation.
-
From the Actions menu, select Award by Bid/Quote and click Go.
-
On the Award by Bid/Quote page, click the Score value link for the bid/quote whose scores you wish to modify.
-
On the Scores: page, click Override Scores.
-
When the Scores: page refreshes, enter the new score values. The Scores: page displays the name of the last user who updated scores.
How is a response's score calculated?
There are two ways Requirement can be assigned a score.
-
Manually - a member (or members) of a scoring team enters a score value for all the Requirements that are included in the Requirement section the negotiation creator assign to their scoring team.
-
Automatically - the system assigns a score based on the acceptable values defined by the negotiation creator.
The score is divided by the value for Maximum Score and the result multiplied by the weight of the Requirement. When members of a scoring team score a response (that is, there are multiple scores for the same Requirement), the system uses the individual team members' values to calculate the average score for that Requirement. This value is then used in the calculation just described.
Participants can respond to Requirements defined with a scoring method of None. But evaluators are not able to enter scores for those responses.
Related Topics
Using Knockout Scores
When you define Requirements, you can choose to specify a knockout value. This is the score below which a response is no longer considered acceptable. Once you apply the knockout values, the response is removed from the shortlist. It can be viewed, but not awarded. If any of the Requirement responses do not pass the knockout test, that response is removed from the shortlist. Note that in a Two-Stage RFQ, if any responses are removed from the shortlist during the technical evaluation stage, that response is not available for commercial evaluation.
To apply knockout scores:
-
Access the negotiation.
-
Select Apply Knockout Results from the Actions menu and click Go.
-
On the Apply Knockout Results page, view the information. The page displays which responses will be removed from the shortlist.
-
If the information is correct, click Apply.
Completing a Two-Stage RFQ
After you create your two-part RFQ, and receive sufficient responses, you can process it.
-
Close the RFQ.
-
From the Actions menu, select Unlock Part: Technical and click Go. Once unlocked, you and any evaluators assigned to the Technical Requirements section can see the supplier responses to the Technical Requirements.
-
Technical evaluators view and score any technical Requirements.
-
Lock scores
-
Apply knockout scores.
-
From the Actions menu, select Unseal Part: Technical and click Go. This allows suppliers to see values for Technical quotes.
-
From the Actions menu, select Complete Evaluation: Technical and click Go.
-
From the Actions menu, select Unlock Part: Commercial.
-
Commercial evaluators view and score any commercial Requirements. Technical evaluators can no longer view responses to Technical Requirements.
-
From the Actions menu, select Unseal Part: Commercial and click Go. This allows suppliers to see values for Commercial quotes.
-
Continue awarding the RFQ.
Awarding in different ways
Once you have closed your negotiation and analyzed the responses you received, you can make your award decisions. There are several methods you can use when awarding business in a buyer's auction or RFQ:
-
You can award the entire negotiation to a single supplier (multiple suppliers if the outcome is a blanket purchase agreement),
-
You can award an individual line to a single supplier.
-
You can divide an individual line among multiple suppliers.
-
You can award alternate lines to a supplier.
-
You can award multiple active offers from the same supplier.
-
You can accept and use the decisions generated by the AutoAward feature.
-
You can download the responses into a spreadsheet, enter award information, and upload the spreadsheet back to the system.
Awarding an entire negotiation to a single supplier
You can easily award all the lines of a negotiation to a single supplier by selecting Award by Quote/Award by Bid from the Actions menu on the negotiation summary page. Awarding at the quote/bid level allows you to quickly enter your award specifications since you do not have to enter an explicit award decision for each line. All the lines on which the supplier quoted/bid are awarded to that supplier. Any lines the supplier did not quote/bid on are not awarded.
Awarding an Individual Line to a Single Supplier
You can award all the business for a negotiation line to single supplier by selecting Award by Line from the Actions menu on the negotiation summary page. If the supplier offered only a partial quote/bid, the supplier is awarded as many units as were quoted/bid. The remaining units remain unawarded.
Note: This award method is not available in large or very large negotiation.
Awarding Alternate Lines
You can award alternate lines to a supplier. The system enables you to view / analyze the alternate lines in the negotiation, and finally award the alternate lines to the supplier.
You can award each multiple active offer fully or partially. If lines are awarded from multiple active responses from the same supplier, they are consolidated and awarded in one award document. If the same line is awarded to more than one response, there will be a record for each award.
Dividing a negotiation line among multiple suppliers
If necessary, you can split a line between multiple suppliers. This happens often when none of the responses to a particular line offers to sell the entire quote/bid quantity asked for. For example, if you are looking to buy 100 monitors, and supplier A offers to sell 75 monitors for $600 each, but supplier B offers to sell 60 monitors for $500 each, you might wish to award supplier B the first 60 monitors and award the remaining 40 to supplier A.
Note: This award method is not available with large or very large negotiation.
Using the AutoAward feature
The AutoAward feature analyzes all the responses from suppliers who participated in the negotiation and generates award decisions based on the details of those responses. AutoAward decisions are based on the response ranking generated by the system.. While on the negotiation summary page, you can select View AutoAward from the Actions menu to see the award decisions made by AutoAward. On the AutoAward Recommendation page, you can see the information on AutoAward's decision. To see detailed information about AutoAward's decision (such as the winning responses picked by AutoAward and the quantity awarded to each), click "Show" in the Details column. You can use the AutoAward's decisions by clicking Accept Recommendation, the award decisions are saved as a draft and can be reviewed in the Award Summary page.
Note: This method is not available for large or very large negotiations.
Awarding by Spreadsheet
If your negotiation has many lines or complex lines having many attributes or cost factors, you may wish to download the responses you received to a spreadsheet file and save it locally. You can then access this file and review the responses offline. After you have made your award decisions, you enter this information into the spreadsheet and upload it back to the system .
Related Topics
Awarding Business in an RFQ or Auction
Awarding Business in an RFQ or Auction
There are several ways you can award business for a negotiation. You can enter award decisions at the supplier level or the line level. You can award the entire negotiation to a single supplier, award multiple lines to the same supplier, or award each line its own supplier. This provides flexibility and allows you to quickly enter award decisions .
Note: The auction or RFQ must be closed for responses before you can award business. You can wait until the negotiation reaches its specified close date/time, or, if the negotiation controls allow it, you can manually close the negotiation prior to its specified close date/time. You cannot initiate a new round of quoting/bidding on this RFQ or auction once you have closed the negotiation and submitted an award decision.
-
Access the negotiation you wish to award .
-
On the negotiations summary page, you see the information on the negotiation and any responses it has received
-
The Rank Indicator for the negotiation can be specified by the buyer as "1,2,3.." or "Win/Lose". The quotes received are evaluated and then sorted on the basis of price or multi-attribute scoring, and displayed in ascending order accordingly. For the Win/Lose rank indicator, the winning quote(s) are displayed first, in ascending order by price. Then the losing quotes are displayed, and are also sorted on price.
-
Once the negotiation is closed, you can begin awarding business. From the Action menu, select Award by Quote/Award by Bid to award an entire negotiation or multiple lines of a negotiation to the same supplier. Select Award by Line to award each line to its own supplier. Or select Award by Spreadsheet to download the responses to a spreadsheet file and enter your award decisions there. Once you have selected the action, click Go.
To award an entire negotiation to a supplier:
-
On the Award by Quote/Award by Bid page, you see all the suppliers who responded to your negotiation. To award the entire negotiation to one supplier, select the supplier and click Award. Note that you can select multiple suppliers on this page. Note also that you can change the shortlist status of a supplier on this page as well.
-
On theAward Quote/Award Bidpage, you see the response information for the supplier(s) you selected in the previous step. If you selected multiple suppliers, their responses are displayed side by side for easy comparison .
-
Click Award to identify the supplier to whom you are awarding the negotiation.
-
Click Save Award. All lines to which the supplier responded are awarded to that supplier. Any lines to which the supplier did not respond are not awarded.
-
The Review / Award Alternate Lines button on the Award by Quote/Bid for RFQ/ Auction enables you to open the Award Alternate Lines page. You can use the Award Alternate Lines page to award alternate lines for the particular Quote/Bid.
-
Select the Award checkbox to award the entire line. In order to perform a partial award, you need to navigate to the Award by Line page and then select Award Alternate Lines.
To award multiple lines to a supplier (not available for large or very large negotiations):
-
On the Award by Quote/Award by Bid page, select the supplier(s) to whom you wish to award the negotiation lines and click Award Multiple Lines.
-
On the Award Multiple Lines page, you see the response information on the supplier(s) you selected in the previous step. You also see entries for every line in the negotiation. For each line, select the radio button for the supplier to whom you wish to award that line.
-
The Award Multiple Lines page has a Review/Award Alternate Lines button for awarding by quote/bid. On the Award Multiple Lines page, click the Review/Award Alternate Lines button, this opens the Award Alternate Lines page.
-
Click Save Award
To award a single line to a supplier (not available for large or very large negotiations):
-
On the Award by Line page, select the line you wish to award and click Award.
-
On the Award Line page, you see all the suppliers who responded to this line. Select the supplier to which you wish to award business.
How you award the line depends on what type of line it is and what the negotiation outcome is.
-
If the line is an Amount-Based line or a Fixed-Price Services line, you select Yes or No from the Award drop down menu (you are essentially awarding the entire line to a single supplier).
-
If the line is a Goods-Based line:
-
If the negotiation has an outcome of standard purchase order, you enter the number of units you are awarding to this supplier. Note that you can split a line among multiple suppliers. Also, you cannot award more units that specified in the negotiation quantity, but you can award less.
-
If the negotiation has an outcome of blanket or contract purchase agreement, you select Yes or No from the Award drop down menu. You can also optionally enter the number of units in the Quantity Agreed field.
-
Note also:
-
You do not have to award a line. You can choose to leave it unawarded.
-
Once a line has been totally awarded, an awarded checkmark appears for the line.
-
-
Once you have selected the suppliers and specified the number of units to be awarded to each, click Save Award.
-
Click "Award by Line" to return to the Award by Line page.
-
Select the next line to be awarded and click Award.
-
Use the previously described instructions to award the next line.
-
Continue until all lines have been awarded.
To award alternate lines:
The Award by Line page enables you to award alternate lines by using the Award Alternate Lines region. Select a line on the Award by Line page, the Award Line page with the Award Alternate Lines region opens. This region shows you the alternate lines and / or the related lines of the negotiation. Select one or more alternate lines to perform the award.
The Related to RFQ/Auction Line field shows the line number which the supplier-provided alternate line is related to. If it is not related to any line, this field will remain blank. If the alternate line is linked to multiple Negotiation lines, this field will show a link called Multiple. If you click the Multiple link, a popup shows with the details of the Negotiation lines to which this line is linked. Use the Award checkbox to enter the quantity in the Award Quantity column. Using this region, the buyer can award alternate lines. Any alternate lines awarded using this region will be saved when the buyer saves the award decision. The award is retained unless overwritten. If the same alternate line is also linked to another line, then in the Award by Line page for the latter line, this line is already awarded, as per the earlier award details. The buyer can change the award details as required.
The Award Alternate Lines button on the Award by Line page, when clicked, opens the Award Alternate Lines page. This page enables buyers to award one or more alternate lines. Select one of the radiobuttons: All Lines, Alternate Lines or Related Lines to perform the award.
The Related to RFQ/Auction Line field display the line number which the supplier-provided alternate line is related to. If it is not related to any line, this field remains blank. If the Alternate line is linked to multiple negotiation lines, this field displays a link called Multiple. Click the Multiple link to open the popup which displays the negotiation lines to which the alternate line is associated.
Use the Award checkbox for entering quantity in Award Quantity column.
Use the following options to complete the awarding process:
Save Award button: Use this to save the alternate lines award. If you do not click the Save Award button, and a new Show / Search is performed, a warning message is displayed with Continue and Cancel options.
Return button: takes you back to the Award Multiple lines page.
Clear Award: clears all the Alternate lines that have been awarded so far to all the suppliers. You get a warning message to either Continue or Cancel.
To award using a spreadsheet:
If you wish to download the responses for a negotiation, select Award by Spreadsheet from the Actions menu. You can then save the responses as a spreadsheet file and view the instructions in the readme file contained in the zip to review offline to make your award decisions. If you have removed any suppliers from the shortlist, you can choose to download only the responses from the remaining shortlisted suppliers.
Note: If this is a large or very large negotiation, a concurrent program will generate the award spreadsheet. You can monitor the progress of the spreadsheet creation by clicking the link in the confirmation message to access the Download Requests page. Once the concurrent requests program has completed, you can download the spreadsheet.
Reopen Awards
Sometimes, an award decision may not be completed or culminate in an outcome document (purchase order or BPA) that can be fulfilled. Various situations can impede the fulfillment of an outcome document: for example, the awarded supplier(s) could back out or be unable to fulfill the requirement. Negotiation discussions could fall through after the awarding or the RFx could be completed prematurely. Additionally, if the awarded supplier is rejected, then the second supplier may be awarded the negotiation. To accommodate situations like these, the Reopen Award action enables you to unlock the negotiation and then modify the award or create a new award. The Reopen Award action is available for negotiations, Two-Stage RFQs, and staggered negotiations.
The completed negotiation cannot be undone. Thus, the Reopen Award action enables buyers to unlock the negotiation, modify the award, create a new award or revise the award(s).
If your negotiation has a status of Complete, Outcome not Requested, or Partially Complete, you can reopen the award. The status changes to Partially Complete.
To reopen an award:
-
Cancel the outcome document in Oracle Purchasing.
-
From the Actions list in the negotiation page, select Reopen Award.
You get a warning message, asking you to cancel the outcome document, and then proceed to reaward the negotiation.
Note that previously awarded suppliers are not automatically notified when an award is reopened.
Linked requisitions that have been returned to the requisition pool after the Complete action was selected are not relinked during re-awarding.
The Purchase Order Summarypage displays all outcome documents that are associated with the negotiation. Cancelled outcome documents are indicated with an icon. To view information about canceled documents, click Prior Award Information. Additionally, Internal Notes tracks the cancellation and reaward actions.
Related Topics
Using a Downloaded Spreadsheet to Award Negotiation Items
Allocating Awarded Items Among Suppliers
Disqualifying Auction or RFQ Responses
Using Award Optimization
You can use the Award Optimization feature to generate award recommendations. You can either choose the default recommendation (which awards based on response rank only), or you can create an award scenario and have Award Optimization generate award recommendations based on that scenario. When the optimization engine calculates the response price, it considers cost factors (if "Transform supplier responses" was selected) and quantity-based price tiers to which the supplier responded.
Award Optimization allows you to define finely-tuned what-if award scenarios which you can use to mirror your procurement best practices or legal requirements. You can create multiple award scenarios and compare the different recommendations generated by Award Optimization. Thus you can use Award Optimization as a decision support tool to evaluate your supplier responses to provide the best award recommendation.
Prioritizing Constraints
For each scenario, you can define one or more constraints specifying certain conditions the award decision should meet. You can define constraints at the header, line, and supplier levels. You can define business related constraints. You can define constraints related to all suppliers, suppliers from the Approved Supplier List, and/or specific suppliers.
You can also prioritize your constraints. If you select Mandatory from the Constraint Priority menu, the resulting award decisions generated by the optimization engine must meet all constraints. Otherwise, if you select User Specified, you can assign a priority for each constraint you define. In this case, you designate a priority, from 1 to 4 for each constraint you define. Priority 1 constraints are considered critical and have the highest priority. The optimization engine will try to meet all the criteria if possible, but if no result set meeting all the constraints exists, the engine will begin relaxing the low level constraints and re-optimize until a result set can be found. For example, if on the first optimization attempt there is no result set that meets all constraints, the engine will optimize again, but this time it will relax any priority 4 constraints. It will continue ignoring successively higher priority constraints until a result set can be created.
Note: In general, the optimization engine will try to relax constraints with lower priorities first. However, in some cases, it may find a solution by relaxing constraints with higher priorities while meeting constraints with lower priorities.
Determining Cost of Constraints
For any constraint you define, you can calculate the cost of that constraint. That is, you can calculate the award amount with the constraint in effect and compare it to the award amount without the constraint in effect. This gives you the "cost" of having the constraint in effect. For example, assume Buyer ABC has an auction with two lines, line one for 100 widgets, and line two for 25 bolts.
| Supplier | Line One Bid | Line Two Bid |
|---|---|---|
| Supplier 123 | $18 | $8 |
| Supplier 987 | $15 | $10 |
Based on the bid prices alone, the optimization engine would recommend awarding the entire 100 widgets to Supplier 987 for a total of $1500 and all 25 bolts to Supplier 123 for a total of $200 for a total award amount of $1700. But assume that because of poor performance history, Buyer ABC has created a constraint specifying that no more than $1000 can be awarded to Supplier 987. In this case, the engine would recommend awarding Supplier 987 only 66 widgets (66 * $15 = $990) and the remaining 34 widgets to Supplier 123 (34 * $18 = $612) for a total award amount of $1602. (Note that in both cases, the entire 25 bolts are awarded to Supplier 123, so the constraint on Supplier 987 is irrelevant on line two.) By comparing the two scenarios, the "cost" of the constraint on Supplier 987 is ($1602 - $1500) = $102.
Note that you can only determine the cost of a single constraint. If there are multiple constraints in effect for the scenario, you compare the cost of the single constraint against scenario with all the remaining constraints in effect. Also note that if the processing required for determining constrain cost is sufficient, a concurrent request is generated to determine the constraint cost.
Using the Optimization Engine
While the negotiation is still open, you can use AutoAward (System Generated) scenario to generate the default award recommendation based on the responses received so far. If you wish to create different what-if scenarios, however, you must close the negotiation first.
Creating a Scenario
From the negotiation summary page, select the Award Optimization option from the Actions menu and click Go.
-
On the Award Optimization page, click Create Scenario. Note that the scenario name is the only required field. Complete as many additional fields or combination of fields to fully describe the requirements of your scenario.
-
On the Create Award Scenario page,
-
Enter a scenario name.
-
Select an objective from the drop down menu.
-
Specify how constraints are prioritized. Mandatory specifies that all constraints are required. Any award decision must meet all constraint criteria. User Specified allows you to specify the priority for constraints (see Prioritizing Constraints above).
-
Specify whether or not to transform supplier responses.
-
Provide any internal notes.
-
-
Specify any header constraints
-
The minimum total award amount - the minimum amount this scenario will award.
-
The maximum total award amount - the maximum amount this scenario will award.
-
Also, for Requirement
-
The minimum total score.
-
The minimum score for each Requirement
-
The minimum score for any line attributes (for Multi-Attribute Scoring negotiations only).
-
-
-
Select a negotiation line and specify any line constraints. Note: Line-level scenario constraints cannot be used with large or very large negotiations. For each line of the negotiation, you can:
-
Choose to allow the line to be split among suppliers.
-
Require integer quantity awards. This means fractional awards are not allowed.
-
Specify a minimum and/or maximum number of units to be awarded for that line.
-
Specify a minimum and/or maximum amount that can be awarded for that line.
-
-
Click the Additional Line Constraints icon (the pencil icon) to define additional constraints for the line (if there is a Priority field, you can specify the weighting for this constraint). For each line you can:
-
Minimum response quantity for this line
-
Maximum response price allowable for this line
-
Specify a date range within which the promise date must fall.
-
Specify the minimum and maximum number of suppliers to which this negotiation line must be awarded.
-
Specify the minimum and maximum award amount, award amount percentage, award quantity, and award quantity percentage which can be awarded to any one supplier, as well as the minimum and maximum award amount or quantity which can be given to any individual supplier/supplier site/contact combination.
-
-
Click Apply to return to the Create Award Scenarios page. Specify supplier constraints. You can define very in-depth supplier restrictions. You can:
-
Exclude suppliers with purchase orders on hold.
-
Select the minimum or maximum number of suppliers to award business to.
-
Specify by amount or percentage, a minimum and/or maximum amount of business to award to:
-
incumbent suppliers
-
any single supplier.
-
any supplier of a particular business classification.
-
any supplier having a particular Approved Supplier List status.
-
any particular combination of supplier/supplier/site/contact.
-
-
Optimizing Scenarios
Once you have a scenario created, you can use the optimization engine to generate suggested award decisions. To use the award scenario to generate award decisions, click Optimize.
If Award Optimization can use the scenario definition to generate award recommendations, the Optimization Results page shows the recommendations generated. If you have prioritized constraints, the optimization engine will re-optimize ignoring lower priority constraints until it can generate an award recommendation (see Prioritizing Constraints above). If no award recommendations can be generated, an information page displays, informing you that no recommendations could be made. Click Edit scenario to make your scenario criteria less restrictive. Click Apply to save your changes and re-optimize.
If your negotiation is a very large negotiation, a concurrent program is initiated to generate the award scenario. You are returned to the main optimization page. You can monitor the status of the concurrent program in the Scenario Award Total column.
Comparing Scenario Results
Once you have defined the scenario and optimized the results, you can compare different scenario results by returning to the Award Optimization page by clicking the Award Optimization bread crumb. The Award Optimization page lists all the scenarios you have defined for the negotiation. If there are recommendations generated for a scenario, an icon appears in the Accept column.
If you wish to compare multiple scenario results, select the scenarios and click Compare.
If you wish to calculate the cost of a constraint, click the Scenario Award Total link. On the Award Scenario: Optimization Results page, click Calculate for the constraint whose cost you wish to determine.
Accepting Scenario Results
If you are satisfied with the recommendations based on the scenario, click Accept. If you wish to modify the scenario, click Update Scenario. If you accept the recommendation, any previously existing draft award recommendations are overridden by the new recommendations. You are taken to the Award Summary page, from which you can continue awarding the negotiation.
Using Supplier Incentives
Supplier incentives are inducements offered by a supplier to increase the amount that a buyer spends with that supplier. Supplier incentives include rebates and/or bonuses.
Rebates are provided by the supplier to the buyer and are based on the amount spent by the buyer with that supplier. This can include both the spend amount of the specific transaction (a particular auction or RFQ) as well as the accumulated spend that the buyer has spent over a period of time with that supplier. Rebates are specified as a percentage of the spend amount that is refunded to the buyer. There can be a fixed rebate for a particular transaction, or rebate tiers can be specified to define rebate percentages that apply to different ranges of spend. For example, if the spend is less than $100,000, perhaps a 2% rebate applies, whereas if the spend is between $100,000 and $200,000, a 5% rebate applies.
Bonuses are fixed amounts that apply to a specific transaction. Signing bonuses and transition bonuses are examples.
Suppliers can provide rebate and bonus information in attachments or attributes which they provide when placing responses. When creating an award optimization scenario, a buyer can use this information to calculate the applicable rebates and bonuses based on the award decision for that supplier (incentive calculations have no effect on the award recommendation generated by the optimizer). Buyers can also use the incentive information along with a line's current price (if entered by the buyer) to determine the total savings for that negotiation.
How are supplier incentives calculated for a supplier's response?
Incentives are calculated according to the supplier's incentive structure. This structure can include any or all of the following:
-
Rebate Tier values
-
Current Rebate % ( the rebate value for this transaction)
-
Current Total Spend (the buyer's accumulated spend with this supplier.
-
Transaction Spend (response value * awarded quantity)
-
Fixed incentive (for example, bonuses)
All applicable incentives are cumulative except that
-
If no Current Total Spend is specified, but both Rebate Tiers and a Current Rebate % are defined, the Current Rebate % is ignored and only the appropriate tier percentage is applied against the Transaction Spend value.
-
If both Current Spend, Rebate Tiers, and a Current Rebate % are specified, the incentives are calculated on both the Current Total Spend and the Transaction Spend as explained below.
(( Current Total Spend + Transaction Spend ) * any applicable Rebate Tier percentages ) - (Current Total Spend * Current Rebate % ) + any fixed incentives.
This calculation prevents the current total spend amount from being rebated twice.
Example:
Buyer 123 has created an auction for 1000 widgets and has received a bid from Supplier ABC. Supplier ABC also included incentive information. Buyer 123 decides to buy 100 widgets from Supplier ABC. Based on the Current Price information Buyer 123 entered and the incentive information provided by Supplier ABC, Buyer 123 determines the incentives for Supplier ABC and the savings available from Supplier ABC's bid.
Incentive Information:
-
Current Price = $25
-
Supplier Response = $23
-
Awarded Quantity = 100
-
Current Total Spend = $100,000
-
Current Rebate % = 2
-
Fixed Incentive (signing bonus) = $1000
-
Rebate Tiers
Minimum Spend Maximum Spend Rebate Percentage $1 $100,000 2 $100,001 $500,000 5
Supplier Incentives: (((100,000 + (23 * 100)) * .02 ) - (100,000 * .05)) + 1000 = $4115
Savings plus supplier incentives: ((25 - 23) * 100 ) + 4115= $4315
To define supplier incentives:
From the negotiation summary page, select Award Optimization from the Actions menu and click Go.
-
On the Award Optimization page, click Define Supplier Incentives.
-
On the Define Supplier Incentives page, select the supplier and click Define Incentives.
-
On the Define Incentives page, enter all the appropriate incentive values:
-
Current Total Spend
This is the total amount the buyer has spent with this supplier based on terms (for example, time period) agreed upon between the buyer and the supplier.
-
Current Rebate %
This is the rebate that applies to the current total spend. If both current rebate % and rebate tiers are defined, and no current spend amount is specified, the rebate tier values apply to the transaction spend and this value is ignored.
-
Fixed Incentives
Any fixed amount bonus that applies to this transaction.
-
Rebate Tiers
Use the rebate tiers table to define all appropriate levels of rebate. Rebate Tier values apply to the sum of current total spend (if specified) and the transaction spend.
-
Minimum Spend
The minimum amount a buyer must spend to be eligible for this rebate.
-
Maximum Spend
The maximum amount that is eligible for this rebate.
-
Rebate %
The rebate percentage that applies to this range of spend.
-
-
-
After entering all applicable incentive values, click Apply.
-
When you are returned to the Define Supplier Incentives page, continue defining incentives for any other suppliers, or click the negotiation link breadcrumb to return to the negotiation summary page.
Viewing incentive calculations:
Once you have entered incentive information for suppliers, you can use that information in optimization scenarios you define. To view incentive information:
-
From the Award Optimization page, click the Optimize icon for the scenario you wish to view.
-
On the Award Scenario: OptimizationResults page, check the following fields for incentive information:
-
Total Savings Amount including Incentives
This field displays the savings amount plus the incentives. The value in this field hyperlinks to the Total Savings Amount including Incentives Detail screen which show all suppliers who responded and the incentives they are offering (if any).
-
Total Savings Percent including Incentives
This field displays the savings amount plus the incentives amount divided by the total award amount.
-
Using a Downloaded Spreadsheet to Award Negotiation Items
See Downloading Responses for instructions on downloading a spreadsheet containing details on your negotiation responses and instructions on using the spreadsheet.
To indicate your award decisions, update the Award Quantity column for each negotiation line item that received responses. Also update the Award column to Yes . You can divide the items between multiple responses or award the entire quantity to a single response. You can also choose to not award any items if the responses were unacceptable. And you do not have to enter award quantities for amount-based line types
Once you have completed entering your award information, save the file and continue with the upload process.
-
Once the negotiation is closed, return to the negotiation summary page and select Award by Spreadsheet from the Actions menu and click Go.
-
Browse to the location where you saved your completed spreadsheet.
-
Click Import Awards.
-
The system will validate the information and prompt you to correct any wrong entries.
Note: If your negotiation is a very large negotiation, a concurrent program will be initiated to perform the award process. You can monitor the progress of this program by clicking the link in the confirmation message.
Since you used a spreadsheet to award your negotiation lines, you probably have no additional lines left to award using the Award by Item page. However, if you have remaining lines to award, you can still modify information in your spreadsheet to upload additional award decisions. Or you can use the instructions in Awarding Business in an RFQ or Auction to award the remaining lines.
Allocating Awarded Items Among Suppliers
If you used AutoCreate to generate a sourcing negotiation, there are backing requisition(s) associated with items you finally awarding. When you create the resulting purchase order dealing with the awarded items, you can specify how the items on these backing requisitions are consumed by the awarded items. Any unconsumed requisition demand is returned to the requisition pool.
For example, assume you have two requisitions for PC keyboards for a total of 75 keyboards. You AutoCreate these into a buyer's auction.
| Requisition Number | Item Quantity |
| 12345 | 50 keyboards |
| 98762 | 25 keyboards |
You receive two bids as follows on the auction item:
| Supplier | Awarded Bid Quantity | Price |
| Office Supplies | 30 keyboards | $10 |
| Your PCs | 30 keyboards | $12 |
You have received bids for 60 of the requested 75 keyboards. You want to allocate the awarded items in such a way that one of the requisitions is fully consumed and the other is partially consumed (any remaining unconsumed demand is returned to the requisition pool available to AutoCreate.
The system generates a default allocation to consume requisitions as efficiently as possible. The bid with the earliest promise date will consume as many of the requisition quantity as possible. Once the awarded bid with the lowest price has finished consuming requisitions items, any other awarded bid quantities are allocated across the requisition quantities until all awarded bids have consumed as much of the requisition demand as possible.
Default Allocation
| Bidder | Awarded Bid Quantity | Consumed Quantity | On Requisition Number |
| Office Supplies | 30 | 30 | 12345 |
| Your PCs | 30 | 2010 | 1234598762 |
Notes: Bidder Office Supplies is awarded all 30 units and the award is applied against requisition 12345. The remaining bidder, Your PCs, is awarded 30 units as well: 20 units are applied against the remaining units for requisition 12345, and 10 units are applied against requisition 97862. Note that this leaves requisition 98762 with 15 units of unsatisfied demand. The 15 unconsumed units are returned to the requisition pool and are available for participation in any future AutoCreated negotiations.
To enter allocations
-
After you have made your award decisions and picked your winning bids, click Complete Award.
-
On the Complete Award page, click Continue to begin purchase order creation.
-
On the Review and Submit page, click Submit.
-
On the Complete Award Confirmation page, click "Continue Purchase Order creation process."
-
The Allocate page shows you the awarded items with backing requisitions that have been allocated.
-
For each awarded line item, you can select the item and enter allocation values by clicking Enter Allocations.
-
On the Enter Allocations page, you will see the system default allocations as described above.
-
Modify the allocation values as needed and click Submit. Note: You cannot allocate more units than you have awarded. You can allocate fewer units than you awarded a particular bidder, but you cannot allocate more units than you awarded that bidder. You cannot allocate more than the requisition quantity of each requisition.
-
Once you are returned to the Allocate page, continue allocating any remaining awarded items.
-
After you have allocated all the items you awarded, click "Create Purchase Order" and continue with the purchase creation order process.
Disqualifying Auction or RFQ Responses
You may receive responses on your RFIs, RFQs or auctions that you wish to disqualify, perhaps because the responses do not meet your target prices, dates, locations, or other criteria.
When you disqualify a response, you are disqualifying an entire response not an individual line in the response.
To disqualify a response:
-
Click the negotiation number under Your Negotiations at a Glance section to access the Negotiation Summary page. Alternatively, use the Search Negotiations fields to list all negotiations. On the Results: Negotiations page, click the negotiation number to access the Negotiation Summary page.
-
On the Negotiation Summary page, select View Bid History from the Action menu and click Go.
-
On the Quote/Bid History page ensure you are viewing the Bid Summary view.
-
Select the response you want to disqualify. Click Disqualify Bid or Disqualify Quote.
-
On the Disqualify page, enter a text note to the participant to explain why you are disqualifying the response. Click Done.
-
The participant will be notified that the response has been disqualified and will have the opportunity to submit another response if the negotiation is still open. All other participants are also notified of the disqualification.
Using the Award Summary Page
The Award Summary page displays the complete award recommendations for a negotiation and provides a central location where sourcing team members and award approvers can view the award recommendations that have been made for a negotiation. The Award Summary page provides two different views of a negotiation's award information: the Supplier view and the Line view. Each view consists of a summary and a detail display allowing approvers and other sourcing team members to drill down and view low-level information about each negotiation line. The Supplier view displays award recommendations in terms of all the suppliers who participated in the negotiation. The Line view displays the award recommendations in terms of the lines that comprised the negotiation. Award approvers can use the information in the Award Summary page when deciding whether or not to approve the award recommendations.
The Supplier View
The Supplier View displays information on each supplier who participated in the negotiation. Among other details, the Supplier Summary View contains :
-
Quote/Bid total (Standard Purchase Order only) The total amount offered by the supplier on all line s .
-
Award Total (Standard Purchase Order only) The total amount of business awarded this supplier.
-
Score Total score for header level attributes.
-
Total Agreement Amount (Blanket Purchase Agreement only)
The Line View
The Line Summary display shows line information, including:
-
Awarded Quantity The number of units currently awarded this negotiation line. .
-
Remaining Quantity Number of units left for awarding
-
Current Value Current price * awarded quantity
-
Award Amount Response price * awarded quantity
-
Saving Amount Award amount - current value
-
Saving Percent Savings versus current amount expressed as a percentage.
To display the Award Summary page:
To use the Award Summary page, you must have closed the negotiation and made some award decisions .
-
Locate the negotiation whose business you have awarded (note that from the Negotiations Home page, you can do an advanced search looking for negotiations with a status of Award) .
-
Click the link in the Number column for the negotiation .
-
On the negotiation summary page, select Award Summary from the Actions menu and click Go .
-
On the Award Summary page, you can use the subtabs to toggle between the Supplier and the Line views. For each entry in the table, there is a triangular +/- icon in the Details column. Use this icon to show or hide the detail information for that entry .
-
Click the Award Alternate Lines button on the Award Summary page, this opens the Award Alternate Lines page. Click the number link in the Alternate Lines Awarded column in the Award Summary page, this opens the Alternate Lines Awarded page. This page is read only, and gives you information about the alternate lines that have been awarded.
Viewing Negotiation Information
In many situations, it can be helpful to review award decisions you have made in the past. This information is stored and can be viewed even after you have closed, awarded and completed the negotiation. To see prior award information:
-
Use the Search Negotiations fields at the top of the Negotiations Home page to perform an Advanced Search.
-
On the Negotiations Search page, select one of the following Status values and click Go.
-
Closed Negotiations which have been closed. These negotiations could be taken to a subsequent round of responding or could have their award process initiated.
-
Award Negotiations for which the award process is either still in progress (there are still outstanding items to be awarded) of completed (there are no outstanding items to be awarded).
-
Completed The award process is completed and a purchase order has been requested or a purchase order has not been requested.
-
Create Order Negotiations for which the allocation process is in progress or for which the purchase order creation process has been initiated.
-
-
From the list of search results, click the number link for the negotiation to see the details.
Submitting Award for Approval
If the negotiation creator selected the response control Require Award Approval, the award decision must be submitted to approvers before the award can be completed. The chain of approvers is defined using Oracle Approvals Management. Both the Employee Supervisor Hierarchy and the Position Hierarchy can be used. For details on defining approval rules see the Oracle Sourcing Implementation and Administration manual.
To submit an award for approval:
-
Access the negotiation (if you just saved the award decision, you begin with the following step).
-
From the Actions menu, select Award Summary.
-
On the Award Summary page, click Submit For Approval.
You can view the approval history. Once the award has been approved, you can continue the award process by completing the award and generating a purchase document..
Viewing Award Approval History
If you selected the "Require award approval" negotiation control, your award decision must be approved before you can complete the award and begin to create a purchasing document. Once you have submitted your negotiation's award decision, you can view the award approval status of your negotiation. You can view the award approval history at any point, but there will only be data displayed after the recommendation has been submitted.
To view the approval status of a negotiation:
-
Navigate to the summary page for the negotiation
-
Select View Award Approval History from the Actions menu.
The Award Approval History page shows who has approved your award recommendation and the approvals remaining in the approval chain.
Generating a Purchase Order Document
Once you have saved your award decisions, you return to the negotiation summary page to complete the award process and generate a purchase order document.
To complete the award process:
-
Select Complete Award from the Actions menu and click Go.
-
On the Complete Award page, you can choose whether or not to create a purchasing document. You can also choose whether to immediately notify the suppliers of their awards (your purchasing document may need to go through an approval process, so you may wish not to notify suppliers until a later date when the purchase document is fully approved). Select your option(s) and click Submit.
-
If the outcome you specified on your negotiation is a Blanket Purchase Agreement (BPA), you can create a new BPA for each award, or add lines to an existing BPA by selecting an agreement number to which to add the lines. Proceed with caution at this stage, because you cannot undo your award decision after you click Submit.
-
The confirmation message informs you that the award is complete and takes you to the Create Purchase Order page.
To generate a purchase order document:
-
On the Create Purchase Order page, you can obtain information on the supplier to whom you awarded business. Click Show All Details to view your award information.
-
Choose an Acceptance Level from the drop-down menu. If Oracle Procurement Contracts is installed and licensed, you can use an Acceptance Level value of Document and Signature to perform contract binding. See Understanding Contract Binding for more information.
-
If you have an approval procedure set up in Oracle Purchasing, click Initiate Approval to begin approval for this purchasing document.
-
If you are creating a blanket purchasing agreement, set the following fields as appropriate. See the Oracle Purchasing User's Guide for information.
The Blanket Purchase Agreement Details region displays the supplier details, and enables you to specify whether you need a new Blanket Purchase Agreement (select the New BPA checkbox), or wish to add to an existing BPA. If you need to add this award information to an existing BPA, enter or select the BPA number in the Blanket Purchase Agreement column. When the negotiation is added to an existing BPA, the header attachments are carried forward to the BPA. However, other negotiation header information will not overwrite the values on the BPA. The header details of the BPA remain the same, even after adding the negotiation to it.
Note: You can select any active BPAs, to which the Purchasing Document Open Interface (PDOI) supports adding lines.
-
Specify the start and end effective dates.
-
Choose whether to enable automatic sourcing in Oracle Purchasing.
-
Choose whether to update sourcing rules in Oracle Purchasing.
-
Select the release method.
-
For rate-based temp labor lines in a GBPA, the attributes get copied to the GBPA line details. The system verifies that only the correct list of attributes gets copied for each of the negotiation lines that have descriptors associated to them. The list of attributes is validated based on the Job – Purchasing Category – Shopping Category combination.
-
-
Click Submit.
-
Use the Purchase Order Summary page to view subsequent information about the purchase order created. You can click the purchase order number link to drill down to the details about the purchase order that was created. You can also print a copy of the purchase order by selecting View PDF from the Actions menu and clicking Go.
If your outcome document was one or more Blanket Purchase Agreements, the Purchase Order Summary page displays the BPAs that were created, along with information such as BPA Number, Approval Status, Total Agreement Amount. A blue icon next to the BPA Number indicates that the award lines were added to an existing BPA.
The Purchase Order Summary page displays all outcome documents that are associated with the negotiation. Cancelled outcome documents are indicated with an icon. To view information about canceled documents, click Prior Award Information. Additionally, Internal Notes tracks the cancellation and reaward actions.
To retain the negotiation line numbers in the outcome document, set the profile PON: Use Negotiation line number in outcome document to Yes. For more information about this profile option, see Oracle Sourcing Implementation and Administration Guide.
Understanding Contract Binding
If Oracle Procurement Contracts is implemented, contract binding provides the ability to require both the supplier and the buyer to sign off on the details of a purchase order before it can be executed. When you are creating the purchase order document, you can require that the supplier sign and accept the document. A notification is sent to the supplier requesting a signature to indicate acceptance after the purchase order is approved by any internal approvers. If the supplier accepts the document, you are sent a notification requesting your acceptance as well. Once both you and the supplier have accepted the purchase document, it is ready for execution.
Once the negotiation is closed for responses, you can award business to selected suppliers and subsequently initiate the purchase order/contract creation. You can optionally indicate whether acceptance is required for the resulting purchase order document. If you require acceptance, you have the choice of four levels :
-
None - No acceptance is required.
-
Document Only - Suppliers are required to accept the entire document. Suppliers can use iSupplier Portal to accept the document or can request that you enter acceptance on their behalf.
-
Document and Signature - You and the supplier must sign the document to indicate acceptance. This option uses Workflow notifications to obtain signatures online.
-
Document or Shipment - Supplier can accept the document or individual lines .
Using Search
There are many times when using Oracle Sourcing that you need to search for information. Some examples include searching for negotiations in which to participate, or finding reusable invitation lists to apply when creating a negotiation. To save time and perform accurate searches, use the search tips below.
Searches are conducted using a search criteria and one of that criteria's search value. In most cases when specifying a search value, you can use the wild card ( % ) as necessary
The search process varies depending on what you are searching for.
-
Searching for your negotiations in which you are participating:
At any point in time, you may have several negotiations that are in different states. One may still be in its preview period, another open and being responded to, and a last closed and being awarded. A common task is monitoring and administering all these different negotiations. All these negotiations can be viewed and accessed from the Your Negotiations at a Glance section of the Negotiations Home page.
The Your Negotiations at a Glance section shows all negotiations you created in order of time left before their close date/time. Note that the display shows only a limited number of negotiations. To see the complete list of negotiations you created, click Full List.
From the Your Negotiations at a Glance display, you can click the negotiation number link to go to the negotiation summary page to see details of the negotiation. You can click the responses link to go to the History page where you can see the details of any responses.
Searching for all negotiations to which you have access:
In addition to the negotiations you own, you may have access to negotiations owned and created by other buyers either because you collaborated on that negotiation or because the negotiation is public. There are several criteria you can use when performing a search to restrict the number of search results. These include number, title, item, line category, event, creator, or supplier. To perform a search, enter a value for the search criteria in the Search Negotiations fields at the top of the Negotiations Home page.
You can select one of two search methods: simple and advanced..
When using the simple search method, you select one of the criteria mentioned above from the drop down menu, supply a search value, and click Go.
When using the advanced search, you enter search values for multiple search fields. These include those mentioned above as well as type, status, security level, style, project number, and task number. You can use any combination of these search criteria to reduce the number of results you receive.
-
To perform a simple search, on the Negotiations Home page, select the type of search from the "Search Negotiations" menu, specify a search value and click Go. To perform an advanced search, click Advanced Search. Enter search values for as many search fields needed to qualify your search. For some fields you select menu options. For others you enter values. When entering values, you can use % as a wildcard. When you are finished, click Go. .
-
Scroll through the Results: Negotiations display until you find the correct negotiation. Click the Number link to go to the negotiation summary page where you can see information on the negotiation. Click "Responses" to go to the negotiation History page where you can see information on current responses.
Searching for draft negotiations
You can have draft negotiations which you and/or a group of collaboration team members are preparing for submission at some time in the future. To search for and manage a draft negotiation:
-
Click the Manage quick link under Drafts on the Negotiations Home page.
-
On the Manage Draft Negotiations page, select a search type from the menu. You can search on negotiation number, negotiation title, negotiation creator, and proximity to open date (specified as the number of days until the negotiation opens). You can use % as a wild card value
-
Enter your search values, and click Go.
-
Scroll through the Results display until you see the target draft .
-
Select the draft and continue processing. If the draft is locked, click Unlock to access it. Click Edit to update the draft. Click Review and Submit to publish the draft.
When creating a negotiation, you can send invitation notifications to particular suppliers inviting them to participate in the negotiation. You can also search for suppliers to add them to reusable invitation lists and/or negotiation templates. You can identify approved suppliers you wish to notify by searching information in the Approved Supplier List, the Supplier Master, as well as information provided by the supplier company itself.
-
You can search the Approved Supplier List to identify suppliers who sell a particular item or commodity. You can also search the Approved Supplier list for suppliers of a particular status (for example, approved or new).
-
You can search the Supplier Master to identify suppliers who meet certain criteria, for example, minority-owned or small business.
-
You can search both the Approved Supplier List and the Supplier Master at the same time. This includes prospective suppliers who have registered with the system, but whose registrations have not yet been approved.
On theSuppliers: Add Supplier page:
-
Specify whether you wish to search for approved suppliers or prospective suppliers.
-
Enter as many search values as are needed to efficiently qualify your supplier search.
-
If you know the name of the supplier you wish to invite, enter a full or partial supplier name.
-
If you wish to see all suppliers who provide a particular commodity, use the flashlight to search and select commodity or category. You can search the commodity or category in Supplier Profile, Approved Supplier List (approved suppliers only), or Negotiation History (approved suppliers only).
-
To search by Supplier Business Classifications , click Show Business Classifications and select the attribute values by which you wish to search.
-
To search the Approved Supplier List Criteria (approved suppliers only), click Show Approved Supplier List Criteria and select the attribute values by which you wish to search.
-
After you have entered your search values, click Search.
-
-
From the search results display, select the supplier(s) and click Add to Invited Suppliers, and the click Apply.
Searching for lines and categories
While creating your negotiation, you must define line(s) on which you wish to negotiate. This can include searching for category values or item numbers. The fields you have to search on depend on the line type. The search fields you have available are indicated by the magnifying glass to the right of the field. Depending on the fields for which you supply a value, other fields may be populated (including other search fields).
To use the Search and Select fields:
-
Click the flashlight icon next to the field on which you wish to search.
-
On the Search and Select: page, select the type of search from the drop down menu, enter appropriate search values search values, and click Go.
-
Scroll through the Search Results display and find the appropriate value. Click Select and then click Go, or click the Quick Select icon. You are returned to the create page with the category value inserted.
-
You can also search the Oracle iProcurment Unified Catalog or your Favorites list to add items to a negotiation. See the Oracle iProcurement online help for instructions on searching the catalog.
See information on Understanding Large Negotiations for instructions on searching for lines in large or very large negotiation.
While creating negotiations, many attributes default according to the organization you select. This includes addresses such as Bill-To and Ship-To. In some cases, however, you may need to change the default to a different address.
To search for and select a different address:
-
Click the flashlight icon next to the address field.
-
On the Search and Select page, enter a search value in the Search field and click Go. The search value can be an address name, a partial name, or the search wildcard, %. The system performs a begins with search using any search values you entered. If you do not know the beginning of the name, use a wildcard, such as the percent sign (%). For example, a search on %Boston might return North Boston as a billing address; a search on b% returns both Beijing and Brussels; a search on br% returns only Brussels.
-
The Search Results display shows all addresses that matched your search criteria. Find the correct address and click Select. You are returned to the negotiation creation page with your new address appearing in the address field.
When creating a negotiation, there are many predefined lists which you can apply to your negotiation to save time and standardize your sourcing practices. Such lists include lists of line attributes, cost factors, Requirements lists, and invitation lists.
To search and apply a list:
-
On the negotiation creation page, click the link to apply a predefined list.
-
For each list, you can search using multiple criteria. For example, most lists allow you to search by the list name and/or words in the list description. Additionally, you can search for all lists that contain a particular list entry. For example, you can search for all cost factor lists that contain a particular price element. Enter as many search values as required to efficiently qualify your search. Click Go.
-
From the Search Results display, select the list and click the appropriate links or buttons to process the list if necessary and to apply it to your negotiation.