Setting Up Display of Customer Information
This chapter covers the following topics:
- About Displaying Customer Information for Agents
- About Customer Profiles
- Customer Profile Setup Process Overview
- Defining Profile Ratings
- Associating Ratings with Colors
- Defining Profile Check Categories
- Defining Profile Check Variables
- Defining Drill Down for a Profile Check
- Enabling Application Windows for Drill Down
- Defining Profile Checks
- Predefined Profile Checks
- Defining Variable Profile Checks
- Defining Boolean Profile Checks
- Grouping Profile Checks for Display in Customer Profile Windows
- Grouping Profile Checks for Display in Dashboard Tabs
- Determining Access by Application Module and Responsibility
- Running the Customer Profile Engine
- Running the Customer Profile Engine for a Subset of Parties
- Setting Automatic Refresh of Profiles on the Dashboard
- Customizing Dashboard Displays by Customer Attributes
About Displaying Customer Information for Agents
You can set up your application to provide agents with summaries of customer information, such as the number of open and escalated service requests, payments in arrears, and expiring contracts.
Agents can view the summarized customer information in three places:
-
The Dashboard tab
Available in the Contact Center (Oracle TeleService) and E-Business Center (Oracle TeleSales).
-
The Profile window
Available in the Service Request and Override Customer Criticality windows in Oracle TeleService and the Repair Order window in Oracle Depot Repair.
-
The Agent Dashboard page
Agent Dashboard pages are available in Customer Support, Service Desk, and Case Management.
To create a view of customer data in the dashboard, you create a dashboard group, a grouping of individual customer indicators called customer profiles.
Setting up customer profiles is also a prerequisite for implementing relationship plans. While the information on the Dashboard tabs and Customer Profile windows summarizes information about customers, they require agents to check that information periodically. Relationship plans, described in a separate section of this guide, automatically display an alert message or a script when a customer meets certain conditions based on your customer profile setup.
Note: Customer profiles are not the same as system profile options.
For a brief overview of customer profile concepts, see About Customer Profiles.
For an overview listing the major steps of the setup procedure, see Customer Profile Setup Process Overview.
Details of individual steps are covered in the following topics:
-
Grouping Profile Checks for Display in Customer Profile Windows
-
Running the Customer Profile Engine for a Subset of Customers
About Customer Profiles
Customer profiles make it possible for you to provide agents with:
You can create different views of customer information for agents by application and by responsibility, or by customer attribute through the implementation of a user hook (See Customizing Dashboard Displays by Customer Attributes).
Summaries of Customer Information
Customer profiles make it possible for you to create summaries of key customer information, called profile checks. Profile checks can summarize information by customer, by account, by customer contact, or by employee.
Profile checks can be of two types:
Variable
The variable profile checks summarize information such as the number of open service requests or the number of booked orders for a particular customer, an account, an employee, or a contact. Each profile check displays a number (the number of open service requests or expiring contracts, for example), a rating (high, medium, low) and a color (green, yellow, and red, for example). The rating and color together comprise a rating label.
Boolean (Yes and No)
Boolean profiles compare the level of a profile check variable against a constant or an expression with one or more variables and returns either a Yes or No. For example: "Does the customer, account, or contact have more than one open escalation?", "Does the customer have a credit hold?".
Views of Customer Information in a Graphical Format
In Service Request and Contact Center windows, agents can view customer information summarized by the profile checks in two places:
-
The Contact Center's Dashboard tab
The Dashboard tab displays a group of profile checks called a dashboard group. You can separate the headings by titles called categories.
You can specify a different dashboard group by customer category and responsibility. For example, displaying different information for consumers and for business customers or different information to agents handling customer account issues from those handling hardware problems.
By customizing the application with a user hook, you can instead display different dashboard groups based on any customer criteria you wish, such as geographical location or product ownership. See Customizing Dashboard Displays by Customer Attributes.
-
The Profile window
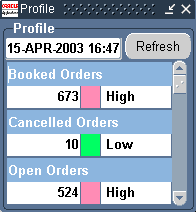
The Profile window displays a list single profile checks in the order you determine. Profile windows do not use category headings.
Here is a sample Dashboard on the Contact Center showing key customer information organized in three dashboard categories: Service, Tasks, and Contracts.
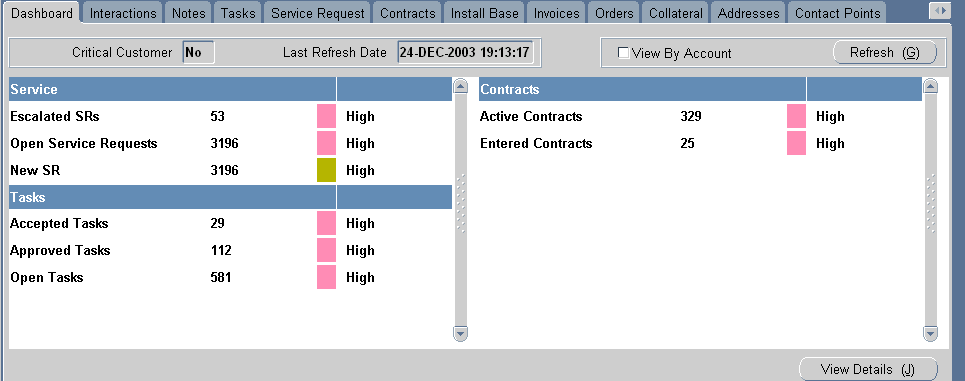
Agents can filter their views of the profile checks in the dashboard group by account, customer, or contact by making a selection from View Details For list on the header.
Profile windows display only individual profile checks. Here is a sample Profile window:
The Ability to Drill Down to Details
You can set up customer profiles to make it possible for agents to drill down from a variable profile check in a Dashboard tab or customer Profile window to a detailed list of all items in the Drilldown List window. This is called a first-level drill down.
During implementation you can select which fields agents see in this window. Boolean (Yes or No) profile checks do not permit you to drill down.
Here is a sample first-level drill down window:
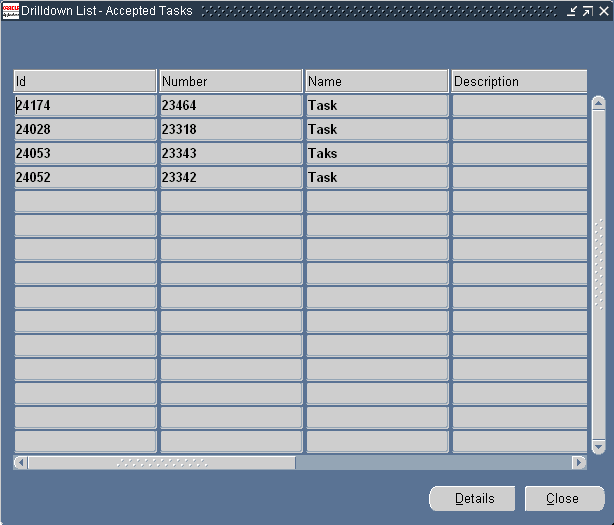
Agents can drill down to the individual item in this window by clicking on one of the displayed fields.
The item displays in an application window. This is called the second-level drill down.
Customer Profile Setup Process Overview
Use this overview of major setup steps to guide you through the customer profile setup.
To set up customer profiles
-
Set up the rating labels (the wording and colors) to use with your profile checks and the categories you want to use to organize the profile checks on the Dashboard tab:
-
Under the Service responsibility, navigate to Setup, then select Customer Care Lookups.
-
Define the general labels you wish to use to classify customer information for agents. For example, you may wish to classify customers into three categories, Low, Medium, and High. See Defining Profile Ratings.
-
Navigate to Setup, Customer Management, Customer Profiles.
-
On the Preferences tab, associate the profile ratings you have defined with color codes to create rating labels. For example, you may wish to display red next to the word High. See Associating Ratings with Colors.
-
On the same tab, define the headings (categories), which organize the profile checks on the Dashboard. See Defining Profile Check Categories.
-
-
Navigate to Setup, then Customer Management, and select Customer Profiles.
-
On the Profile Variable tab, define the variables you wish to use in your profile checks. This is where you enter the SQL queries that retrieve and summarize your customer data. You can use the same variable in multiple profile checks.
For details see Defining Profile Check Variables.
-
On the Profile Checks tab, define all of the profile checks you want to use to summarize customer information in the Profile windows and Dashboard tabs. You get to select which agents see them in a subsequent step. See Defining Profile Checks.
-
On the Drilldown tab, set up the two levels of drilldowns your agents use to view the details of the customer information summarized by the profile check. The first level provides a window with a list of individual records; the second level displays the individual record itself. See Defining Drill-Downs for a Profile Check.
-
On the Profile Groups tab, define the groupings of profile checks for display in the customer Profile window. By matching these profile groups to application modules and responsibilities in a later step, you can create different customer overviews for different groups within your organization. See Grouping Profile Checks for Display in Customer Profile Windows.
-
On the Dashboard Groups tab, define the groupings of profile checks for display in the Dashboard tabs of the Contact Center and E-Business Center windows.
You can create different dashboard groups to provide different views of customer information by application modules, responsibilities, and customer type (business or consumer). See Grouping Profile Checks for Display in Dashboard Tabs.
If you prefer to specify different views of customers by a customer attribute such as geographical location or product type, for example, then you can instead use a user hook to customize the application. See Customizing Dashboard Displays by Customer Attributes.
-
On the Preferences tab, specify the application modules and responsibilities that can view the profile groups and dashboard groups you have created. See Determining Access by Module and Responsibility.
-
Set up the concurrent program that automatically refreshes the Dashboard tab and Profile views of customer information. See Running the Customer Profile Engine.
-
You can have the application refresh customer information on the dashboard each time an agent displays a customer by setting the profile Customer Care: To Allow Auto Refresh Facility for Dashboard. For performance reasons, you may wish to refresh only key customer indicators in real time. See Setting Automatic Refresh of Profiles on the Dashboard.
Defining Profile Ratings
Use this procedure to modify or create the labels used to describe the ranges of values of your profile checks. The application provides four seeded values: High, Medium, Low, or “Key Parameter”. These labels are called profile ratings.
Profile ratings are implemented in Customer Care using standard Oracle Applications lookup codes. Profile rating codes are implemented with the User access level. This means that you can create new labels and modify the seeded values.
Prerequisites:
None
To define profile ratings
-
Under the Service responsibility, navigate to Setup, then select Customer Care Lookups.
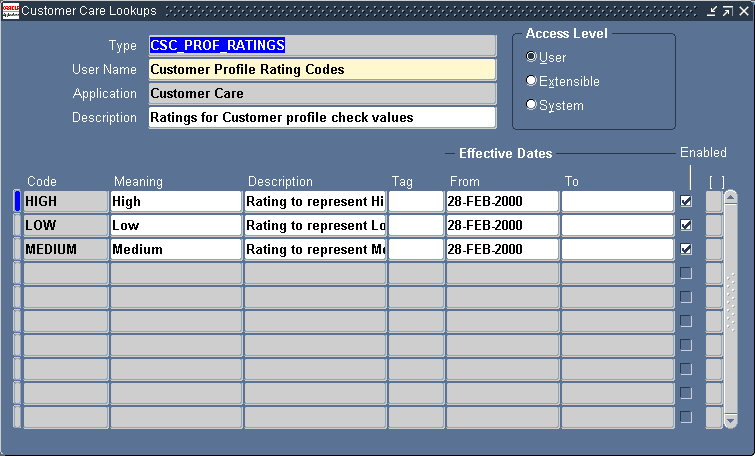
The Customer Care Lookups window appears.
-
In the Type field perform a search using the Query by Example method on
CSC_PROF_RATINGS.The window displays the three predefined ratings, High, Medium, and Low, and any other ratings your organization has defined.
-
To create a new rating code:
-
Place your cursor in a row and click New in the toolbar.
-
Enter a name in the Code field to associate with while building the profile checks.
-
Enter a name in the Meaning field. This is the name that the agents see on the Dashboard tab and Customer Profile window.
-
Optionally, enter a description in the Description field.
The Tag field is not used.
-
To control the dates this rating code is to be effective, enter dates in the Effective Date fields.
-
-
Verify that the Enabled check box is selected.
-
Save your work.
Associating Ratings with Colors
Use this procedure to associate colors with the ratings you defined to create a rating label. It is here that you specify, for example, that the label High always displays in the Dashboard and Customer Profile windows together with the color red.
Prerequisites:
You must define profile ratings as described inDefining Profile Ratings.
To associate ratings with colors
-
Under the Service responsibility, navigate to Setup, then Customer Management, and select Customer Profiles.
-
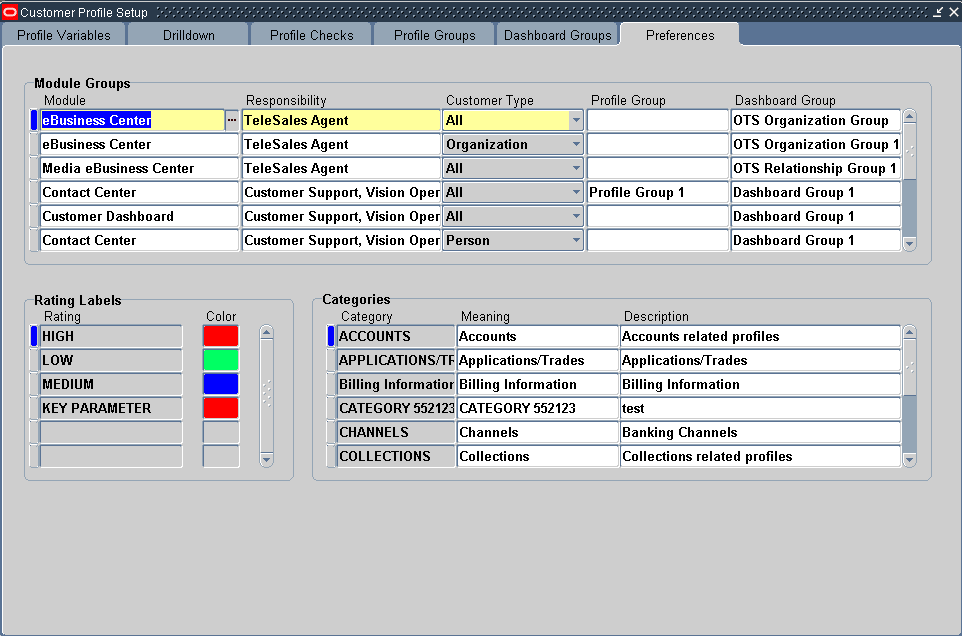
Select the Preferences tab.
-
In the Rating Labels region, select the rating you want to associate with a color from the Rating list of values. The Rating field displays the Code value from the lookup, not the value users see.
-
Select a color from the Color list of values, to associate with the rating.
-
Save your work.
Defining Profile Check Categories
Use this procedure to define the categories used in the Dashboard tab to group profile checks. For example, open, escalated, and accepted tasks can all be grouped under the Tasks category.
Prerequisites:
None
To define categories
-
Under the Service responsibility, navigate to Setup, then Customer Management, and select Customer Profiles.
-
Select the Preferences tab.
-
In the Categories region of the tab, for each category you wish to define:
-
Enter a name for the category in the Category field. The internal name is not displayed on the Dashboard tab.
-
Enter the wording in the Meaning field. This detail is displayed on the Dashboard tab .
-
Optionally enter a description for the category in the Description field.
-
-
Save your work.
Defining Profile Check Variables
Use this procedure to define the variables you want to use in your profile checks. The variables contain the SQL statement that is executed to retrieve the customer profile check value. You can use the same variables in multiple profile checks.
Your SQL statements can contain three bind variables:
-
:party_id: Use this variable if the SQL statement refers to a party and contact.
-
:party_site_id: Use this variable if the SQL statement refers to a party site.
-
:cust_account_id: Use this variable if the SQL statement refers to a customer account.
-
:employee_id: Use this variable if the SQL statement refers to an employee.
No other bind variables are supported.
Your SQL statement must be constructed so that only a single row is returned by the query.
For a detailed description of the database objects you can include in your SQL statement, please refer to the Electronic Technical Reference Manual (eTRM). The Customer Care database objects you can use are stored in the folder named "CSC".
Prerequisites:
None
To define a profile check variable
-
Under the Service Responsibility, navigate to Setup, then Customer Management, and select Customer Profiles.
The Customer Profile Setup window appears.
-
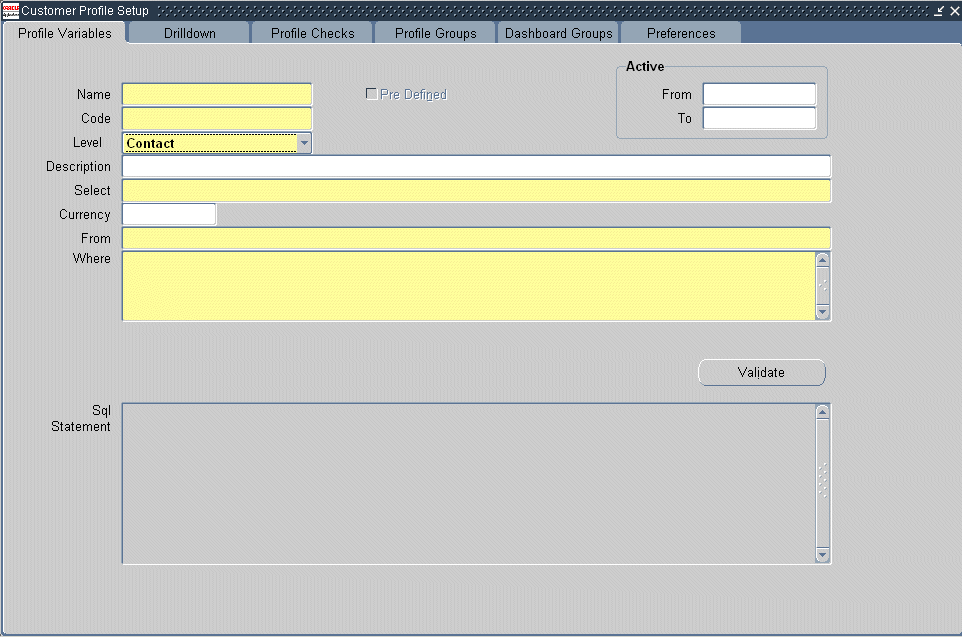
Select the Profile Variables tab.
-
Click New on the toolbar.
-
Enter a name in the Name field.
-
Enter a unique name in the Code field.
-
If you are displaying the information from this variable in the Dashboard tab, then using the Level list, select the appropriate view where the information is to appear. Available views are: Customer, Account, Employee, Contact and Party Site. Agents use these views to filter the information in the Dashboard tab.
-
To restrict the use of this variable, enter dates in the Active: From and Active: To fields.
-
Optionally enter a description of the profile variable in the Description field.
-
Enter the appropriate components of the SQL statement in the following fields:
-
Select (mandatory field).
-
Currency (optional field).
-
From (mandatory field).
-
Where (mandatory field).
-
-
Click Validate to validate the SQL statement.
-
Click Save in the toolbar to save the variable .
Your SQL statement is validated automatically when you save. You cannot save an invalid SQL statement.
Defining Drill Down for a Profile Check
Use this procedure to define the drill down windows for a profile check. There are two levels of drill down windows. The first level lists the items summarized by the profile check. The second-level drill down displays the details of an individual record. An agent displays an item in the application window by double clicking on one of the fields in the summary list.
Prerequisites:
You must create the variables for the profile check as described inDefining Profile Check Variables.
To define drill down windows
-
Under the Service responsibility, navigate to Setup, then Customer Management, and select Customer Profiles.
The Customer Profiles window opens.
-
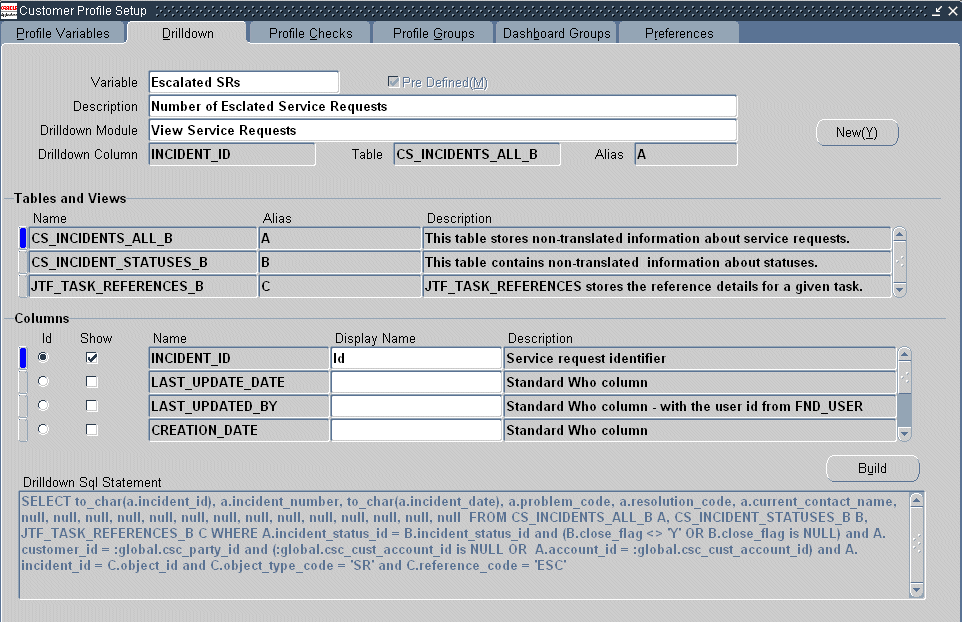
Select the Drilldown tab.
-
From the Variable field, select the profile variable for which you want to define the drilldown.
The Description field as well as the Tables and Views region display information about the selected profile variable.
-
Using the Drilldown Module list of values, select the application module you want to use for the second-level drill down. If the module you wish to use is not listed, then you can add it to the list by following the steps outlined in Enabling Application Windows for Drill Down.
-
Select up to 20 columns you wish to display in the first-level drill-down list:
-
Select one of the tables in the Table and Views region.
The Columns region displays the available columns for that table.
Note: Only columns from registered tables and views are displayed. Column names are retrieved from FND_COLUMNS and FND_VIEWS. If the columns you wish to use are not visible, check to see if the table or view is registered.
-
Select the Show check box for the columns that you wish to display in the first-level drill down.
-
For the columns you want to display, enter a user-friendly name in the Display Name field. The text you enter here is what agents see in the first-level drill down window.
-
-
Select one of the columns in the first-level drill down as the column that agents use to drill down to the application window (the second-level drill down). For example, if you select the service request number, an agent can view the details of the service request in the Service Request window by double-clicking on the service request number in the summary list.
-
Select the table in the Table and Views region.
The Columns region displays the available columns for that table.
-
Select the ID option for the column that you want to use for the drill down.
Note: You can select only one ID column for a profile variable.
-
Click Save in the toolbar.
The column name of the ID you have selected, displays in the Drilldown Column field at the top of the tab.
-
-
Optionally, click Build to generate and display the SQL for the drill down.
The SQL statement is validated when you save. You cannot save an invalid SQL statement.
Enabling Application Windows for Drill Down
Use this procedure to enable application windows for drill down.
Prerequisites:
You must define the form object first in the Form Functions window. You can access this window by logging in under the Systems Administrator Responsibility and navigating to Application, and selecting Function.
To enable application windows for drill down
-
Under the Service responsibility, navigate to Setup, then Customer Management, and select Customer Profiles.
The Customer Profiles window opens.
-
Select the Drilldown tab.
-
Click New.
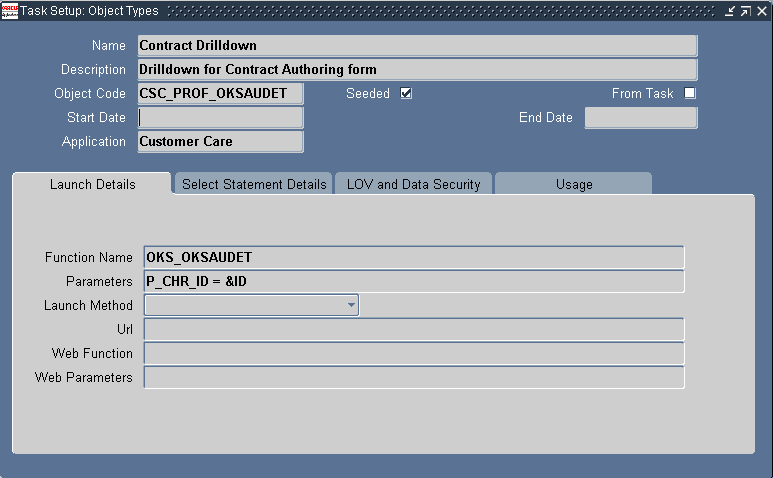
The Task Setup: Object Types window opens.
-
Enter a name for the drill down module object type you are creating in the Name field.
Note: The name you enter here is for your reference only. It does not display in the Drilldown Module list of values.
-
Enter a description for the drill down module in the Description field.
-
Enter a value in the Object Code field that begins with
CSC_PROF, for example:CSC_PROF_OKSAUDET. -
You must know both the function name and the window name displayed for the user. The function name, for example,
OKS_OKSAUDET, is what you enter in the Function Name field in this window. You need to know the associated User Function Name:Author Service Contractsbecause this is what gets displayed in the Drilldown Module list of values on the Drilldown tab. Use the following procedure to find either name:-
Switch Responsibility to Systems Administrator.
-
Navigate to Application, and select Function.
The Functions window appears.
-
Using the Query by Example method, display the function either using the Function or User Function Name fields.
-
Note down the names of both fields.
-
-
Enter the function name in the Function Name field. For example,
OKS_OKSAUDET.The Drill Down Module list of values displays the User Function Name associated with this form function name.
-
Enter the parameters.
-
Select Customer Care from the Application Name list of values.
-
Entry in the Usage region is optional. You can select CUSTOMER_CARE from the list of values, which also populates the Object User field. The Seeded check box indicates whether the module is predefined.
-
Save your changes.
-
Close the form to return to the Drilldown tab.
The new application window is available in the Drilldown Module field list of values.
Defining Profile Checks
Use this procedure to define profile checks.
You can use the predefined profile checks as a guide. See Predefined Profile Checks.
Prerequisites:
You must define profile variables, ratings, and rating labels first.
To define profile checks
-
Under the Service responsibility, navigate to Setup, then Customer Management, and select Customer Profiles Setup.
The Customer Profile Setup window appears.
-
Select the Profile Checks tab.
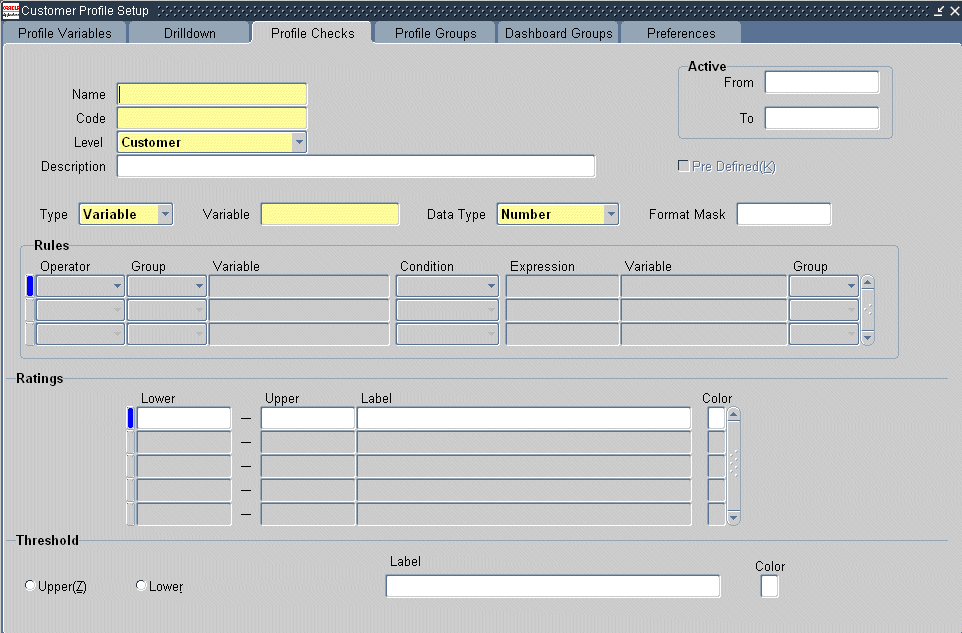
-
Enter a name for the profile check in the Name field. This is the wording the agents see in the Dashboard tab or Profile window.
-
The Code field defaults to the name you enter in the Name field. You can substitute the value in the Code field with another unique value.
-
Select the level for the profile check depending on what type of information the profile check summarizes. The options are: Customer, Account, Contact, Employee, or Party Site.
-
Enter a description for the profile check in the Description field.
-
Enter the date when the profile check is to be in force by specifying the Active From and Active To fields.
-
To create a variable profile check, select Variable from the Type list and follow the steps described in Defining Variable Profile Checks.
-
To create a Boolean (Yes or No) profile check, select Yes or No from the Type list and follow the steps described in Defining Boolean Profile Checks.
-
Save your work.
Predefined Profile Checks
Oracle TeleService provides the following 32 predefined profile checks you can use as a guide to define your own. All but Critical Customer are variable profile checks:
Note: Do not modify the predefined data. If you want to make modifications, please make a copy and modify your copy.
The following predefined profile checks are related to customers:
-
Accepted Tasks
-
Active Contracts
-
Approved Tasks
-
Booked Orders
-
Cancelled Contracts
-
Cancelled Orders
-
Cancelled Tasks
-
Critical Customer
-
Customer Opportunities
-
Entered Contracts
-
Escalated Defects
-
Escalated Service Requests
-
Expired Contracts
-
Expiring Contracts
-
Installed Base Size (11.5.6)
-
Loyalty
-
On-Hold Contracts
-
On-Hold Tasks
-
Open Defects
-
Open Orders
-
Open Service Requests
-
Open Tasks
-
Profitability
-
Rejected Tasks
-
Revenue
-
Satisfaction
-
Terminated Contracts
The following four are for employees only:
-
Eligible Plan
-
Escalated SRs
-
Government Identifier
-
Open SRs
Defining Variable Profile Checks
Perform these steps to create a variable profile check after you have completed the basic steps described in Defining Profile Checks.
To define variable profile checks
-
In the Variable field, select the variable on which the profile check is to be based. This is one of the variables you have defined in the Profile Variables tab.
-
In the Data Type field, enter the data type for the variable you have selected. The valid choices are Number, Char, and Date.
-
If appropriate, enter a format mask in the Format Mask field.
-
In the Ratings region, define value ranges and their labels. For each range:
-
Enter a Lower and Upper number. The range you enter here cannot overlap another range.
-
Select an appropriate label. This is one of the rating labels you have created which combine the rating and color code.
Enter the low value for the first range and the high value for the last range as shown in the example below. In the example, leaving the Upper Value for the High range blank ensures that your profile check displays for customers of any high value above 20.
Lower Value Upper Value Label 0 10 Low 11 20 Medium 21 Leave blank High
-
-
You can turn the display of the profile on only when the number is below or above a threshold.
For example, you may wish call center agents to see information on the number of open service requests for a customer regardless if the number is low or high. But managers may care only about customers with high numbers. By specifying the upper number in the Medium range as your trigger, you can display only the high range to the group of your choice. To define a threshold for a profile check:
-
Select either the Upper or Lower radio button depending on whether you wish to use the lower or higher number for the range as the threshold.
-
Using the Label list of values, select the range below or above which you wish the display to be triggered.
To display the profile check only when the value is High in the above example, you select the Upper radio button and select Medium from the Label list of values.
-
For the threshold to affect the display of information you must select the Display on Threshold check box when you define profile groups and dashboard groups. For more information, see:
-
Defining Boolean Profile Checks
Perform these steps to create a boolean profile check after you have completed the basic steps described in Defining Profile Checks.
To define boolean profile checks
-
Select Yes or No from the Type list.
-
In the Rules region, build a logical expression (rule) comparing an existing profile variable with a constant or an expression.
For example, the predefined Critical Customers profile check evaluates the expression
Open Service Requests > 5. -
Save the profile check you have defined.
Grouping Profile Checks for Display in Customer Profile Windows
Use this procedure to group profile checks for display in the customer Profile window. By associating the groups you create here with application modules and responsibilities you can provide different groups of agents with different customer views in the Profile window.
Prerequisites:
You must define profile checks before you can define Profile Groups.
To define profile groups
-
Under the Service responsibility, navigate to Setup, then Customer Management, and select Customer Profiles.
The Customer Profile Setup window appears.
-
Select the Profile Groups tab.
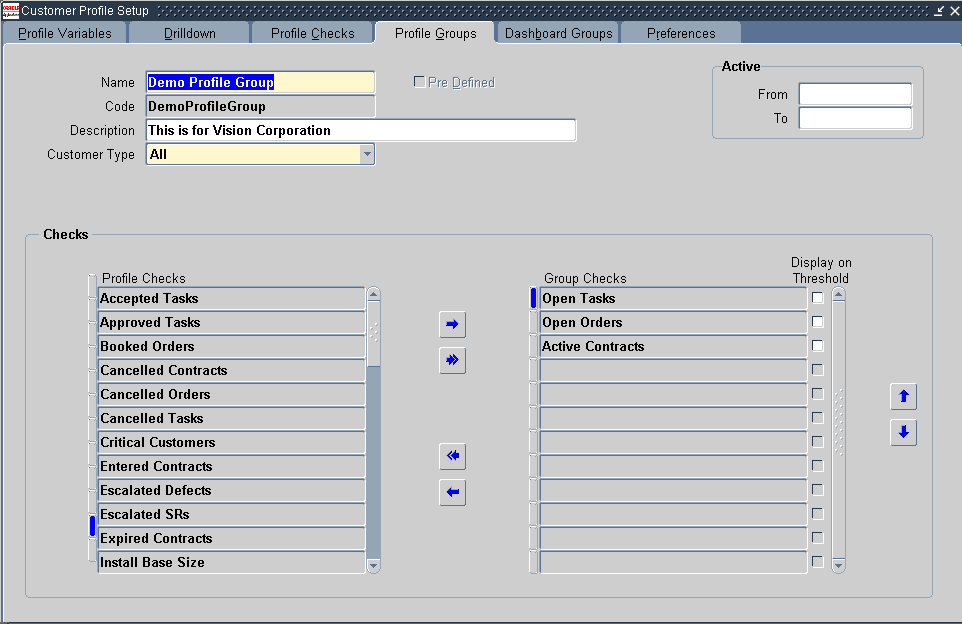
-
In the Name field, enter a name for the profile group.
All profile checks you have defined are displayed in the Checks region.
-
The Code field defaults based on the value you entered in the Name field.
-
In the Description field, optionally enter a description for the profile group you are defining.
-
In the Customer Type field, select the customer type you want to associate with the profile group.
Selecting All, the default, displays the profile group you are creating for both persons (consumers) and Organizations.
To restrict this profile group for display when agents are handling a specific customer type, select either Person or Organization.
-
You can enter dates in the Active From and Active To fields to limit the availability of this profile group.
-
In the Checks region:
-
Select the appropriate profile check from the Profile Checks column and move it to the Group Checks column. Use the right and left arrow buttons to move the profile checks between the columns. Use the up arrow and down arrow buttons to move the selected group check up or down in the list.
-
Do not select the Display on Threshold check box, unless:
-
You have set up your profile check with a threshold.
-
You want this profile check to display only when this threshold is crossed.
For an explanation of using thresholds, please see Defining Variable Profile Checks.
-
-
Save the Profile group.
Grouping Profile Checks for Display in Dashboard Tabs
Use this procedure to group profile checks in dashboard groups to create different Dashboard tab views for agents by application module and by responsibility.
You can use this procedure to create different views for customers, individual accounts, and for customer contacts.
Prerequisites:
You must define profile checks and categories before you define dashboard groups.
To define dashboard groups
-
Under the Service Responsibility, navigate to Setup, then Customer Management, and select Customer Profiles.
The Customer Profile Setup window appears.
-
Select the Dashboard Groups tab.
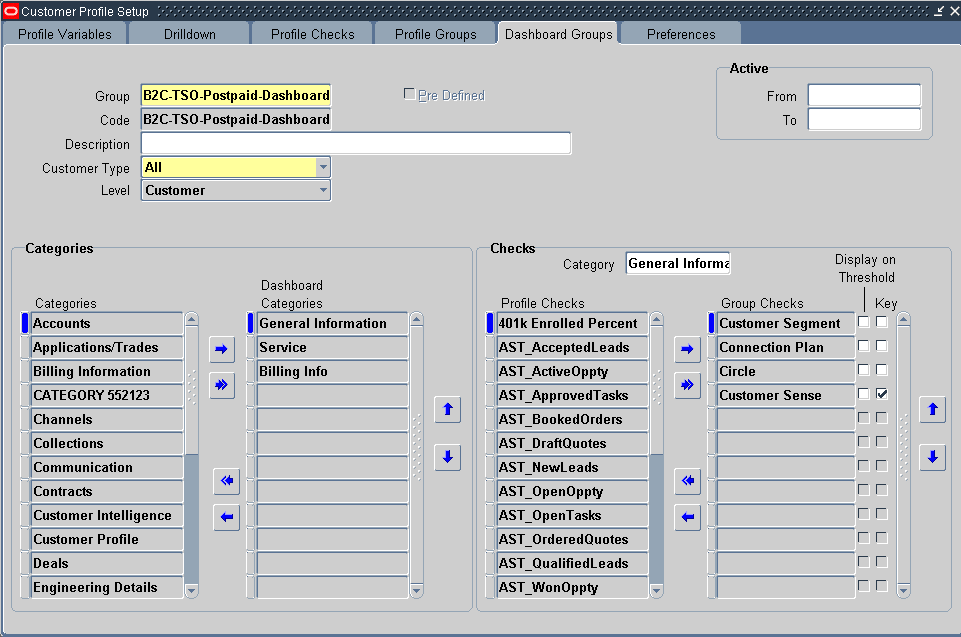
-
Enter a name for the dashboard group in the Group field.
-
The Code field defaults based on the value you entered in the Group field.
-
Enter a description for the dashboard group in the Description field.
-
From the Customer Type list, select the customer type for this dashboard group.
The default is All, but you can restrict the usage of groups to either Organizations or Persons. Restricting a Dashboard group to a customer type means that the information displays only for customers of that type.
-
Select the level at which you wish to display this group using the Level list. You can display information on the Dashboard for customers, accounts, customer contacts, employees, and party sites. Each level requires that you to set up different profile checks, so the selection you make here restricts the profile checks you can select for the group.
You can use the dashboard group definitions to determine the display of any one level (such as customers) or for all five levels (customers, accounts, employees, customer contacts, and party sites). Remember that the categories you set are for the entire dashboard group and are not defined for a specific level. However, the profile checks that display are applicable for the specific level that you choose.
-
To restrict the use of this dashboard group for a specific time period, enter dates in the Active From and Active To fields.
-
Select the categories to organize the information on the Dashboard tab:
-
In the Categories region, move the categories from the Categories column to the Dashboard Categories column using the right and left arrow buttons.
-
Order the categories in the order you want them to display in the Dashboard. Use the up and down arrow buttons to move a category up or down in the list.
-
-
Save your changes so your categories are available in the next step.
-
In the Checks region, specify which profile checks you wish to display under each category:
-
Select the dashboard category you want to set up from the Category list of values.
-
Select the profile checks you wish to use by moving them from the Profile Checks column to the Group Checks column. Use the right and left arrow buttons to move the profile checks between the columns.
-
Determine the display order of the profile checks by ordering those you have selected (the Group Checks column). Use the up and down arrow buttons to move the selected profile check up or down in the list.
-
-
If you have set up a particular profile check with a threshold and wish to restrict the display using that threshold, then select the Display on Threshold check box to the right of the Group Checks column.
-
You can set up the application to automatically refresh only a key subset of the profile checks to conserve system resources. To restrict automatic refresh to only key profile checks:
-
Specify the key profile checks by selecting the Key check box to the right of the Group Checks column.
-
For the Contact Center, you can choose to display these in a different color by choosing a color for KEY PARAMETER. This is located in the Rating Labels region of the Preferences tab.
-
Set the Customer Care: Permit the Dashboard to be Refreshed Automatically to Just in Time - Key to enable this setup. See Setting Automatic Refresh of Profiles on the Dashboard.
-
-
Save your dashboard group.
Determining Access by Application Module and Responsibility
Use this procedure to determine the application module, customer type, and responsibility that displays the profile groups and dashboard groups you have created.
Prerequisites:
You must create the profile and dashboard groups first.
To determine access by modules, customer types, and responsibilities
-
Under the Service responsibility, navigate to Setup, then Customer Management, and select Customer Profiles.
-
Select the Preferences tab.

-
Select an application module from the Module list of values. Although all application modules from all E-Business Suite applications appear in the list of values, you can enable access only to those applications that use the Profile window and Dashboard tabs:
For dashboard groups, which are available in Oracle TeleService and Oracle TeleSales, you must select the following modules:
Select the module… To enable the… Application Customer Dashboard Contact Center window in Oracle TeleService Oracle TeleService E-Business Center E-Business Center window in Oracle TeleSales Oracle TeleSales Case Management Tier 2 Agent Create Case Create Case page Oracle Case Management Case Management Tier 2 Agent Read-Only Case Read-only Case page Oracle Case Management Case Management Tier 2 Agent Update Case Update Case page Oracle Case Management Customer Support Tier 2 Agent Create Service Request Create Service Request page Oracle Customer Support Customer Support Tier 2 Agent Read-Only Service Request Read-only Service Request page Oracle Customer Support Customer Support Tier 2 Agent Update Service Request Update Service Request page Oracle Customer Support Incident Manager Tier 2 Agent Create Ticket Create Ticket page Oracle Incident Manager Incident Manager Tier 2 Agent Read-Only Ticket Read-only Ticket page Oracle Incident Manager Incident Manager Tier 2 Agent Update Ticket Update Ticket page Oracle Incident Manager Service Desk Tier 2 Agent Create Service Request Create Service Request page Oracle Service Desk Service Desk Tier 2 Agent Read-Only Service Request Read-only Service Request page Oracle Service Desk Service Desk Tier 2 Agent Update Service Request Update Service Request page Oracle Service Desk -
For Customer Profile groups, which are available in Oracle TeleService and Oracle Depot Repair applications, you must select one of the following:
-
Critical Customer Management
The Override Customer Criticality window in Oracle TeleService.
-
Enter Service Request
The Service Request window of Oracle TeleService.
-
Depot Repair Orders
The Repair Order window in Oracle Depot Repair.
-
-
Specify which responsibilities can view the profile and dashboard groups you have created:
-
Agents logging under the seeded Service responsibility can view all dashboard and profile groups by default. You can restrict their access by mapping this responsibility to the groups you want them to access. This is accomplished by selecting the responsibility using the Responsibility list of values (LOV)
-
Custom responsibilities do not give any access by default. This means you must map the group to the responsibility to grant access.
You can map more than one responsibility to a group by creating multiple records.
-
-
Use the Customer Type list to restrict the type of profile and dashboard groups that appear in the Group and Dashboard Group LOVs:
-
Selecting Organization or Person restricts the selection to the profile and dashboard groups you have set up for that customer type.
-
Selecting All displays all dashboard and profile groups.
-
-
Select a profile group, a dashboard group, or both you want to enable using the Group (Profile Group) and Dashboard Group LOVs.
-
Save your work.
Running the Customer Profile Engine
The Customer Profile Engine is a server side PL/SQL concurrent program. You must run the Customer Profile Engine after completing the customer profile setup process so that all SQL statements defined during the setup are executed to generate the appropriate profile values.
To generate data for the contact level profiles, you must set the system profile Customer Care: Include Contact Profiles in Customer Profile Engine Batch Runs to Yes.
The Customer Profile Engine, when executed, performs the following operations in the sequence below:
-
Evaluates the results of all the effective profile variables.
-
Evaluates the results of all effective profile checks based on the profile variables.
-
Evaluates the results for all the customers, accounts, contacts, and employees.
The Customer Profile Engine must be run to:
-
Retrieve profile values for new customers
-
Retrieve the latest profile values for all customers
-
Reflect changes made to the profile setup
-
Retrieve values for new profiles
The Customer Profile Engine can be run in two ways:
-
As a concurrent program (for more information on running concurrent programs, refer to the Oracle E-Business Suite Setup Guide).
-
This manual method fetches the latest data for the displayed customer, when agents click the Refresh button available in the Profile section or the Dashboard tab of the Contact Center or the E-Business Center in Oracle TeleSales.
The parameters for running Customer Profile Engine are:
-
Party Type: Employee or Customer.
-
Party Name
-
Group Name: Dashboard group name.
Running the Customer Profile Engine for a Subset of Parties
By default, you can either have the profile engine evaluate a single party or all parties. If you do not supply a party in the Party Name parameter, the profile engine evaluates all parties.
If you want to use the profile engine to evaluate a subset of parties, then you can use a user hook described in this topic. For example, a cell phone service provider can use this feature to evaluate the billing information for only the most recent customers who purchased a particular plan.
To run Customer Profile Engine for a subset of parties
-
Create a package body with the name CSC_PROF_PARTY_SQL_CUHK
This package returns a Ref Cursor with the SQL the application uses to select the parties to be processed.
-
Run the following script to enable the user hook:
UPDATE jtf_user_hooks SET execute_flag = 'Y'
WHERE pkg_name = ' CSC_PROF_PARTY_SQL_CUHK '
AND api_name = 'GET_PARTY_SQL_PRE'
AND processing_type = 'B'
AND user_hook_type = 'C'
Note: Note: After the user hook is enabled, the custom code written in CSC_PROF_PARTY_SQL_CUHK specifies which parties the profile engine selects irrespective of the entry you make in the Party Name concurrent program parameter.
Sample Procedure
Here is a sample procedure a cell phone provider can use to evaluate the billing information for the most recent customers who purchased a particular plan. This example assumes that the plan information is stored in ATTRIBUTE1 of HZ_PARTIES.
CREATE OR REPLACE PACKAGE BODY CSC_PROF_PARTY_SQL_CUHK AS
procedure Get_Party_Sql_Pre( p_ref_cur    OUT NOCOPY csc_utils.Party_Ref_Cur_Type) IS
l_sql varchar2(2000);
l_filter_condition varchar2(100);
BEGIN
l_sql := 'SELECT party_id FROM hz_parties where creation_date <= sysdate-3 and attribute1='Plan-699';
OPEN p_ref_cur FOR l_sql;
END Get_Party_Sql_Pre;
END CSC_PROF_PARTY_SQL_CUHK;
Setting Automatic Refresh of Profiles on the Dashboard
You can have the application automatically recalculate all or only the key customer profile values whenever the agent displays a customer record by setting the profile option Customer Care: Permit the Dashboard to be Refreshed Automatically.
To enable or disable the automatic refresh of customer profiles
-
Under the Service responsibility, navigate to Others, Profile System Values.
-
Using the Query by Example method, display the Customer Care: Permit the Dashboard to be Refreshed Automatically system profile.
The available settings are:
-
Just in Time - Full
The application updates all profile values when the agent queries a new customer or clicks Refresh or when you run the Customer Profile Engine concurrent program.
-
Just in Time - Key
The application updates only the key profile values when the agent queries a new customer. The application updates all values only when the agent clicks Refresh or when the Customer Profile Engine concurrent program is run.
-
No (the default setting)
The profile values are updated only when the agent clicks the Refresh button or runs the Customer Profile Engine concurrent program.
-
Screen Pop
Do not use this setting. It is available for legacy reasons only.
-
-
If you set the value of the system profile Customer Care: Permit the Dashboard to be Refreshed Automatically to Just In Time - Key or Just In Time - Full, then you must set the following system profiles for JIT processing in the telephony mode. The setting is not required for the nontelephony mode.
-
Customer Care: Permit the Dashboard to be Refreshed Automatically
-
Customer Care: Default View by in Contact Center
-
Service: Default Customer Name
-
Customer Care: Default Dashboard Display by Customer or Account
-
Customer Care: Display Only Active Accounts in Contact Center
-
Customer Care: Default the First Customer Account in Contact Center Header
-
Customer Care: Default Contact Type for Contact Center
You must set these system profiles at the responsibility level to process parties passed from the Oracle Telephony Manager. The application ignores any settings at the User level.
-
-
Set the system profile Customer Care: Run the Profile Engine to process the profile checks for contacts at batch mode to Yes to enable the engine to calculate contact-specific profile checks.
Customizing Dashboard Displays by Customer Attributes
By default, the application permits you to create different views of customer information for each responsibility, customer type (consumer or business), and application (Contact Center or Oracle TeleSales' E-Business Center).
If you prefer to display different customer information to agents depending on a customer attributes, such as geographical location or product ownership type, then you can instead use a user hook described in this topic. For example, a cell phone service provider can use this feature to create different views for customers with prepaid plans and those with pay-as-you-go plans.
Prerequisites:
What information gets displayed in the Dashboard tab depends on the dashboard group specified by your procedure. This means you must create the dashboard groups and their profile checks first.
To customize dashboard displays using the user hook
-
Create a package body with the name CSC_DASHBOARD_GROUP_CUHK.
This package must return the dashboard GROUP_ID.
-
Run the following script to enable the user hook:
UPDATE jtf_user_hooks SET execute_flag = 'Y'
WHERE pkg_name = 'CSC_DASHBOARD_GROUP_CUHK'
AND api_name = 'GET_DASHBOARD_GROUP_PRE'
AND processing_type = 'B'
AND user_hook_type = 'C'
Note: After the user hook is enabled, the custom code written in CSC_DASHBOARD_GROUP_CUHK is the only code executed to specify which dashboard group displays in the Dashboard tab. This means the application ignores any mapping between dashboard groups, responsibilities, customer types, and application modules.
Sample Procedure
Here is a sample procedure a cell phone provider may use to display different customer views based on customer connection type. The connection information is stored in the party information descriptive flexfield which is displayed in the Contact Center header. You can use any of the customer or contract information from the header for your procedure.
CREATE OR REPLACE PACKAGE BODY CSC_DASHBOARD_GROUP_CUHK AS
PROCEDURE Get_DashBoard_Group_Pre( P_PARTY_REC IN OUT NOCOPY csc_utils.dashboard_Rec_Type)
IS
/*   The Party Information descriptive flex field has been setup to store
-- connection type information in Attribute2 column of hz_parties.
--   Connection Type is used to decide which dashboard group is
--   returned by the custom hook
*/
  l_party_id NUMBER;
 l_connection_type VARCHAR2(240);
BEGIN
 l_party_id := p_party_rec.cust_party_id;
 l_connection_type := p_party_rec.cust_attribute2;
/* Custom Hook can be called from JIT process or from Contact Center.

-- When it is called from Contact Center, Connection Type info is passed though cust_attribute2.
-- When called from JIT, this info will not be passed. So, get this info from hz_parties
*/
   IF l_party_id IS NOT NULL AND l_connection_type IS NULL THEN
  INTO l_connection_type
       FROM hz_parties
       WHERE party_id = l_party_id;
  END IF;
   IF UPPER(l_connection_type) = 'PRE-PAID' THEN
      p_party_rec.group_id := 1594;
   ELSIF UPPER(l_connection_type) = 'POST-PAID' THEN
      p_party_rec.group_id := 1595;
   ELSE
      /* return the default dashboard group */
   END IF;
END Get_DashBoard_Group_Pre;
END CSC_DASHBOARD_GROUP_CUHK;