Managing Your Work
This chapter describes the process of managing contracts.
This chapter covers the following topics:
- Overview of Managing Your Work
- Finding Contracts by Status or Notification Type
- Finding Your Most Recently Accessed Contracts
- Bookmarking Contracts
- Finding Bookmarked Contracts
- Creating Groups
- Organizing Contracts by Group and Subgroup
- Finding Contracts Using the Contract Groups Hierarchy
- Removing a Contract from a Group
- Searching for Contracts Using the Entitlements Search Window
- Using the Index to Navigate Through Contracts
Overview of Managing Your Work
This group of topics explains how to manage your work in Oracle Service Contracts.
You can access contracts from multiple points within the application. Oracle Service Contracts enables you to find contracts by status or notification type, and to open recently accessed or bookmarked contracts.
You can also organize your contracts into a hierarchy of groups, which can be viewed from the Contract Navigator. Contract groups provide a convenient way to organize contracts using any criteria. They are similar to folders and can be created for private or public use.
You will generally access contracts from either the Launchpad or the Contract Navigator.
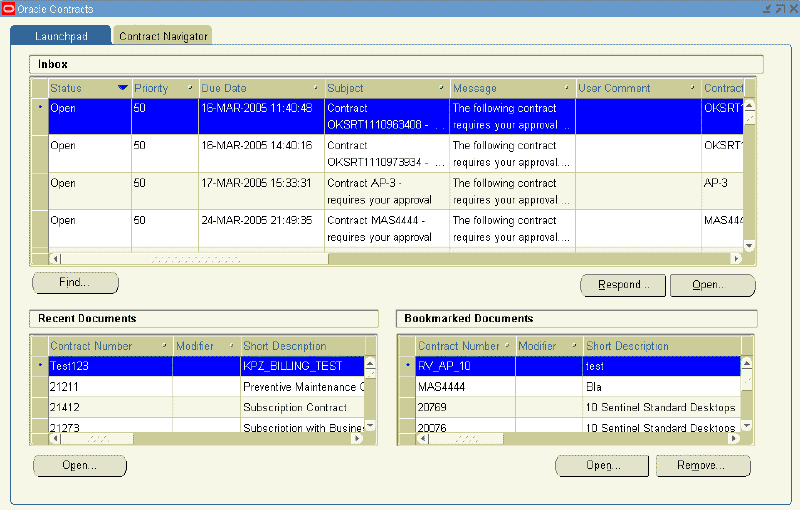
Finding Contracts by Status or Notification Type
To find a contract by status or notification type:
-
From the Navigator, navigate to Contract Administration, and then select Launchpad. The Launchpad appears.
-
In the Inbox region, click Find.
The Inbox Find window appears.
-
Select your search criteria:
-
To find a contract with a particular status, select a status from the Select Status list.
-
To find a contract with a particular notification type, select a notification type from the Select Notification Type list.
For example, you could perform a search for contracts with an open status that require contract approvals or you could simply search for contracts that require contract approval.
-
-
Select Find.
The application refreshes the Inbox with contracts that meet your criteria.
-
To sort the results, click the column heading by which you want the results sorted.
You can sort columns in ascending or descending order.
-
Highlight the contract to review.
-
From the Inbox region, select Open.
The contract appears in the Service Contracts Authoring window.
Additional Information: For information about responding to notifications, see Approving Contracts.
Finding Your Most Recently Accessed Contracts
To find your most recently accessed contracts:
-
From the Navigator, navigate to Contract Administration, and then select Launchpad. The Launchpad appears.
-
In the Recent Documents region, scroll through the list of contracts.
These are the contracts that you have most recently accessed.
-
To sort the list, click the column heading by which you want the list sorted.
You can sort columns in ascending or descending order.
-
Highlight the contract to review.
-
From the Recent Documents region, select Open.
The contract appears in the Service Contracts Authoring window.
Note: You can also double-click the contract number to open the Service Contracts Authoring window.
Bookmarking Contracts
To bookmark contracts:
-
From the Service Contracts Authoring window, select the Actions menu and select Bookmark.
A note appears, indicating that the contract has been successfully bookmarked. This adds the bookmark to the Bookmarked Documents region in the Launchpad. The Bookmarked Documents region is a personal listing of contracts that you can access quickly.
-
To review bookmarked contracts, see Finding Bookmarked Contracts.
Note: You can also bookmark a contract from the Contract Navigator by:
-
Highlighting a contract in the right panel
-
Selecting Add Bookmark from the Tools menu.
-
Finding Bookmarked Contracts
To find bookmarked contracts:
-
From the Navigator, navigate to Contract Administration, and then select Launchpad. The Launchpad appears.
-
In the Bookmarked Documents region, scroll through the listing of contracts.
Creating Groups
Groups help you to organize and find contracts more efficiently. A contract can be in more than one group at a time. For example, a contract can be in your personal group My Contracts and also be in the public group Business World Contracts. You can also use groups to help you identify contracts that can be processed through actions such as mass change, or reports.
To create a group:
-
From the Navigator, navigate to Contract Groups, and then select Contract Groups.
The Contracts Groups window appears.

-
In the Name field enter the group name, for example, Service Agreements.
-
In the Description field, provide a description of the group.
-
If you want this folder to be public, select the Public check box.
Note: If you do not select the Public check box, you will create a private folder that only you will see.
For you to be able to create public folders, your administrator must set the profile OKC: Public Group Creator to Yes.
-
Save.
Note: If you want to see a listing of all groups, you can use the query function to display the groups in the Contracts Groups window.
-
From the View menu, select Query by Example and Enter. The form changes to query mode.
-
Enter % in the Name field.
-
From the View menu, select Query by Example and Run. A complete listing of the Contract Groups appears.
-
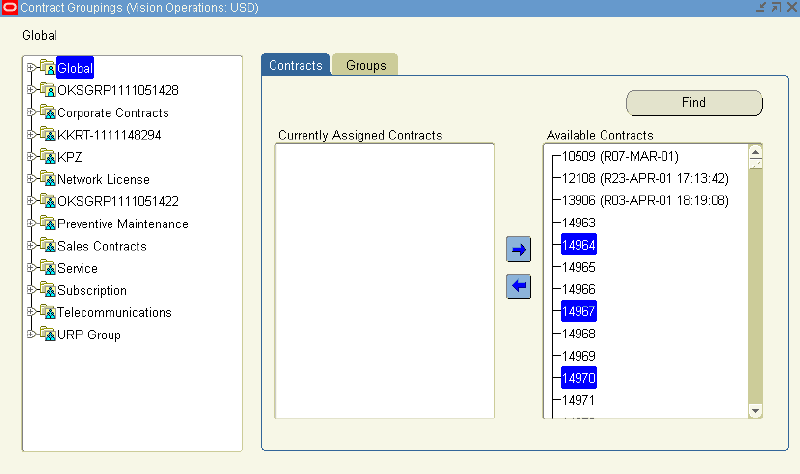
Organizing Contracts by Group and Subgroup
To organize contracts by group and subgroup:
-
From the Navigator, select Contract Groups, and then select Assign Contract Groups.
The Contracts Groupings window appears. The Groupings region on the left provides a hierarchy that you can use to navigate the contract groups.
You can click the + icon to expand a node
You can click the - icon to collapse a node.
-
Select a node from the Global region, for example, Service.
The contracts that are currently a part of the group appear under the Currently Assigned Contracts heading.
-
Click Find.
The Search templates and Contracts window appears. You can use this window to search for contracts that you want to add to the criteria.
-
Enter your search criteria, and click Search.
The results appear in the Available Contracts region of the Contract Groupings window.
-
To add a contract to the group, highlight the contract in Available Contracts and select the left arrow.
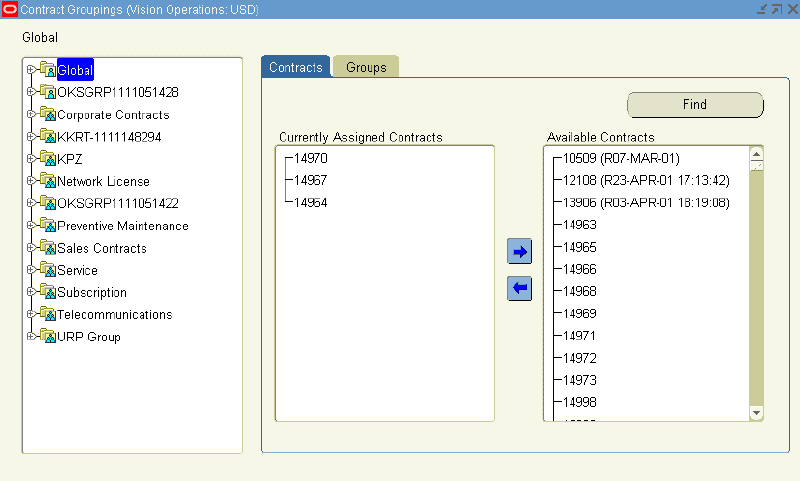
The contract is moved to Currently Assigned Contracts, which indicates that it is a part of the group.
-
To remove a contract from the group, highlight a contract in the Currently Assigned Contracts region and select the right arrow.
The contract is moved to Available Contracts, which indicates that it is not a part of the group.
-
To add a subnode to the Group, select the Groups tab.
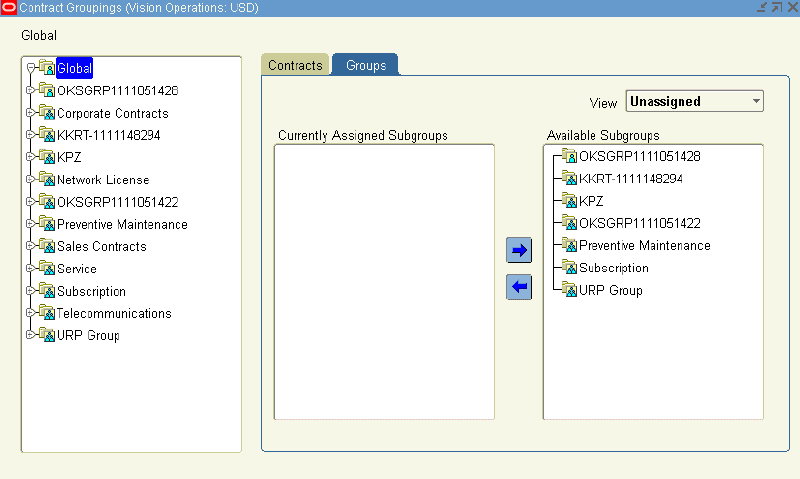
The Currently Assigned Groups and Available Subgroups regions are populated with a listing of subgroups.
You can change the view of the Available Subgroups region by selecting either Unassigned or All Groups from the View list.
-
To add a subgroup to the group, highlight the subgroup in the Available Subgroups region and select the left arrow.
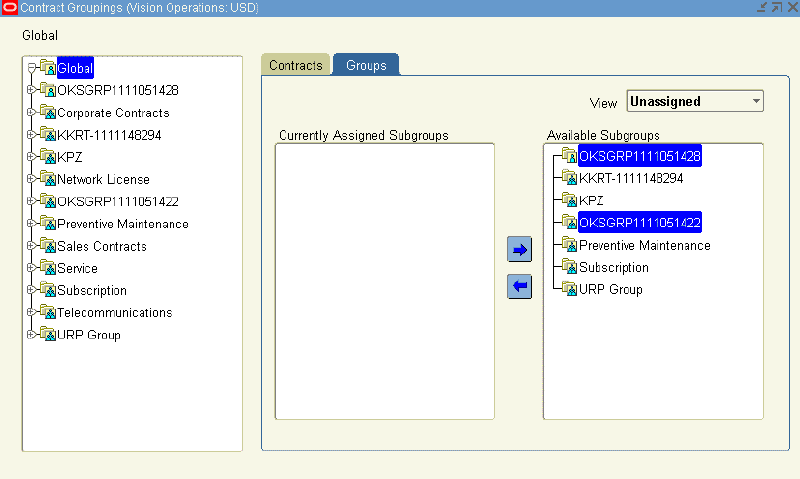
The subgroup is moved to Currently Assigned Groups, which indicates that it is a subgroup of the group.
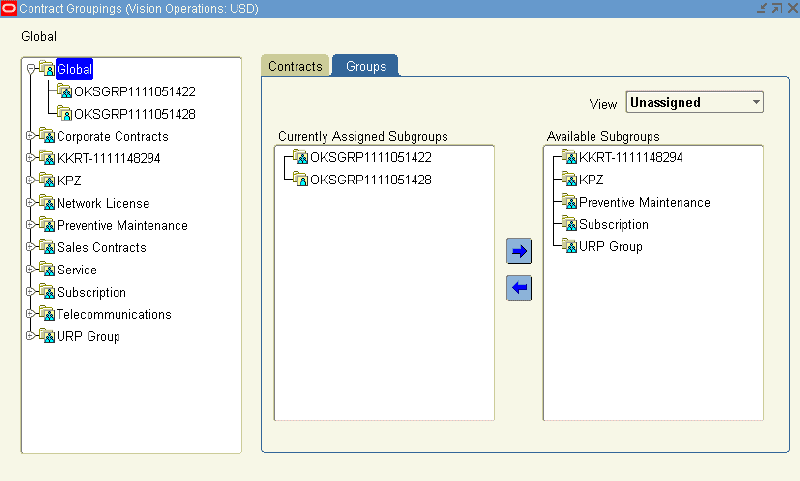
-
To remove a subgroup from the group, highlight a subgroup in the Currently Assigned Groups region and select the right arrow.
The contract is moved to Available Subgroups, which indicates that it is not a part of the group.
-
Save.
Finding Contracts Using the Contract Groups Hierarchy
To find a contract using the contract groups hierarchy:
-
From the Navigator, navigate to Contract Administration, and then select Launchpad. The Launchpad appears. Select the Contract Navigator tab.
-
In the left panel, review the group hierarchy.
You can expand a node by selecting the + icon. You can collapse a node by selecting the - icon.
-
Select a node to view the contracts that are in contract group node.
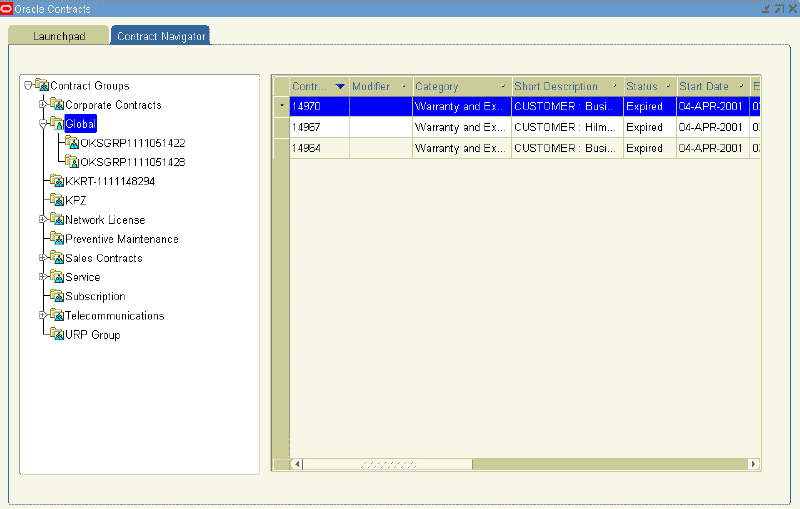
For example, you could select the Global node to view all contracts within that node.
The contracts that are included in this group appear in the right-hand panel.
-
To sort the results, click the column heading by which you would like the results sorted.
You can sort columns in ascending or descending order.
-
Highlight the contract that you want to review.
-
Right-click and select Open.
The contract appears in the Service Contracts Authoring window.
Note: Double-click the contract number to open the Contract Execution window.
Removing a Contract from a Group
To remove a contract from a group:
-
From the Navigator, navigate to Contract Administration, and then select Launchpad. The Launchpad appears. Select the Contract Navigator tab.
-
In the left panel, select a group such as Service.
A listing of contracts appears.
-
Highlight the contract to remove from the group.
-
You can do one of the following:
-
Right-click the contract and select Remove from Group.
-
From the Tools menu, select Remove from Group.
A decision box appears, asking whether you are sure that you want to remove the contract from the group.
-
-
Click Yes.
The contract is removed from the group.
Note: You can also add or remove a contract from a group by updating the Contracts Group region within the Administration subtab of the contract.
Searching for Contracts Using the Entitlements Search Window
To search for contracts using the Entitlements Search window:
-
From the Navigator, navigate to Contract Administration, and then select Entitlements Search.
The Entitlements Search window appears.
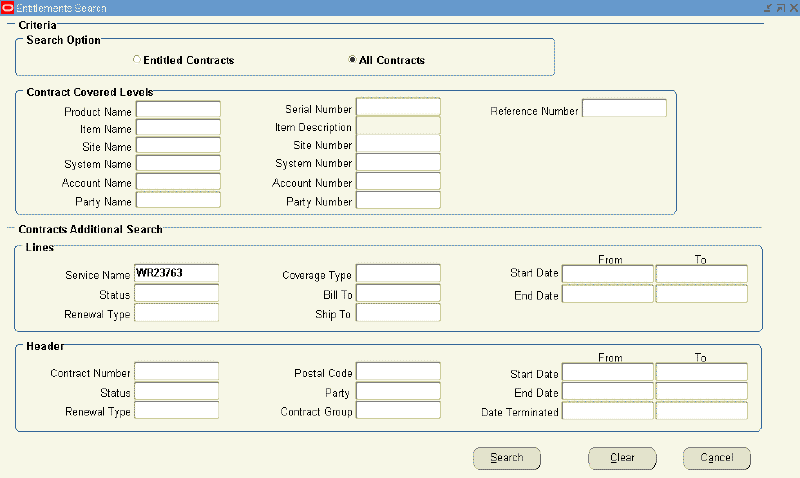
You can use this window to search for all contracts that match your search criteria, or limit the search to Entitled contracts.
You can search for contracts based on their covered levels attributes, header attributes, or line attributes, or a combination of these.
-
From the Search Option region, select whether to search all contracts or entitled contracts.
Entitled contracts are those that are within their start and end dates as of the time of the search, and are in a status that has the operation Eligible for Entitlement set to Yes.
-
From the Contract Covered Levels region, specify the contract covered levels to use in your search.
You can search by the following covered levels: product, item, site, system, account, and party.
This region has specific attributes associated with each covered level, which are separated by rows. For example, if you select a product, the row with the Product Name field also contains a Serial Number field and Reference Number field. These additional attributes are used to narrow your search.
-
From the Lines region, specify lines attributes.
For example, you could add a service name, a status, and a duration to the search criteria.
-
From the Header region, specify header attributes.
For example, you could add a contract status, party, and duration.
Additional Information: To clear the form and enter your search criteria again, select Clear.
-
Select Search.
The Results window appears, which shows contract line details that match the search criteria. You can also determine the operating unit for the contract.

-
To view the coverage for a specific contract and line, select the line and click View Coverage.
The Coverage Template appears in read-only form.
-
To open the contract, select the contract line and click Open.
The Service Contracts Authoring window appears. From this window, you can manually adjust Warranty Start and End dates on installed products.
Note: If the entitlements search is used for any application other than Oracle Service Contracts, the Line Detail window appears in read-only mode. For example, a service agent could use entitlement search from Oracle TeleService.
Using the Index to Navigate Through Contracts
The index helps you find parts of the contract and allows you to navigate to them directly, for example, to a particular line number.
To use the index to navigate through contracts:
-
From the Service Contracts Authoring window, select the Actions menu and Show Index.
The Contract Index window appears.
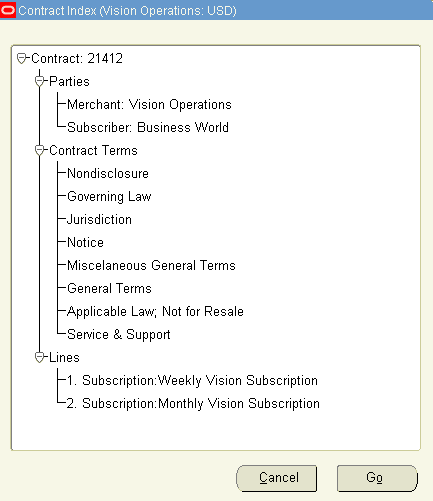
From this window, you can view details of the contract such as the parties, the line level service items, the covered level products at the sublines, and the names of any terms that are attached to the contract.
You can expand the hierarchy by selecting the + icon next to the node.
You can collapse the hierarchy by selecting the - icon next to the node.
-
To navigate to a specific point within the contract:
-
Highlight the node.
-
Click Go.
For example, if you highlight the Lines node and click Go, the Service Contracts Authoring window displays the Lines tab.
-
-
Optionally, you can close the Contract Index window by selecting Cancel.