Integrating Oracle iStore with Oracle Partner Management
This chapter covers the following topics:
- Integrating Oracle iStore with Oracle Partner Management
- Overview of Oracle Partner Management
- Oracle iStore-Oracle Partner Management Integration Overview
Integrating Oracle iStore with Oracle Partner Management
This chapter describes the integration of Oracle iStore with Oracle Partner Management.
Overview of Oracle Partner Management
Oracle Partner Management is an integrated software solution for managing business partner relationships. It allows management of partner dashboards, partner profiling, and partner enrollments, and allows partner access to opportunities, referrals, deals, and special pricing.
See the Oracle Partner Management Implementation Guide for more information.
Test Object
test description
Implementing Oracle Partner Management
Install and set up Oracle Partner Management according to the latest Oracle Partner Management Implementation Guide.
Oracle iStore-Oracle Partner Management Integration Overview
You can integrate Oracle Partner Management with Oracle iStore to provide a partner dashboard in the Oracle iStore Customer UI. Using this dashboard, partners can navigate to Oracle Partner Management pages, potentially drilling down into:
-
Sales opportunity summaries
-
Trade management offers
-
Claims summaries
-
Customer information
-
Forecast information
-
Special offer requests
-
Partner program enrollments
Summary of Site Management Options for Oracle Partner Management
This section summarizes the options available when you integrate with Oracle Partner Management.
Partner Dashboard and Other Customer UI Options
Following are some Partner dashboard and other Customer Application options:
-
Set up a Partner Home Page with links to the Oracle Partner Management application -- See the sections, "Partner Home Page" and "Setting up a Partner Site - Sample Scenario".
-
Target content in bins, for example, a bin that allows partners to enroll in specific programs, or a bin that links to other applications. Partner bins (except the Enrollment Left/Right Bins) typically would be used in the Partner dashboard page in partner site or integrated site. Users can map these bins to the locations through Configurable Bin Layout. The Enrollment Left/Right bins typically would be used in the Partner program enrollment page in the Partner site. See the chapter Oracle Partner Management Implementation Guide for more information. See the Implementing the Catalog, for information on Configurable Bin Layout. For information on seeded bins, see the Oracle Partner Management Implementation Guide and the appendixSeeded Display Data, in this guide .
-
Map sections to specific templates designed to show your Partner content items -- See the chapter, Implementing the Catalog, for more information.
-
Implement sites with targeted catalog and pricing information, including specifying a price list for partner users -- See the chapters, Implementing the Catalog, and Implementing Site Management, for information.
-
Allow Partner Management users to navigate back to the site portal from Oracle Partner Management -- See the "Enabling Sites Navigation Icon" section below.
-
Leverage Oracle iStore's globalization features, such as multiple language and currency support.
-
Allow partners to enroll in partner program memberships through the Oracle iStore Customer UI -- See the "Partner Program Enrollments" section, below.
User Access Control and User Management Options
Following are common user access control and user management options for your Partner users:
-
Restrict access to sites based on user responsibility
-
Support partner user types and registration
-
Customize user profile screens specifically for partners
Additional details are available later in this chapter. Also refer to the chapter, Implementing User Management.
Partner Home Page
Oracle iStore supports Oracle Partner Management content and links in the post-login Partner Home Page, including:
-
Available Programs --- Displays the list of programs available for enrollments
-
Renewal-Upgrade --- Displays the list of programs in which the partner is enrolled; the partner can start the upgrade process or the renewal process if the program requires it
-
Quick Links navigation bin --- Supports navigation to the Oracle Partner Management application
For information on program enrollments, see the Oracle Partner Management Implementation Guide. See also: "Enabling the Quick Links Bin", and "Summary of Site Management Options for Oracle Partner Management", in this chapter.
Setting up a Partner Site - Sample Scenario
Following is a high-level example to set up a partner site. Note that this is a sample scenario only. Your business requirements may dictate other methods of building sites.
-
Ensure that your user registration and approval processes are set up.
-
Create a site and assign it to the Partner group.
-
Create a price list for partner users and assign it to the Partner field in the Site Administration Pricing page.
-
Create your section hierarchy, with or without sections for products, depending upon your business requirements.
-
Name one of the top-level sections, Partners.
-
Create subsections under Partners, for example, Hot Topics and Product News. Note that it is not necessary to create additional sections -- you can set up the hierarchy any way your business requirements mandate.
-
Assign the sections to the site you created in a previous step.
-
Assign one of the content-specific section Display Templates to the sections created above. As a best practice, use Multilevel Subsection List with Content for non-Leaf sections, and Section Detail with Leaf sections.
-
Create content items and save them as HTML files.
-
Map the content files to media objects, either using the seeded ones or ones that you create.
-
Map the media objects to content components designed to show section additional information.
-
Map the content components at the section level, using the sections created above.
-
Set up the Quick Links bin.
-
Map the Partners group bin as desired.
Partner Program Enrollments
The Oracle iStore registration framework also supports partner program enrollments. Oracle Partner Management's enrollment functionality provides vendors a convenient process to enroll partners into programs or memberships. Partners can initiate self-service program enrollment within the partner dashboard provided through the partner site implementation.
Once initiated, the partner will be guided through the process of completing an enrollment form, reviewing and signing a contract online, and submitting payment for membership fees. The enrollment form, contract, and payment are elements that may not be necessary depending on the configuration of the process. Vendors can create enrollment forms using the Partner Program Management functionality. The program enrollment process also involves managing features such as:
-
Online partner program self-service enrollment
-
Automatic update of partner profile attributes
-
Online submission of payments for membership fees
-
Execution of payment processing
-
Online display of program terms and conditions
-
Online partner acceptance of program terms and conditions
-
Proper approval routing following partner enrollment
For more information on partner program enrollments, refer to the Oracle Partner Management documentation.
Enabling Sites Navigation Icon
To enable users to navigate back to the Customer UI from Oracle Partner Management through a universal navigation icon called Return to Dashboard, you must link the seeded Site Selection and Site Home page functions to the Oracle Partner Management menu root. After these two functions are mapped to the Oracle Partner Management customer root menu, the navigation icon will appear at the top of the Oracle Partner Management customer pages.
Important: If you implement the Sites navigation icon in Oracle Partner Management, you must also use the Oracle iStore site management, login, and user profile pages.
Following is the function data for the Site Selection Page and Site Home Page:
-
Site Selection Page:
-
Function: IBE_C_SITE_SELECTION
-
User function name: iStore Site Selection Page
-
Type: JSP
-
HTML call: ibeCZzdMinisites.jsp
-
-
Site Home Page:
-
Function: IBE_C_SITE_HOME
-
User function name: iStore Site Home Page
-
Type: JSP
-
HTML call: ibeCZzpHome.jsp
-
For data on the Oracle Partner Management root menu, see the Oracle Partner Management Implementation Guide.
Enabling the Quick Links Bin
You can enable a Quick Links bin on the Partner dashboard to provide partners with links to Oracle Partner Management features, such as deals, referrals, and opportunities. Out-of-the-box, this bin is mapped to a JSP, but you must create a menu linked to a responsibility to allow users with the responsibility to see the bin.
The bin has the programmatic access name, STORE_QUICK_LINKS_BIN_IBEWC, and is mapped by default to the JSP, ibeCAcdQuickLinkBin.jsp.
Following are the steps to enable the bin:
-
All the links inside the Quick Links bin are retrieved from Oracle Applications (FND) menus. In Oracle Forms, navigate to Application Developer, Menu.
-
Create the Quick Links menu root. Then create all the menu entries under the quick link menu root (up to two levels allowed). You can use any submenus and functions that are already associated to the menu of the responsibility assigned to the site. Be sure to define prompts for all functions.
Important: Ensure that the menu tree does not have any functions with empty prompts.
-
Save the menu.
-
Attach the Quick Links menu to the responsibility menu, directly under the user menu root (second level).
-
Set the prompt of the Quick Links menu root to empty.
-
Set the value of the profile option, IBE: Quick Links Menu, to the Quick Links root menu code. The corresponding responsibility is the one to which the quick links menu is assigned; thus, the value of the profile option should be the specific responsibility associated to the site.
All links inside the bin will be rendered as relative URLs. Thus, if the container page is non-secure, all the links inside the bin will be non-secure as well, and vice versa.
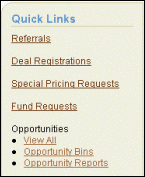
The figure below shows how the Quick Links bin might look in an implementation. The example has the text, Quick Links, at the top of the bin, and hyperlinks to areas of the Oracle Partner Management application below the title. The links shown in the graphic are: Referrals, Deal Registrations, Special Pricing Requests, Fund Requests; and under an Opportunities section: View All, Opportunity Bins, and Opportunity Reports.
Example Partner Quick Links Bin
Enabling the Partners Group Bin
Oracle iStore seeds a bin template which displays sites associated to the group, Partners. To display this group, map the logical template, PARTNER_GROUP_BIN_IBEWC, to the bin layout component of your choice. See the section, "Using Configurable Bin Layout", in the chapter, Implementing the Catalog. See the appendix, Seeded Display Data, for more information about the bin templates.
Oracle iStore Customer UI Access for Oracle Partner Management Users
Oracle iStore restricts access to its Customer UI pages by checking users' responsibilities. The responsibilities your specialty sites will support must be associated to specific sites during setup. Oracle iStore supports all Oracle Partner Management responsibilities, both seeded and non-seeded, provided that you map these responsibilities to sites. If a site allows guest user access, in the Site Selection Page, all specialty sites available to the guest user are displayed.
For specific information on Oracle Partner Management responsibilities, see the Oracle Partner Management Implementation Guide.
Setting Profile Options for Pricing
In order for prices to display along with products in sites which support users of Oracle Partner Management, set the following pricing profile options at the Partner Management application level:
-
IBE: Pricing Event--Before Shopping Cart --- Set to Enter Order Line
-
IBE: Pricing Event for Shopping Cart --- Set to Batch Processing
Registration for Oracle Partner Management Users
During registration, each Oracle Partner Management end-user is assigned at least one responsibility through an association with his username. As with other Customer UI users, initial registration of Oracle Partner Management users should be done through Oracle iStore. Setup and support of enrollments, approval processes, and user types is handled through the Oracle CRM Technology Foundation HTML pages.
Important: Registration through Oracle CRM E-Business Suite HTML login (JTF login) is not recommended. User types supported in Oracle iStore are not supported in JTF/JTA, since they are associated to Oracle iStore registration templates. If you register using JTF/JTA user types, users will not have access to the Site Selection Page and the partner sites.
Enable Partner Management User Types
Before allowing users to register through Oracle iStore, the registration page should be implemented to support Oracle Partner Management users. After it is set up to support Oracle Partner Management users, the page will display registration links for Oracle Partner Management users.
Follow the steps below to set up the registration page for Oracle Partner Management users:
-
Log in to the Oracle CRM System Administration Console.
-
Set the desired Oracle Partner Management user types as active. The Oracle Partner Management registration links will automatically be available in the New User Registration page.
Note that these steps also enable the partner user types for e-mail notifications.
For more information, see the chapter, Implementing User Management, and the appendix, Seeded User Data.
See the Oracle Partner Management Implementation Guide for more information on Oracle Partner Management seeded user registration data.
Note: The seeded Oracle Partner Management enrollments are enabled by default. See the Oracle Partner Management documentation and the Oracle E-Business Suite CRM System Administrator's Guide for more information.
Sample Oracle Partner Management User Registration Flows
This section contains example user registration flows for Oracle Partner Management users.
Partner User Registration
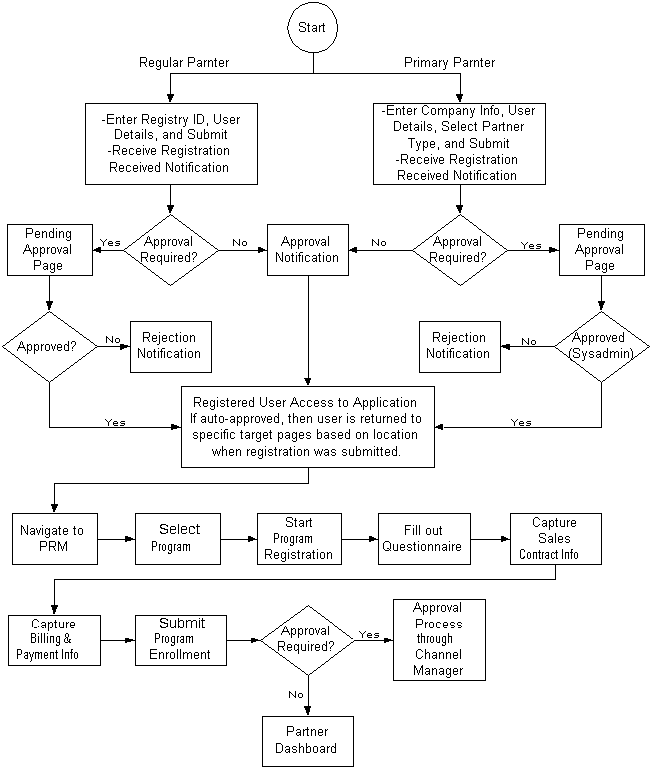
Following is the registration flow for Oracle Partner Management users, both primary and non-primary. As a prerequisite, Partner User Type is defined in Oracle CRM Technology Foundation User Management framework.
Note: For the partner primary user registration flow, the impact on Oracle TCA storage is as follows:
-
The organization is defined as party ID of type "organization"
-
The organization address is saved as "party address"
-
The user is defined as party relationship of "employee of" the partner organization
-
The user is defined based on the relationship "partner of" an internal organization
-
User chooses to register as a user for a partner organization. Primary and regular partner users select different links.
-
The following information is displayed in the seeded registration page:
-
Organization Information: organization name, address and primary phone number
-
Personal Information: name, e-mail address, primary phone number and username and password
-
-
Primary users select a partner type (previously defined in the Partner Management schema); note that partner type selection is not available for non-primary users
-
The user indicates default currency and country
-
The user submits the registration.
-
The user receives an e-mail notification with username, password and organization identifier number.
At the submission level, the information is saved in the Partner Management, TCA and FND schema. A party relationship of "partner of" between the new party organization and the internal organization is also created. The user is also created as a resource and assigned to a resource group. The partner is also assigned to a profile, that will be populated with information when the partner will apply for a partner program
-
Once the partner has completed the registration, an approval process can be launched if required.
-
If the partner is auto-approved, the following target pages are displayed, based on the starting point of the registration:
-
Site Selection Page
-
Site Home Page
-
Checkout screen
-
-
If the partner is not auto-approved, the pending approval page is displayed.
-
During approval, the user is assigned a default responsibility based on the user type setup.
Note: Until the primary user has approved and assigned him roles and responsibilities, the non-primary user is not assigned to all responsibilities associated to the partner organization.
When the primary user approves the non-primary user, responsibilities need to be assigned and the partner profile needs to be populated.
-
Once the user has been approved and has access to the site dashboard, he can apply for a partner program:
-
If implemented, the list of available partner programs will be displayed in the partner Program Enrollment bin. Note that a program is an orderable item, associated with a default inventory organization.
-
The primary user selects one of the programs and starts the application.
-
Based on the program setup, the following steps can be implemented:
--The user can be required to complete a questionnaire, defined in Oracle Partner Management. The results of the questionnaire are saved in the Partner Profile. If a user applies for another program and gives different answers to the questionnaire, the new answers overwrite the previous ones.
--The user can accept a sales contract.
--The user can enter billing information (in this case, an account is created in Oracle TCA).
--The user can enter payment information
-
The user submits the program application.
-
An order is generated in order management in Entered status, associated to the operating unit mapped to the partner site responsibility.
-
The partner is directed to the partner dashboard and a message is displayed, saying that the program application needs to be approved.
-
The Vendor/Channel Manager approves or rejects the application. When the partner program application is approved, then the order is booked. If the partner program application is rejected, then the order is canceled.
-
Once the program application is approved, the partner program membership status is changed.
Note: Partner Management users can navigate to Profile, My Company Profile, Membership to check the status of membership.
-
-
Based on the program benefits setup, the partner company is associated to additional privileges. Primary users might be assigned to specific Oracle iStore and Oracle iSupport responsibilities. Based on the partner dashboard setup, if the merchant has set up group navigations bin for Store and Support sites, the sites associated to these responsibilities will show up in the group bins. Also, based on the responsibility associated to the site and the responsibility associated to the user, the Quick Links bin will display links to Partner Management functionality.
The following diagram depicts the flow.
Partner User Registration Flow
Registration in Oracle Partner Management Implementation
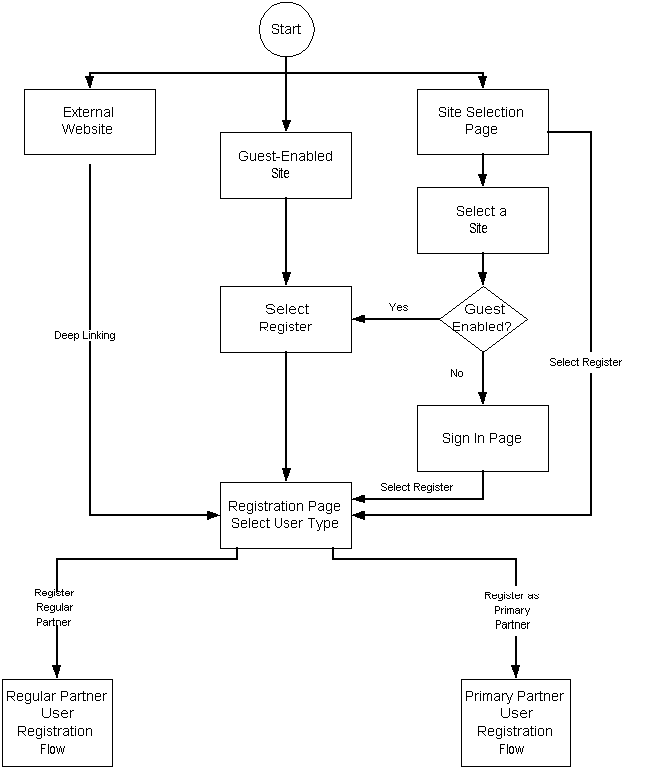
Following is the registration flow in an implementation of Oracle Partner Management using Oracle iStore framework.
-
The user arrives at the registration page through one of the following paths:
-
From an external website, the user selects a deep link to the registration page.
-
The user navigates to the Site Selection Page and selects a site. If the site allows guest users, he is taken to the Site Home Page and can select the Register icon. If the site does not allow guest users, he is taken to the login page, and from there can select the Register icon.
-
The user navigates to the Site Selection Page and selects the Register icon.
-
The user accesses a site which allows guest users and selects the Register icon.
-
-
From the Registration page, if he is registering as a primary user, he follows the partner primary user registration flow; if he is registering as a non-primary user, he follows the partner non-primary user registration flow.
The following diagram depicts the flow.
Registration in Oracle Partner Management Implementation
Customizing Oracle Partner Management User Profile Pages
Out-of-box, all of the user and company profile pages will display the seeded Oracle iStore profile menus. To enable the Oracle Partner Management profile menus, follow the steps in the section, "Steps to Configure Profile Menus", in the chapter, Implementing User Management.
Setting Default Administrator for Partner Orders Errors
To specify a default username to receive a notification each time an error occurs during the partner ordering process, set the profile option, IBE: Order Administrator. See the "Profile Options" appendix for more information.
Example Business Scenarios
The following sample business scenarios with Oracle iStore and Oracle Partner Management implemented together, can enhance your understanding of the site management capabilities.
Prerequisite: Activate the appropriate Oracle Partner Management enrollment(s) within the desired Oracle iStore user type. When the user selects the enrollment during registration, he will receive both responsibilities, and will have primary user access in both applications. See the "Implementing User Management" chapter and the Oracle E-Business Suite CRM System Administrator's Guide for more information on how to set up enrollments.
Sample Scenario 1 - Oracle iStore and Oracle Partner Management Implemented in Same Site
In this sample scenario, Oracle iStore and Oracle Partner Management share site access.
Sample User Type/Enrollments Setup
For the scenarios below, the following is the user enrollment setup:
Partner Primary User:
-
Enrollment1: Responsibility A
-
Enrollment2: Responsibility C
Partner Business User:
-
Enrollment1: Responsibility B
-
Enrollment2: Responsibility D
Sample Sites Setup
Sample sites defined are Site 1, Reseller Site, and Site 2, Distributors Site. Each site supports two responsibilities. Neither site support guest users, and both sites are responsibility-restricted.
Site 1 - Resellers
This site does not allow guest user access and checks responsibility before allowing access to the site. It is identified with the following responsibilities:
-
Responsibility A = Oracle iStore and Oracle Partner Management primary users
-
Responsibility B = Oracle iStore and Oracle Partner Management business users
Site 2 -- Distributors
This site does not allow guest user access and checks responsibility before allowing access to the site. It is identified with the following responsibilities:
-
Responsibility C = Oracle iStore and Oracle Partner Management primary users
-
Responsibility D = Oracle iStore and Oracle Partner Management business users
Access Scenarios Related to Sample Enrollments and Groups
Use the sample user type/enrollment and sites setups in the following cases:
Case 1: Login/Register as Primary User
-
The partner primary user accesses the login/registration page.
-
At registration/login completion, the Site Selection Page displays all partner sites that are accessible to the primary users (responsibilities A and C).
-
The partner drills down into Resellers Site. The Partner Home Page is displayed.
-
The Products tab displays the catalog. The partner can browse the catalog and place orders.
-
The Partner Home Page also displays a bin that shows all sites belonging to the Partner group, a bin that allows partners to enroll in new memberships, a bin that allows partners to navigate to opportunities, deals and referrals, and a bin that allows partners to upgrade renew programs.
-
The partner navigates to opportunities, then selects the Dashboard link to return to the portal.
Case 2: Login/Register as Business User
-
The partner business user accesses the login/registration page.
-
At registration/login completion, the Site Selection Page displays all partner sites that are accessible to the primary users (responsibilities B and D).
-
The partner drills down into Distributors Site. The Partner Home Page is displayed.
-
The Products tab displays the catalog. The partner can browse the catalog and place orders.
-
The Partner Home Page also displays a bin that shows all sites belonging to the North America group, and a bin that allows partners to navigate to opportunities, deals and referrals.
-
The partner navigates to opportunities, then selects the Dashboard link to return to the portal.
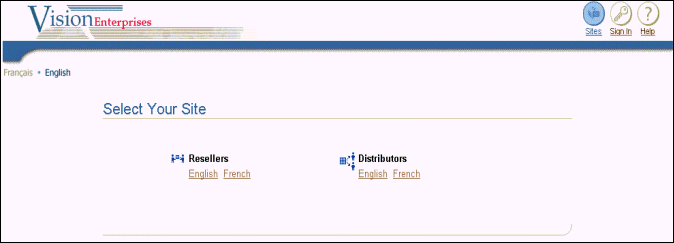
The figure below shows how the Site Selection Page might look in a sample implementation. The example shows the page set up in multiple-column format. At the top of the page, the company (in this example graphic, the company is Vision Enterprises) logo displays. Under the logo, the language list appears. At the top of the central portion of the screen, the text, Select Your Site, directs users to choose a specialty site from within the two main groups presented: Resellers and Distributors. Language hyperlinks -- reading, for example, English and French -- display under the name of each specialty site. Users select the language link to access the Site Home Page for the specialty site.
Example Site Selection Page: Combined Store and Partner Sites
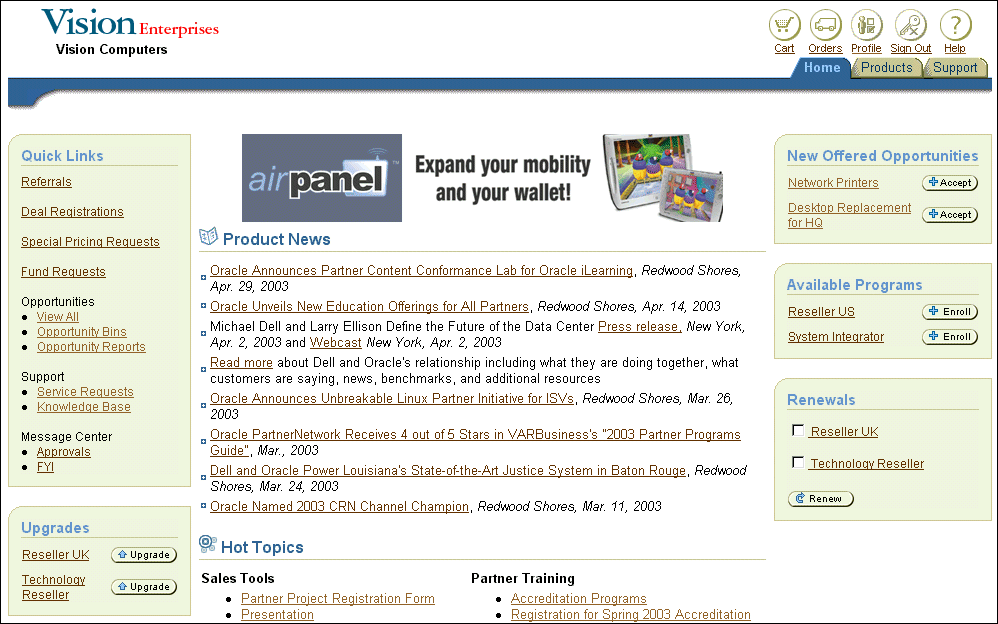
The figure below shows how the partner dashboard might look in a sample implementation. The example shows a web page set up in multiple-column format, with the navigation icons at the top right of the page above the site tabs: Home, Products, Library, Training. At the top left of the page, the company (in this example graphic, the company is Vision Enterprises) logo displays. At the top of the central portion of the screen, an image displays. below this title, and some welcome text to the right of the image. Below that, the central portion of the screen displays the following sections: Product News and Hot Topics. Each of these sections contains hyperlinks to other web pages appropriate for partner users. Along the left portion of the screen, two bins display: Quick Links and Upgrades. The Quick Links bin displays the following hyperlinks: Referrals, Deal Registrations, Special Pricing Requests, Fund Requests; (under Opportunities heading) View All, Opportunity Bins, Opportunity Reports; (under Support heading) Service Requests, Knowledge Base; and (under Message Center heading) Approvals and FYI. Below the Quick Links bin is a bin named Upgrades. It includes two hyperlinks, Reseller UK and Technology Reseller; next to each hyperlink is a button called Upgrade. Along the right side of the screen, three bins display: New Offered Opportunities, Available Programs, and Renewals. The New Offered Opportunities bin displays two hyperlinks: Network Printers and Desktop Replacement for HQ; next to each hyperlink is a button called Accept. The Available Programs bin displays two hyperlinks: Reseller US and System Integrator; next to each hyperlink is a button called Enroll. The Renewals bin displays two hyperlinks: Reseller UK and Technology Reseller, along with the button, Renew.
Example Partner Dashboard for Partner Primary User
Sample Scenario 2 - Partner Sites and Multiple Partner Sites
In this sample scenario, multiple partner sites are enabled with partner sites.
Sample User Type/Enrollments Setup
For the scenarios below, the following is the user enrollment setup:
Partner Primary User:
-
Enrollment 1: Partner Primary User
Partner Business User:
-
Enrollment 1: Partner Business User
Pre-conditions: The partner primary user registers the partner organization. The primary user is assigned to the Partner Primary user responsibility. The primary user enrolls in a membership that grants him with the "Reseller Primary User" Responsibility, the "Distributor Primary User" responsibility and the sites responsibilities.
Sample Groups and Sites Setup
In this scenario, two groups are set up, each with two sites.
Group 1 - Partners
-
Site 1 -- Resellers: In this site, no guest user access is allowed. The following responsibilities are associated with the site:
-
Responsibility A = Reseller Primary User
-
Responsibility B = Reseller Non-primary user
-
-
Site 2 -- Distributors: In this site, no guest user access is allowed. The following responsibilities are associated with the site:
-
Responsibility C = Distributor Primary User
-
Responsibility D = Distributor Non-primary user
-
Group 2 - Stores
-
Site 3 -- USA Store: In this site, no guest user access is allowed. The following responsibility are associated with the site:
-
Responsibility = Vision Computers Indirect USA
-
-
Site 4 -- Canada Store: In this site, no guest user access is allowed. The following responsibility are associated with the site:
-
Responsibility = Vision Computers Indirect Canada
-
Access Scenarios Related to Sample Enrollments and Groups
Use the sample user type/enrollment and sites setups in the following cases:
Case 1: Login/Register as Primary User
-
The partner primary user accesses the login/registration page.
-
At registration/login completion, the Site Selection Page displays all partner sites that are accessible to the primary users (responsibilities A and C).
-
The partner drills down into Resellers Site. The Partner Home Page is displayed.
-
The Partner Home Page also displays a bin that shows all accessible sites belonging to the Stores group, including the targeted sites assigned to this partner through memberships, a bin that allows the partner to enroll in new memberships, a bin that allows the partner to navigate to opportunities, deals and referrals, and a bin that allows the partner to upgrade renew programs.
-
The partner navigates to opportunities, then selects the Dashboard link to go back to the portal.
-
The partner navigates to the targeted sites, places orders.
-
The partner selects the Site Selection Page, selects the Partner Group and navigates back to the partner dashboard. As an alternative -- if the merchant has mapped the partner bin to the target Site Home Page -- the user can navigate back to the partner site through the partner group bin.
Case 2: Login/Register as Business User
-
The partner business user accesses the login/registration page.
-
At registration/login completion, the Site Selection Page displays all partner sites that are accessible to the business users (responsibilities B and D).
-
The partner drills down into Resellers Site. The Partner Home Page is displayed.
-
The Partner Home Page also displays a bin that shows all sites belonging to the Partners group and the sites belonging to the Stores group, including the targeted sites assigned to this partner through memberships.
-
The partner navigates to opportunities, then selects Dashboard to go back to the portal.
-
The partner navigates to the targeted sites, places orders.
-
The partner selects the Partner site link in the Group sites bin to go back to the partner Dashboard.