Setting Up the Development Environment
Overview
If you do not want to use standard Oracle E-Business Suite mobile apps installed directly from public app stores, Oracle lets you deploy mobile apps against Oracle E-Business Suite in the following different ways:
-
Enterprise distribution for Oracle E-Business Suite mobile apps
Starting from Oracle E-Business Suite Mobile Foundation Release 4.0, enterprises can distribute Oracle E-Business Suite mobile apps that are developed based on Oracle E-Business Suite Mobile Foundation internally through the use of Mobile Application Archive (MAA) files.
Note: This functionality provided through the use of MAA files is also available for selected mobile apps that are not developed based on Oracle E-Business Suite Mobile Foundation. See: Understanding Mobile Application Archive (MAA) Files.
For each Oracle E-Business Suite mobile app available on the public app stores for a given release, a corresponding MAA file is provided that lets enterprises distribute mobile apps to internal users on an internal corporate location. This means that instead of downloading Oracle E-Business Suite mobile apps from a public app store, enterprise users can download the apps directly from an enterprise's own site.
For information on using MAA files for enterprise distribution, see Using Mobile Application Archives for Enterprise Distribution.
Note that starting from Oracle E-Business Suite Mobile Foundation 7.0, enterprises can optionally enable and send push notifications to the mobile devices of their enterprise users when using Oracle Mobile Cloud Service or using Oracle Mobile Hub from Release 9.0 when an appropriate patch is applied. For more information, refer to Implementing Push Notifications.
-
Custom mobile app development for Oracle E-Business Suite
Starting from Oracle E-Business Suite Mobile Foundation Release 4.1, enterprises can develop custom mobile apps to meet the enterprise needs. This feature enables enterprises to:
-
Extend Oracle E-Business Suite functionality with custom mobile apps that are not covered by the Oracle E-Business Suite mobile apps available in public stores.
-
Develop custom apps for customized Oracle E-Business Suite applications.
Custom mobile app development typically involves the following three high-level steps:
-
Design mobile apps
This is an important step before you begin to implement mobile apps. Refer to Using the Sample App as a Reference for different design patterns. For Oracle mobile user experience (UX) standards and design guidelines, refer to https://www.oracle.com/webfolder/ux/middleware/alta/index.html.
-
Deploy required REST APIs
If you would like to develop custom Oracle E-Business Suite APIs for use in custom app development, you can publish them in the Oracle Integration Repository and deploy them as REST services.
Starting from Oracle E-Business Suite Mobile Foundation Release 6.1, Oracle provides seeded REST APIs used in Oracle E-Business Suite mobile apps that can also be used to develop custom apps. Enterprises can deploy desired APIs that are available in Oracle Integration Repository as REST services for use in custom apps development. For information on searching and testing these seeded APIs, refer to Implementing Oracle E-Business Suite REST Services.
-
Implement the custom mobile apps
After deploying required APIs as REST services, you can develop your custom mobile apps using one of the following options:
-
The Login component from Oracle E-Business Suite Mobile Foundation Release 4.1 or later
Starting from Oracle E-Business Suite Mobile Foundation Release 7.0, you can optionally enable push notifications when using Oracle Mobile Cloud Service or using Oracle Mobile Hub, from Release 9.0 when an appropriate patch is applied, for the custom apps developed using the Login component.
For more details about implementing this feature for the custom mobile apps, see: Implementing Push Notifications.
-
Any mobile app development framework of your choice
-
Using Oracle E-Business Suite Mobile Foundation Login Component
The Oracle E-Business Suite Mobile Foundation Login component is an extension to Oracle Mobile Application Framework to rapidly develop and deploy custom mobile apps against Oracle E-Business Suite that provides required flows, such as configuration, login, responsibility selection, and so on.
For information on custom app development for Oracle E-Business Suite mobile apps, see Using the Login Component to Develop Mobile Apps.
Important: Oracle Mobile Application Framework development knowledge is required for developing custom mobile apps for Oracle E-Business Suite using Oracle E-Business Suite Mobile Foundation. Refer to the Oracle Mobile Application Framework documentation (https://www.oracle.com/application-development/technologies/maf/oraclemaf.html).
-
This chapter describes the following topics on the environment setup for both enterprise distribution and custom app development for Oracle E-Business Suite:
Performing Server-Side Tasks
Perform the following tasks on the server side:
Note: When setting up a development environment for Oracle Mobile Supply Chain Applications for Oracle E-Business Suite (MSCA), you only need to apply the Oracle E-Business Suite server-side patches described in this section. The mobile app definition metadata setup and migration between instances are not applicable for MSCA that is not developed based on Oracle E-Business Suite Mobile Foundation.
After applying the server-side patches and performing needed tasks, you need to perform setup tasks on the client side. See: Performing Client-Side Tasks.
Applying Oracle E-Business Suite Server-Side Patches
Oracle strongly recommends applying the latest server-side patches for your mobile apps.
For the product family patch information, see Applying Prerequisite Patches on the Oracle E-Business Suite Server, Oracle E-Business Suite Mobile Apps Administrator's Guide, Release 12.1 and 12.2.
Setting Up Mobile App Definition Metadata
Oracle E-Business Suite Mobile Foundation based mobile apps can be configured and managed from Oracle E-Business Suite server.
Once an app is launched, it runs the validation steps against the Oracle E-Business Suite server to check if the app is configured and if the current user can access the app before allowing the user to use the app. Therefore, before deploying a mobile app that you have modified for enterprise distribution or created for custom app development, you need to perform the following setup tasks on the server to ensure the app is ready for deployment:
Note: Since enterprises can develop custom mobile apps either using the Oracle E-Business Suite Mobile Foundation Login component or any mobile app development framework of their choices, the setup tasks described in this section are not required if the Login component is not used in custom app development.
Note: For Oracle E-Business Suite mobile apps that you installed directly from a public app store, such as Apple App Store or Google Play, the definitions of these apps are already shipped by Oracle.
-
Registering and Updating Your Mobile App Definition Metadata
You must register your mobile app definition metadata first before deploying and testing the app against the Oracle E-Business Suite server.
-
Creating and Using Mobile App Access Roles
Oracle E-Business Suite mobile apps use role-based access control to secure mobile app data. To secure your mobile apps, you need to set up required app-specific mobile app access roles first so that administrators can assign these roles to responsibilities later. Users who have the mobile app access roles through those responsibilities will have access to the corresponding mobile apps.
-
Prior to the deployment of your app, ensure that the app can work as expected. You need to work with administrators to configure and validate the app against an Oracle E-Business Suite environment.
Registering and Updating Your Mobile App Definition Metadata
You need to register your mobile app definition metadata on the server first before deploying and testing the app. If any changes to the mobile definition later, you can modify the application definition metadata if needed.
Accessing the Mobile Applications Manager UI Pages
To access the Mobile Applications Manager UI pages, log in to Oracle E-Business Suite as a user who has the Mobile Applications Manager responsibility.
Note: Separate User Privileges in the Mobile Applications Manager UI Pages
The Mobile Applications Manager responsibility allows you to access the Mobile Applications Manager UI pages, and this responsibility is assigned through the Mobile Applications Administrator role (UMX|FND_MBL_ROLE_ADMIN) or the Mobile Applications Developer role (UMX|FND_MBL_ROLE_DEV) which provides you with various access privileges. For more information about these user roles and their privileges, see Enabling a Mobile App Individually and Specifying the Configuration Through the UI Pages, Oracle E-Business Suite Mobile Apps Administrator's Guide, Release 12.1 and 12.2.
The Search Mobile Applications page appears.
Search Mobile Applications Page
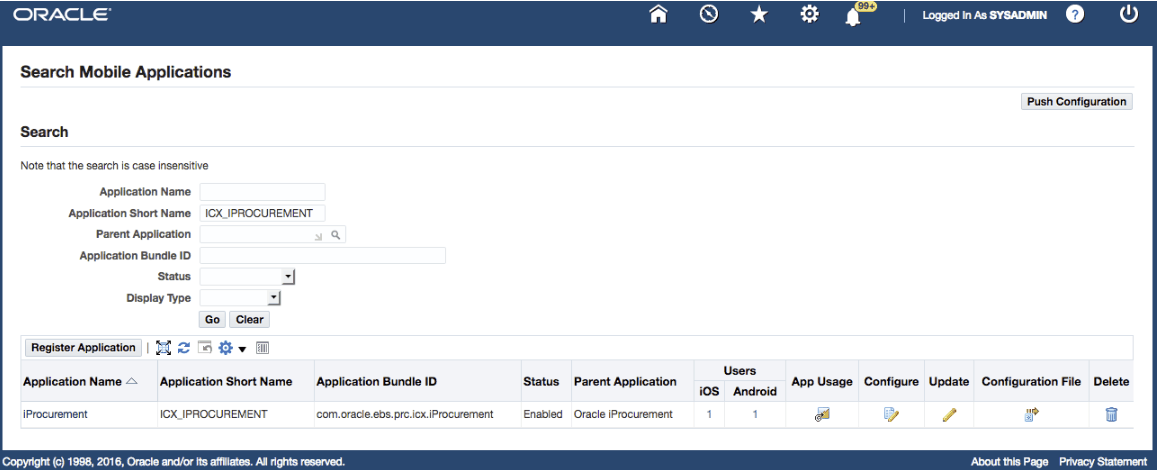
Note: Users who have the Mobile Applications Administrator role can find the additional Users and App Usage columns from the search result table for viewing the platform-specific user installation and app usage information. See: Viewing Mobile App Installation and Usage Metrics, Oracle E-Business Suite Mobile Apps Administrator's Guide, Release 12.1 and 12.2.
For additional administrative tasks on enabling and configuring a mobile app individually through the UI pages or configuring multiple apps using a script as well as viewing configuration details, see the Oracle E-Business Suite Mobile Apps Administrator's Guide, Release 12.1 and 12.2.
This is the entry point where you can:
-
Register an app by clicking the Register Application button. See: Registering Your Mobile App.
-
Update the application definition metadata for an existing app by clicking the Update icon from a search result table. See: Updating Your Mobile App Definition.
-
Delete an existing mobile app's application definition metadata by clicking the Delete icon from the search result table. See: Deleting Your Mobile App Definition.
Registering Your Mobile App
Use the following steps to register an app on the server:
-
Log in to Oracle E-Business Suite as a user who has the Mobile Applications Developer role.
-
Select the Mobile Applications Manager responsibility and choose the Applications link from the navigator.
-
In the Search Mobile Applications page, click the Register Application button to register an enterprise app.
The following pages are displayed in the sequence listed here as part of the registration process for an app:
Application Details Page
After you click the Register Application button in the Search Mobile Applications page to register an app, the Application Details page appears.
Application Details Page
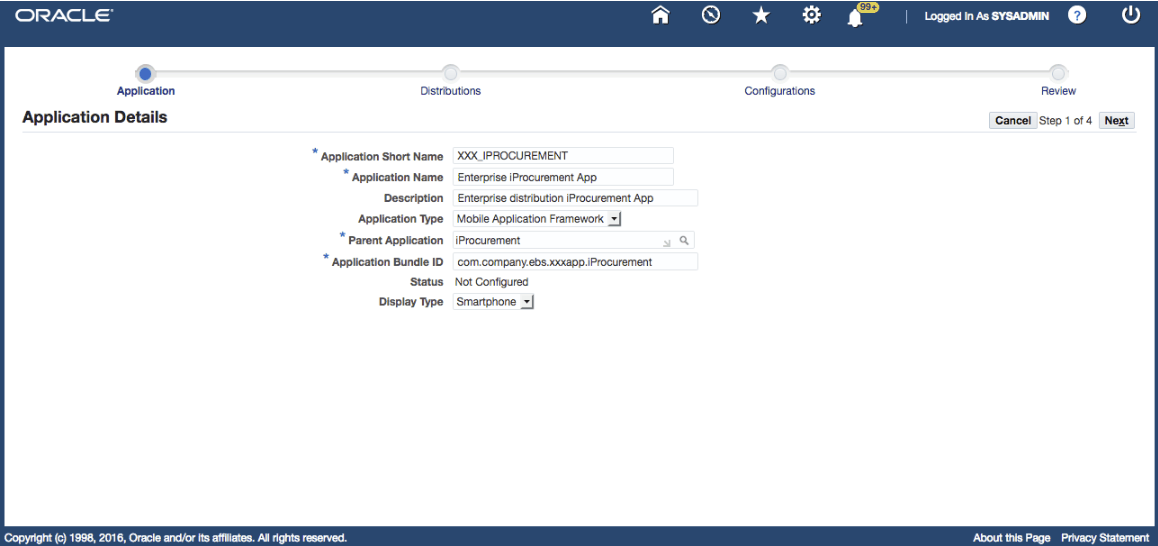
Enter the following application metadata information for your enterprise app:
-
Application Short Name: Enter the short name for the mobile app, such as "XXX_IPROCUREMENT".
-
Application Name: Enter the display name for the mobile app.
-
Description: Enter optional description information for the mobile app
-
Application Type: "Mobile Application Framework" is selected by default.
-
Parent Application Name: Enter the Oracle E-Business Suite application to which the mobile app belongs, such as "iProcurement".
-
Application Bundle Id: Enter a unique bundle identifier for the mobile app, such as
com.company.ebs.xxxapp.iProcurementfor your mobile app.This value will be used later in the Id field of the
maf-application.xmlfile in Oracle JDeveloper for the mobile app. -
Display Type: "Smartphone" is selected by default.
-
Status: "Not Configured" is selected by default.
When the app is configured, the status should be set to "Enabled". For information on configuring your mobile apps, see Configuring the Mobile Apps on the Oracle E-Business Suite Server, Setting Up the Mobile Apps chapter, Oracle E-Business Suite Mobile Apps Administrator's Guide, Release 12.1 and 12.2.
Note: Ensure that the desired information for Application Name, Application Short Name, and Application Bundle Id are correctly specified for your app. These fields are not allowed to change after the registration. See: Updating Your Mobile App.
Click Next to access the Distributions page to continue the registration process. See: Distributions Page.
For information on registering an app, see Registering Your Mobile App.
Distributions Page
After you enter the application metadata information for an app and click Next, the Distributions page appears. This is the page where you specify the service version and distribution method for the app.
Distributions Page

Enter the following distribution information for the app:
-
Service Version: Enter the service version number corresponding to the app's REST service implementation.
-
Enterprise distribution for Oracle E-Business Suite mobile apps
This service version number must be exactly the same as the service version of the corresponding Oracle E-Business Suite mobile app. This is because the app uses the same REST services as that of the corresponding seeded mobile app. This service version number is important for mobile clients to access and determine the server's capability. Therefore, this service version number cannot be different from the corresponding seeded app.
For example, if the service version of the seeded Oracle Mobile iProcurement for Oracle E-Business Suite app is "1.0.0", you must enter the same service version "1.0.0" here.
To obtain the service version information of the corresponding seeded app, locate the seeded app through a search first, and then click the app's Application Name link from the search result table. The service version information is displayed in the read-only Application Details page.
If you upgrade an enterprise-distributed app to a new version of the corresponding MAA file and apply the corresponding consolidated product family patches, ensure to manually check and update the Service Version number of the enterprise app to that of the value in the corresponding seeded app. For information on initiating the server updates, see Directing Users to Obtain Connection Details and Initiate Server Updates, Oracle E-Business Suite Mobile Apps Administrator's Guide, Release 12.1 and 12.2.
-
Custom mobile apps
For custom apps, use this Service Version field to maintain the version number for the app's REST service implementation. This version number could start with 1.0.0 and increment only when the app's REST service implementation is enhanced significantly with new features. The Service Version value is available to the mobile app code through application scope variable
{applicationScope.EBSServiceVersion). You can use the value on the mobile app to determine the server capability.
-
-
Distribution: Select the desired distribution platform check box(es) for your app, such as Android, iOS, or both platforms. By default, both the Android and iOS check boxes are selected.
If you plan to enable push notifications for both platforms, select both check boxes for iOS and Android. Otherwise, push notifications will not work for the unselected platform.
Click Next to access the Configurations page. See: Configuration Details Page.
Click Back to modify the application metadata information if needed. See: Application Details Page.
For information on registering an enterprise app, see Registering Your Mobile App.
Configuration Details
Use the Configuration Details page to specify the desired configuration parameters for your mobile apps. Specifically, you can use this page to:
-
Configure a desired authentication type and set the related parameters
-
Configure push notifications with desired parameters for the supported mobile apps (available from Oracle E-Business Suite Mobile Foundation Release 7.0 and onwards)
Configuring a Desired Authentication Type
Selecting "Connection Settings" as the Category Value for Configuring a Desired Authentication Type
Category "Connection Settings" is required to be configured for every mobile app for it to connect to the Oracle E-Business Suite server. You must select either one of the following authentication types for your app based on your authentication scenarios as the Sub Category value for the connection settings:
-
Apps Local Login (previously known as "HTTP Basic")
This type corresponds to the "HTTP Basic" authentication server type used in Oracle Mobile Application Framework.
-
Apps SSO Login (previously known as "Web SSO")
This type corresponds to the "Web SSO" authentication server type used in Oracle Mobile Application Framework.
Note: The authentication type selected here during the app registration can be changed later when an administrator configures the app.
-
Apps Local Login (default) - for local authentication
This is the default authentication type for the connection settings where users are authenticated locally against the Oracle E-Business Suite server. The corresponding configuration parameters for the Apps Local Login type are:
-
APPS_MOBILE_SESSION_TIMEOUT
-
APPS_MOBILE_IDLE_TIMEOUT
-
APPS_MOBILE_AGENT
Configuration Details Page with Configuration Parameters for Apps Local Login
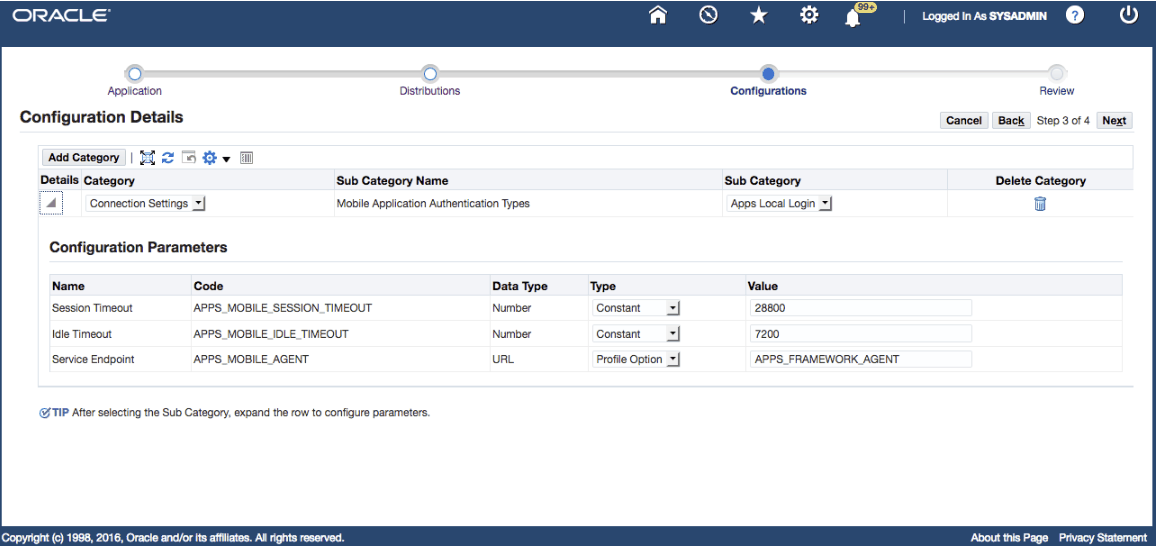
For information on setting configuration parameters for the Apps Local Login authentication type, see step 8 in the Enabling and Configuring a Mobile App Individually section, Oracle E-Business Suite Mobile Apps Administrator's Guide, Release 12.1 and 12.2.
-
-
Apps SSO Login - for remote authentication
Use the Apps SSO Login authentication type if you want to delegate authentication to Oracle Access Manager.
Before selecting this authentication type, ensure that your Oracle E-Business Suite instance is integrated with Oracle Access Manager. Refer to My Oracle Support Knowledge Document 1388152.1, Overview of Single Sign-On Integration Options for Oracle E-Business Suite. You must apply required patches and perform additional setup tasks to enable this feature. See: Mobile Specific Setup Tasks to Enable Apps SSO Login Authentication Security, Oracle E-Business Suite Mobile Apps Administrator's Guide, Release 12.1 and 12.2.
For more information about single sign-on, see Advanced Configurations for Single Sign-On (SSO), Oracle E-Business Suite Mobile Apps Administrator's Guide, Release 12.1 and 12.2.
Configuration Details Page with Configuration Parameters for Apps SSO Login
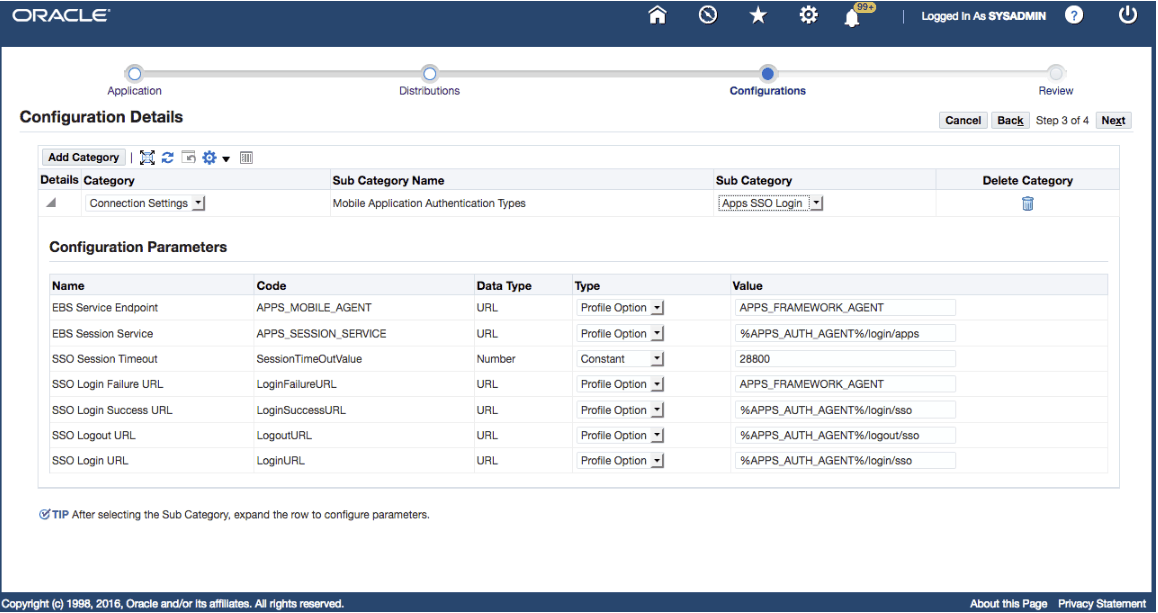
Once "Apps SSO Login" is selected as the authentication type, the following corresponding configuration parameters are automatically displayed in the Configuration Parameters region:
-
APPS_MOBILE_AGENT
-
APPS_SESSION_SERVICE
-
SessionTimeOutValue
-
LoginFailureURL
-
LoginSuccessURL
-
LogoutURL
-
LoginURL
-
For information on setting configuration parameters for the Apps SSO Login authentication type, see step 8 in the Enabling and Configuring a Mobile App Individually section, Oracle E-Business Suite Mobile Apps Administrator's Guide, Release 12.1 and 12.2.
Configuration Parameters region
The Configuration Parameters region allows you to predefine the configuration parameters for a selected configuration category. To display this region, click the Show link next to the configuration category.
Specify the parameter values listed in the region to predefine the configuration settings for the app.
-
Name: This is the configuration parameter name corresponding to the category and sub-category specified earlier in the Configuration Categories region.
-
Type: This determines how the default value for a parameter is assigned. Select either one of the following values:
-
Constant - It indicates that the value for the parameter is a constant.
For example, if "Constant" is selected, enter a constant value "28800" seconds as the default value in the Value field for the Session Timeout (APPS_MOBILE_SESSION_TIMEOUT) parameter.
-
Profile Option - It indicates a profile option is used to retrieve the value for the parameter.
If this is selected, enter the profile option name in the Value field for the parameter. For example, enter "APPS_FRAMEWORK_AGENT" as the default profile option name in the Value field for the Service Endpoint (APPS_MOBILE_AGENT) parameter.
-
-
Value: This is the default value for the parameter. This value is either a valid profile option internal name or a constant value depending on the value selected in the Type field.
For example, the default value for the SSO Login URL (LoginURL) parameter is the current value of
%APPS_AUTH_AGENT%/login/sso.Please note that the convention
%<string>%is used specifically for parameter values of type "Profile Option" and the value of which contains content that is in addition to the profile value. For example, the runtime value of this SSO Login URL parameter would be<profile-value-of-the-APPS_AUTH_AGENT>/login/sso, where/login/ssois a constant.
Click Next to access the Review page. See: Review Page.
Click Back to modify the configuration information if needed. See: Distributions Page.
For information on registering an app, see Registering Your Mobile App.
Adding Push Notifications to App Configuration
Starting from Oracle E-Business Suite Mobile Foundation 7.0 and onwards, Oracle E-Business Suite supports push notifications in the following apps, when using Oracle Mobile Cloud Service or using Oracle Mobile Hub (from Release 9.0 and onwards when an appropriate patch is applied):
-
Custom Oracle E-Business Suite mobile apps developed using the Login component from Oracle E-Business Suite Mobile Foundation
-
Oracle Mobile Approvals for Oracle E-Business Suite, when provided to users through enterprise distribution
Selecting "Push Notifications" as the Category Value for Configuring Push Notifications
If your mobile app supports push notifications, in order to enable the feature and configure the related parameters, you must add the "Push Notifications" category.
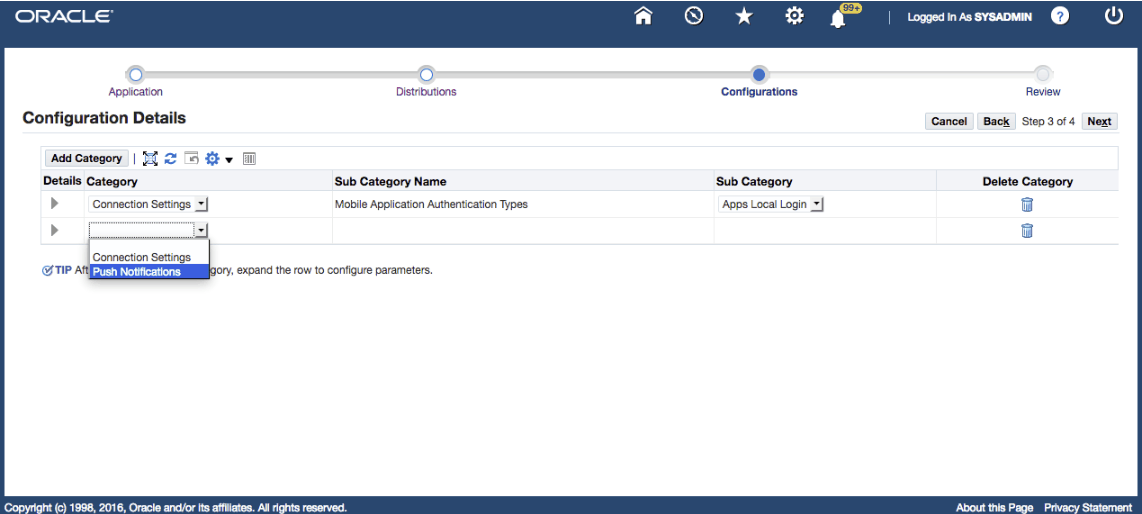
Click the Add Category button to add another row. Select "Push Notifications" as the Category value. "No" is displayed as the default value in the Sub Category field which means that when the app is deployed, the push notifications feature is disabled by default.
Configuration Details Page with "Push Notifications" Category Selected
In addition to adding the "Push Notifications" category for the mobile app definition and configuring corresponding parameters, following tasks are important for the server and the mobile app to send and process push notifications:
-
Perform required changes for the mobile apps.
-
Perform required tasks on the Oracle E-Business Suite server.
See: Setting Up and Enabling Push Notifications for Oracle E-Business Suite Mobile Apps, Oracle E-Business Suite Mobile Apps Administrator's Guide, Release 12.1 and 12.2.
In the Configuration Parameters region, specify default parameter values for the mobile app. The default parameter values can be overwritten by the administrator when configuring the mobile app.
Configuration Details Page with Configuration Parameters for Push Notifications
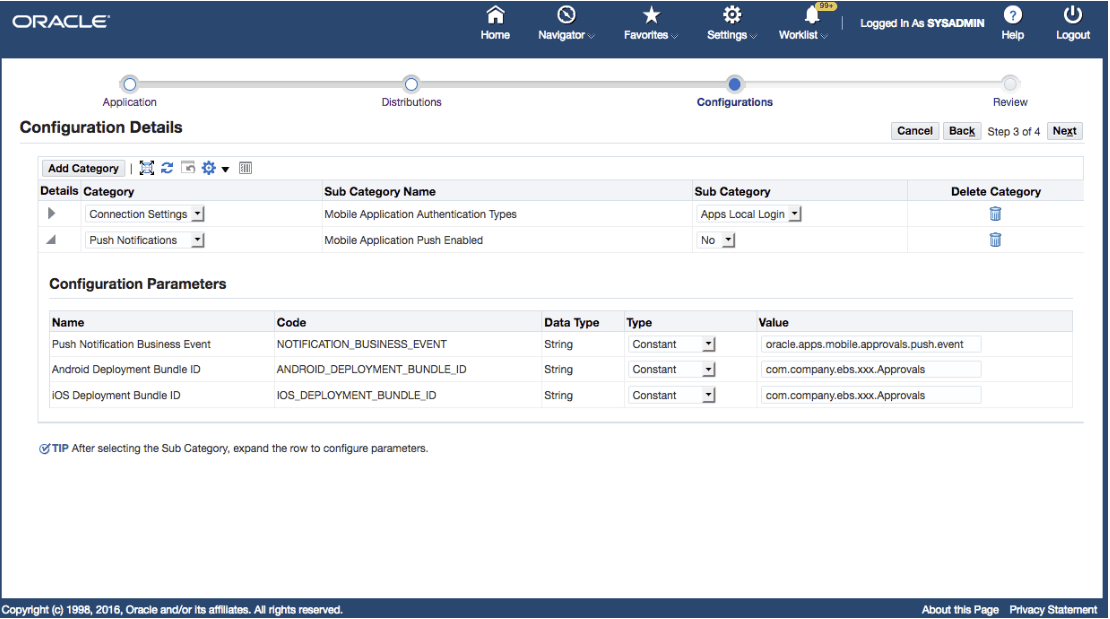
Note: You must specify the Push Notifications Business Event field, but you may leave the Android Deployment Bundle ID and iOS Deployment Bundle ID fields blank when creating the mobile app definition metadata.
-
Push Notifications Business Event (NOTIFICATION_BUSINESS_EVENT): The app-specific business event used to trigger push notifications from the Oracle E-Business Suite application code when the event arises.
For example, Oracle Workflow server code uses
oracle.apps.mobile.approvals.push.eventbusiness event to send push notifications to the enterprise-distributed Approvals app. -
Android Deployment Bundle ID (ANDROID_DEPLOYMENT_BUNDLE_ID): The Package Name used in the deployment profile to create the Android app.
-
iOS Deployment Bundle ID (IOS_DEPLOYMENT_BUNDLE_ID): The Bundle ID registered with Apple to receive the iOS provisioning profile. This is the bundle ID used in the deployment profile to create the iOS app.
Click Next to access the Review Page.
For information on registering an app, see Registering Your Mobile App.
Review Page
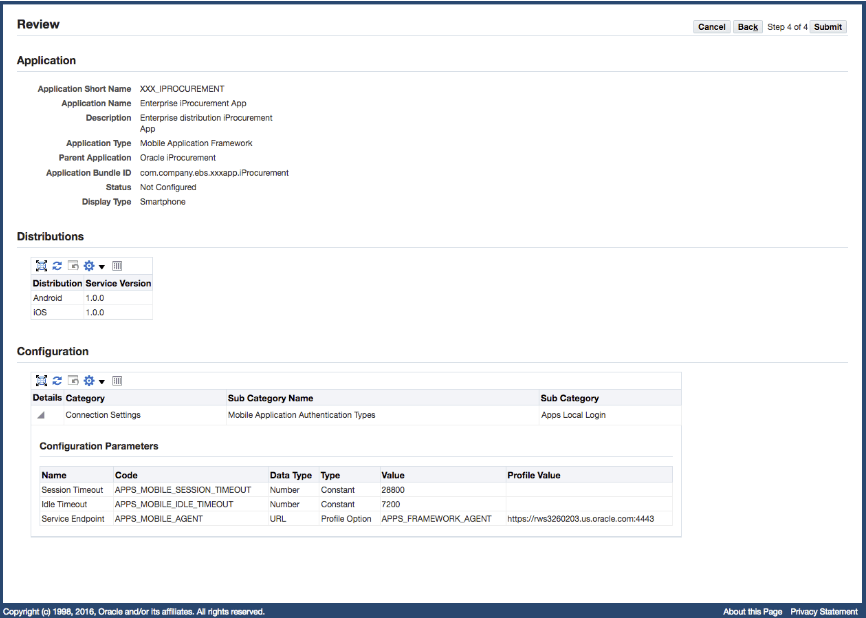
Once you complete the required registration information for your app, the read-only Review page appears. It displays all the metadata information, distributions, and configuration details that you specified earlier for the app.
Mobile App Registration Information Displayed in the Review Page
If no more change is required for the app, click Submit to save and register the app. A confirmation message appears indicating that the mobile app is successfully registered.
Click Back to modify the information if needed. See: Configuration Details Page.
For information on registering a mobile app, see Registering Your Mobile App.
Updating Your Mobile App Definition
To update the definition of an existing app, locate the app from the search result table in the Search Mobile Applications page.
Search Mobile Applications Page
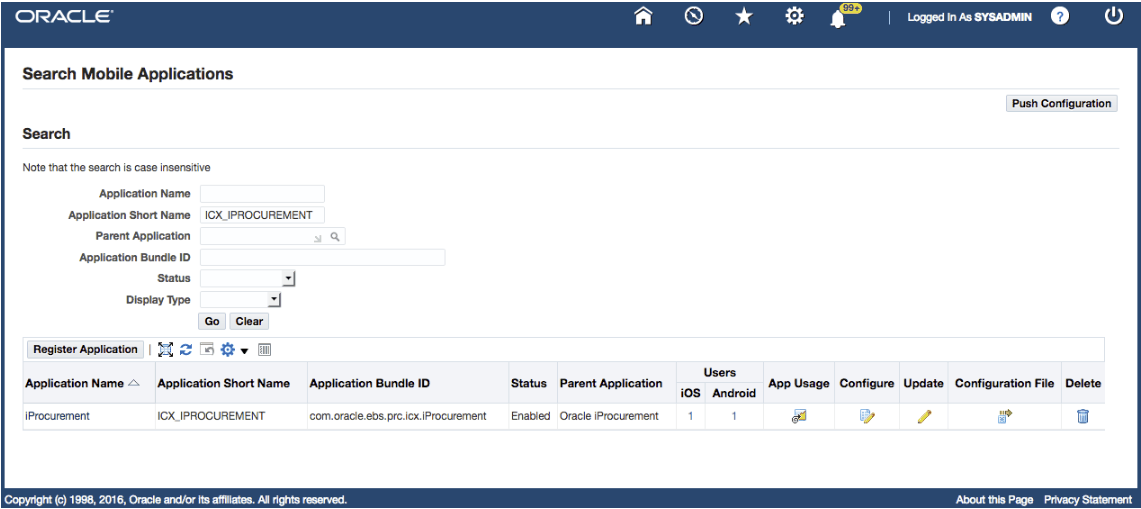
Click the Update icon from the search result table. This action allows you to access the Application Details page and modify the definition of the selected enterprise app.
Warning: You can update the application definition metadata for an app that you register for enterprise distribution or custom app development, but should never remove or modify the application definitions of Oracle E-Business Suite mobile apps, starting with com.oracle.ebs*.
Application Details Page
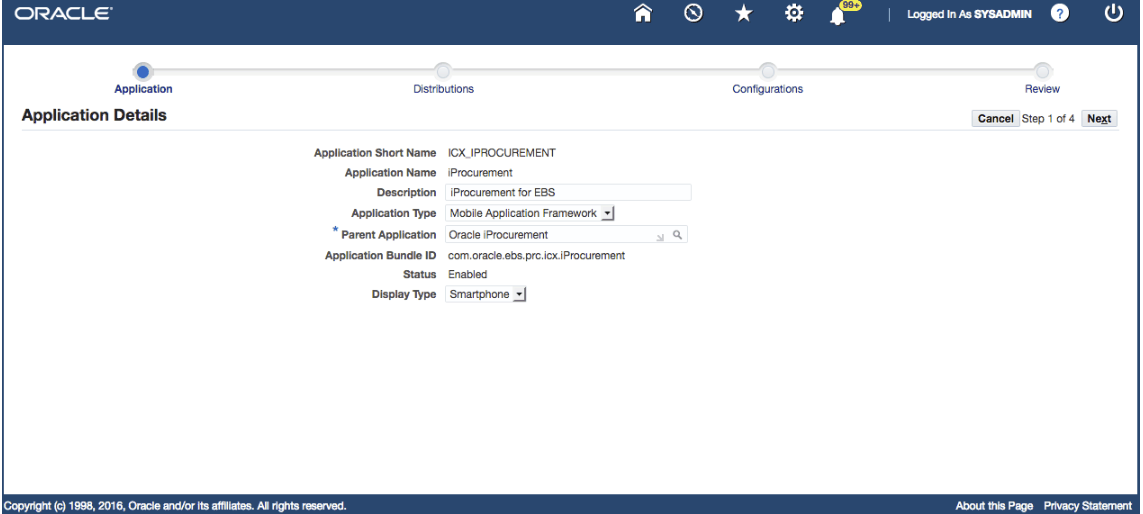
Note: Alternatively, you can click the Application Name link, such as ICX_IPROCUREMENT, from the search result table first to display the read-only Application Details page. Click the Update button in the page to enable the update for the app.
Similar to the app registration process, you can update the application definition metadata for the selected app.
-
Updating the application definition metadata in the Application Details Page
In the Application Details page, you can update the application metadata information including description, application type, parent application, and display type.
Please note that the Application Name, Application Short Name, and Application Bundle ID fields are not enabled for update.
-
Updating the distribution information in the Distributions Page
In the Distributions page, you can update the service version, and distribution methods for the selected app.
-
Updating the configuration information in the Configuration Details Page
In the Configuration Details page, you can change the Sub Category values for currently used configuration categories and corresponding parameter values, as well as add or remove configuration categories.
Note that the "Connection Settings" category is required for all Oracle E-Business Suite mobile apps. See: Configuring a Desired Authentication Type.
As mentioned earlier during the app registration, if "Apps SSO Login" is selected as the mobile app authentication type for an app, ensure that the Oracle E-Business Suite instance must be integrated with Oracle Access Manager. Refer to My Oracle Support Knowledge Document 1388152.1, Overview of Single Sign-On Integration Options for Oracle E-Business Suite. You must apply required patches and perform additional setup tasks to enable this feature. See: Mobile Specific Setup Tasks to Enable Apps SSO Login Authentication Security, Oracle E-Business Suite Mobile Apps Administrator's Guide, Release 12.1 and 12.2.
For information on registering an app, see Registering Your Mobile App.
Deleting Your Mobile App Definition
When the application definition of an app becomes invalid or is no longer needed, you can remove it from the server.
Warning: You can delete or update the application definition metadata for an app that you register for enterprise distribution or custom app development, but should never remove or modify the seeded application definitions of Oracle E-Business Suite mobile apps, starting with com.oracle.ebs*.
To delete the definition of an app, click the Delete icon from the search result table. A confirmation message appears requiring you to confirm the delete action. Once it's confirmed, the definition of the selected app is removed from the database and it is no longer available for users.
Creating and Using Mobile App Access Roles
Oracle E-Business Suite mobile apps use role-based access control to allow users who are assigned the appropriate access roles to access Oracle E-Business Suite.
Similar to self-service applications, some mobile apps may require a responsibility to be selected before accessing required application data. In order to show a list of responsibilities for users to select before using a mobile app, you need to first create a mobile app access role, and then associate the access role with your mobile app in Oracle JDeveloper.
When the mobile app is deployed to users, a mobile applications administrator can then assign the mobile app access role to responsibilities that will have access to the mobile app. All users who have access to those responsibilities will then inherit that mobile app access role and hence be able to use one of those responsibilities before using the mobile app to access Oracle E-Business Suite.
Important: Oracle Mobile Approvals for Oracle E-Business Suite is the only app that does not have an app-specific access role required for users to access the app. Other than the Approvals app, you must set up required roles for your apps.
-
Create mobile app access roles in Oracle E-Business Suite.
-
Assign the mobile app access roles to responsibilities.
-
Migrate the mobile app access role definitions to a target Oracle E-Business Suite instance where your app could connect.
Creating Mobile App Access Roles
Perform the following steps to create mobile app access roles:
-
Log in to Oracle E-Business Suite as a user who has the User Management responsibility. For example, log in as
SYSADMIN. -
Select the User Management responsibility and navigate to the Roles and Role Inheritance page.
-
In the Roles and Role Inheritance page, click the Create Role button.
-
The Create Role page appears.
Create Role Page
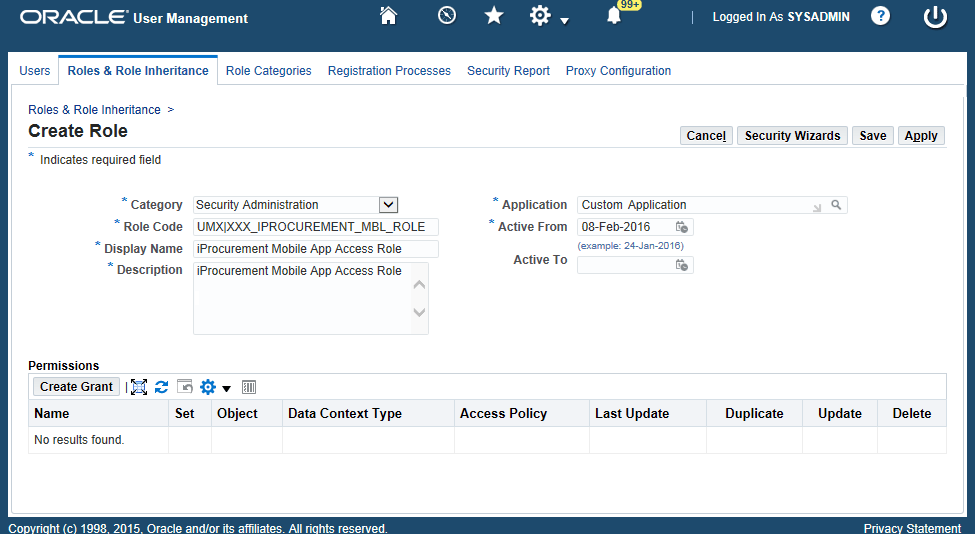
Enter the following information in the Create Role page:
-
Category: Select "Security Administration" from the drop-down list.
-
Role Code: Enter the role code in the format of "
PROD_MBL_APP_NAME", such as "XXX_IPROCUREMENT_MBL_ROLE".Record the Role Code information entered here which will be used later for the client-side setup.
-
A prefix "
UMX|" is added to this value automatically.In this example, the entered code value is automatically converted to
UMX|XXX_IPROCUREMENT_MBL_ROLE. -
The Role Code information entered here should be specified in the
oracle.ebs.login.rolecodeproperty of theebs.propertiesfile later. See Assigning Mobile App Access Roles.
-
-
Display Name: Enter a valid display name, such as "iProcurement Mobile App Access Role".
-
Description: Enter a valid description information for the role, such as "iProcurement Mobile App Access Role".
-
Application: Select the application name. For example, "Custom Application".
Similar to the Role Code value, the Application Short Name information entered here should be set up in the
oracle.ebs.login.roleappnameproperty of theebs.propertiesfile later. See Assigning Mobile App Access Roles. -
Active From: Leave the default unchanged.
-
Active To: Leave this field blank.
-
-
Save your work.
Note that the REST interfaces created for a given mobile app should be granted to the mobile app access role created for that app. See: Implementing Oracle E-Business Suite REST Services.
Additionally, once a new mobile app access role is created for an enterprise app, make sure that the corresponding REST services permission set of the associated seeded app is granted to the new access role. For information on the seeded app-specific access roles and REST services permission sets for Oracle E-Business Suite mobile apps, see Appendix C: Mobile App Access Roles, Oracle E-Business Suite Mobile Apps Administrator's Guide, Release 12.1 and 12.2.
Assigning Mobile App Access Roles to Responsibilities
After you create app-specific access roles, a mobile applications administrator can then assign these roles to responsibilities.
If the mobile app access roles were not assigned to any valid responsibilities that are assigned to the mobile users, those users will not be able to see any responsibilities on the mobile app and hence will not be able to connect the mobile app to Oracle E-Business Suite.
For information on assigning roles to responsibilities, see Setting Up Mobile App Access to Responsibilities, Setting Up the Mobile Apps chapter, Oracle E-Business Suite Mobile Apps Administrator's Guide, Release 12.1 and 12.2.
Please note that on the client side you need to specify these app-specific roles in the MAF application's ebs.properties file in order for the corresponding apps to use these roles. See: Using Mobile App Access Roles.
Configuring Your Mobile Apps
Before deploying your apps, you must work with a mobile applications administrator to perform needed administrative tasks to ensure your apps can work as expected. These administrative tasks, including mobile app configuration and validation, can be performed in a development instance.
For information on the administrative tasks, see the Oracle E-Business Suite Mobile Apps Administrator's Guide, Release 12.1 and 12.2.
Migrating Mobile App Metadata Between Instances
If there is a need to migrate the mobile application definition metadata and relevant mobile app access roles from one instance to another, perform the following tasks to transport the needed information:
This section includes the following topics:
-
Downloading and Uploading Mobile App Definitions
You can download the app definition metadata into a data (.ldt) file and then upload the file to another instance if needed.
-
Downloading and Uploading Mobile App Access Roles
Similar to the migration of the app definition metadata, this allows you to migrate mobile app access roles between instances.
Downloading and Uploading Mobile App Definitions
Once the application definition metadata has been registered in the database, you can transport the metadata information between different instances for testing or migration purposes.
Downloading Mobile App Definition Metadata
This can be achieved by first downloading the metadata into a data (.ldt) file, based on a .lct file $FND_TOP/patch/115/import/afmobile.lct using the Application Short Name as the key.
For example, use the following commands to download the metadata to a .ldt file:
FNDLOAD <APPS username> 0 Y DOWNLOAD $FND_TOP/patch/115/import/afmobile.lct xxxiproc.ldt FND_MBL_APPLICATION APPLICATION_SHORT_NAME=XXX_IPROCUREMENT
ORACLE Password:
Uploading Mobile App Definition Metadata
To upload the downloaded .ldt file, such as xxxiproc.ldt, to another instance, use the following commands:
FNDLOAD <APPS username> 0 Y UPLOAD $FND_TOP/patch/115/import/afmobile.lct xxxiproc.ldt
ORACLE Password:
Downloading and Uploading Mobile App Access Roles
Similar to the concepts of transporting application definition metadata information between instances, you can migrate the mobile app access role definitions from one instance to another if required.
Downloading Mobile App Access Roles
Use the following commands to download the definition of mobile app access roles:
FNDLOAD <APPS username> 0 Y DOWNLOAD $FND_TOP/patch/115/import/afrole.lct xxxapprole.ldt WF_ROLE ROLE_NAME=UMX|XXX_IPROCUREMENT_MBL_ROLE
ORACLE Password:
Uploading Mobile App Access Roles
After downloading the definition of mobile app access roles, you can upload the downloaded .ldt file to another Oracle E-Business Suite instance to which the mobile app should connect. For example, use the following commands to upload the role definition:
FNDLOAD <APPS username> 0 Y UPLOAD $FND_TOP/patch/115/import/afrole.lct xxxapprole.ldt
ORACLE Password:
Performing Client-Side Tasks
This section describes the following setup tasks:
Installing the Development Tools
Install the required development tools for the iOS and Android platforms:
-
For the iOS platform, register with iOS Developer Program. Download and install Apple Xcode 10 and iOS SDK.
-
For mobile apps built with Oracle E-Business Suite Mobile Foundation Release 8.0, download and install Apple Xcode 9 and iOS SDK.
-
For mobile apps built with Oracle E-Business Suite Mobile Foundation Release 7.0, download and install Apple Xcode 8 and iOS SDK.
-
-
For the Android platform, set up the downloaded Android SDK.
Downloading and Installing Oracle JDeveloper 12.2.1.3.0 Studio Edition
To develop mobile apps for Oracle E-Business Suite Mobile Foundation 9.1, 9.0, and 8.0, ensure you have Oracle JDeveloper version 12.2.1.3.0 Studio Edition.
Note: For mobile apps built with Oracle E-Business Suite Mobile Foundation 7.0, ensure that you have Oracle JDeveloper version 12.2.1.0.0 Studio Edition.
For information on setting up Oracle JDeveloper, see Oracle Fusion Middleware Installing Oracle JDeveloper.
Downloading and Installing Oracle Mobile Application Framework 2.6.3 for Oracle E-Business Suite Mobile Foundation Release 9.1
Downloading Oracle Mobile Application Framework
In addition to Oracle JDeveloper, you need to download Oracle Mobile Application Framework 2.6.3 included in the "Oracle E-Business Suite Mobile Foundation and Mobile Application Archive 9.1" software distribution from the Oracle Software Delivery Cloud (https://edelivery.oracle.com) through part number V1031711-01. You can also download this MAF version on My Oracle Support through Patch 31581902.
-
If your MAA files are developed based on Oracle E-Business Suite Mobile Foundation Release 9.0, download "Oracle Mobile Application Framework 2.6.2 for Oracle E-Business Suite Mobile Foundation Release 9.0" (with additional bug fixes on top of Oracle MAF 2.6.2) included in the "Oracle E-Business Suite Mobile Application Archive 9.0" software distribution instead from the Oracle Software Delivery Cloud (https://edelivery.oracle.com) through part number V995061-01. You can also download this MAF version on My Oracle Support through Patch 30707039.
-
If your MAA files are developed based on Oracle E-Business Suite Mobile Foundation Release 8.0, download "Oracle Mobile Application Framework 2.5.0 for Oracle E-Business Suite Mobile Foundation Release 8.0" (with additional bug fixes on top of Oracle MAF 2.5.0) included in the "Oracle E-Business Suite Mobile Application Archive 8.0" software distribution instead from the Oracle Software Delivery Cloud (https://edelivery.oracle.com) through part number V978633-01. You can also download this MAF version on My Oracle Support through Patch 27983689.
-
If your MAA files are developed based on Oracle E-Business Suite Mobile Foundation Release 7.0, download "Oracle Mobile Application Framework 2.4.0 for Oracle E-Business Suite Mobile Foundation Release 7.0" (with additional bug fixes on top of Oracle MAF 2.4.0) included in the "Oracle E-Business Suite Mobile Application Archive 7.0" software distribution instead from the Oracle Software Delivery Cloud (https://edelivery.oracle.com) through part number V861706-01.
-
You can also download this specific Oracle MAF version at https://www.oracle.com/application-development/technologies/maf/mafdownload.html.
Additionally, install underlying mobile platforms required for Oracle Mobile Application Framework. For example, in Oracle E-Business Suite Mobile Foundation Release 9.1, install the following platforms required for Oracle Mobile Application Framework 2.6.3:
-
iOS - Xcode 11.x
-
Android - Compile API Level 29
For information on maintaining two instances, refer to Oracle Mobile Application Framework 2.6.3 Migration Notes (from MAF 2.6.2) (https://www.oracle.com/application-development/technologies/maf/maf263migration.html).
-
For Oracle E-Business Suite Mobile Foundation Release 9.0, see Oracle Mobile Application Framework 2.6.2 Migration Notes (https://www.oracle.com/application-development/technologies/maf/maf262migration.html).
-
For Oracle E-Business Suite Mobile Foundation Release 8.0 and Release 7.0, refer to "Using Xcode 9.x with MAF 2.5.0" and "Using Xcode 8 and Deploying to iOS 10 with MAF 2.4.0" respectively in Installing Oracle Mobile Application Framework.
Installing Oracle Mobile Application Framework
After you have installed the iOS SDK, Android SDK, or both required for your platform(s) and downloaded the required Oracle Mobile Application Framework 2.6.3, follow the installation instructions to install the downloaded Oracle Mobile Application Framework. See: Installing the MAF Extension in JDeveloper, Installing Mobile Application Framework with JDeveloper, Installing Oracle Mobile Application Framework.
You can use Oracle Mobile Application Framework for:
-
Working with Mobile Application Archive files to create enterprise-distributed Oracle E-Business Suite mobile apps
For information on downloading Mobile Application Archive files, see: Downloading Mobile Application Archives Files.
-
Developing custom apps for Oracle E-Business Suite using Oracle E-Business Suite Mobile Foundation Login Component
Setting Up Oracle JDeveloper
To configure the environment for your target platform in Oracle JDeveloper. select Tools from the menu and then Preferences to open the Preferences dialog. Select your desired platform, either Android or iOS, from the Mobile Application Framework tree node. This opens a page for the selected platform. Specify the platform and SDK location and then provide the information for the signing credentials.
For instructions on setting up development tools for the iOS and Android platforms, see:
-
Installing Mobile Application Framework with JDeveloper, Installing Oracle Mobile Application Framework
-
Setting Up the Development Environment, Installing Oracle Mobile Application Framework
Setting Up Oracle JDeveloper for Internationalization
In Oracle JDeveloper, select Tools from the menu, and then Preference.
In the Preference dialog, select Environment from the left panel, and then select "UTF-8" in the Encoding field from the drop-down list.
For information on internationalizing Oracle E-Business Suite mobile apps, see Internationalizing Oracle E-Business Suite Mobile Apps.