| Oracle® Big Data Appliance Owner's Guide Release 1 (1.0.3) Part Number E25960-05 |
|
|
PDF · Mobi · ePub |
| Oracle® Big Data Appliance Owner's Guide Release 1 (1.0.3) Part Number E25960-05 |
|
|
PDF · Mobi · ePub |
This chapter describes how to use the Oracle Big Data Appliance Configuration Utility. It contains the following sections:
Note:
An Oracle representative typically completes the Oracle Big Data Appliance Configuration Utility from information provided by the customer in the Oracle Big Data Appliance Configuration Worksheets.The information entered in the Oracle Big Data Appliance Configuration Utility is used to generate the installation and deployment files. After you enter values into the utility, the information is validated. Then the utility generates the files for Oracle Big Data Appliance.
The utility is implemented as a spreadsheet containing these worksheets:
Welcome
Network Configuration
Software Configuration
Preview
This section explains how to use the Oracle Big Data Appliance Configuration Utility. It contains these topics:
You must use Apache OpenOffice Spreadsheet 3.4 or Oracle Open Office Calc 3.3 to configure the spreadsheet. Do not use other spreadsheet programs like Excel, which can modify the spreadsheet but not generate the files.
To obtain the Oracle Big Data Appliance Configuration Utility, refer to My Oracle Support Note 1434477.1.
To open the Oracle Big Data Appliance Configuration Utility:
Download OpenOffice from this website and follow the instructions for installing it:
Open Apache OpenOffice Spreadsheet.
From OpenOffice Spreadsheet, open the bda_configurator.ods file. If the current settings do not allow macros, you see a message.
To change the macro setting:
From the Tools menu, choose Options.
In the navigation tree, expand the OpenOffice.org folder and select Security.
In the right pane, click Macro Security.
Either lower the security level or enter a trusted source.
To turn off AutoCorrect:
From the Tools menu, choose AutoCorrect Options.
Select the Options tab.
Clear all check boxes, and then click OK.
AutoCorrect settings can make it difficult for you to enter passwords.
Save your changes and reload the spreadsheet.
If you see a security warning, select Enable Macros.
This procedure describes how to use the Oracle Big Data Appliance Configuration Utility to customize the default configuration settings for your installation. The other sections in this chapter provide detailed information about each field in the spreadsheet.
To generate the configuration files:
Open the spreadsheet with OpenOffice as described in the previous procedure. The Welcome sheet opens.
Click Next to edit the Network Configuration sheet.
Enter the network configuration settings as specified in the Oracle Big Data Appliance Configuration Worksheets.
Click Next. If your changes are invalid, then you see an error message. You must correct the errors before continuing to the Software Configuration sheet.
To discard your changes, click Reset.
Enter the software configuration settings as specified in the Oracle Big Data Appliance Configuration Worksheets.
Click Preview to view the configuration settings defined by your entries. To make any changes, either click Previous or click the tab for a particular sheet. You must click Preview on the Software Configuration sheet for the changes to appear on the Preview sheet.
When you are satisfied with the configuration, click Save Configuration on the Preview sheet to generate the configuration files.
This step does not save the worksheet. To save your changes, click the Save icon.
Choose a location for the configuration files in the Select Path dialog box. The files are created in a directory named bda-customer_name/rack_name in that location, such as bda-Example Inc/bda1.
If you are configuring multiple racks as a single CDH cluster, then you are done. Otherwise, generate separate configuration files for every set of racks that will be configured as a single CDH cluster.
Provide the network administrators and others at the site with a copy of the Configuration Templates to verify that the configuration is correct.
The Oracle Big Data Appliance Configuration Utility generates the following files to use when you configure the system.
Runs a series of tests to ensure the specified names and IP addresses for Oracle Big Data Appliance were added correctly to the name server and they do not conflict with the existing network configuration. See "Checking for Network Errors" for instructions on running this script.
Contains the network configuration. Transfer this file to a USB drive for copying to Oracle Big Data Appliance. See "Configuring the Network".
Contains all information provided in the spreadsheet, including the network configuration, port numbers, default user names, and passwords. Transfer this file to a USB drive for copying to Oracle Big Data Appliance. See "Using the Mammoth Utility".
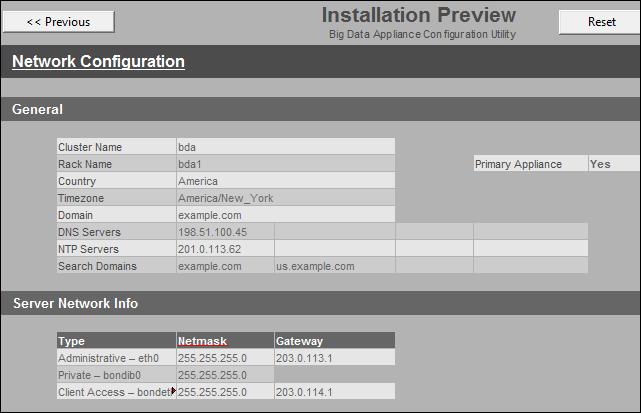
Reproduces the Installation Preview page of the spreadsheet in a printable format. The network administrator and others can use this Installation Template to verify the settings and make any last minute corrections.
Figure 4-1 shows part of the first page of the Installation Template.
The network administrator must add the host names and IP addresses for the components of Oracle Big Data Appliance to a name server. When this task is complete, you can use the preinstall-checkip.sh script to check the network for errors.
Run the preinstall-checkip.sh script at these points in the installation process:
Before Oracle Big Data Appliance arrives at the site but after the network administrator has added the new names and IP addresses to the name server. This step ensures that the network configuration parameters are valid and the network is ready to accept Oracle Big Data Appliance connections.
After Oracle Big Data Appliance arrives but before it is connected to the network. This step ensures that the network has not changed and is still ready to accept Oracle Big Data Appliance connections.
To check the network for conflicts:
Copy the preinstall-checkip.sh script to any Linux system with a 10 GB Ethernet connection to the subnet on which Oracle Big Data Appliance will be deployed.
Ensure that the script is executable:
chmod +x preinstall-checkip.sh
Execute the script:
./preinstall-checkip.sh
If the script identifies errors, open the bda-checkip.out file for details. It contains information about every test the script performed. The output file is created in the same directory as the script.
Resolve the conflicts if possible before proceeding.
If you are unable to resolve all IP address conflicts between the existing network and Oracle Big Data Appliance, then you can proceed without connecting to the network up to "Configuring the Network". The procedures take longer to complete because of time-outs from attempts to connect to configured services such as Domain Name System (DNS) and Network Time Protocol (NTP).
Example 4-1 shows success and error messages from the preinstall-checkip.sh script.
Example 4-1 Output from preinstall-checkip.sh
Big Data Appliance pre-installation network verification starting ...

Using name server 198.51.100.21 for all DNS lookups

Domain is example.com

Processing DNS name servers : SUCCESS
Processing NTP time servers : SUCCESS
Processing gateways : SUCCESS
Processing factory IP addresses : SUCCESS
Processing public node names (bondeth0) : SUCCESS
Processing private IP addresses (bondib0) : ERROR - see bda-checkip.out for details
Processing admin node names (eth0) : SUCCESS
Processing ILOM names : SUCCESS
Processing switch and PDU IP addresses : SUCCESS
Processing ASR hostname : SUCCESS

One or more checks report ERROR. Review bda-checkip.out for details
Table 4-1 to Table 4-5 briefly describe the fields in the Network Configuration sheet of the Oracle Big Data Appliance Configuration Utility. See the Oracle Big Data Appliance Configuration Worksheets for complete details.
Table 4-1 describes the general rack properties.
Table 4-1 General Properties for the Rack
| Spreadsheet Field | Description |
|---|---|
|
Cluster Name |
The name of the CDH cluster. Required. |
|
Rack Name |
The name of the Oracle Big Data Appliance rack. By default, the rack name is derived from the cluster name, so that a CDH cluster named bda has racks named bda1, bda2, and so forth. |
|
Server Base Name |
Base name for all servers. A two-digit suffix uniquely identifies each server. The Rack Name and Server Base Name are used to generate the host names for all network interfaces: eth0, bondib0, bondeth0, and Oracle ILOM. For example, a cluster name of |
|
Admin Access Suffix |
Suffix to the basic host name to form the bondeth0 host names |
|
Private Name Suffix |
Suffix to the basic host name to form the bondib0 host name |
|
ILOM Name Suffix |
Suffix to the basic host name to form the Oracle ILOM name |
|
Switch Base Name |
Suffix to the rack name to form the base name for all switches. For example, a rack name of |
|
Customer Name |
Name of the enterprise. Required. |
|
Domain Name |
Name of the domain in which Oracle Big Data Appliance operates. Required. |
|
Region |
Region in which the Oracle Big Data Appliance is located. Click the field, and then click the arrow for a list of regions. |
|
Time Zone |
Time zone for your installation. You must select a region before selecting the time zone. Click the field, and then click the arrow for a list of time zones for your region. |
|
Is this the only or primary rack in the cluster? |
Yes or no. Required. |
Table 4-2 describes the network properties for the entire rack.
Table 4-2 Network Properties for the Rack
| Spreadsheet Field | Description |
|---|---|
|
DNS Servers |
Up to four IP addresses for the Domain Name Server |
|
NTP Servers |
Up to four IP addresses for the Network Time Protocol Server |
|
Search Domains |
Up to four domain names in which Oracle Big Data Appliance operates, such as |
Table 4-3 describes the network properties for individual servers in the rack. You specify the IP addresses assigned to server 01. Sequential numbers are assigned automatically to the other 17 servers. Ensure that ranges of 18 IP addresses are free for each type of access. If 18 sequential IP addresses are not available, then you can edit the output files generated by the Oracle Big Data Appliance Configuration Utility.
Table 4-3 Network Properties for Servers
| Spreadsheet Field | Description |
|---|---|
|
Administrative - eth0 |
First IP address of 18 from the management network |
|
Private - bondib0 |
First IP address of 18 |
|
Client Access - bondeth0 |
First IP address of 18 from the client access network |
|
ILOM |
First IP address of 18 from the management network |
Table 4-4 describes the network properties for all switches. You configure the switches manually, as described in Chapter 8.
Table 4-4 Network Properties for Switches
| Spreadsheet Field | Description |
|---|---|
|
KVM Switch IP |
IP address of the KVM switch |
|
Cisco Switch IP |
IP address of the Cisco switch |
|
First InfiniBand Switch IP |
First IP address of three for the InfiniBand switches |
Table 4-5 describes the network properties for the power distribution units (PDUs). You configure the PDUs manually, as described in Chapter 8.
Table 4-6 to Table 4-9 briefly describe the fields in the Software Configuration sheet of the Oracle Big Data Appliance Configuration Utility.
Table 4-6 describes the optional software available for Oracle Big Data Appliance. If you have a license for Oracle Big Data Connectors, then you can install the software For more information about these components, see the Oracle Big Data Appliance Software User's Guide.
Table 4-6 Installed Components
| Spreadsheet Field | Description |
|---|---|
|
Oracle Big Data Connectors facilitate data access between data stored in the CDH cluster and Oracle Database. The connectors require a separate license. If you have a license, choose Yes. |
|
|
The agent is a required component of Oracle Data Integrator, which is a graphical tool for performing extraction, transformation, and loading (ETL) of data into Oracle Database. To configure Oracle Data Integrator for use immediately, choose Yes. |
|
|
Oracle NoSQL Database is a distributed key-value database that provides a storage option to Hadoop Distributed File System (HDFS). To configure Oracle NoSQL Database for use, choose Yes. |
|
|
Total disk space to allocate for Oracle NoSQL Database in Terabytes |
If you install Oracle NoSQL Database, you can allocate 54 or 108 terabytes (TB) for its use. Disk space allocated to Oracle NoSQL Database is not available for HDFS. |
|
External backup NFS directory |
The address of an NFS shared directory used to store a backup of the name node data. Enter the address in the form |
Table 4-7 describes the options for Auto Service Request (ASR). This service monitors the health of Oracle Big Data Appliance hardware. ASR Manager automatically submits a service request to Oracle Support Services when it detects a fault. See Chapter 12 for more information about ASR.
Table 4-7 Oracle Auto Service Request
| Spreadsheet Field | Description |
|---|---|
|
Enable Auto Service Request? |
Although you can opt out of this service, Oracle strongly recommends that you enable ASR by choosing Yes. |
|
The fully qualified name of a Linux server on the network, where ASR will be installed |
|
|
ASR Manager Port |
The port number for ASR Manager. The default port is 162. |
|
ASR Server Root Password |
Password for |
Table 4-8 identifies the users, groups, and passwords that can be set during the software installation. If you leave the passwords blank, then the installation prompts for them. The Oracle IDs must match those of a connected Oracle Exadata Database Machine to support the network file system (NFS) protocol.
Table 4-8 Users, Groups, and Passwords
Table 4-9 describes the configuration settings for the email server that Cloudera Manager uses to send alerts from the CDH cluster.
Table 4-9 Cloudera Manager Email Alerts
| Spreadsheet Field | Description |
|---|---|
|
The fully qualified name of the existing SMTP server that the company uses on its internal network |
|
|
Email Server (SMTP) Port |
The port used by the email server |
|
Email Server (SMTP) User Name |
User name for Cloudera Manager to use for authentication on the SMTP server |
|
Email Server (SMTP) Password |
Password for the user name |
|
Email Server uses SSL? |
Yes or no |
|
Email Alert Recipients |
One or more email addresses. These users receive the alerts from Cloudera Manager. |
|
Copyright © 2012, Oracle and/or its affiliates. All rights reserved. Legal Notices |
|