8 Managing Application Instances
Application instance is a new abstraction used in 11g Release 2 (11.1.2). It is a combination of IT resource instance (target connectivity and connector configuration) and resource object (provisioning mechanism).
In pre-R2 releases, requests creation was based on name of resources and it was Administrator-centric, which needed good knowledge of technology. However in 11g Release 2 (11.1.2), accounts and entitlements of users are associated with application instances, and not with the IT resource instance or resource object. This makes it easier for an end user to operate.
Application instance will be published to organizations and can be requested by users of those organizations. Suppose Microsoft Active Directory (AD) is to be provisioned to users across different organizations or departments across the world. You can define application instances consisting of the following:
-
AD as the resource object
-
Each AD server instance with the connectivity information, such as URL and password, as IT resources
This is because the resource object is same for all users, but the connectivity information, such as port number, can be different for users who are part of different organizations. Therefore, the AD resource object can be provisioned as an application instance without the user being aware of the connectivity information.
Application Instance is the provisionable entity. In order to get an account in a specific target, end users will need to request for the application instance. Instead of requesting for a resource and configuring IT resource instance separately, end user can request for an application instance. The request is subject to approval by an approver. When the request is approved, the resource is provisioned to the user, and an account is created in the target system.
Note:
If the request is coming from an administrator, then it may not require approval, where as a request coming from an end user needs approval by approver.This chapter describes application instances in the following topics:
8.1 Application Instance Architecture and Concepts
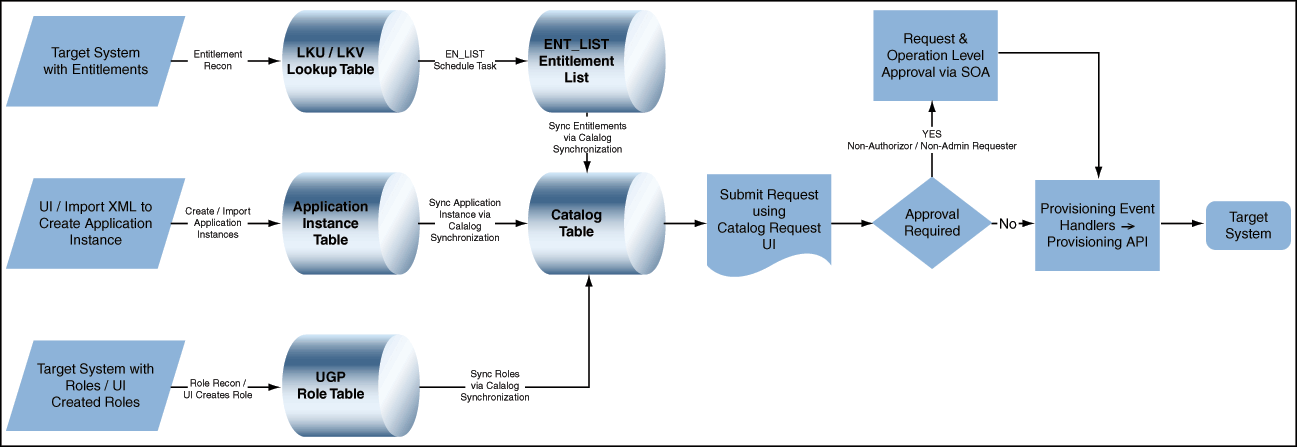
An Application Instance is the provisionable entity which will be published to the catalog. 11g Release 2 (11.1.2) provides the functionality to create catalog-based request to grant application instance, entitlements, and roles. The architecture includes enhancements required in provisioning module to support request for application instances and entitlements. Figure 8-1 illustrates the Application Instance architecture.
The application instance concepts are described in the following sections:
8.1.1 Multiple Accounts Per Application Instance
Users in an enterprise can have multiple accounts in a single application instance. This is required in a scenario in which an HR administrator performs various tasks for other employees in the organization by using an administrative account. The same HR administrator logs in by using a separate user account when performing certain tasks for self. In this example, the same user requires two different accounts for logging in to the system and performs different types of operations.
In addition, supporting multiple accounts for users is required to prevent potential security threats. Suppose a user uses the same account for logging in to the environment, and performs administrative tasks, regular business tasks for self and others, and tasks related to IT infrastructure. If there is an intrusion in the system and the account is hacked, the hacker can access infrastructure data and other confidential information. If the user has multiple accounts for each type of task and the regular account is hacked, the confidential information related to IT infrastructure and other sensitive resources are secured from the hacker.
Oracle Identity Manager supports multiple accounts in a single application instance. The first account that is created is tagged as primary account, and there can be only one primary account for a user. The subsequent accounts created on the same application instance would be tagged as Other. When the user requests entitlements, the entitlements are appended to the primary account.
When the user gets provisioned to an application instance, the Oracle Identity Manager checks if it is the first account getting provisioned for the user in that application instance. If it is the first account, then the account is marked as primary. When existing user accounts are reconciled from application instances, the first account that gets reconciled is marked as primary. If the account marked as primary is not the actual primary account, then you can manually change the primary tag for the account and mark another account as primary.
8.1.2 Entitlements
An entitlement granted to an account on a target system enables the account owner (user) to perform a specific task or function. An entitlement can be a role, responsibility, or group membership. For example, if user Richard is granted the Inventory Analyst role on a target system, then Richard has a child process form that holds Inventory Analyst role data.
In Oracle Identity Manager, there is one process form for each account (resource) provisioned to an OIM User. Entitlement data is stored in child process form. In the example described earlier, the process form for Richard's account on the target system has a child process form that holds Inventory Manager role data.
Note:
To reconcile entitlements created in the target system into Oracle Identity Manager, you must first run the scheduled job for lookup field synchronization, and then run the Entitlement List scheduled job.Attributes that constitute entitlement data stored on a child process form may vary from one target system to another. In addition, different types of entitlements, such as roles and responsibilities, may have different attributes.
Entitlements that are required to be associated to the administrative accounts are provisioned by requesting a modify resource on the administrative account. From the user's resource (account) profile, the administrator can request for modifying the administrative account and add the administrative entitlements to this account's child table, which then provisions this entitlement to the respective administrative account. Entitlements can also be requested through Entitlement request.
All types of entitlements are available for request in the request catalog. If the request for an administrative entitlement is approved, then it is associated to the primary account and not the administrative account.
You can edit the entitlements by using the Application Instances section of the Oracle Identity System Administration.
See "Developing Entitlements" for detailed information about entitlements.
8.1.3 Disconnected Application Instances
You might deploy self service, delegated administration, request management, and role-based provisioning features in Oracle Identity Manager, and might not deploy provisioning and reconciliation connectors to automate provisioning. After completion of delegated administration operation, request-approval, or role-based provisioning, a manual provisioning task is assigned to an administrator. The administrator then manually performs the provisioning in the target application instance. An example of this is provisioning of an access card, which is physical. Because Oracle Identity Manager cannot provision a physical access card, the application instance of the disconnected resource is to be provisioned.
Oracle Identity Manager supports provisioning of disconnected resources by using the SOA worklist for manual provisioning of disconnected resources. After the role-based provisioning decision or SOA request approval is complete and the corresponding application instance is determined to be a disconnected application instance, a new SOA workflow is started. This new SOA workflow is assigned to the manual provisioning administrator.
To achieve provisioning of disconnected resource, you can create application instances of the disconnected type. The manual provisioning administrator can use the Pending Approvals section of the Oracle Identity Self Service to update all fields in the request. After the manual provisioning administrator submits the manual provisioning worklist item, the provisioning infrastructure marks the underlying provisioning task to be completed based on the response of the manual provisioning administrator. If the administrator specifies that task is manually completed, then the status is changed to provisioned.
8.1.4 Application Instance Security
The Application Instance is also the entity with which security primitives are associated via the organization publishing mechanism. In multi-tenant environments, resource definitions can be shared by multiple organizations, but only those organizations that have the application instance published to them will be actually able to provision to the targets.
8.2 Managing Application Instances
You manage application instances by using Oracle Identity System Administration. This includes:
See Also:
""Converting a Disconnected Application Instance to Connected" in the Oracle Fusion Middleware Developer's Guide for Oracle Identity Manager for information about converting a disconnected application instance to a connected application instance8.2.1 Creating Application Instances
To create an application instance:
-
Login to Oracle Identity System Administration.
-
In the left pane, under Configuration, click Application Instances. The Application Instances page is displayed.
-
From the Actions menu, select Create. Alternatively, click Create on the toolbar. The Create Application Instance page is displayed.
-
Enter the values of the attributes, as listed in Table 8-1:
Table 8-1 Fields in the Create Application Instance Page
Attribute Description Name
The name of the application instance. This is a required field.
Note: If you enter non-ASCII characters in the Name field, then an error message is displayed when you try to save the application instance. It is recommended that you enter only ASCII or alphanumeric characters in the Name field.
Display Name
The display name of the application instance. This is a required field.
Description
A description of the application instance.
Disconnected
Select if you want to specify the application instance as disconnected. Selecting this option creates a new approval process that is assigned to the manual provisioning administrator. See "Disconnected Application Instances" for more information.
Note: Disconnected application instance can only be created when a sandbox is active. See "Managing Sandboxes" in the Oracle Fusion Middleware Developer's Guide for Oracle Identity Manager for more information about sandbox.
Resource Object
The resource object name. You can click the search icon next to this field to search and select a resource object.
IT Resource Instance
The IT resource instance name. You can click the search icon next to this field to search and select an IT resource instance.
Form
Select the form or dataset name. The forms associated with the selected resource object are populated in the Forms list.
Here, you can create a new form, or edit an existing form. See "Creating and Modifying Forms" for more information.
Parent AppInstance
The application instance name that you want to specify as a parent to the new application instance. The new application instance inherits all the properties of the parent application instance.
-
Click Save. The application instance is created, and the details of the application instance is displayed in a page.
8.2.2 Searching Application Instances
To search for application instances:
-
In the Oracle Identity System Administration, under Configuration, click Application Instances. The Application Instances page is displayed.
-
Select any one of the following:
-
All: On selecting this option, the search is performed with the AND condition. This means that the search operation is successful only when all the search criteria specified are matched.
-
Any: On selecting this option, the search is performed with the OR condition. This means that the search operation is successful when any search criterion specified is matched.
-
-
In the searchable application instance attribute fields, such as Display Name, specify a value. You can include wildcard characters (*) in the attribute value.
For some attributes, select the attribute value from the lookup. For example, to search all application instances with a particular resource object, specify the resource object name in the Resource Object field.
-
For each attribute value that you specify, select a search operator from the list. The following search operators are available:
-
Starts with
-
Ends with
-
Equals
-
Does not equal
-
Contains
The search operator can be combined with wildcard characters to specify a search condition. The asterisk (*) character is used as a wildcard character.
-
-
To add a searchable application instance attribute to the Application Instances page, click Add Fields, and select the attribute from the list of attributes.
For example, if you want to search all application instances under a parent application instance, then you can add the Parent AppInstance attribute as a searchable field and specify a search condition.
-
Optionally click Reset to reset the search conditions that you specified. Typically, you perform this step to remove the specified search conditions and specify a new search condition.
-
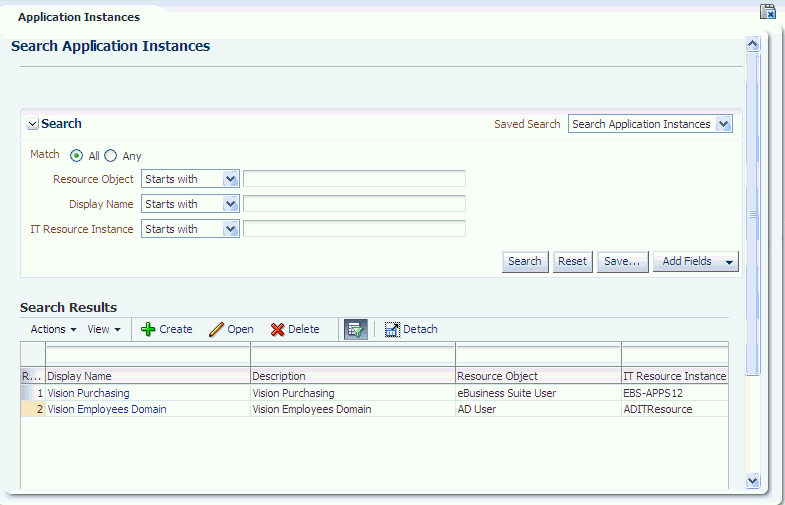
Click Search. The search result is displayed in a tabular format, as shown in Figure 8-2:
Tip:
You can use the Query By Example feature to refine your search based on specific values. For more information, see "Query By Example" in Oracle Fusion Middleware User's Guide for Oracle Identity Manager.8.2.3 Modifying Application Instances
You can open an application instance and modify the attributes, assign and revoke organizations to which the application instance is available, and edit the entitlements associated with the application instance. These tasks are described in the following sections:
8.2.3.1 Modifying Application Instance Attributes
To modify the attributes of an application instance:
-
In the Application Instances page, search and select the application instance that you want to open.
-
From the Actions menu, click Open. Alternatively, click Open on the toolbar. You can also click the Display Name of the application instance.
The Application Instance details page is displayed.
-
Ensure that the Attributes tab is displayed. The fields that you are not allowed to modify are grayed out.
-
Edit the values in the fields, such as Display Name, Description, Form, and Parent AppInstance.
-
Click Apply. The attribute modifications are saved.
Note:
After modifying an application instance, if the modified details are reflected in the Catalog page of Oracle Identity Self Service, but are not reflected in the User Details page, then close and reopen the User Details page. The updated application instance details will be reflected now.8.2.3.2 Managing Organizations Associated With Application Instances
You must make an application instance available for requesting and subsequent provisioning to users by publishing the application instance to an organization. The users in that organization or the users who has User Viewer role in that organization or the users who has Application Instance Viewer role + User Viewer Role in that organization can request for application instance. For information about authorization in Oracle Identity Manager, see Oracle Fusion Middleware Developer's Guide for Oracle Identity Manager.
In the Organizations tab of the Application Instance details page, you can publish the application instance to organizations, and revoke organizations from the application instance.
In addition, you can publish the application instance to an organization and its suborganizations so that users of the suborganizations can also request for the application instance. You can also publish an application instance to organizations with entitlements so that users of the organization can request for the application instance with the entitlements associated with it.
Note:
An administrator user can publish an entity to any organization that the administrator can view. For example, an Entitlement Administrator can publish entitlements with administrative permissions to any organization on which the Entitlement Administrator has view permission.This section describes the following tasks:
8.2.3.2.1 Publishing an Application Instance to Organizations
To publish an application instance to organizations:
-
In the Application Instance details page, click the Organizations tab. A list of organizations to which the open application instance is published is displayed.
For each organization, the include sub-orgs option is displayed in the Hierarchy Aware column. Select this option to make the open application instance available to the organization and its suborganizations. Deselect this option to make the open application instance available to the organization only.
-
From the Actions menu, click Assign. Alternatively, click Assign on the toolbar. The Select Organizations dialog box is displayed.
-
Search for the organizations to which you want to publish to the open application instance.
-
Click Add Selected. The selected organizations are added to the Selected Organizations table.
If you want the select all organizations, then click Add All.
-
For each organization added to the Selected Organizations table, a checkbox is displayed in the Hierarchy column. Select the Hierarchy option to publish the open application instance to the suborganizations of the selected organization.
To publish the open application instance to the selected organizations only, leave the Hierarchy option deselected.
-
Select the Apply to Entitlement option to publish the open application instance to the selected organizations with the entitlements associated with the application instance. Otherwise, leave this option deselected.
Figure 8-3 shows the Select Organizations dialog box with the Hierarchy and Apply to Entitlement options:
Figure 8-3 The Select Organizations Dialog Box
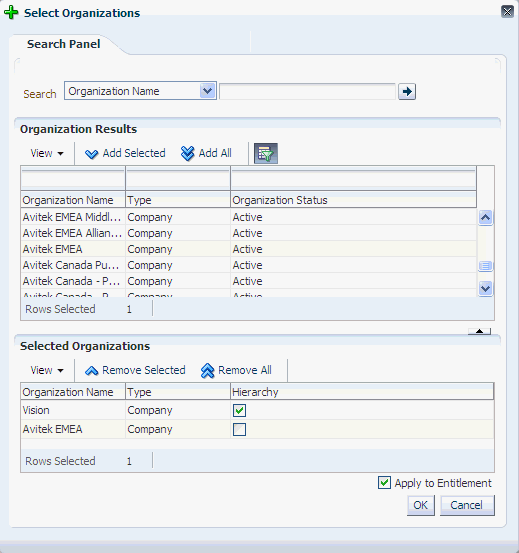
Description of "Figure 8-3 The Select Organizations Dialog Box"
-
Click OK. The application instance is published to the selected organizations.
The include sub-orgs option is displayed for the organizations for which you selected the Hierarchy option in the Select Organizations dialog box.
8.2.3.2.2 Revoking Organizations From an Application Instance
To revoke an organization from an application instance:
-
In the Organizations tab, select an organization that you want to revoke from the open application instance.
-
From the Action menu, select Revoke. Alternatively, click Revoke on the toolbar. A confirmation box is displayed with the selected organization.
-
Click Yes to confirm. The organization is revoked from the application instance.
8.2.3.3 Managing Entitlements Associated With Application Instances
To modify entitlements associated with an application instance:
-
In the Application Instance details page, click the Entitlements tab. A list of entitlements associated with the open application instance is displayed.
-
Select the entitlement that you want to modify.
-
From the Actions menu, select Edit. Alternatively, click Edit on the toolbar. The details of the selected entitlement is displayed in a page.
-
Change the attributes of the attributes, and click Save. The entilement modifications are saved.
8.2.4 Deleting Application Instances
An application instance can be deleted in any one of the following ways:
-
Deleting the application instance from the Application Instances section of the Oracle Identity System Administration.
-
Deleting the IT resource, which is a constituent of the application instance.
When you delete an application instance by using any one these methods, the application instance is not hard-deleted from Oracle Identity Manager. The application instance is soft-deleted. This is because accounts provisioned as a result of the application instance might exist in the target system. Therefore, after deleting an application instance, you must run a scheduled job to achieve the following:
-
Unpublish the application instance from the entity publication
-
Unpublish the associated entitlements from the entity publication
-
Revoke, or hard-delete, or mark as deleted all the accounts for the application instance
To delete an application instance:
-
In Oracle Identity System Administration, under Configuration, click Application Instances. The Application Instances page is displayed with a list of application instances that are published to your organization.
-
Search and select the application instance that you want to delete.
-
From the Actions menu, select Delete. Alternatively, click Delete on the toolbar. A message box is displayed asking for confirmation.
-
Click Delete to confirm. The application instance is soft-deleted in Oracle Identity Manager.
You can also delete an application instance by deleting the IT resource of the application instance. For information about deleting IT resources, see "Managing IT Resources" in the Oracle Fusion Middleware Developer's Guide for Oracle Identity Manager.
-
Run the Application Instance Post Delete Processing Job scheduled job. This scheduled job can be run in any one of the following modes:
-
Revoke: This mode is used when the application instance is deleted, but the provisioned accounts in the target system still exist. Using the Revoke mode deletes the accounts from the target system.
-
Delete: This mode is used when the target system no longer exists, and there are no traces of the accounts in Oracle Identity Manager. Using the Delete mode hard-deletes the accounts from all provisioning tasks and targets, and subsequently from Oracle Identity Manager.
-
Decommission: This mode is used when the target system no longer exists and the provisioned accounts cannot be revoked from the target system. Using the Decommission mode changes the account status to Revoke without keeping the accounts in Oracle Identity Manager in provisioned state.
For information about scheduled jobs, see "Managing the Scheduler".
Note:
The Application Instance Post Delete Processing Job scheduled job can be run after deleting each application instance. -
-
Run the Catalog Synchronization Job scheduled job. This scheduled job identifies the soft-deleted application instances, and removes them from the catalog.
Note:
-
The Catalog Synchronization Job scheduled job run is independent of the Application Instance Post Delete Processing Job run. This means that the Catalog Synchronization Job scheduled job removes the soft-deleted application instances from the catalog even if Application Instance Post Delete Processing Job is not run after soft-deleting the application instances.
-
Catalog Synchronization Job should be run preferably in Incremental mode so that change like Add/update/delete in base entity App Instance & Entitlements are synced to Catalog DB.
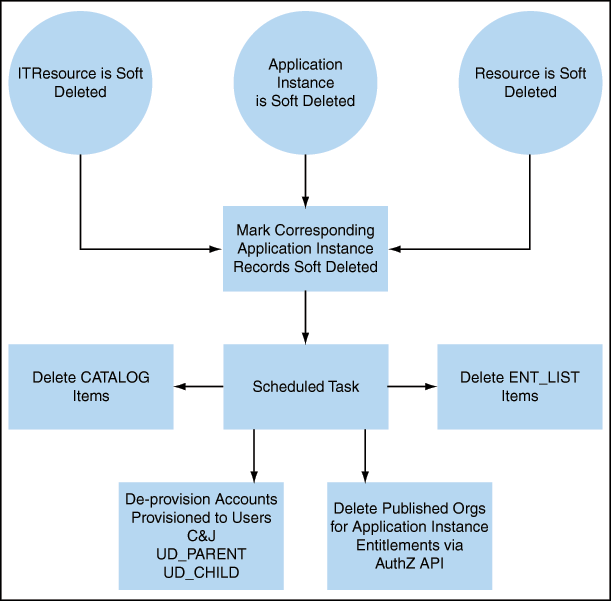
Figure 8-4 shows the flow and changes that will be made upon Application Instance soft-deletion.
-
8.2.5 Creating and Modifying Forms
In the Application Instances section of Oracle Identity System Administration, you can create and modify forms associated with the resource objects, and subsequently with the application instances.
See Also:
-
See "Managing Sandboxes" in the Oracle Fusion Middleware Developer's Guide for Oracle Identity Manager for information about sandbox
-
See Chapter 6, "Managing Forms" for information about creating forms
-
See Chapter 7, "Configuring Custom Attributes" for information about configuring custom attributes
This section describes the following topics:
8.2.5.1 Creating Forms Associated With Application Instances
To create a form associated with an application instance:
Note:
You cannot create forms directly. Before creating forms, you must create a sandbox and activate it. See "Managing Sandboxes" in the Oracle Fusion Middleware Developer's Guide for Oracle Identity Manager for information about creating and activating a sandbox.-
Open the Create Application Instance page or the Attributes tab of the Application Instance details page.
-
Adjacent to the Forms field, click Create. The Create Form page is displayed.
-
In the Name field, verify that the name of the resource object with which the form is associated is displayed. To change the resource object name, click the search icon next to the Name field, and search and select a name from the Search and Select: Name dialog box.
-
In the Form Name field, enter a form name.
-
In the Available form fields section, a list of form field names along with description and Display Name are displayed. These fields are available for the form you are creating. For each available form field, select one or more of the following options:
-
Bulk Update: Selecting this option makes the form field available for updating the entities in bulk.
-
Encrypted: Selecting this option displays the value of the form field in encrypted format.
-
-
Click Create. A message is displayed stating that the form is created.
-
In the Create Application Instance page or the Attributes tab of the Application Instance details page, click Refresh adjacent to the Form field. The newly created form is available for selection in the Form list.
8.2.5.2 Modifying Forms Associated With Application Instances
Note:
You cannot modify forms directly. Before creating forms, you must create a sandbox and activate it. See "Managing Sandboxes" in the Oracle Fusion Middleware Developer's Guide for Oracle Identity Manager for information about modifying and activating a sandbox.To modify a form associated with an application instance:
-
Open the Create Application Instance page or the Attributes tab of the Application Instance details page.
-
From the Form list, select the form you want to modify.
-
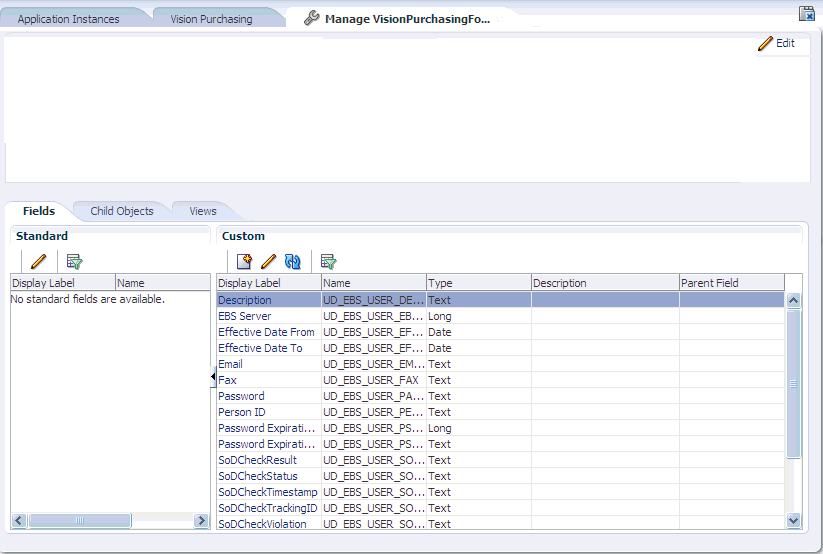
Click Edit to right of the Form field. The Manage Form page is displayed, as shown in Figure 8-5:
For detailed information about modifying forms, see "Developing Process Forms" in the Oracle Fusion Middleware Developer's Guide for Oracle Identity Manager.
For information about creating and editing custom fields, see "Configuring Custom Attributes".
8.2.5.3 Localizing Application Instance Form
To localize the application instance form:
-
Publish the sandbox containing application instance form that is supposed to be localized.
-
Export the MDS file, "/xliffBundles/oracle/iam/ui/runtime/BizEditorBundle.xlf". In this file, you can see message keys and messages to be localized.
sessiondef.oracle.iam.ui.runtime.form.model.testAppInstance.entity.testAppInstanceEO.UD_TES8393_ACCOUNTID__c_LABEL
See Also:
"Deploying and Undeploying Customizations" chapter in Oracle Fusion Middleware Developer's Guide for Oracle Identity Manager, for more information about exporting metadata files -
Export the file to localize, for example, for German:
/xliffBundles/oracle/iam/ui/runtime/BizEditorBundle_de.xlf
Note:
This file may not exist in MDS. If it does not exist, create a new one, but path must be the same. -
Provide localization for messages in German, follow the same format as in the file exported in step 2.
See Also:
Oracle Fusion Applications Extensibility Guide for more information about translating resource bundles from metadata services metadata repository -
Import /xliffBundles/oracle/iam/ui/runtime/BizEditorBundle_de.xlf back to MDS.
-
Logout and relogin.
8.3 Configuring Application Instances
You can configure application instances by using Oracle Identity System Administration. This includes:
-
Section 8.3.1, "Configuring Provisioning for Connected Application Instances"
-
Section 8.3.4, "Configuring Password Policies for Application Instances"
8.3.1 Configuring Provisioning for Connected Application Instances
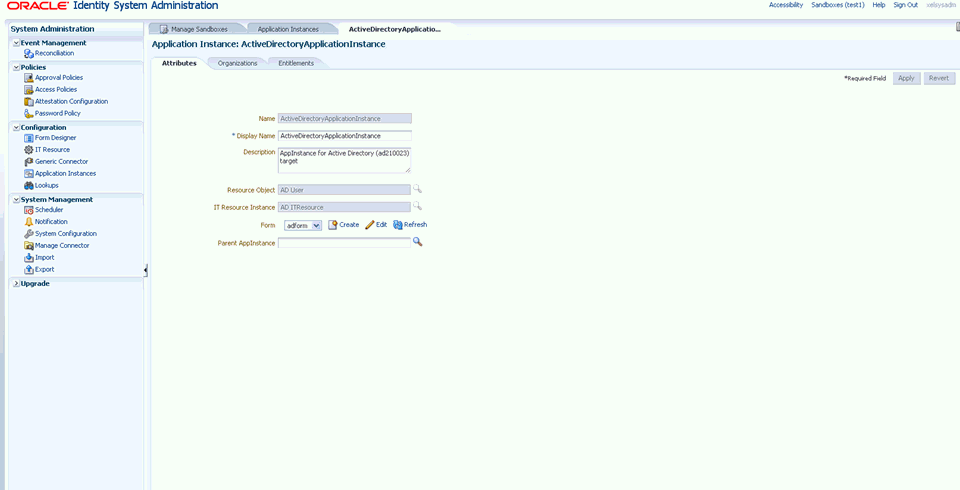
To configure the provisioning for connected (AD User) application instances:
-
Go to Oracle Identity System Administration.
-
Under Configuration, click Application Instances.
-
Select the connected application instance, for example ActiveDirectoryApplicationInstance (AD User).
-
Enter the required fields and click Apply.
8.3.2 Configuring a Resource Object
For information about configuring a resource object, see "Resource Objects Form" in the Oracle Fusion Middleware Developer's Guide for Oracle Identity Manager.
8.3.3 Configuring IT Resource
For information about configuring an IT resource, see "Creating IT Resources" and "Managing IT Resources" in the Oracle Fusion Middleware Developer's Guide for Oracle Identity Manager.
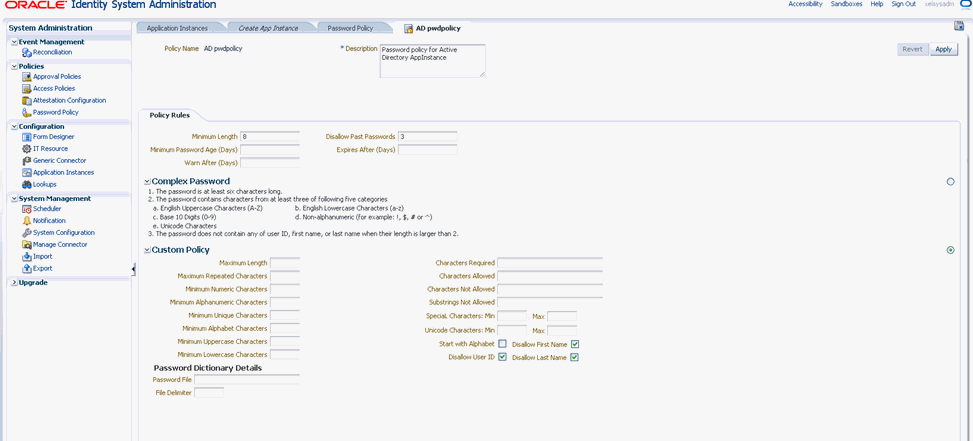
8.3.4 Configuring Password Policies for Application Instances
Perform the following steps to configure the password policy for application instances:
-
Go to Oracle Identity System Administration.
-
Under Policies, click Password Policy.
-
Set the required field to set a new rule for the password.
shows the Policy Rules fields and Custom Policy fields that you can configure.
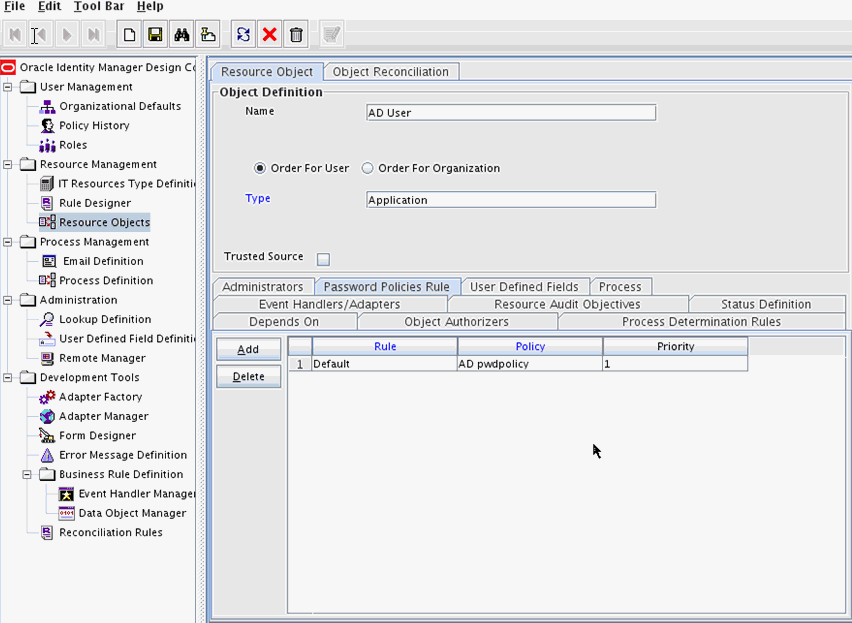
-
After you set the password policy for an Application Instance, you need to attach the new policy to the connected (AD User) application instance. To do so:
-
Go to Design Console.
-
Under Resource Management, click Resource Objects.
-
Click on Password Policies Rule tab.
-
Select the new password policy (AD pwdpolicy) that you created to attach it to the connected application instance.
-
Click Add.
-
8.4 Developing Entitlements
An entitlement granted to an account on a target system enables the account owner (user) to perform a specific task or function. An entitlement can be a role, responsibility, or group membership. For example, if user Richard is granted the Inventory Analyst role on a target system, then Richard can use that entitlement to access and generate inventory-related reports from the target system.
In Oracle Identity Manager, there is one process form for each account (resource) provisioned to an OIM User. Entitlement data is stored in child process forms of the process form. In the example described earlier, the process form for Richard's account on the target system has a child process form that holds Inventory Manager role data.
Attributes that constitute entitlement data stored on a child process form may vary from one target system to another. In addition, different types of entitlements, such as roles and responsibilities, may have different attributes. For example, Target System A contains the following role data attributes:
-
Role Name
-
Role Description
-
Start Date
-
End Date
The same target system can have a different set of attributes for responsibility data:
-
Responsibility ID
-
Date Assigned
-
Proxy User
-
Escalation User
You can mark or highlight the attribute that uniquely identifies an entitlement on a target system. For the sample role and responsibility data attributes listed earlier, the Role Name and Responsibility ID attributes uniquely identify the role and responsibility entitlements on Target System A. By marking attributes that uniquely identify entitlements, you enable the capture of entitlement data that can be used by other identity management solutions and also displayed in reports.
Note:
If you are using the SAP User Management connector release 9.x with this release of Oracle Identity Manager, then perform the following steps for the Roles and Profiles entitlements to work correctly:-
In the Role Child Form, from the Role System Name field, remove the Entitlement and Required properties.
-
In the Profiles Child Form, from the Profile System Name field, remove the Entitlement and Required properties.
This section discusses the following sections:
-
Configuring Scheduled Tasks for Working with Entitlement Data
-
Disabling the Capture of Modifications to Assigned Entitlements
8.4.1 Available Entitlements and Assigned Entitlements
A target system can have a set of entitlements defined and ready for assignment to accounts (users) on the target system. When you integrate this target system with Oracle Identity Manager, you can import (synchronize) entitlement data from the target system into the LKV table on Oracle Identity Manager.
Note:
If you use a predefined connector to integrate the target system, then you can use scheduled tasks to fetch entitlement data into this table.The schedule job, Entitlement List will synchronize the entitlements from LKV to ENT_LIST. This job will also kick off Catalog Synchronization job to synchronize the entitlements to Catalog. An entitlement is available when it can be found in Catalog. See Section 16.3.2.3, "Ongoing Synchronization" for more information about configuring Catalog Synchronization.
During a provisioning operation, you request the entitlement through the Catalog. You can also populate the entitlement data along with the parent data as request data set when submitting a request for an application instance. In this guide, entitlements assigned to accounts are called assigned entitlements. Data about assigned entitlements is stored in child process form tables.
8.4.2 Entitlement Data Capture Process
After you mark the entitlement attribute in each child process form, the following processes take place:
8.4.2.1 Capture of Data About Available Entitlements
The following steps describe how data about available entitlements is captured:
Note:
-
You must mark the entitlement attribute in each child process form to enable the process described in these steps. The procedure is described later in this chapter.
-
Make sure that the parent form has the latest child form version. It does not automatically happen when you create, edit, and activate the child parent without doing the same with the parent form.
-
Data about available entitlements is stored in the LKV table through synchronization with the target system.
-
You schedule and run the Entitlement List scheduled task.
-
The schedule task identifies the entitlement through the entitlement property in process form.
-
The scheduled task copies data about available entitlements from the LKV table to the ENT_LIST table.
8.4.2.2 Capture of Data About Assigned Entitlements
This section describes how data about assigned entitlements is captured. When the entitlement attribute is marked in a child process form, a trigger is created on the corresponding UD table. The same holds true when a form with entitlement attribute marked is imported via connector installation.
Note:
You must mark the entitlement attribute in each child process form UD_ table to enable the process described in these steps. The procedure is described later in this chapter.Entitlement assignment is mostly performed in real time via triggers.
The trigger:
-
Copies assigned entitlements from UD tables to ent_assign table when the entitlement is inserted to the UD tables.
-
Moves assigned entitlements from ent_assign to ent_assign_list when the entitlement is removed from UD tables.Copies newly assigned entitlement from UD tables to ent_assign table when the entitlement is updated in UD tables and moves the old assignment to ent_assign_list table.
In case entitlement does not get assigned properly via trigger, then you can use the Entitlement Assignments scheduled task to do a full synchronization.
For example, if an Account Reconciliation scheduled task runs and brings in new entitlement assignments from the target, but the entitlement definitions do not exist in ENT_LIST, then the trigger-based mechanism will not work. In this condition, you need to ignore such entries in the trigger, and handle them via the scheduled task. This is applicable after the entitlement is reconciled from the target.
8.4.3 Marking Entitlement Attributes on Child Process Forms
You must mark the entitlement attribute in the child process form UD_ table for resources for which you want to capture entitlement data. Suppose there are 15 target systems in your operating environment. If you want to capture entitlement data from 12 of 15 resources, then you must mark the entitlement attribute in those 12 resources.
Apply the following guidelines while performing the procedure described in this section:
-
On a child process form, only one attribute holding entitlement data can be marked.
-
The attribute that you mark must be of the LookupField type and its property must be one of the following:
-
Lookup code
-
Lookup query
The Lookup query must satisfy the following conditions:
-
The query uses the LKU and LKV tables
-
The Lookup code in the query is from the LKU table
-
The LKV_ENCODED column value is used for saving
-
The LKV_DECODED column value is used for display purposes
-
-
To mark a field as an entitlement in a child process form:
-
Log in to the Design Console.
-
Expand Development Tools, and then double-click Form Designer.
-
Search for and open the child form on which you want to mark an entitlement.
For example, you might want to mark an entitlement on the UD_ADUSRC child form.
-
Click Create New Version.
-
Enter a label for the new version, click the Save icon, and then close the dialog box.
-
From the Current Version list, select the version that you create.
-
On the Properties tab, select the field that you want to mark as an entitlement and then click Add Property.
-
From the Property Name list in the Add Property dialog box, select Entitlement.
Note:
You can set Entitlement as the property of a field only if the column type is set to LookupField and the property name is set to Lookup Code. -
In the Property Value field, enter
true.You need not specify values for any of the other fields in the dialog box.
The following screenshot shows the Edit Property dialog box for the lookup field:

-
Click the Save icon and then close the dialog box.
-
If you want to enable the capture of Start Date and End Date values for the entitlement, then:
Note:
You can enable the capture of the Start Date and End Date values only if the column type for both fields is DateFieldDlg.-
On the Properties tab, select the Start Date field and then click Add Property.
-
From the Property Name list in the Add Property dialog box, select Entitlement Valid From.
-
In the Property Value field, enter
true. -
Click the Save icon and then close the dialog box.
-
On the Properties tab, select the End Date field and then click Add Property.
-
From the Property Name list in the Add Property dialog box, select Entitlement Valid To.
-
In the Property Value field, enter
true.The following screenshot shows the Edit Property dialog box for the Start Date field:
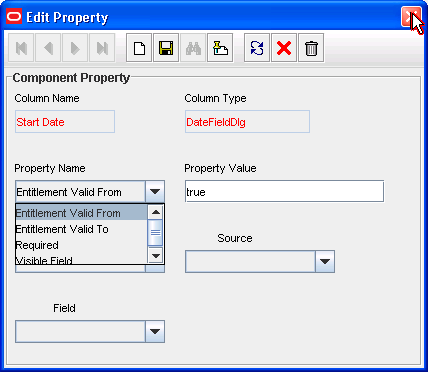
-
Click the Save icon, and then close the dialog box.
-
-
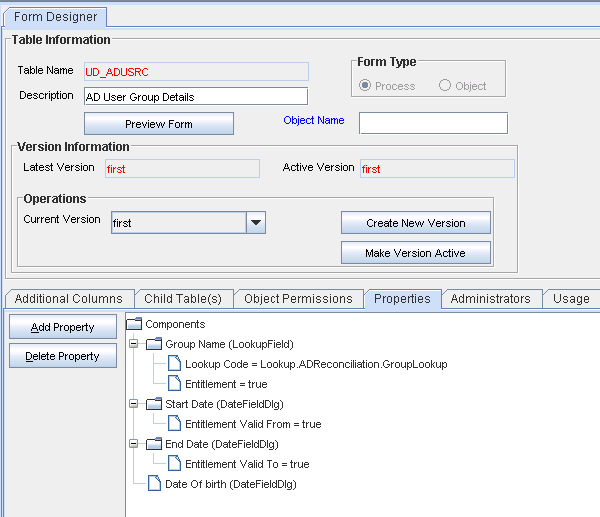
Click the Save icon to save the changes made to the child process form.
The following screenshot shows the Properties tab of the child process form:
Note:
Marking Start Date and End Date are optional. -
Click Make Version Active.
Note:
Make sure that the parent form has the latest child form version. It does not automatically happen when you create, edit, and activate the child parent without doing the same with the parent form.
8.4.4 Duplicate Validation for Entitlements or Child Data
Oracle Identity Manager validates duplicate entitlement or child data based on the following attributes, which ever is set:
-
Key attribute
-
Entitlement attribute
The configuration of the above mentioned attributes are checked prior to validating duplicates in the child data. Table 8-2 summarizes the possible valid and invalid configurations.
Table 8-2 Possible Scenarios and Duplicate Validation Basis
| Entitlement Attribute | Key Attribute for Recon Field Mapping | Configuration Validation | |
|---|---|---|---|
| Connected Application Instance | Disconnected Application Instance | ||
|
Not defined Note: In this scenario, the user is at a risk of adding duplicate entitlements or child data as the configurations are not defined properly. A warning message is logged on the server asking the user to define entitlement attribute and matching reconciliation field mapping. |
Not defined |
Valid |
Valid |
|
Defined.One attribute, say UD_CHILD1_ENT1 has Entitlement=true Note: Entitlement attribute does not have a matching key attribute defined in reconciliation field mapping. |
Not defined |
Invalid |
Valid |
|
Not defined |
Defined. One attribute, say UD_CHILD1_ENT1 is set as the key attribute in recon field mapping. |
Valid |
Valid |
|
Defined. One attribute, say UD_CHILD1_ENT1 has Entitlement=true |
Defined. One attribute, say UD_CHILD1_ENT1 is set as the key attribute in recon field mapping. |
Valid |
Valid |
|
Defined. One attribute, say UD_CHILD1_ENT1 has Entitlement=true Note: Entitlement attribute is a subset of the reconciliation field mapping key attributes. |
Defined. Two or more attributes, say UD_CHILD1_ENT1 and UD_CHILD1_ENT2 are defined as key attributes in recon field mapping for child table UD_CHILD1. |
Valid |
Valid |
|
Defined. One attribute, say UD_CHILD1_ENT1 has Entitlement=true Note: Entitlement attribute does not have a matching key attribute defined in reconciliation field mapping. |
Defined. One or more attributes, say UD_CHILD1_ENT2 and UD_CHILD1_ENT3 are defined as key attributes in recon field mapping |
Invalid |
Invalid |
Oracle recommends configuring both the entitlement attribute and the matching key attribute for the child data in reconciliation field mappings to enable effective validation.
Once a valid configuration is detected, duplicates are validated based on the operation as listed in Table 8-3.
Table 8-3 Duplicate Validation Based on Operation
| Operation | Duplicate Validation Description |
|---|---|
|
Adding entitlement(s) |
The attribute for which "Entitlement=true" property is defined. |
|
Adding child data |
The attribute that is the key attribute in the reconciliation field mappings. |
Note:
Oracle recommends configuring both the entitlement attribute and the key attribute for the child data in reconciliation field mappings to enable effective duplicate entitlement or child data validation.8.4.5 Configuring Scheduled Tasks for Working with Entitlement Data
You configure the following scheduled tasks for working with entitlement data:
8.4.5.1 Entitlement List
The Entitlement List scheduled task identifies the entitlement attribute from the child process form table and then copies entitlement data from the LKV table into the ENT_LIST table. A record created in the ENT_LIST table corresponds to an entitlement defined on a particular target system.
You must set a schedule for this task depending on how frequently new entitlements are defined on the target systems in your operating environment. In addition, you must run this scheduled task when new target systems are integrated with Oracle Identity Manager. In other words, you must run this task each time you mark a new entitlement. After the connector scheduled tasks fetch lookup field data from the target system into the LKV table, you can run the Entitlement List scheduled task to copy that entitlement data into the ENT_LIST table.
This scheduled task also handles updates to or deletion of entitlements from the target system. For example, if the Senior Accounts Analyst role is removed from the target system, then the connector scheduled task removes the entry for that role from the LKV table. When the Entitlement List scheduled task is run, it marks the row containing the role in the ENT_LIST table as a deleted row.
8.4.5.2 Entitlement Assignments
The Entitlement Assignments scheduled task is used for copying data about assigned entitlements into the ENT_ASSIGN table, in case when triggers fail to synchronization entitlement from UD table to ENT_ASSIGN. This task identifies the entitlement attribute from the child process form table, and then copies data about assigned entitlements from the child process form table into the ENT_ASSIGN table. A record created in the ENT_ASSIGN table corresponds to an entitlement assigned to a particular user on a particular target system.
In addition, it creates INSERT, UPDATE, and DELETE triggers on the child process form tables from which it copies entitlement data. See "Capture of Data About Assigned Entitlements" for information about the function of these triggers.
You can use the RECORDS_TO_PROCESS_IN_BATCH attribute of this scheduled task to specify the number of records in each batch. The default batch size is 5000.
8.4.6 Deleting Entitlement
Entitlements can get deleted in any one of the following ways:
-
Deleting the Entitlement in the target, followed by synchronizing it via lookup reconciliation and further by the Entitlement List scheduled job.
-
Direct deletion of the Entitlement from Entitlement List via APIs.
-
Deleting via corresponding application instance.
In all the ways of deleting, the Entitlement will be marked as soft-deleted, that is, the "valid" flag on the Entitlement will be updated to mark it as soft-deleted.
In all the cases of deleting, Entitlement Post Delete scheduled job performs the following post-processing tasks:
-
Unpublish the entitlement from the organization to which it is published
-
Purge the instances of the Entitlement in the child table and Entitlement AssignRemove the Entitlements that are picked up by Catalog harvesting, that are marked as soft-deleted, and all request profiles.
Note:
-
In-flight requests that have references to soft-deleted Entitlements will fail.
-
Access Policies having deleted Entitlements should be manually updated to remove the same.
To perform post-processing of Entitlement soft-deletion in the provisioning component:
-
Run the EntitlementPostDeleteProcessing scheduled job.
This task will take the following inputs:
-
Application Instance Name/ALL
-
Mode: Revoke/Delete
-
-
The task will perform the following functionality:
-
Revoke mode: The scheduled task will revoke the entitlement-grant for all the accounts in Oracle Identity Manager, which have that specific entitlement granted.
-
Delete mode: The schedules task will simply hard-delete the entitlements from OIM database in the UD_CHILD table.
-
In both the above cases, the Entitlement grant entry will be removed from ENT_ASSIGN.
-
-
Alter ENT_LIST schema, adding the column SVR_KEY and constraints.Run the Entitlement List scheduled job. This is an existing schedule task that will go to all the resources that have an entitlement field, get the corresponding lookup definition and populate ENT_LIST with the values from the lookup definition, setting the correct SVR_KEY in the process
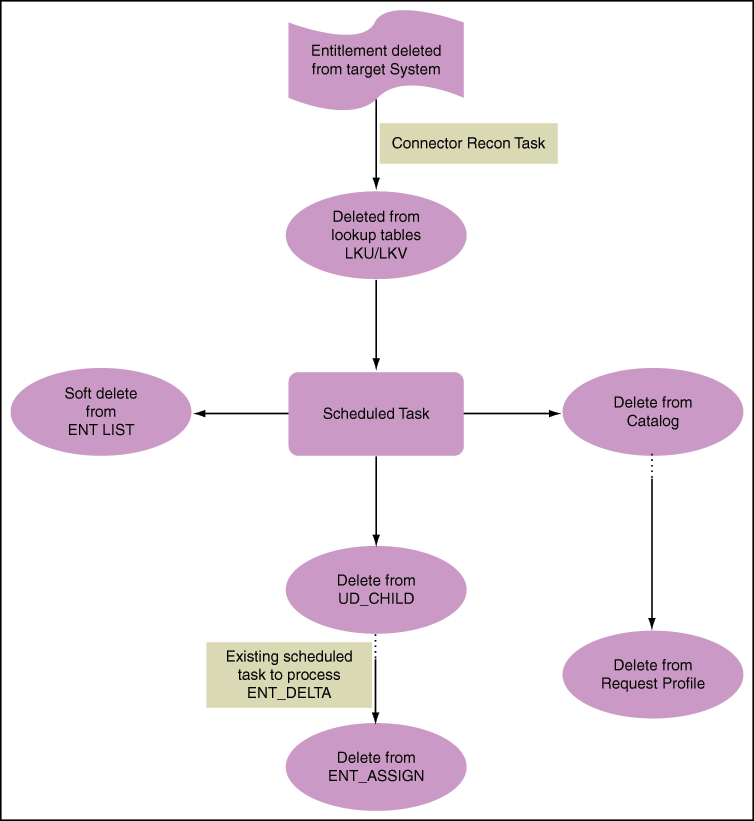
Figure 8-9 shows the flow and changes that will be made upon Entitlement soft-deletion.
8.4.7 Refreshing the Entitlement List Post Delete for New Entries
When an entry with the same encoded value is deleted and added consecutively in a lookup code, you need to perform the following steps to synchronize the data to the entitlement list:
-
Login to Oracle Identity System Administration.
-
Run the Entitlement List job to soft delete the existing entry.
-
Run the EntitlementPostDeleteProcessing job with Delete mode to clean up soft deleted items.
-
Run Entitlement List job again to add the new entry.
8.4.8 Disabling the Capture of Modifications to Assigned Entitlements
You can manually disable incremental synchronization of assigned entitlement data in the ENT_ASSIGN table. In other words, you can disable the capture of modifications to assigned entitlements. To achieve this, you create and run an SQL script to drop the following triggers created on the child process form tables:
Note:
These triggers are created by the Entitlement Assignments scheduled task.-
The OIU_UDPATE trigger created on the OIU table
-
The TABLE_NAME_ENT_TRG triggers created on the UD_ tables:
After you run the script, modifications to assigned entitlements are not copied into the staging table.
The following is a sample SQL script to drop the triggers on the child process form tables:
create or replace
TRIGGER UD_LDAP_GRP_ENT_TRG
AFTER INSERT
OR DELETE
OR UPDATE OF UD_LDAP_GRP_GROUP_NAME
ON UD_LDAP_GRP
FOR EACH ROW
BEGIN
CASE
WHEN INSERTING THEN
OIM_SP_MANAGEENTITLEMENT('UD_LDAP_GRP',:NEW.UD_LDAP_GRP_GROUP_NAME,NULL,
:NEW.UD_LDAP_GRP_KEY,:NEW.ORC_KEY,NULL,NULL,NULL,
NULL,NULL,'INSERT');
WHEN UPDATING THEN
IF :NEW.UD_LDAP_GRP_GROUP_NAME != :OLD.UD_LDAP_GRP_GROUP_NAME
THEN
OIM_SP_MANAGEENTITLEMENT('UD_LDAP_GRP',:NEW.UD_LDAP_GRP_GROUP_NAME,
:OLD.UD_LDAP_GRP_GROUP_NAME,:NEW.UD_LDAP_GRP_KEY,:NEW.ORC_KEY,NULL,
NULL,NULL,
NULL,NULL,'UPDATE');
END IF;
WHEN DELETING THEN
OIM_SP_MANAGEENTITLEMENT('UD_LDAP_GRP',:OLD.UD_LDAP_GRP_GROUP_NAME,
NULL,NULL,:OLD.ORC_KEY,NULL,NULL,NULL,
NULL,NULL,'DELETE');
END CASE;
END;
8.4.9 Entitlement-Related Reports
The following predefined reports provide data about assigned entitlements:
Note:
You must be a member of the ADMINISTRATORS group to be able to view these reports.
Duplicate assignments of the same entitlement to a particular user are suppressed in the reports because they are not copied to the ENT_ tables. For example, if user John Doe has been assigned the Sales Superintendent role twice on a target system, then the reports show only one instance of this entitlement.
8.4.9.1 Entitlement Access List
The Entitlement Access List report lists users who are currently assigned the entitlements that you specify while generating the report. The report provides basic information about the entitlements and the list of users to whom the entitlements are assigned.
8.4.9.2 Entitlement Access List History
The Entitlement Access List History report lists users who had been assigned the entitlements that you specify while generating the report. The report provides basic information about the entitlements and the list of users to whom the entitlements were assigned.
8.4.9.3 User Resource Entitlement
The User Resource Entitlement report lists the current entitlements of users whom you specify while generating the report. The report displays basic user information and entitlement details.
8.4.9.4 User Resource Entitlement History
The User Resource Entitlement History report lists details of past entitlements assigned to users whom you specify while generating the report. The report displays basic user information and entitlement details.