28 Transferring Files
This chapter provides information on moving or copying content from one Oracle WebCenter Content Server instance to another over sockets by using the Transfer function of the Archiver utility.
This chapter covers the following topics:
28.1 Introduction to Transferring Files
You can use the Transfer function of the Archiver utility to transfer files between Content Server instances on a shared file system, but transfers do not require a shared file system. Transferring files between non-shared file systems requires an outgoing provider on the source Content Server instance.
Transfers are successful only between Content Server version 4.5 or newer systems.
Caution:
Archiver cannot be used to move or copy data between two instances that share the same Content Server instance name (IDC_Name). To do so will corrupt the data on the target system.
This section covers these topics:
28.1.1 Transfer Uses
Typical uses for the Transfer function include:
-
Exporting and importing content over a firewall.
Note:
To transfer across a firewall, you might need to configure the firewall to permit the outgoing provider's socket to pass through it.
-
Transferring content between Content Server instances in different physical locations (buildings, cities, or countries).
-
Transferring content between Content Server instances using a shared drive. (A transfer over a file system share can handle large archives better than a socket transfer.)
-
Avoiding the need to build a FTP or HTTP interface to move files from one file system to another.
-
Combining the batch files from two archives into a single archive.
28.1.2 Transfer Methods
You can transfer files in the following ways:
-
Manual Transfer: A one-time transfer initiated from Archiver by an administrator. This copies an archive to another archive.
-
Automatic Transfer: Moving archive files to another archive is initiated automatically whenever the source archive is updated.
28.1.3 Transfer Terms
The following terms are related to the Transfer function:
-
local archive: An archive that belongs to a local collection.
-
local collection: A collection that the Content Server instance can reach by file access using a mapped or mounted network share.
-
local transfer: A transfer between local archives. Both the source archive and the target archive are in a local collection.
-
proxied: In Archiver, the term proxied refers to any Content Server instance to which the local Content Server instance is connected through an outgoing provider.
-
proxied archive: An archive that belongs to a proxied collection.
-
proxied collection: A collection on another Content Server instance that the local Content Server instance can reach through an outgoing provider.
-
pull transfer: A transfer over an outgoing provider that is owned by the proxied (remote) Content Server instance.
-
push transfer: A transfer over an outgoing provider that is owned by the local Content Server instance.
-
source archive: An archive that contains batch files to be transferred.
-
target archive: An archive that receives transferred batch files.
-
targetable archive: An archive that is enabled to be a target archive.
-
transferring: The process of copying or moving batch files and their associated content files from one archive to another. There are three types of transfers: local, push, and pull.
-
transfer owner: The Content Server instance that performs and monitors a transfer.
-
transfer source: See source archive.
-
transfer target: See target archive.
28.2 Understanding Transfer Types
This section provides information about the different transfer types, listed in order from simplest to most complex.
28.2.1 Local Transfer
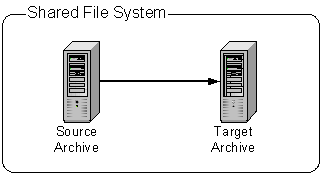
A local transfer is a transfer between local archives, which belong to collections that both the source and target Content Server instances can reach through a mapped or a mounted drive. An outgoing provider is not required. This type of transfer is typically used to combine the batch files of two archives.
Note:
If you are transferring between Content Server instances on a shared file system, the mapped or mounted drive must be available to both Content Server instances. The computers must be on and logged in as a user who has system access to both Content Server instances.
28.2.2 Pull Transfer
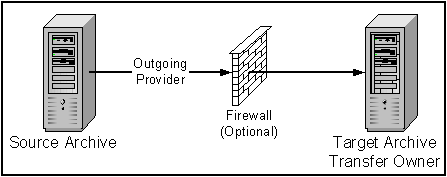
A pull transfer is a transfer that is owned by the proxied (remote) Content Server instance, which is the instance that is the target of the outgoing provider.
-
Multiple pull transfers can be concurrent.
-
If you are running a pull transfer across a firewall, you might need to configure the firewall to permit the outgoing provider's socket to pass through it.
Note:
In Archiver, the term proxied refers to any Content Server instance to which the local instance is connected through an outgoing provider.
28.2.3 Push Transfer
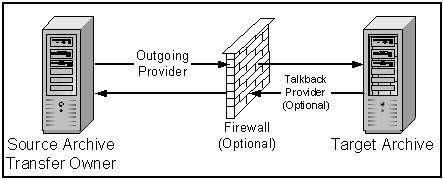
A push transfer is a transfer that is owned by the local Content Server instance, which is the instance on which the outgoing provider is set up.
-
For performance monitoring of a push transfer, you also should set up an outgoing provider from the target (proxied) Content Server instance back to the source (local) Content Server instance. This talkback provider can then notify the source Content Server instance when each transfer is complete. A push transfer will work without the talkback provider, but the source Content Server instance would not be aware of transfer completion or problems.
-
Only one push transfer can be in progress at a time.
-
If you are running a push transfer across a firewall, you might need to configure the firewall to permit the both providers' sockets to pass through it.
28.3 How Transferring Batch Files Works
This section provides information about how transferring batch files works.
28.3.1 Transfer Process Actions
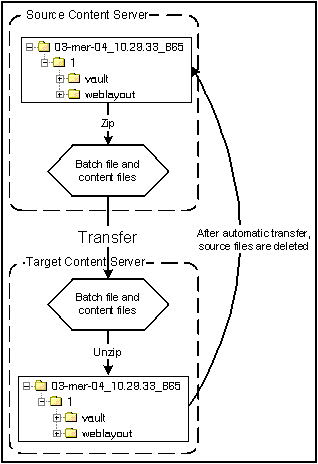
When a transfer is initiated, the following actions occur:
-
Each batch file in the archive is zipped together with its associated content files.
-
The Zip files are transferred to the target Content Server instance by a local file system move (local transfer) or by the outgoing provider (push or pull transfer).
-
The Zip files are unzipped and placed in the appropriate file system locations.
-
For an automated transfer, the batch files and their associated content files are removed from the source Content Server instance. For a manual transfer, the batch files and associated content files remain in the source Content Server instance.
The transferred archive is now available for import through the Archiver of the target Content Server instance.
28.3.2 Transfer Rules
The following list provides applicable transfer rules:
-
If you are transferring between Content Server instances on a shared file system, the mapped or mounted drive must be available to both Content Server instances. The computers must be on and logged in as a user who has system access to both Content Server instances.
-
The Content Server instance that has an outgoing provider set up is considered the local server, and the target Content Server instance for the outgoing provider is considered the proxied server. Files are always transferred in the direction of the outgoing provider, from the local (source) instance to the proxied (target) instance.
-
To transfer multiple archives from a Content Server instance, you must set up a separate outgoing provider from the local instance for each target instance.
-
Only archives that are identified as targetable can be transfer targets. When you are selecting a transfer target, the targetable attribute can help you find the target archive quickly.
-
At least one archive in the transfer must be local to the transfer owner. For example, you cannot set up a transfer between two Content Server instances that is owned by a third Content Server instance.
-
An archive can contain only one copy of each batch file. Therefore, if a batch file being transferred already exists in the target archive, the batch file and its associated content files will be ignored.
28.4 Managing Transfers
This section provides information about tasks for managing transfers.
28.4.1 Transferring Content
To transfer content between Content Server instances:
-
In the source Content Server instance, create the archive to be transferred and set up an export to this archive. See Section 26.2.1.
-
In the target Content Server instance, create the archive to receive transferred content and make the target archive targetable. See Section 28.4.2.
-
Set up communications between the Content Server instances:
-
If the source and target archives are on a shared file system, ensure that both computers are on and logged in as a user who has system access to both Content Server instances.
-
If the source and target archives are not on a shared file system, create an outgoing provider from the source Content Server instance to the target Content Server instance. See Section 28.4.3.
-
-
From the source archive, specify the target archive. See Section 28.4.4.
-
Initiate the transfer. See Section 28.4.5.
The batch files and content files are copied to the target archive.
28.4.2 Making an Archive Targetable
To indicate that an archive can receive transfers from other archives (be targetable):
-
Open the archive collection that contains the target archive. See Section 25.3.1.
-
Select the target archive in the Current Archives list.
-
Click the Main Archiver Transfer window.
-
Click Edit in the Transfer Options section.
-
In the Transfer Options window, select Is Targetable.
-
Click OK.
28.4.3 Defining an Outgoing Transfer Provider
To create an outgoing provider for transfer purposes:
-
In the source Content Server instance, create an outgoing provider. Enter the following information:
Element Description Provider Name
Enter a name. This will become a subdirectory in the
DomainHome/ucm/cs/data/providers/directory.Provider Description
Enter a user-friendly description. For example, Transfer Provider.
Server Host Name
Enter the server host name of the target Content Server instance. For example, extranet_server.
Server Port
Enter a unique port number on which the provider will communicate with the target Content Server instance.
Instance Name
Enter the name of the target Content Server instance. For example, instance_on_extranet.
Relative Web Root
Enter the relative web root of the target Content Server instance. For example, /company_name/.
-
Using the System Properties utility of the target Content Server instance, set the IP Address Filter or Hostname Filter to the IP address or host name of the source Content Server instance. (The IP Address Filter setting is recommended.)
-
If you are setting up a push transfer (transfer owned by the local Content Server instance), consider setting up a talkback outgoing provider from the target Content Server instance back to the source Content Server instance.
-
If you are transferring across a firewall, configure the firewall to permit the outgoing providers' sockets to pass through it.
28.4.4 Setting a Transfer Destination (Target)
To specify the target archive to receive transferred content:
-
Open Archiver from the Content Server instance that will own the transfer.
-
For a pull transfer, the transfer owner is the target (proxied) Content Server instance.
-
For a push transfer, the transfer owner is the source (local) Content Server instance.
-
-
Open the archive collection that contains the source archive. See Section 25.3.1.
-
Select the source archive in the Current Archives list.
-
Click the Main Archiver Transfer window.
-
Click Edit in the Transfer Destination section.
-
In the Archive Collections window, select the collection that contains the target archive.
-
Select the target archive.
Note:
The target archive must be identified as targetable. See Section 28.4.2.
-
Click OK.
28.4.5 Initiating a Manual Transfer
To transfer content manually:
-
Open Archiver on the source Content Server instance.
-
Open the archive collection that contains the source archive. See Section 25.3.1.
-
Select the source archive in the Current Archives list.
-
Select Actions, then click Transfer.
The transfer process is initiated, and the status bar at the bottom of the Archiver page displays progress messages.
28.4.6 Deleting a Transfer
This section describes procedures for deleting a transfer.
28.4.6.1 Deleting a Transfer
To delete a transfer from the Transfer to tab:
-
Open the archive collection that contains the source archive. See Section 25.3.1.
-
Select the source archive in the Current Archives list.
-
Click the Main Archiver Transfer window.
-
Click Remove in the Transfer Destination section.
-
When prompted to confirm the action, click Yes.
28.4.6.2 Deleting an Automated Transfer
To delete an automated transfer from the Automation for Instances page:
-
Open the archive collection. See Section 25.3.1.
-
Choose Options, then View Automation For Instance.
-
In the Automation window, click the Transfers tab.
-
Select the automated transfer to delete.
-
Click Remove.
The automated transfer is removed from the list.


