3 Working with Portal Templates
This chapter introduces the out-of-the-box portal templates provided with WebCenter Portal, and describes how to work with portal templates and create new custom portal templates.
This chapter includes the following topics:
Permissions:
To perform the tasks in this chapter, you must have the application-level permission Create Portal Templates. This permission is granted to all authenticated users by default. Users with this permission can create a new portal template, rename, hide, or delete a portal template that they own. To publish a portal template for others to use, you additionally need the application-level Portal Templates: Manage All permission.
To view and manage all portal templates, including private portal templates created by other users, and import or export portal templates, you must have the Application Specialist role (or the application-level Portal Templates: Manage All permission). See Chapter 58, "Managing All Portal Templates."
For more information about permissions, see Section 29.1, "About Roles and Permissions for a Portal."
3.1 About Portal Templates
When you create a portal, you can base it on one of the out-of-the-box portal templates, your own custom portal template, or a published portal template created by others. Portal templates provide a consistent look and feel and an efficient way to get started creating a portal that is configured exactly as required by an organization.
A portal template may include custom attributes that can be set as needed during the creation of a new portal based on the template. For example, a portal template for product development team portals may provide an attribute that can be set to a specific product ID to populate the portal appropriately when it is created.
To learn more about portal templates, refer to the following sections:
3.1.1 About Out-of-the-Box Portal Templates and Categories
WebCenter Portal provides several portal templates out-of-the box from which you can choose when creating a new portal. These templates are named and grouped into categories according to their general purpose, and can be used as is for a new portal or as a starting point for developing your own custom templates.
Table 3-1 lists and describes the out-of-the-box portal templates and categories, which you will see for selection when you create a new portal (Section 2.2, "Creating a New Portal").
Table 3-1 Out-of-the-Box Portal Templates and Categories
| Categories | Portal Templates | Description |
|---|---|---|
|
|
Portal |
Generic template for building a custom portal, designed to accommodate the latest features of WebCenter Portal in your new portal. |
|
|
Blogger |
Designed for a portal where members can publish their opinions through blogs, and preconfigures announcements, discussions, documents, events, lists, and mail. |
|
Discussion Site |
Designed for a portal where members can exchange ideas in discussion forums to quickly resolve issues, come up with new product ideas, resolve customer escalations, determine new service offerings, and more. |
|
|
Document Exchange |
Designed for a portal centered around sharing and organizing documents to enable teams to quickly facilitate agreement on wording and messaging. This template also enables checkin and workflow around document approvals and working in teams. |
|
|
Portal Site |
Designed for a portal appropriate for a large organization with several smaller groups or departments, each of which needs to store their own content, engage in discussions, and more. This template speeds enterprise portal construction and delivery and enables teams to easily provide their unique value to the company, promoting their group's charter to all other organizations while securely collaborating within their team or organization. This template provides an essentially unpopulated, unconfigured starting point for building a portal exactly to your specifications. When you create a portal using this template, it results in a blank Home page. All tools such as discussions, announcements, and so on, are disabled. |
|
|
Project Site |
Designed for a portal where members can share information about a common project and maintain a common calendar. This template provides an optimal structure for supporting a core project team where members might come from different departments to work together toward reaching a common goal. The focus of a portal based on this template is to streamline the process of starting a new project, defining the project team, and executing on project deliverables. Members can share documents, communicate with one other, keep up to date on status, and generally function better as a team than as individuals working side by side. |
|
|
Team Site |
Designed for a portal that provides an optimal structure for supporting communities of people who are working together to achieve a common goal, collaborating through document sharing, team announcements, discussion forums, mail, wikis, and more. The focus of a portal based on this template is to learn more about a subject area through the sharing of expertise, ideas, and content. Team Site portals provide a consistent, dynamic, timely, and interactive participant experience. For example, all the Java programmers responsible for supporting your customer-facing Web site might want a place to keep up with what's happening in the Java world using discussion forums, links to articles about upcoming patches, and so on. |
|
|
|
no out-of-the-box templates |
An out-of-the-box category for custom templates that you create, when you select a category of Business Application for the new template (see Section 3.3, "Creating a New Portal Template"). |
|
|
no out-of-the-box templates |
An out-of-the-box category for custom templates that you create, when you select a category of Mobile for the new template (see Section 3.3, "Creating a New Portal Template"). |
|
|
no out-of-the-box templates |
An out-of-the-box category for templates that you create, when you do not select a category, leaving the selection as <None> if no category is suitable (see Section 3.3, "Creating a New Portal Template"). |
3.1.2 About Custom Portal Templates
You can create a custom portal template to allow users to quickly create new portals designed to solve a business process need.
A custom portal template may be simple, or may include robust functionality such as:
-
Preseeded data, such as discussions, documents, lists, member information (including roles), pages, or assets. When you select such a template to build a new portal, the new portal includes all the preseeded data.
-
Limited available page styles and resource catalogs in order to create a safe environment for users to build portals with little support. Such a portal template could even include necessary custom documentation and references.
-
Custom java code that executes when you select the template for a new portal. For example, custom code may include logic to automatically create a mailing list for a new portal. For more information, see the "Developing Components for WebCenter Portal Using JDeveloper" chapter in Oracle Fusion Middleware Developing Portals with Oracle WebCenter Portal and Oracle JDeveloper.
3.2 Viewing Available Portal Templates
To view the portal templates available to you:
-
In the Home portal, click the Portal Templates tab to view the Portal Templates page (Figure 3-1).
If the Portal Templates tab is not exposed in the Home portal, open the Personalize Pages page and select the Show Page check box for the Portal Templates page.
Tip:
The way you access the Personalize Pages page depends on the page template in use. For example, you may access it through an Actions
 menu.
menu.Figure 3-1 Portal Templates Page in Home Portal
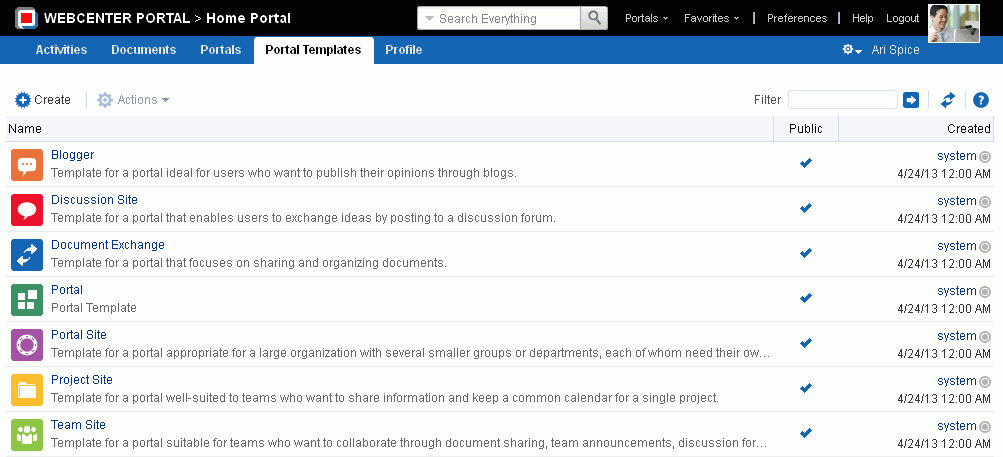
Description of "Figure 3-1 Portal Templates Page in Home Portal"
3.3 Creating a New Portal Template
You cannot modify the out-of-the-box portal templates described in Section 3.1, "About Portal Templates", but any user with the portal-level Portal Templates-Create permission can create a new portal template.
To create a new portal template, you start by creating a portal based on an existing template (see Chapter 2, "Creating and Building a New Portal"), and customize it according to your requirements. Then, you can create a new portal template based on the customized portal that you have developed. During the creation of a portal template, you can select to copy the discussions, documents, lists, member information (including roles), or pages from the source portal. The security settings for the portal are also copied by the template.
Note:
When creating a new portal template, the template does not copy announcements data from the source portal.
As a portal template creator, you can publish your portal template for others to use; otherwise, it remains private and hidden from others. To make the template public, you must be granted the application-level Portal Templates-Manage All permission.
Note:
Application specialists can also create portal templates to be made available at the application level, and import and export custom portal templates, including seeded data. For more information, see Chapter 58, "Managing All Portal Templates."
To create a portal template:
-
In the Home portal, go to the Portal Templates page (see Section 3.2, "Viewing Available Portal Templates").
-
Click Create to open the Create dialog (Figure 3-2).
Note:
If you have not created any portals, and do not have permissions to manage a portal, the Create link is not available.
Figure 3-2 Create a Portal Template Dialog: Setup Step
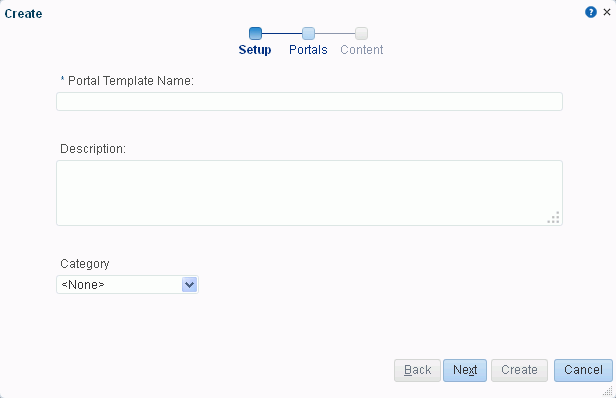
Description of "Figure 3-2 Create a Portal Template Dialog: Setup Step"
-
In the Setup step, enter a suitable Portal Template Name and (optionally) Description. Enter a name that describes the portal template and other WebCenter Portal users will recognize. You can later rename the template, as described in Section 3.6, "Renaming a Portal Template."
Portal template names can contain alphanumeric characters, underscores, spaces, multibyte characters, and special characters such as
&and#. The maximum allowable length is 200 characters. The following reserved keywords are not allowed as the full portal template name in either upper or lower case, or a combination of both—admin,builder,group,groups,home,last,page,pages,my portals,my spaces,portal,portals,space,spaces,system,webcenter,webcenter administration,webcenter portal,webcenter portals,webcenter space,webcenter spaces. These reserved words are allowable as part of a longer name (for example,Sales Group).Note:
WebCenter Portal removes any unsupported special characters (such as
-) and character spaces in the display name specified here to derive the initial internal name for the portal template. For example, a display nameMy Mega-Templategenerates the internal nameMyMegaTemplate. -
From the Category list, select a category under which to list the portal template when creating a portal, or leave as <None> if no category is suitable. In the portal creation wizard, the portal template is listed under the selected category heading, or under More... if you do not select a category. Click Next.
-
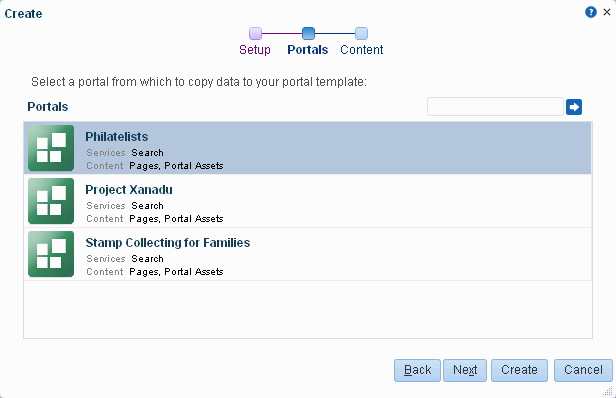
In the Portals step (Figure 3-3), select a portal from the list (which displays portals that you created or have permissions to manage) to use as the basis for the new portal template. Click Next.
Figure 3-3 Create a Portal Template Dialog: Portals Step
Description of "Figure 3-3 Create a Portal Template Dialog: Portals Step"
-
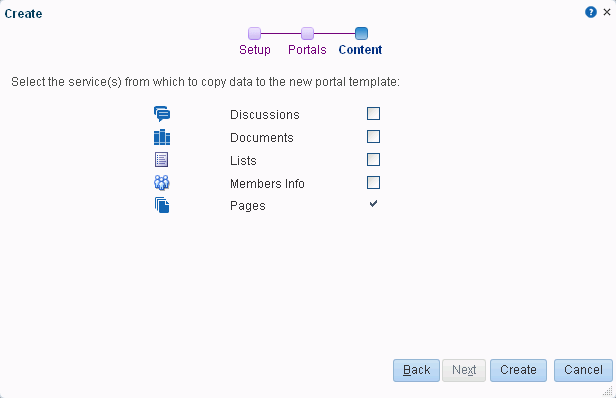
In the Content step, select the services that contain data that you want the portal template to copy from the source portal (Figure 3-4).
Note:
-
Portal templates cannot copy announcements data from a portal.
-
List definitions are always copied; checking Lists in this step specifies that you want to copy the list data, too.
-
A new portal template automatically copies all assets from the source portal. For a full list of all portal assets, see Section 20.1, "About Assets." You can edit a portal that is based on the portal template to remove individual assets that you do not want to include in the portal, and (optionally) create another portal template from the edited portal.
Figure 3-4 Create a Portal Template Dialog: Content Step
Description of "Figure 3-4 Create a Portal Template Dialog: Content Step"
-
-
Click Create.
The new portal template displays on your Portal Templates page in the Home portal. By default, the template is private, which means that other users will not see it on their personal Portal Templates page in the Home portal. However, users granted the
Portal Templates-Manage Allpermission can view and manage private templates on the application-level Portal Templates page. For more information, see Chapter 58, "Managing All Portal Templates." -
To publish your portal template to make it available to all WebCenter Portal users, you must be granted the application level
Portal Templates-Manage Allpermission. If you have this permission, select the template name, click the Actions menu, and select Make Public.The template is published and displays on the Portal Templates page in the Home portal for all users.
3.4 Viewing Information About a Portal Template
To view information about a portal template:
-
In the Home portal, go to the Portal Templates page (see Section 3.2, "Viewing Available Portal Templates").
Figure 3-5 Portal Templates Page in Home Portal

Description of "Figure 3-5 Portal Templates Page in Home Portal"
-
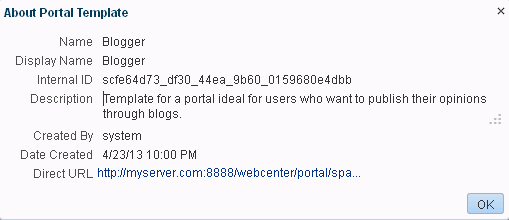
Click in the row of the portal template that you want to learn about, then from the Actions menu, select About Portal Template.
The About Portal Template dialog opens (Figure 3-6).
-
Explore the information in the About Portal Template dialog:
-
Name: Internal name of the portal template displayed in the URL to the portal template. You cannot change the internal name of a portal template.
-
Display Name: Display name of the portal template. This name displays in places where the templates are available for selection, such as the portal creation wizard and the Portal Templates page. You cannot change the display name of an out-of-the-box portal template. To change the display name of a custom portal template that you create, see Section 3.6, "Renaming a Portal Template."
-
Internal ID: ID of the portal template, which other applications may use to reference this portal template.
-
Description: A description of the portal template, specified when creating the portal template. You cannot modify the description of a portal template, unless you rename the template, where you can enter a new description in the Rename dialog, as described in Section 3.6, "Renaming a Portal Template."
-
Created By: User name of the portal template creator.
-
Date Created: Date and time that the portal template was created.
-
Direct URL: URL that provides direct access to the portal template.
-
3.5 Searching for a Portal Template
Global search does not search portal assets, such as portal templates, page templates, resource catalogs, navigation models, and so on. The Filter field on the Portal Templates page is useful for searching for portal template names or descriptions when your application includes a large number of portal templates.
To search for a portal template by a string in the Name or Description:
-
In the Home portal, go to the Portal Templates page (see Section 3.2, "Viewing Available Portal Templates").
-
In the Filter field, enter a search string.
-
Click the Filter icon (Figure 3-7).
The Portal Templates page displays portal templates where the search string is found in the Name or Description.
-
To clear the current search string and display all portal templates, click the Clear Filter icon (Figure 3-8).
3.6 Renaming a Portal Template
To rename a portal template that you own:
-
In the Home portal, go to the Portal Templates page (see Section 3.2, "Viewing Available Portal Templates") and select the portal template.
-
From the Actions menu, select Rename Portal Template to open the Rename Portal Template dialog.
-
In the Display Name field, enter a new name for the portal template. Optionally, enter a Description.
-
Click OK.
3.7 Setting Up Access to a Portal Template
You can grant specific users and groups view-only or manage access to a portal template that you own.
To set up access to a portal template that you own:
-
In the Home portal, go to the Portal Templates page (see Section 3.2, "Viewing Available Portal Templates") and select the portal template.
-
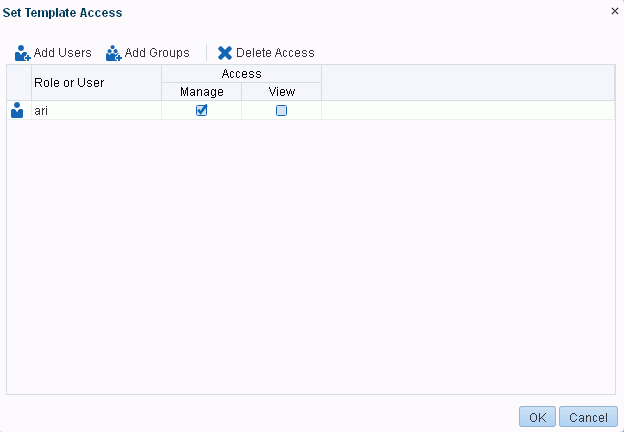
From the Actions menu, select Set Template Access.
The Set Template Access dialog opens (Figure 3-9).
-
In the Set Template Access dialog:
-
Click Add Users to open the Search Users dialog where you can select from a list of users or search for a user name.
-
Click Add Groups to open the Search Groups dialog where you can search for a user group.
For tips on searching for a user or group in the identity store, see Section 30.5.1, "Searching for a User or Group in the Identity Store."
-
-
For each user or user group listed in the Set Template Access dialog, specify which level of access to grant (one permission per user or user group):
-
Select the View check box to grant view-only access to the portal template, allowing them to perform the following tasks on the portal template:
-
Select the Manage check box to grant full access to the portal template, allowing them to additionally perform the following tasks on the portal template:
-
-
Click OK.
3.8 Publishing or Hiding a Portal Template
Permissions:
To publish a portal template, you must have the application-level Portal Templates: Manage All permission. Users with the Create Portal Templates permission can create, rename, hide, or delete a portal template, but cannot publish a template without the Portal Templates: Manage All permission.
For more information about permissions, see Section 29.1, "About Roles and Permissions for a Portal."
When you create a portal template (see Section 3.3, "Creating a New Portal Template"), it is private by default. This means that only you as the template creator can see the template on your personal Portal Templates page in the Home portal. Other users will not see the private template on their personal Portal Templates page in the Home portal. However, the application specialist (or users with application-level Portal Templates-Manage All permission) can view and manage all private templates on the application-level Portal Templates page. For more information, see Chapter 58, "Managing All Portal Templates."
To publish or hide a portal template that you create, when you have the application-level Portal Templates-Manage All permission:
-
In the Home portal, go to the Portal Templates page (see Section 3.2, "Viewing Available Portal Templates") and select the portal template.
-
From the Actions menu, select either of the following:
-
Make Public to publish the template to all WebCenter Portal users.
-
Remove Public Access to remove the template(s) from the portal template lists in the Home portal for all users, except yourself (as the template creator) and those users to whom you have specifically granted View or Manage access in the Set Template Access dialog (see Section 3.7, "Setting Up Access to a Portal Template").
Note:
If another user is in the process of creating a new portal (see Section 2.2, "Creating a New Portal"), and you remove public access from the portal template selected for the portal before the user has completed creating the portal, the template becomes invalid for the portal and the user receives an error.
-
-
In the confirmation prompt, confirm your selection.
3.9 Deleting a Portal Template
Note:
Out-of-the-box portal templates cannot be deleted. However, application specialist (or users with Portal Templates-Manage All permission) can hide the out-of-the-box templates from everyone's view using the application-level Portal Templates page, as described in Section 58.9, "Publishing and Hiding Portal Templates."
Deleting a portal template does not affect the portals that were created using the portal template.
To delete one or more portal templates that you own:
-
In the Home portal, go to the Portal Templates page (see Section 3.2, "Viewing Available Portal Templates") and select the portal template(s).
-
In the confirmation prompt, click Delete.
