25 Working with the Comments Widgets
This chapter provides a quick reference for moderating the comments posted to your site by visitors, configuring the visitor permissions and appearance settings for the Comments widget, and deploying the Comments widget (and all related widgets) to a web page with either dynamic (default) or custom settings.
This chapter contains the following sections:
25.1 Overview
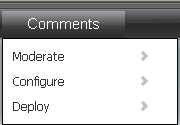
The Comments menu (shown in Figure 25-1) is used to work with the Comments widget and all of its related widgets (Comments Summary, Links to Topics, Recently Commented, and Most Commented). The Comments menu provides you with options to moderate the comments that visitors post to the pages of your website, configure visitor permissions and appearance settings for the Comments widget, and deploy the Comments widget and all related widgets (with either default or custom settings) to web pages.
The instructions in this section are written as a quick reference and it is assumed you are already logged in to the Community interface. If you need instructions for logging in, see Section 24.1, "Logging In."
25.2 Moderating Comments
This section is for users assigned the Moderator role. You can moderate the comments that site visitors post to your website in the following ways:
25.2.1 Moderating All Comments
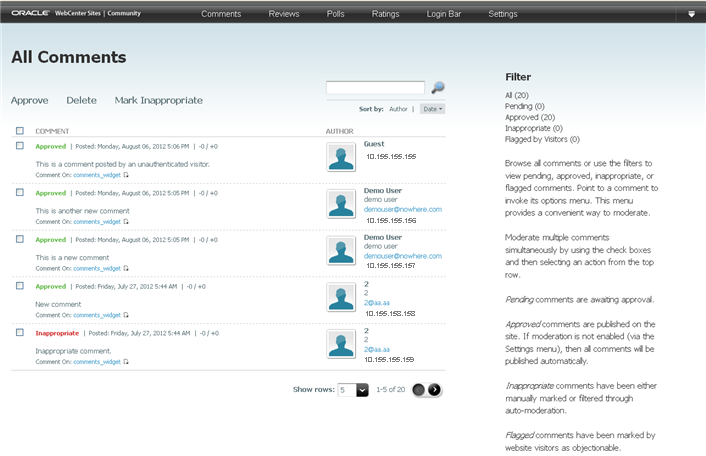
To access the "All Comments" screen (shown in Figure 25-2), select Comments from the menu bar, then select Moderate, and then select All Comments. The "All Comments" screen is used to moderate all of the comments that have been posted to the pages of your website. The comments are listed in the order they were posted (most recent to least recent). You can sort the comments in this list by either the visitor who posted the comment or the date the comment was posted.
Table 25-1 Moderating All Comments
| Action | Instructions |
|---|---|
|
|
|
Delete visitors' comments |
|
|
Mark a comment as inappropriate |
Note: Comments can be marked as inappropriate either manually or through auto moderation. For information about configuring automatic moderation, see Chapter 30, "Configuring Community Widget Settings." |
|
Modify a comment |
Note: If manual moderation is enabled (Section 30.2.5, "Working with the Moderation Screen"), manually approve the comment you modified to display it on the web page. |
|
Add an authenticated visitor to the "Visitor Whitelist" |
Note: For more information about the "Visitor Whitelist," see Section 30.2.4, "Working with the Visitor Whitelist Screen." |
|
Add a visitor to the "Visitor Blacklist" |
Note: For more information about the "Visitor Blacklist," see Section 30.2.3, "Working with the Visitor Blacklist Screen." |
|
Search for a comment containing specific content |
|
|
Identify a flagged comment |
A comment that is flagged on the website by a visitor will be listed in the "All Comments" screen with Flagged posted next to its Approved status. |
|
View a topic on the website |
The web page opens displaying the topic, the deployed Comments widget, and the comments that visitors posted to the page. |
|
View all comments posted by a specific visitor |
Note: For information about moderating comments by user, see Section 25.2.3, "Moderating Comments by User." |
|
View all comments posted to a specific topic |
Note: For information about moderating comments by topic, see Section 25.2.2, "Moderating Comments by Topic." |
|
Post a reply to a comment |
Note: You can only post a reply to comments with a status of approved. |
25.2.2 Moderating Comments by Topic
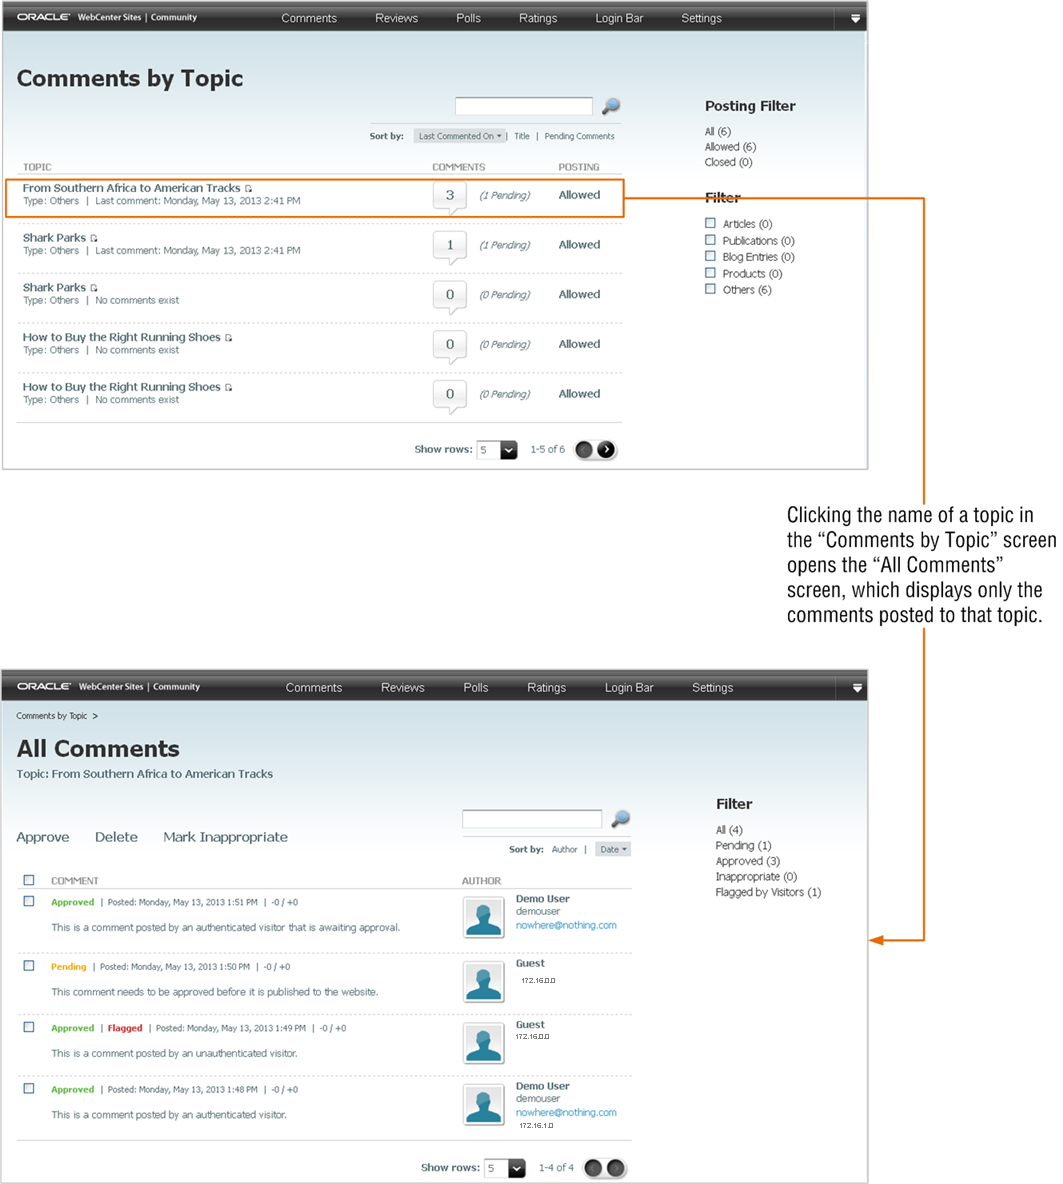
To access the "Comments by Topic" screen (shown in Figure 25-3), select Comments from the menu bar, then select Moderate, and then select Comments by Topic. The "Comments by Topic" screen is used to sort all comments that have been posted to the pages of your website by the title of the topic (web page) to which the comments are posted. When you select the title of a topic from this screen, the "All Comments" screen opens and displays only the comments posted to that topic.
Table 25-2 Moderating Comments by Topic
| Action | Instructions |
|---|---|
|
Filter topics by resource type (topic type) |
Note: The resource types (topic types) available in the "Filter" panel are dynamically modified by the current category file (Section 25.3.1, "Reconfiguring the Comments Widgets' Appearance Settings"). "Others" refers to Comments widgets (and topics) that do not belong to a resource type. |
|
Approve visitors' comments |
|
|
Delete visitors' comments |
|
|
Mark a comment as inappropriate |
Note: Comments can be marked as inappropriate either manually or through auto moderation. For information about configuring automatic moderation, see Chapter 30, "Configuring Community Widget Settings." |
|
Modify a comment |
Note: If manual moderation is enabled (Section 30.2.5, "Working with the Moderation Screen"), manually approve the comment you modified to display it on the web page. |
|
Add an authenticated visitor to the "Visitor Whitelist" |
Note: For more information about the "Visitor Whitelist," see Section 30.2.4, "Working with the Visitor Whitelist Screen." |
|
Add a visitor to the "Visitor Blacklist" |
Note: For more information about the "Visitor Blacklist," see Section 30.2.3, "Working with the Visitor Blacklist Screen." |
|
Post a reply to a comment |
Note: You can only post a reply to comments with a status of approved. |
|
Search for a topic |
|
|
Enable or disable the comments widget deployed on a given topic (web page) |
Note: You can use the "Posting Filter" to filter the topics displayed in the "Comments by Topic" list by the status of the comments widget deployed on the topic. For example, if you select Allowed in the "Posting Filter" section, then only the topics that allow visitors to post comments will be displayed in the list and vice versa. |
|
Identify a flagged comment |
|
|
View a topic on the website |
|
|
View all the comments posted by a specific visitor |
Note: For more information about moderating comments by user, see Section 25.2.3, "Moderating Comments by User." |
25.2.3 Moderating Comments by User
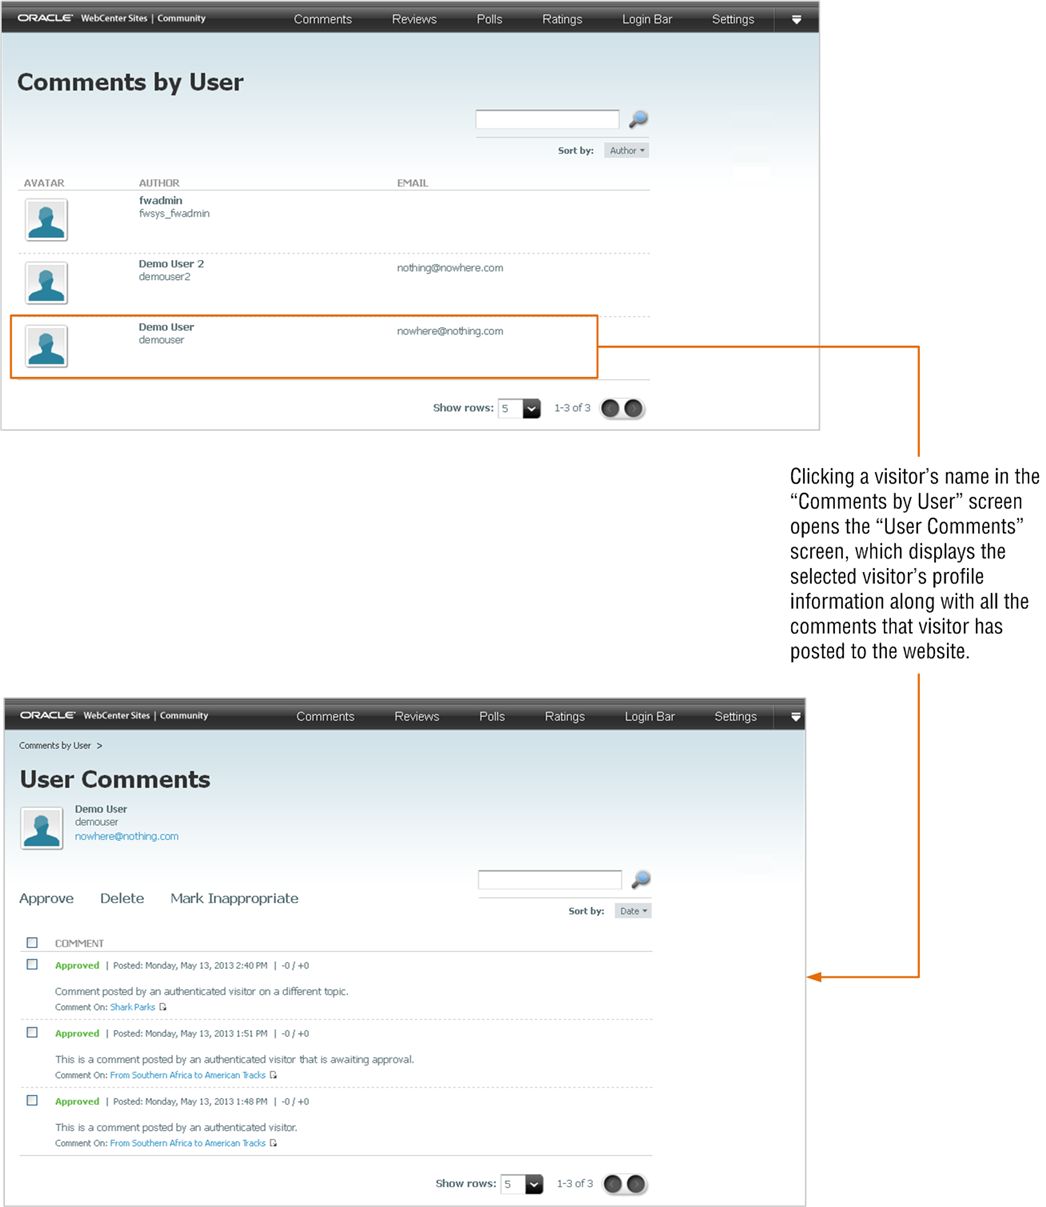
To access the "Comments by User" screen (shown in Figure 25-4), select Comments from the menu bar, then select Moderate, and then select Comments by User. The "Comments by User" screen is used to sort all comments posted to the website by the names of the visitors who posted the comments. When you select a visitor's name from this screen, the "User Comments" screen opens and displays the comments the visitor has posted along with the visitor's user name, profile picture, and e-mail address (if available).
Table 25-3 Moderating Comments by User
| Action | Instructions |
|---|---|
|
Approve visitors' comments |
|
|
Delete visitors' comments |
|
|
Mark a comment as inappropriate |
Note: Comments can be marked as inappropriate either manually or through auto moderation. For information about configuring automatic moderation, see Chapter 30, "Configuring Community Widget Settings." |
|
Modify a comment |
Note: If manual moderation is enabled (Section 30.2.5, "Working with the Moderation Screen"), manually approve the comment you modified to display it on the web page. |
|
Add an authenticated visitor to the "Visitor Whitelist" |
If you know which authenticated visitor you want to add to the whitelist, do the following:
If you wish to view the comments posted by the visitor before adding that visitor to the whitelist, do the following:
Note: For more information about the "Visitor Whitelist," see Section 30.2.4, "Working with the Visitor Whitelist Screen." |
|
Add an authenticated visitor to the "Visitor Blacklist" |
If you know which visitor you want to add to the blacklist, do the following:
If you wish to view the comments posted by the visitor before adding that visitor to the blacklist, do the following:
The "Visitor Blacklist" screen opens, and the visitor's name is displayed in the list of blacklisted visitors. Note: For more information about the Visitor Blacklist, see Section 30.2.3, "Working with the Visitor Blacklist Screen." |
|
Search for a specific visitor |
Only visitor names that match the specified search criteria are displayed in the "Comments by User" screen. |
|
Identify a flagged comment |
A comment that is flagged on the website will appear in the list of comments with Flagged posted next to its Approved status. |
|
View a topic on the website |
The web page opens displaying the topic, the deployed Comments widget, and the comments visitors posted to the page. |
|
Post a reply to a comment |
The reply is displayed in the "All Comments" screen (in the menu bar, select Comments, then select Moderate, and then select All Comments) and on the web page that displays the comment to which the reply was posted. |
|
View all the comments posted to a specific topic |
Note: For more information about moderating comments by topic, see Section 25.2.2, "Moderating Comments by Topic." |
25.3 Reconfiguring the Comments Widget's Default Settings
Default settings are a widget's saved appearance and permission settings. Users assigned the Designer role can modify the default appearance of the Comments widget by selecting Comments, Configure, and then Appearance in the menu bar. Users assigned the Moderator role can reconfigure the default commenting permissions by selecting Comments, Configure, and then Permissions in the menu bar. Once the permission and appearance settings are saved, the system dynamically updates the Comments widget's default tag in the Community interface and on pages where tags with default settings are deployed.
You can reconfigure the default settings of the Comments widget in the following ways:
25.3.1 Reconfiguring the Comments Widgets' Appearance Settings
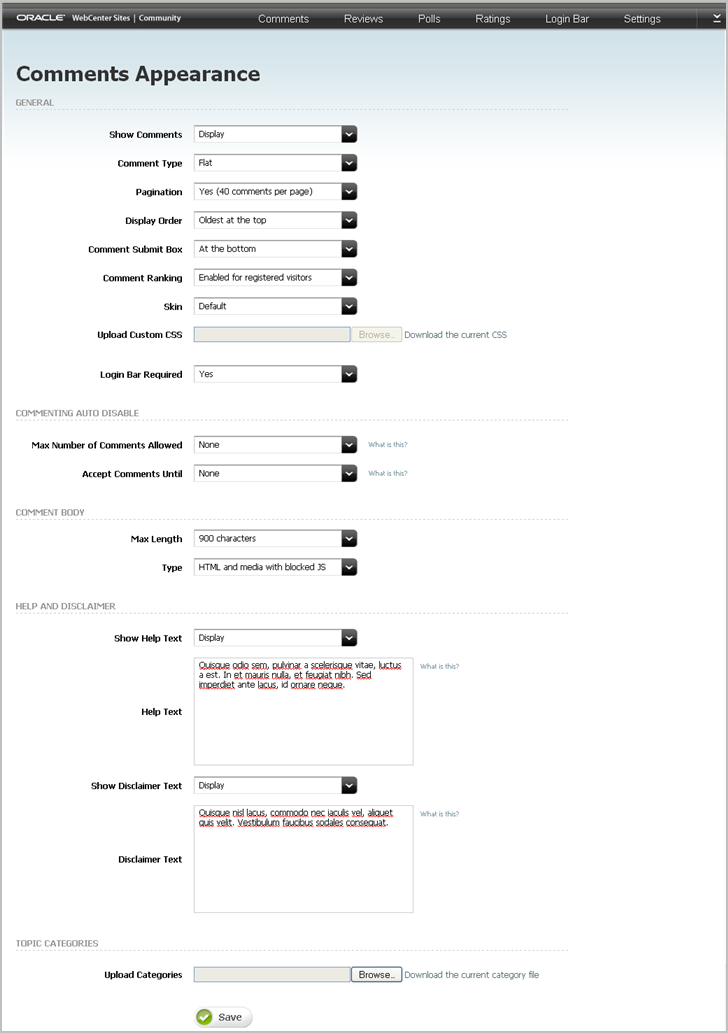
To access the "Comments Appearance" screen (shown in Figure 25-5), select Comments from the menu bar, then select Configure, and then select Appearance. This screen can be used by designers to reconfigure the Comments widget's color schema, sort order, and other display properties.
Table 25-4 Reconfiguring the Comments Widget's Appearance Settings
| Section | Field | Description |
|---|---|---|
|
General |
Show Comments |
Select either Display or Do not Display to specify whether approved comments are displayed to site visitors. |
|
General |
Comment Type |
Select whether your deployment supports a Flat commenting structure, or a Threaded commenting structure which allows replies to comments. |
|
General |
Pagination |
Select the number of approved comments that will be displayed on a given page at one time. |
|
General |
Display Order |
Select one of the following to specify the order in which approved comments will be displayed on a given page:
|
|
General |
Comment Submit Box |
Specify whether the comment field will be displayed At the top or At the bottom of the list of comments on a given page. |
|
General |
Specify whether visitors can rank individual comments as Helpful or Not Helpful. Select one of the following:
|
|
|
General |
Skin |
Select Default to use the default color schema for the Comments widget, or select Custom to upload your own CSS file. |
|
General |
Upload Custom CSS |
If you selected the Custom option in the Skin field, use the Browse button to select a cascading style sheet (CSS) that will control the appearance of the Comments widget. |
|
General |
Login Bar Required |
Select either Yes or No to specify whether a Login Bar widget tag will be embedded in and deployed with the Comments widget tag. Note: If you select No, you can still deploy a standalone Login Bar widget tag on the same page as the Comments widget (for instructions, see Section 28.3, "Deploying a Login Bar Widget Tag"). |
|
Commenting Auto Disable |
Max Number of Comments Allowed |
Use the drop-down menu to select the maximum number of comments that can be posted to a given web page. Once the maximum number of comments is reached, visitors cannot post comments to that particular web page. Note: You can also enter the maximum number of comments that can be posted to a given web page (for example, to specify 50 as the maximum number of comments that can be posted, enter |
|
Commenting Auto Disable |
Accept Comments Until |
Use the drop-down menu to select the maximum number of days comments can be posted to a given web page. Once the specified number of days is reached, visitors cannot post comments to that particular web page. Note: You can also enter the maximum number of days comments can be posted to a given web page (for example, to specify 30 as the maximum number of days comments can be posted, enter |
|
Comment Body |
Max Length |
Select either 450 characters or 900 characters to set the comment field size. |
|
Comment Body |
Type |
Specify the type of text that can be entered into the comment field. Select one of the following:
|
|
Help and Disclaimer |
Show Help Text |
Select either Display or Do not display to specify whether the Comments widget will display help text to visitors. |
|
Help and Disclaimer |
Help Text |
If you selected Display in the "Show Help Text" field, enter the help text you wish to display to visitors. When the Comments widget is deployed, the help text is displayed above the comments submit box. Note: This field supports plain text and basic HTML tags. You can use HTML tags to control the appearance of your help text. |
|
Help and Disclaimer |
Show Disclaimer Text |
Select either Display or Do not display to specify whether the Comments widget will display a disclaimer to visitors. |
|
Help and Disclaimer |
Disclaimer Text |
If you selected Display in the "Show Disclaimer Text" field, enter the disclaimer text you wish to display to visitors. When the Comments widget is deployed, the disclaimer is displayed beneath the comments submit box. Note: This field supports plain text and basic HTML tags. You can use HTML tags to control the appearance of your disclaimer. |
|
Topic Categories |
Upload Categories |
Use the Browse button to upload the desired category file, which will dynamically modify the resource types available from:
Note: The category file must be in |
25.3.2 Reconfiguring the Comments Wigets' Permissions Settings
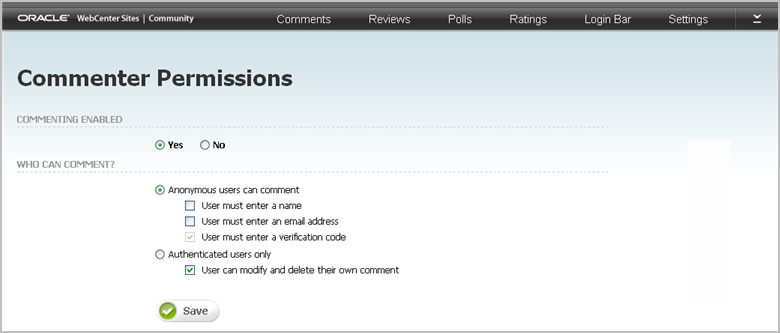
To access the "Commenter Permissions" screen (shown inFigure 25-6), select Comments from the menu bar, then select Configure, and then select Permissions. This screen can be used by moderators to display or hide comment fields and set visitors' permissions to comment.
Figure 25-6 'Commenter Permissions' Screen
Description of "Figure 25-6 'Commenter Permissions' Screen"
Table 25-5 Reconfiguring Commenting Permissions for Site Visitors
| Section | Field |
|---|---|
|
Commenting Enabled |
|
|
Who Can Comment? |
Available only if the widget is configured to display a comment field:
|
25.4 Deploying the Comments Widget Tags
This section is for users assigned the Designer role. You can deploy the Comments widget tag and all of its related widget tags with either default or custom settings by selecting Comments, Deploy, and then selecting the name of the widget tag you wish to deploy in the menu bar. Table 25-6 lists the widget tags related to commenting functionality and indicates which type of deployment each tag supports.
Table 25-6 Deploying the Comments Widget Tags
| Widget Tag | Deploy with Default Settings | Deploy Custom Settings |
|---|---|---|
|
Comments |
Yes |
Yes |
|
Comments Summary |
No |
Yes |
|
Links to Topics |
No |
No |
|
Recently Commented |
Yes |
Yes |
|
Most Commented |
Yes |
Yes |
This section contains the following topics:
25.4.1 Deploying a Default Comments Widget Tag
Several types of comments widgets can be deployed with default settings: Comments, Recently Commented, and Most Commented. The default settings for the Comments widget are its saved settings, which are configured in the "Permissions" screen (select Comments, Configure, and then Permissions) and "Appearance" screen (select Comments, Configure, and then Appearance). The default settings for all other commenting related widgets are configured out-of-the-box and cannot be reconfigured in the Community interface. Each type of comments widget has its own deployment screen, which displays the widget tag. The default settings are used as property values in the widget tag.
To deploy default comments widget tags
-
In the menu bar, select Comments, Deploy, and the name of the widget tag you wish to deploy:
-
Comments – to deploy the Comments widget tag. If commenting is enabled (in the "Commenter Permissions" screen), the Comments widget displays a comment field. If displaying comments is enabled (in the "Comments Appearance" screen), then a list of site visitors' comments is displayed on the web page.
Note:
If any of the following deployment scenarios are true, you will have to customize the Comments widget by specifying a resource ID:
-
You wish to link the Links to Topics widget to a Comments widget.
-
You want to deploy the Comments Summary widget on a web page different from the one on which a Comments widget is deployed.
-
You want to deploy two or more Comments widgets on the same web page.
For more information, see the description of the Resource ID field in Table 25-7.
-
-
Recently Commented – to deploy the Recently Commented widget tag. When deployed, this widget displays a list of the top ten web pages (topics) to which site visitors have recently posted comments.
Note:
By default, the Recently Commented widget lists topics that have an associated Comments widget of resource type "Others." To configure the Recently Commented widget to list topics of all resource types, you will have to modify the widget tag by removing the
"resource_type":"other" parameter. For more information, see the Oracle Fusion Middleware WebCenter Sites Developer's Guide. -
Most Commented – to deploy the Most Commented widget tag. When deployed, this widget displays a list of the top ten web pages (topics) to which visitors frequently post comments.
Note:
By default, the Most Commented widget lists topics that have an associated Comments widget of resource type "Others." To configure the Most Commented widget to list topics of all resource types, you will have to modify the widget tag by removing the
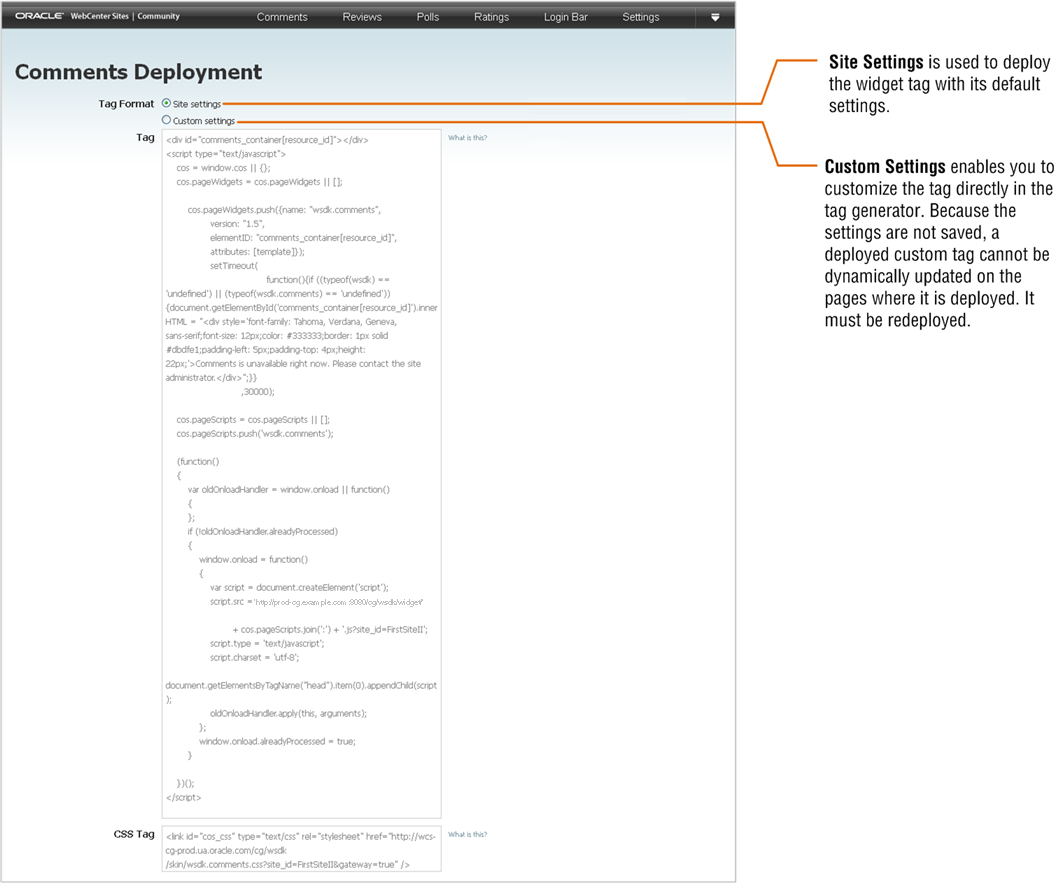
"resource_type":"other"parameter. For more information, see the Oracle Fusion Middleware WebCenter Sites Developer's Guide.The deployment screen for each widget tag looks similar to the Comments Deployment screen, shown in Figure 25-7:
Figure 25-7 'Comments Deployment' Screen: Site Settings vs. Custom Settings
Description of "Figure 25-7 'Comments Deployment' Screen: Site Settings vs. Custom Settings"
-
-
In the "Tag Format" field, make sure Site settings is selected.
-
-
In the "Tag" field, copy (Ctrl+C) the widget tag.
-
Insert the widget tag into the desired template, preview the asset to which the template is assigned, and publish the template to the website. For detailed instructions, see steps 3 – 7 in Section 24.2, "How Do I Deploy Community Widget Tags?"
-
25.4.1.1 Hiding the Default Comments Widget
If you want to hide a default Comments widget that is displayed on various web pages, instead of accessing the template's source code, you (depending on your role in the Community application) can use the Comments widget's Permissions and Appearance screens.
-
If you are a moderator, hide the comment field:
-
In the menu bar, select Comments, Configure, and then Permissions.
-
In the "Commenting Enabled" field, select No.
-
Click Save.
The comment field is now hidden from site visitors.
-
-
If you are a designer, hide the list of comments:
-
In the menu bar, select Comments, Configure, and then Appearance.
-
In the "Show Comments" field, select Do not display.
-
Click Save.
The list of comments is now hidden from site visitors.
-
25.4.2 Deploying Custom Comments Widget Tags
You can customize any widget tag related to commenting functionality (except Links to Topics) by settings its properties using the tag generator in the widget's Deployment screen. Each time a widget tag is customized, it must be redeployed because custom values cannot be saved in the Community interface; instead they are stored only in that particular instance of the widget tag.
To configure and deploy custom comments widgets
-
In the menu bar, select Comments, Deploy, and then the name of the widget tag you wish to customize and deploy:
-
Comments – to customize and deploy the Comments widget tag: that is, (1) Configure the Comments widget tag with a unique identifier and resource type so that it can be referred to by other commenting related widgets for its content, such as the number of comments and date of the most recently posted comment. (2) Specify the web page (topic title and URL) on which the Comments widget tag is deployed. (3) Reconfigure certain properties that were set as defaults in the tag's "Permissions" screen (select Comments, Configure, and then Permissions) and "Appearance" screen (select Comments, Configure, and then Appearance).
-
Comments Summary – to customize and deploy the Comments Summary widget tag; that is, specify the resource ID of a Comments widget in the "Comments Summary Deployment" screen. When deployed, the Comments Summary widget displays short, summarized information about the number of comments posted to the web page on which the specified Comments widget is deployed along with the date of the most recently posted comment.
-
Links to Topics – to customize and deploy the Links to Topics widget tag; that is, specify the resource ID of a Comments widget and, optionally, the resource URL of the web page to which you wish this widget to link. When deployed, the Links to Topics widget displays summarized information about the specified Comments widget, such as the number of comments posted to the web page (topic) on which that Comments widget is deployed along with a link to the desired web page (if you specified the URL of a web page in the Links to Topics widget tag).
Note:
To configure the Links to Topics widget to display summarized information about and links to multiple Comments and/or Reviews widgets, see the Oracle Fusion Middleware WebCenter Sites Developer's Guide.
-
Recently Commented – to customize and deploy the Recently Commented widget tag; that is, have the Recently Commented widget list topics of a desired type (instead of topics of type "Others") to which site visitors have recently posted comments. For example, topics of type "Article" are posted on a web page; each article has its own Comments widget of resource type Article. If the Recently Commented widget is to list topics of type "Article" to which site visitors have recently posted comments, it must be configured to refer to the Comments widget by resource type.
Note:
To configure the Recently Commented widget to list topics of all resource types, you will have to modify the widget tag by removing the
"resource_type":"other" parameter. For more information, see the Oracle Fusion Middleware WebCenter Sites Developer's Guide. -
Most Commented – to customize and deploy the Most Commented widget tag; that is, have the Most Commented widget list the most popular topics of a desired type (instead of topics of type Others). For example, topics of type "Article" are posted on a web page; each article has its own Comments widget of resource type Article. If the Most Commented widget is to list the most popular topics of type "Article," it must be configured to refer to the Comments widget by resource type.
Note:
To configure the Most Commented widget to list topics of all resource types, you will have to modify the widget tag by removing the
"resource_type":"other" parameter. For more information, see the Oracle Fusion Middleware WebCenter Sites Developer's Guide.
-
-
In the Tag Format field, select Custom settings. Customize the desired widget tag by setting values for the available fields in the tag's custom deployment screen.
For field definitions, see:
-
Section 25.4.3.1, "Custom Comments Widget Tag's Deployment Screen"
-
Section 25.4.3.2, "Custom Comments Summary Widget Tag's Deployment Screen"
-
Section 25.4.3.3, "Links to Topics Widget Tag's Deployment Screen"
-
Section 25.4.3.4, "Custom Recently Commented Widget Tag's Deployment Screen"
-
Section 25.4.3.5, "Custom Most Commented Widget Tag's Deployment Screen"
-
-
-
In the "Tag" field, copy (Ctrl+C) the widget tag.
-
Insert the widget tag into the desired template, preview the asset to which the template is assigned, and publish the template to the website. For instructions, see steps 3 – 7 in the section Section 24.2, "How Do I Deploy Community Widget Tags?."
-
25.4.3 Custom Widget Tag Deployment Screens
Once you access a given widget's custom deployment screen, you can use the available fields to set custom (temporary) values for the widget tag. These values are not saved, except in the template to which you copy the customized instance of the tag. This section provides field definitions.
25.4.3.1 Custom Comments Widget Tag's Deployment Screen
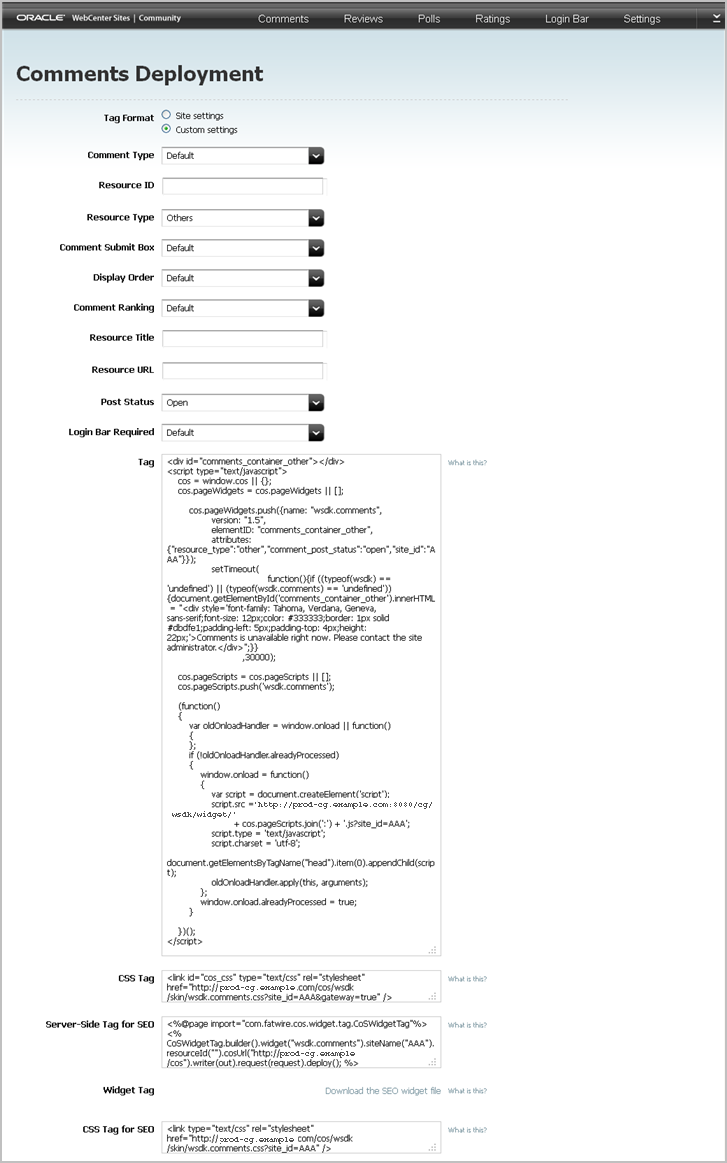
The screen shown in Figure 25-8 is used to define custom values for a particular instance of the Comments widget tag, which can then be deployed on web pages.
Figure 25-8 Custom 'Comments Deployment' Screen
Description of "Figure 25-8 Custom 'Comments Deployment' Screen"
Note:
The Default field value references the setting that is specified in the widget's Permissions or Appearance screen. If you choose a default setting for your custom tag, and you deploy the tag, the default setting will be dynamically updated if its value is modified and saved in the Community interface.
Table 25-7 Customizing and Deploying the Comments Widget Tag
| Field | Description |
|---|---|
|
Comment Type |
Select whether your deployment supports a Flat commenting structure, or a Threaded commenting structure which allows replies to comments. |
|
Enter a resource ID (unique identifier) for this instance of the Comments widget tag. This resource ID can be used in other comments widget tags (for example, the Comments Summary widget tag) to refer to this instance of the Comments widget. You can enter a maximum of 50 English alphanumeric characters into this field. This field is required if:
|
|
|
Resource Type |
Select a resource type (topic type) for this instance of the Comments widget tag. The resource type of a Comments widget tag categorizes the web page on which it is deployed. If you do not specify a resource type, the topic (web page) on which this instance of the Comments widget is deployed is associated with the default Others resource type. Note: The current category file (Section 25.3.1, "Reconfiguring the Comments Widgets' Appearance Settings") determines the resource types that are available to you. |
|
Comment Submit Box |
Specify whether the comment field will be displayed At the top or At the bottom of the list of comments on a given page. |
|
Display Order |
Select one of the following to specify the order in which approved comments will be displayed on a given page:
|
|
Comment Ranking |
Specify whether visitors can rank individual comments as Helpful or Not Helpful. Select one of the following:
|
|
Resource Title |
Enter the title of the web page on which this instance of the Comments widget tag will be deployed. |
|
Resource URL |
Enter the URL of the web page on which this instance of the Comments widget tag will be deployed. |
|
Post Status |
Select either Open or Close to specify whether visitors can post comments to the page on which this instance of the Comments widget tag is deployed. Note: If you deploy the Comments widget with a "Post Status" of Close on a web page (topic), you cannot enable commenting on that web page (topic) from the "Comments by Topic" screen. |
|
Login Bar Required |
Select either Yes or No to specify whether a Login Bar widget tag will be embedded in and deployed with this instance of the Comments widget tag. Note: If you select No, you can still deploy a standalone Login Bar widget tag on the same page as the Comments widget (for instructions, see Section 28.3, "Deploying a Login Bar Widget Tag"). |
25.4.3.2 Custom Comments Summary Widget Tag's Deployment Screen
The screen shown in Figure 25-9 is used to define custom values for a particular instance of the Comments Summary widget tag, which can then be deployed on web pages.
Figure 25-9 'Comments Summary Deployment' Screen
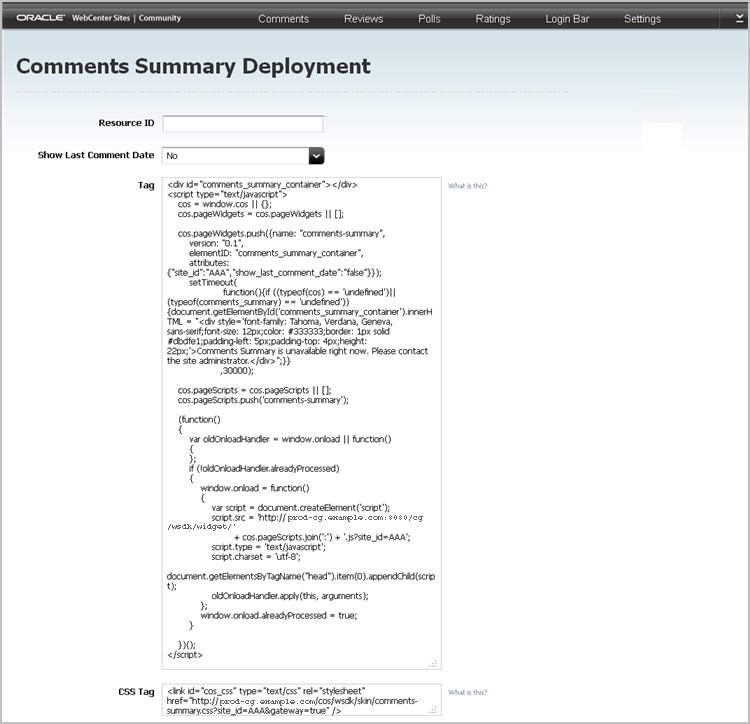
Description of "Figure 25-9 'Comments Summary Deployment' Screen"
Table 25-8 Customizing and Deploying the Comments Summary Widget Tag
| Field | Description |
|---|---|
|
Specify the resource ID (unique identifier) of a Comments widget tag. When the Comments Summary widget is deployed, it displays summarized information about the number of comments posted to the web page on which the specified Comments widget is deployed. |
|
|
Show Last Comment Date |
Select Yes to display the most recent date a comment was posted to a given page, or select No to display only the number of comments posted to the page. Default Value: No |
25.4.3.3 Links to Topics Widget Tag's Deployment Screen
The screen shown in Figure 25-10 is used to define custom values for a particular instance of the Links to Topics widget tag, which can then be deployed on web pages.
Figure 25-10 'Links to Topics Deployment' Screen
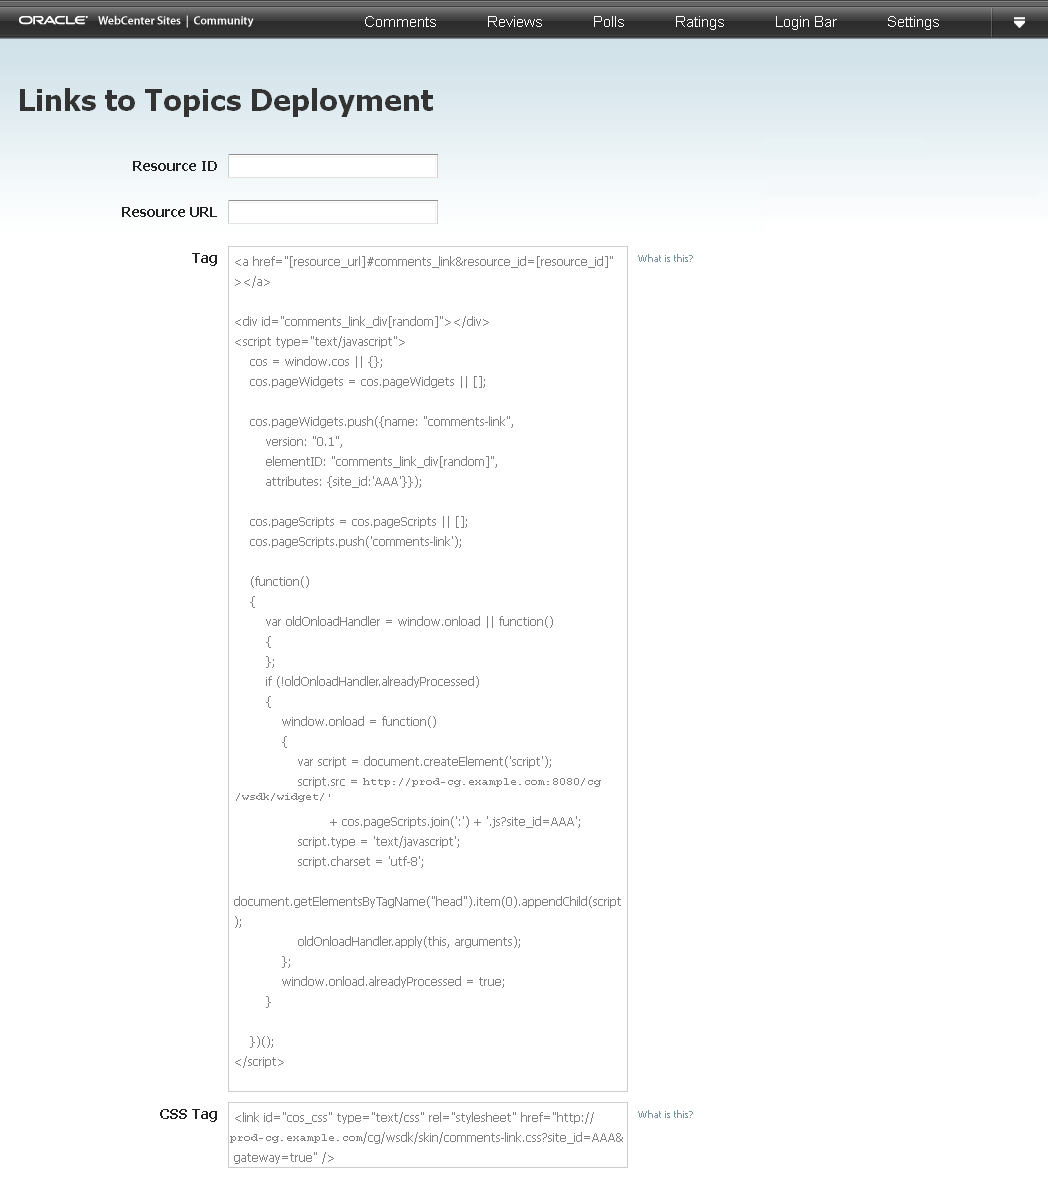
Description of "Figure 25-10 'Links to Topics Deployment' Screen"
Table 25-9 Customizing and Deploying the Links to Topics Widget Tag
| Field | Description |
|---|---|
|
Resource ID |
This field is required. Specify the resource ID (unique identifier) of a Comments widget tag. When the Links to Topics widget is deployed, it displays summarized information about the number of comments posted to the web page on which the specified Comments widget is deployed. |
|
Resource URL |
If you want the Links to Topics widget to redirect visitors to a certain web page when a visitor clicks the summarized information about a Comment widget, specify the resource URL of the desired web page. Note: If you do not specify a resource URL, when a visitor clicks the summarized information about the specified Comments widget, the Links to Topics widget redirects the visitor to the page on which the Comments widget (specified in the Resource ID field) is deployed. If there are multiple Comments widgets with the same resource ID deployed on a page, the Links to Topics widget redirects the visitor to the last active widget on that page. |
25.4.3.4 Custom Recently Commented Widget Tag's Deployment Screen
The screen shown in Figure 25-11 is used to define custom values for a particular instance of the Recently Commented widget tag, which can then be deployed on web pages.
Figure 25-11 'Recently Commented Deployment' Screen
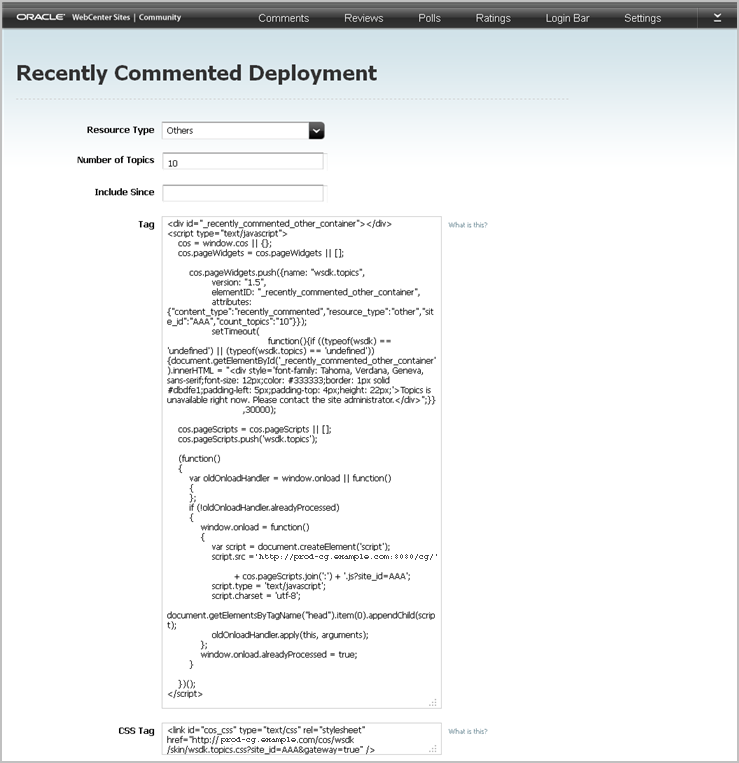
Description of "Figure 25-11 'Recently Commented Deployment' Screen"
Table 25-10 Customizing and Deploying the Recently Commented Widget Tag
| Field | Description |
|---|---|
|
Resource Type |
Select a resource type (topic type). When the Recently Commented widget is deployed, it lists the recently commented topics of a certain type (for example Article) on which a Comments widget assigned to the specified resource type is deployed. If the deployed Comments widgets are not assigned a resource type, select Others. Default Value: Others Note: The current category file (see Section 25.3.1, "Reconfiguring the Comments Widgets' Appearance Settings") determines the resource types that are available to you. |
|
Number of Topics |
Specify the number of web pages (topics) to be included in the list (for example, enter 5 to list the five topics to which site visitors have recently posted comments). Default Value: |
|
Include Since |
Click in this field to render the date picker. Select a date by which to filter the web pages that will be listed. When deployed, the Recently Commented widget lists only the web pages whose comments were posted on or after the specified date. This allows you to avoid displaying outdated pages and comments. Note: If you do not wish to use the date picker, you can enter a date using the format dd-mm-yyyy (for example, 02-04-2011). |
25.4.3.5 Custom Most Commented Widget Tag's Deployment Screen
The screen in Figure 25-12 is used to define custom values for a particular instance of the Most Commented widget tag, which can then be deployed on web pages.
Figure 25-12 'Most Commented Deployment' Screen
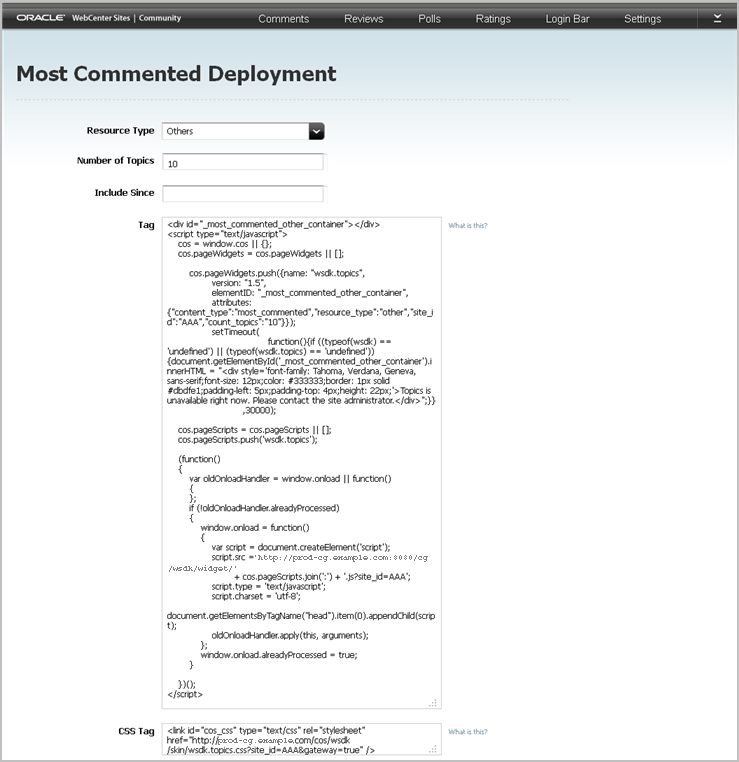
Description of "Figure 25-12 'Most Commented Deployment' Screen"
Table 25-11 Customizing and Deploying the Most Commented Widget Tag
| Field | Description |
|---|---|
|
Resource Type |
Select a resource type (topic type). When the Most Commented widget tag is deployed, it lists the most popular topics of a certain type (for example Article) on which a Comments widget assigned to the specified resource type is deployed. If the deployed Comments widgets are not assigned a resource type, select Others. Default Value: Others Note: The current category file (see Section 25.3.1, "Reconfiguring the Comments Widgets' Appearance Settings") determines the resource types that are available to you. |
|
Number of Topics |
Specify the number of web pages (topics) to be included in the list (for example, enter 5 to list the five topics to which site visitors frequently post comments). Default Value: |
|
Include Since |
Click in this field to render the date picker. Select a date by which to filter the web pages that will be listed. When deployed, the Most Commented widget lists only the web pages whose comments were posted on or after the specified date. This allows you to avoid displaying outdated pages and comments. Note: If you do not wish to use the date picker, you can enter a date using the format dd-mm-yyyy (for example, 02-04-2011). |
