28 Working with the Login Bar Widget
This chapter is for designers and provides a quick reference for reconfiguring settings for the Login Bar widget and deploying the Login Bar widget tag. The Login Bar widget is common between the Community and Gadgets applications – any changes you make to the Login Bar widget in the Community interface are also applied to the Login Bar widget in the Gadgets User interface, and vice versa. Therefore, when a visitor logs in to the community widgets on your website, they are also logged in to the gadgets and dashboard widgets that are deployed on the website.
Note:
For information about working with the Oracle WebCenter Sites: Gadgets application, see Part IV, "Using the Gadgets Application."
This chapter contains the following sections:
28.1 Overview
The Login Bar menu (shown in Figure 28-1) is used to reconfigure the login bar site visitors use to log in to the community widgets (and gadgets) deployed on the pages of your company's website. Configuring login settings includes determining which credentials (for example, Facebook and Twitter) visitors can use to log in to community widgets (and gadgets). Once you save these configurations, all login bar widgets (standalone and embedded) deployed on the website will use the new settings.
The instructions in this section are written as a quick reference and it is assumed you are already logged in to the Community interface. If you need instructions for logging in, see Section 24.1, "Logging In."
28.2 Reconfiguring the Login Bar Widget's Default Settings
The Login Bar widget's default settings are its saved settings. These settings determine which credentials visitors can use to log in to the community widgets (and gadgets) on your website, and whether visitors can share their comments and reviews with social network news feeds such as Facebook and Twitter.
Note:
The Login Bar widget tag is common to both the Community and Gadgets applications. The instructions in this section can be applied to reconfiguring the Login Bar widget tag in the Community interface and the Gadgets User interface. For more information about the Gadgets application, see Part IV, "Using the Gadgets Application."
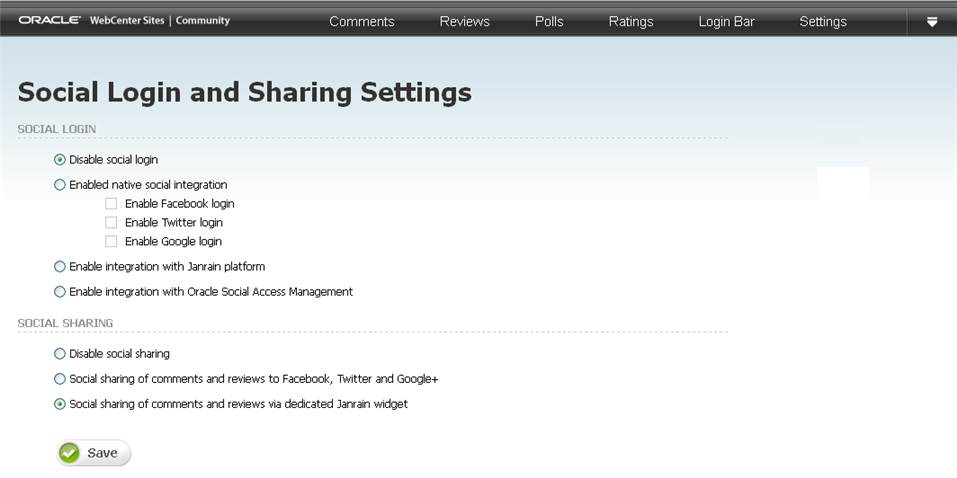
To reconfigure the Login Bar widget's default settings, designers can select Login Bar, and then Configure in the menu bar, which opens the "Social Login and Sharing Settings" screen (shown in Figure 28-2). Once default settings are saved, all Login Bar widget tags deployed on the website (including standalone instances and instances that are embedded in and deployed with community and dashboard widget tags) will use the new settings.
Figure 28-2 'Social Login and Sharing Settings' Screen

Description of "Figure 28-2 'Social Login and Sharing Settings' Screen"
Table 28-1 Reconfiguring the Login Bar
| Option | Description |
|---|---|
|
Disable social login |
Select this option if you want site visitors to log in to deployed community widgets (as well as any deployed gadgets and/or dashboard widgets) using only the credentials they used to register with your website. |
|
Enable native social integration |
If your developers have registered the Community-Gadgets application with Facebook, Twitter, and/or Google, select Enable native social integration. This enables Facebook, Twitter, and Google to be used as external identity providers. Available only if the Login Bar widget is enabled for native social integration:
Note: For information about registering the Community-Gadgets application with these external identity providers, see theOracle Fusion Middleware WebCenter Sites Developer's Guide. |
|
Enable integration with Janrain platform |
Janrain is a third-party service for social login and social user profile management. If your developers have registered the Community-Gadgets application with the Janrain platform, and you want to allow visitors to log in to the widgets and gadgets on the website using their assigned credentials for any of the social networks supported by the Janrain platform, select the Enable integration with Janrain platform radio button. Note: If your developers have not registered the Community and Gadgets applications with the Janrain platform, this option will not be available. For information about registering the Community and Gadgets applications with the Janrain platform, see the Oracle Fusion Middleware WebCenter Sites Developer's Guide. |
|
Enable integration with Oracle Access Management |
If your developers have registered the Community and Gadgets applications with Oracle Access Management (OAM), select Enable integration with Oracle Access Management. This allows visitors to log in to deployed widgets or gadgets using credentials for any of the social networks supported by OAM. Once visitors log in to the website, they are automatically logged in to all widgets and gadgets deployed on the website. Note: If your developers have not registered the Community and Gadgets applications with Oracle Access Management (OAM), this option will not be available. For more information about integrating the Community and Gadgets applications with Oracle Mobile and Social Access Manager, see the Oracle Fusion Middleware WebCenter Sites Developer's Guide. |
|
Disable social sharing |
Select this option if you do not want to allow site visitors to share comments and reviews with social networks, such as Facebook, Twitter, and Google+. |
|
Social sharing of comments and reviews to Facebook, Twitter, and Google+ |
Select this option to allow visitors to share the comments and reviews they post about the content of your website to their Facebook, Twitter, and Google+ news feeds. |
|
Social sharing of comments and reviews via dedicated Janrain widget |
Select this option if you want to allow visitors to share posted comments and reviews to the social networks supported by the Janrain platform. Note: If your developers have not registered the Community application with the Janrain platform, these options will not be available. For information about registering the Community application with the Janrain platform, see the Oracle Fusion Middleware WebCenter Sites Developer's Guide. |
28.3 Deploying a Login Bar Widget Tag
Designers can deploy the Login Bar widget tag with either default or custom settings by selecting Login Bar and then Deploy in the menu bar. The Login Bar widget tag can be deployed as a standalone widget on a web page or embedded in the tag of another community widget. This section provides instructions for deploying a standalone Login Bar widget tag.
To deploy a standalone login bar widget tag
-
In the menu bar, select Login Bar, then select Deploy.
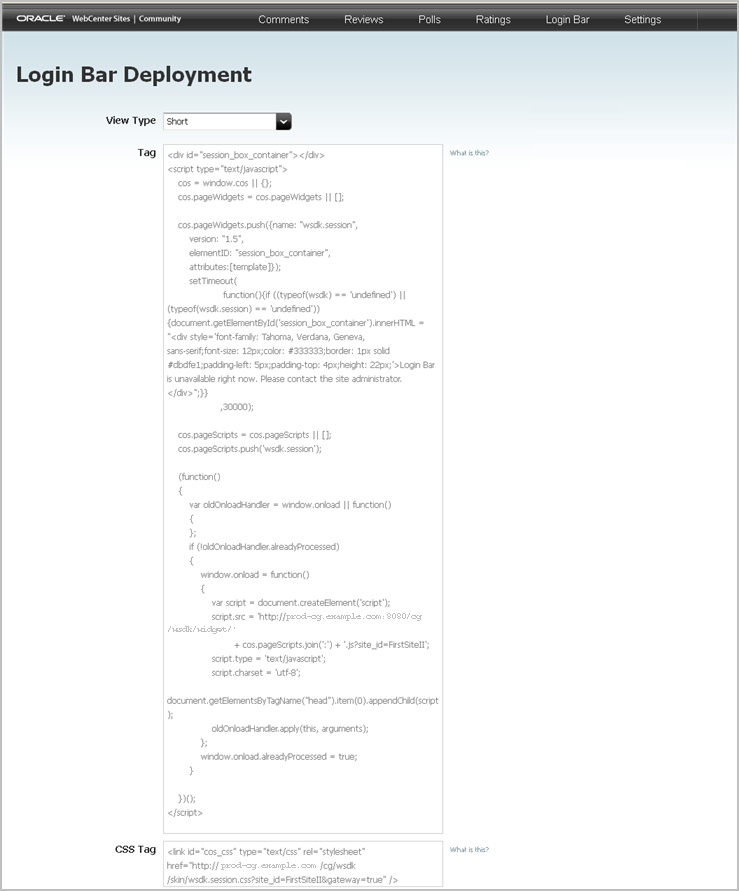
The "Login Bar Deployment" screen opens, shown in Figure 28-3.
Figure 28-3 'Login Bar Deployment' Screen

Description of "Figure 28-3 'Login Bar Deployment' Screen"
-
If you want to customize this instance of the Login Bar widget tag, use the "View Type" field to select whether a Short or Full version of the Login Bar widget will be displayed on the website. Select one of the following options:
-
Short – When a visitor logs in to the website, the Login Bar widget displays the visitor's user name as well as links which enable the visitor to either edit his profile or log out of the website. The website's font styles are automatically applied to this version of the Login Bar widget.
-
Full – When a visitor logs in to the website, the Login Bar widget will display the visitor's user name and profile picture, along with links that enable the visitor to edit his profile or log out of the website. This version of the Login Bar widget is displayed on the website with default font styles (which are specified in the Login Bar widget tag). The website's font styles are not automatically applied to the Full version of the Login Bar widget.
-
-
Deploy the widget tag:
-
In the "Tag" field, copy (Ctrl+C) the widget tag.
-
Insert the widget tag into the desired template, preview the asset to which the template is assigned, and publish the template to the website. For detailed instructions, see steps 3 – 7 in the Section 24.2, "How Do I Deploy Community Widget Tags?"
-
