80 Community-Gadgets: Integrating with Social Networking Services
The Community-Gadgets widgets are designed to leverage the authentication APIs of Facebook, Twitter, and Janrain on your web site. Community-Gadgets widgets enable the visitors of your web site (or blogs) to use their existing social networking profiles to provide feedback on your company's content and to share the same content on their social networking profiles. This chapter describes how to integrate the Community-Gadgets web application with Facebook, Twitter, Google, Janrain, and Oracle Mobile and Social Access Service (OMSAS).
This chapter contains the following sections:
-
Section 80.6, "Integrating with Oracle Internet Access Service"
-
Section 80.7, "Enabling Social Networking Services on WebSphere Application Server"
80.1 About Authentication Plug-Ins
Developers can leverage third-party authentication providers in the following ways:
-
Use the built-in support of Facebook, Twitter, and Google, which is available ready-to-use with the Community-Gadgets web application.
-
Use the authentication hub, Janrain, to enable access to most prevalent providers available online. Janrain is a SaaS solution that provides integration services with a number of online authentication providers such as Facebook, Twitter, Google, and so on. The more services supported, the more chances that the site visitor has an identity in one of these services, which they may use to log in.
-
Use the authentication hub, Oracle Mobile and Social Access Service (OMSAS), to enable access to prevalent providers available online. OMSAS is a solution that provides integration services with a number of online authentication providers such as Facebook, Twitter, Google, and so on.
Note:
Community-Gadgets uses only social functionality from OMSAS. Mobile functionality is not used.
80.2 Integrating with Facebook
On a web site, visitors' Facebook identities are authenticated via a trusted bridge, which is established between the Community-Gadgets web application and Facebook at each login attempt. To enable this bridge, you must first create a Facebook application using the Community-Gadgets production site URL. Then, you will configure the Facebook authentication properties on the application server on the production system of the Community-Gadgets web application. This section describes how to:
80.2.1 Create a Facebook Application for Community-Gadgets
Note:
Steps and screens shown in this section may not match the Facebook interface at the time when you create an application. If you see new fields and require help, contact product support.
To create a Facebook application for Community-Gadgets:
-
Log in to Facebook to access the Apps page:
https://developers.facebook.com/apps -
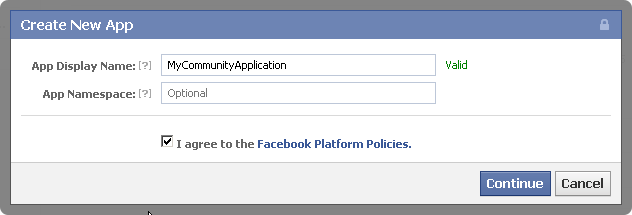
On the top right corner of the page, click Create New App to display the New App dialog box.
-
In the App Display Name field, enter a name for the Community-Gadgets web application.
-
Select the I agree to the Facebook Platform Policies check box, then click Continue.
-
On the Security Check Required page, in the Text in the box field, enter the displayed CAPTCHA text. Then, click Submit.
-
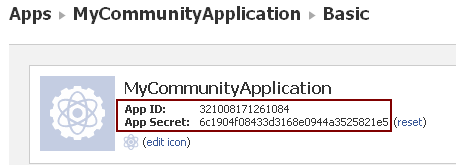
Under Basic, copy the values of App ID and App Secret parameters (Figure 80-2). You will need these values while configuring the Facebook authentication properties on the application server.
-
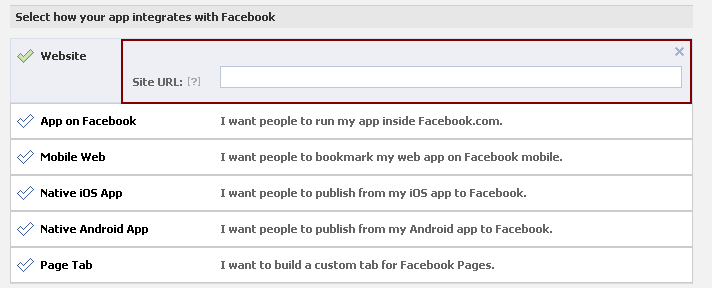
Under Select how your app integrates with Facebook, click the gray text next to Website to display the Site URL input field, as shown in Figure 80-3.
Figure 80-3 Select How Your App Integrates With Facebook
Description of "Figure 80-3 Select How Your App Integrates With Facebook"
-
In the Site URL field, enter the production address for the Community-Gadgets web application, and click Save Changes.
80.2.2 Configure Facebook Application Authentication Settings on the Community-Gadgets Web Application
To configure Facebook application authentication properties on the Community-Gadgets application server:
-
In the application server home on the production system, navigate to the standalone_node folders. Default management and production locations are:
<cg_install_dir>/deploy/management/management_node1
<cg_install_dir>/deploy/production/production_node1
-
Open the
setup_auth.propertiesfile, then scroll down to the Facebook Application Settings section. -
For
widgets.external_auth.facebook.attrs.client_idandwidgets.external_auth.facebook.attrs.client_secretconfiguration properties, enter the application ID and application secret values you copied at the time of creating the Facebook application.The Facebook Application Settings section should look like this:
## Facebook Application Settings
#######################################
#
# Facebook application id
#
widgets.external_auth.facebook.attrs.client_id=1111111111111111111
#
# Facebook application secret
#
widgets.external_auth.facebook.attrs.client_secret=571bf600e8d23
-
After saving the configuration file, restart the application server.
-
Open the Community interface or the Gadgets interface on the management side as a general administrator:
http://host:port/cs/login. -
Choose the desired site.
-
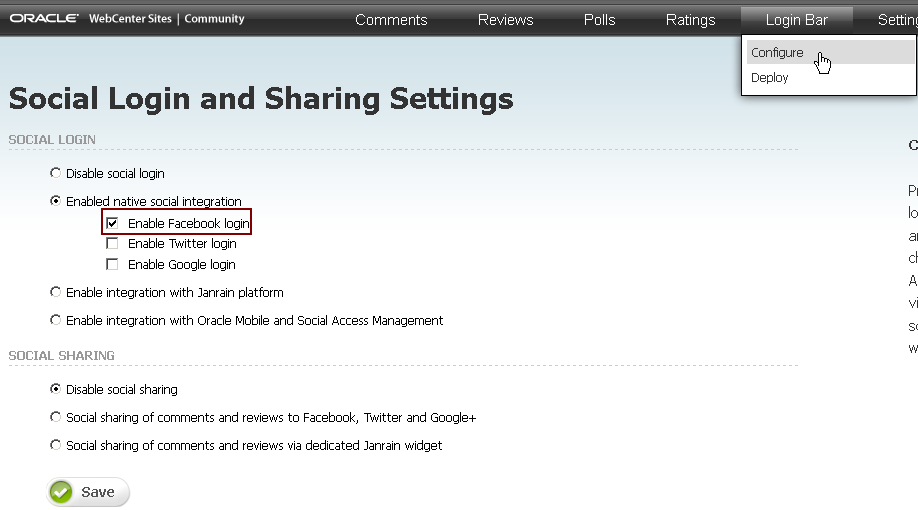
From the Login Bar menu, choose Configure.
-
On the Social Login and Sharing Settings page, in the Social Login section, under Enabled native social integration, select the Enable Facebook login check box (Figure 80-4), then click Save.
-
Restart the management and production environments.
-
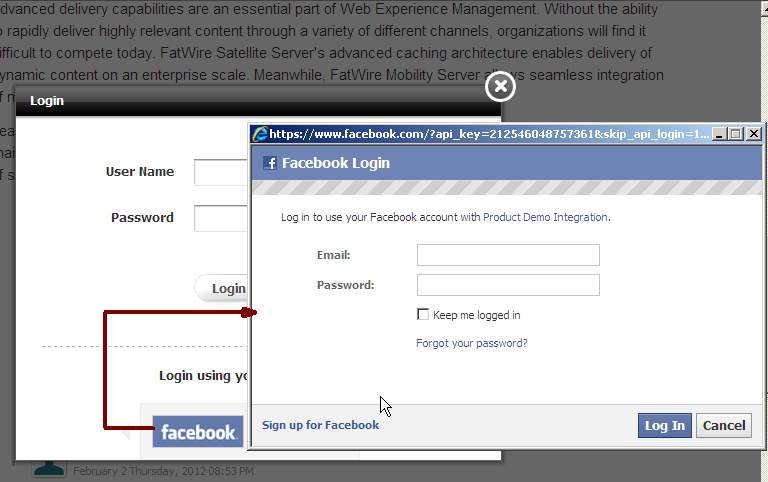
Access the web site on which the widget is deployed.
The Facebook login button is displayed (Figure 80-5) in the Community-Gadgets widget's Login screen.
Note:
If your Community-Gadgets web application is running on Oracle WebLogic Server or Tomcat application server, then the procedures described in Section 80.2.1, "Create a Facebook Application for Community-Gadgets" and Section 80.2.2, "Configure Facebook Application Authentication Settings on the Community-Gadgets Web Application" are all you require to integrate Community-Gadgets with Facebook. However, on a WebSphere Application Server instance, you must also perform the export/import procedures described in Section 80.7, "Enabling Social Networking Services on WebSphere Application Server" to enable communication between Community-Gadgets and this social networking service.
80.3 Integrating with Twitter
You can integrate the Community-Gadgets web application with Twitter just like you integrated it with Facebook. That is, first create a Twitter application using the production site URL, then update the authentication properties on the application server to include the Twitter application's required information.
This section describes how to:
-
Section 80.3.1, "Create a Twitter Application for Community-Gadgets"
-
Section 80.3.2, "Configure Twitter Application Authentication Settings on Community-Gadgets"
80.3.1 Create a Twitter Application for Community-Gadgets
To create a Twitter application:
-
Log in to Twitter's developers central at
https://dev.twitter.com/. -
Under Create applications that integrate Twitter, click Create an app.
-
Under Application Details, enter the required information as follows:
-
In the Name and Description fields, enter a name for the Community-Gadgets web application and a description.
-
In the WebSite field, enter the Community-Gadgets production server URL. For example,
http://production.example.com. -
In the Callback URL field, enter the production host location of the Community-Gadgets web application, which is the same as the URL in step b.
-
Select the Yes, I agree check box.
-
Under CAPTCHA, enter the words you see on the screen.
-
Click Create your Twitter application.
-
-
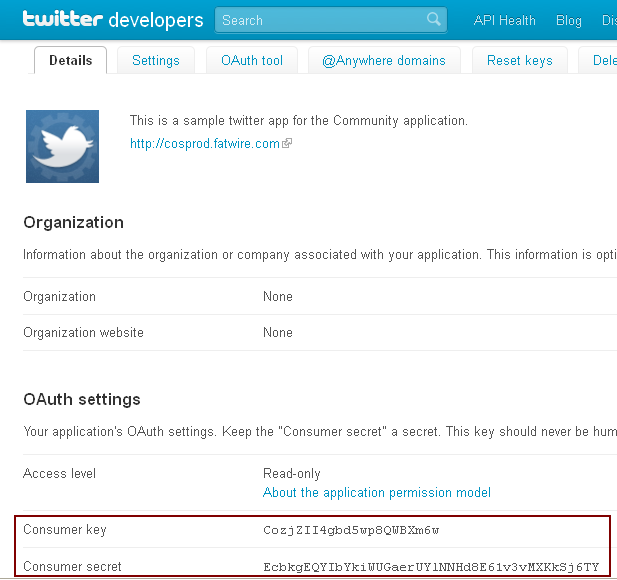
From the Details page, copy the values of Consumer key and Consumer secret properties displayed in the OAuth settings section (Figure 80-6). You will need these values to configure the authentication properties on the application server.
80.3.2 Configure Twitter Application Authentication Settings on Community-Gadgets
To configure the authentication properties on Community-Gadgets:
-
In the application server home on the production system, navigate to the standalone_node folders. Default management and production locations are:
<cg_install_dir>/deploy/management/management_node1
<cg_install_dir>/deploy/production/production_node1
-
Open the
setup_auth.propertiesfile, then scroll down to the Twitter Application Settings section. -
For
widgets.external_auth.twitter.attrs.consumer_keyandwidgets.external_auth.twitter.attrs.consumer_secretconfiguration properties, enter the consumer key and consumer secret values you copied earlier.The Twitter Application Settings section should look like this:
## Twitter Application Settings
# Twitter consumer key
#
widgets.external_auth.twitter.attrs.consumer_key=uh5nvtwCg5WjBD9UHM29eQ
#
# Twitter consumer secret
#
widgets.external_auth.twitter.attrs.consumer_secret=CaYaLDk9IZBConpQVkxk
-
After saving the configuration file, restart the application server.
-
Open the Community interface or the Gadgets interface on the management side as a general administrator:
http://host:port/cs/login. -
Choose the desired site.
-
From the Login Bar menu, choose Configure.
-
On the Social Login and Sharing Settings page, in the Social Login section, under Enabled native social integration, select the Enable Twitter login check box, then click Save.
-
Restart the management and production environments.
-
Access the web site on which the widget is deployed.
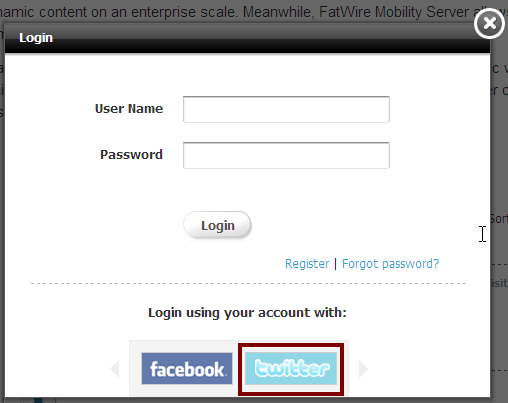
The Twitter login button is displayed (Figure 80-7) in the Community-Gadgets widget's Login screen on the web site on which the widget is deployed.
Note:
If your Community-Gadgets web application is running on Oracle WebLogic Server or Tomcat application server, then the procedures described in Section 80.3.1, "Create a Twitter Application for Community-Gadgets" and Section 80.3.2, "Configure Twitter Application Authentication Settings on Community-Gadgets" are all you require to integrate Community-Gadgets with Twitter. However, on a WebSphere Application Server instance, you must also perform the export/import procedures described in Section 80.7, "Enabling Social Networking Services on WebSphere Application Server" to enable communication between Community-Gadgets and this social networking service.
80.4 Integrating with Google
On a web site, visitors' Google identities are authenticated via a trusted bridge, which is established between the Community-Gadgets web application and Google at each login attempt. To enable this bridge, you must first create a Google application using the Community-Gadgets production site URL. Then, configure the Google authentication properties on the application server on the production system of the Community-Gadgets web application.
This section describes how to:
-
Section 80.4.1, "Create a Google Application for Community-Gadgets"
-
Section 80.4.2, "Configure Google Application Authentication Settings on Community-Gadgets"
80.4.1 Create a Google Application for Community-Gadgets
To create a Google application:
-
Open the Google APIs Console by signing in to the following URL:
https://code.google.com/apis/console
-
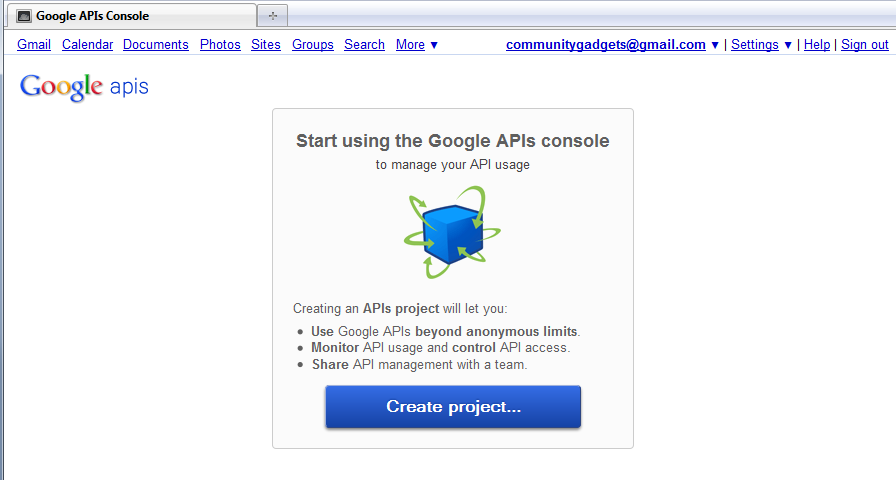
Click Create project.... as shown in Figure 80-8.
-
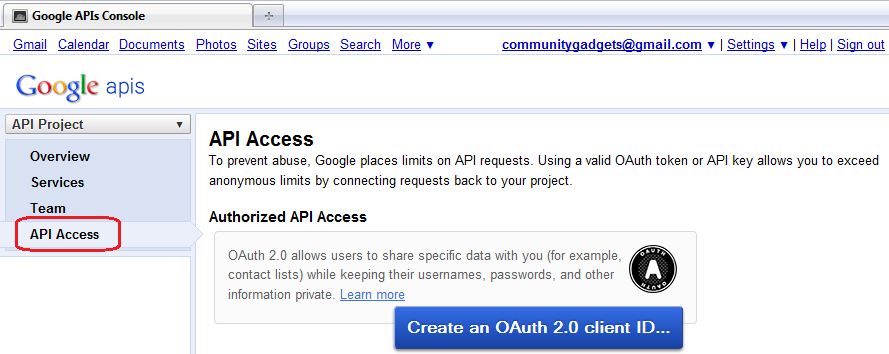
On the All Services page, on the left pane, click API Access, as shown in Figure 80-9.
-
To create an application, on the API Access page, click Create an OAuth 2.0 client ID (Figure 80-9) and do the following:
-
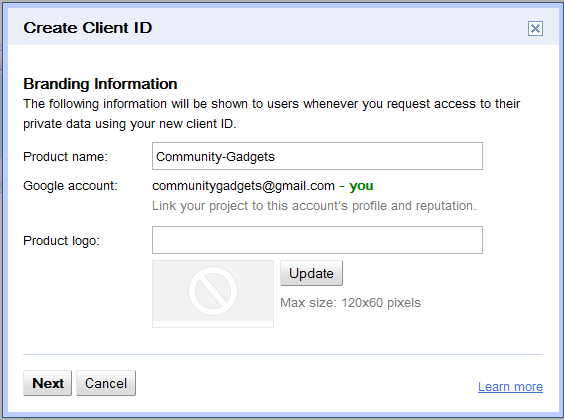
In the Create Client ID dialog box, in the Product name field, enter a meaningful name for your application. For example,
Community-Gadgets, as shown in Figure 80-10. -
Click Next.
-
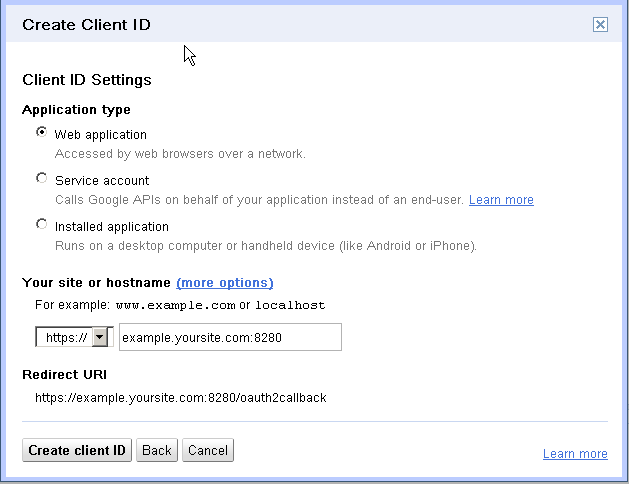
On the Client ID Settings screen, for Application type, choose Web application (Figure 80-11), if it is not selected by default.
-
Under Your site or hostname, enter the URL of your Community-Gadgets production server. For example,
example.yoursite.com:8280, as shown in Figure 80-11. -
Click Create client ID.
-
-
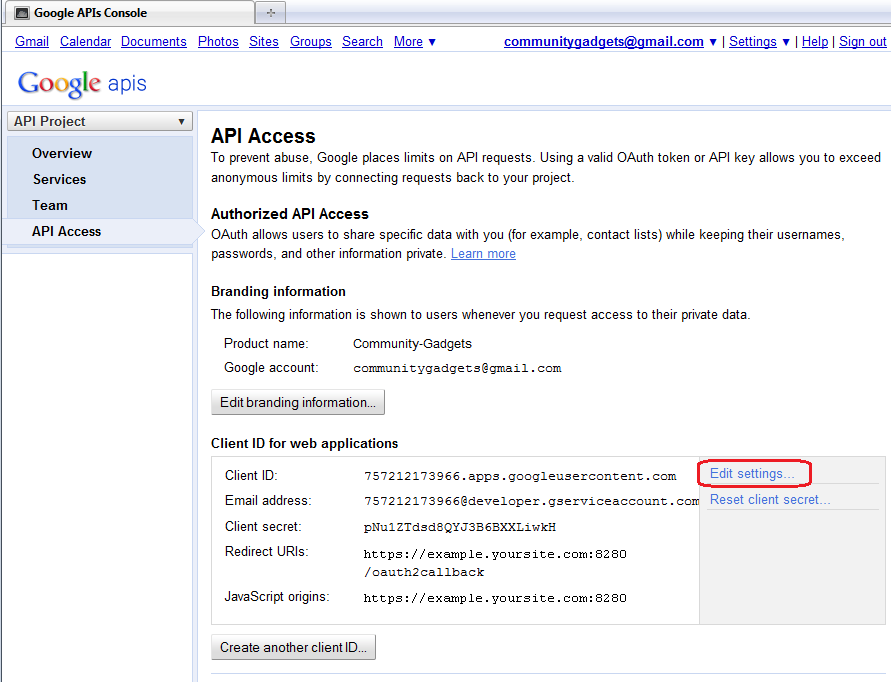
To generate client ID and client secret for your application, in the Client ID for web applications section, click Edit settings (Figure 80-12) and do the following:
-
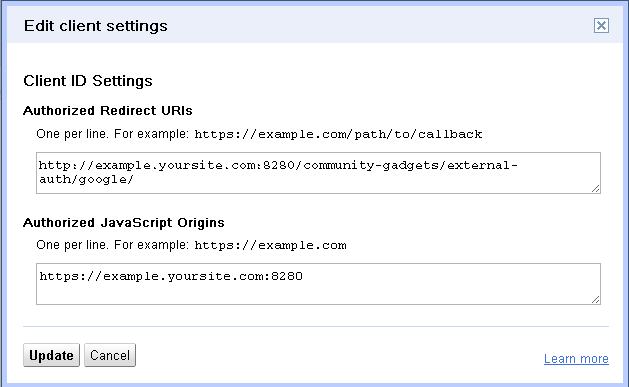
In the Edit client settings dialog box, in the Authorized JavaScript Origins field, enter
http://<cg_production_hostname>:<cg_production_port>/<context-root>/external-auth/google/. For example,http://example.yoursite.com:8280/community-gadgets/external-auth/google/, as shown in Figure 80-13. -
Click Update.
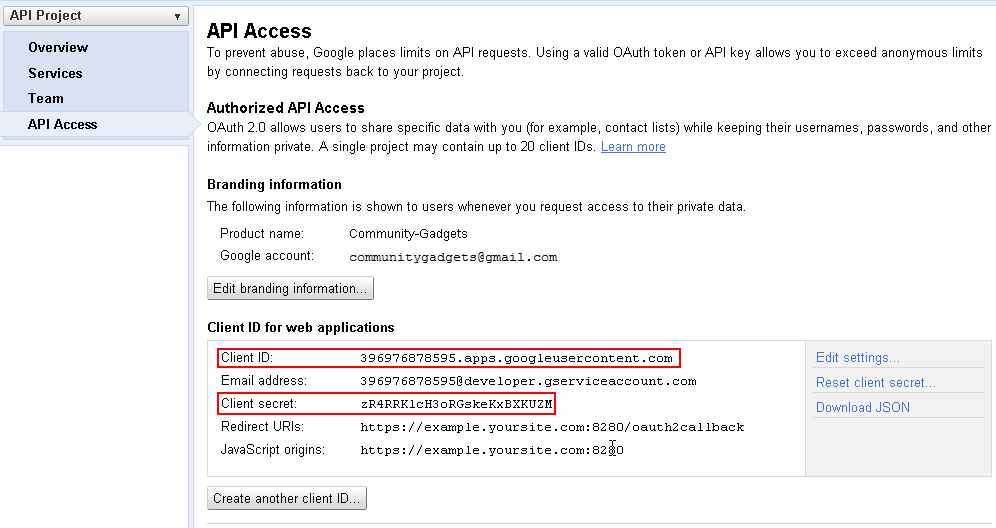
You will receive
Client IDandClient secretsimilar to those displayed in Figure 80-14 in your email.Figure 80-14 Client ID for Web Application
Description of "Figure 80-14 Client ID for Web Application"
These parameters are added to the
setup_auth.propertiesfile, as described in Section 80.4.2, "Configure Google Application Authentication Settings on Community-Gadgets."
-
80.4.2 Configure Google Application Authentication Settings on Community-Gadgets
To configure Google application authentication properties on the Community-Gadgets application server:
-
In the application server home on the production system, navigate to the standalone_node folders. Default location are:
<cg_install_dir>/deploy/management/management_node1and<cg_install_dir>/deploy/production/production_node1. -
Open the
setup_auth.propertiesfile, then scroll down to the Google Application Settings section. -
For
widgets.external_auth.google.attrs.client_idandwidgets.external_auth.google.attrs.client_secretconfiguration properties, enter the client ID and client secret values you copied at the time of creating the Google application.The Google Application Settings section should look like this:
## Google+ Application Settings
#######################################
#
# Google+ application id
#
widgets.external_auth.google.attrs.client_id= 757212173966.apps.googleusercontent.com
#
# Google+ application secret
#
widgets.external_auth.google.attrs.client_secret= pNu1ZTdsd8QYJ3B6BXXLiwkH
-
After saving the configuration file, restart the application server.
-
Open the Community interface or the Gadgets interface on the management side as a general administrator:
http://host:port/cs/login. -
Choose the desired site.
-
From the Login Bar menu, choose Configure.
-
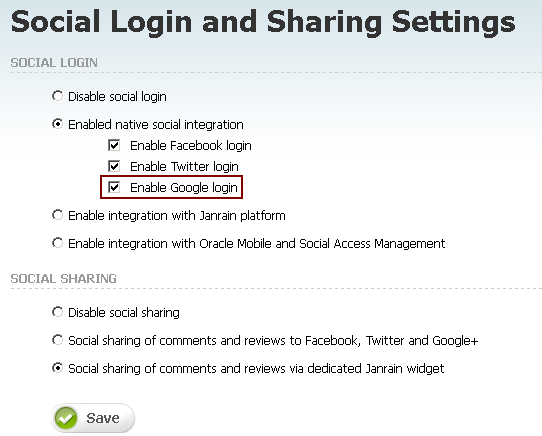
On the Social Login and Sharing Settings page, in the Social Login section, under Enabled native social integration, select the Enable Google login check box (Figure 80-15), then click Save.
-
Restart the management and production environments.
-
Access the web site on which the widget is deployed.
The Google login button is displayed in the Community-Gadgets widget's Login screen on the web site on which the widget is deployed.
Note:
If your Community-Gadgets web application is running on Oracle WebLogic Server or Tomcat application server, then the procedures described in Section 80.4.1, "Create a Google Application for Community-Gadgets" and Section 80.4.2, "Configure Google Application Authentication Settings on Community-Gadgets" are all you require to integrate Community-Gadgets with Google. However, on a WebSphere Application Server instance, you must also perform the export/import procedures described in Section 80.7, "Enabling Social Networking Services on WebSphere Application Server" to enable communication between Community-Gadgets and this social networking service.
80.5 Integrating with Janrain
The Community-Gadgets web application integrates with Janrain, and Janrain integrates with a number of third-party services. From this list of services, visitors can choose a service that they already use to log in to your site.
To configure Janrain support:
-
Create an account on Janrain's web site.
-
Configure Janrain Application Authentication Settings on Community-Gadgets.
80.5.1 Create a Janrain Application for Community-Gadgets
To perform the steps described in this section, you must have a Janrain account. Register your company on the Janrain web site by choosing the Enterprise subscription plan.
To create a Janrain application:
-
Go to
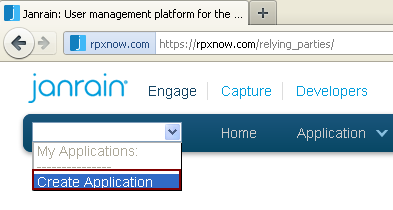
rpxnow.com, then from the drop-down list on the toolbar, as shown in Figure 80-16, select Create Application. -
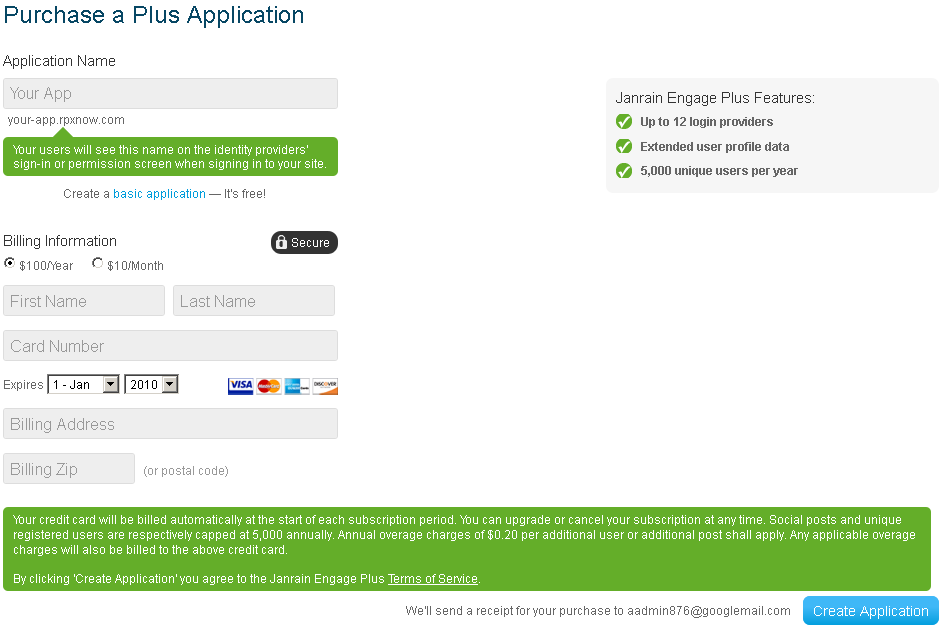
Fill in the required fields, then click Create Application.
-
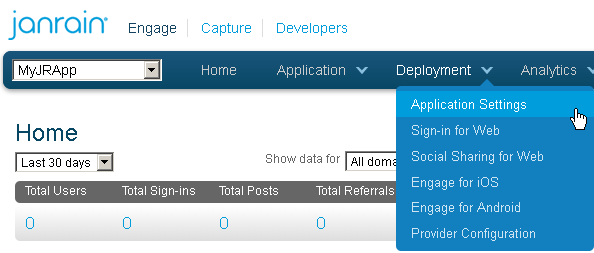
From the Deployment menu, choose Application Settings.
-
In the Application Info section, unique values for your newly created application are displayed under Application Domain, App ID, and API Key (Secret). Copy these values as you will need them when you configure Janrain support on the Community-Gadgets production server.
Figure 80-19 Required Application Parameters
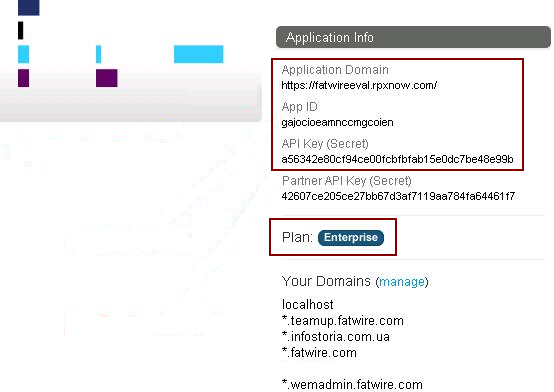
Description of "Figure 80-19 Required Application Parameters"
-
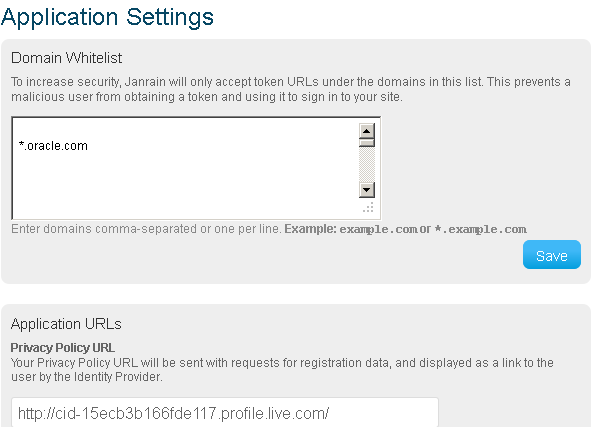
In the Domain Whitelist box, specify the web site domains on which the Community-Gadgets widgets will be deployed (Figure 80-20).
-
In this step, you will enable the identity providers to be listed on the web site on which Community-Gadgets widgets will be deployed. Therefore, visitors will be able to use one of their existing online identities to add comments and ratings on your web site content.
-
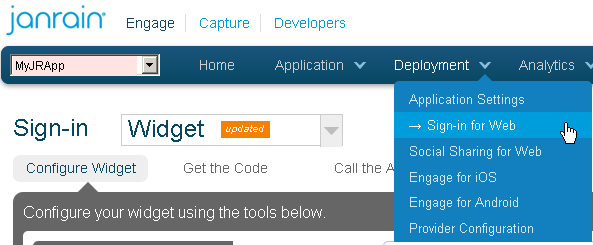
From the Deployment menu, choose Sign-in for Web.
-
Click the Choose Providers link, and drag each provider to Your Widget.
Figure 80-22 Configuration of Identity Providers
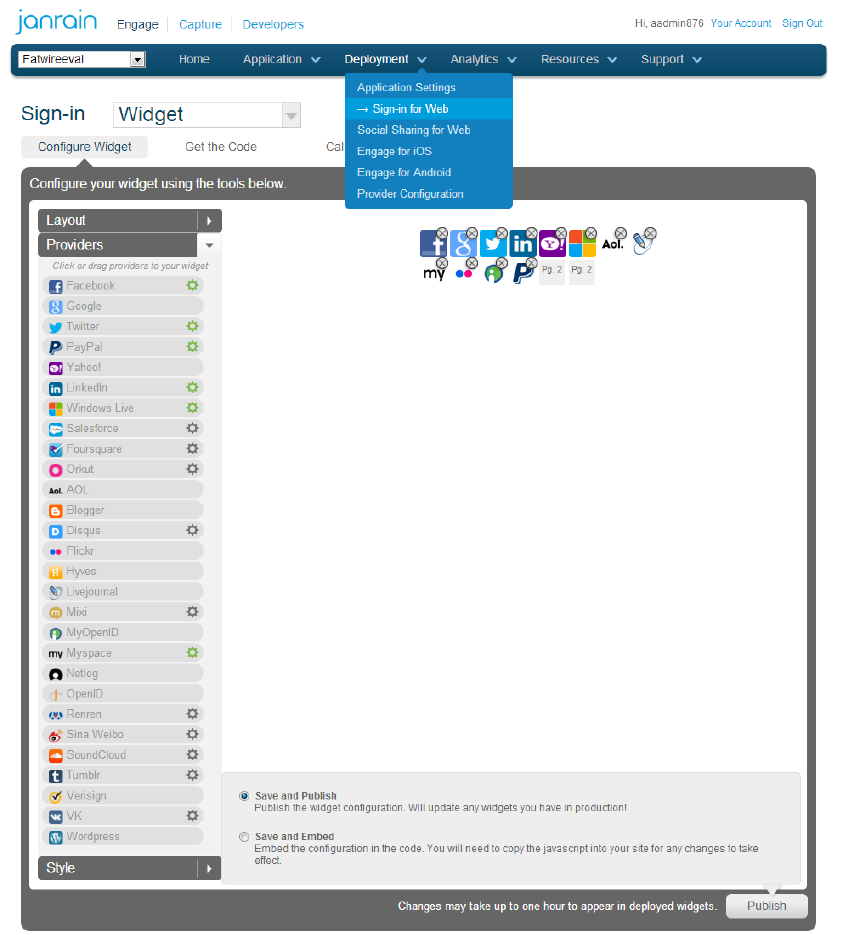
Description of "Figure 80-22 Configuration of Identity Providers"
-
-
Configuring identity providers will allow site visitors to choose a provider for which they already have login credentials. When an identity provider is enabled, its configuration wizard is displayed. For example, Figure 80-23 shows the configuration wizard for Google. Complete the configuration steps for each enabled provider.
Figure 80-23 Google Configuration via Janrain
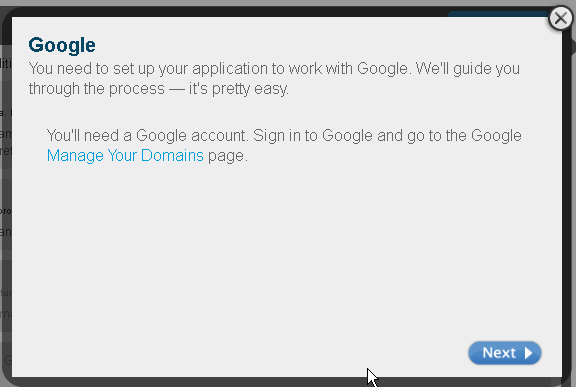
Description of "Figure 80-23 Google Configuration via Janrain"
-
Configure social sharing with Janrain. This step will enable your web site visitors to share selected content via their profiles on social networking sites. From the Deployment menu, choose Social Sharing for Web.
Figure 80-24 Configuration of Social Networking Services Providers
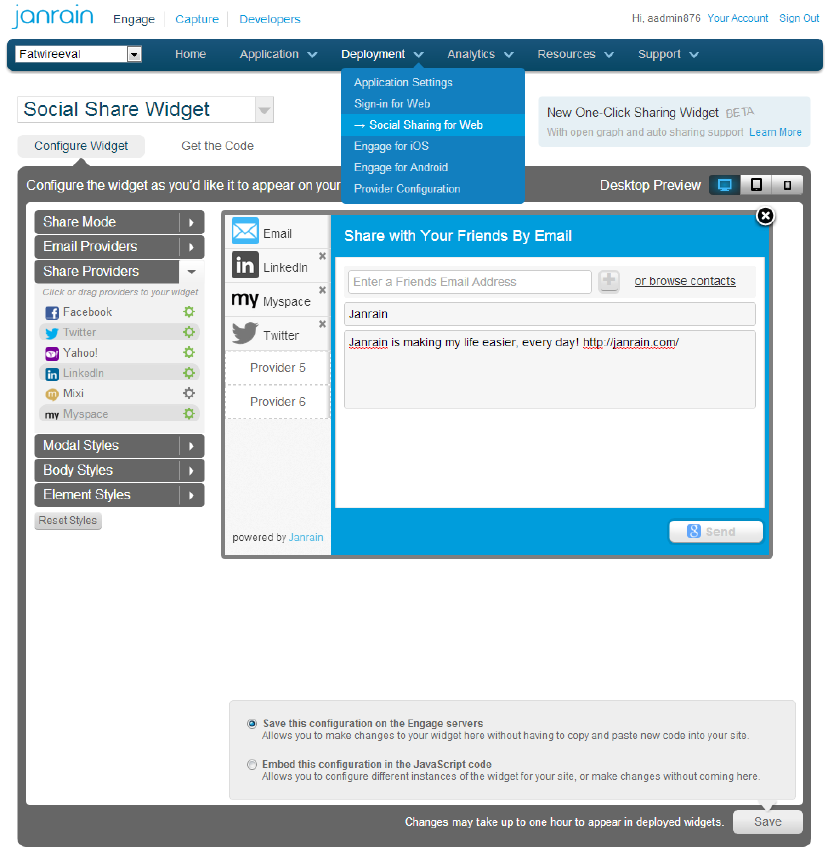
Description of "Figure 80-24 Configuration of Social Networking Services Providers"
80.5.2 Configure Janrain Application Authentication Settings on Community-Gadgets
After configuring the Janrain application, configure Janrain authentication settings on the production Community-Gadgets web application.
-
In the application server on the production system, navigate to the standalone_node folders. Default management and production locations are:
<cg_install_dir>/deploy/management/management_node1
<cg_install_dir>/deploy/production/production_node1
-
Open the
setup_auth.propertiesfile, then scroll down to the Janrain Application Settings section. -
Enable Janrain support by setting the
widgets.external_auth.janrain.attrs.enabledproperty totrue. -
For
widgets.external_auth.janrain.attrs.app_name,widgets.external_auth.janrain.attrs.app_id, andwidgets.external_auth.janrain.attrs.app_secretconfiguration properties, enter the application name, application domain, application ID, and API key you copied earlier.The Janrain Application Settings section should look like this:
## Janrain Application Settings
#######################################
#
# Enabling Janrain support
# Default is "false"
#
widgets.external_auth.janrain.attrs.enabled=true

#
# Jainrain application name
#
widgets.external_auth.janrain.attrs.app_name=fw

## Janrain application domain
# widgets.external_auth.janrain.attrs.app_domain=https://fw.rpxnow.com/

#
# Jainrain application id
#
widgets.external_auth.janrain.attrs.app_id=gajo1d134dfk3tgcoien

#
# Jainrain application secret
#
widgets.external_auth.janrain.attrs.app_secret=5asdf234jasdfk531
-
After saving the configuration file, restart the application server.
-
Open the Community interface or Gadgets interface, then go to Login Bar then Configure.
-
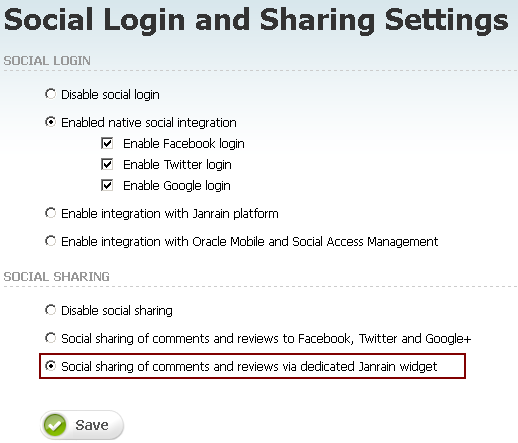
On the Social Login and Sharing Settings page, in the Social Sharing section, select the Social sharing of comments and reviews via dedicated Janrain widget option (Figure 80-25) if you configured the sharing option on the Janrain site, then click Save.
-
Restart the management and production environments.
-
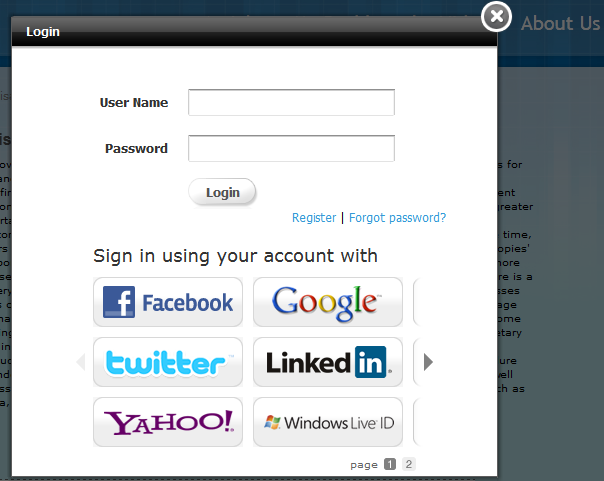
On the web site on which the Community-Gadgets widgets are deployed, verify that the configured identity providers are displayed in the Community-Gadgets widget's Login screen, as shown in Figure 80-26.
Figure 80-26 Login Screen with Identity Provider Links
Description of "Figure 80-26 Login Screen with Identity Provider Links"
Note:
If your Community-Gadgets web application is running on Oracle WebLogic Server or Tomcat application server, then the procedures described in Section 80.5.1, "Create a Janrain Application for Community-Gadgets" and Section 80.5.2, "Configure Janrain Application Authentication Settings on Community-Gadgets" are all you require to integrate Community-Gadgets with Janrain. However, on a WebSphere Application Server instance, you must also perform the export/import procedures described in Section 80.7, "Enabling Social Networking Services on WebSphere Application Server" to enable communication between Community-Gadgets and this social networking service.
80.6 Integrating with Oracle Internet Access Service
This section describes how to configure WebLogic Server to support Internet identity providers, then how to enable Mobile and Social service and define Internet identity providers and create for them a new Mobile and Social application profile, and finally, how to enable integration of OMSAS with Community-Gadgets for secure transactions through the configured identity providers.
This section includes the following topics:
-
Section 80.6.1, "Configuring WebLogic Server to Support Mobile and Social Identity Providers"
-
Section 80.6.3, "Defining Internet Identity Providers for OMSAS"
-
Section 80.6.4, "Creating a New Mobile and Social Application Profile"
-
Section 80.6.5, "Enabling the Integration of OMSAS with Community-Gadgets"
80.6.1 Configuring WebLogic Server to Support Mobile and Social Identity Providers
Before you can enable Mobile and Social service and configure identity providers on OAM, you must configure the OAM's WebLogic managed server instance for the required identity providers.
For information about configuring WebLogic Server for Facebook compatibility, see the section Troubleshooting Internet Identity Providers at http://docs.oracle.com/cd/E27559_01/admin.1112/e27239/oicconfiginetidentitysrvcs.htm#AIAAG8292
80.6.2 Enabling Mobile and Social Service on OAM
This section describes the procedure to enable Mobile and Social service on OAM so that in the next steps you can configure the required identity providers (such as Facebook, Twitter, and so on) with this service, as well as Community-Gadgets and the identity providers with OAM through an application profile.
To enable the Mobile and Social service on OAM:
-
Log in to the OAM Console application:
http://<weblogic_host>:<weblogic_admin_port>/oamconsole
-
On the System Configuration tab, expand the Available Services node.
-
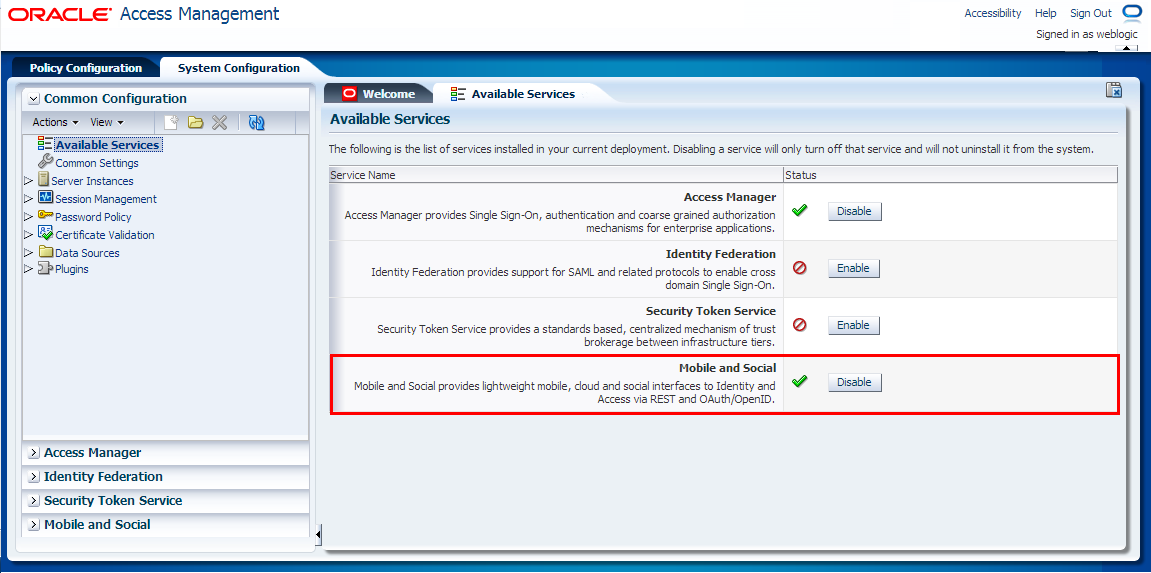
On the Available Services tab, click Enable for the Mobile and Social service.
In Figure 80-27, the Mobile and Social service has already been enabled, and therefore, the Disable option is displayed.
Figure 80-27 Mobile and Social Service Enabled
Description of "Figure 80-27 Mobile and Social Service Enabled"
80.6.3 Defining Internet Identity Providers for OMSAS
After enabling the Mobile and Social service on OAM, define the identity providers (such as Facebook, Twitter, LinkedIn, and so on) to be supported through this service. For information, see the section Defining Internet Identity Providers at http://docs.oracle.com/cd/E27559_01/admin.1112/e27239/oicconfiginetidentitysrvcs.htm#autoId5
80.6.4 Creating a New Mobile and Social Application Profile
The next step after defining Internet identity providers is to create a new Mobile and Social application profile for the production instance of Community-Gadgets. While creating this application profile, you will also enable the required identity providers to be supported by it.
You can create a new Mobile and Social Application profile in the following ways:
-
Section 80.6.4.1, "Create a Mobile and Social Application Profile using the OAM Console Application"
-
Section 80.6.4.2, "Create an Application Profile using WebLogic Scripting Tool (WLST) Script"
80.6.4.1 Create a Mobile and Social Application Profile using the OAM Console Application
To create the new application profile using the OAM Console:
-
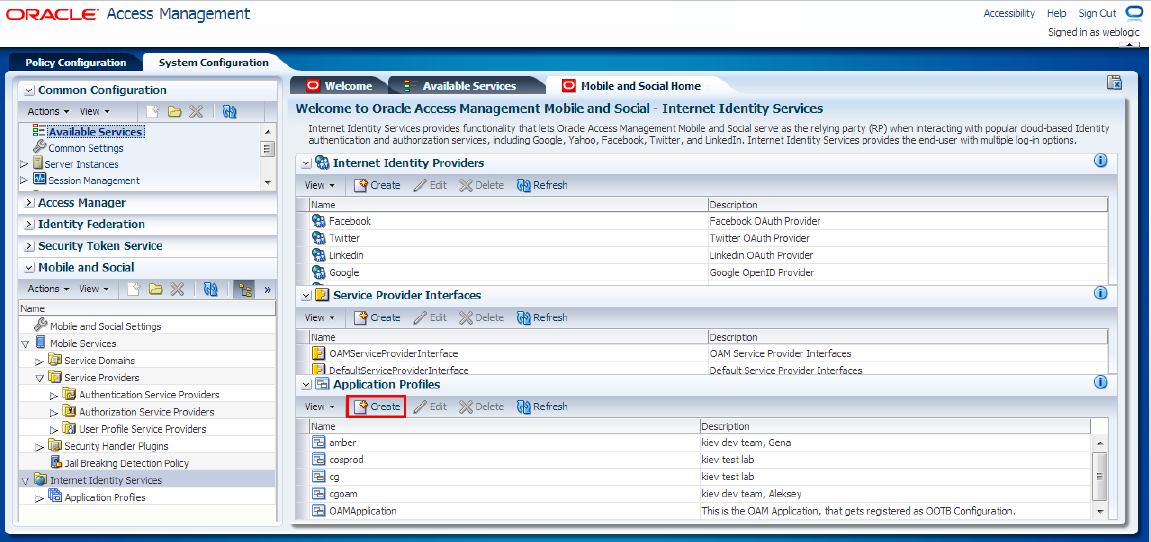
Log in to the OAM Console application, then click the System Configuration tab (Figure 80-28).
-
On the left pane, click Mobile and Social (Figure 80-28).
-
On the left pane, expand Internet Identity Services, then click Application Profiles (Figure 80-28).
-
On the Mobile and Social Home tab, under the Application Profiles section, click Create (Figure 80-28).
Figure 80-28 OAM - System Configuration - Mobile and Social
Description of "Figure 80-28 OAM - System Configuration - Mobile and Social"
-
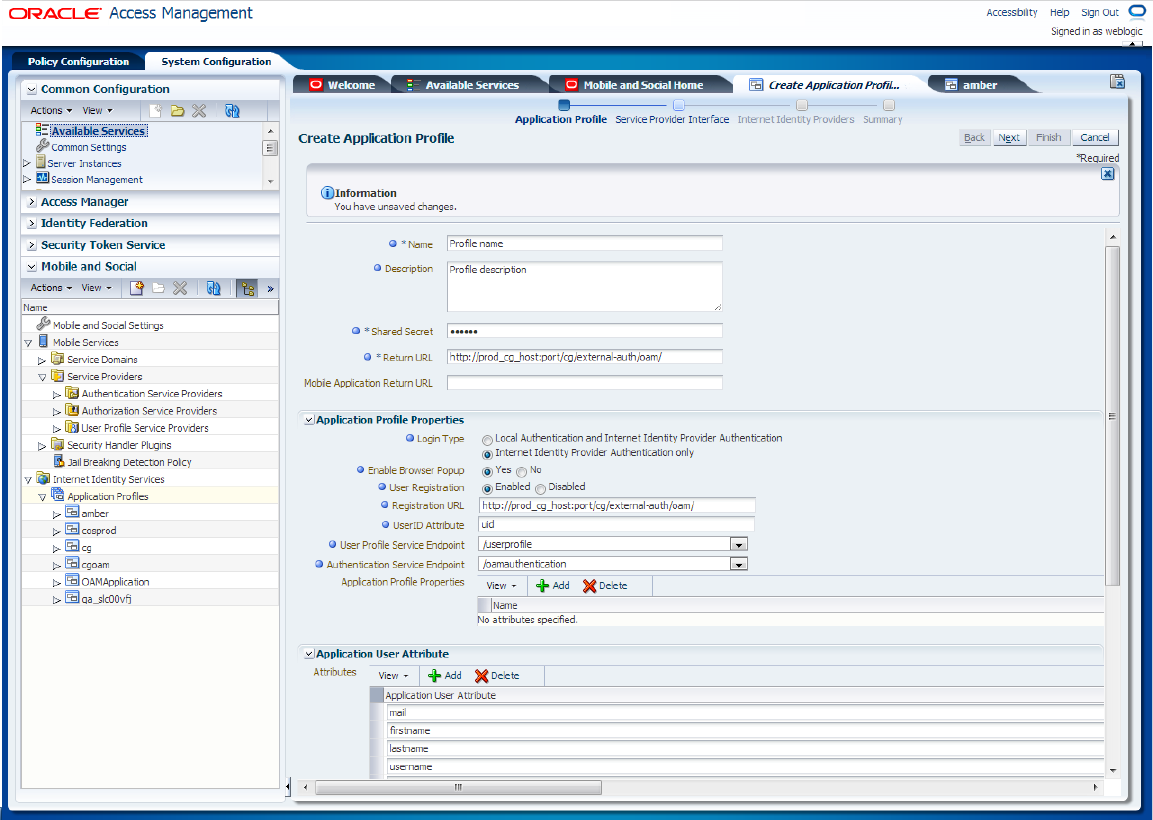
In the Create Application Profile form, on the Application Profile page, specify the required information, as shown in Figure 80-29 and as described in Table 80-1, then click Next.
Figure 80-29 Create Application Profile Form
Description of "Figure 80-29 Create Application Profile Form"
Table 80-1 Application Profile Form Fields
Field Name Description Name
Name of the new application profile.
Description
Description of the new application profile.
Shared Secret
Password for the application profile.
Return URL
URL that Mobile and Social should use to return authentication responses to web applications.
URL format:
<production_cg_protocol>://<production_cg_host>:<production_cg_port>/<production_cg_context>/external-auth/oamwhere:
-
<production_cg_protocol>: protocol used for Community-Gadgets production system. Can behttporhttps -
<production_cg_host>: host server of the production system -
<production_cg_port>: port of the production system -
<production_cg_context>: context root where application is deployed
Example:
http://prodcg.example.com:8080/cg/external-auth/oamMobile Application Return URL
URL that Mobile and Social should use to return authentication responses to mobile applications.
Application Profile Properties
Login Type
Local authentication is not supported. Therefore, select the Internet Identity Provider Authentication Only option.
Enable Browser Popup
For the login dialog box to pop up in a new window choose Yes.
User Registration
You must choose Enabled to create appropriate user account in Community-Gadgets.
Registration URL
URL that Mobile and Social should use to return authentication responses to web applications with credentials from the identity provider (For example, avatar, user name, and so on.)
URL format:
<production_cg_protocol>://<production_cg_host>:<production_cg_port>/<production_cg_context>/external-auth/oamToken description is described in previous entries.
UserID Attribute
Unique user attribute:
uid.User Profile Service Endpoint
It must be
/userprofile.Authentication Service Endpoint
It must be
/internetidentityauthentication.Application Profile Properties
Not required
Application User Attributes
Add user attributes such as
mail,firstname,lastname,username,image,user_id,displayname.Registration Service Details with Application User Attribute Mapping
Mapping of registration service attributes with user attribute display names
For example:
uid
Login ID
mail
Email ID
firstname
First Name
lastname
Last Name
displayname
Display Name
name
Common Name
jpegphoto
User Image
-
-
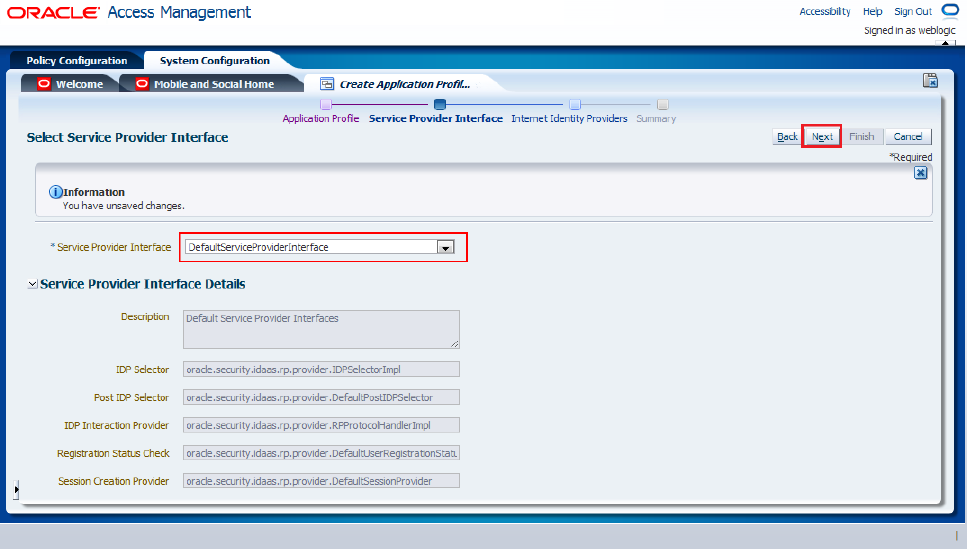
The Service Provider Interface page refers to the set of rules that govern the authentication flow for the specified application profile. Mobile and Social provides the following service provider interfaces (Figure 80-30):
-
DefaultServiceProviderInterface: provides support for web applications that run on Java-compliant application servers.
-
OAMServiceProviderInterface: provides support for web applications that run on the Access Manager service.
Choose the suitable option.
Figure 80-30 Selection of Service Provider Interface
Description of "Figure 80-30 Selection of Service Provider Interface"
-
-
Configure identity providers supported by this application profile, as follows, then click Next.
-
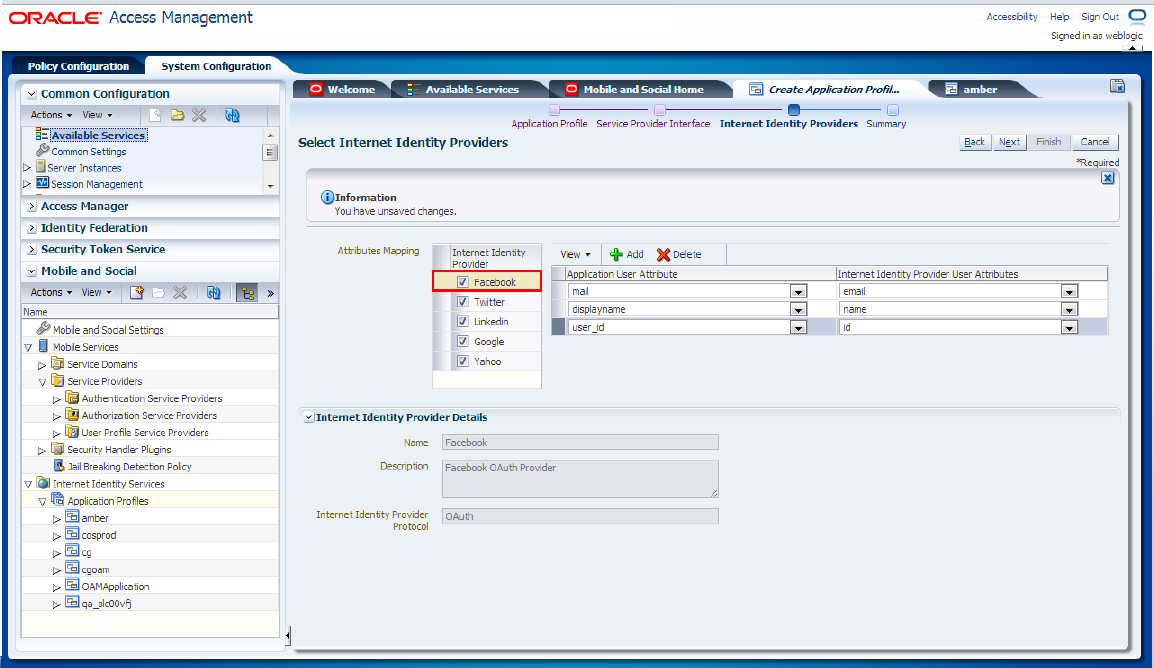
To configure the Facebook identity provider, select the Facebook check box in the Attribute Mapping section and specify the attributes of the application user and the Internet identity provider user, as shown in Figure 80-31.
Figure 80-31 Configuration of the Facebook Identity Provider
Description of "Figure 80-31 Configuration of the Facebook Identity Provider"
-
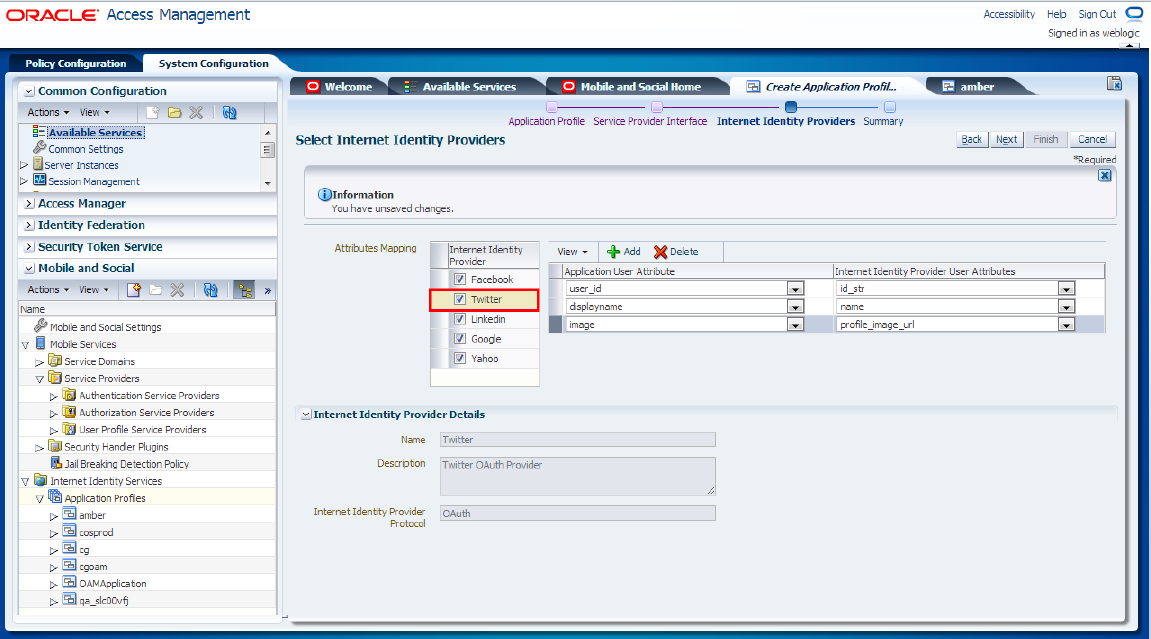
To configure the Twitter identity provider, select the Twitter check box in the Attribute Mapping section and specify the attributes of the application user and the Internet identity provider user, as shown in Figure 80-32.
Figure 80-32 Configuration of the Twitter Identity Provider
Description of "Figure 80-32 Configuration of the Twitter Identity Provider"
-
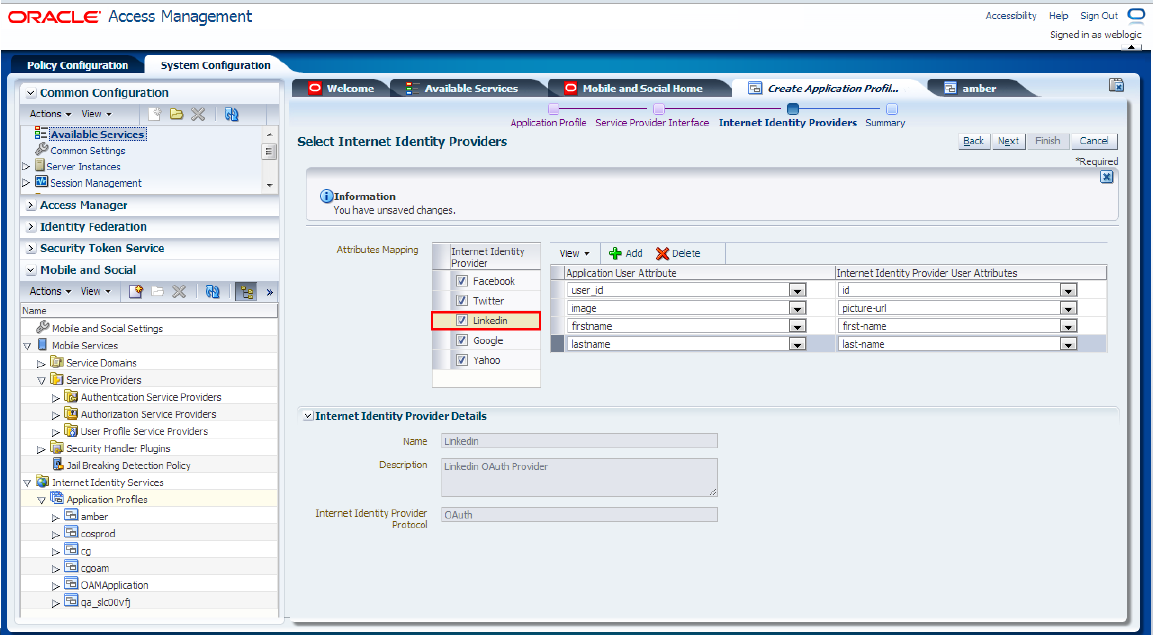
To configure the LinkedIn identity provider, select the LinkedIn check box in the Attribute Mapping section and specify the attributes of the application user and the Internet identity provider user, as shown in Figure 80-33.
Figure 80-33 Configuration of the LinkedIn Identify Provider
Description of "Figure 80-33 Configuration of the LinkedIn Identify Provider"
-
To configure the Google identity provider, select the Google check box in the Attribute Mapping section and specify the attributes of the application user and the Internet identity provider user, as shown in Figure 80-34.
Figure 80-34 Configuration of the Google Identity Provider
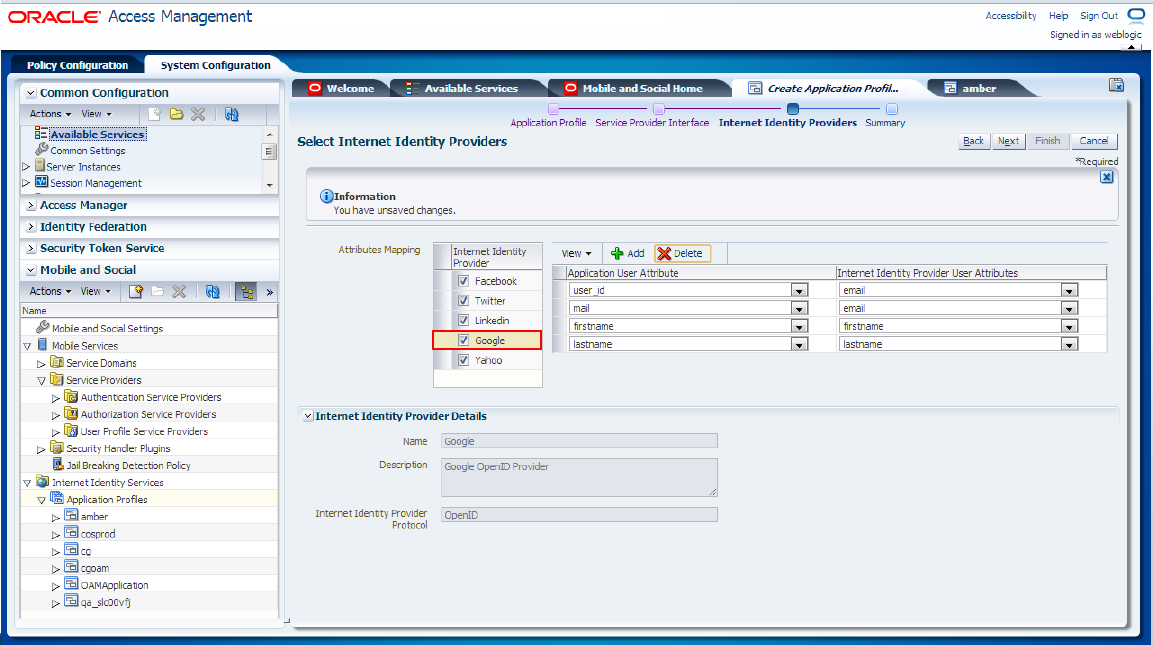
Description of "Figure 80-34 Configuration of the Google Identity Provider"
-
To configure the Yahoo identity provider, select the Yahoo check box in the Attribute Mapping section and specify the attributes of the application user and the Internet identity provider user, as shown in Figure 80-35.
Figure 80-35 Configuration of the Yahoo Identity Provider
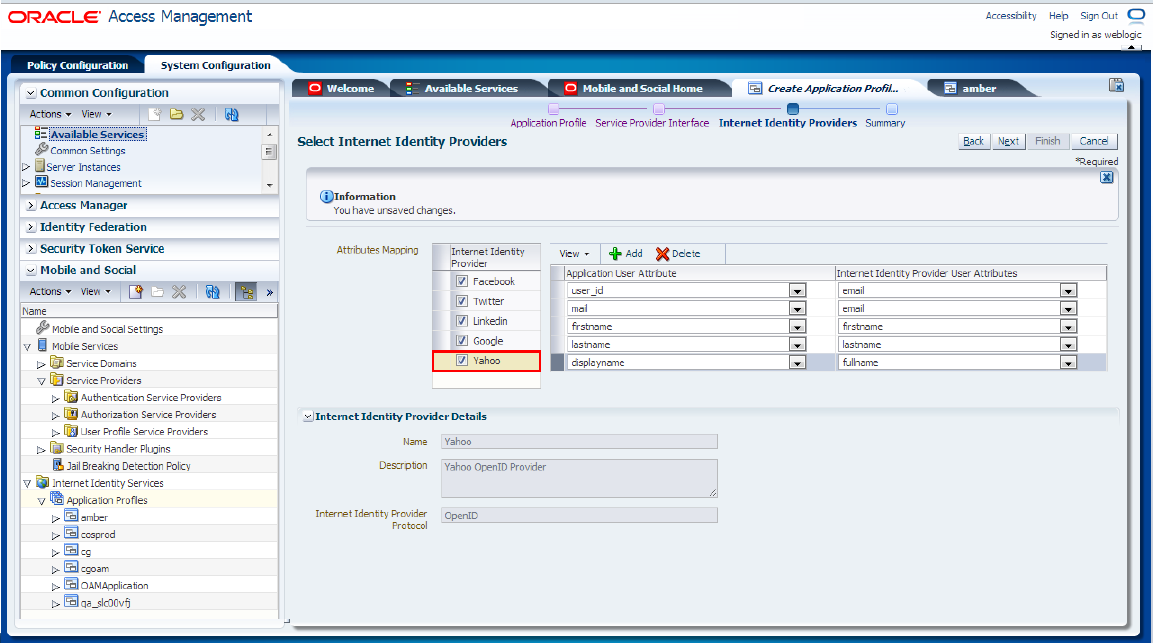
Description of "Figure 80-35 Configuration of the Yahoo Identity Provider"
-
-
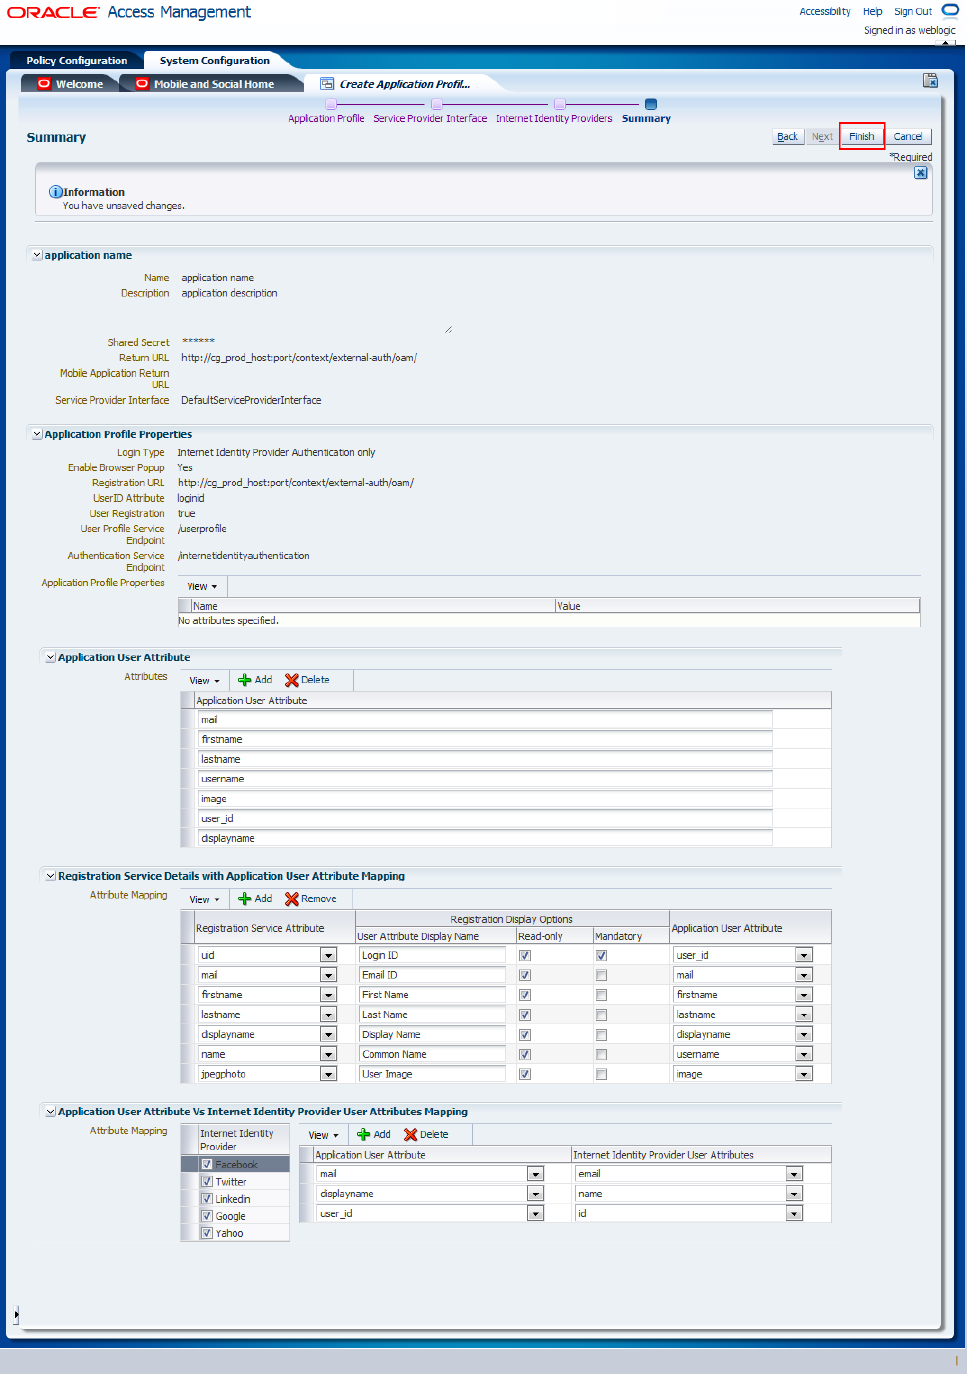
In the Summary page, on which all defined values are displayed (Figure 80-36), click Finish to complete creation process.
80.6.4.2 Create an Application Profile using WebLogic Scripting Tool (WLST) Script
To create a new application profile using WLST:
-
Launch WLST. For detailed steps, see the Oracle Fusion Middleware Oracle WebLogic Scripting Tool.
-
To connect to the WebLogic Server managed server on which OAM is running, run the
connect();command. -
To connect to the root of the domain-wide runtime management objects, run the
domainRuntime()command. -
Replace tokens in the following script and launch it. Table 80-2 describes these tokens and Example 80-1 includes is a sample script.
createRPApplication('Facebook,Twitter,Linkedin,Google,Yahoo',
   '<application_profile_shared_secret>',
   '<production_cg_protocol>://<production_cg_host>:<production_cg_
    port>/<production_cg_context>/external-auth/oam/',
   'DefaultServiceProviderInterface',
   '[{app.logintype:idp},
   {app.login.popup:true},
   {app.user.registration.enabled:true},
   {app.registration.url: "<production_cg_protocol>://<production_cg_
   host>:<production_cg_port>/<production_cg_context>/external-auth/oam/"},
   {app.userid.attribute.name:uid},
   {idaas.rest.crudservice:"/userprofile"},
   {idaas.rest.tokenservice:"/internetidentityauthentication"},
   {app.user.provisioning.mapping:"uid:Login ID:user_id:true:true;mail:Email
   ID:mail:true:false;firstname:First Name:firstname:true:false;lastname:Last
   Name:lastname:true:false;displayname:Display
   Name:displayname:true:false;name:Common
   Name:username:true:false;jpegphoto:User Image:image:true:false;"}]',
   '[{Facebook:[{user_id:id},{mail:email},{displayname:name}]},
   {Twitter:[{user_id:id_str},{displayname:name},{image:profile_image_url}]},
   {Linkedin:[{user_
   id:id},{image:picture-url},{firstname:first-name},{lastname:last-name}]},
   {Google:[{user_
   id:email},{mail:email},{firstname:firstname},{lastname:lastname}]},
   {Yahoo:[{user_
   id:email},{mail:email},{firstname:firstname},{lastname:lastname},
   {displayname:fullname}]}]',
   '[{user_id:uid},{mail:mail},{firstname:firstname},{lastname:lastname},
   {displayname:displayname},
   {username:name},{image:jpegphoto}]', '',
   '<mobile_and_social_application_profile_name>',
   '<mobile_and_social_application_profile_description>');
Table 80-2 Descriptions and Examples of Tokens
| Token | Description | Example |
|---|---|---|
|
|
OAM application profile shared secret |
password |
|
|
Host of the Community-Gadgets application server |
prodcg.example.com |
|
|
Port of the Community-Gadgets application server |
8080 |
|
|
Context root of the Community-Gadgets application server |
cg |
|
|
Name of the OAM application profile |
Community-Gadgets profile |
|
|
Description of the OAM application profile |
Description of the Community-Gadgets profile |
createRPApplication('Facebook,Twitter,Linkedin,Google,Yahoo', 'password',
     'http://prodcg.example.com:8080/cg/external-auth/oam/', 'DefaultServiceProviderInterface',
     '[{app.logintype:idp}, {app.login.popup:true},
     {app.user.registration.enabled:true}, {app.registration.url:
     "http://prodcg.example.com:8080/cg/external-auth/oam/"}, {
      app.userid.attribute.name:uid},
     {idaas.rest.crudservice:"/userprofile"},
     {idaas.rest.tokenservice:"/internetidentityauthentication"},
     {app.user.provisioning.mapping:"uid:Login ID:user_id:true:true;mail:Email
     ID:mail:true:false;firstname:First Name:firstname:true:false;lastname:Last
     Name:lastname:true:false;displayname:Display
     Name:displayname:true:false;name:Common
     Name:username:true:false;jpegphoto:User Image:image:true:false;"}]',
     '[{Facebook:[{user_id:id}, {mail:email}, {displayname:name}]},
     {Twitter:[{user_id:id_str}, {displayname:name}, {image:profile_image_url}]},
     {Linkedin:[{user_id:id}, {image:picture-url}, {firstname:first-name},
     {lastname:last-name}]}, {Google:[{user_id:email}, {mail:email},
     {firstname:firstname}, {lastname:lastname}]}, {Yahoo:[{user_id:email},
     {mail:email}, {firstname:firstname}, {lastname:lastname},
     {displayname:fullname}]}]', '[{user_id:uid}, {mail:mail},
     {firstname:firstname}, {lastname:lastname}, {displayname:displayname},
     {username:name}, {image:jpegphoto}]', '', 'Community Gadgets profile',
     'Community Gadgets profile description');
To complete the integration process, perform the steps described in Section 80.6.5, "Enabling the Integration of OMSAS with Community-Gadgets."
80.6.5 Enabling the Integration of OMSAS with Community-Gadgets
The last step after defining Internet identity providers for the Mobile and Social service and creating a Mobile and Social application profile for the Community-Gadgets application is to enable the integration of OMSAS with Community-Gadgets.
In the Community-Gadgets instance on the production system:
-
Navigate to the
<cg_install_dir>/deploy/production/production_node1folder (or the folder you created during installation. See the Oracle Fusion Middleware WebCenter Sites Installation Guide for details). -
Open the
setup_auth.propertiesfile and modify OAM - Social Settings section as follows:-
Enable Mobile and Social support by set the
widgets.external_auth.oam.attrs.enabledparameter to true:## OAM - Social Settings ####################################### # # Enabling OAM - Social support # Default is "false" # widgets.external_auth.oam.attrs.enabled=true
-
Specify the OAM managed server URL in the
widgets.external_auth.oam.attrs.hosturlparameter:## OAM - Social server URL widgets.external_auth.oam.attrs.hosturl=<oam_protocol>://<oam_host>: <oam_port>
-
Specify the OMSAS application profile name in the
widgets.external_auth.oam.attrs.application_nameparameter:# OAM - Social application name # widgets.external_auth.oam.attrs.application_name=<mobile_and_social_application_profile_name>
-
Specify the OMSAS application profile secret in the
widgets.external_auth.oam.attrs.sharedsecretparameter:# OAM - Social application shared secret # widgets.external_auth.oam.attrs.sharedsecret=<application_profile_shared_secret>
-
Save the file.
-
-
Restart Community-Gadgets.
-
Open the Community interface or the Gadgets interface with the credentials of a general administrator.
-
From the Login Bar menu, choose the Configure option.
-
On the Social Login and Sharing Settings screen, choose the Enable integration with Oracle Mobile and Social Access Management option, as shown in Figure 80-37.
Figure 80-37 Social Login and Sharing Settings - Oracle Mobile and Social Access Management
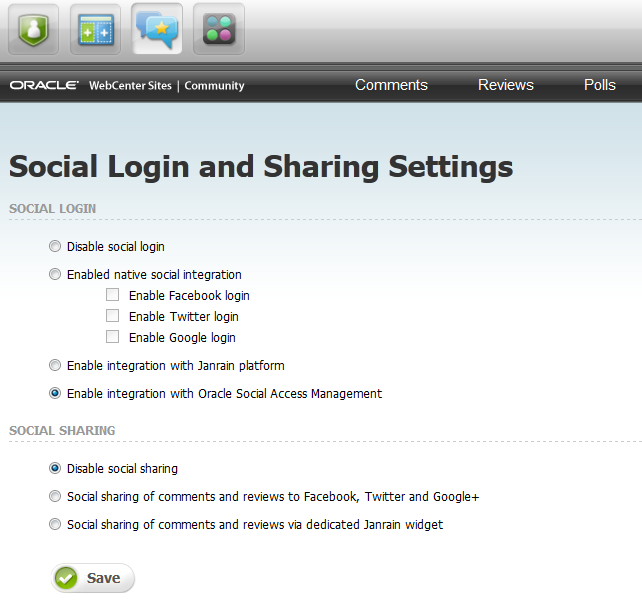
Description of "Figure 80-37 Social Login and Sharing Settings - Oracle Mobile and Social Access Management"
-
Click Save to apply this setting.
-
80.7 Enabling Social Networking Services on WebSphere Application Server
If you integrated the Community-Gadgets web application with Facebook, Twitter, Google, or Janrain on a WAS instance, then you must also perform the procedures described in this section to enable communication between Community-Gadgets and these social networking sites.
This section includes the following:
80.7.1 Export Security Certificate
If you enabled native social integration and the login option in your Community-Gadgets web application (for reference, see Figure 80-25), then export the application certificates as you will need them to enable integration on WebSphere.
Tip:
The native login can be disabled via the Community interface and Gadgets interface by selecting Login Bar then Configure and choosing the Disable social login option. If you disable this feature, then the Login screen displayed on the web site will require visitors' local credentials (as used on the web site).
-
To get the security certificates, open a provider's URL (see Table 80-3) in FireFox browser. For example:
https://developers.facebook.com/docs/reference/apiProvider URL Facebook
Twitter
Janrain
Google
-
From the Tools menu, choose Page Info.
-
On the Security tab, click View Certificate (Figure 80-38) to display the Certificate Viewer dialog box.
Figure 80-38 Facebook Security Certificate
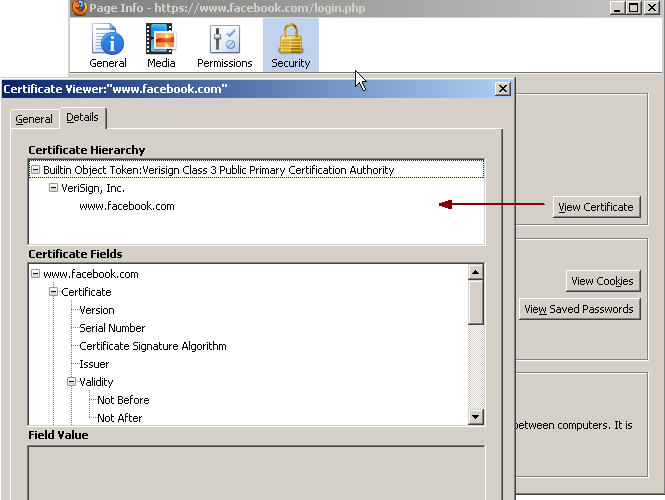
Description of "Figure 80-38 Facebook Security Certificate"
-
Choose the lowermost node.
-
From the Save in drop-down list, choose a directory in which you want to save this certificate.
-
In the Save Certificate to File dialog box, from the Save as type field, choose X.509 Certificate (DER).
-
Repeat steps 5 through 8 for the parent of the lowermost node.
Note:
Facebook additionally requires the
Entrust.netsecure server certificate, which you can download from your Internet Explorer by choosing Internet Options, then selecting Content, then Certificates, and thenEntrust.net Secure Server Certification Authority. -
Repeat steps 3 through 9 for each Provider URL from Table 80-3.
80.7.2 Import Security Certificates into WebSphere
To import security certificates into WebSphere:
-
Log in to the WAS administrative console.
-
Expand Security, then click SSL certificate and key management.
-
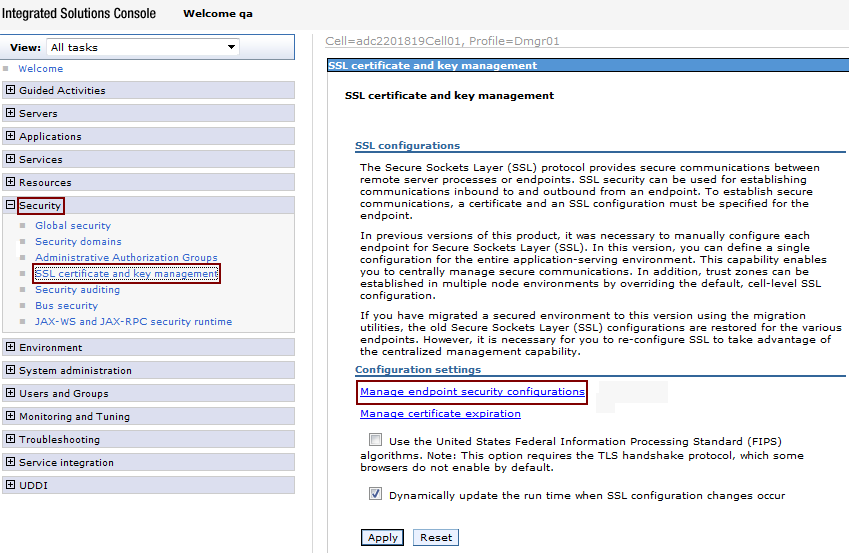
Under Configuration settings, click Manage endpoint security configurations, as shown in Figure 80-39.
-
Under the Local Topology tab, expand Outbound, then select the appropriate outbound configuration to get to the (cell).
-
Under Related Items on the right side, click Key stores and certificates.
-
Under Preferences, select the CellDefaultTrustStore key store, as shown in Figure 80-40.
Figure 80-40 Preferences: CellDefaultTrustStore
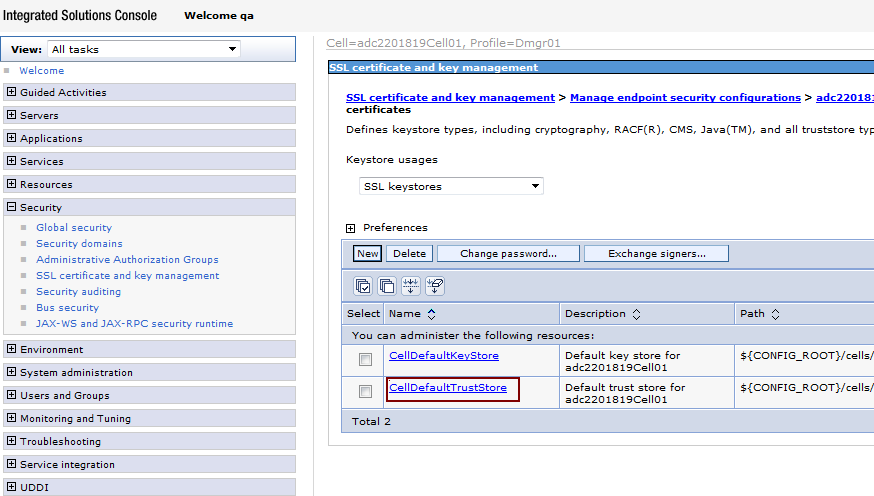
Description of "Figure 80-40 Preferences: CellDefaultTrustStore"
-
Under Additional Properties on the right side, click Signer certificates.
-
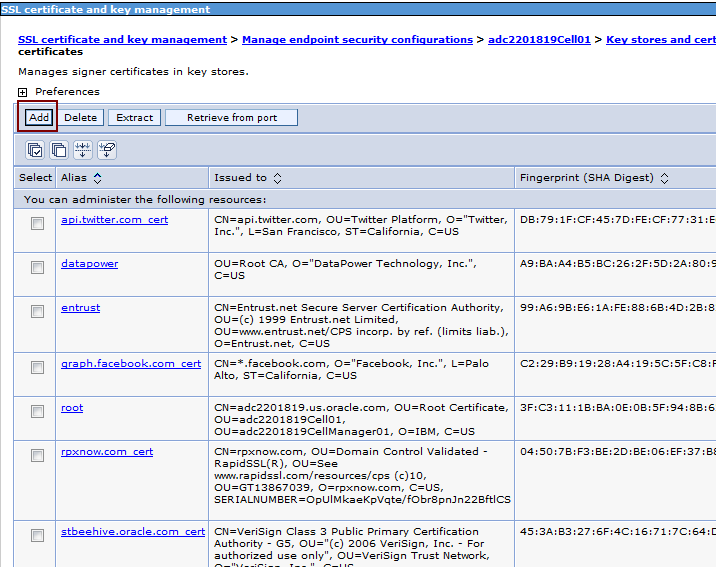
Under Preferences, click Add (Figure 80-41).
-
In the Alias field, enter the URL names depending on the certificates you are adding, as shown in Figure 80-42. For example,
graph.facebook.com_cert,api.twitter.com_ cert, orrpxnow.com_cert. -
In the File name field, enter the path to the saved certificates, as shown in Figure 80-42.
-
From Data type, choose Binary DER data, as shown in Figure 80-42.
Figure 80-42 SSL Certificate and Key Management: Data Type
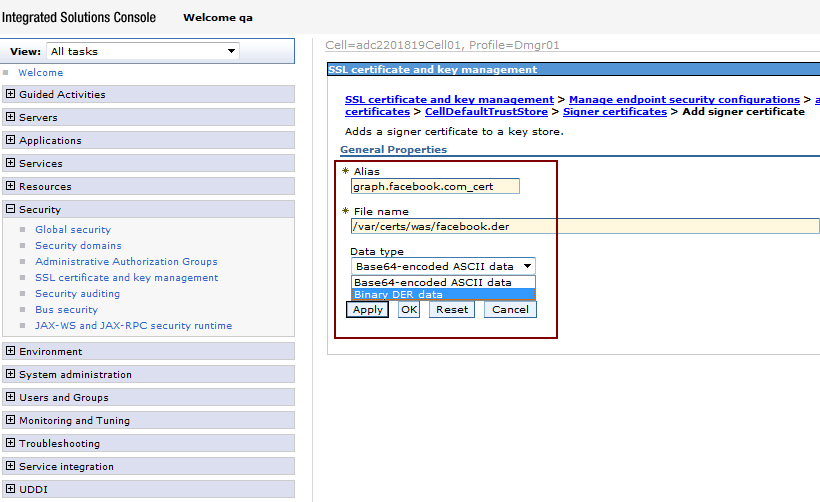
Description of "Figure 80-42 SSL Certificate and Key Management: Data Type"
-
Click Apply.
