20 Creating Promotions with Engage
Promotions are assets that offer some type of value or discount to your site visitors based on the products the visitors are buying and the segments they qualify for.
This chapter describes how promotions work and how to create them. It contains the following sections:
20.1 About Promotions
Promotions offer some type of value to your site visitors and customers based on the segments the visitors belong to and products that they buy or view. This value can be offered in several ways:
-
A discount off the purchase price of the promoted products.
-
A discount off the entire value of the shopping cart.
-
A discount off shipping charges.
-
A combination discount: a shipping discount with a price or cart discount.
You (the marketers) define your promotions by using the following criteria:
-
The segment members who qualify for the promotion. Promotions can be offered to everyone or to visitors in selected segments.
-
The products to promote.
-
The value the customers receive when they purchase the promoted product.
-
The duration of the promotion.
-
The text or graphics (or both) that appear on the rendered site page that notifies visitors of the promotion.
-
The location of the notification. Promotions are displayed on the live (public) site pages by replacing the recommendation that would normally appear there.
20.1.1 About Promotions and Recommendations
Recommendation assets are the delivery mechanism for all promotional content. When you create a promotion asset, you determine where you want the promotion to be displayed by selecting a Recommendation asset. The promotion replaces, or overrides, the recommendation and uses the template assigned to that recommendation to render the promotion in place of the recommendation that would normally be displayed.
Consequently, when Engage calculates the recommendation that a template asks for, it automatically checks whether there are any promotions that should override the recommendation. If so, it passes the promotion back to the recommendation's template and the template displays the promotion instead.
20.1.2 When Promotions Overlap
More than one promotion can use the same recommendation. What happens, then, when a visitor qualifies for more than one promotion and those promotions are using the same recommendation? It is easiest to explain with an example:
Example: Overlapping Promotions
There are two promotions running and both override the same recommendation:
Table 20-1 End Of Summer Sale Promotion
|
Name: |
End-of-Summer Sale |
|---|---|
|
Discount: |
10% off the entire contents of the visitor's shopping cart |
|
Segments it applies to: |
All segments |
Table 20-2 Printer Sale Promotion
|
Name: |
Printer Sale |
|---|---|
|
Discount: |
30% off all printers |
|
Segments it applies to: |
1) Home Office Worker 2) Back to School |
Note:
Promotions do not have segment ratings. Either the promotion applies to the segment or it doesn't.
Question: How does Engage decide which promotion to display if the visitor is from either the Home Office Worker segment or the Back to School segment? And which discount is applied?
Answer: Engage randomly selects which promotion to display (each has a 50/50 chance) but it applies both discounts. However, applying both discounts does not mean that printers are discounted twice.
Examine the contents of this shopping cart:
Before Engage applies the discounts, it lists and compares the promotions for all the items in the cart:
Table 20-4 Applied Discounts for Promotions
| Item in Cart | Summer Sale | Printer Sale |
|---|---|---|
|
box of paper |
10% |
|
|
printer |
10% |
30% |
|
toner cartridge |
10% |
Engage then applies the largest discount to each item. Therefore, on the final bill, the box of paper and the toner cartridge are 10% off and the printer is 30% off (not 40%).
Question: Only one of the promotions was displayed: how do the shoppers understand the total on the invoices?
Answer: If you (the marketers) created the promotions correctly, you entered a meaningful description of the discount in the Engage discount forms. Those descriptions are printed on the invoice next to the discounted items.
20.2 Creating Promotions
Before you create your promotions, be sure that you complete the following tasks:
-
Ask your site developers for a list of all the recommendations in your system and a description of where each one is programmed to appear.
-
If you are creating promotions that apply to specific segments, you and the other marketers must create the segments.
This section contains the following topics:
20.2.1 Name and Define the Promotion
Note:
You can click Save as you progress through the sections of the Promotion form in this procedure to save the changes you have made up to and in that section.
-
Log in to WebCenter Sites, select the site you want to work with (FirstSite II in this example) and the icon for the WebCenter Sites Contributor interface.
-
In the menu bar, select Content, then select New, and then select New Promotion.
Note:
If New Promotion is not on the list, stop here. You do not have the permissions to create promotions. If you have questions about your permissions, contact your administrator.
If the administrator configured the asset type such that all new assets of that type are placed into workflow upon creation, a tab opens displaying the Choose Assignees form.
Select at least one user for each required role and click Set Assignees. Any of these users can complete the next step in the workflow process. For more information, see Chapter 16, "Workflow."
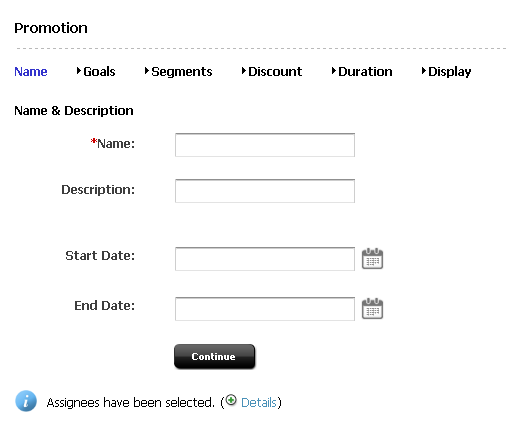
A tab opens displaying the Promotion asset's Create view. Notice the names of the form's sections near the top. The Name section of the form is displayed:
Note:
When creating or editing a Promotion asset, you can switch between the sections of the form by clicking the name of the section you want to switch to.
-
In the Name section, do the following:
-
Click in the Name field and enter a unique, descriptive name for the recommendation. You can enter up to 64 alphanumeric characters, including spaces. The first character must be a letter.
-
Click in the Description field and enter a brief description of the promotion. You can enter up to 128 alphanumeric characters.
-
In the Start Date and End Date fields, select a date range for the asset to display in Site Preview. For more information on Start/End dates, see Section 7.3.1, "About Start and End Dates."
-
Click Continue.
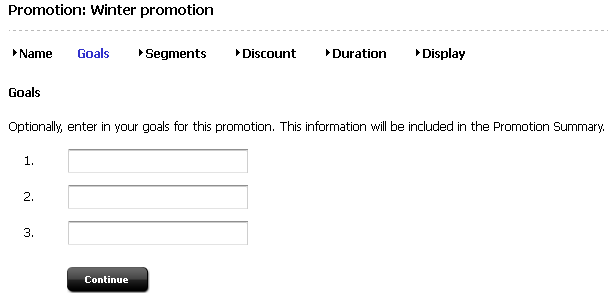
The tab displays the Goals section of the Promotion form, as shown in the next step.
-
Even though you can skip to any section of the Promotion form, be sure that you create your first promotions in the sequence that takes place when you use the Continue button. Remember that the information you enter on any form is not saved to the database until you save.
20.2.2 Define the Goals for the Promotion
A statement of goals is useful if your work is to be reviewed by others. Additionally, you might want to document why you designed the promotion a certain way after the promotion is complete.
In the Goals section of the Promotion form, do the following:
-
Click in the first Goal field and describe a goal.
-
Enter goals in the second and third Goal fields, as needed.
-
Click Continue.
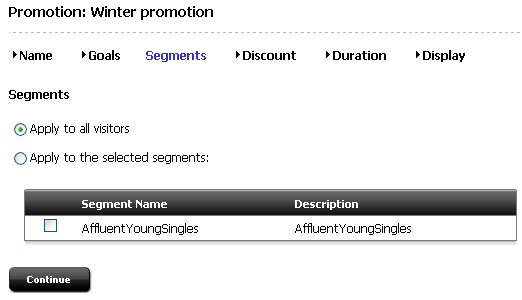
The tab displays the Segments section of the Promotions form, as shown in the next step.
20.2.3 Define Which Visitors Are Eligible for the Promotion
Use the Segments section of the Promotion form to select the visitors who are eligible for the promotion. If you do not make any selections on this form, all visitors to the site are eligible for the promotion.
-
To offer the promotion to all visitors to the site, select Apply to all visitors.
To restrict the promotion to visitors from certain segments, select Apply to selected segments and select the segments to whom you want to offer the promotion.
-
(Optional) If you need to create a new segment for the promotion, complete the following steps:
-
Create a new segment. For help with this step, see Section 18.3, "Creating Segments."
-
Click the Refresh icon in the tab displaying the promotion you are creating.
-
Repeat the first step in this procedure to include this segment in the promotion.
-
-
Click Continue.
The tab displays the Discount section of the Promotion form, as shown in the next step.
20.2.4 Define the Discount
Figure 20-4 Promotion Discount Definition
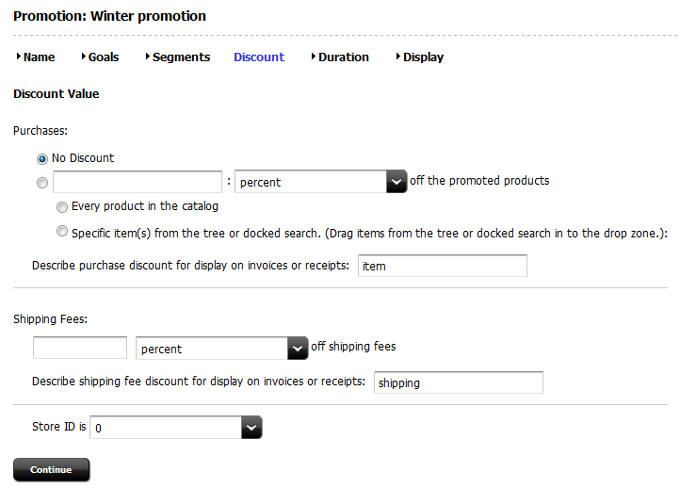
Description of "Figure 20-4 Promotion Discount Definition"
Note:
To configure the discount to be based on the current state of a visitor's shopping cart, create a segment based on the shopping cart. Then, select that segment for the promotion. For information about creating segments based on the shopping cart, see Section 18.3.4, "Step 4: Define the Segment with Shopping Cart Criteria."
To define the discount, use the following options:
You can combine either of the first two options with the third option, but you cannot combine the first two options.
20.2.4.1 Discounting the Entire Shopping Cart
In the Discount section of the Promotion form, do the following:
-
Select the second option under Purchases and then set the values that define the discount.
For example, to offer $5.00 off, set the values as follows:
Figure 20-5 Purchase Discount as a Fixed Value

Description of "Figure 20-5 Purchase Discount as a Fixed Value"
To offer 10% off, set the values as follows:
Figure 20-6 Purchase Discount as a Percentage

Description of "Figure 20-6 Purchase Discount as a Percentage"
-
Select Every product in the catalog.
-
Click in the Describe purchase discount text box and enter a meaningful description of the discount. The text that you enter in this field is displayed on the invoice or receipt next to the items that it applies to. Use it to describe to your visitors how their bill is calculated.
-
Either click Continue or go to Section 20.2.4.3, "Discounting the Shipping Costs."
20.2.4.2 Discounting Specific Products
In the Discount section of the Promotion form, do the following:
-
Select the second option under Purchases and then set the values that define the discount.
For example, to offer $5.00 off, set the values as follows:
Figure 20-7 Purchase Discount as a Fixed Value

Description of "Figure 20-7 Purchase Discount as a Fixed Value"
To offer 10% off, set the values as follows:
-
Select the products that the discount applies to:
Figure 20-8 Purchase Discount as a Percentage

Description of "Figure 20-8 Purchase Discount as a Percentage"
-
Select Specific item(s) from the tree or docked search.
-
Select the products or product categories from the Content Tree, My Work tree, or docked search results list, and drag and drop the selected items into the Drag Products Drop Zone.
-
-
Click in the text box and enter a meaningful description of the discount. The text that you enter in this field is displayed on the invoice or receipt next to the items that it applies to. Use it to describe to your visitors how their bill is calculated.
-
Either click Continue or go to the procedure Section 20.2.4.3, "Discounting the Shipping Costs."
20.2.4.3 Discounting the Shipping Costs
You can discount shipping in addition to, or instead of, discounting purchases. In the Discount section of the Promotion form, do the following:
-
Under Shipping Fees, set the values that define the discount.
For example, to offer 15% off shipping set the values as follows:
-
Click in the Describe shipping fee discount for display on invoices or receipts text box and enter a meaningful description of the discount. The text that you enter in this field is displayed on the invoice or receipt next to the items that it applies to. Use it to describe to your visitors how their bill is calculated. For example:
Figure 20-10 Promotion Shipping Description

Description of "Figure 20-10 Promotion Shipping Description"
-
Either click Continue or go to the procedure Section 20.2.4.3, "Discounting the Shipping Costs."
20.2.4.4 Specifying a Store
You can specify the discount to apply to a certain store, if you have multiple stores. In the Store ID section, select the store.
-
Under Store ID, set the values that define the store discount.
-
Click Continue.
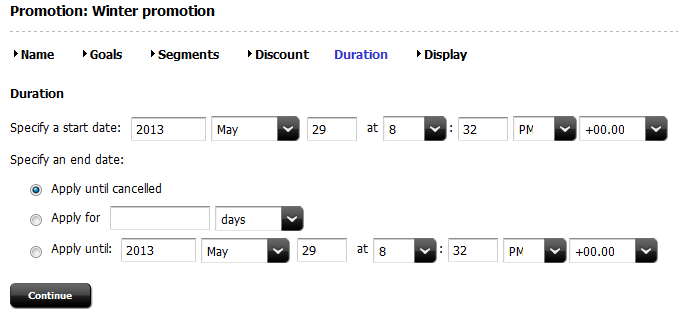
The tab displays the Duration section of the Promotion form, as shown in the next step.
20.2.5 Define the Promotion's Duration
Note:
If you do not specify how long the promotion should run, the promotion runs until you delete it.
In the Duration section of the Promotion form, do the following:
-
Specify when the promotion will end. Do one of the following:
If you want the promotion to run until you delete it or change its duration, select Apply until deleted. Use this option if you are designing an ongoing promotion with an indefinite duration. When you want to cancel it, you can either delete it or you can edit it and apply an end duration date.
If you want the promotion to run for a certain period of time after the start time that you specified in step 1, click Apply for. Enter a whole number (not a fraction or decimal) in the text box and choose hours, days, weeks, months, or years from the drop-down field.
If you want the promotion to run until a specific date, select Apply until and enter the date and time that you want it to end. The current date and time are displayed by default.
-
Click Continue.
The Display section of the Promotion form displays, as shown in the next step.
20.2.6 Advertise the Promotion on Your Site
Figure 20-13 Configuring Promotion as it Displays on SIte
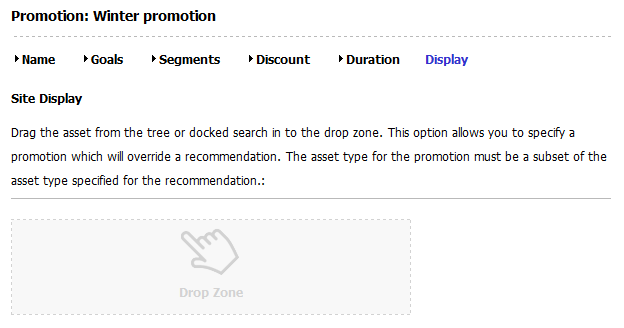
Description of "Figure 20-13 Configuring Promotion as it Displays on SIte"
In the Display section of the Promotion form, do the following:
-
Find the assets to be included in the recommendation and optionally bookmark them (which adds them to the Bookmarks node in the My Work tree):
-
In the Search field, enter the desired search criteria (if any) and click the magnifying glass button.
-
If you want to narrow your search down to a specific type of asset, in the Search field, click the down-arrow to render the Search Type drop-down box. Select the asset type to which you want to limit your search.
-
In the search results list, either drag and drop the results to the drop zone, or select (Ctrl+click) the assets you wish to bookmark.
For more information on searching for and bookmarking assets, see Chapter 6, "Finding and Organizing Assets."
-
-
If you selected to bookmark assets from the search results, drag and drop the asset that you want to use to advertise this promotion from the Bookmarks node into the Drop Zone. (Typically a promotional banner is stored as either an article or an image.)
If you chose to drag from the search results, the items are already placed.
Note:
If you select multiple assets, when the promotion is displayed on your site pages, Engage displays the content that was rated the highest for the segments that the visitor belongs to. In other words, if you are using this promotion for more than one segment, you can use segment-specific ad banners for the promotion.
Once placed in the Drop Zone, the items appear on a list in the form with a drop-down list box of recommendations next to each name. For example:
-
In the Pick recommendation field next to the first item, select the name of the recommendation that you want to replace or override with this item. (The recommendation provides the location for the text you selected in step 0)
-
Save the asset. Do one of the following:
-
In the asset's toolbar, click the Save icon.
-
In the menu bar, select Content, then select Save.
-
20.3 Sample Promotion Asset
When you work with the FirstSite II sample site, you get a sample promotion asset, SummerSale. This promotion is designed to work in concert with the sample Segment and Recommendation assets (also available from the FirstSite II sample site). Use the sample promotion as a template for creating promotion assets for your site.
20.4 Publishing Promotions
After you create a promotion, it must be approved before it can be published to your delivery system. The promotion takes effect only after it is published. Be sure to examine or inspect your promotion to verify that you configured it correctly before you approve it for publishing.
For more information about approving assets, see Chapter 14, "Approval for Publishing."
