26 Exploring Your Worklists
This chapter describes the features offered through worklists. Worklists can provide access to all assigned worklist items that are associated with the SOA server configured to this portal instance. Worklist notifications and alerts are displayed on a page in a portal or the Home portal, where you can view and act on all items in one place.
This chapter contains the following topics:
Permissions:
This chapter is intended for WebCenter Portal users interested in understanding and using worklist features to track their tasks, notifications, and alerts. The tasks described in this chapter are available to any WebCenter Portal user with access to a page that contains a worklist.
Note:
Tasks discussed in this chapter are not available if worklists are not exposed on a page. The portal moderator adds and configures worklists, as described in the "Adding Worklists to a Portal" section in Oracle Fusion Middleware Building Portals with Oracle WebCenter Portal.
26.1 About Worklists
Worklists is one of the ways you can access tasks, notifications, and alerts that require your attention. Note that you can be notified in other ways as well, for example, by email. If alerts and notifications are processed as worklist items for you, you can view them in the worklist view as the logged in user.
You can view and respond to all worklist items allocated to you (Figure 26-1).
If the worklist feature is configured in WebCenter Portal, then your portal moderator must add a worklist to a portal page or Home portal for you to see your portal membership notifications, invitations to join new portals, and so on. For more information, see the "Adding Worklists to a Portal" chapter in Oracle Fusion Middleware Building Portals with Oracle WebCenter Portal. If the Oracle BPM Worklist has been configured with the User Messaging Service's email driver to send notifications associated with BPM Workflows, then you may receive email notifications that you can act on.
You can view and respond to messages, alerts, and notifications from the automated processes in place in your organization. For more information, see Section 26.2.1, "Viewing and Responding to Worklist Items."
In WebCenter Portal, for example, one worklist item might be a request for portal membership. If you are selected as an approver for portal membership, a workflow item will be assigned to you and will appear on your worklist each time a user applies to become a member, which you can then accept or reject. This is just one example of the types of notifications and requests that can be posted on your worklist.
Another worklist item might be a notice of acceptance as a member of a portal. Response to such a notification would be to acknowledge that you have received it. These are two minor examples of a much wider range of possible messages, alerts, notifications, and responses.
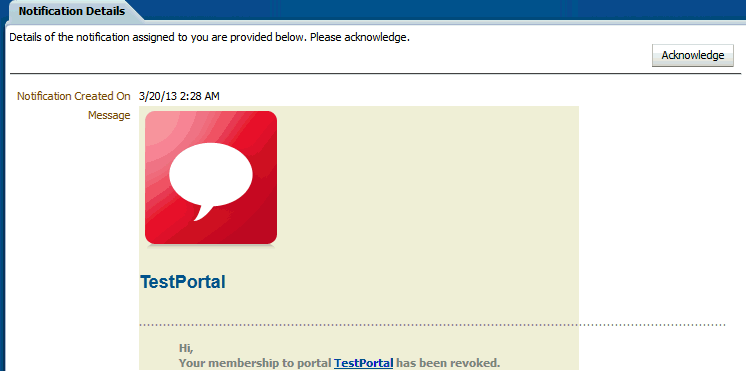
Figure 26-2 shows an example of a worklist notification that is to be acknowledged.
WebCenter Portal also has internally-defined workflows. An example of an internally-defined workflow includes the process of subscribing to a portal. A user requests a subscription. The request appears on the portal moderator's worklist. If the portal has multiple moderators, the first response to the worklist item is to claim ownership of the request, so that only one moderator responds to the request itself.
Messages, alerts, and notifications might also come from the User Messaging Service. The worklist includes a control for accessing messaging preferences on this server. Click the Messaging preferences icon (Figure 26-3) to display the User Messaging Preferences page in which you can specify the channels over which to receive User Messaging Service messages and define messaging filters.
Figure 26-3 Worklist Messaging Preferences Icon

Description of "Figure 26-3 Worklist Messaging Preferences Icon"
For information about setting messaging preferences for the User Messaging Service through WebCenter Portal, see the "Setting Messaging Preferences" section in Oracle Fusion Middleware Building Portals with Oracle WebCenter Portal.
To assist you in maintaining an organized view of your worklist items, the worklist provides a variety of display options, accessible from the worklist toolbar (Figure 26-4).
Worklist display options enable you to approach responding to messages, alerts, and notifications according to timeliness and relevance.
See Section 26.2.2, "Arranging Your Display of Worklist Items" for more information about worklist display options.
26.2 Working with Worklists
Worklists provide a fast and convenient way to read and respond to items that you need to act upon from the automated processes in place in your organization. All of the information on the worklist is specifically relevant to you.
This section provides information about using worklists. This section includes the following topics:
For information about setting messaging preferences for the User Messaging Service through WebCenter Portal, see the "Setting Messaging Preferences" section in Oracle Fusion Middleware Building Portals with Oracle WebCenter Portal.
26.2.1 Viewing and Responding to Worklist Items
To view a task, message, alert, or notification:
-
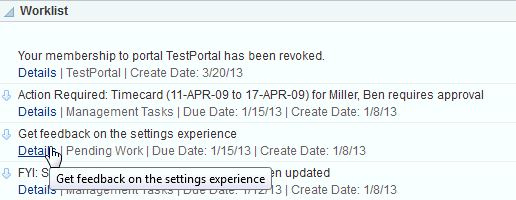
From a worklist, click the Details link (Figure 26-5) of the worklist item you want to view.
-
If not already logged in, log in to Oracle User Messaging Preferences.
-
View the details of the worklist item (Figure 26-6).
Figure 26-6 Sample Worklist Message Window
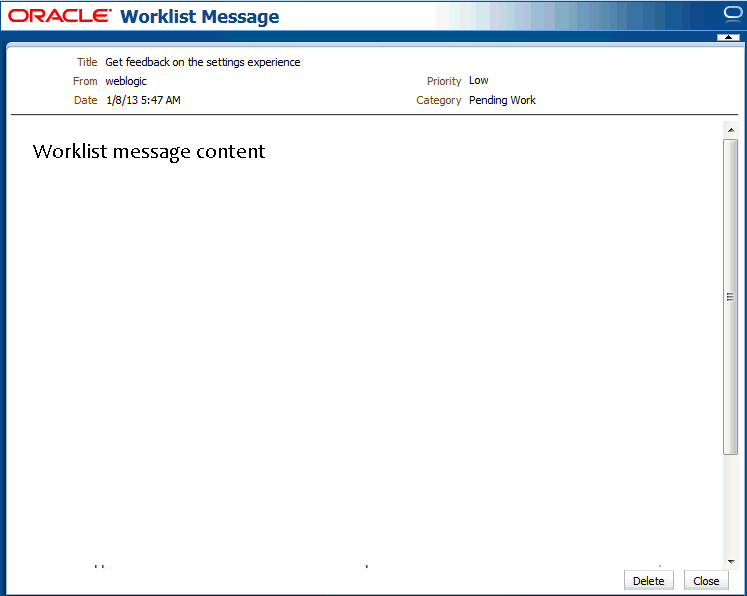
Description of "Figure 26-6 Sample Worklist Message Window"
-
Respond to the worklist item accordingly or click Close.
You might have the option to delete or acknowledge an item, depending on the type of notification. Any worklist item that is no longer of the
Assignedstate is removed from the worklist during the next refresh.
26.2.2 Arranging Your Display of Worklist Items
This section describes how to use worklist sorting and grouping options to arrange your display of the worklist. Sorting affects the display order of worklist items. Grouping divides items into groups that share a common attribute, such as a common category, a shared priority level, or some other common attribute.
A number next to each group (Figure 26-7), which indicates the number of items contained in a particular group. To expand a group and see the items it contains, click the Expand icon to the left of the group title.
Figure 26-7 Numbers Next to Worklist Groups

Description of "Figure 26-7 Numbers Next to Worklist Groups"
To arrange your display of worklist items:
-
Go to a worklist.
-
Click the Display Options icon at the top of the worklist (Figure 26-4).
-
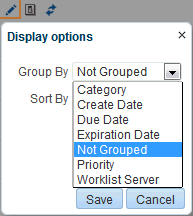
In the Display Options dialog box, expand the Group By drop-down list (Figure 26-8), and select an option for grouping your worklist items.
Select from the following options:
-
Category—Group worklist items into their assigned categories. Items that do not belong to a category are grouped under the heading Not Categorized. Whether a worklist item includes a category is determined by the workflow developer; consequently, not all items include categories.
-
Create Date—Group worklist items according to the date they were created, starting with the most recent.
-
Due Date—Group worklist items according to when they are due. Due dates are optional; therefore, some items may not have them. In such cases, the date the item was created is used.
-
Expiration Date—Group worklist items according to when they are due to expire. Expiration dates are optional; therefore, some items may not have them. In such cases, the date the item was created is used.
-
Not Grouped—Do not group worklist items. When you group worklist items by Not Grouped, the worklist displays items in a flat list. All other grouping options display the items in a tree format.
-
Priority—Group worklist items according to priority, either high, normal, or low. Table 26-1 illustrates the priority indicators that are used in worklists.
-
Worklist Server—Group worklist items, according to the server from which they originated.
-
-
Select a Sort By option (Figure 26-9).
Figure 26-9 Sort By Options in the Display Options Dialog
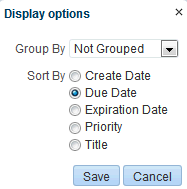
Description of "Figure 26-9 Sort By Options in the Display Options Dialog"
Select from the following options:
-
Create Date—Sort worklist items according to the date they were created, starting with the most recent.
-
Due Date—Sort worklist items according to when they are due. Due dates are optional; therefore, some items may not have them. In such cases, the date the item was created is used.
-
Expiration Date—Sort worklist items from the most recent expiration to the furthest away. Expiration dates are optional; therefore, some items may not have them. In such cases, the date the item was created is used.
-
Priority—Sort worklist items from highest to lowest priority (see Table 26-1 for illustrations of priority indicators).
-
Title—Sort worklist items first from 0 to 9 then from a to z.
-
-
Click Save to save your changes and close the Display Options dialog box.
The worklist displays the newest created 25 items for each worklist server connection. For items exceeding the 25-item limit, follow the link, from where you can view and act on a larger volume of worklist items.
26.2.3 Refreshing Worklists
Every 15 minutes, the worklist refreshes automatically with new messages, alerts, and notifications. Optionally, you can update your view yourself by clicking the Refresh Worklist icon (Figure 26-10).
Note:
A worklist does not get refreshed automatically when you perform an action on any task. You must refresh the worklist to list the latest items.
Do not click the Reload or Refresh button in your browser. Click the Refresh icon to update your view.
Roll your mouse pointer over the Refresh Worklist icon to display the date and time the worklist was last refreshed.

