Before you create a new virtual machine, make sure that the following resources are available:
A server pool. See Section 6.8, “Creating a Server Pool” for information on creating server pools.
An Oracle VM Server as part of the server pool.
Source file(s) in a repository from which to create the virtual machine. The source files can be any of the following:
Imported ISO file. See Section 7.5.5, “ISO Files (CD/DVD Images)” for more information on how to import ISO files.
Virtual machine template. See Section 7.5.3, “Virtual Machine Templates” for more information on how to import a virtual machine template.
Virtual machine assembly. See Section 7.5.4, “Assemblies” for more information on how to import an assembly.
This section discusses creating a virtual machine using a template, and creating a virtual machine from an ISO file, or from physical or virtual disks.
To create a virtual machine using a template:
Click the Servers and VMs tab.
Click Create Virtual Machine
 in the toolbar.
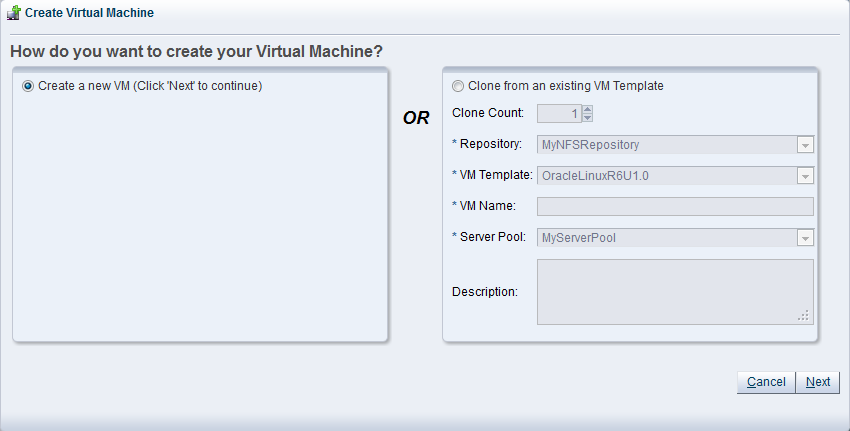
The Create Virtual Machine wizard is displayed.
Select the Clone from an existing VM Template option.
Enter or select the following:
Clone Count: The number of virtual machines to create from the template.
Repository: Select the repository in which to create the virtual machine configuration files.
VM Template: The template to use to create the virtual machines.
VM Name: A name for the virtual machines. The maximum name length is 256 characters and may contain any character. The name need not be unique. Each clone is suffixed with a dot and the clone number, starting with 0, for example MyVM.0, MyVM.1 and so on.
Server Pool: The server pool in which to deploy the virtual machines.
Description: A description of the virtual machines.
Click Finish. The virtual machines are created and deployed to the server pool.

To create a virtual machine using all other media:
Click the Servers and VMs tab.
Click Create Virtual Machine
in the toolbar.
The Create Virtual Machine wizard is displayed.
Select the Create a new VM option. Click Next.
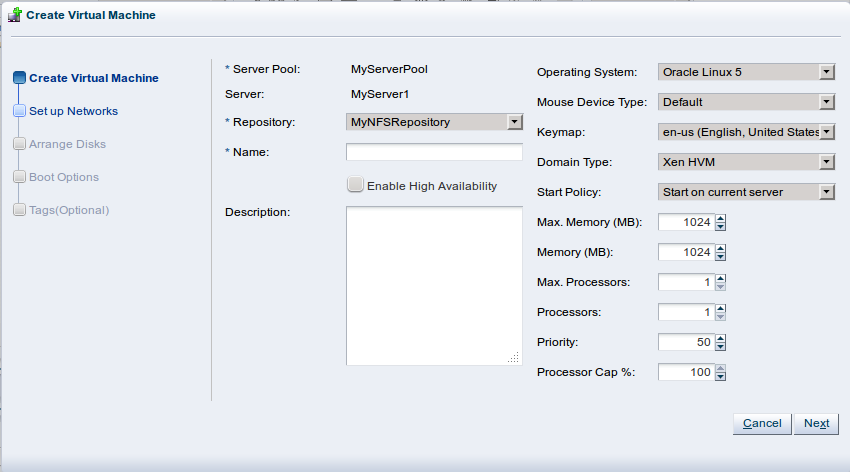
The Create Virtual Machine step is displayed in the wizard.
Enter or select the following:
Server Pool: The server pool on which to create the virtual machine.
Server: A Oracle VM Server on which to run the virtual machine. If you do not have a preference as to which Oracle VM Server to use, select Any and the Oracle VM Server with the most available resources is selected to host the virtual machine.
Repository: Select the repository in which to create the virtual machine configuration file.
Name: A name for the virtual machine. The maximum name length is 256 characters and may contain any character. The name need not be unique.
Enable High Availability: Select to enable HA. See Section 6.4, “High Availability (HA)” for more information on HA.
Description: A description of your virtual machine.
Operating System: The operating system of your virtual machine. This setting enables or disables certain virtual machine settings that your guest operating system may require.
Mouse Device Type: The mouse type to use for the template. Select one of:
Default
PS2 Mouse
USB Mouse
USB Tablet
This option is ignored if using a SPARC hypervisor.
Keymap: The keyboard mapping to use for the virtual machine.
Domain Type: The domain type of the virtual machine. Oracle recommends you create paravirtualized virtual machines if possible, as the performance of a paravirtualized virtual machine is superior to that of a hardware virtualized guest.
Xen HVM: Hardware virtualization, or fully virtualized. When you select this option you must supply an ISO file in a repository (in the Create Storage step of the wizard) from which to create the virtual machine. See Section 7.5.5, “ISO Files (CD/DVD Images)” for information on importing an ISO file into a repository.
Xen HVM, PV Drivers: Identical to Xen HVM, but with additional paravirtualized drivers for improved performance of the virtual machine. See Section 7.13, “Converting to Paravirtualized Guests or Installing Paravirtualized Drivers” for more information about using paravirtualized drivers. This Domain Type is used to run Microsoft Windows guest operating systems with an acceptable performance level.
Xen PVM: Paravirtualized. Enables you to select a location for the mounted ISO file from which to create the virtual machine. Before you create the virtual machine using the paravirtualized method, mount the ISO file on an NFS share, or HTTP or FTP server. You supply the location of the mounted ISO file in the Network Boot Path field in the Boot Options step of the wizard. For information on creating a mounted ISO file, see Section 7.4, “Virtual Machine Installation Media”.
OVM/SPARC: This domain type should be selected if the server pool and hypervisors use Oracle VM Server for SPARC as the hypervisor instead of Oracle VM Server for x86.
Unknown: This hypervisor should be selected if the domain type is unknown.
Start Policy: The policy that should be used to start the virtual machine. Select one of:
Start on best server: The virtual machine is started on the best available server as determined by the algorithm used for DRS and DPM.
Start on current server: The virtual machine is started on the current server to which it is assigned.
Use server pools VM start policy: The virtual machine is started using the Start Policy defined for the entire server pool. See Section 6.8, “Creating a Server Pool” for more information on setting the Start Policy for a server pool.
Max. Memory (MB): The maximum memory size the virtual machine can be allocated.
Memory (MB): The memory size the virtual machine is allocated. When creating a virtual machine, this is the memory allocation used when starting the virtual machine. You can change this when editing a running PVM and no virtual machine restart is required. For HVM guests, increasing or decreasing the memory requires the virtual machine to be stopped.
Max. Processors: The maximum number of processors the virtual machine can be allocated. The number of processors is expressed in number of physical CPU cores, and is limited to 128. This cannot be changed when editing a running virtual machine. To edit this value, you must first stop the virtual machine.
Processors: The number of processors the virtual machine is allocated. The number of processors is expressed in number of physical CPU cores, and is limited to 128. You can change this when editing a running virtual machine, up to the value of Max. Processors.
Priority: The CPU priority of the virtual machine. The higher the priority, the more physical CPU cycles are given to the virtual machine.
This option is ignored if using a SPARC hypervisor.
Processor Cap %: Increase or decrease the percentage to which the virtual CPUs can receive scheduled time. This parameter defines the maximum percentage to which the virtual CPUs can receive scheduled time. Use this parameter to keep low priority virtual machines from consuming too many CPU cycles on a Virtual Machine Server.
This option is ignored if using a SPARC hypervisor.
The Priority and Processor Cap% parameters are passed to the Xen hypervisor for use by the credit scheduler, which automatically load balances guest VCPUs across all available physical CPUs using an algorithm that combines these two parameters. Therefore, these parameters are a key factor for the performance of the virtual machine on x86 hardware.
On SPARC, each virtual machine uses dedicated physical CPU threads and CPUs are not shared between virtual machines, being exclusively assigned to a single virtual machine.
Click Next.
The Setup Networks step is displayed in the wizard.
For each VNIC you want to add to the virtual machine, select a VNIC from the Unassigned VNICs drop-down list. Select the network to use from the Network drop-down list, and click Add VNIC. The VNIC order specified here is important, as it determines the order in which they are presented to the virtual machine. You can control the ordering of the VNICs using the up and down arrows on the right of the panel.
If you are editing the networking of an existing stopped virtual machine, you can change the network to which the VNIC belongs using the Network drop-down list. It is important that the VNIC belongs to a network already associated with the servers on which it can run, or you will not be able to start the virtual machine. See Section 5.12.1, “Creating a Network” and Section 5.12.2, “Editing a Network” for more information on associating servers with networks. You can also change the ordering of the VNICs for your virtual machines by using the Up and Down arrow buttons on the right of the panel.
If you are editing an existing running virtual machine, you are able to add VNICs to the virtual machine, but you are not able to remove VNICs that are already in use. You will also not be able to reorder VNICs on a running virtual machine. If you choose to add a VNIC to a running machine you must ensure that the VNIC belongs to a VM Network already associated with the servers on which it can run, by selecting the appropriate network from the Network drop-down list. See Section 5.12.1, “Creating a Network” and Section 5.12.2, “Editing a Network” for more information on associating servers with networks.
If no VNICs are available in the Unassigned VNICs drop-down list, click Create VNICs to display the Create Virtual NICs dialog box.
Click Auto Fill, then Create to create VNICs. Click Close.
A virtual machine can have up to eight virtual network interfaces for emulated guests and up to 31 for PVM guests. A PVM guest requires network connectivity to perform the operating system install and must have a VNIC.
Click Next.
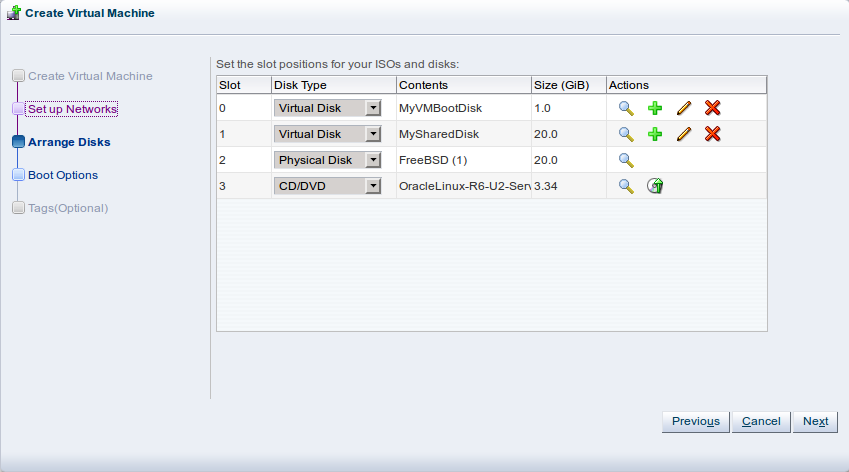
The Arrange Disks step of the wizard is displayed.
Select the desired storage configuration of your virtual machine, such as virtual disks, physical disks, and ISO files. On a separate slot, add one or more of the following disk types:
Empty A empty slot.
Virtual Disk: This allows you to add or create a virtual disk. Virtual disks can be shared by virtual machines.
Physical Disk The physical disks are the disks in a storage array. Physical disks can be shared by virtual machines.
CD/DVD: This adds an ISO file in a storage repository and can be used to create HVM and PVHVM virtual machines. When creating a virtual machine from an ISO file, you must use a single file. Installations that span multiple ISO files are not supported. ISO files cannot be used to create PVM virtual machines.
Add or create any virtual disks to use as the virtual machine's hard disk, select any physical disks to add, and select any ISO files to use to create the virtual machine. Add the disks in the order they should appear in the virtual machine. The disk with the boot partition or installation media should be the first disk listed. An HVM guest can have up to four disks, including empty CD/DVD drives. A PVM guest can have up to 104 disks. A PVHVM guest can have up to 107 disks. Only one slot can contain an empty CD/DVD.
TipWhen editing a running virtual machine, you can change the CD/DVD using this dialog box and the CD/DVD is mounted in the operating system.
To create or add a virtual disk:
To create a virtual disk, select Virtual Disk from the Disk Type drop-down list and click Create a Virtual Disk
 .
.
The Create Virtual Disk dialog box is displayed.
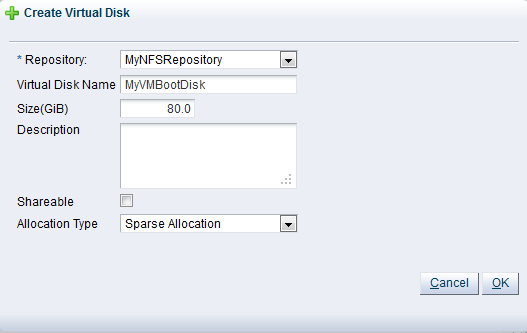
Enter or select the following to create a virtual disk:
Repository: The repository in which the virtual disk is to be created.
Virtual Disk Name: The name of the virtual disk to be created and made available to the virtual machine. See Section 7.5.6, “Virtual Disks” for more information about using virtual disks.
Size (GiB): The disk size in GiB of the virtual disk.
Description: A description of the virtual disk.
Shareable: Whether the virtual disk should be shareable (read/write) with other virtual machines.
Allocation Type: Whether to use a Sparse Allocation or Non-sparse Allocation. Sparse Allocation creates a sparse disk, so the size of the disk is initially small and increases as it is used. Sparse allocation is faster than using Non-Sparse Allocation when creating a virtual machine. Non-Sparse Allocation creates the entire disk when the virtual machine is created, and so is slower than creating a sparse disk.
Click OK.
To search for an existing virtual disk to add to the virtual machine, click Select a Virtual Machine Disk
 . The Select a Virtual Machine
Disk dialog box is displayed.
. The Select a Virtual Machine
Disk dialog box is displayed.
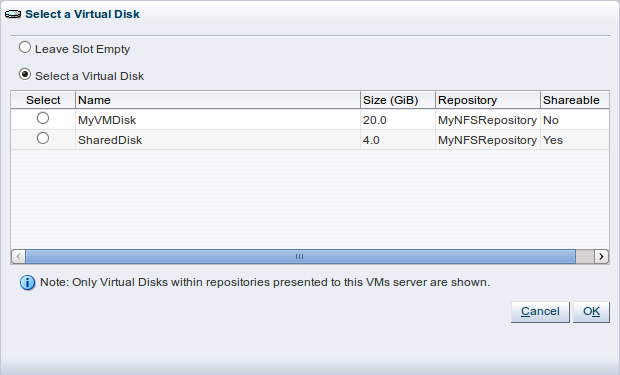
Select the virtual disk to use and Click OK.
NoteIf your virtual machine needs more than one disk, you can create the disk(s) afterwards in the repository, and add them to the virtual machine. See Section 7.5.6, “Virtual Disks” for more information.
To add a physical disk:
To add a physical disk to the virtual machine, select Physical Disk from the Disk Type drop-down list. Click Select a Virtual Machine Disk
. The Select a Physical
Disk dialog box is displayed.
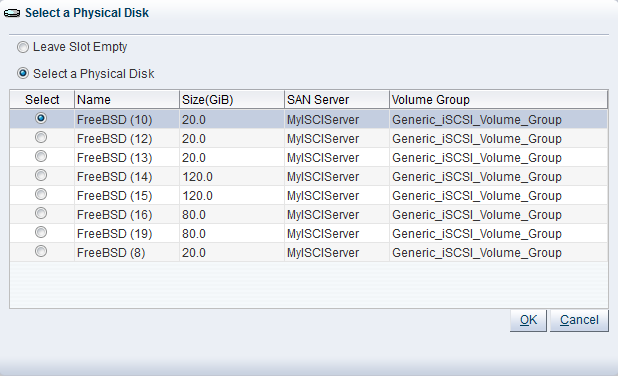
Select a physical disk and click OK.
To add an ISO file:
To add an ISO file to the virtual machine, select CD/DVD from the Disk Type drop-down list. Click Select a Virtual Machine Disk
. The Select an ISO
dialog box is displayed.
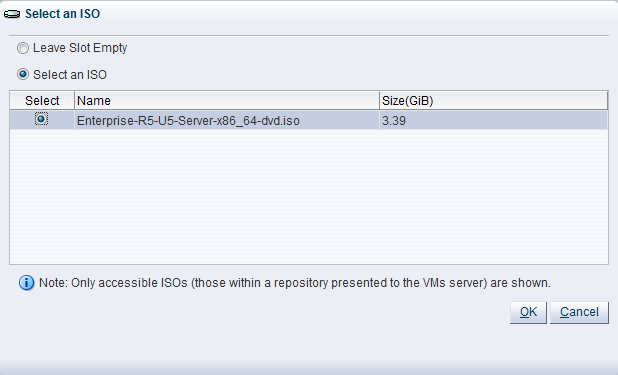
Select an ISO file and click OK.
NoteWhen adding an ISO file to an existing virtual machine, the ISO file is available to the operating system, but may not be mounted. To access the ISO file, you may need to mount it, for example:
# mkdir /cdrom
# mount -o loop /dev/xvdb /cdrom
When you have set up the virtual machine's disks, click Next.
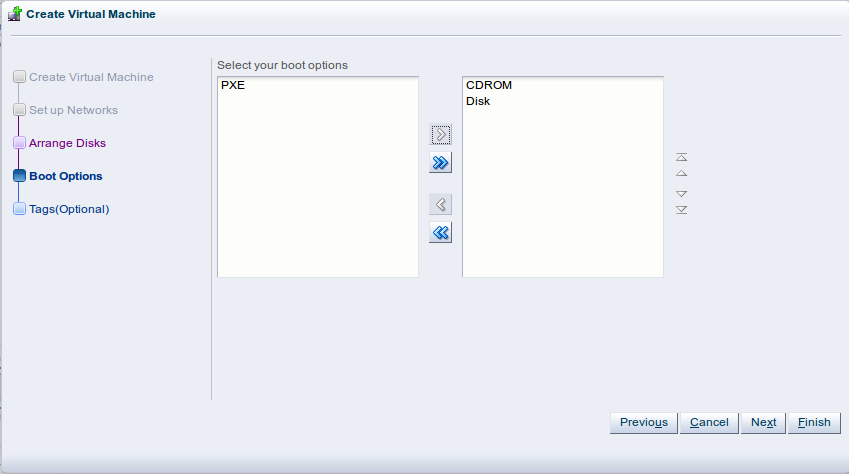
The Boot Options step is displayed in the wizard.
Select the boot media order for your virtual machine.
If you are creating a hardware virtualized virtual machine (HVM), you can choose the PXE boot option. If so, remember to put PXE first in the Select your boot options field, and change the boot order again after installation and before rebooting the virtual machine. To use PXE, you must configure a PXE/tftp environment to offer the necessary boot media and instructions to the virtual machine.
If you are creating a paravirtualized virtual machine (PVM), you also have the Network option available (not shown in here). If so, specify Network to be at the top of the right-hand-side column, and enter the location of the mounted ISO file from which to perform the operating system installation in the Network Boot Path field (also not shown in here), for example
http://example.com/Enterprise-R6-U1-Server-x86_64-dvd.iso/
For information on creating a mounted ISO file, see Section 7.4, “Virtual Machine Installation Media”.
You cannot use the Network Boot Path field to boot a virtual machine using PXE. This field can only be used to specify the path to a mounted ISO file to use when installing a PVM guest.
If you have defined tags and wish to add any to this virtual machine, click Next. Otherwise, click Finish to create and deploy the virtual machine to the server pool.
The Tags step is optional and displays in the wizard if you clicked Next in the previous step.
NoteThe Virtual Machine has already been created and deployed to the server pool at this point. This step is entirely optional. Cancelling the operation within this screen does not prevent the virtual machine from being created.
If you have defined tags previously they will appear in the Available Tags column. You can select the tags that you wish to apply to the virtual machine and move them to the Selected Tags column.
See Section 3.15, “Tags” for more information on creating and managing tags.
Click Finish.


To access the virtual machine, select the server pool on which the virtual machine was created in the navigation tree, and select Virtual Machines in the Perspective drop-down list in the management pane. Select the virtual machine in the table to perform operations on it. Expand the virtual machine in the table to see more detailed configuration information.

If you created a PVM, there are some steps you should take after the operating system installation is completed:
Stop the virtual machine.
Edit the virtual machine and remove PXE from the Boot Order column in the Boot Options step of the Edit Virtual Machine wizard.
Start the virtual machine and complete the installation if necessary.
To edit the virtual machine configuration information, see Section 7.10.2, “Editing a Virtual Machine”.