- 7.10.1 Viewing Virtual Machine Information and Events
- 7.10.2 Editing a Virtual Machine
- 7.10.3 Starting Virtual Machines
- 7.10.4 Stopping (Shutting Down) Virtual Machines
- 7.10.5 Killing Virtual Machines
- 7.10.6 Restarting Virtual Machines
- 7.10.7 Suspending Virtual Machines
- 7.10.8 Resuming a Virtual Machine
- 7.10.9 Moving Virtual Machines Between Repositories
- 7.10.10 Moving Virtual Machines Between Oracle VM Servers
- 7.10.11 Moving Virtual Machines To/From Unassigned Virtual Machines Folder
- 7.10.12 Migrating Virtual Machines
- 7.10.13 Deleting Virtual Machines
When you have created a virtual machine, there are a number of actions you can perform on them in Oracle VM Manager. This section describes the actions you can perform on virtual machines.
You can view information about the configuration, networks, disks, and jobs associated with the virtual machine.
To edit the virtual machine details, see Section 7.10.2, “Editing a Virtual Machine”.
To view virtual machine details:
Click the Servers and VMs tab.
Select the server pool on which the virtual machine resides in the navigation tree.
Select Virtual Machines from the Perspective drop-down list. Select the virtual machine in the management pane.
Click the expand arrow to the left of the virtual machine name in the table.
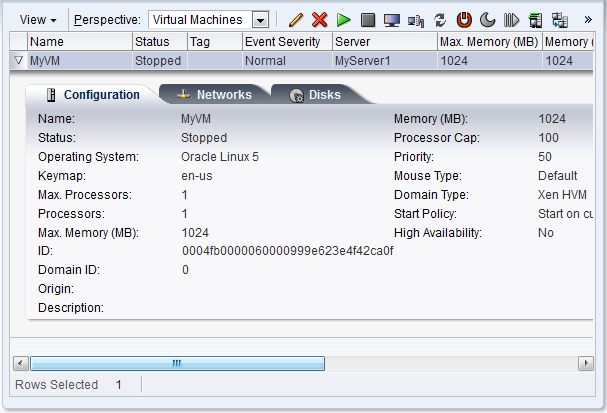
Three tabs displaying information about the virtual machine are displayed. Click each tab to view the following information about the virtual machine:
Configuration: General information about the virtual machine, such as the minimum and maximum memory and processors, operating system, domain type, high availability status, and so on.
Networks: Networks and vNICs used.
NoteThe IP addresses for a virtual machine are only displayed if the paravirtual drivers are installed. See Section 7.13, “Converting to Paravirtualized Guests or Installing Paravirtualized Drivers” for information on installing the paravirtual drivers.
Disks: Virtual and physical disks and ISOs attached to the virtual machine.
To view virtual machine events:
Click the Servers and VMs tab.
Select the server pool on which the virtual machine resides in the navigation tree.
Select Virtual Machines from the Perspective drop-down list. Select the virtual machine in the management pane, and click Display Selected VM Events
 in the management pane toolbar
The Events dialog box is displayed.
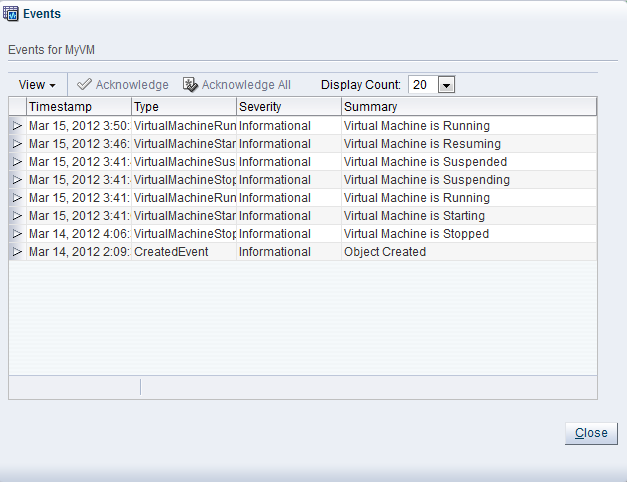
If a virtual machine has error event associated with it you must acknowledge the event to clear the error. See Section B.1.11, “Acknowledging Events/Errors” for information on acknowledging events. Click Close to close the dialog box.
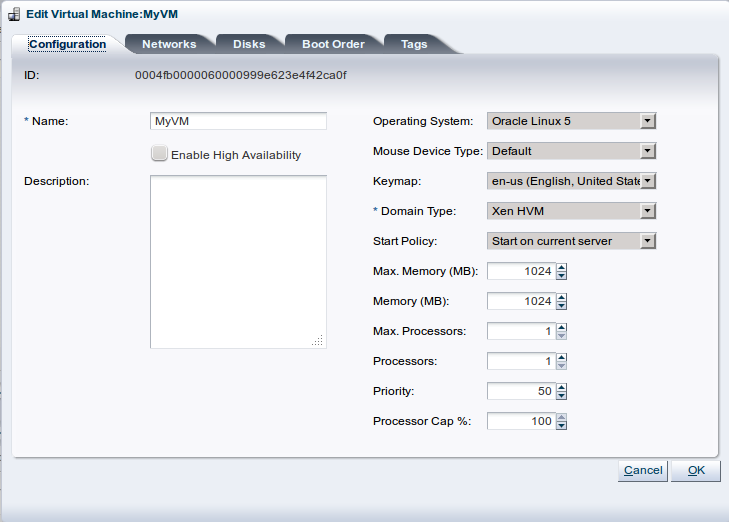
To edit a virtual machine:
Click the Servers and VMs tab.
Select the server pool on which the virtual machine resides in the navigation tree.
Select Virtual Machines from the Perspective drop-down list. Select the virtual machine in the management pane, and click Edit...
 in the management pane toolbar
The Edit Virtual Machine dialog box is displayed.
Select each tab to edit the virtual machine configuration. See Section 7.7, “Creating a Virtual Machine” for the details of each tab. Click OK to save the changes.
NoteIt is not possible to dynamically change resources such as the number or processors or allocated memory for an Oracle Solaris VM without first enabling the drd service on the VM itself. To allow for these changes, connect to the VM and make sure that the drd service is enabled:
# svcadm enable -s drd
# svcs drd
These commands should notify you that the service is online. Once you have performed these actions, you will be able to use Oracle VM Manager to dynamically change the allocation of resources.
After a virtual machine is created, you can start it. Starting a virtual machine is analogous to starting a computer by pressing the Power On button.
To start virtual machines:
Click the Servers and VMs tab.
Select the server pool on which the virtual machines reside in the navigation tree.
Select Virtual Machines from the Perspective drop-down list. Select one or more virtual machines in the management pane, and click Start
 .
.
The virtual machines are started.
When a virtual machine is not in use, you should shut it down to release system resources. Stopping a virtual machine is analogous to a normal shutdown of a physical computer.
If you want to save the state of the virtual machine, you should suspend it. See Section 7.10.7, “Suspending Virtual Machines” for information on suspending virtual machines.
In some situations you may not be able to stop a virtual machine, for example, if you have tried to stop it while another job is in progress on the virtual machine such as a start virtual machine job. To resolve this type of situation, you should abort the job that is in progress, then kill the virtual machine. See Section B.1.9, “Aborting Jobs” for information on aborting jobs, and Section 7.10.5, “Killing Virtual Machines” for information on killing a virtual machine.
To stop virtual machines:
Click the Servers and VMs tab.
Select the server pool on which the virtual machines reside in the navigation tree.
Select Virtual Machines from the Perspective drop-down list. Select one or more virtual machines in the management pane, and click Stop
 .
.
You can also shut down a virtual machine from within the virtual machine, the same way you shut down a physical computer.
After issuing the stop command, the status of the virtual machine is changed to Stopped. However, this only indicates that the command was acknowledged. There is no guarantee that the virtual machine is effectively shut down correctly. This is expected behavior since an operating system running on a physical PC may also hang during the shutdown sequence.
If the virtual machine fails to shut down, you can power it off using the kill virtual machine option, which is similar to unplugging the power cable from a physical machine. To perform a power off (kill) of virtual machines, see Section 7.10.5, “Killing Virtual Machines”.
Killing a virtual machine is equivalent to performing a power off of a virtual machine, similar to unplugging the power cable from a physical machine. This is not the recommended method of shutting down a virtual machine, but may be used if the shut down command fails to shut down the virtual machine.
To kill virtual machines:
Click the Servers and VMs tab.
Select the server pool on which the virtual machine resides in the navigation tree.
Select Virtual Machines from the Perspective drop-down list. Select one or more virtual machines in the management pane, and click Kill
 .
.
The virtual machines are powered off.
Restarting a virtual machine is analogous to rebooting a computer. You may need to restart a virtual machine if an operating system update requires you to restart the virtual machine, for example Microsoft Windows™ updates.
To restart virtual machines:
Click the Servers and VMs tab.
Select the server pool on which the virtual machines reside in the navigation tree.
Select Virtual Machines from the Perspective drop-down list. Select one or more virtual machines in the management pane, and click Restart
 .
.
The virtual machines are restarted.
If a virtual machine has not fully started, a restart request may not succeed as the virtual machine may not be ready to initiate the request. In this case, you may need to abort the restart job and try again later. Alternately, kill the virtual machine and start it again.
Suspending a virtual machine is analogous to putting a computer into sleep mode. When a virtual machine is suspended, the current state of the operating system, and applications is saved, and the virtual machine put into a suspended mode. When you resume the virtual machine, the operating system and applications continue from the same point you suspended the virtual machine.
To suspend virtual machines:
Click the Servers and VMs tab.
Select the server pool on which the virtual machine resides in the navigation tree.
Select Virtual Machines from the Perspective drop-down list. Select one or more virtual machines in the management pane, and click Suspend
 .
.
The virtual machine state is saved and the virtual machines suspended.
To resume the virtual machine, see Section 7.10.8, “Resuming a Virtual Machine”.
Resuming a suspended virtual machine is analogous to waking up a computer that has been in sleep mode. When you resume a suspended virtual machine, the operating system and applications continue from the same point you suspended the virtual machine.
To resume a virtual machine:
Click the Servers and VMs tab.
Select the server pool on which the virtual machine resides in the navigation tree.
Select Virtual Machines from the Perspective drop-down list. Select the virtual machine to start in the management pane, and click Resume
 .
.
The virtual machine state is retrieved and the virtual machine started.
You should never manually move the files for a virtual machine from one repository to another. This can result in duplicate UUIDs for a virtual machine which can cause problems within your Oracle VM environment. If you need to move a virtual machine to another storage repository, alway use the tools provided within Oracle VM Manager.
You can move a non-running virtual machine from one repository to another. During the move you can specify where the disks should be moved to using a clone customizer. If you keep the clone customizers to the default settings (the same as the original virtual machine), a move is essentially the same as migrating the virtual machine to another Oracle VM Server. You can change the location of disks and the virtual machine configuration file to another storage repository when you move a virtual machine using a clone customizer.
The network information is not changed when moving a virtual machine, so you cannot move VNICs between networks. Any network changes you make in a clone customizer are ignored when moving a virtual machine. This allows you to preserve the virtual machine in its original state, while moving the configuration file and storage to a different repository.
To move a virtual machine:
Click the Servers and VMs tab.
Select the server pool on which the virtual machine resides in the navigation tree.
Select Virtual Machines from the Perspective drop-down list. Select the virtual machine in the management pane, and click Clone or Move
 .
.
The Clone or Move dialog box is displayed.
Select Move this VM.
Select a clone customizer from the Clone Customizer drop-down list. If no clone customizers are displayed or you want to create a new one, click Create. See Section 7.9.1.1, “Creating a Clone Customizer” for information on creating a clone customizer.
Select a repository from the Target Repository drop-down list. This is the location of the new virtual machine configuration file.
Click Finish to move the virtual machine.

You can drag and drop one or more virtual machines to other Oracle VM Servers to change the Oracle VM Server that the virtual machine is running on. See Section 3.11, “Drag and Drop” for information on using the drag and drop feature.
This facility is also known as migration. See Section 7.10.12, “Migrating Virtual Machines” for more information.
You can also drag and drop one or more virtual machines to the Unassigned Virtual Machines folder to prevent the virtual machine from running on any Oracle VM Servers. See Section 7.10.11, “Moving Virtual Machines To/From Unassigned Virtual Machines Folder” for more information.
You can move one or more non-running virtual machines from an Oracle VM Server or server pool to the Unassigned Virtual Machines Folder, and vice versa. Placing a virtual machine in the Unassigned Virtual Machines folder means it cannot be started, but it is available to move to another server pool. You do not need to specify clone customizers when moving virtual machines to the Unassigned Virtual Machines folder, and you can move multiple virtual machines at one time. The same is true when moving virtual machines from the Unassigned Virtual Machines folder to a server pool or Oracle VM Server.
To move virtual machines to/from the Unassigned Virtual Machines folder:
Click the Servers and VMs tab.
Select the server pool on which the virtual machine resides in the navigation tree.
Select Virtual Machines from the Perspective drop-down list. Select one or more virtual machines in the management pane, and drag and drop them to the Unassigned Virtual Machines folder.
To move one or more virtual machines from the Unassigned Virtual Machines folder, select the folder, then select one or more virtual machines in the management pane, and drag and drop them on an Oracle VM Server or server pool in the navigation tree. See Section 3.11, “Drag and Drop” for information on using the drag and drop feature.
Migrating a virtual machine is a process to move a virtual machine from one Oracle VM Server, or server pool, to another. If the virtual machine is running during the migration, the applications continue to run, uninterrupted and this is called live migration. This feature is important, and useful, when the existing Oracle VM Server may be out of commission (if HA is enabled), or on a planned shutdown for maintenance purposes. Live migration can only be performed within the same server pool, so a running virtual machine cannot be moved out of its server pool. Live migration does not require HA to be enabled; it can occur in a server pool simply by selecting a running virtual machine and migrating it, independently of whether or not the server pool is clustered and/or whether the virtual machine has its HA flag set.
You can migrate one or more virtual machines at a time. When migrating multiple virtual machines, the migrations are performed serially and not concurrently, so one migration is performed, then the next, until all the migrations are completed. Cross-server pool migration is allowed, though the virtual machines must first be stopped. A virtual machine must also be in a stopped state before migrating it to the Unassigned Virtual Machines folder. When you migrate a virtual machine to another server pool, the virtual machine is not deployed to a particular Oracle VM Server until you start the virtual machine, then the placement strategies for the virtual machine depends on the Oracle VM Server roles, and destination server pool policies such as Distributed Resource Scheduler (DRS) and Distributed Power Management (DPM). See Section 6.9.1, “Oracle VM Server Roles” for information on Oracle VM Server roles, and Section 6.5, “Server Pool Policies” for information on server pool policies.
The CPU family and model number of the source and destination computers must be compatible in order to perform live migration. This means, for instance, that you cannot migrate a virtual machine from an x86-based server pool to a SPARC-based server pool, or vice versa. Equally, you cannot perform a live-migration within the same x86-server pool, if the servers have different CPU families or model numbers. For more information on CPU compatibility, please see Section 6.7, “Server Processor Compatibility Groups”.
The steps below assume the virtual machine is deployed to an Oracle VM Server. If the virtual machine is located in the Unassigned Virtual Machines folder, select it in that folder to perform the migration.
To migrate a virtual machine:
Click the Servers and VMs tab.
Select the server pool on which the virtual machine resides in the navigation tree.
Select Virtual Machines from the Perspective drop-down list. Select the virtual machine to migrate in the management pane, and click Migrate
 .
.
The Migrate Virtual Machine dialog box is displayed.
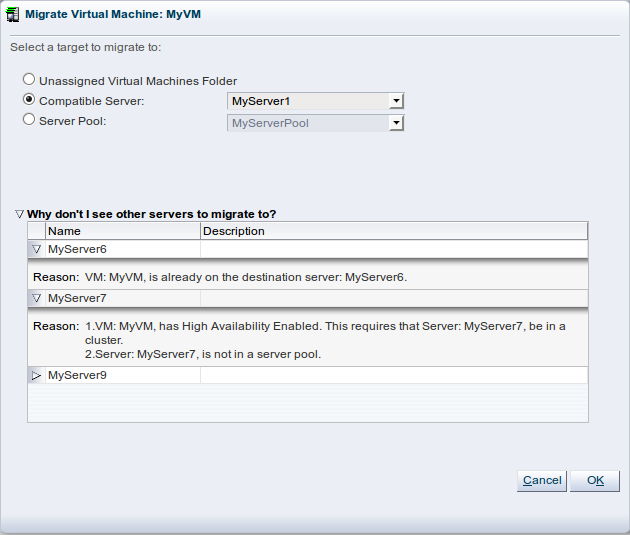
Select the virtual machine destination:
Unassigned Virtual Machines Folder: Removes the virtual machine from the server pool and moves it to the Unassigned Virtual Machines folder. The virtual machine must be in a stopped state for this option to be available. When migrating a running virtual machine, this option is not enabled.
Compatible Server: Moves the virtual machine to the selected Oracle VM Server. Stopped virtual machines can be migrated to Oracle VM Servers in other server pools sharing the same repository, so Oracle VM Servers from other server pools may be listed here.
Server Pool: Moves the virtual machine to the selected server pool. Stopped virtual machines can be migrated to other server pools. The virtual machine is not deployed to a particular Oracle VM Server within the destination pool; you need to start the virtual machine in the destination server pool for it to be deployed to an Oracle VM Server. When migrating a running virtual machine, this option is not enabled.
If the Oracle VM Server you want is not listed, click the arrow next to Why don't I see other servers to migrate to?. A list of all Oracle VM Servers registered with Oracle VM Manager is displayed. Click the arrow next to the Oracle VM Server you want for an explanation as to why it is not available as a migration target.
Click OK.
The virtual machine is migrated.
To migrate multiple virtual machines:
Click the Servers and VMs tab.
Select the server pool on which the virtual machines reside in the navigation tree.
Select Virtual Machines from the Perspective drop-down list. Select the virtual machines to migrate in the management pane and drag and drop them to the Oracle VM Server, server pool or the Unassigned Virtual Machines folder in the navigation tree to which you want to migrate the virtual machines. See Section 3.11, “Drag and Drop” for information on using the drag and drop feature.
The virtual machines are migrated.
When you delete a virtual machine, all the files and data associated with this virtual machine are removed from Oracle VM Manager. Before deleting a virtual machine, make sure you do not need it any longer. You can only delete a virtual machine when the virtual machine status is Stopped or Error.
To delete virtual machines:
Click the Servers and VMs tab.
Select the server pool on which the virtual machines reside in the navigation tree.
Select Virtual Machines from the Perspective drop-down list. Select one or more virtual machines in the management pane, and click Delete
 in the management pane toolbar.
The Delete Confirmation dialog box is displayed. Select any virtual disks associated with the virtual machines that you want to delete. Click OK to delete the virtual machines and the selected virtual disks.